height TOYOTA C-HR 2019 Owners Manual (in English)
[x] Cancel search | Manufacturer: TOYOTA, Model Year: 2019, Model line: C-HR, Model: TOYOTA C-HR 2019Pages: 532, PDF Size: 10.35 MB
Page 27 of 532
271-1. For safe use
1
For safety and security
C-HR_OM_USA_OM10569U
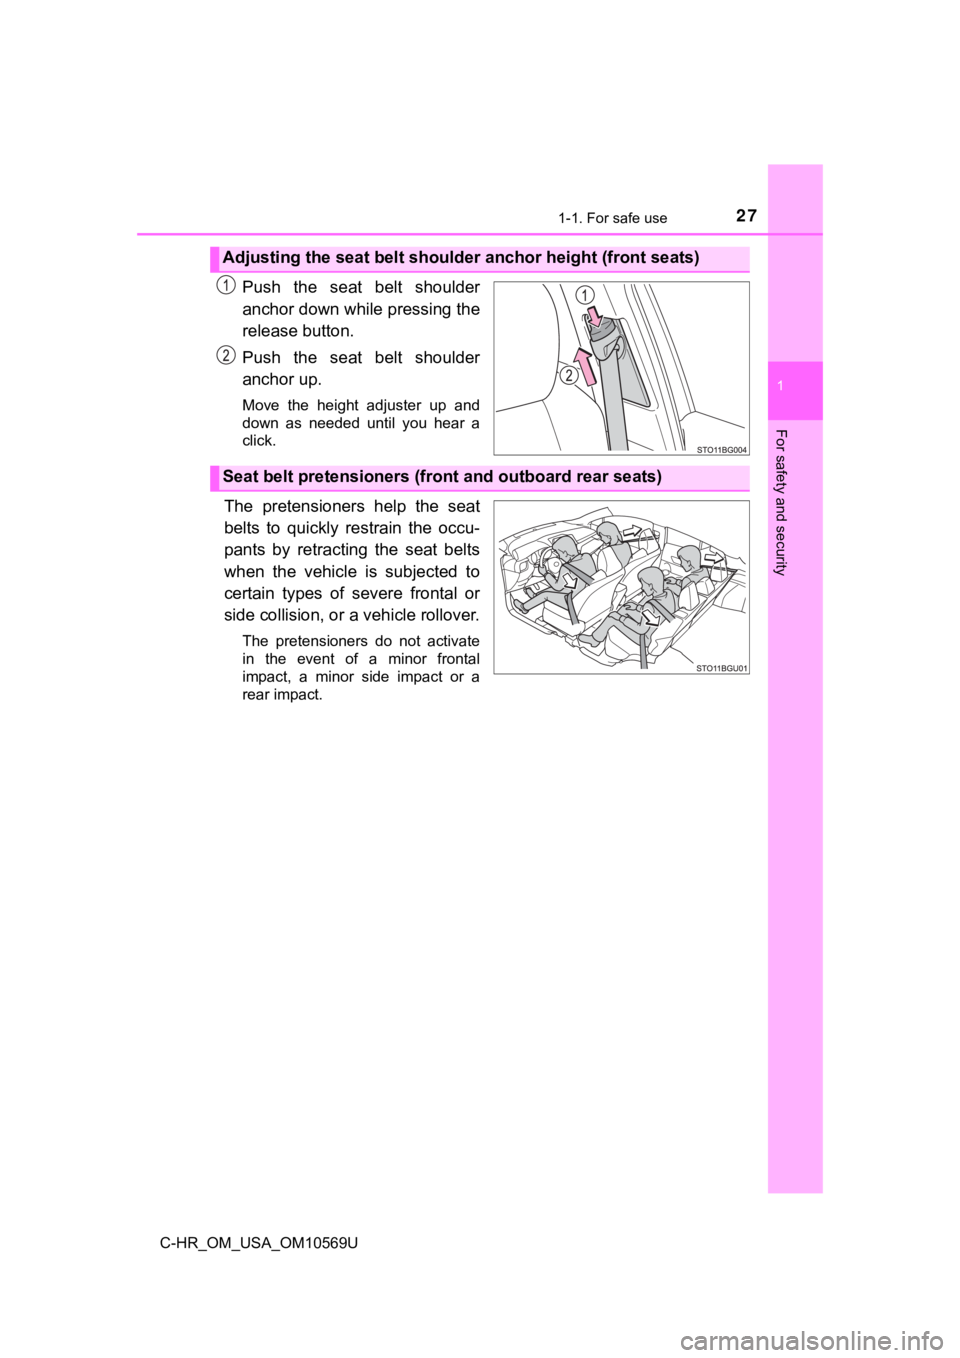
Push the seat belt shoulder
anchor down while pressing the
release button.
Push the seat belt shoulder
anchor up.
Move the height adjuster up and
down as needed until you hear a
click.
The pretensioners help the seat
belts to quickly restrain the occu-
pants by retracting the seat belts
when the vehicle is subjected to
certain types of severe frontal or
side collision, or a vehicle rollover.
The pretensioners do not activate
in the event of a minor frontal
impact, a minor side impact or a
rear impact.
Adjusting the seat be lt shoulder anchor height (front seats)
Seat belt pretensioners (fr ont and outboard rear seats)
Page 135 of 532
1353-3. Adjusting the seats
3
Operation of each component
C-HR_OM_USA_OM10569U
Front seats
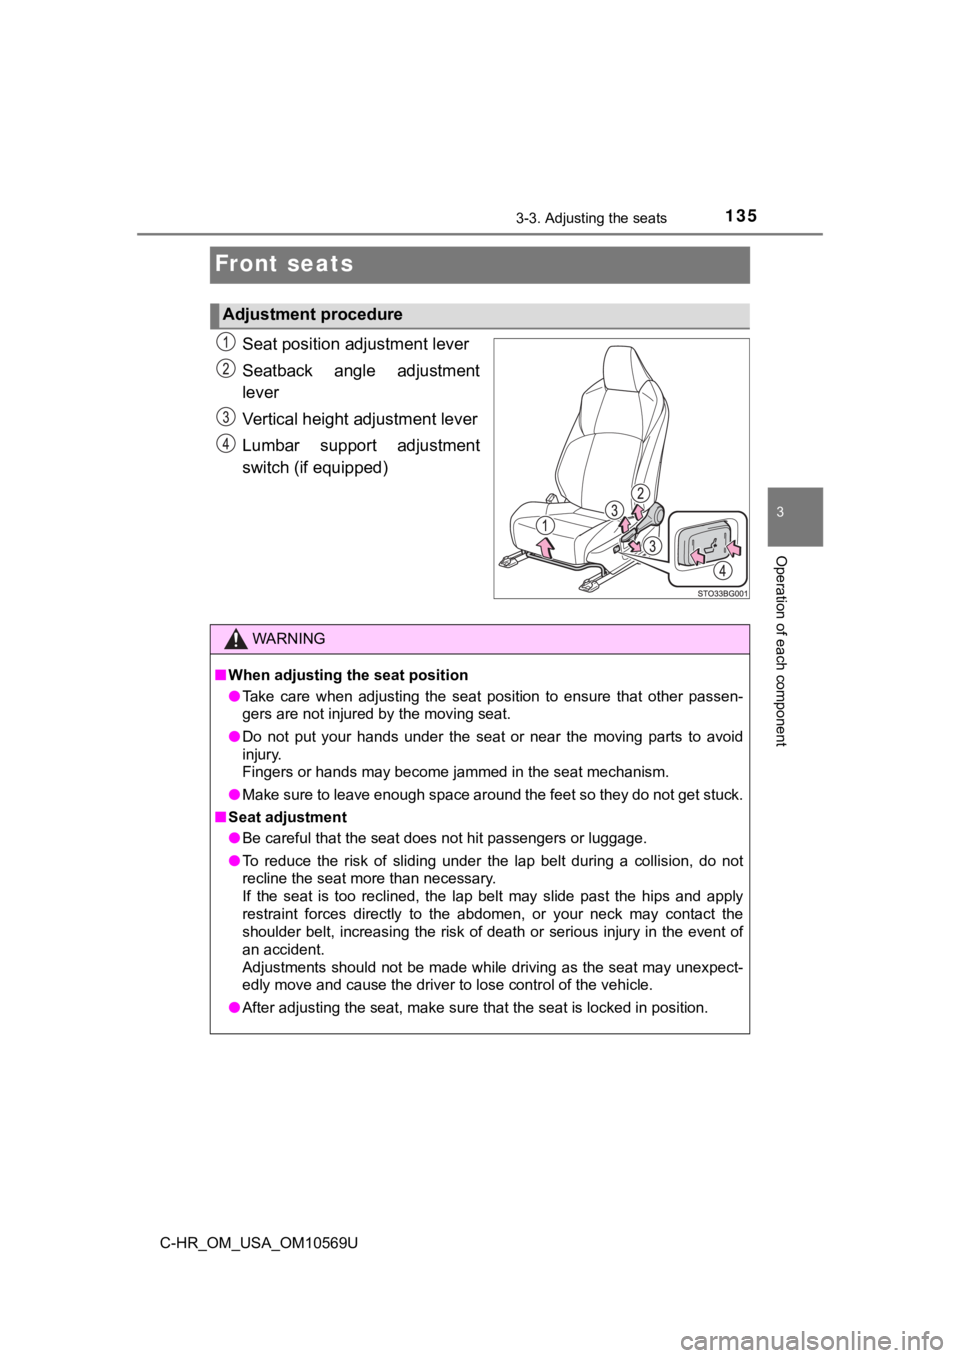
Seat position adjustment lever
Seatback angle adjustment
lever
Vertical height adjustment lever
Lumbar support adjustment
switch (if equipped)
Adjustment procedure
WARNING
■When adjusting the seat position
● Take care when adjusting the seat position to ensure that other passen-
gers are not injured by the moving seat.
● Do not put your hands under the seat or near the moving parts t o avoid
injury.
Fingers or hands may become jammed in the seat mechanism.
● Make sure to leave enough space around the feet so they do not get stuck.
■ Seat adjustment
● Be careful that the seat does not hit passengers or luggage.
● To reduce the risk of sliding under the lap belt during a colli sion, do not
recline the seat more than necessary.
If the seat is too reclined, the lap belt may slide past the hi ps and apply
restraint forces directly to the abdomen, or your neck may cont act the
shoulder belt, increasing the risk of death or serious injury i n the event of
an accident.
Adjustments should not be made while driving as the seat may un expect-
edly move and cause the driver to lose control of the vehicle.
● After adjusting the seat, make sure that the seat is locked in position.
Page 141 of 532
1413-3. Adjusting the seats
3
Operation of each component
C-HR_OM_USA_OM10569U■
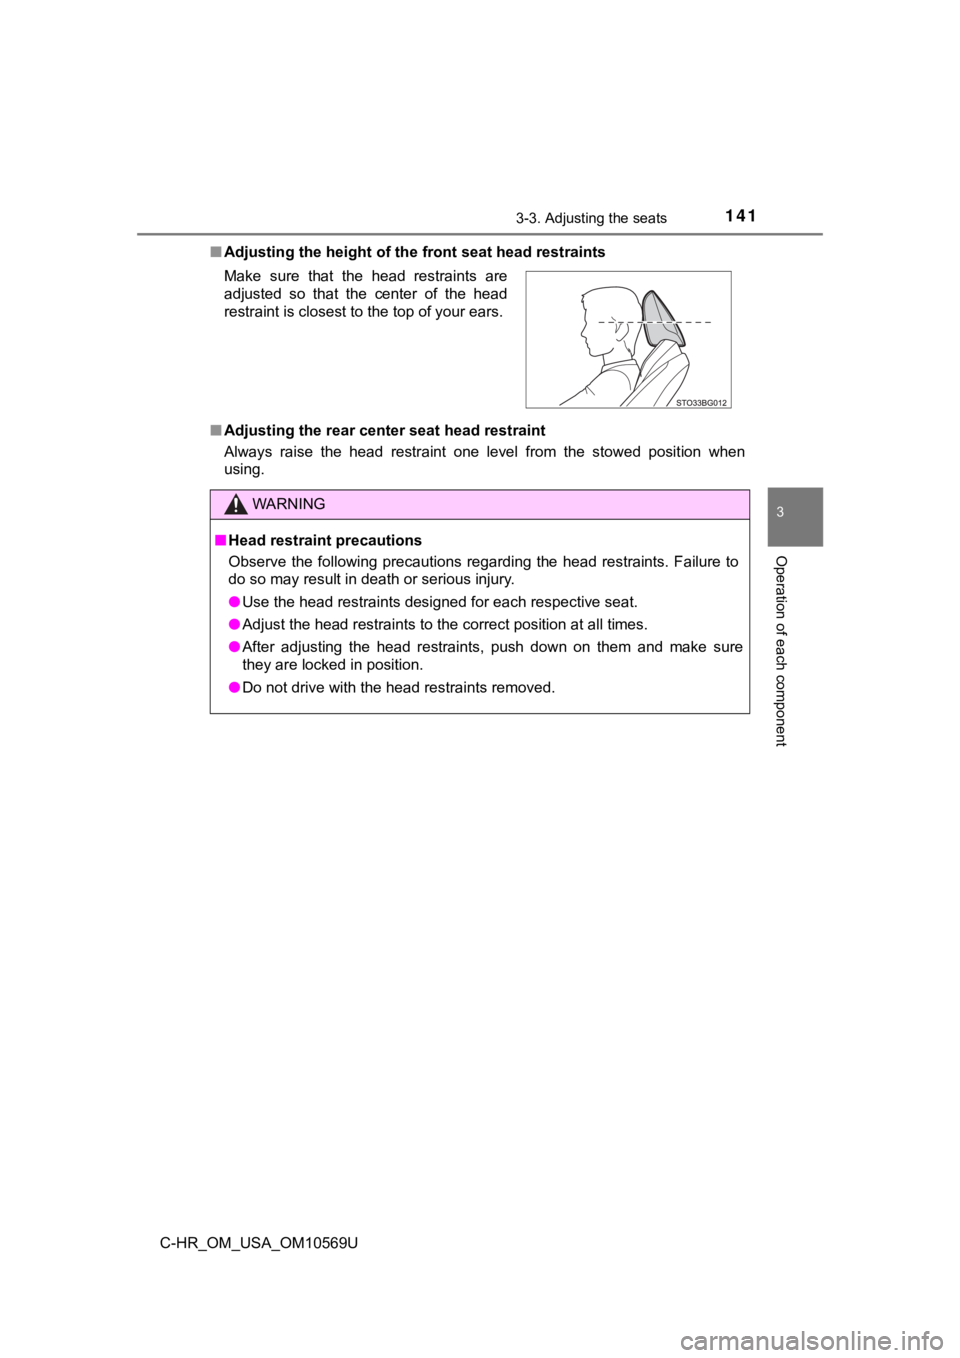
Adjusting the height of th e front seat head restraints
■ Adjusting the rear cen ter seat head restraint
Always raise the head restraint one level from the stowed posit ion when
using. Make sure that the head restraints are
adjusted so that the center of the head
restraint is closest to the top of your ears.
WARNING
■ Head restraint precautions
Observe the following precautions regarding the head restraints. Failure to
do so may result in death or serious injury.
● Use the head restraints designed for each respective seat.
● Adjust the head restraints to the correct position at all times.
● After adjusting the head restraints, push down on them and make sure
they are locked in position.
● Do not drive with the head restraints removed.
Page 144 of 532
1443-4. Adjusting the steering wheel and mirrors
C-HR_OM_USA_OM10569U
Inside rear view mirror
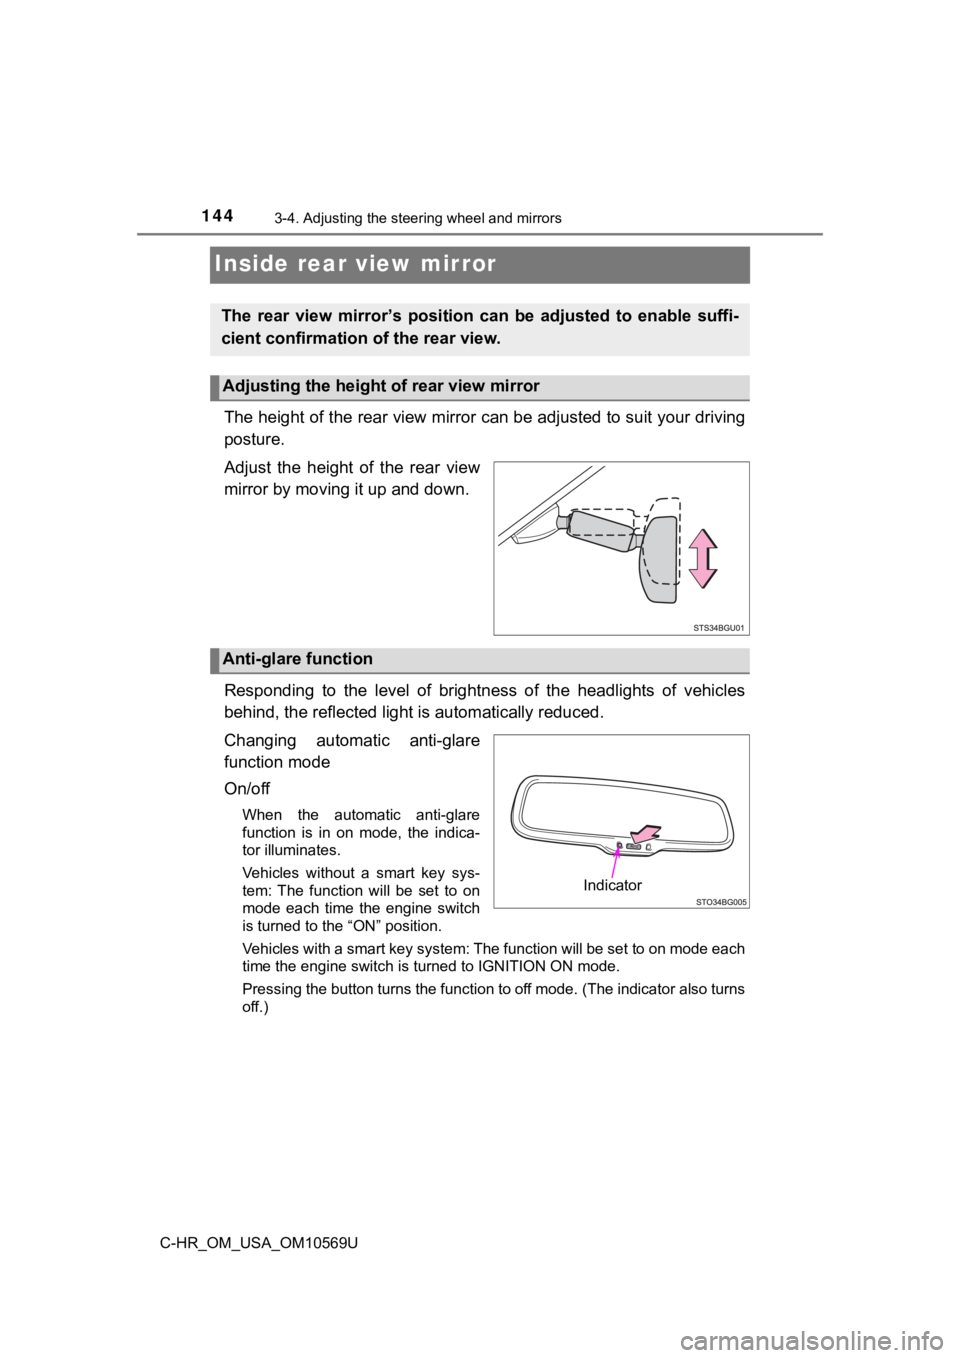
The height of the rear view mirror can be adjusted to suit your driving
posture.
Adjust the height of the rear view
mirror by moving it up and down.
Responding to the level of brightness of the headlights of vehi cles
behind, the reflected light is automatically reduced.
Changing automatic anti-glare
function mode
On/off
When the automatic anti-glare
function is in on mode, the indica-
tor illuminates.
Vehicles without a smart key sys-
tem: The function will be set to on
mode each time the engine switch
is turned to the “ON” position.
Vehicles with a smart key system: The function will be set to on mode each
time the engine switch is turned to IGNITION ON mode.
Pressing the button turns the function to off mode. (The indica tor also turns
off.)
The rear view mirror’s position ca n be adjusted to enable suffi-
cient confirmation of the rear view.
Adjusting the height of rear view mirror
Anti-glare function
Indicator
Page 273 of 532

2734-5. Using the driving support systems
4
Driving
C-HR_OM_USA_OM10569U■
Conditions under which the BSM function may not function correc tly
● The BSM function may not detect vehicles correctly in the follo wing situa-
tions:
• When the sensor is misaligned due to a strong impact to the se nsor or its
surrounding area
• When mud, snow, ice, a sticker, etc., is covering the sensor o r surround-
ing area on the rear bumper
• When driving on a road surface that is wet with standing water during bad
weather, such as heavy rain, snow, or fog
• When multiple vehicles are approaching with only a small gap b etween
each vehicle
• When the distance between your vehicle and a following vehicle is short
• When there is a significant difference in speed between your v ehicle and
the vehicle that enters the detection area
• Vehicles which are being overtaken rapidly by your vehicle.
• When the difference in speed between your vehicle and another vehicle
is changing
• When a vehicle enters a detection area traveling at about the same
speed as your vehicle
• As your vehicle starts from a stop, a vehicle remains in the d etection area
• When driving up and down consecutive steep inclines, such as hills, dips
in the road, etc.
• When driving on roads with sharp bends, consecutive curves, or uneven
surfaces
• When vehicle lanes are wide, or when driving on the edge of a lane, and
the vehicle in an adjacent lane is far away from your vehicle
• When a bicycle carrier or other accessory is installed to the rear of the vehicle
• When there is a significant difference in height between your vehicle and
the vehicle that enters the detection area
• Immediately after BSM system is set to on
Page 308 of 532
3085-3. Using the storage features
C-HR_OM_USA_OM10569U
Cup holders
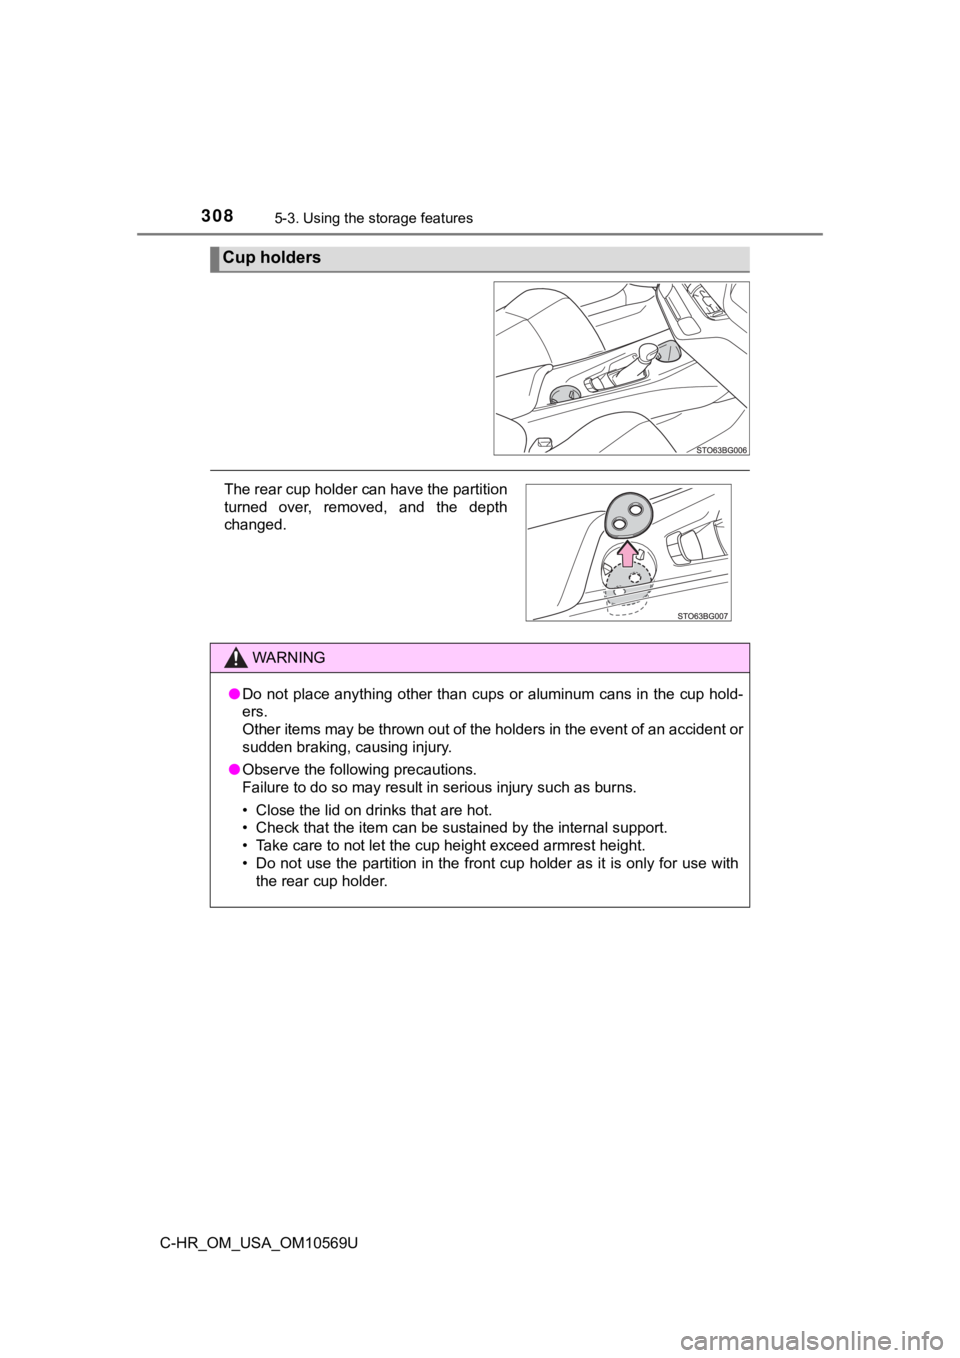
The rear cup holder can have the partition
turned over, removed, and the depth
changed.
WARNING
●Do not place anything other than cups or aluminum cans in the cup hold-
ers.
Other items may be thrown out of the holders in the event of an accident or
sudden braking, causing injury.
● Observe the following precautions.
Failure to do so may result in serious injury such as burns.
• Close the lid on drinks that are hot.
• Check that the item can be sustained by the internal support.
• Take care to not let the cup height exceed armrest height.
• Do not use the partition in the front cup holder as it is only for use with
the rear cup holder.
Page 383 of 532
3836-3. Do-it-yourself maintenance
6
Maintenance and care
C-HR_OM_USA_OM10569U
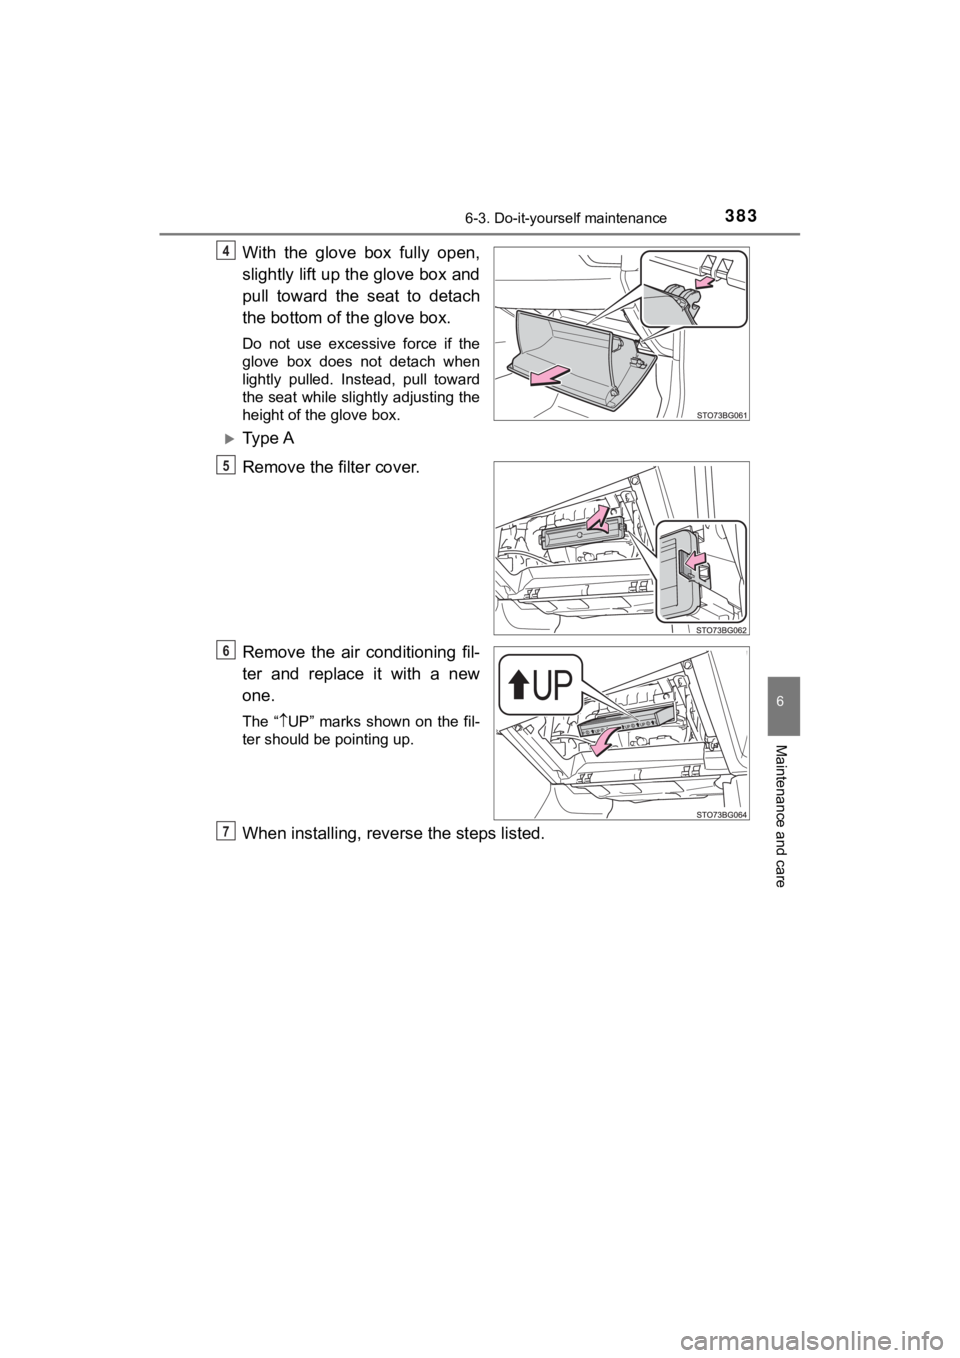
With the glove box fully open,
slightly lift up the glove box and
pull toward the seat to detach
the bottom of the glove box.
Do not use excessive force if the
glove box does not detach when
lightly pulled. Instead, pull toward
the seat while slightly adjusting the
height of the glove box.
Ty p e A
Remove the filter cover.
Remove the air conditioning fil-
ter and replace it with a new
one.
The “UP” marks shown on the fil-
ter should be pointing up.
When installing, rever se the steps listed.
4
5
6
7
Page 437 of 532
4377-2. Steps to take in an emergency
7
When trouble arises
C-HR_OM_USA_OM10569U
WARNING
■Using the tire jack
Observe the following precautions.
Improper use of the tire jack may cause the vehicle to suddenly fall off
the jack, leading to death or serious injury.
●Do not use the tire jack for any purpose other than replacing t ires or
installing and removing tire chains.
●Only use the tire jack that comes with this vehicle for replacing a flat
tire.
Do not use it on other vehicles, and do not use other tire jack s for
replacing tires on this vehicle.
●Do not put any part of your body under the vehicle while it is supported
by the jack.
●Do not start the engine or drive the vehicle while the vehicle is sup-
ported by the jack.
●Do not raise the vehicle w hile someone is inside.
●When raising the vehicle, do not put an object on or under the jack.
●Do not raise the vehicle to a height greater than that required to
replace the tire.
●Use a jack stand if it is nece ssary to get under the vehicle.
●When lowering the vehicle, make sure that there is no-one near the
vehicle. If there are people nearb y, warn them vocally before lowering.
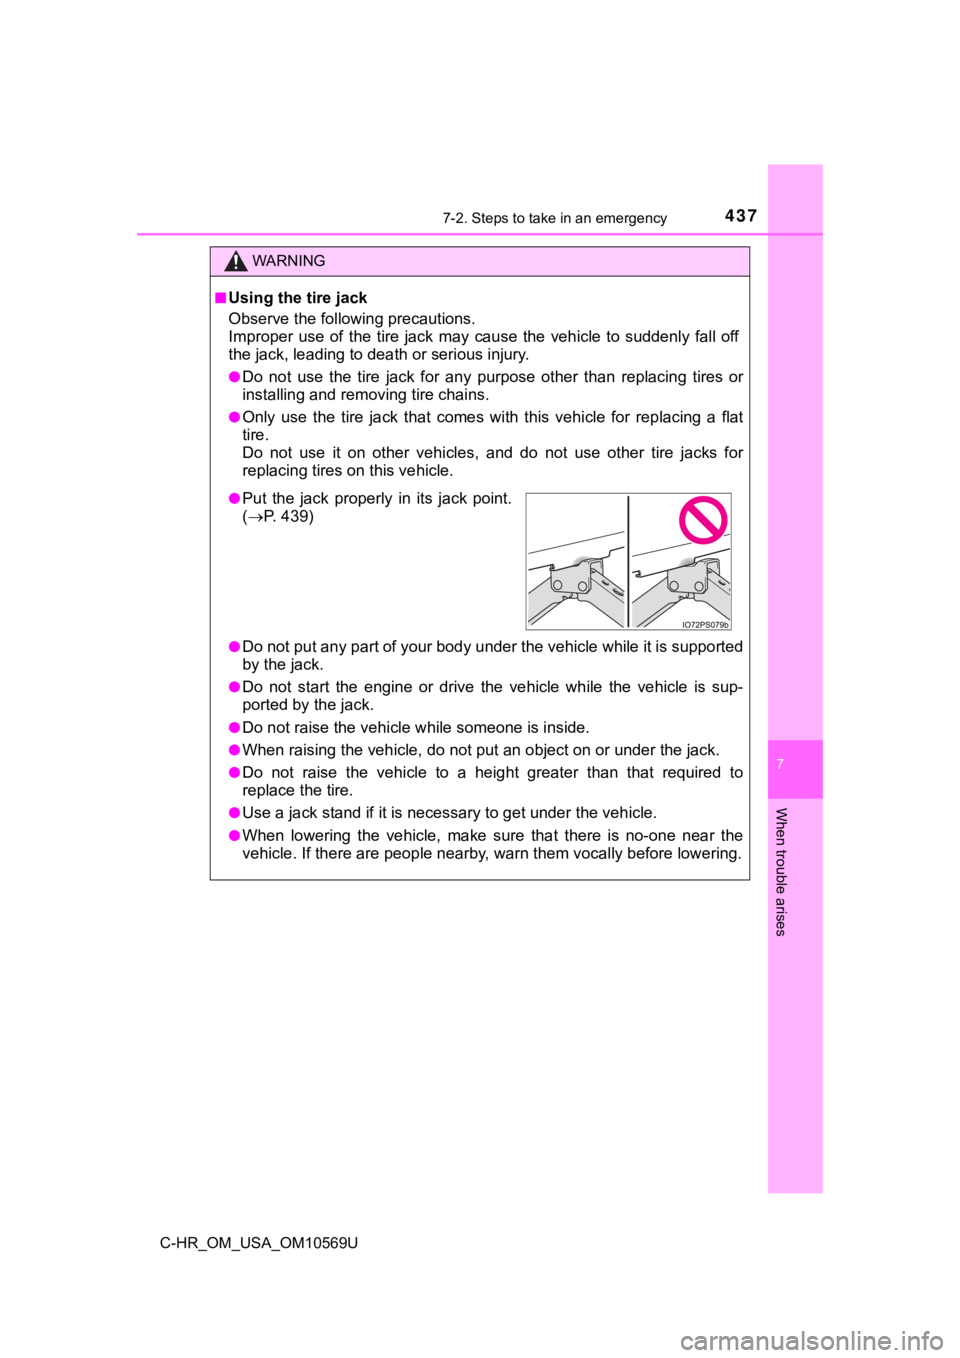
●Put the jack properly in its jack point.
( P. 439)
Page 445 of 532
4457-2. Steps to take in an emergency
7
When trouble arises
C-HR_OM_USA_OM10569U
NOTICE
■Be careful when driving over bumps with the compact spare tire
installed on the vehicle.
The vehicle height may become lower when driving with the compact
spare tire, compared to when driving with standard tires. Be ca reful
when driving over uneven road surfaces.
■Driving with tire chains and the compact spare tire
Do not fit tire chains to the compact spare tire.
Tire chains may damage the vehicle body and adversely affect dr iving
performance.
■When replacing the tires
When removing or fitting the wheels, tires or the tire pressure warning
valve and transmitter, contact your Toyota dealer as the tire p ressure
warning valve and transmitter may be damaged if not handled cor rectly.
■To avoid damage to the tire pressure warning valves and transmi t-
ters
When a tire is repaired with liqui d sealants, the tire pressure warning
valve and transmitter may not operate properly. If a liquid sea lant is
used, contact your Toyota dealer or other qualified service shop as soon
as possible. Make sure to replac e the tire pressure warning valve and
transmitter when replacing the tire. ( P. 3 6 6 )
Page 462 of 532
4628-1. Specifications
C-HR_OM_USA_OM10569U
Maintenance data (fuel, oil level, etc.)
*1: Unladen vehicles
*2: Vehicles with 215/60R17 tires
*3: Vehicles with 225/50R18 tires
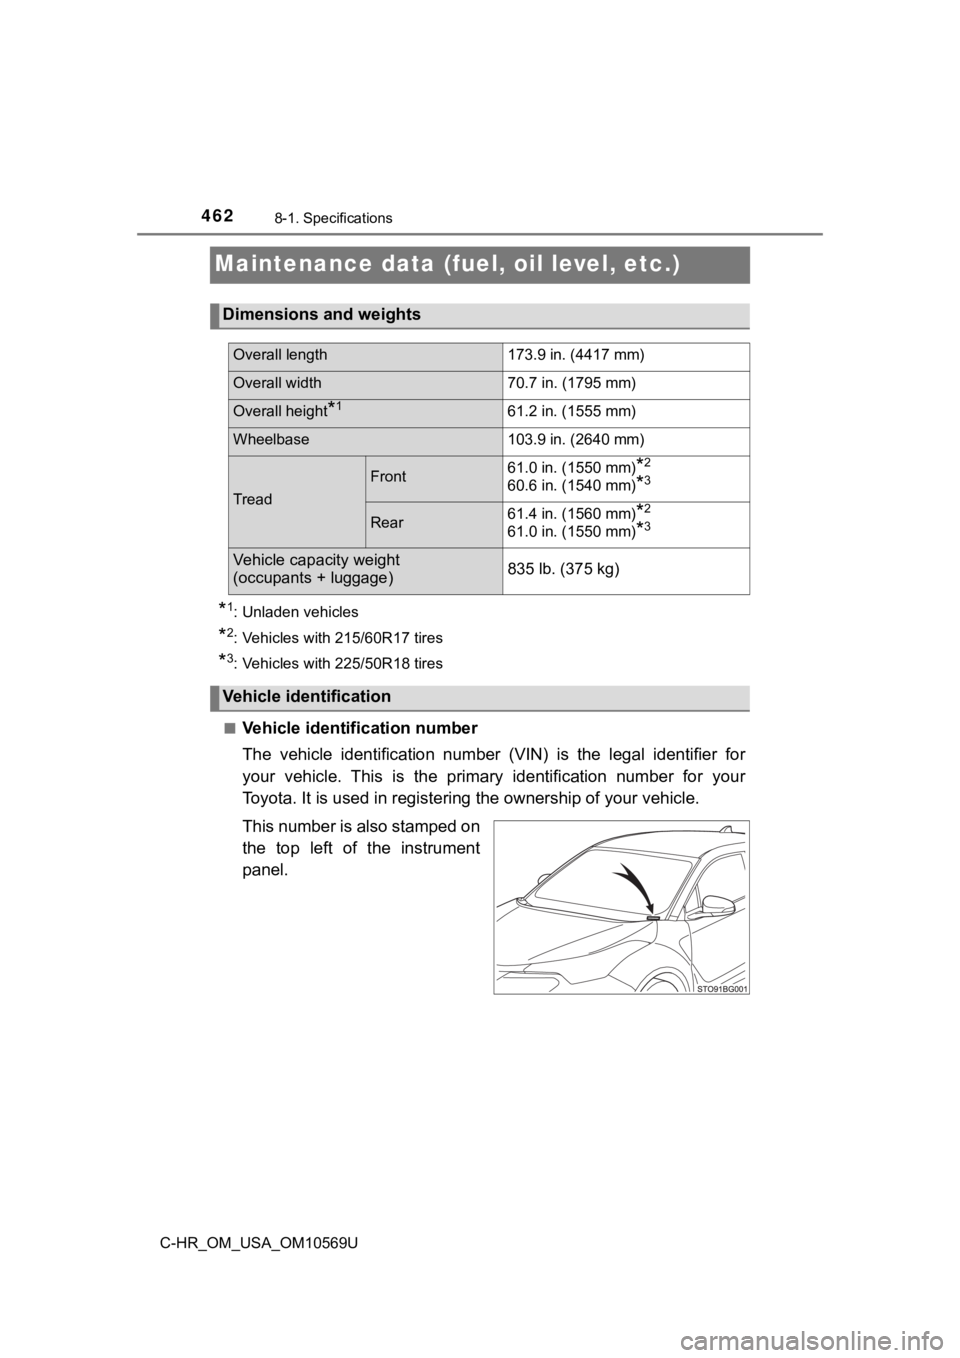
■
Vehicle identification number
The vehicle identification number (VIN) is the legal identifier for
your vehicle. This is the primary identification number for you r
Toyota. It is used in registeri ng the ownership of your vehicle .
This number is also stamped on
the top left of the instrument
panel.
Dimensions and weights
Overall length 173.9 in. (4417 mm)
Overall width 70.7 in. (1795 mm)
Overall height*161.2 in. (1555 mm)
Wheelbase103.9 in. (2640 mm)
Tread
Front61.0 in. (1550 mm)*2
60.6 in. (1540 mm)*3
Rear61.4 in. (1560 mm)*2
61.0 in. (1550 mm)*3
Vehicle capacity weight
(occupants + luggage)
835 lb. (375 kg)
Vehicle identification