TOYOTA CAMRY 1999 Service Repair Manual
Manufacturer: TOYOTA, Model Year: 1999, Model line: CAMRY, Model: TOYOTA CAMRY 1999Pages: 4592, PDF Size: 55.16 MB
Page 4071 of 4592
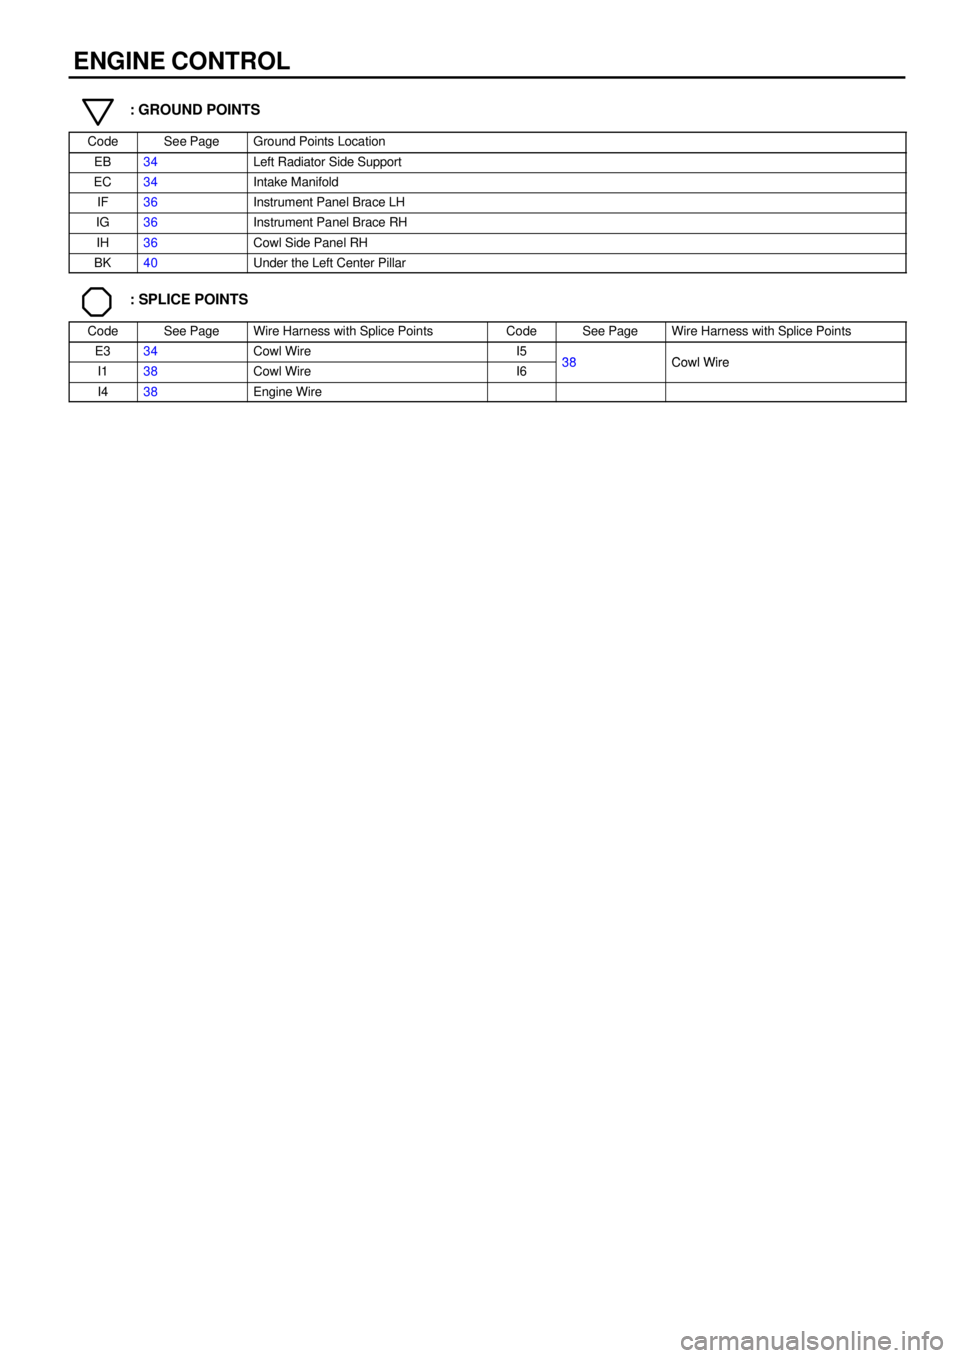
ENGINE CONTROL
: GROUND POINTS
CodeSee PageGround Points Location
EB34Left Radiator Side Support
EC34Intake Manifold
IF36Instrument Panel Brace LH
IG36Instrument Panel Brace RH
IH36Cowl Side Panel RH
BK40Under the Left Center Pillar
: SPLICE POINTS
CodeSee PageWire Harness with Splice PointsCodeSee PageWire Harness with Splice Points
E334Cowl WireI538Cowl WireI138Cowl WireI638Cowl Wire
I438Engine Wire
Page 4072 of 4592

MEMO
Page 4073 of 4592
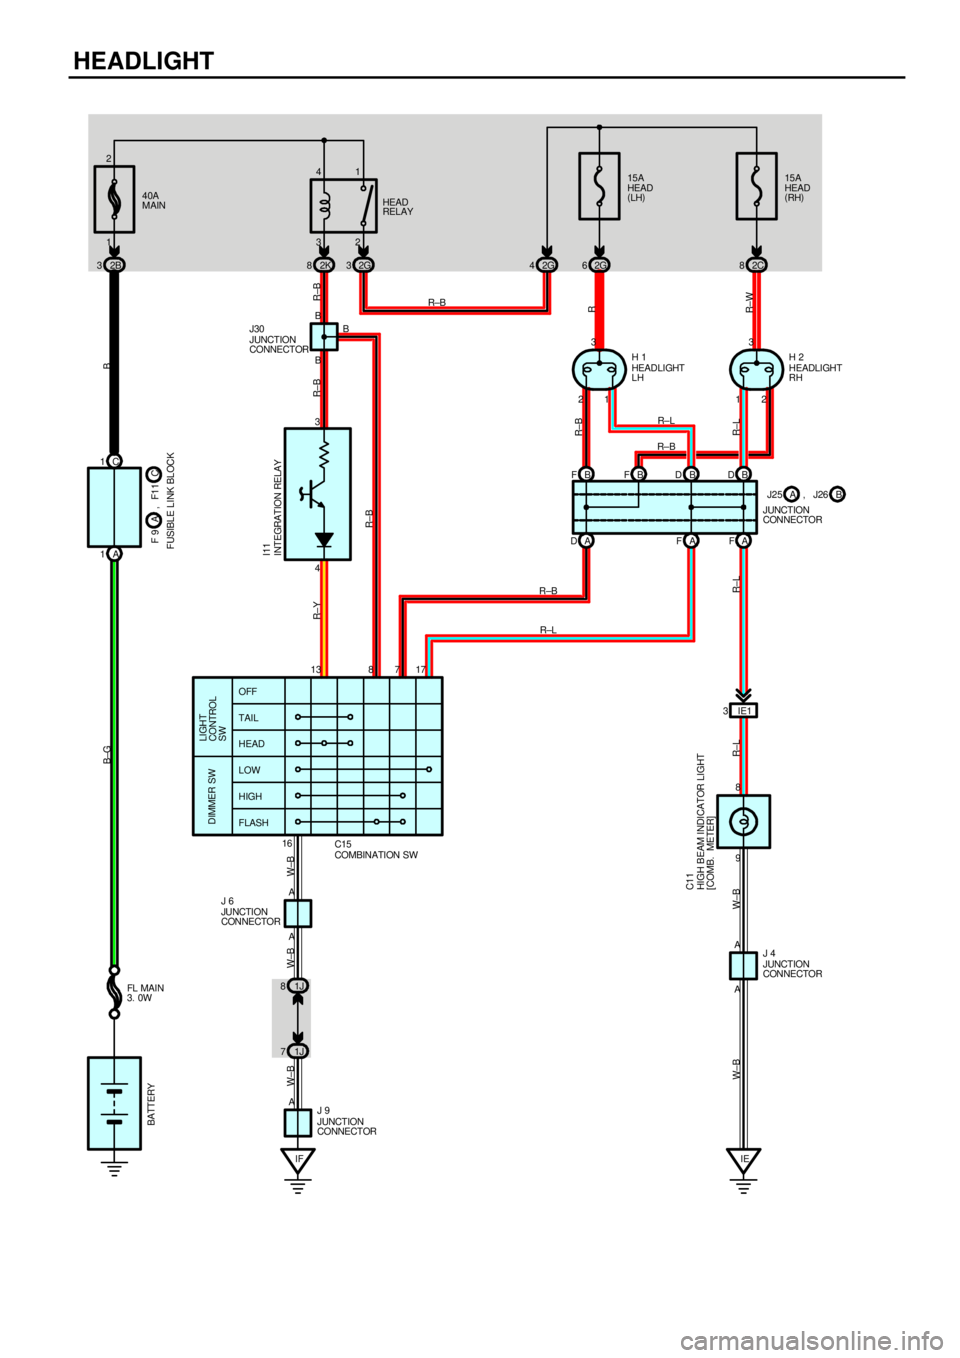
HEADLIGHT
15A
HEAD
(
LH)15A
HEAD
(
RH)
3
4
16 OFF
TAIL
HEAD
LOW
HIGH
FLASH
LIGHT
CONTROL
SW DIMMER SW
2K 82G32G4
R±B
HEAD
RELAY
IFIE R±B
R
W±BW±B
R±B
R±BB
INTEGRATION RELAY BATTERY
FL MAIN
3. 0W
I11
32 41
40A
MAIN
2B 31 2
2G 62C8
213
123
B FBFBDBD
A F A F A D
A 1C 1
1J 79 8IE1 3
A B
AA B
B
COMBINATION SW C15
HIGH B EAM INDICATOR LIGHT
[COMB. METER] C11
JUNCTION
CONNECTOR J 9JUNCTION
CONNECTOR J 4 JUNCTION
CONNECTOR J30
HEADLIGHT
LH H 1
HEADLIGHT
RH H 2
R±Y
JUNCTION
CONNECTOR J 6
W±B
W±B R±L R±LR±B
R±L
R±BR±L
R±W B±G
R±B
R±L
F 9
FUSIBLE LINK BLOCKC A, F11
J25
JUNCTION
CONNECTORB A, J26
8717 13
A A
1J 8
W±B
Page 4074 of 4592
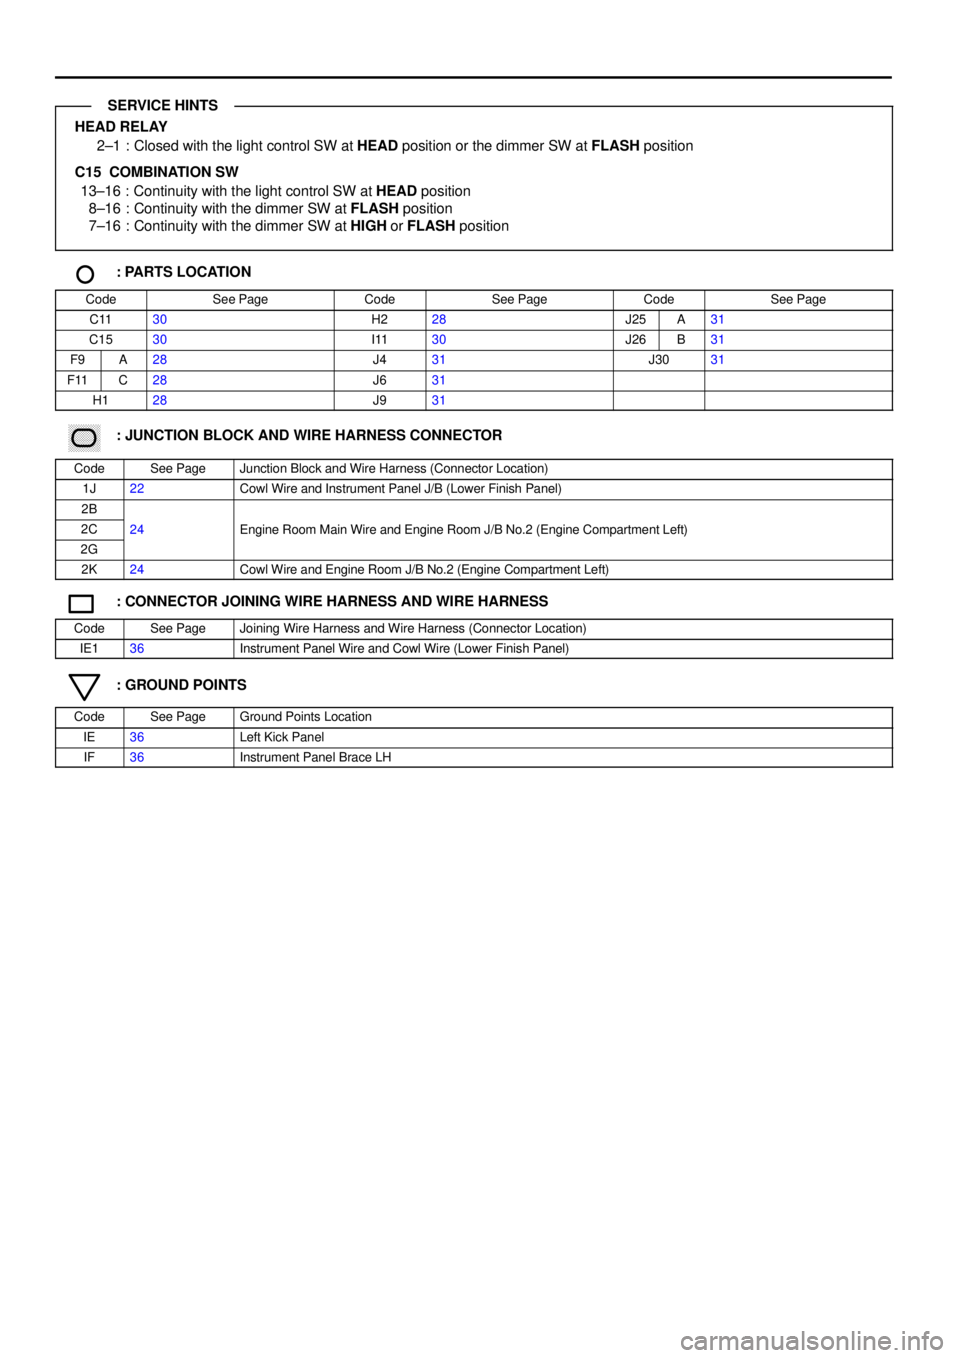
HEAD RELAY
2±1 : Closed with the light control SW at HEAD position or the dimmer SW at FLASH position
C15 COMBINATION SW
13±16 : Continuity with the light control SW at HEAD position
8±16 : Continuity with the dimmer SW at FLASH position
7±16 : Continuity with the dimmer SW at HIGH or FLASH position
: PARTS LOCATION
CodeSee PageCodeSee PageCodeSee Page
C1130H228J25A31
C1530I1130J26B31
F9A28J431J3031
F11C28J631
H128J931
������ ���: JUNCTION BLOCK AND WIRE HARNESS CONNECTOR
CodeSee PageJunction Block and Wire Harness (Connector Location)
1J22Cowl Wire and Instrument Panel J/B (Lower Finish Panel)
2B
2C24Engine Room Main Wire and Engine Room J/B No.2 (Engine Compartment Left)
2G
gg(g)
2K24Cowl Wire and Engine Room J/B No.2 (Engine Compartment Left)
: CONNECTOR JOINING WIRE HARNESS AND WIRE HARNESS
CodeSee PageJoining Wire Harness and Wire Harness (Connector Location)
IE136Instrument Panel Wire and Cowl Wire (Lower Finish Panel)
: GROUND POINTS
CodeSee PageGround Points Location
IE36Left Kick Panel
IF36Instrument Panel Brace LH
SERVICE HINTS
Page 4075 of 4592
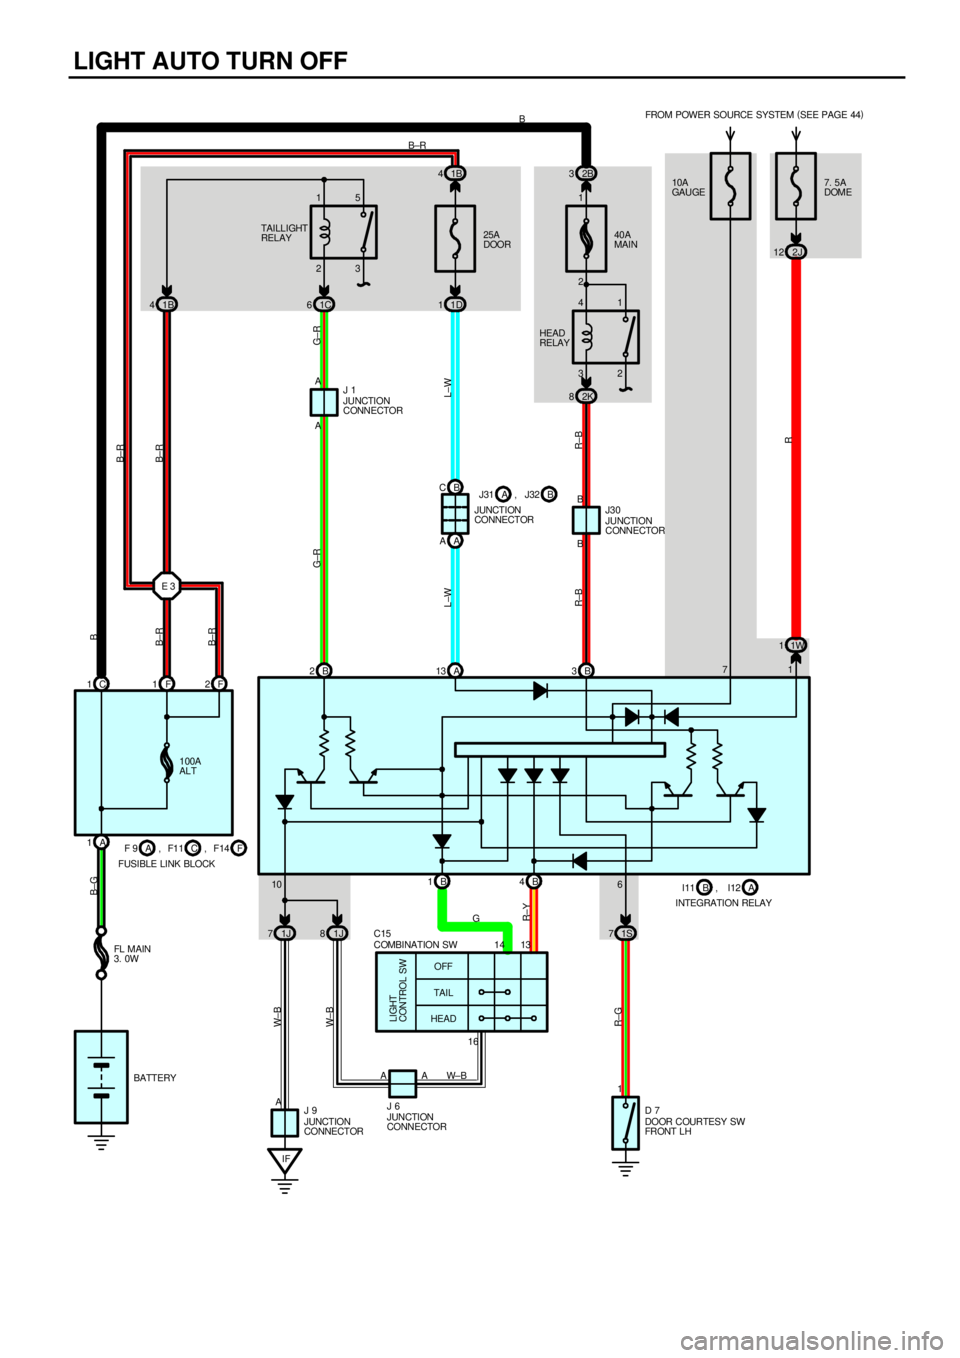
LIGHT AUTO TURN OFF
40A
MAIN
2 12B 3
32 41
2K 8
B 3B B
R±B R±B
HEAD
RELAY
JUNCTION
CONNECTOR J30
A 1C 1F1F2 E 37. 5A
DOME FROM POWER SOURCE SYSTEM (
SEE PAGE 44)
2J 12
1W 1 23 15
1C 6 1B 4
B 2
IF 1J 71J8
OFF
TAI L
HEAD
LIGHT
CONTROL SW
B 1B4
11S 7
16 A
6 10
A71 AB±G
B±R
B±RB
B±R
G±R G±R
R R±GR±Y W± B
W± B
G
JUNCTION
CONNECTOR J 9
JUNCTION
CONNECTOR J 6
DOOR COURTESY SW
FRONT L H D 7 COMBINATION SW C15 FUSIBLE LINK BLOCKB
TAI LL I GHT
RELAY10A
GAU GE
BATTERY13 14
FL M AIN
3. 0W100A
ALT
C F 9 A , F1 1 F, F1425A
DOOR 1B 4
1D 1
B C
A A
A 13
L±W L±W
AAI11
INTEGRATION RELAYA B, I12 B±R
B±R
JUNCTION
CONNECTOR J 1
J31
JUNCTION
CONNECTORB A, J32
W± B
Page 4076 of 4592
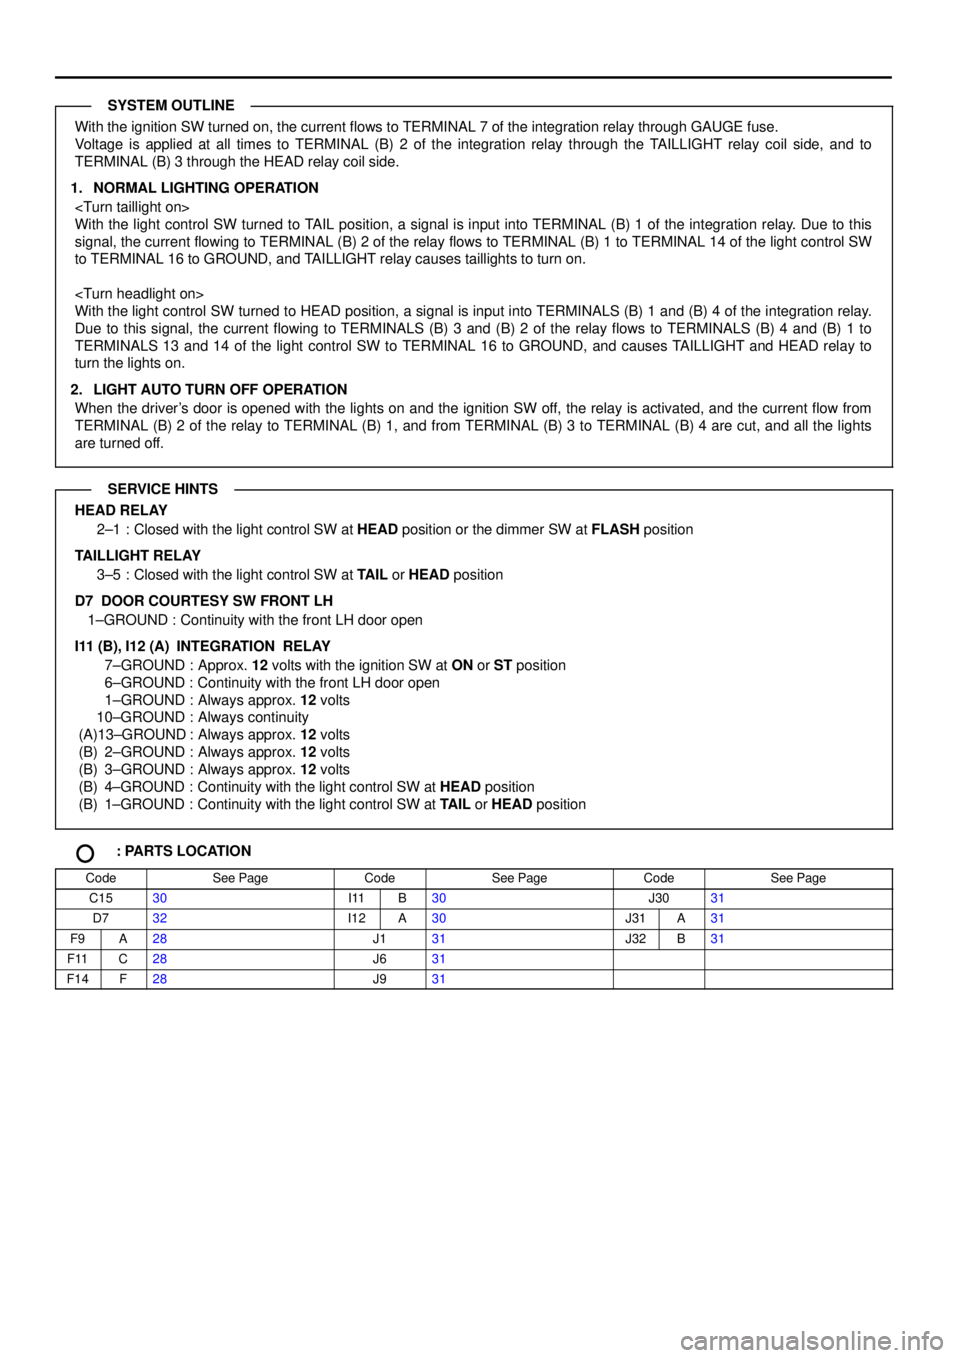
With the ignition SW turned on, the current flows to TERMINAL 7 of the integration relay through GAUGE fuse.
Voltage is applied at all times to TERMINAL (B) 2 of the integration relay through the TAILLIGHT relay coil side, and to
TERMINAL (B) 3 through the HEAD relay coil side.
1. NORMAL LIGHTING OPERATION
With the light control SW turned to TAIL position, a signal is input into TERMINAL (B) 1 of the integration relay. Due to this
signal, the current flowing to TERMINAL (B) 2 of the relay flows to TERMINAL (B) 1 to TERMINAL 14 of the light control SW
to TERMINAL 16 to GROUND, and TAILLIGHT relay causes taillights to turn on.
With the light control SW turned to HEAD position, a signal is input into TERMINALS (B) 1 and (B) 4 of the integration relay.
Due to this signal, the current flowing to TERMINALS (B) 3 and (B) 2 of the relay flows to TERMINALS (B) 4 and (B) 1 to
TERMINALS 13 and 14 of the light control SW to TERMINAL 16 to GROUND, and causes TAILLIGHT and HEAD relay to
turn the lights on.
2. LIGHT AUTO TURN OFF OPERATION
When the driver's door is opened with the lights on and the ignition SW off, the relay is activated, and the current flow from
TERMINAL (B) 2 of the relay to TERMINAL (B) 1, and from TERMINAL (B) 3 to TERMINAL (B) 4 are cut, and all the lights
are turned off.
HEAD RELAY
2±1 : Closed with the light control SW at HEAD position or the dimmer SW at FLASH position
TAILLIGHT RELAY
3±5 : Closed with the light control SW at TAIL or HEAD position
D7 DOOR COURTESY SW FRONT LH
1±GROUND : Continuity with the front LH door open
I11 (B), I12 (A)
INTEGRATION RELAY
7±GROUND : Approx. 12 volts with the ignition SW at ON or ST position
6±GROUND : Continuity with the front LH door open
1±GROUND : Always approx. 12 volts
10±GROUND : Always continuity
(A)13±GROUND : Always approx. 12 volts
(B) 2±GROUND : Always approx. 12 volts
(B) 3±GROUND : Always approx. 12 volts
(B) 4±GROUND : Continuity with the light control SW at HEAD position
(B) 1±GROUND : Continuity with the light control SW at TAIL or HEAD position
: PARTS LOCATION
CodeSee PageCodeSee PageCodeSee Page
C1530I11B30J3031
D732I12A30J31A31
F9A28J131J32B31
F11C28J631
F14F28J931
SYSTEM OUTLINE
SERVICE HINTS
Page 4077 of 4592
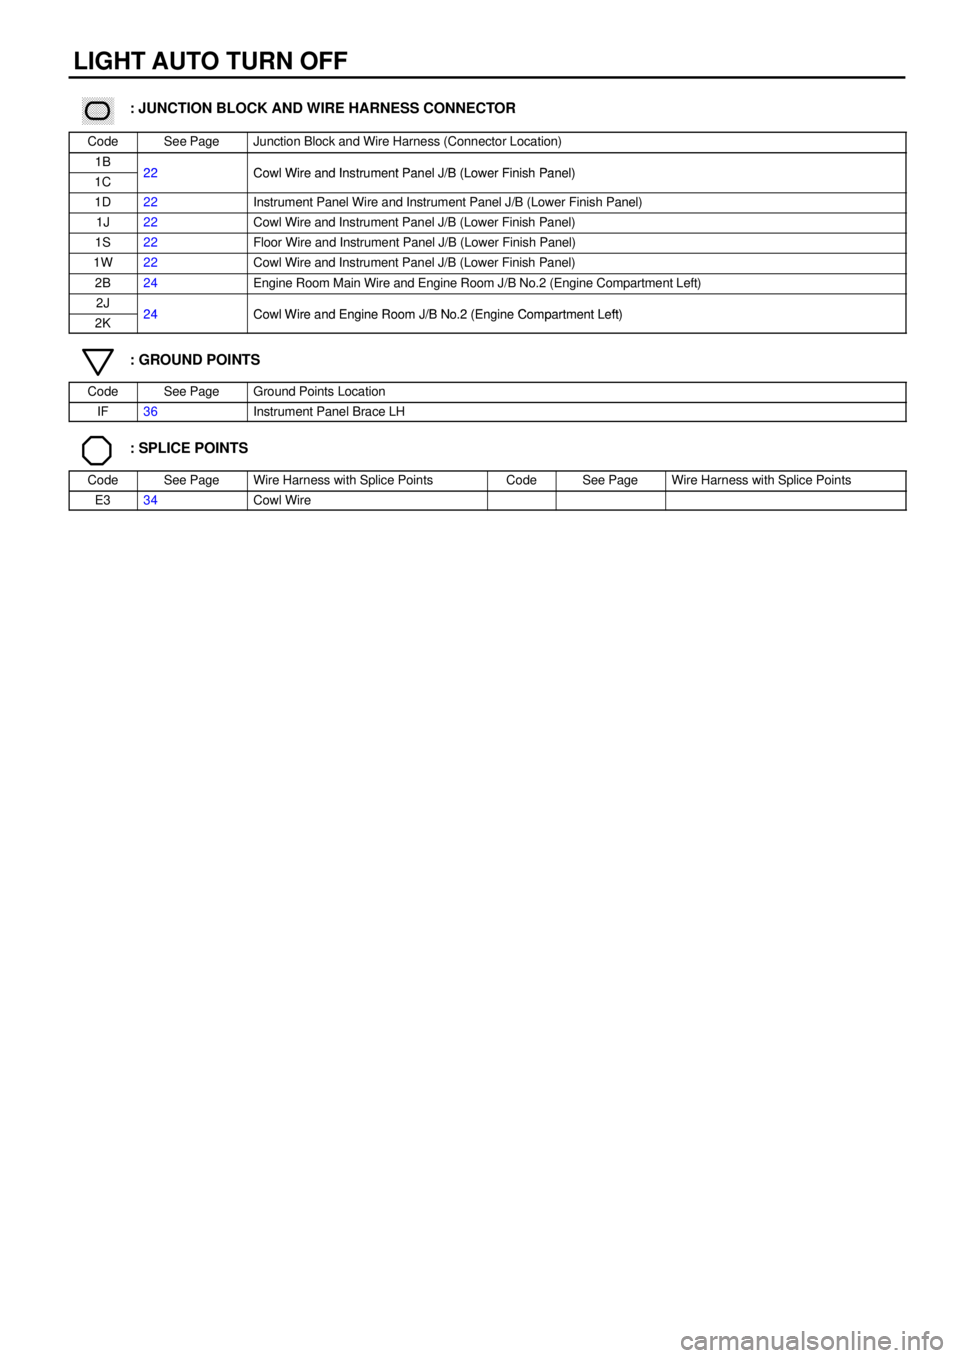
LIGHT AUTO TURN OFF
������ ���: JUNCTION BLOCK AND WIRE HARNESS CONNECTOR
CodeSee PageJunction Block and Wire Harness (Connector Location)
1B22Cowl Wire and Instrument Panel J/B (Lower Finish Panel)1C22Cowl Wire and Instrument Panel J/B (Lower Finish Panel)
1D22Instrument Panel Wire and Instrument Panel J/B (Lower Finish Panel)
1J22Cowl Wire and Instrument Panel J/B (Lower Finish Panel)
1S22Floor Wire and Instrument Panel J/B (Lower Finish Panel)
1W22Cowl Wire and Instrument Panel J/B (Lower Finish Panel)
2B24Engine Room Main Wire and Engine Room J/B No.2 (Engine Compartment Left)
2J24Cowl Wire and Engine Room J/B No 2 (Engine Compartment Left)2K24Cowl Wire and Engine Room J/B No.2 (Engine Compartment Left)
: GROUND POINTS
CodeSee PageGround Points Location
IF36Instrument Panel Brace LH
: SPLICE POINTS
CodeSee PageWire Harness with Splice PointsCodeSee PageWire Harness with Splice Points
E334Cowl Wire
Page 4078 of 4592

MEMO
Page 4079 of 4592
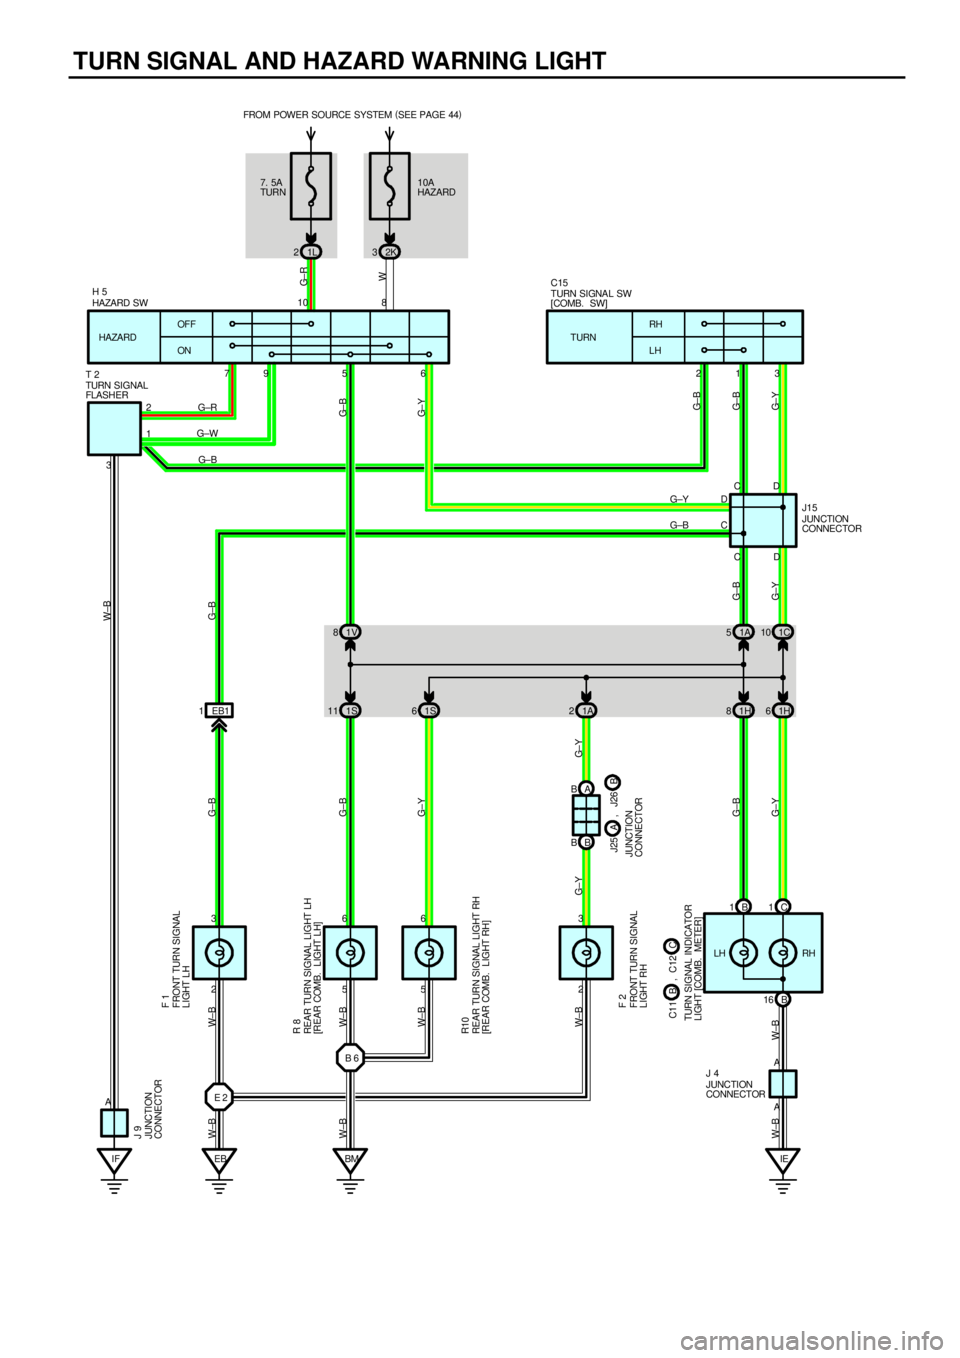
TURN SIGNAL AND HAZARD WARNING LIGHT
1L 22K3
2 3
2 3
IF EB BMIE EB1 1 37956 231
5 5
A 66
A
A10 8
2
1FROM POWER SOURCE SYSTEM (
SEE PAGE 44)
OFF
ONRH
LH TURN HAZARD10A
HAZARD 7. 5A
TURN
G± R
W
G±RG± B
G±W
G± Y W±B
G±B
G±Y
W±BG±B
G±Y
W±BW± B W±B
HAZARD SWTURN SIGNA L SW
[COMB. SW]
REAR TURN SIGNAL LIGHT LH
[REAR COMB. LIGHT LH]FRONT TURN SI GNAL
LIGHT LH
REAR TURN SIGNAL LIGHT RH
[REAR COMB. LIGHT RH]
G± B
G± Y
TURN SIGNAL
FLASHER
FRONT TURN SI GNAL
LIGHT RH F 1
R 8
R10
F 2
J 4
J 9
H 5
JUNCTION
CONNECTOR
JUNCTION
CONNECTOR
LH RH
G± B G±B
G± B
G±Y W±B
E 2B 6
W± B W± B
W± B
B 1C1
B 161C 10 1A 5 1V 8
1H 6 1H 8 1A 2 1S 11 1S6
B BA B
G±BG± Y
CDD C
D
CJUNCTION
CONNECTOR J15 T 2C15
JUNCTION
CONNECTOR
TURN SIGNAL INDICATOR
LI GHT [COMB. METER]
G±Y G±B
G±Y
G±B
C C11 B , C12B J25 A , J26
Page 4080 of 4592
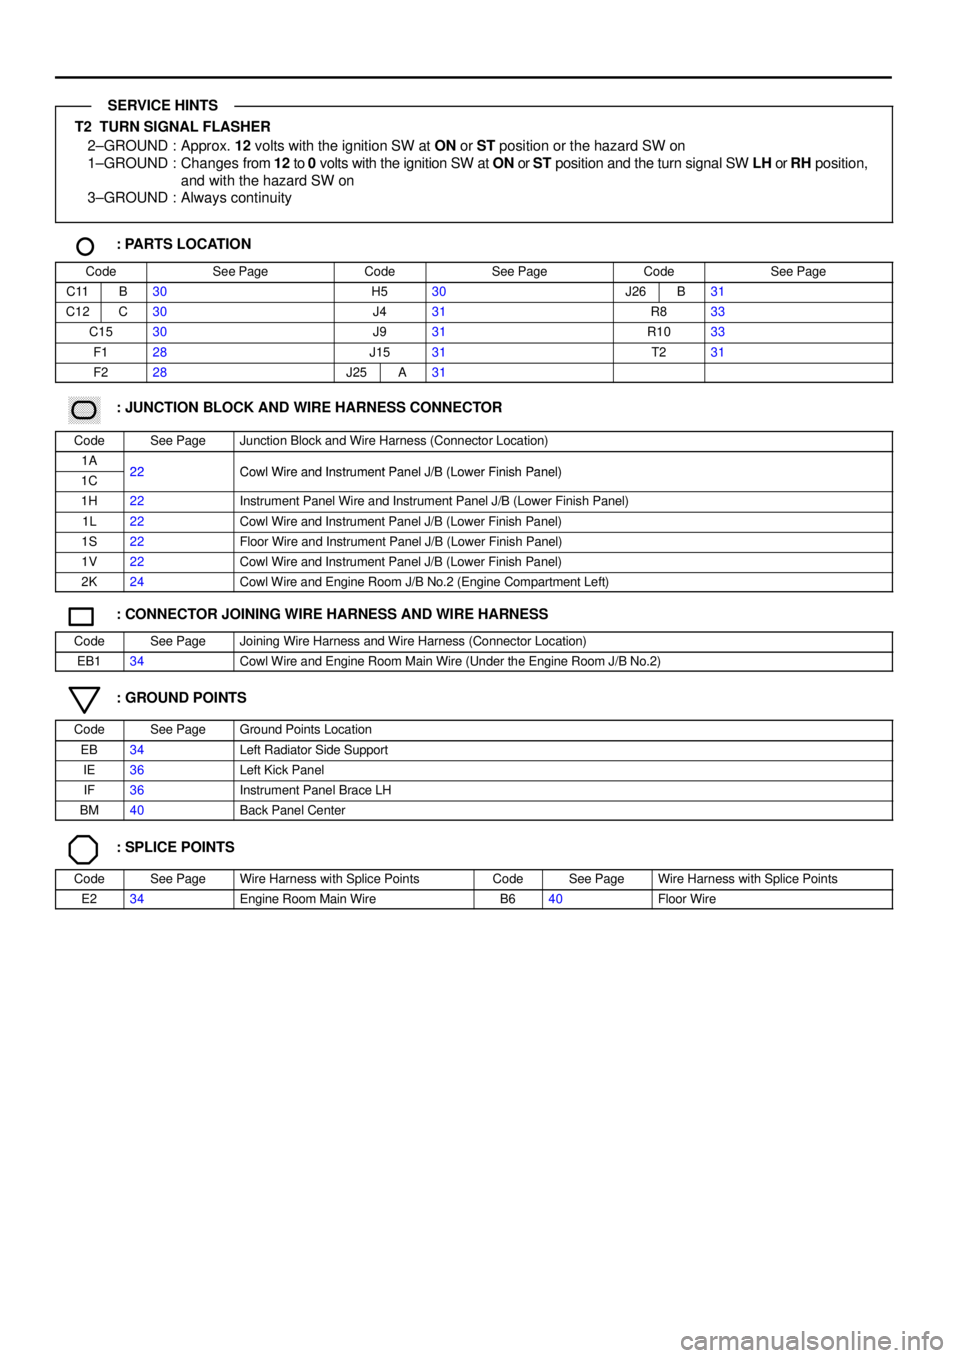
T2 TURN SIGNAL FLASHER
2±GROUND : Approx. 12 volts with the ignition SW at ON or ST position or the hazard SW on
1±GROUND : Changes from 12 to 0 volts with the ignition SW at ON or ST position and the turn signal SW LH or RH position,
and with the hazard SW on
3±GROUND : Always continuity
: PARTS LOCATION
CodeSee PageCodeSee PageCodeSee Page
C11B30H530J26B31
C12C30J431R833
C1530J931R1033
F128J1531T231
F228J25A31
������ ���: JUNCTION BLOCK AND WIRE HARNESS CONNECTOR
CodeSee PageJunction Block and Wire Harness (Connector Location)
1A22Cowl Wire and Instrument Panel J/B (Lower Finish Panel)1C22Cowl Wire and Instrument Panel J/B (Lower Finish Panel)
1H22Instrument Panel Wire and Instrument Panel J/B (Lower Finish Panel)
1L22Cowl Wire and Instrument Panel J/B (Lower Finish Panel)
1S22Floor Wire and Instrument Panel J/B (Lower Finish Panel)
1V22Cowl Wire and Instrument Panel J/B (Lower Finish Panel)
2K24Cowl Wire and Engine Room J/B No.2 (Engine Compartment Left)
: CONNECTOR JOINING WIRE HARNESS AND WIRE HARNESS
CodeSee PageJoining Wire Harness and Wire Harness (Connector Location)
EB134Cowl Wire and Engine Room Main Wire (Under the Engine Room J/B No.2)
: GROUND POINTS
CodeSee PageGround Points Location
EB34Left Radiator Side Support
IE36Left Kick Panel
IF36Instrument Panel Brace LH
BM40Back Panel Center
: SPLICE POINTS
CodeSee PageWire Harness with Splice PointsCodeSee PageWire Harness with Splice Points
E234Engine Room Main WireB640Floor Wire
SERVICE HINTS