ESP TOYOTA CAMRY 2018 Accessories, Audio & Navigation (in English)
[x] Cancel search | Manufacturer: TOYOTA, Model Year: 2018, Model line: CAMRY, Model: TOYOTA CAMRY 2018Pages: 340, PDF Size: 7.43 MB
Page 117 of 340
117
6. TIPS FOR OPERATING THE AUDIO SYSTEM
AUDIO SYSTEM
3
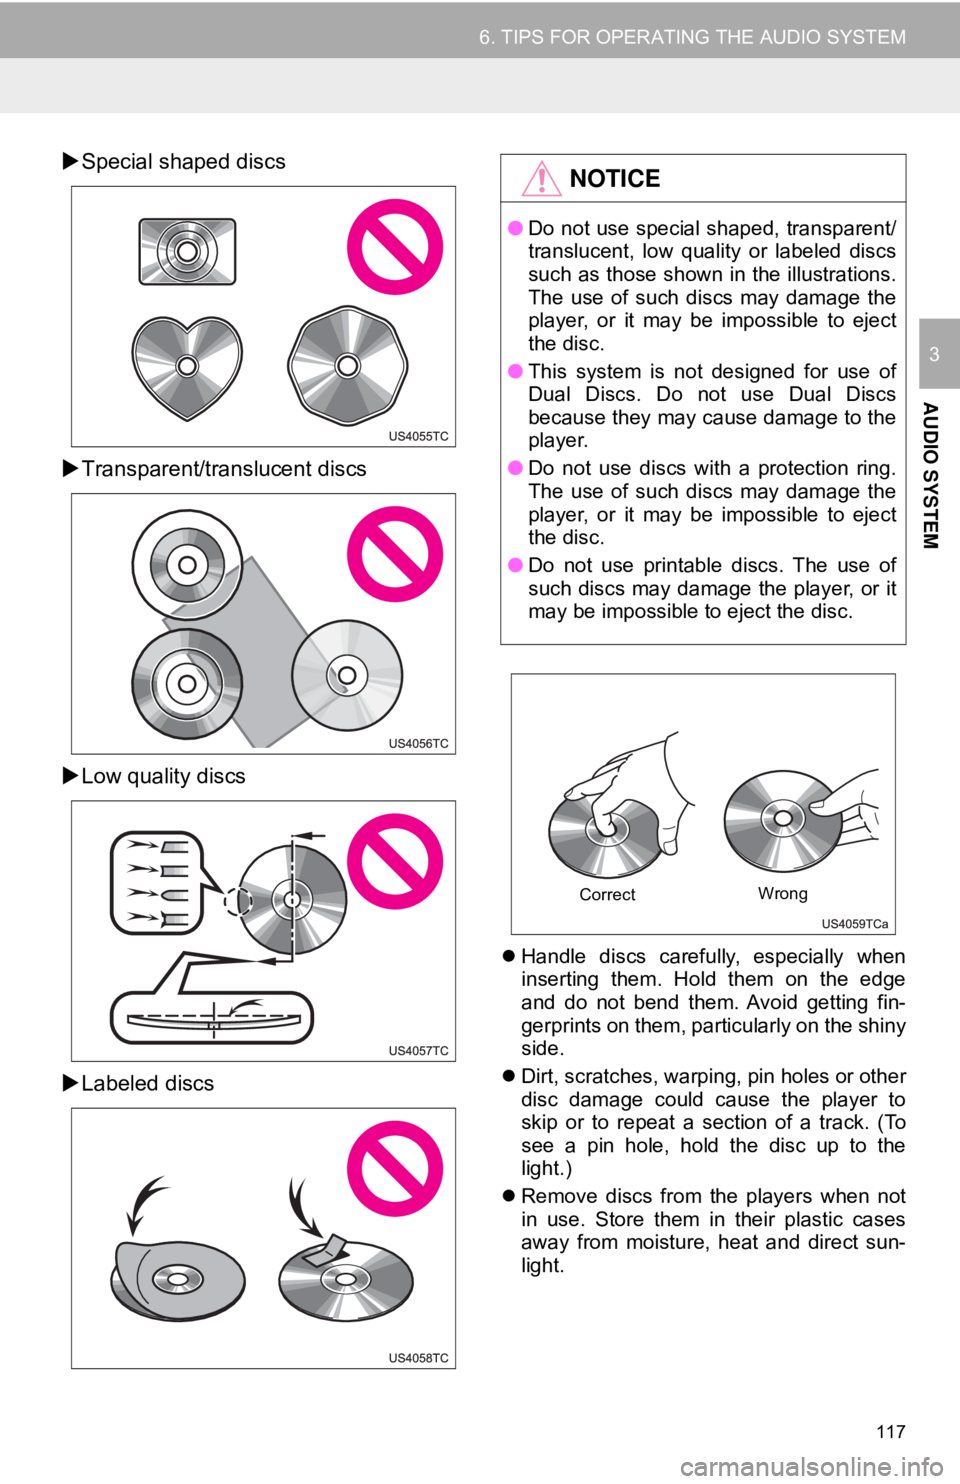
Special shaped discs
Transparent/translucent discs
Low quality discs
Labeled discs
Handle discs carefully, especially when
inserting them. Hold them on the edge
and do not bend them. Avoid getting fin-
gerprints on them, particularly on the shiny
side.
Dirt, scratches, warping, pin holes or other
disc damage could cause the player to
skip or to repeat a section of a track. (To
see a pin hole, hold the disc up to the
light.)
Remove discs from the players when not
in use. Store them in their plastic cases
away from moisture, heat and direct sun-
light.
NOTICE
● Do not use special shaped, transparent/
translucent, low quality or labeled discs
such as those shown in the illustrations.
The use of such discs may damage the
player, or it may be impossible to eject
the disc.
● This system is not designed for use of
Dual Discs. Do not use Dual Discs
because they may cause damage to the
player.
● Do not use discs with a protection ring.
The use of such discs may damage the
player, or it may be impossible to eject
the disc.
● Do not use printable discs. The use of
such discs may damage the player, or it
may be impossible to eject the disc.
Correct Wrong
Page 118 of 340
118
6. TIPS FOR OPERATING THE AUDIO SYSTEM
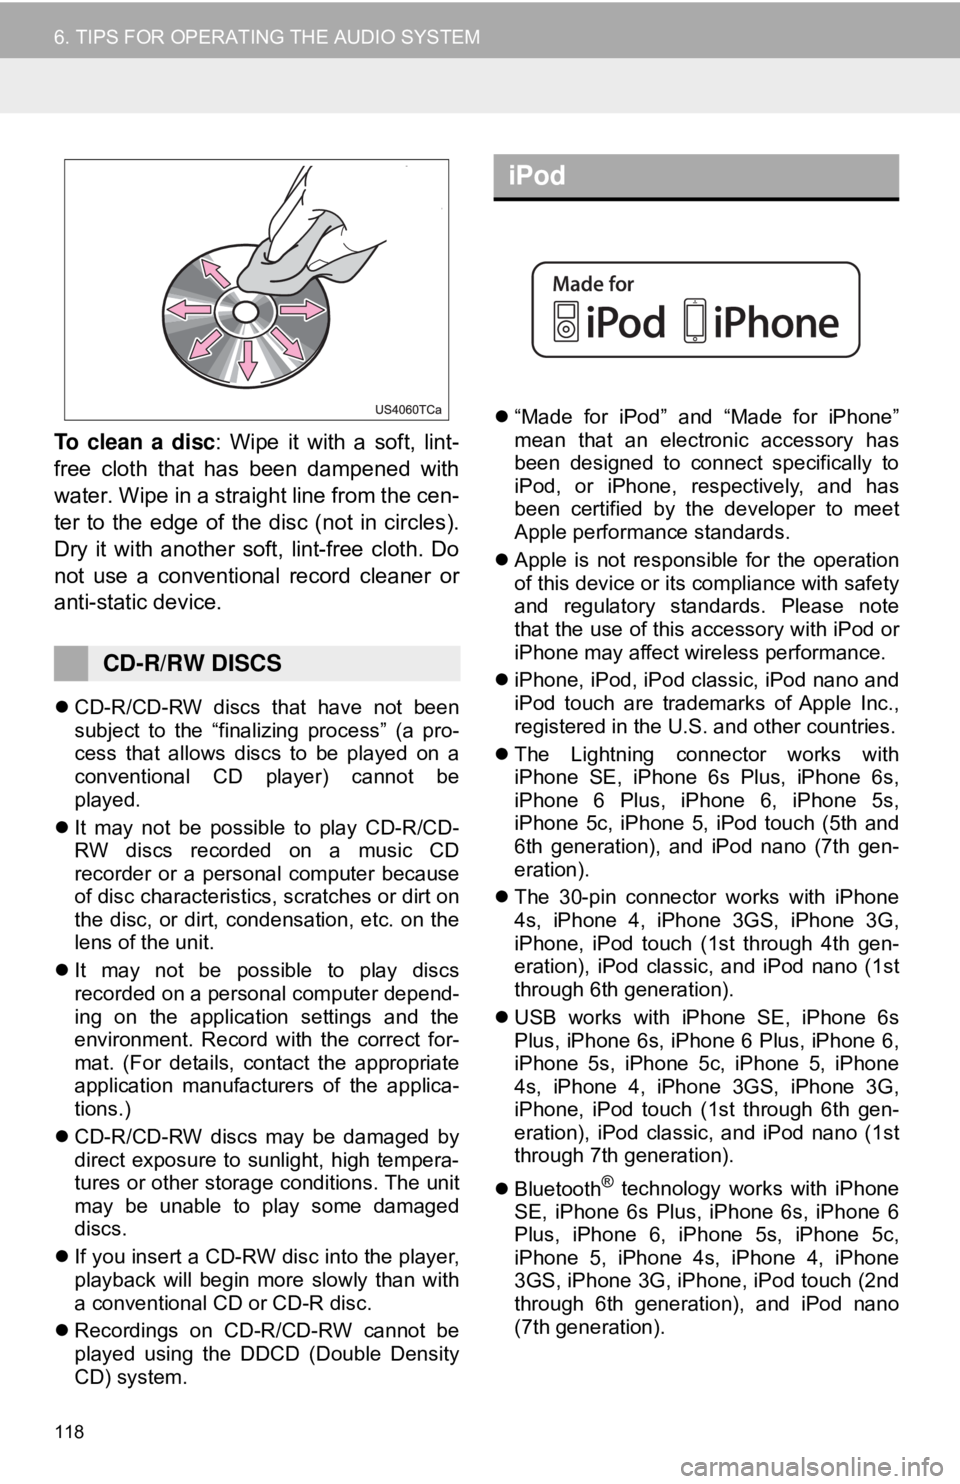
To clean a disc: Wipe it with a soft, lint-
free cloth that has been dampened with
water. Wipe in a straight line from the cen-
ter to the edge of the disc (not in circles).
Dry it with another soft, lint-free cloth. Do
not use a conventional record cleaner or
anti-static device.
CD-R/CD-RW discs that have not been
subject to the “finalizing process” (a pro-
cess that allows discs to be played on a
conventional CD player) cannot be
played.
It may not be possible to play CD-R/CD-
RW discs recorded on a music CD
recorder or a personal computer because
of disc characteristics, scratches or dirt on
the disc, or dirt, condensation, etc. on the
lens of the unit.
It may not be possible to play discs
recorded on a personal computer depend-
ing on the application settings and the
environment. Record with the correct for-
mat. (For details, contact the appropriate
application manufacturers of the applica-
tions.)
CD-R/CD-RW discs may be damaged by
direct exposure to sunlight, high tempera-
tures or other storage conditions. The unit
may be unable to play some damaged
discs.
If you insert a CD-RW disc into the player,
playback will begin more slowly than with
a conventional CD or CD-R disc.
Recordings on CD-R/CD-RW cannot be
played using the DDCD (Double Density
CD) system.
“Made for iPod” and “Made for iPhone”
mean that an electronic accessory has
been designed to connect specifically to
iPod, or iPhone, respectively, and has
been certified by the developer to meet
Apple performance standards.
Apple is not responsible for the operation
of this device or its compliance with safety
and regulatory standards. Please note
that the use of this accessory with iPod or
iPhone may affect wireless performance.
iPhone, iPod, iPod classic, iPod nano and
iPod touch are trademarks of Apple Inc.,
registered in the U.S. and other countries.
The Lightning connector works with
iPhone SE, iPhone 6s Plus, iPhone 6s,
iPhone 6 Plus, iPhone 6, iPhone 5s,
iPhone 5c, iPhone 5, iPod touch (5th and
6th generation), and iPod nano (7th gen-
eration).
The 30-pin connector works with iPhone
4s, iPhone 4, iPhone 3GS, iPhone 3G,
iPhone, iPod touch (1st through 4th gen-
eration), iPod classic, and iPod nano (1st
through 6th generation).
USB works with iPhone SE, iPhone 6s
Plus, iPhone 6s, iPhone 6 Plus, iPhone 6,
iPhone 5s, iPhone 5c, iPhone 5, iPhone
4s, iPhone 4, iPhone 3GS, iPhone 3G,
iPhone, iPod touch (1st through 6th gen-
eration), iPod classic, and iPod nano (1st
through 7th generation).
Bluetooth
® technology works with iPhone
SE, iPhone 6s Plus, iPhone 6s, iPhone 6
Plus, iPhone 6, iPhone 5s, iPhone 5c,
iPhone 5, iPhone 4s, iPhone 4, iPhone
3GS, iPhone 3G, iPhone, iPod touch (2nd
through 6th generation), and iPod nano
(7th generation).
CD-R/RW DISCS
iPod
Page 120 of 340
120
6. TIPS FOR OPERATING THE AUDIO SYSTEM
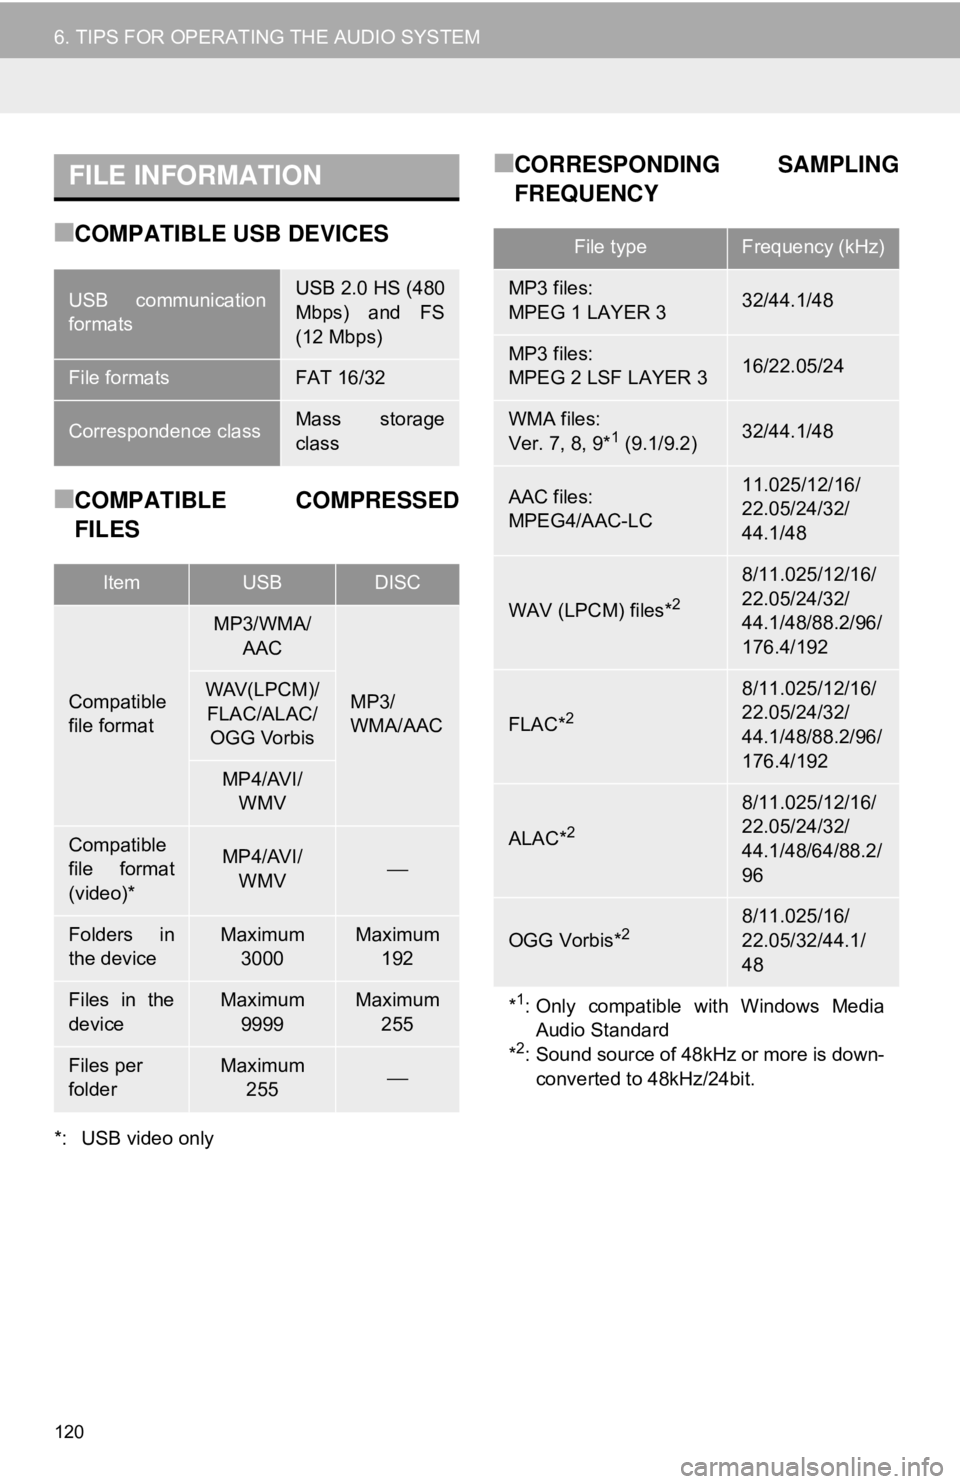
■COMPATIBLE USB DEVICES
■COMPATIBLE COMPRESSED
FILES
*: USB video only
■CORRESPONDING SAMPLING
FREQUENCYFILE INFORMATION
USB communication
formatsUSB 2.0 HS (480
Mbps) and FS
(12 Mbps)
File formatsFAT 16/32
Correspondence classMass storage
class
ItemUSBDISC
Compatible
file format
MP3/WMA/AAC
MP3/
WMA/AACWAV(LPCM)/
FLAC/ALAC/ OGG Vorbis
MP4/AVI/ WMV
Compatible
file format
(video)*MP4/AVI/
WMV⎯
Folders in
the deviceMaximum 3000Maximum 192
Files in the
deviceMaximum 9999Maximum 255
Files per
folderMaximum 255⎯
File typeFrequency (kHz)
MP3 files:
MPEG 1 LAYER 332/44.1/48
MP3 files:
MPEG 2 LSF LAYER 316/22.05/24
WMA files:
Ver. 7, 8, 9*1 (9.1/9.2)32/44.1/48
AAC files:
MPEG4/AAC-LC11.025/12/16/
22.05/24/32/
44.1/48
WAV (LPCM) files*2
8/11.025/12/16/
22.05/24/32/
44.1/48/88.2/96/
176.4/192
FLAC*2
8/11.025/12/16/
22.05/24/32/
44.1/48/88.2/96/
176.4/192
ALAC*2
8/11.025/12/16/
22.05/24/32/
44.1/48/64/88.2/
96
OGG Vorbis*28/11.025/16/
22.05/32/44.1/
48
*1: Only compatible with Windows MediaAudio Standard
*
2: Sound source of 48kHz or more is down-
converted to 48kHz/24bit.
Page 121 of 340
121
6. TIPS FOR OPERATING THE AUDIO SYSTEM
AUDIO SYSTEM
3
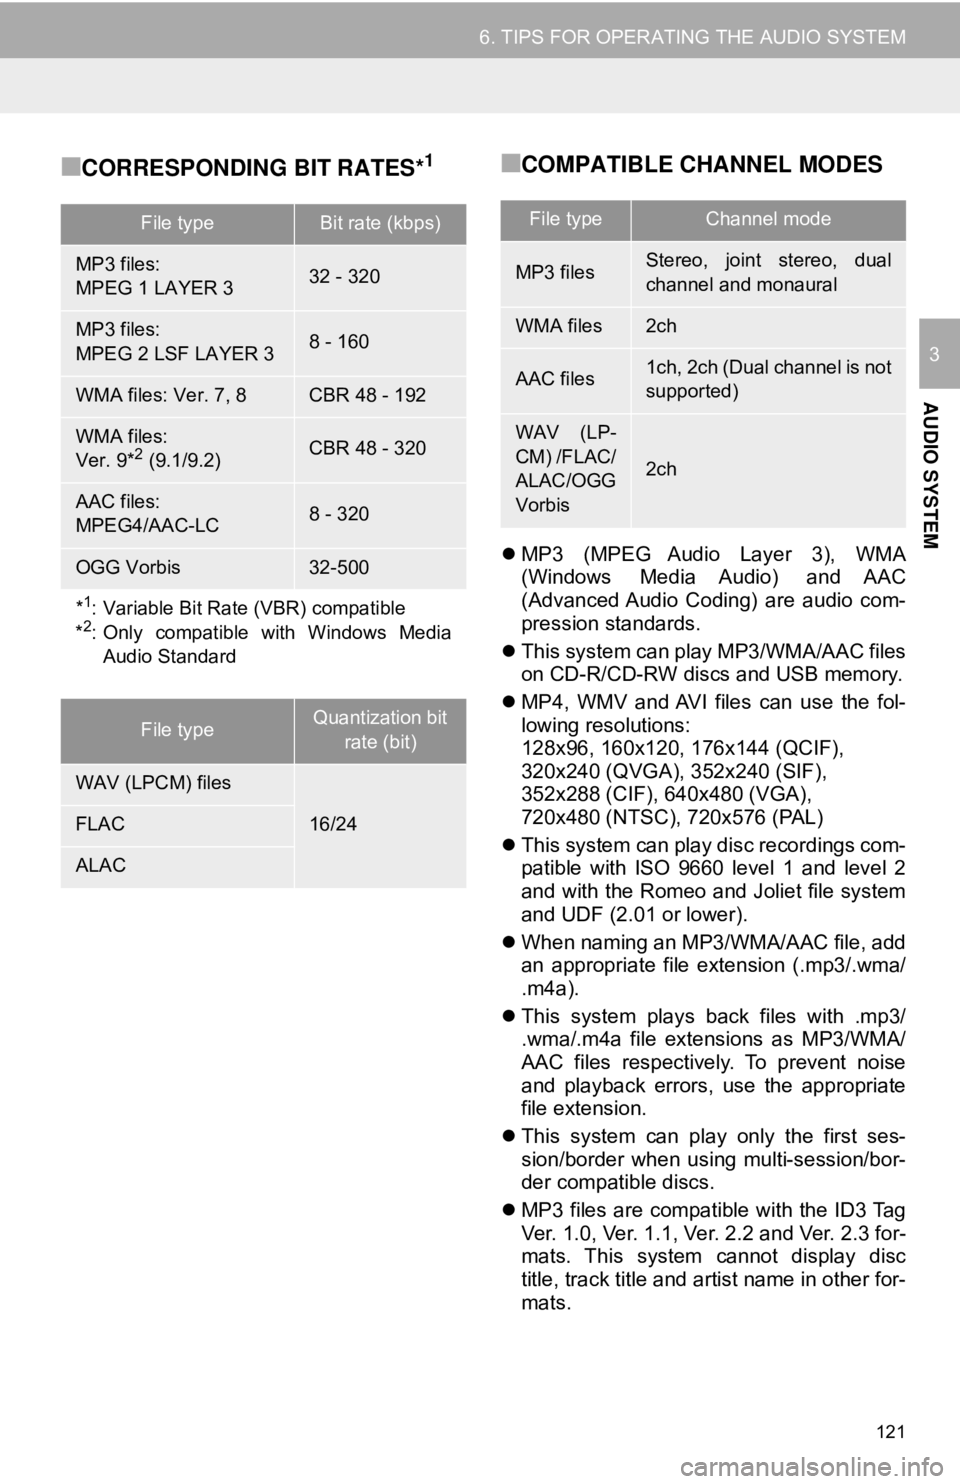
■CORRESPONDING BIT RATES*1■COMPATIBLE CHANNEL MODES
MP3 (MPEG Audio Layer 3), WMA
(Windows Media Audio) and AAC
(Advanced Audio Coding) are audio com-
pression standards.
This system can play MP3/WMA/AAC files
on CD-R/CD-RW discs and USB memory.
MP4, WMV and AVI files can use the fol-
lowing resolutions:
128x96, 160x120, 176x144 (QCIF),
320x240 (QVGA), 352x240 (SIF),
352x288 (CIF), 640x480 (VGA),
720x480 (NTSC), 720x576 (PAL)
This system can play disc recordings com-
patible with ISO 9660 level 1 and level 2
and with the Romeo and Joliet file system
and UDF (2.01 or lower).
When naming an MP3/WMA/AAC file, add
an appropriate file extension (.mp3/.wma/
.m4a).
This system plays back files with .mp3/
.wma/.m4a file extensions as MP3/WMA/
AAC files respectively. To prevent noise
and playback errors, use the appropriate
file extension.
This system can play only the first ses-
sion/border when using multi-session/bor-
der compatible discs.
MP3 files are compatible with the ID3 Tag
Ver. 1.0, Ver. 1.1, Ver. 2.2 and Ver. 2.3 for-
mats. This system cannot display disc
title, track title and artist name in other for-
mats.
File typeBit rate (kbps)
MP3 files:
MPEG 1 LAYER 332 - 320
MP3 files:
MPEG 2 LSF LAYER 38 - 160
WMA files: Ver. 7, 8CBR 48 - 192
WMA files:
Ver. 9*2 (9.1/9.2)CBR 48 - 320
AAC files:
MPEG4/AAC-LC8 - 320
OGG Vorbis32-500
*1: Variable Bit Rate (VBR) compatible
*2: Only compatible with Windows Media Audio Standard
File typeQuantization bit
rate (bit)
WAV (LPCM) files
16/24FLAC
ALAC
File typeChannel mode
MP3 filesStereo, joint stereo, dual
channel and monaural
WMA files2ch
AAC files1ch, 2ch (Dual channel is not
supported)
WAV (LP-
CM) /FLAC/
ALAC/OGG
Vorbis
2ch
Page 127 of 340
127
1. VOICE COMMAND SYSTEM OPERATION
VOICE COMMAND SYSTEM
4
1Press the talk switch.
Voice guidance for the voice command
system can be skipped by pressing the
talk switch.
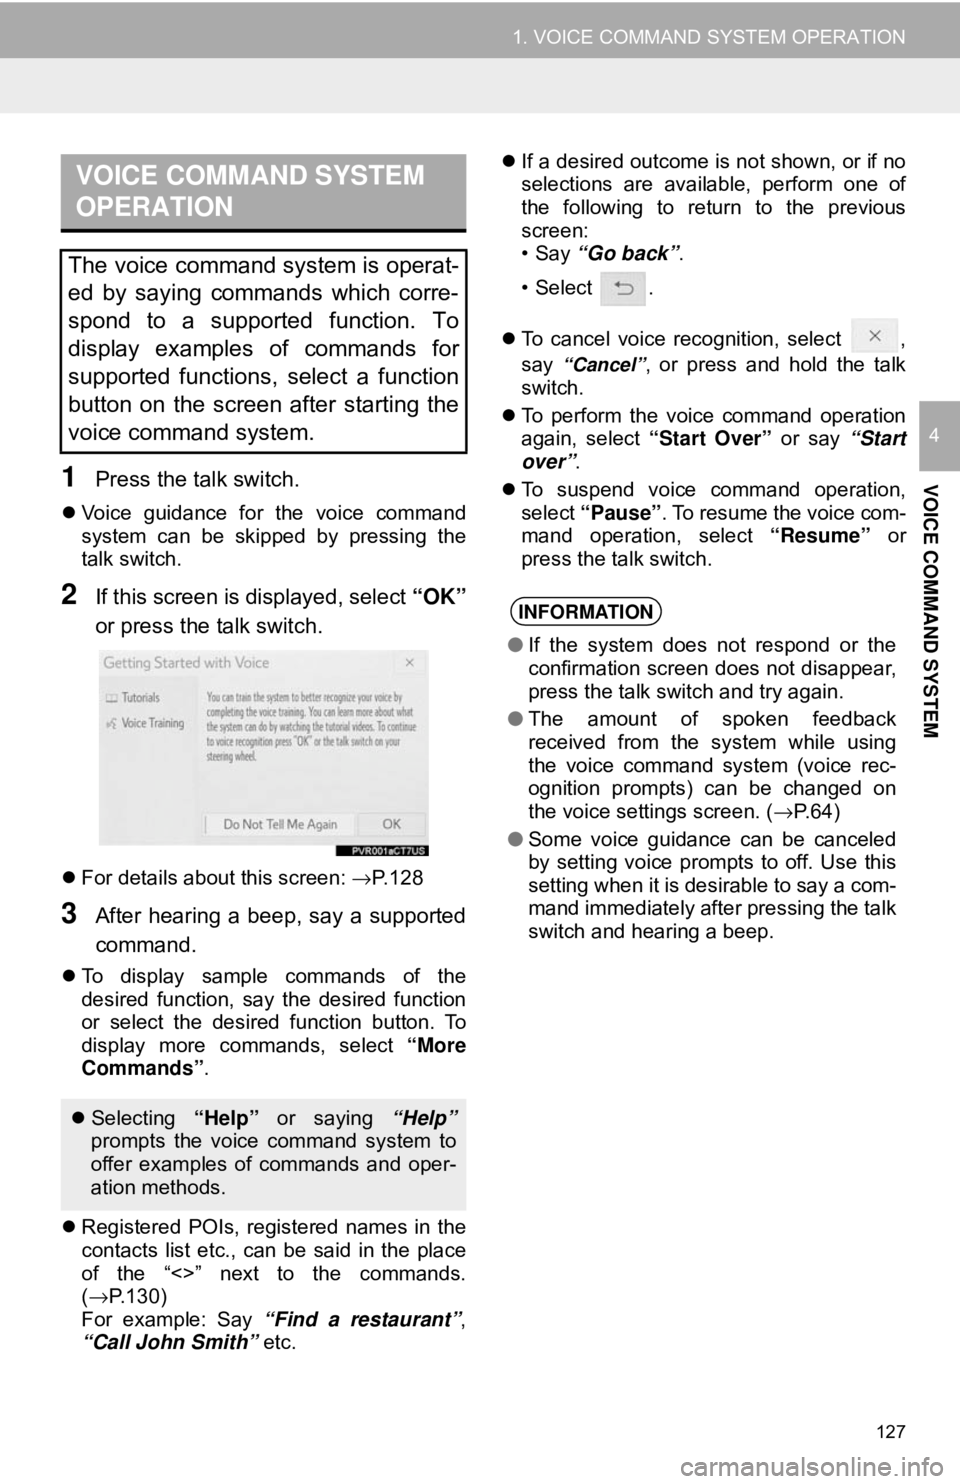
2If this screen is displayed, select “OK”
or press the talk switch.
For details about this screen: →P.128
3After hearing a beep, say a supported
command.
To display sample commands of the
desired function, say the desired function
or select the desired function button. To
display more commands, select “More
Commands”.
Registered POIs, registered names in the
contacts list etc., can be said in the place
of the “<>” next to the commands.
(→ P.130)
For example: Say “Find a restaurant” ,
“Call John Smith” etc.
If a desired outcome is not shown, or if no
selections are available, perform one of
the following to return to the previous
screen:
•Say “Go back” .
•Select .
To cancel voice recognition, select ,
say
“Cancel”, or press and hold the talk
switch.
To perform the voice command operation
again, select “Start Over” or say “Start
over” .
To suspend voice command operation,
select “Pause” . To resume the voice com-
mand operation, select “Resume” or
press the talk switch.
VOICE COMMAND SYSTEM
OPERATION
The voice command system is operat-
ed by saying commands which corre-
spond to a supported function. To
display examples of commands for
supported functions, select a function
button on the screen after starting the
voice command system.
Selecting “Help” or saying “Help”
prompts the voice command system to
offer examples of commands and oper-
ation methods.
INFORMATION
● If the system does not respond or the
confirmation screen does not disappear,
press the talk switch and try again.
● The amount of spoken feedback
received from the system while using
the voice command system (voice rec-
ognition prompts) can be changed on
the voice settings screen. ( →P.64)
● Some voice guidance can be canceled
by setting voice prompts to off. Use this
setting when it is desirable to say a com-
mand immediately after pressing the talk
switch and hearing a beep.
Page 131 of 340
131
1. VOICE COMMAND SYSTEM OPERATION
VOICE COMMAND SYSTEM
4
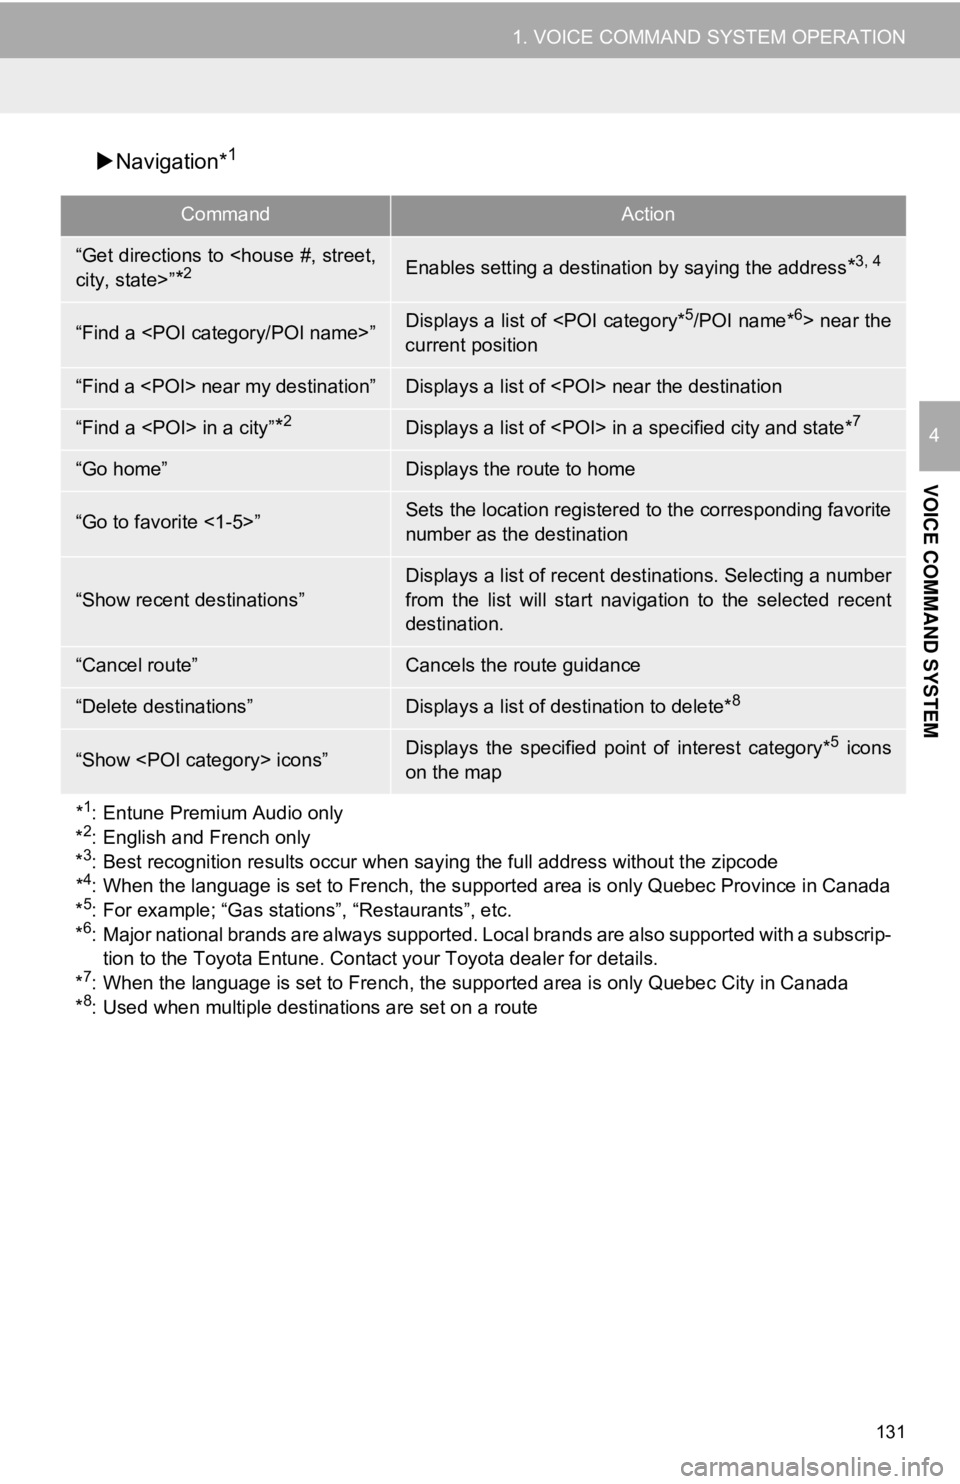
Navigation*1
CommandAction
“Get directions to
*2Enables setting a destination by saying the address*3, 4
“Find a
current position
“Find a
“Find a
“Go home”Displays the route to home
“Go to favorite <1-5>”Sets the location registered to the corresponding favorite
number as the destination
“Show recent destinations”
Displays a list of recent destinations. Selecting a number
from the list will start nav igation to the selected recent
destination.
“Cancel route”Cancels the route guidance
“Delete destinations”Displays a list of destination to delete*8
“Show
on the map
*
1: Entune Premium Audio only
*2: English and French only
*3: Best recognition results occur when saying the full address without the zipcode
*4: When the language is set to French, the supported area is only Quebec Province in Canada
*5: For example; “Gas stations”, “Restaurants”, etc.
*6: Major national brands are always supported. Local brands are also supported with a subscrip-
tion to the Toyota Entune. Contact your Toyota dealer for details.
*
7: When the language is set to French, the s upported area is only Quebec City in Canada
*8: Used when multiple destinations are set on a route
Page 135 of 340
135
VOICE COMMAND SYSTEM
4
2. MOBILE ASSISTANT OPERATION
1. MOBILE ASSISTANT
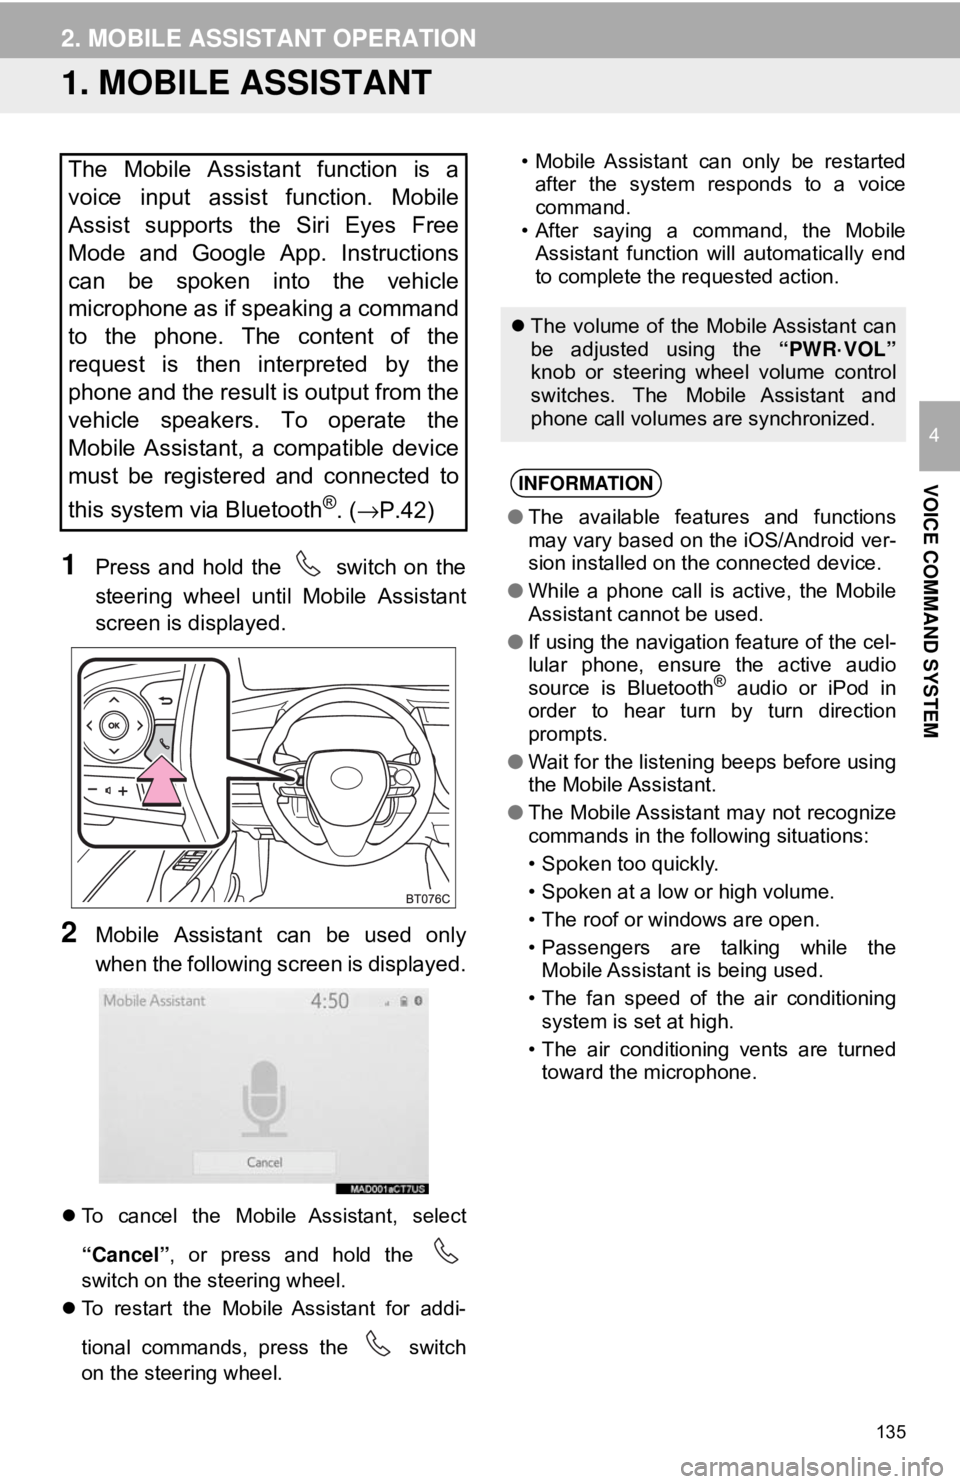
1Press and hold the switch on the
steering wheel until Mobile Assistant
screen is displayed.
2Mobile Assistant can be used only
when the following screen is displayed.
To cancel the Mobile Assistant, select
“Cancel”, or press and hold the
switch on the steering wheel.
To restart the Mobile Assistant for addi-
tional commands, press the switch
on the steering wheel. • Mobile Assistant can only be restarted
after the system responds to a voice
command.
• After saying a command, the Mobile Assistant function will automatically end
to complete the requested action.
The Mobile Assistant function is a
voice input assist function. Mobile
Assist supports the Siri Eyes Free
Mode and Google App. Instructions
can be spoken into the vehicle
microphone as if speaking a command
to the phone. The content of the
request is then interpreted by the
phone and the result is output from the
vehicle speakers. To operate the
Mobile Assistant, a compatible device
must be registered and connected to
this system via Bluetooth
®. ( →P.42)
The volume of the Mobile Assistant can
be adjusted using the “PWR·VOL”
knob or steering wheel volume control
switches. The Mobile Assistant and
phone call volumes are synchronized.
INFORMATION
● The available features and functions
may vary based on the iOS/Android ver-
sion installed on the connected device.
● While a phone call is active, the Mobile
Assistant cannot be used.
● If using the navigation feature of the cel-
lular phone, ensure the active audio
source is Bluetooth
® audio or iPod in
order to hear turn by turn direction
prompts.
● Wait for the listening beeps before using
the Mobile Assistant.
● The Mobile Assistant may not recognize
commands in the following situations:
• Spoken too quickly.
• Spoken at a low or high volume.
• The roof or windows are open.
• Passengers are talking while the
Mobile Assistant is being used.
• The fan speed of the air conditioning system is set at high.
• The air conditioning vents are turned toward the microphone.
Page 178 of 340
178
3. PANORAMIC VIEW MONITOR
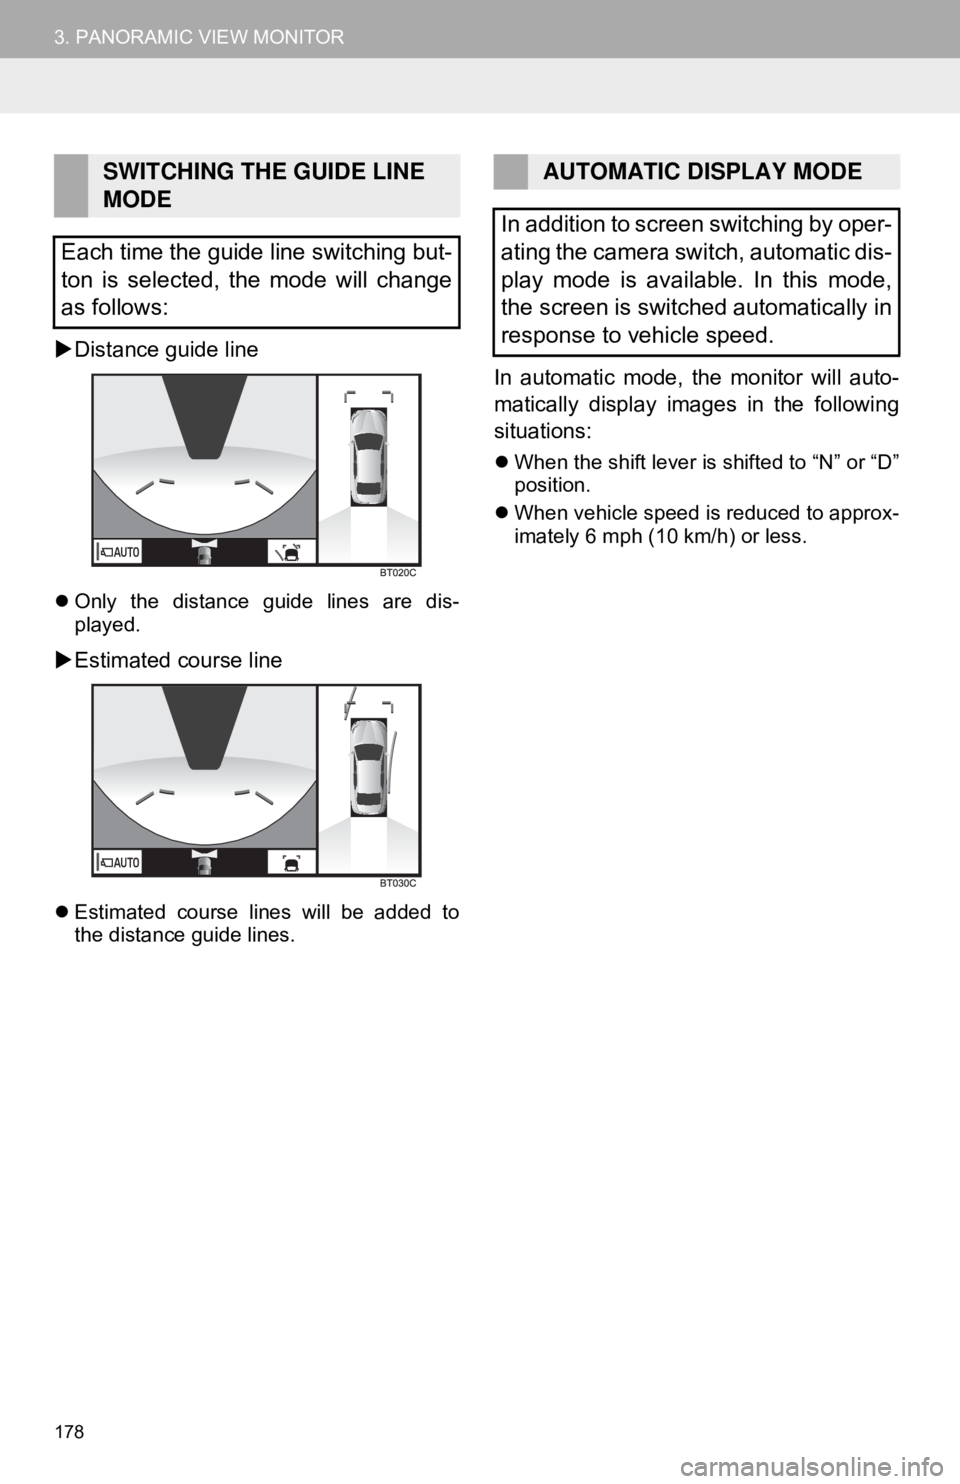
Distance guide line
Only the distance guide lines are dis-
played.
Estimated course line
Estimated course lines will be added to
the distance guide lines.
In automatic mode, the monitor will auto-
matically display images in the following
situations:
When the shift lever is shifted to “N” or “D”
position.
When vehicle speed is reduced to approx-
imately 6 mph (10 km/h) or less.
SWITCHING THE GUIDE LINE
MODE
Each time the guide line switching but-
ton is selected, the mode will change
as follows:AUTOMATIC DISPLAY MODE
In addition to screen switching by oper-
ating the camera switch, automatic dis-
play mode is available. In this mode,
the screen is switched automatically in
response to vehicle speed.
Page 180 of 340
180
3. PANORAMIC VIEW MONITOR
In automatic mode, the monitor will auto-
matically display images in the following
situations:
• When the shift lever is shifted to “N” or “D” position.
• When vehicle speed is reduced to approximately 6 mph (10 km/h) or less.
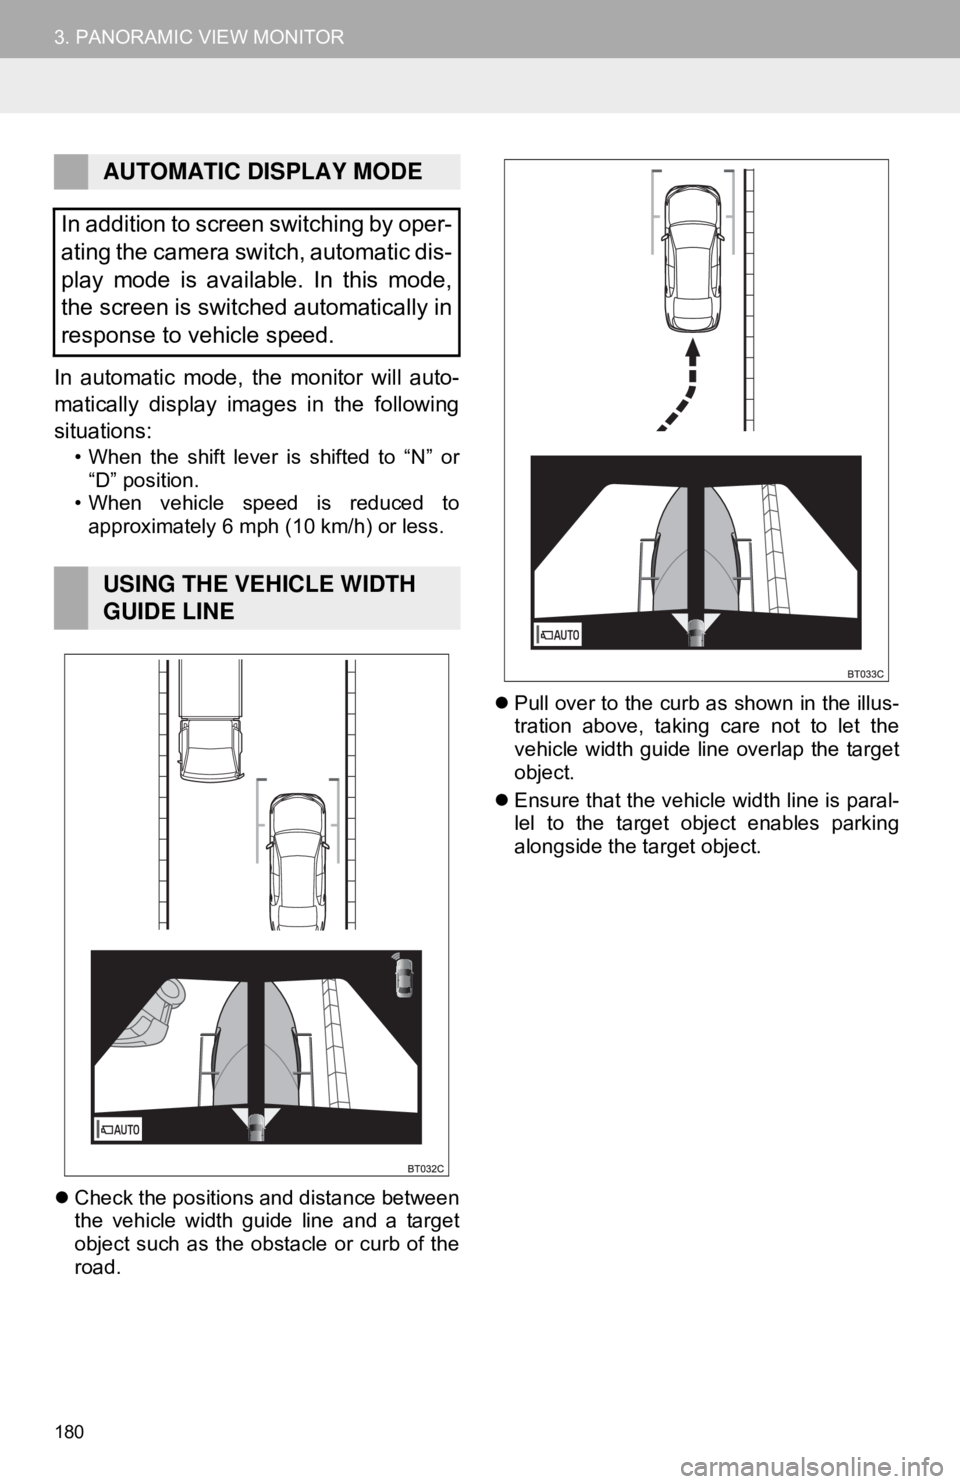
Check the positions and distance between
the vehicle width guide line and a target
object such as the obstacle or curb of the
road.
Pull over to the curb as shown in the illus-
tration above, taking care not to let the
vehicle width guide line overlap the target
object.
Ensure that the vehicle width line is paral-
lel to the target object enables parking
alongside the target object.
AUTOMATIC DISPLAY MODE
In addition to screen switching by oper-
ating the camera switch, automatic dis-
play mode is available. In this mode,
the screen is switched automatically in
response to vehicle speed.
USING THE VEHICLE WIDTH
GUIDE LINE
Page 219 of 340
219
1. PHONE OPERATION (HANDS-FREE SYSTEM FOR CELLULAR PHONES)
PHONE
7
■EDITING QUICK REPLY MESSAG-
ES
1Select corresponding to the de-
sired message to edit.
2Select “OK” when editing is complet-
ed.
*: Entune Premium Audio only
■CALLING FROM E-MAIL/SMS/MMS
MESSAGE DISPLAY
1Display the message screen.
(→P.216)
2Select the desired message.
3Select , or press the switch on
the steering wheel.
If there are 2 or more phone numbers,
select the desired number.
4Check that the “Dialing...” screen is
displayed.
This operation cannot be performed
while driving.
INFORMATION
● To reset the edit quick reply messages,
select “Default” .
● “Quick Message 1” (“I am driving and
will arrive in approximately [ETA]
minutes.”)*:
This message cannot be edited and will
automatically fill in [ETA] with the
navigation calculated estimated time of
arrival on the confirm message screen.
If there are waypoints set, [ETA] to the
next waypoint will be shown.
If there is no route currently set in the
navigation system, “Quick Message 1”
cannot be selected.
CALLING THE MESSAGE
SENDER
Calls can be made to an e-mail/SMS/
MMS message sender’s phone num-
ber.
This operation can be performed while
driving.