turn signal TOYOTA CAMRY 2018 (in English) User Guide
[x] Cancel search | Manufacturer: TOYOTA, Model Year: 2018, Model line: CAMRY, Model: TOYOTA CAMRY 2018Pages: 612, PDF Size: 10.63 MB
Page 399 of 612
3995-4. Other interior features
CAMRY_U (01999-06139)
5
Interior features
■Reprogramming a single HomeLink® button
When the following procedure is pe rformed, buttons which already
have devices registered to them can be overwritten:
With one hand, press and hold the desired HomeLink
® button.
When the HomeLink
® indicator starts flashing orange, continue
to hold the HomeLink® button and perform “Programming the
HomeLink®” (it takes 20 seconds for the HomeLink® indicator
to start flashing).
Press the appropriate HomeLink
® button. The HomeLink® indicator
light should turn on.
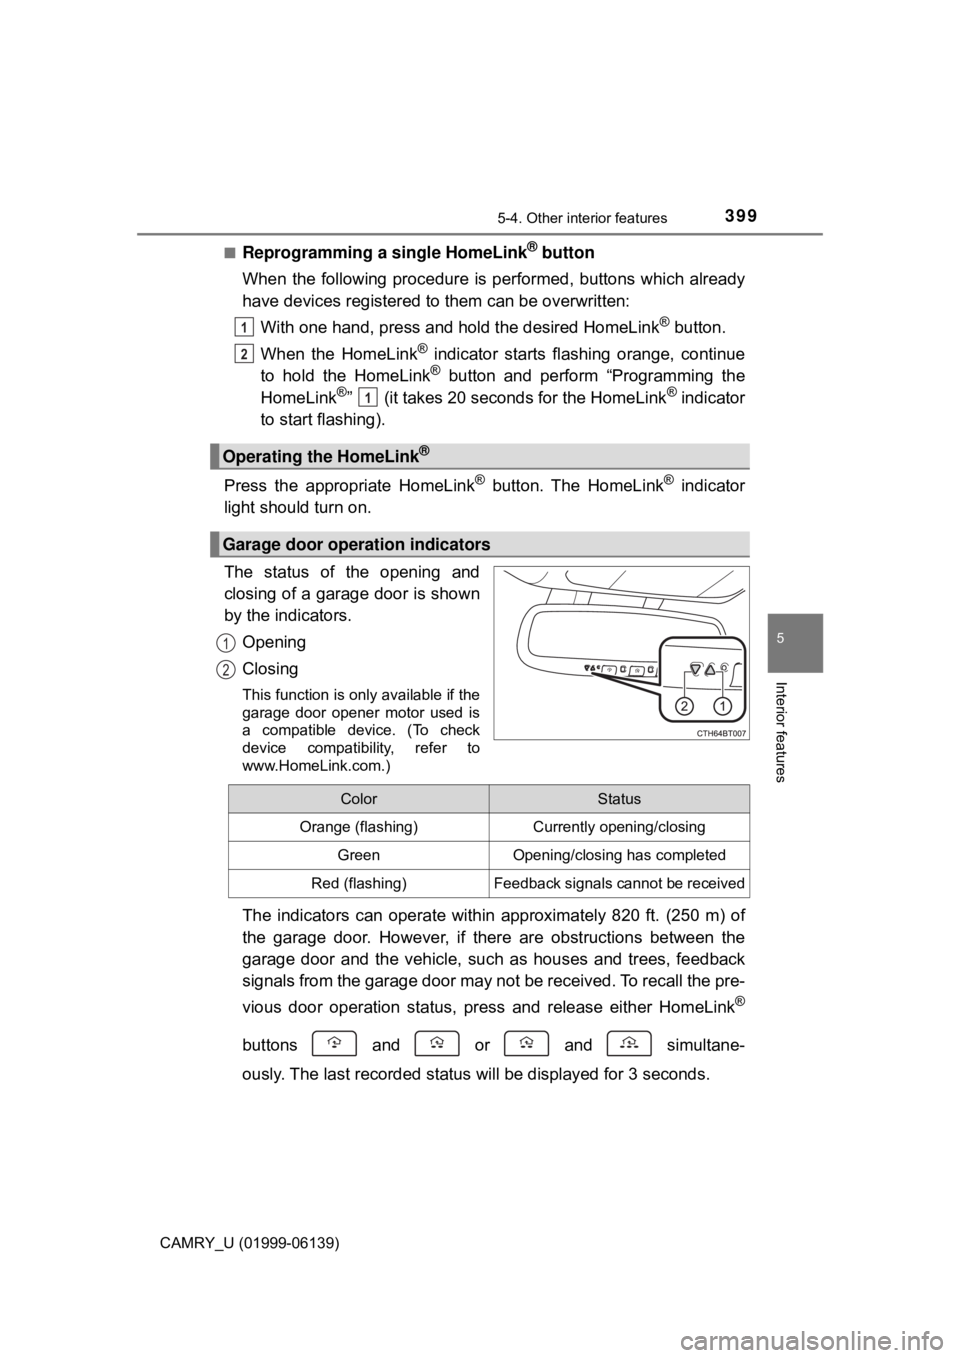
The status of the opening and
closing of a garage door is shown
by the indicators.
Opening
Closing
This function is only available if the
garage door opener motor used is
a compatible device. (To check
device compatibility, refer to
www.HomeLink.com.)
The indicators can operate within approximately 820 ft. (250 m) of
the garage door. However, if there are obstructions between the
garage door and the vehicle, such as houses and trees, feedback
signals from the garage door may not be received. To recall the pre-
vious door operation status, pres s and release either HomeLink
®
buttons and or and simultane-
ously. The last recorded status will be displayed for 3 seconds.
Operating the HomeLink®
Garage door operation indicators
1
2
1
1
2
ColorStatus
Orange (flashing)Currently opening/closing
GreenOpening/closing has completed
Red (flashing)Feedback signals cannot be received
Page 404 of 612
4045-4. Other interior features
CAMRY_U (01999-06139)
■Safety Connect Services Information
●Phone calls using the vehicle’s Bluetooth® technology will not be possible
during Safety Connect.
● Safety Connect is available beginning Fall 2009 on select Toyota models (in
the contiguous United States only). Contact with the Safety Connect
response center is dependent upon the telematics device being in operative
condition, cellular connection availability, and GPS satellite signal reception,
which can limit the ability to reach the response center or receive emer-
gency service support. Enrollment and Telematics Subscription Service
Agreement are required. A variety of subscription terms are available;
charges vary by subscription term selected and location.
● Automatic Collision Notification, Emergency Assistance and Stolen Vehicle
Location are available in the United States, including Hawaii and Alaska,
Puerto Rico and Canada, and Enhanced Roadside Assistance are available
in the United States, Puerto Rico and Canada.
● Automatic Collision Notification, Emergency Assistance, Stolen Vehicle and
Enhanced Road Assistance are not available in the U.S. Virgin Islands.
For vehicles first sold in the U.S. Virgin Islands, no Safety Connect services
are available in or outside the U.S. Virgin Islands.
● Safety Connect services are not subject to section 255 of the Telecommuni-
cations Act and the device is not TTY compatible.
■ Languages
The Safety Connect response center will offer support in multiple languages.
The Safety Connect system will offer voice prompts in English, Spanish, and
French. Please indicate your language of choice when enrolling.
■ When contacting th e response center
You may be unable to contact the response center if the network is busy.
When the engine switch is turned to IGNITION ON mode, the red indi-
cator light comes on for 2 seconds then turns off. Afterward, the green
indicator light comes on, indicating that the service is active.
The following indicator light pattern s indicate specific system usage
conditions:
● Green indicator light on = Active service
● Green indicator light flashing = Sa fety Connect call in process
● Red indicator light (except at vehicle start-up) = System malfunction
(contact your Toyota dealer)
● No indicator light (off) = Safety Connect service not active
Safety Connect LE D light Indicators
Page 473 of 612
4736-3. Do-it-yourself maintenance
CAMRY_U (01999-06139)
6
Maintenance and care
Check the wattage of the light bulb to be replaced. (→P. 550)
Light bulbs
You may replace the following bulb s yourself. The difficulty level
of replacement varies depending on the bulb. If necessary bulb
replacement seems difficult to perform, contact your Toyota
dealer.
For more information about replacing other light bulbs, contact
your Toyota dealer.
Preparing for light bulb replacement
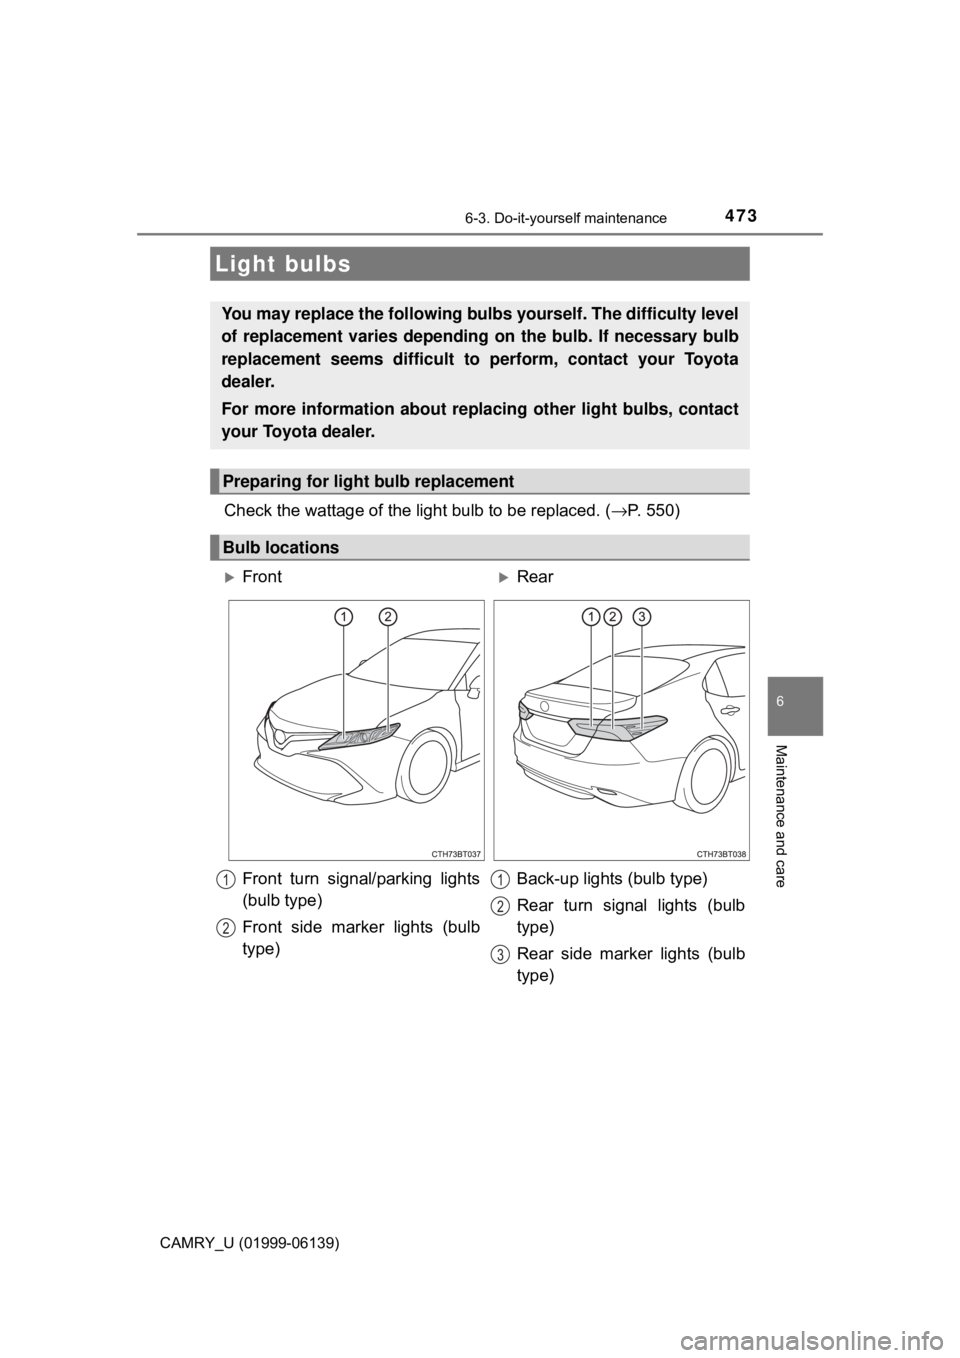
Bulb locations
FrontRear
Front turn signal/parking lights
(bulb type)
Front side marker lights (bulb
type) Back-up lights (bulb type)
Rear turn signal lights (bulb
type)
Rear side marker lights (bulb
type)
1
2
1
2
3
Page 474 of 612
4746-3. Do-it-yourself maintenance
CAMRY_U (01999-06139)■
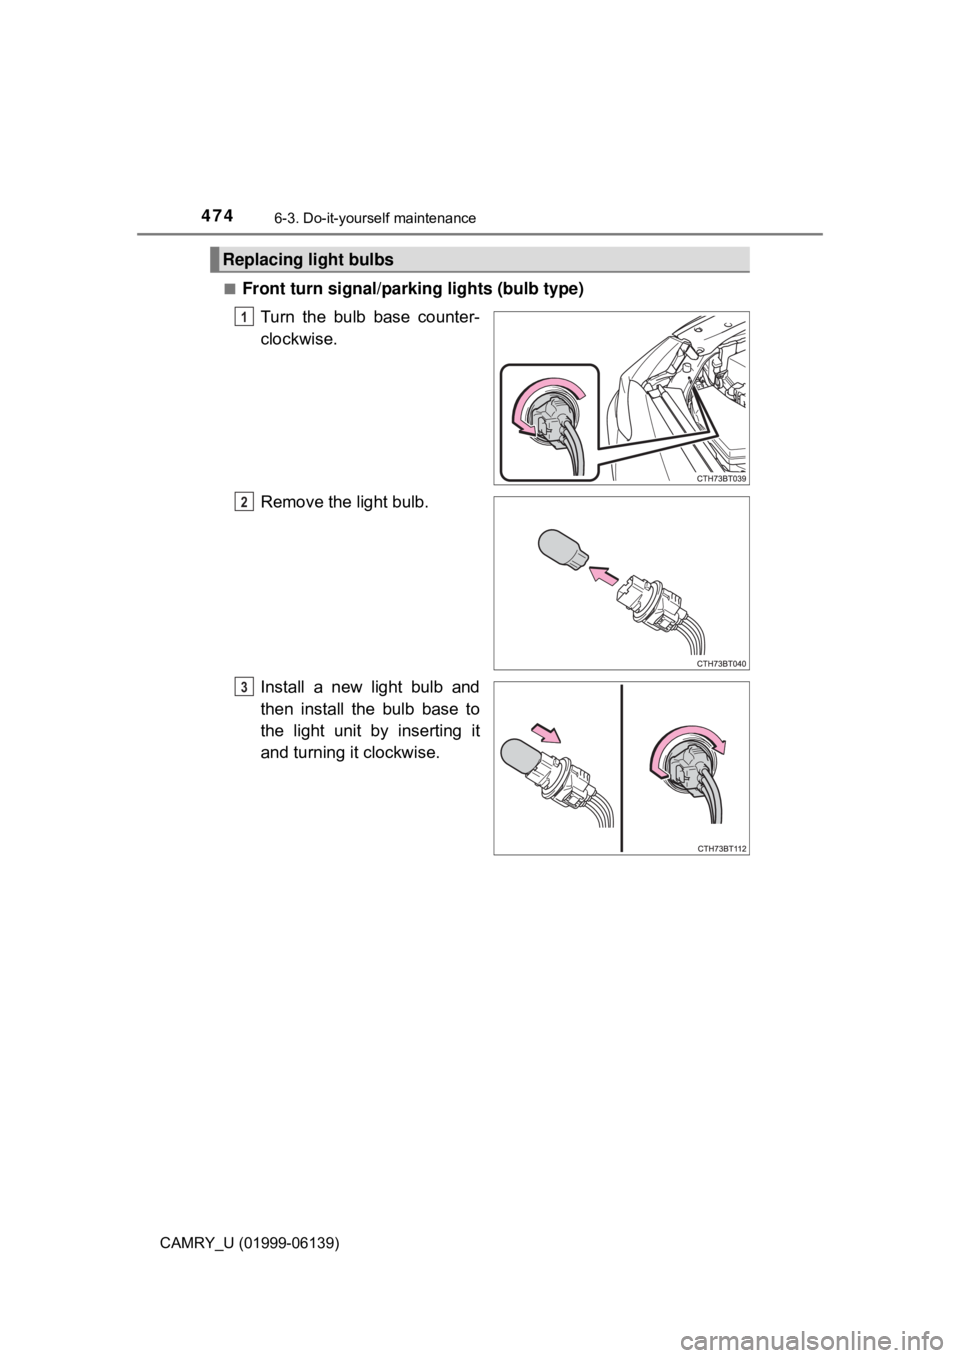
Front turn signal/parking lights (bulb type)
Turn the bulb base counter-
clockwise.
Remove the light bulb.
Install a new light bulb and
then install the bulb base to
the light unit by inserting it
and turning it clockwise.
Replacing light bulbs
1
2
3
Page 480 of 612
4806-3. Do-it-yourself maintenance
CAMRY_U (01999-06139)■
Rear turn signal lights (bulb type
) and rear side marker lights
(bulb type)
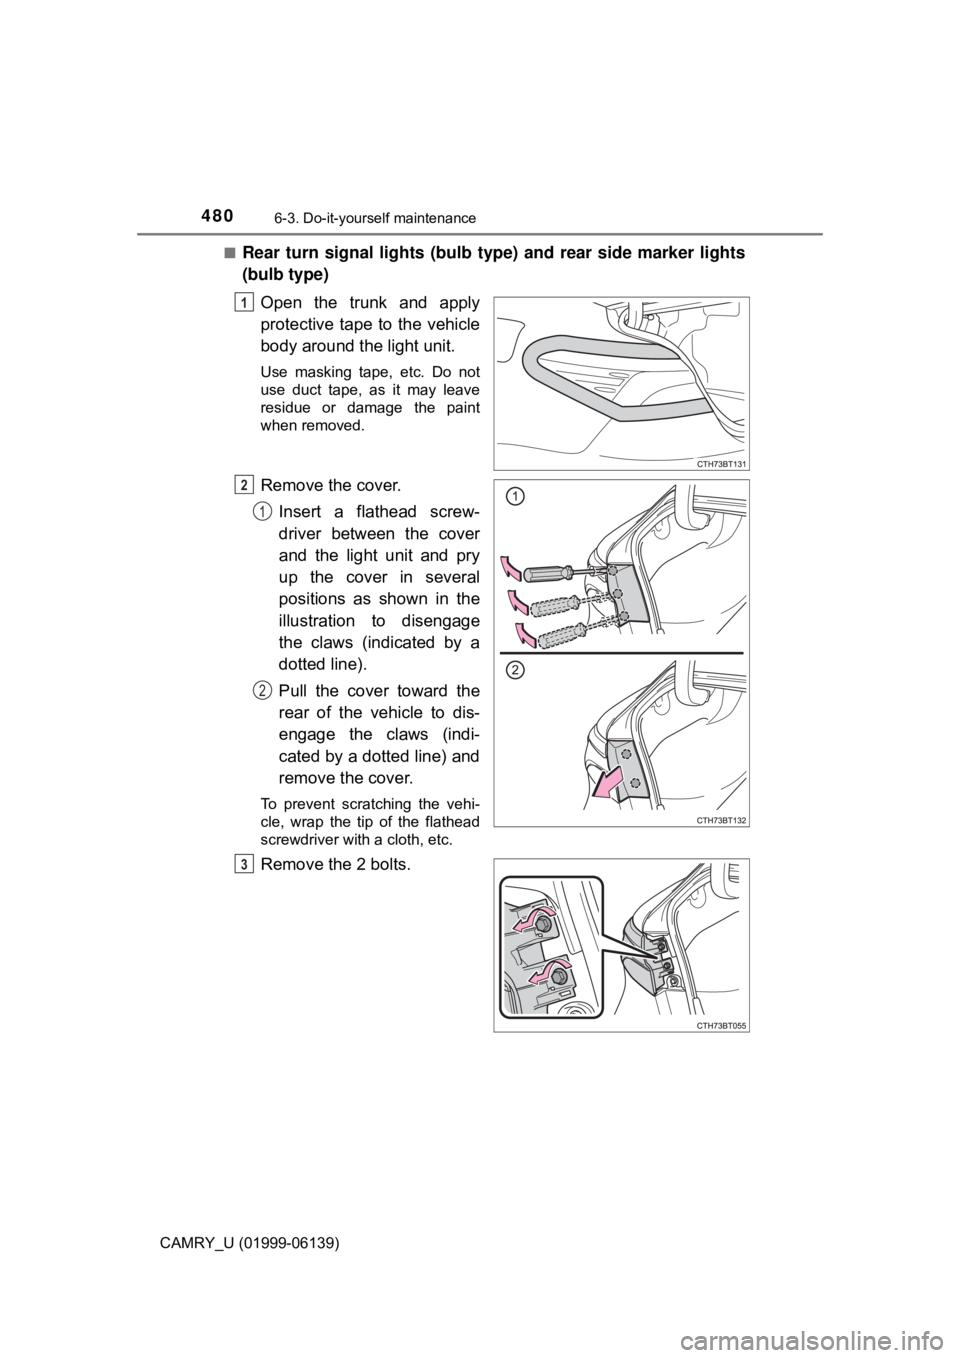
Open the trunk and apply
protective tape to the vehicle
body around the light unit.
Use masking tape, etc. Do not
use duct tape, as it may leave
residue or damage the paint
when removed.
Remove the cover.Insert a flathead screw-
driver between the cover
and the light unit and pry
up the cover in several
positions as shown in the
illustration to disengage
the claws (indicated by a
dotted line).
Pull the cover toward the
rear of the vehicle to dis-
engage the claws (indi-
cated by a dotted line) and
remove the cover.
To prevent scratching the vehi-
cle, wrap the tip of the flathead
screwdriver with a cloth, etc.
Remove the 2 bolts.
1
2
1
2
3
Page 481 of 612
4816-3. Do-it-yourself maintenance
CAMRY_U (01999-06139)
6
Maintenance and care
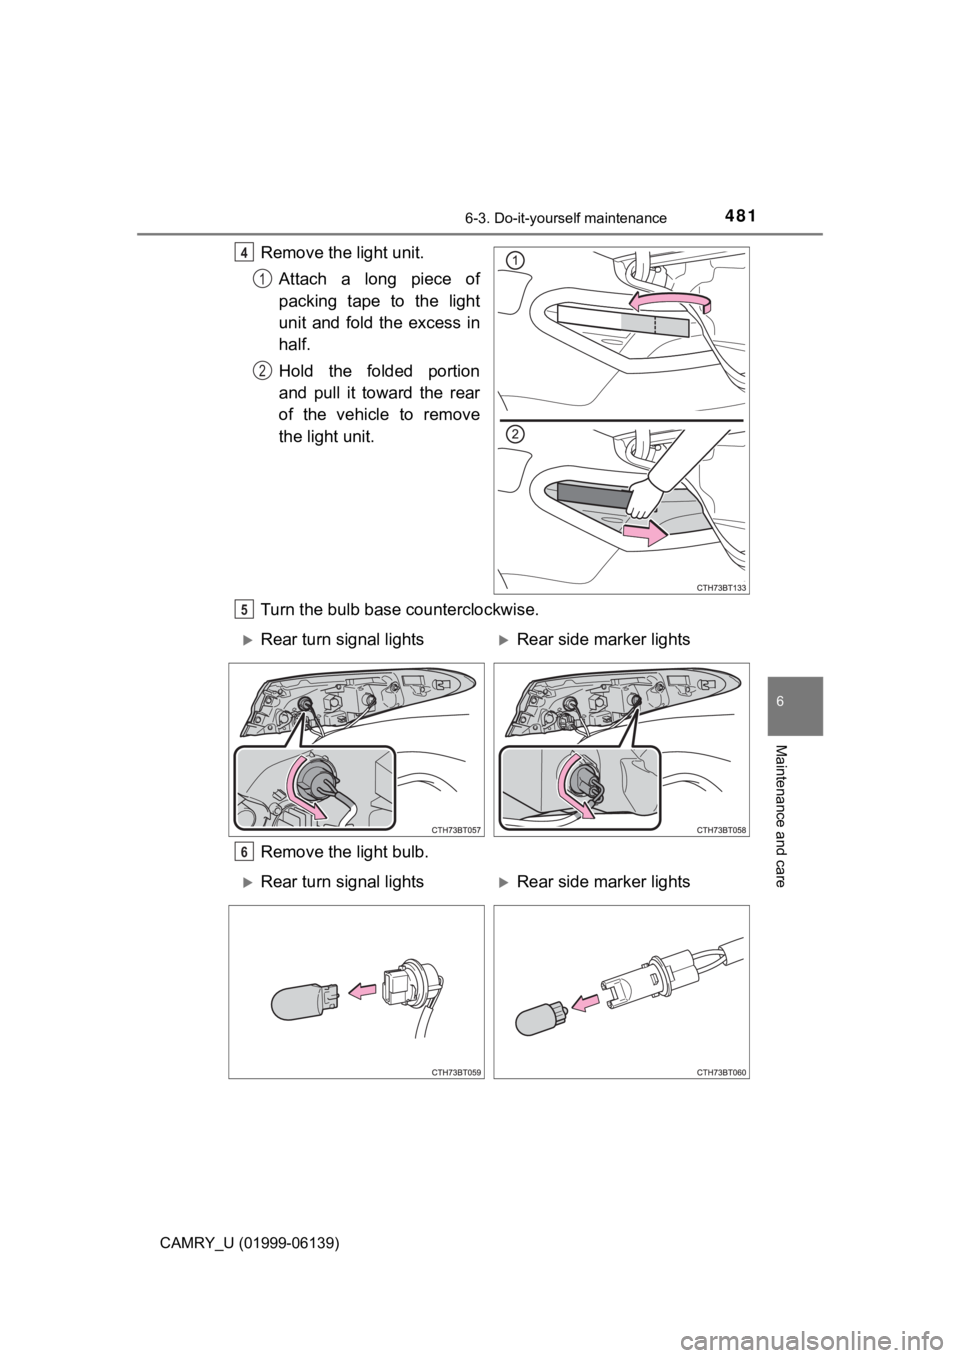
Remove the light unit.Attach a long piece of
packing tape to the light
unit and fold the excess in
half.
Hold the folded portion
and pull it toward the rear
of the vehicle to remove
the light unit.
Turn the bulb base counterclockwise.
Remove the light bulb.4
1
2
5
Rear turn signal lightsRear side marker lights
6
Rear turn signal lightsRear side marker lights
Page 482 of 612
4826-3. Do-it-yourself maintenance
CAMRY_U (01999-06139)
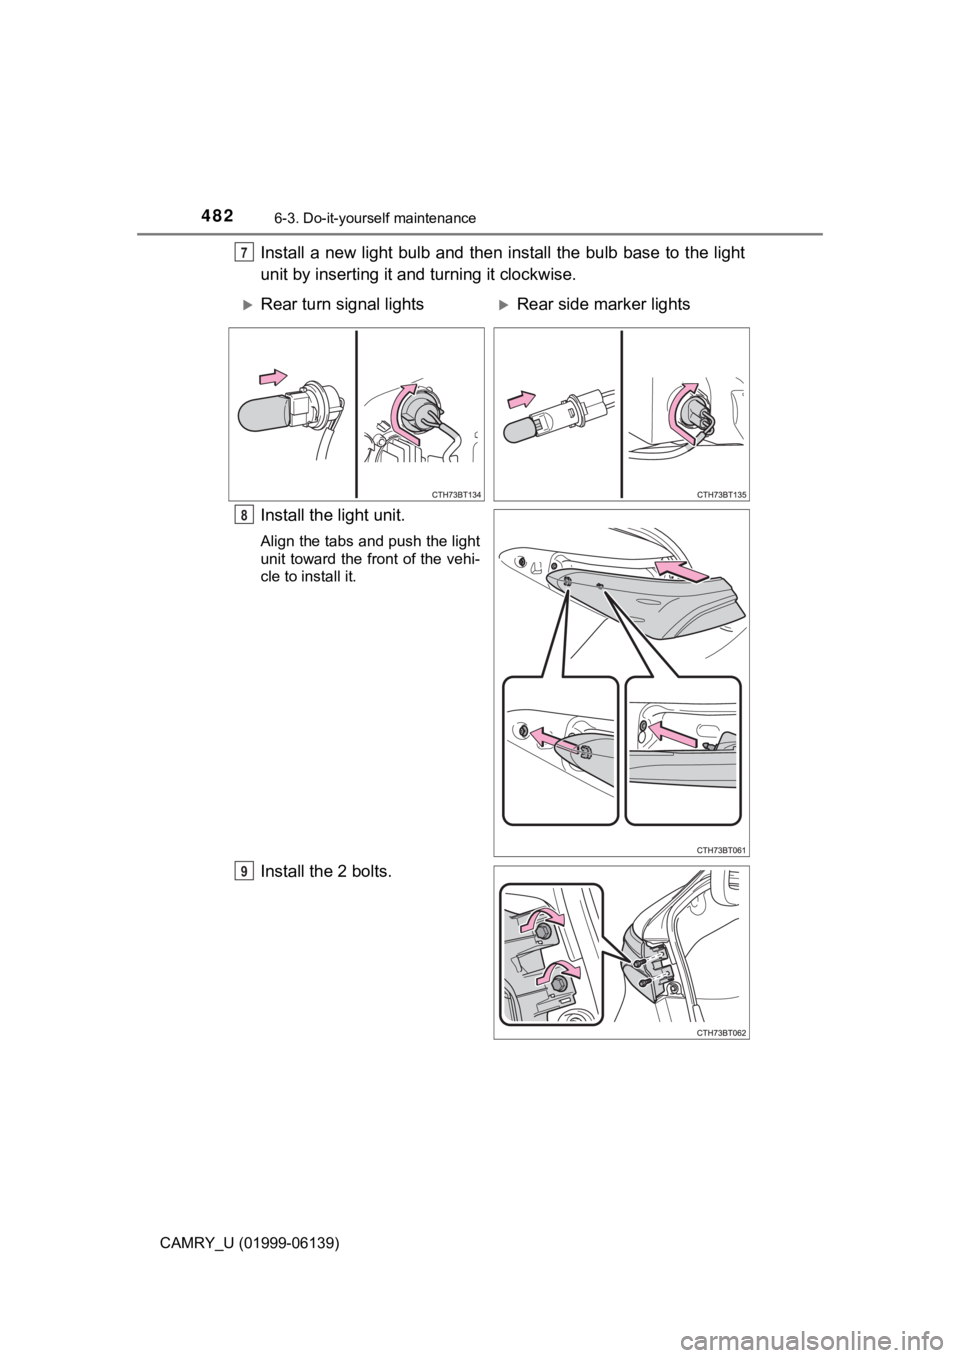
Install a new light bulb and then install the bulb base to the light
unit by inserting it and turning it clockwise.
Install the light unit.
Align the tabs and push the light
unit toward the front of the vehi-
cle to install it.
Install the 2 bolts.
7
Rear turn signal lightsRear side marker lights
8
9
Page 483 of 612
4836-3. Do-it-yourself maintenance
CAMRY_U (01999-06139)
6
Maintenance and care
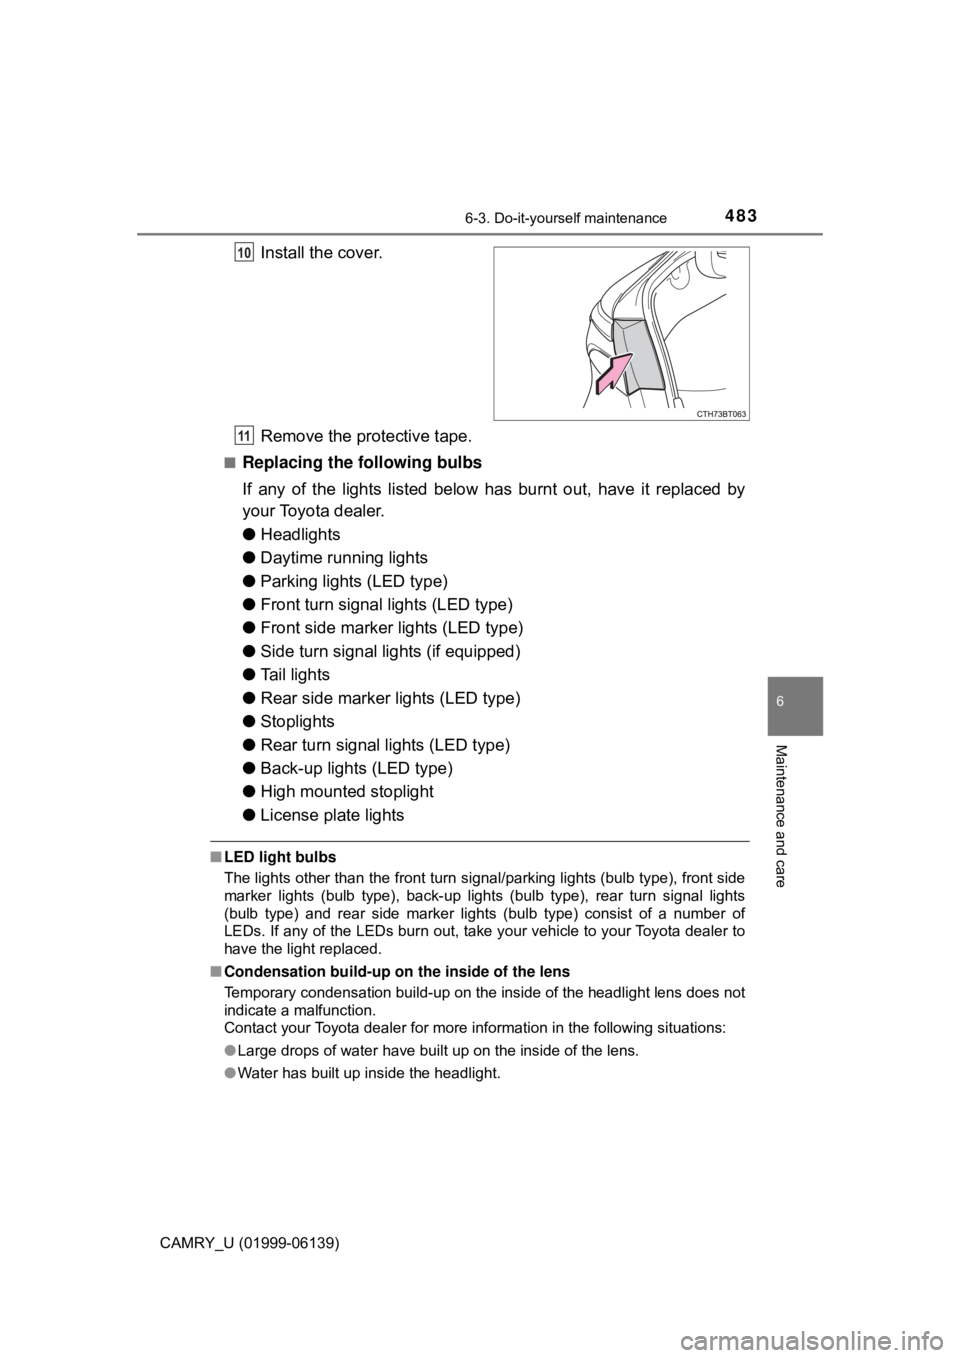
Install the cover.
Remove the protective tape.
■Replacing the following bulbs
If any of the lights listed below has burnt out, have it replaced by
your Toyota dealer.
● Headlights
● Daytime running lights
● Parking lights (LED type)
● Front turn signal lights (LED type)
● Front side marker lights (LED type)
● Side turn signal lights (if equipped)
● Tail lights
● Rear side marker lights (LED type)
● Stoplights
● Rear turn signal lights (LED type)
● Back-up lights (LED type)
● High mounted stoplight
● License plate lights
■LED light bulbs
The lights other than the front turn signal/parking lights (bulb type), front side
marker lights (bulb type), back-up lights (bulb type), rear turn signal lights
(bulb type) and rear side marker lights (bulb type) consist of a number of
LEDs. If any of the LEDs burn out, take your vehicle to your Toyota dealer to
have the light replaced.
■ Condensation build-up on the inside of the lens
Temporary condensation build-up on the inside of the headlight lens does not
indicate a malfunction.
Contact your Toyota dealer for more information in the following situations:
●Large drops of water have built up on the inside of the lens.
● Water has built up inside the headlight.
10
11
Page 486 of 612
486
CAMRY_U (01999-06139)
7-1. Essential information
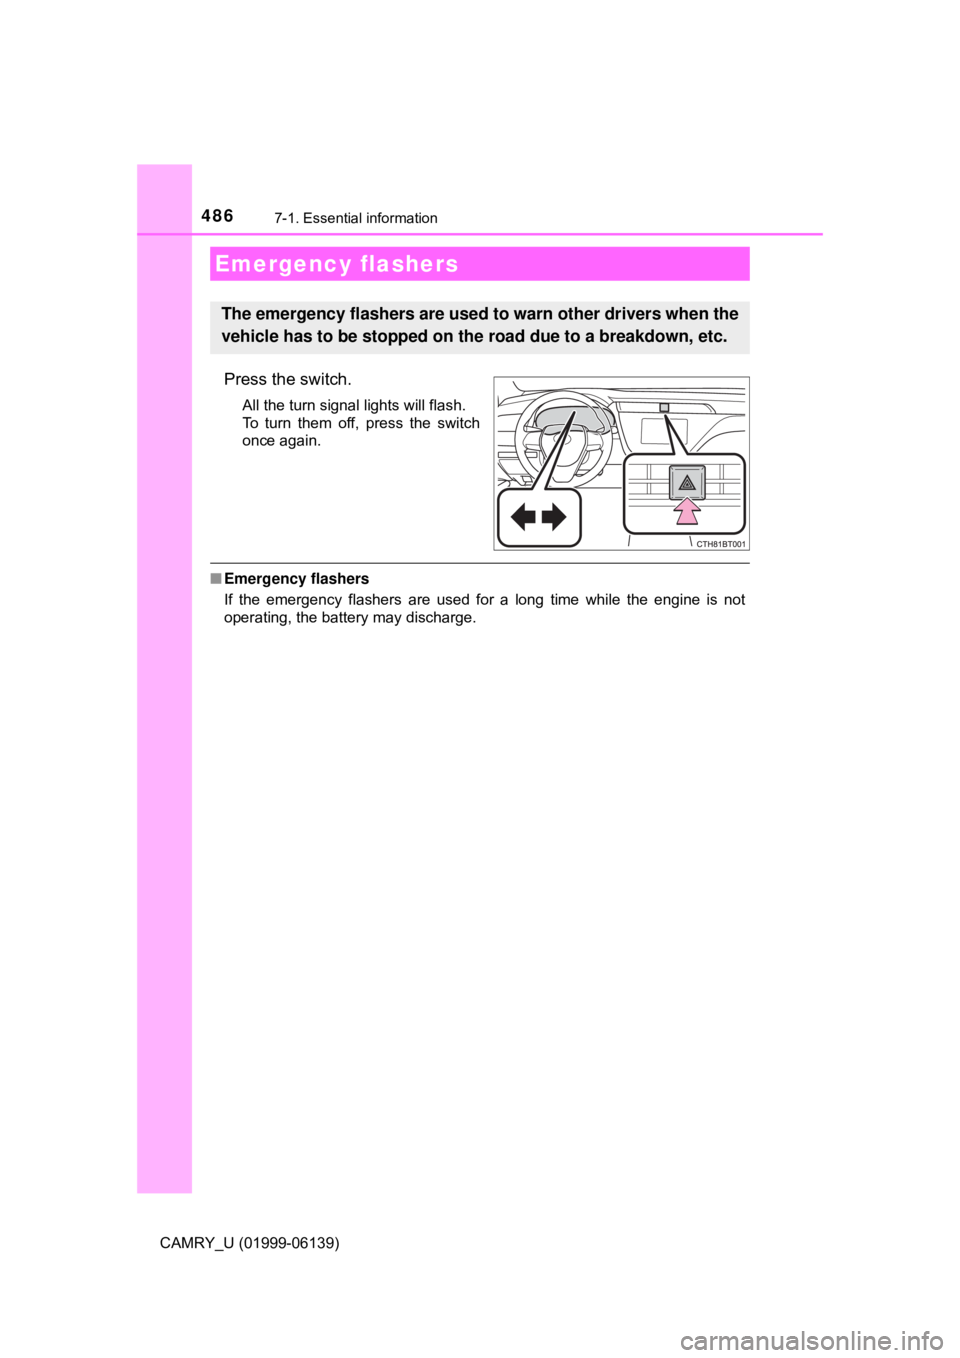
Press the switch.
All the turn signal lights will flash.
To turn them off, press the switch
once again.
■Emergency flashers
If the emergency flashers are used for a long time while the engine is not
operating, the battery may discharge.
Emergency flashers
The emergency flashers are used to warn other drivers when the
vehicle has to be stopped on the road due to a breakdown, etc.
Page 550 of 612
5508-1. Specifications
CAMRY_U (01999-06139)
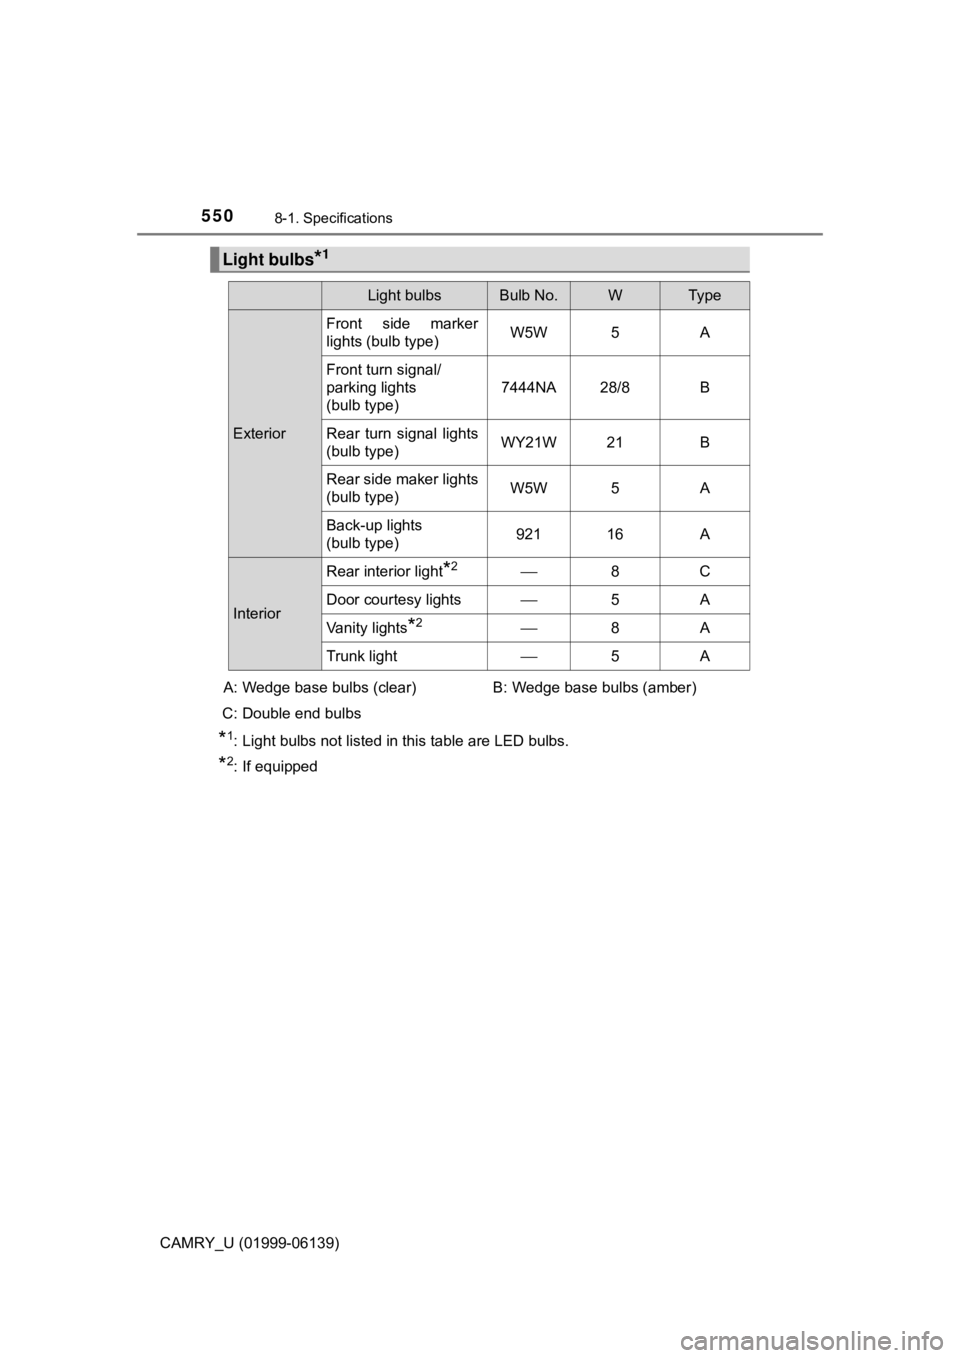
*1: Light bulbs not listed in this table are LED bulbs.
*2: If equipped
Light bulbs*1
Light bulbsBulb No.WTy p e
ExteriorFront side marker
lights (bulb type)
W5W 5 A
Front turn signal/
parking lights
(bulb type) 7444NA 28/8 B
Rear turn signal lights
(bulb type) WY21W 21 B
Rear side maker lights
(bulb type) W5W 5 A
Back-up lights
(bulb type) 921 16 A
InteriorRear interior light
*2⎯
8C
Door courtesy lights ⎯5A
Vanity lights
*2⎯ 8A
Trunk light ⎯5A
A: Wedge base bulbs (clear)
C: Double end bulbs B: Wedge base bulbs (amber)