TOYOTA CAMRY HYBRID 2014 XV50 / 9.G Owners Manual
CAMRY HYBRID 2014 XV50 / 9.G
TOYOTA
TOYOTA
https://www.carmanualsonline.info/img/14/6283/w960_6283-0.png
TOYOTA CAMRY HYBRID 2014 XV50 / 9.G Owners Manual
Trending: service schedule, door lock, wheelbase, fuel consumption, Heater, radio, oil dipstick
Page 471 of 612
471
4-3. Do-it-yourself maintenance
4
Maintenance and care
Light bulbs
You may replace the following bulbs by yourself. The difficulty level
of replacement varies depending on the bulb. If necessary bulb
replacement seems difficult to perfor m, contact your Toyota dealer.
For more information about replacing other light bulbs, contact your
Toyota dealer.
■ Preparing for light bulb replacement
Check the wattage of the light bulb to be replaced. ( P. 560)
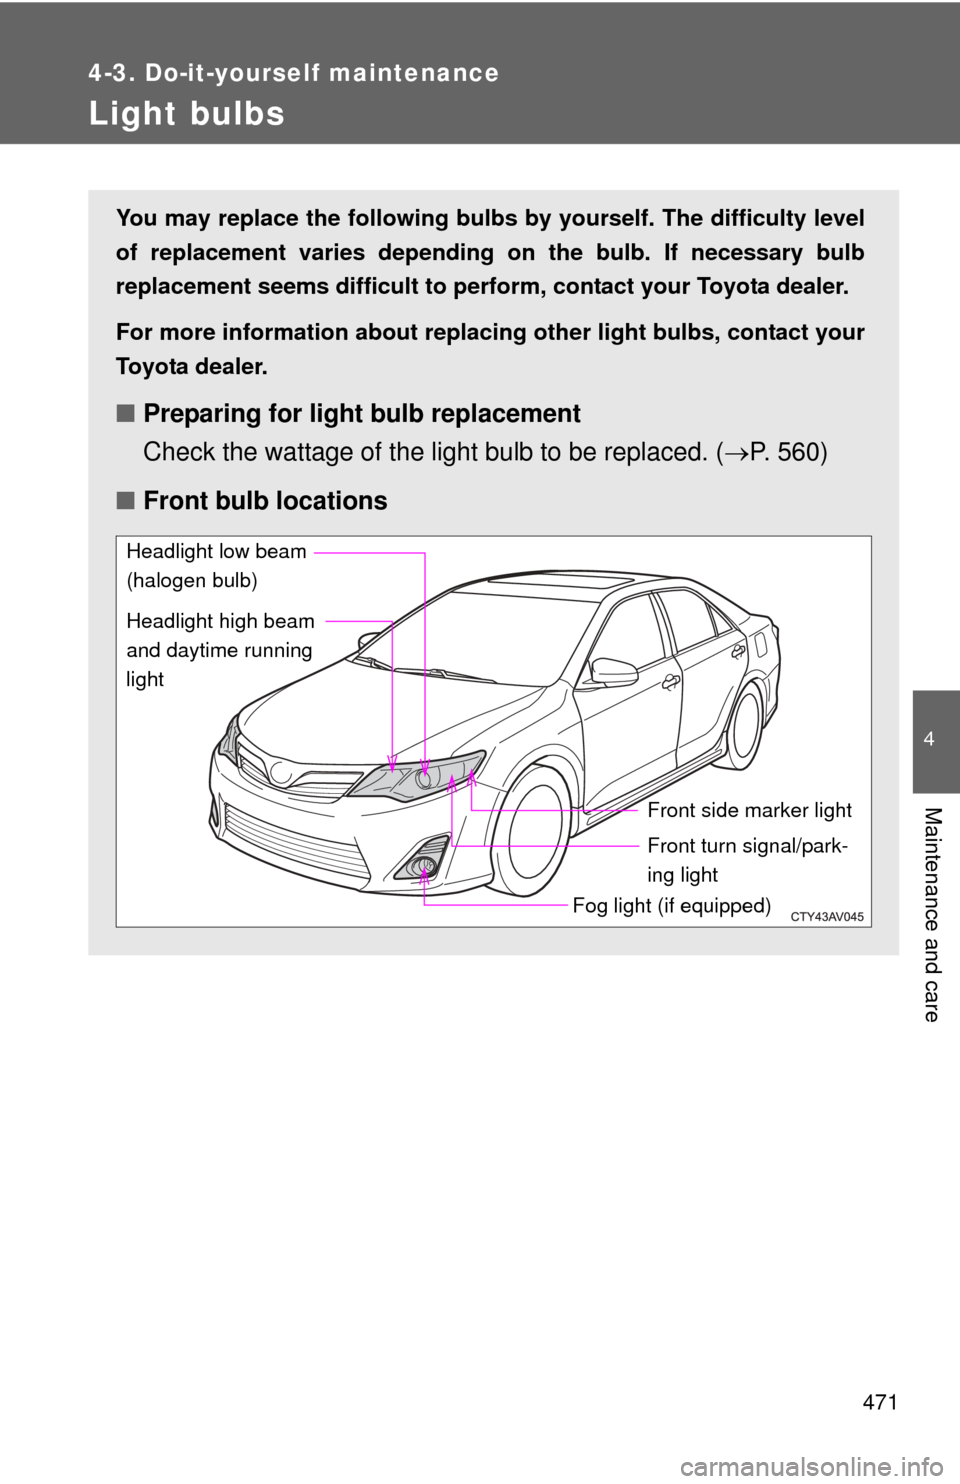
■ Front bulb locations
Headlight low beam
(halogen bulb)
Headlight high beam
and daytime running
light
Front side marker light
Front turn signal/park-
ing light
Fog light (if equipped)
Page 472 of 612
472 4-3. Do-it-yourself maintenance
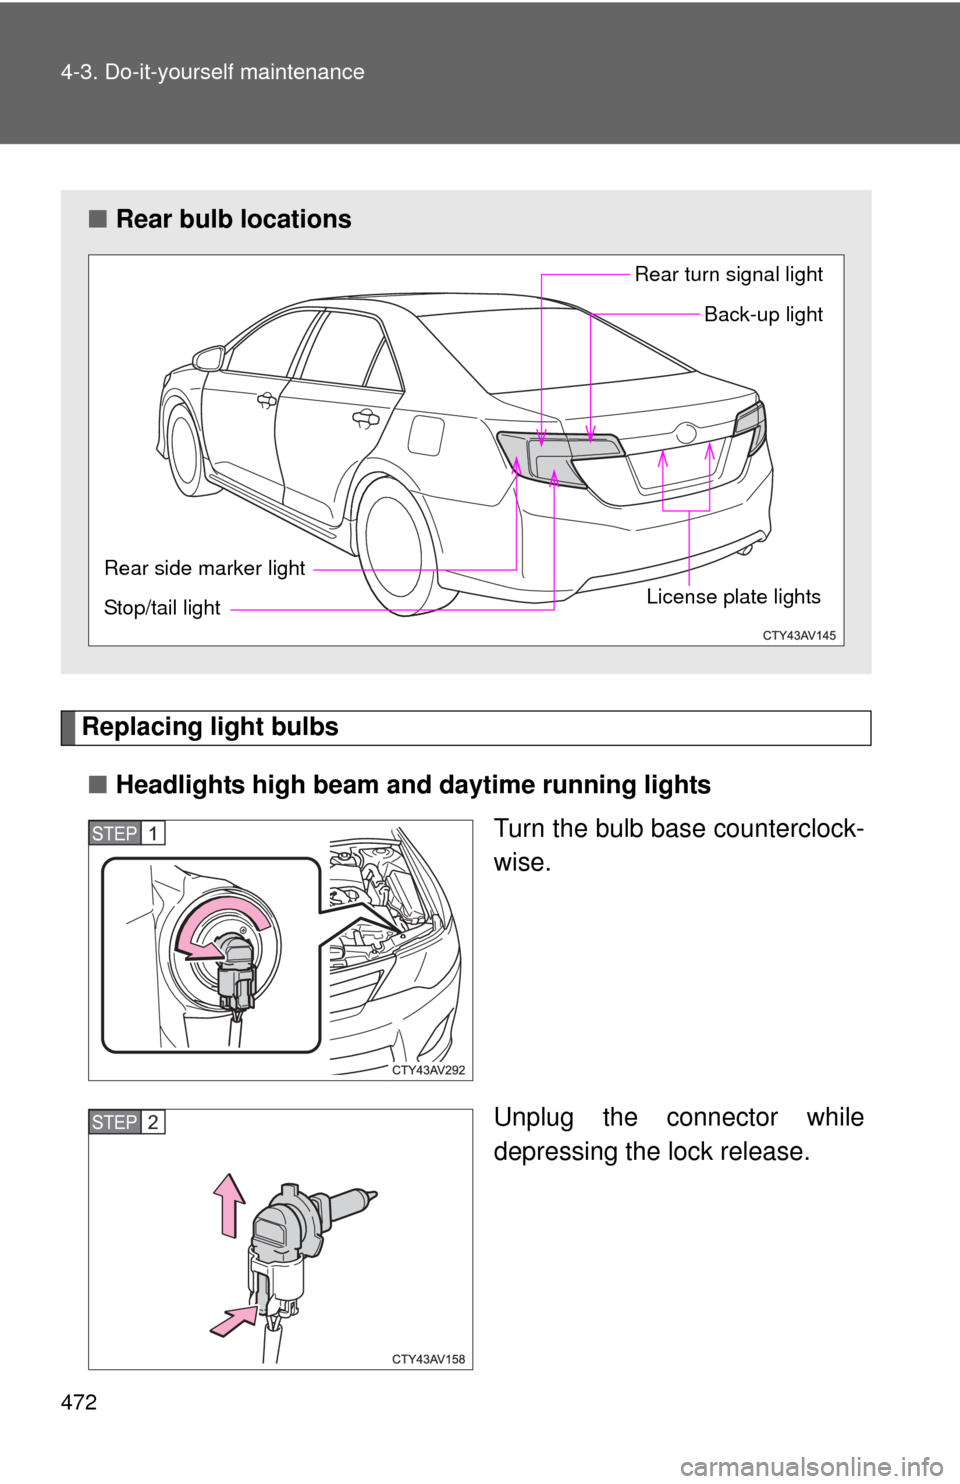
Replacing light bulbs■ Headlights high beam and daytime running lights
Turn the bulb base counterclock-
wise.
Unplug the connector while
depressing the lock release.
■Rear bulb locations
Rear turn signal light
Stop/tail light License plate lightsBack-up light
Rear side marker light
STEP1
STEP2
Page 473 of 612
473
4-3. Do-it-yourself maintenance
4
Maintenance and care
■
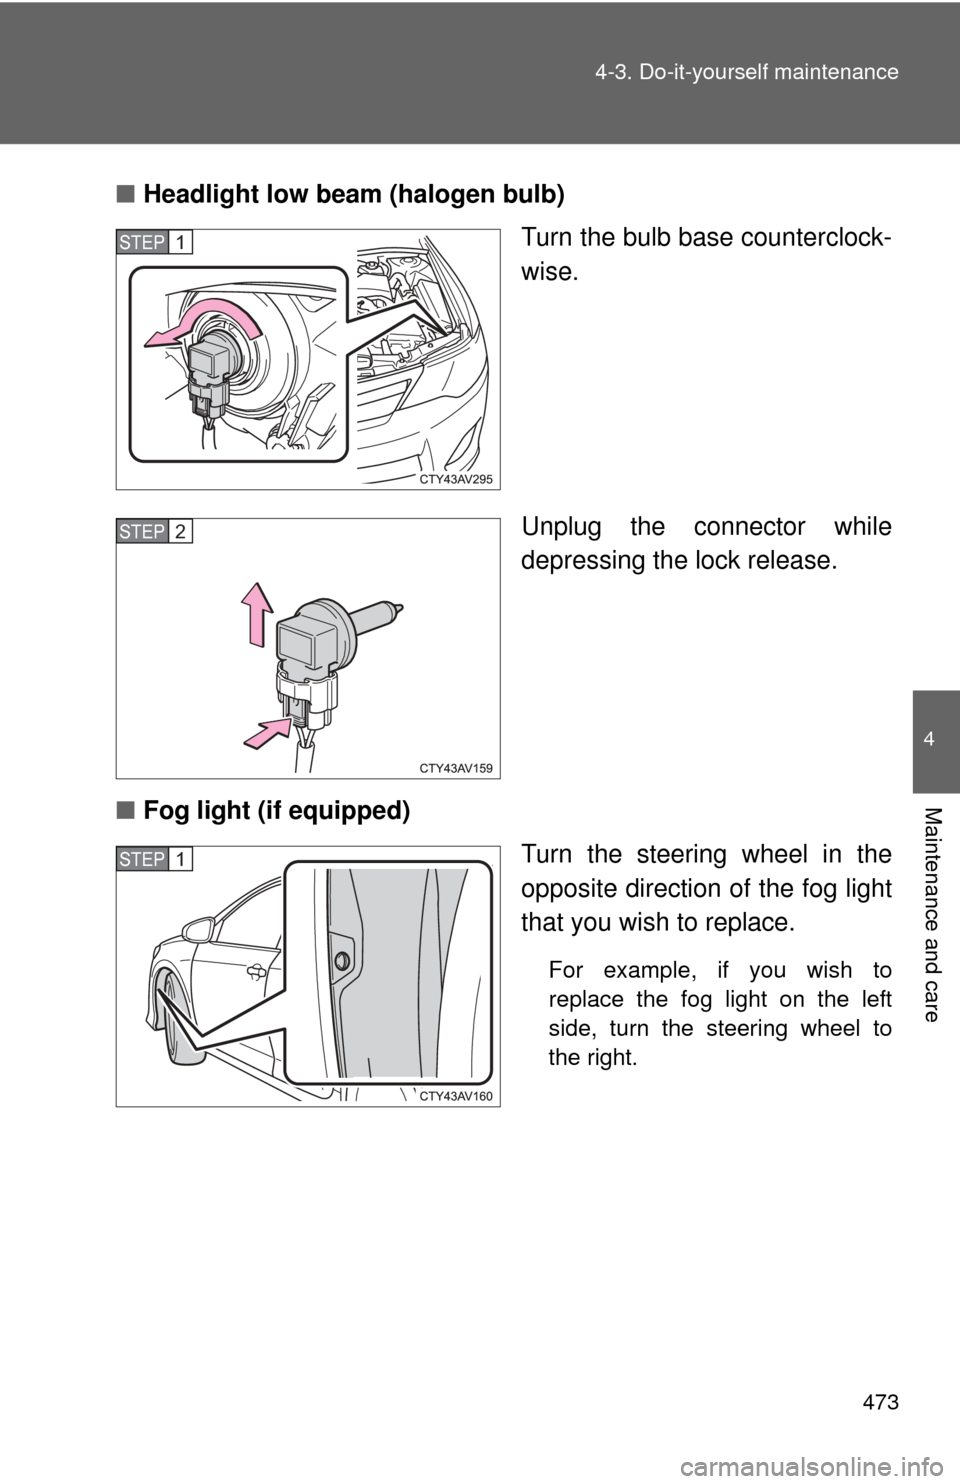
Headlight low beam (halogen bulb)
Turn the bulb base counterclock-
wise.
Unplug the connector while
depressing the lock release.
■ Fog light (if equipped)
Turn the steering wheel in the
opposite direction of the fog light
that you wish to replace.
For example, if you wish to
replace the fog light on the left
side, turn the steering wheel to
the right.
STEP1
STEP2
STEP1
Page 474 of 612
474 4-3. Do-it-yourself maintenance
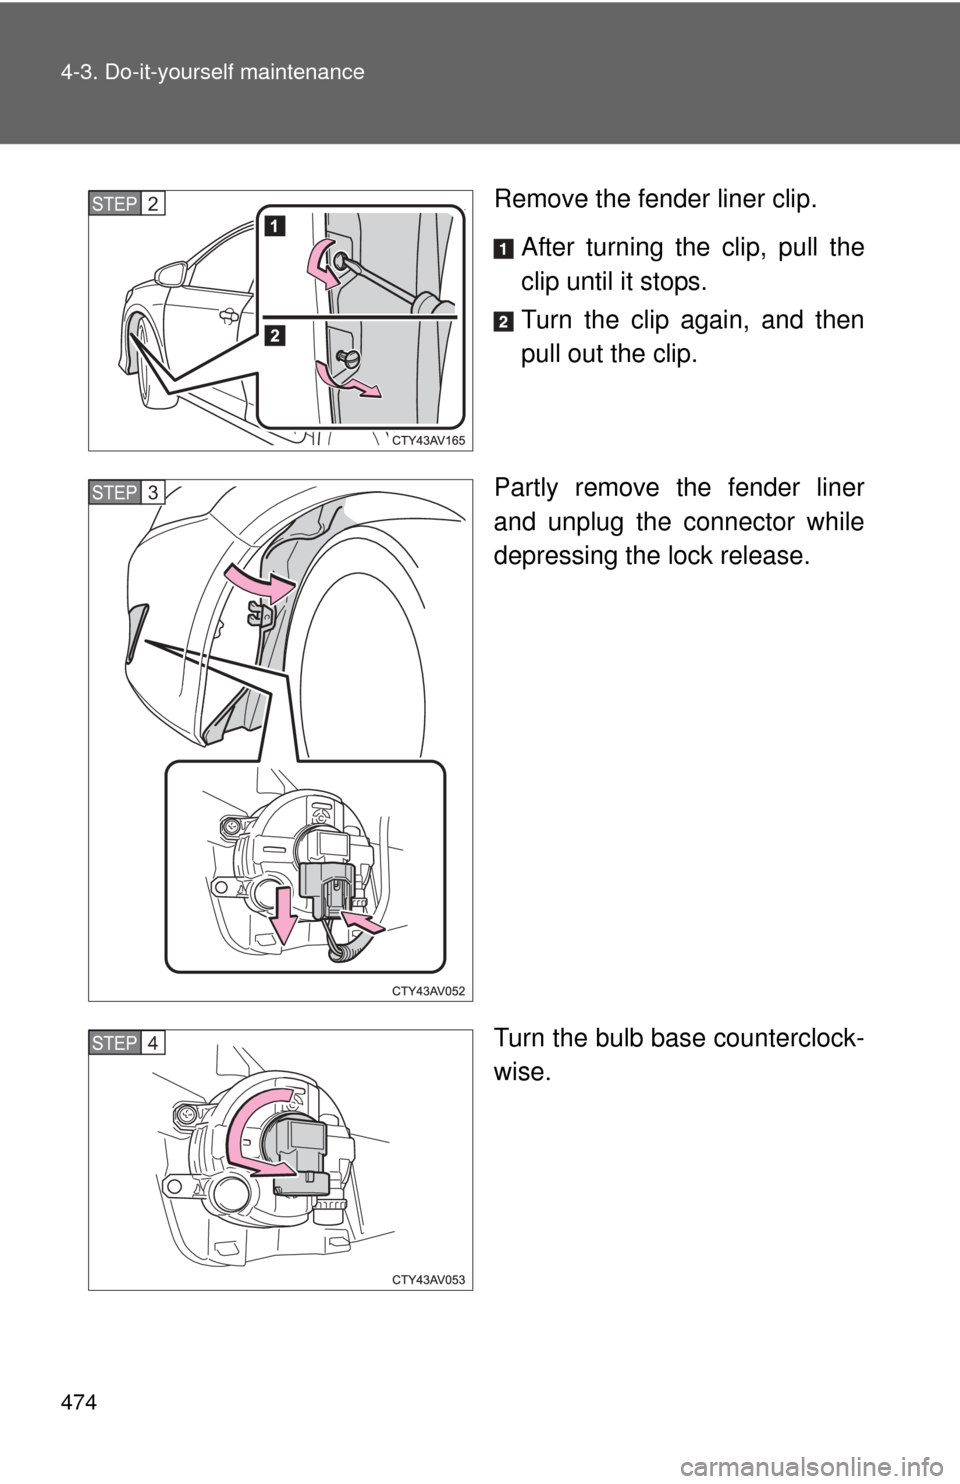
Remove the fender liner clip.After turning the clip, pull the
clip until it stops.
Turn the clip again, and then
pull out the clip.
Partly remove the fender liner
and unplug the connector while
depressing the lock release.
Turn the bulb base counterclock-
wise.STEP2
STEP3
STEP4
Page 475 of 612
475
4-3. Do-it-yourself maintenance
4
Maintenance and care
■
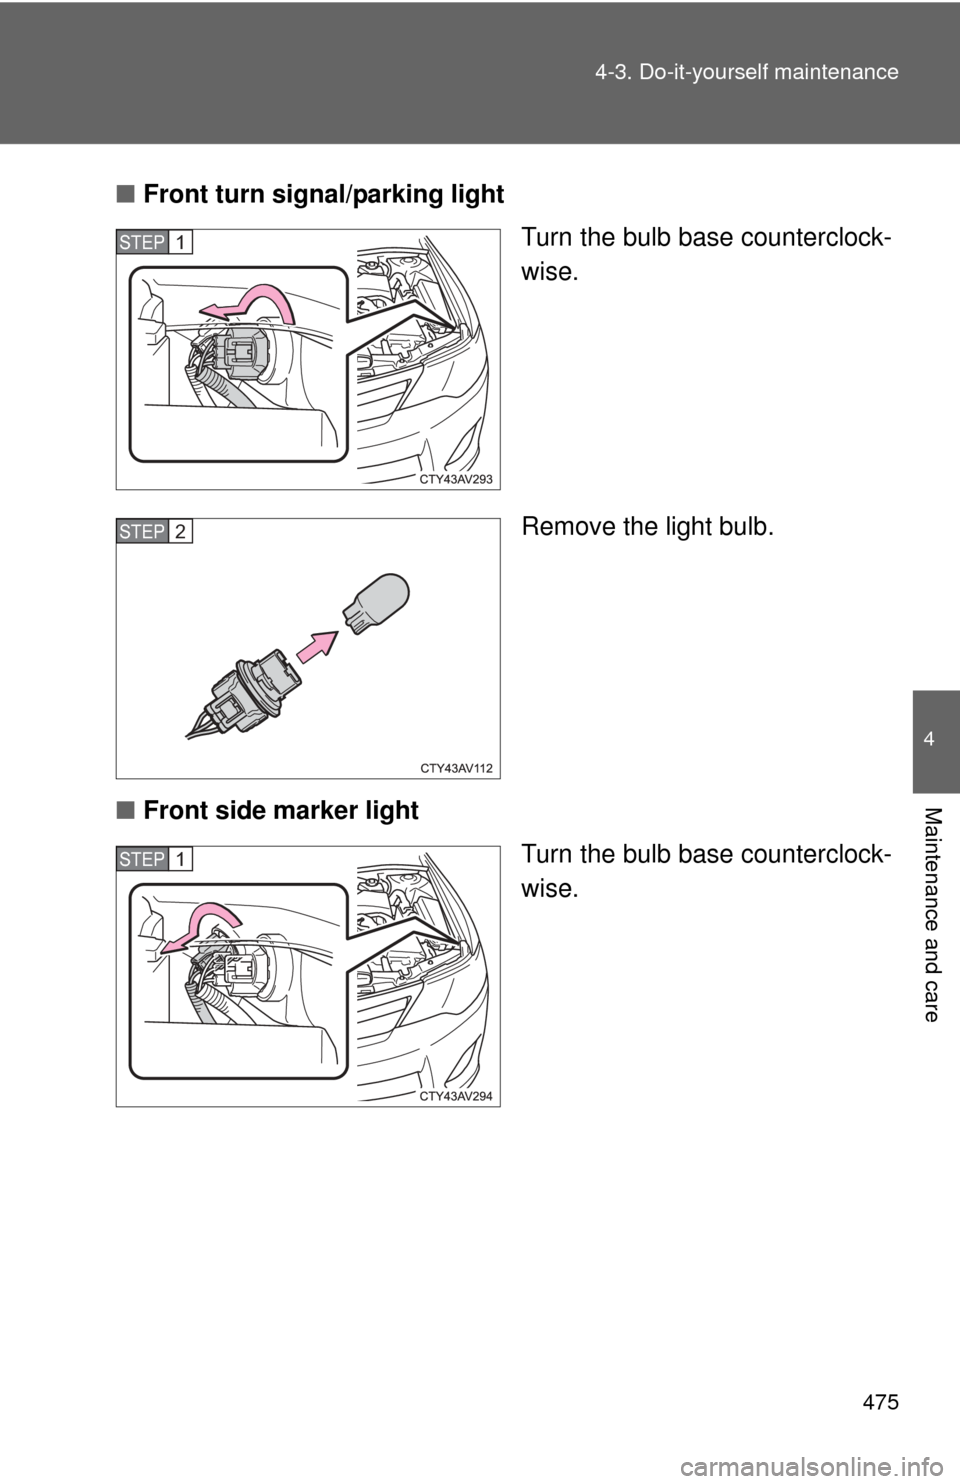
Front turn signal/parking light
Turn the bulb base counterclock-
wise.
Remove the light bulb.
■ Front side marker light
Turn the bulb base counterclock-
wise.
STEP1
STEP2
STEP1
Page 476 of 612
476 4-3. Do-it-yourself maintenance
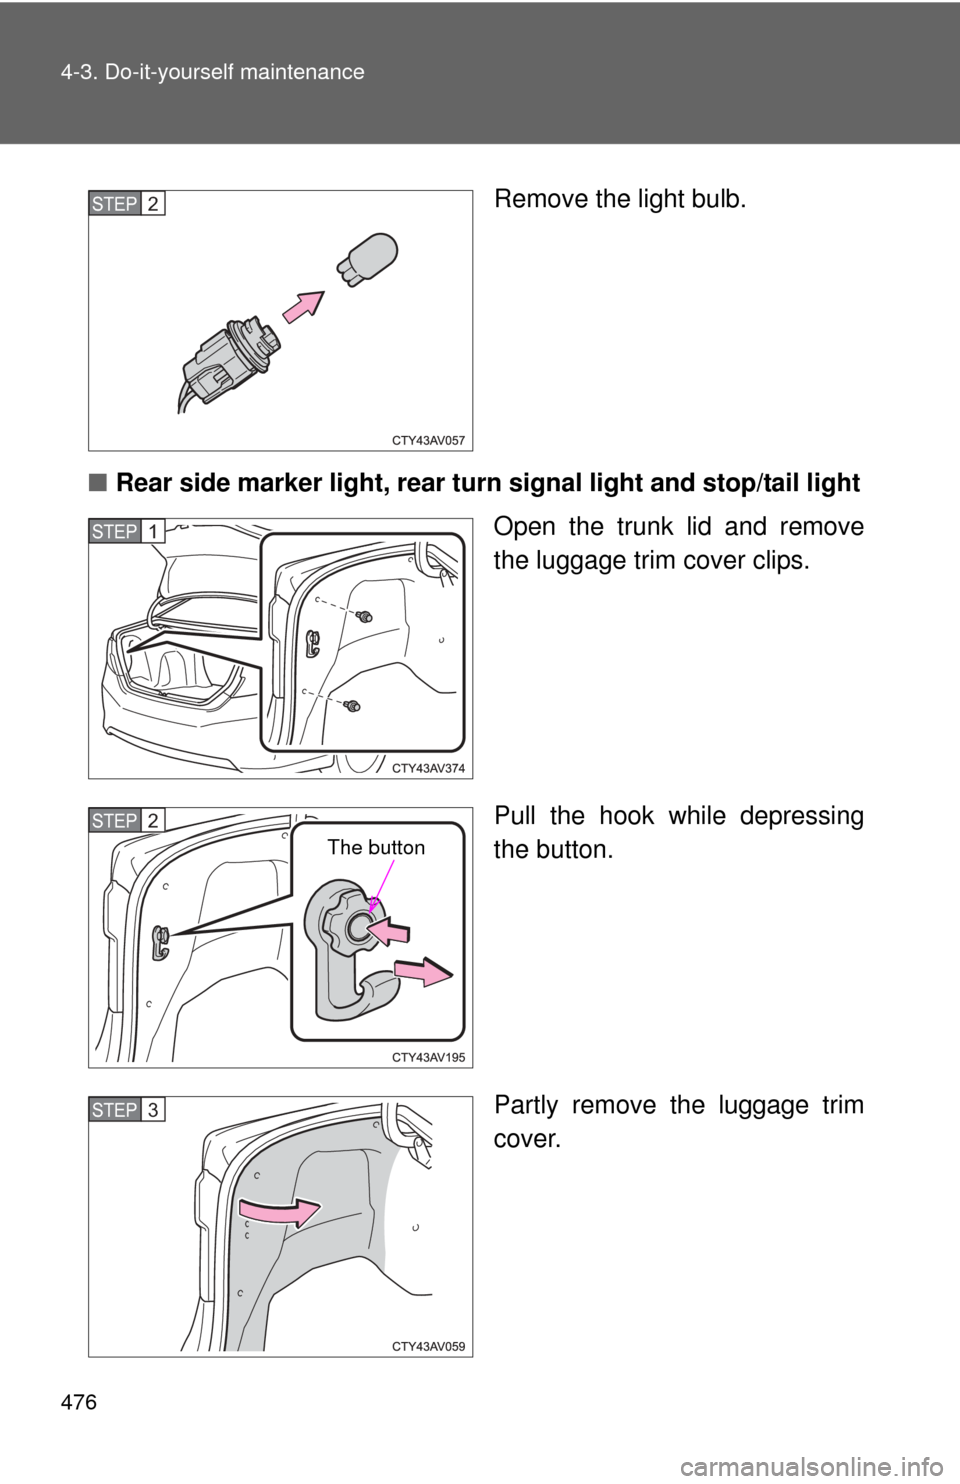
Remove the light bulb.
■ Rear side marker light, rear tu rn signal light and stop/tail light
Open the trunk lid and remove
the luggage trim cover clips.
Pull the hook while depressing
the button.
Partly remove the luggage trim
cover.STEP2
STEP1
STEP2
The button
STEP3
Page 477 of 612
477
4-3. Do-it-yourself maintenance
4
Maintenance and care
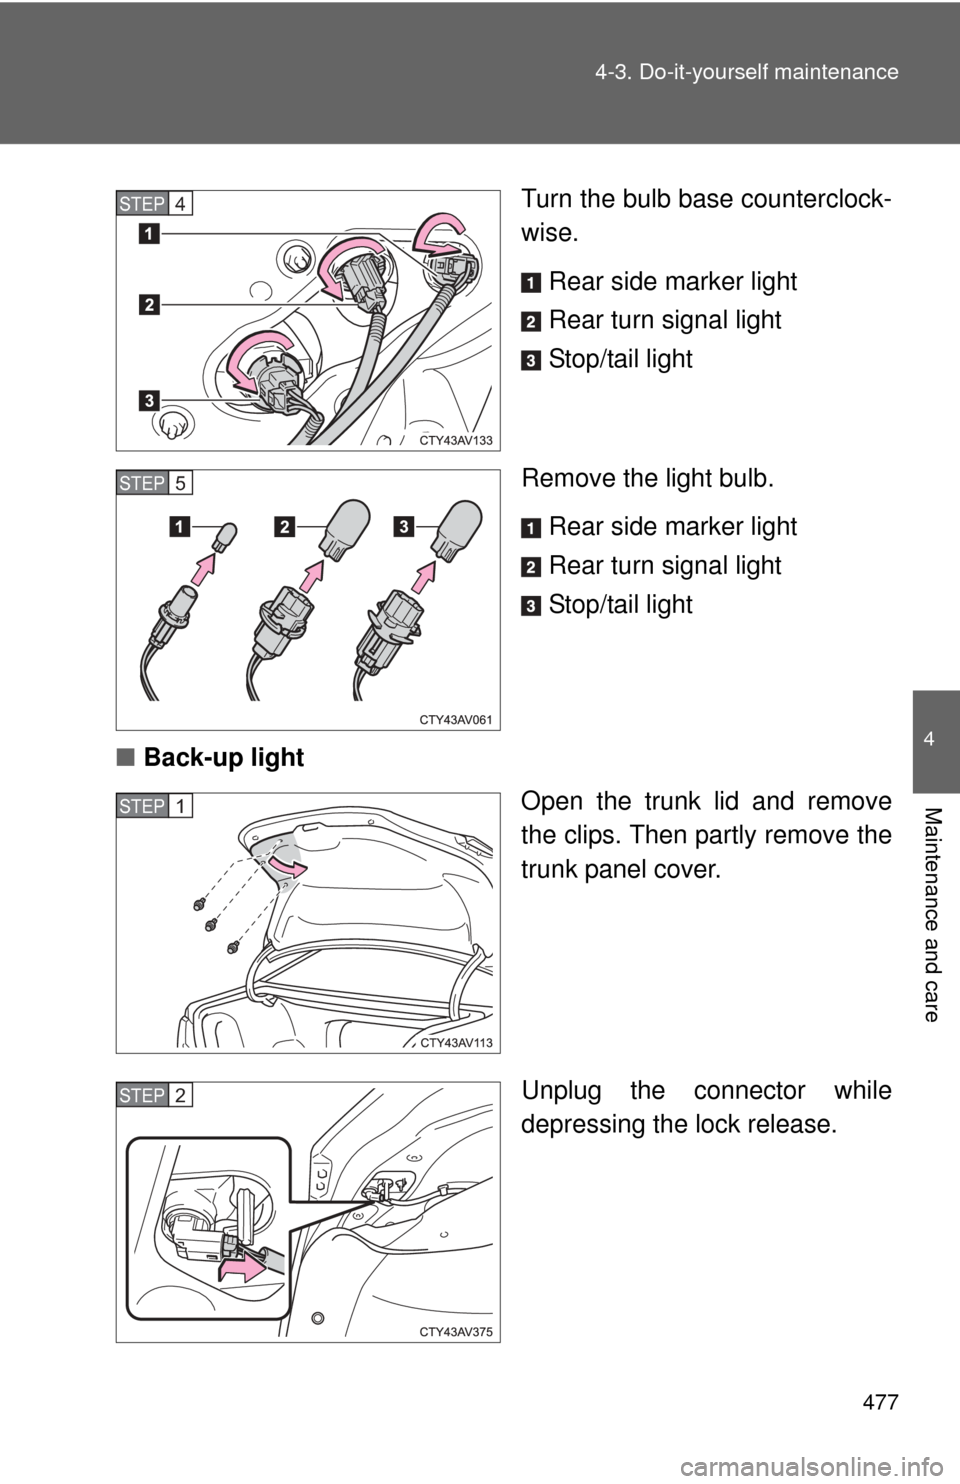
Turn the bulb base counterclock-
wise.
Rear side marker light
Rear turn signal light
Stop/tail light
Remove the light bulb. Rear side marker light
Rear turn signal light
Stop/tail light
■ Back-up light
Open the trunk lid and remove
the clips. Then partly remove the
trunk panel cover.
Unplug the connector while
depressing the lock release.STEP4
STEP5
STEP1
STEP2
Page 478 of 612
478 4-3. Do-it-yourself maintenance
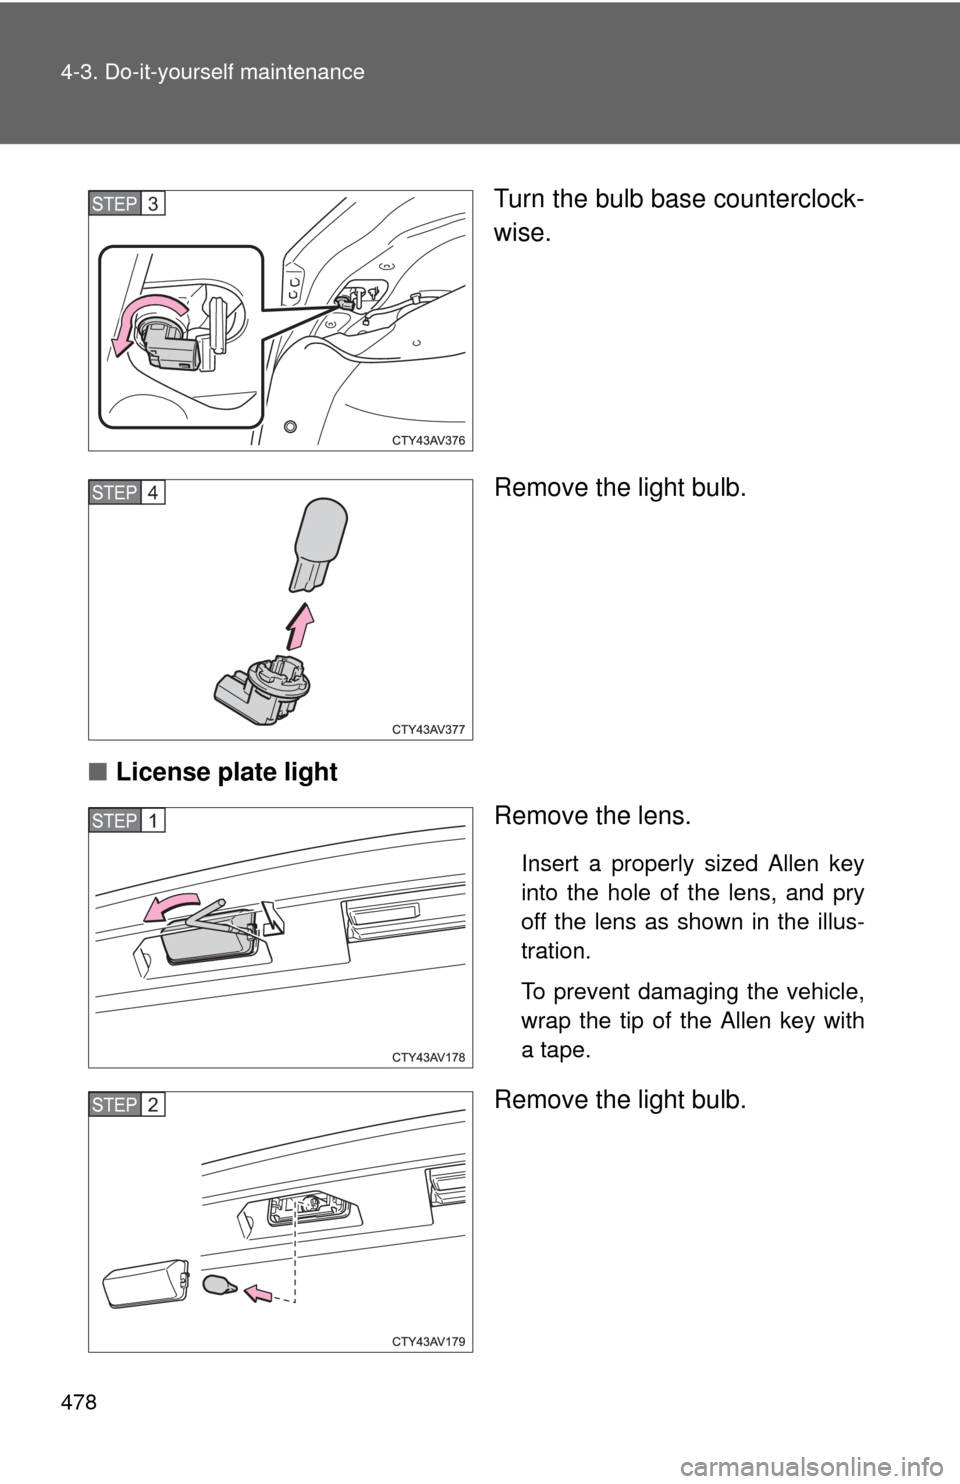
Turn the bulb base counterclock-
wise.
Remove the light bulb.
■ License plate light
Remove the lens.
Insert a properly sized Allen key
into the hole of the lens, and pry
off the lens as shown in the illus-
tration.
To prevent damaging the vehicle,
wrap the tip of the Allen key with
a tape.
Remove the light bulb.
STEP3
STEP4
STEP1
STEP2
Page 479 of 612
479
4-3. Do-it-yourself maintenance
4
Maintenance and care
■
Lights other than the above
If any of the lights listed below has burnt out, have it replaced by
your Toyota dealer.
● Headlight low beams (discharge bulb)
● High mounted stoplight
■Discharge headlights (if equipped)
If voltage to the discharge bulbs is insufficient, the bulbs may not come on,
or may go out temporarily. The discharge bulbs will come on when normal
power is restored.
■ LED light bulbs
The high mounted stoplight consists of a number of LEDs. If any of the LEDs
burn out, take your vehicle to your Toyota dealer to have the light replaced.
■ Condensation build-up on th e inside of the lens
Temporary condensation build-up on the inside of the headlight lens does
not indicate a malfunction.
Contact your Toyota dealer for more information in the following situations:
● Large drops of water have built up on the inside of the lens.
● Water has built up inside the headlight.
Page 480 of 612
480 4-3. Do-it-yourself maintenance
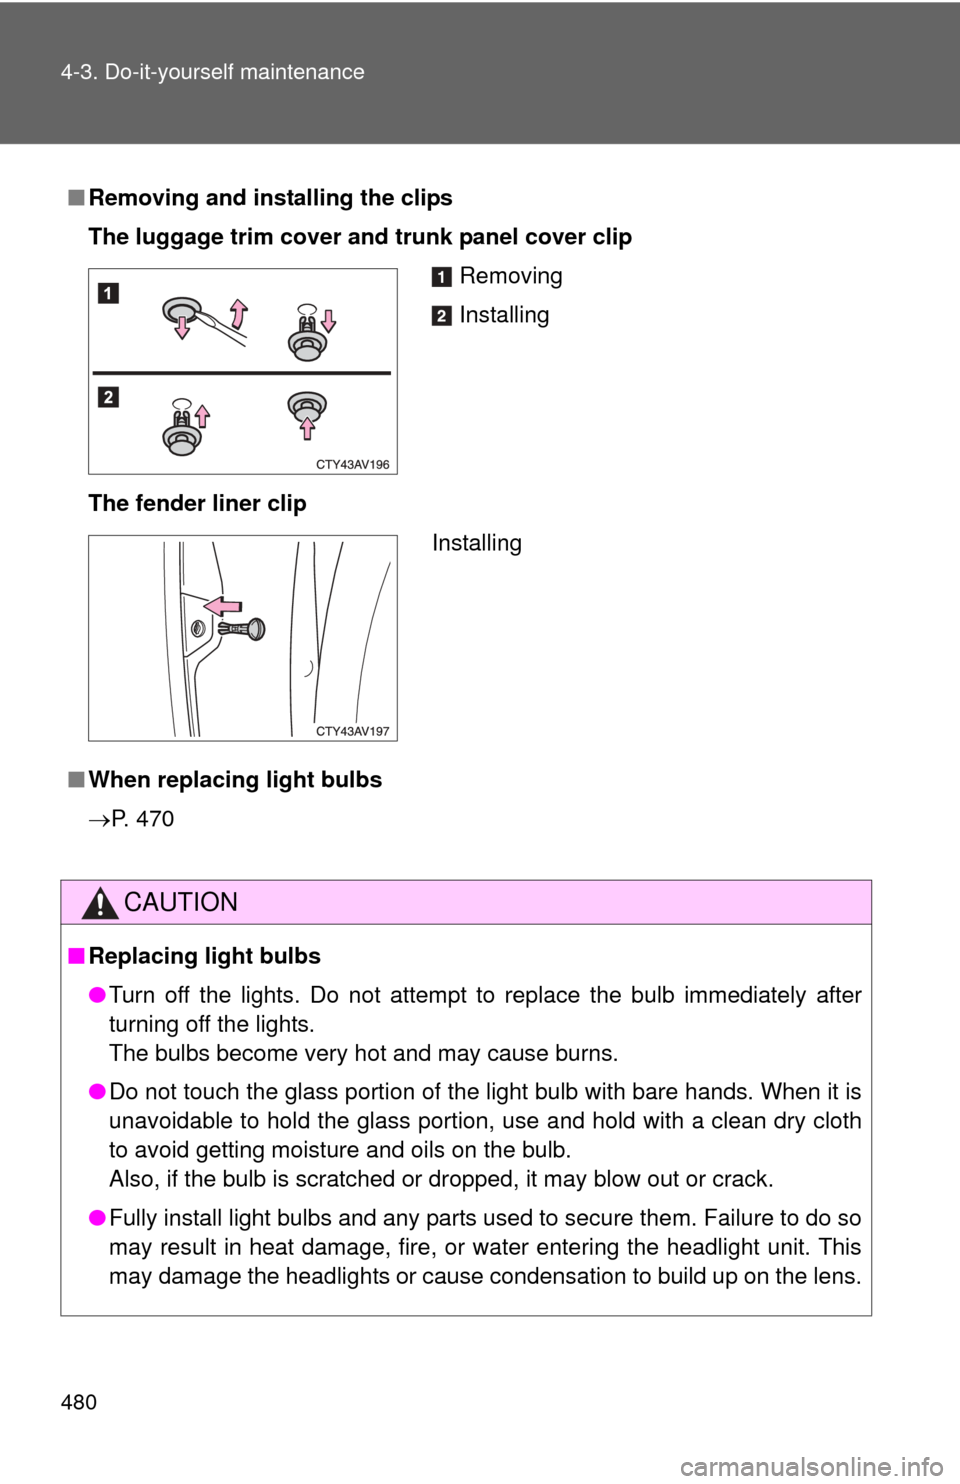
■Removing and installing the clips
The luggage trim cover and trunk panel cover clip
The fender liner clip
■ When replacing light bulbs
P. 470
CAUTION
■Replacing light bulbs
●Turn off the lights. Do not attempt to replace the bulb immediately after
turning off the lights.
The bulbs become very hot and may cause burns.
● Do not touch the glass portion of the light bulb with bare hands. When i\
t is
unavoidable to hold the glass portion, use and hold with a clean dry cloth
to avoid getting moisture and oils on the bulb.
Also, if the bulb is scratched or dropped, it may blow out or crack.
● Fully install light bulbs and any parts used to secure them. Failure to do so
may result in heat damage, fire, or water entering the headlight unit. This
may damage the headlights or cause condensation to build up on the lens.
Removing
Installing
Installing
Trending: display, parking brake, tire type, snow chains, check engine light, bulb, overheating
