reset TOYOTA CAMRY HYBRID 2014 XV50 / 9.G Owners Manual
[x] Cancel search | Manufacturer: TOYOTA, Model Year: 2014, Model line: CAMRY HYBRID, Model: TOYOTA CAMRY HYBRID 2014 XV50 / 9.GPages: 612, PDF Size: 7.26 MB
Page 45 of 612
45
1-1. Hybrid system
1
Before driving
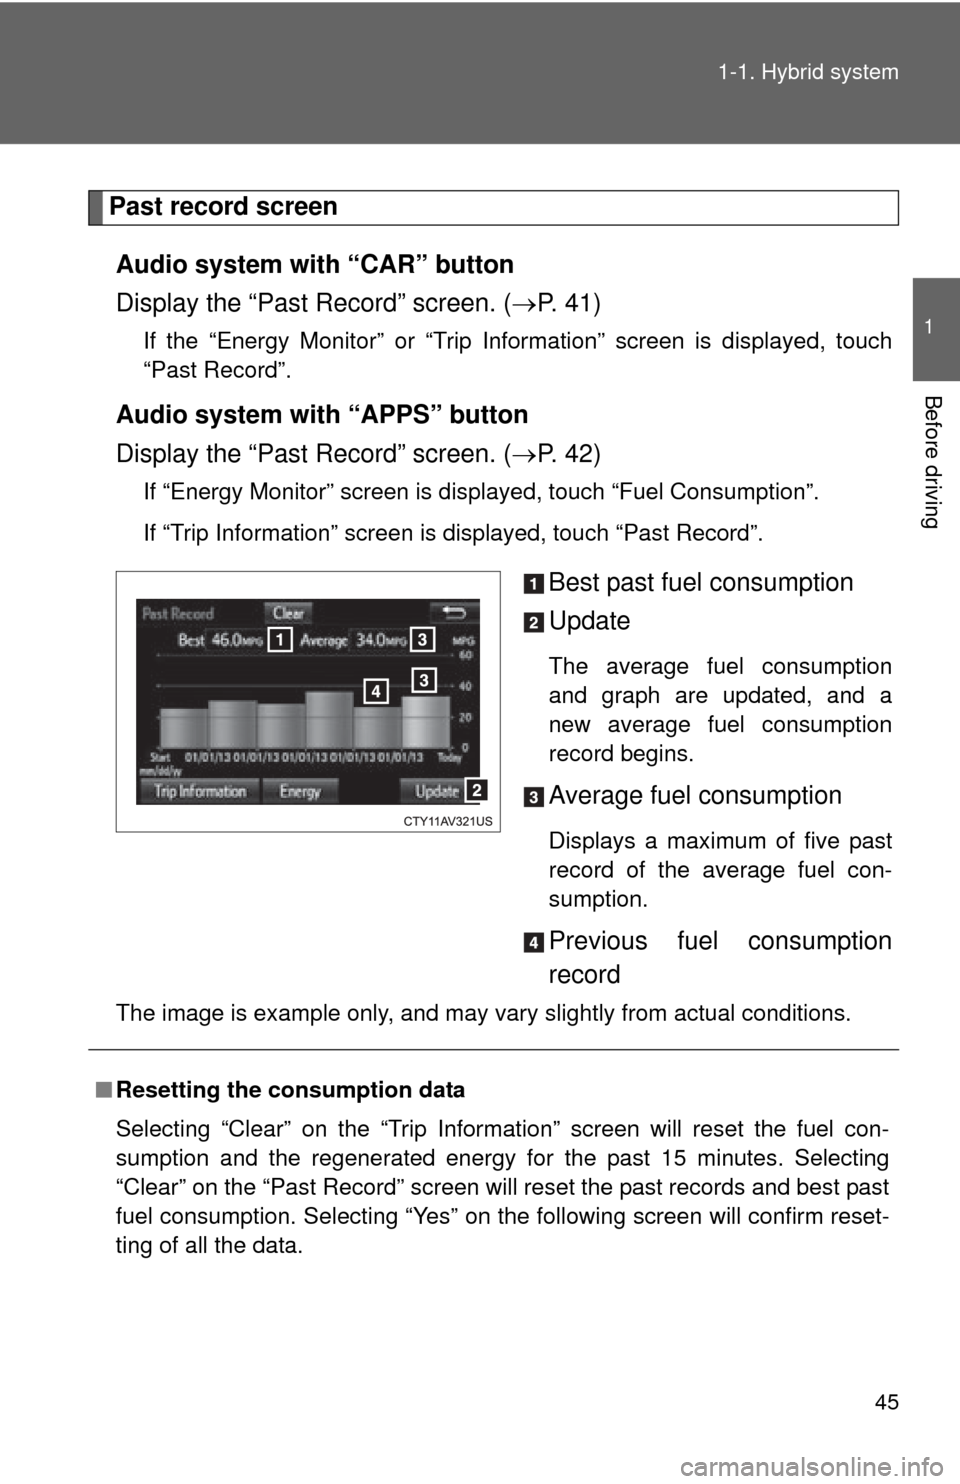
Past record screen
Audio system with “CAR” button
Display the “Past Record” screen. ( P. 41)
If the “Energy Monitor” or “Trip Information” screen is displayed, touch
“Past Record”.
Audio system with “APPS” button
Display the “Past Record” screen. ( P. 42)
If “Energy Monitor” screen is displayed, touch “Fuel Consumption”.
If “Trip Information” screen is displayed, touch “Past Record”.
Best past fuel consumption
Update
The average fuel consumption
and graph are updated, and a
new average fuel consumption
record begins.
Average fuel consumption
Displays a maximum of five past
record of the average fuel con-
sumption.
Previous fuel consumption
record
The image is example only, and may vary slightly from actual conditions.
■Resetting the consumption data
Selecting “Clear” on the “Trip Information” screen will reset the fuel con-
sumption and the regenerated energy for the past 15 minutes. Selecting
“Clear” on the “Past Record” screen will reset the past records and best past
fuel consumption. Selecting “Yes” on the following screen will confirm reset-
ting of all the data.
Page 174 of 612
174
2-2. Instrument cluster
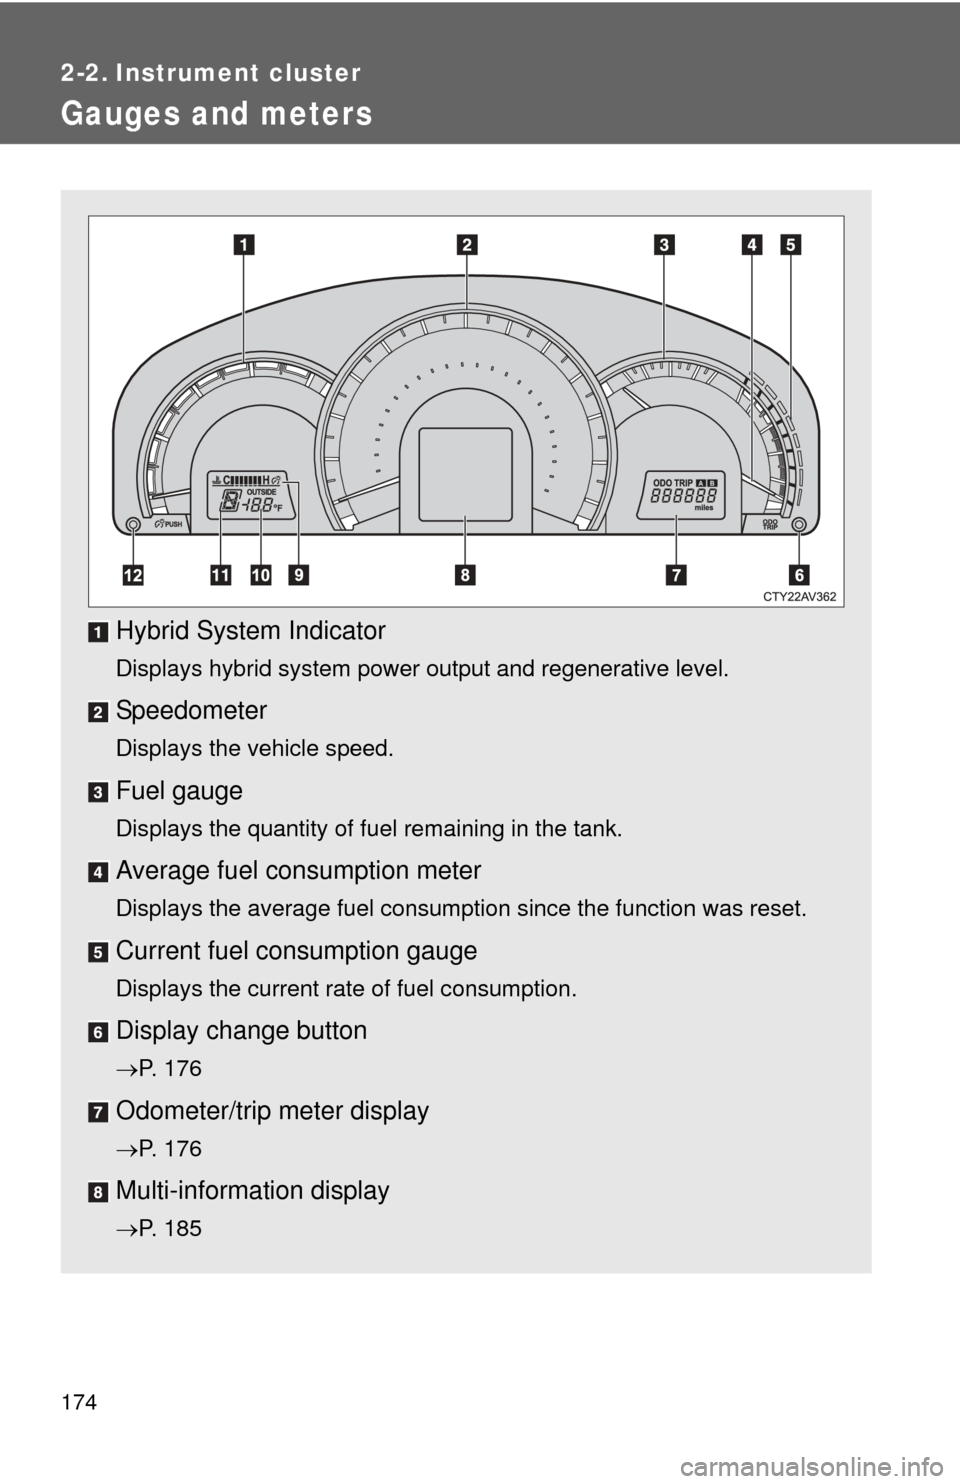
Gauges and meters
Hybrid System Indicator
Displays hybrid system power output and regenerative level.
Speedometer
Displays the vehicle speed.
Fuel gauge
Displays the quantity of fuel remaining in the tank.
Average fuel consumption meter
Displays the average fuel consumption since the function was reset.
Current fuel consumption gauge
Displays the current rate of fuel consumption.
Display change button
P. 176
Odometer/trip meter display
P. 176
Multi-information display
P. 185
Page 176 of 612
176 2-2. Instrument cluster
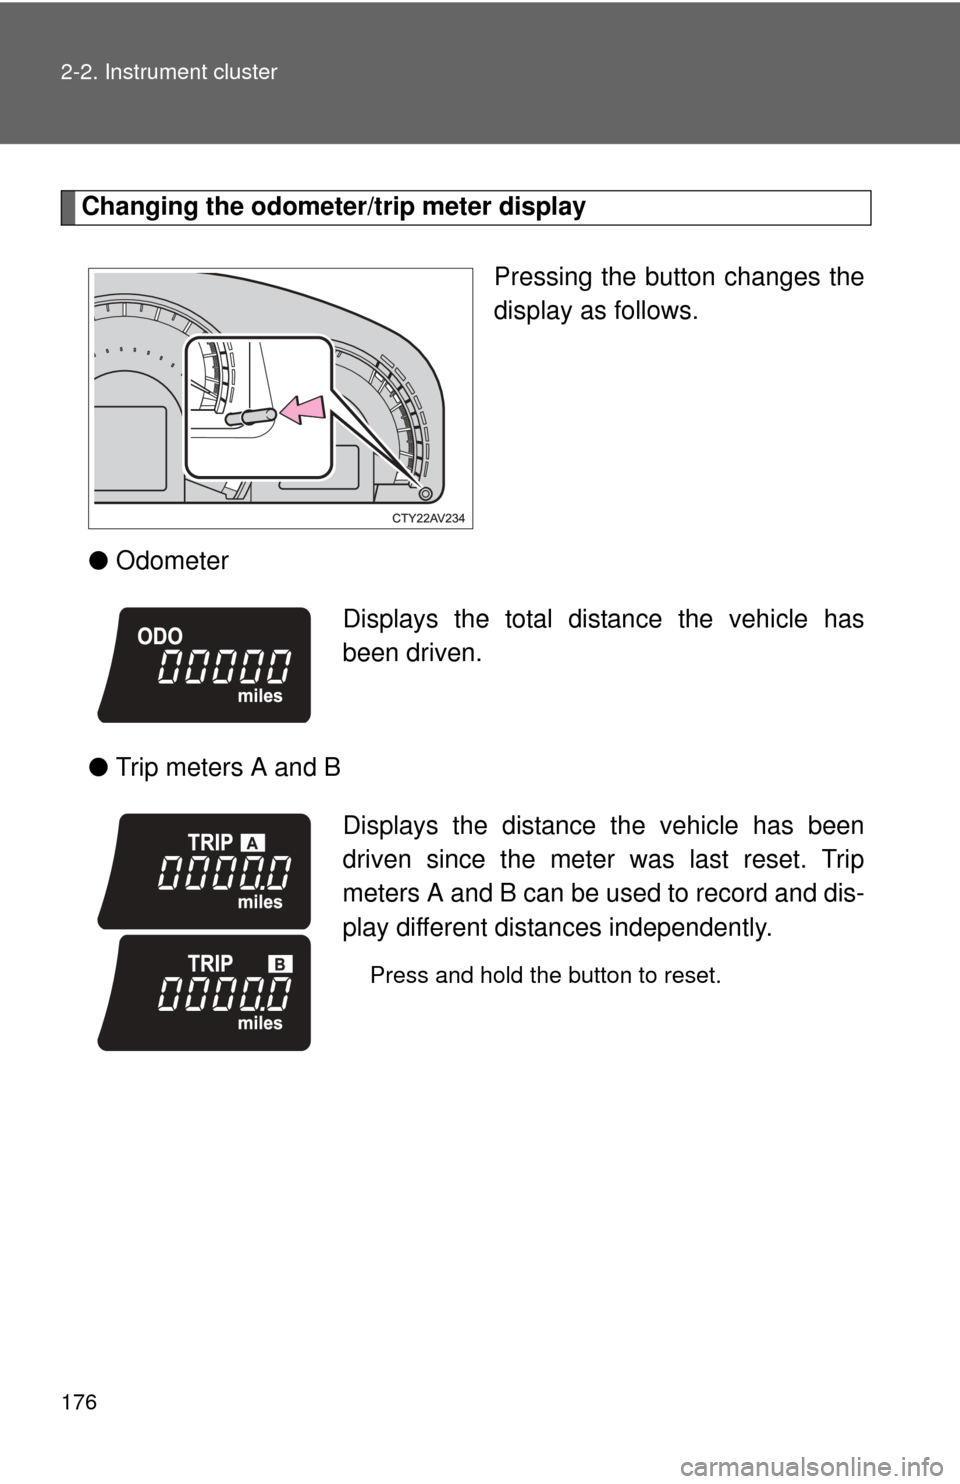
Changing the odometer/trip meter displayPressing the button changes the
display as follows.
● Odometer
● Trip meters A and B
Displays the total distance the vehicle has
been driven.
Displays the distance the vehicle has been
driven since the meter was last reset. Trip
meters A and B can be used to record and dis-
play different distances independently.
Press and hold the button to reset.
Page 187 of 612

187
2-2. Instrument cluster
2
When driving
Trip information
■ Cruising range/average fuel consumption
Cruising range
Displays the estimated maximum di stance that can be driven with
the quantity of fuel remaining.
• This distance is computed based on your average fuel consumption.
As a result, the actual distance that can be driven may differ from that
displayed.
• When only a small amount of fuel is added to the tank, the display
may not be updated.
When refueling, turn the “POWER” switch off. If the vehicle is refueled
without turning the “POWER” switch off, the display may not be
updated.
Average fuel consumption
Displays the average fuel cons umption since the function was
reset.
• The function can be reset by pressing the “DISP” button for longer
than 1 second when the average fuel consumption is displayed.
The average fuel consumption meter will also be reset, returning the
needle to the 0 position.
• Use the displayed average fuel consumption as a reference.
■ Average vehicle speed/elapsed time
Displays the average vehicle speed and elapsed time since the
hybrid system was started.
Page 206 of 612
206 2-4. Using other driving systems
■Cruise control can be set when
●The shift lever is in D.
● Vehicle speed is above approximately 25 mph (40 km/h).
■ Accelerating after setting the vehicle speed
●The vehicle can be accelerated normally. After acceleration, the set
speed resumes.
● Even without canceling the cruise control, the set speed can be
increased by first accelerating the vehicle to the desired speed and then
pushing the lever down to set the new speed.
■ Automatic cruise control cancelation
Cruise control will stop maintaining the vehicle speed in any of the following
situations.
●Actual vehicle speed falls more than approximately 10 mph (16 km/h)
below the preset vehicle speed.
At this time, the memorized set speed is not retained.
● Actual vehicle speed is below approximately 25 mph (40 km/h).
● Enhanced VSC is activated.
CAUTION
■To avoid operating the cruise control by mistake
Switch the cruise control off using the “ON-OFF” button when not in use.
■ Situations unsuitable for cruise control
Do not use cruise control in any of the following situations.
Doing so may result in loss of control and could cause an accident resulting
in death or serious injury.
●In heavy traffic
● On roads with sharp bends
● On winding roads
● On slippery roads, such as those covered with rain, ice or snow
● On steep hills
Vehicle speed may exceed the set speed when driving down a steep hill.
Page 254 of 612
254
3-2. Using the audio system
Steering wheel audio switches
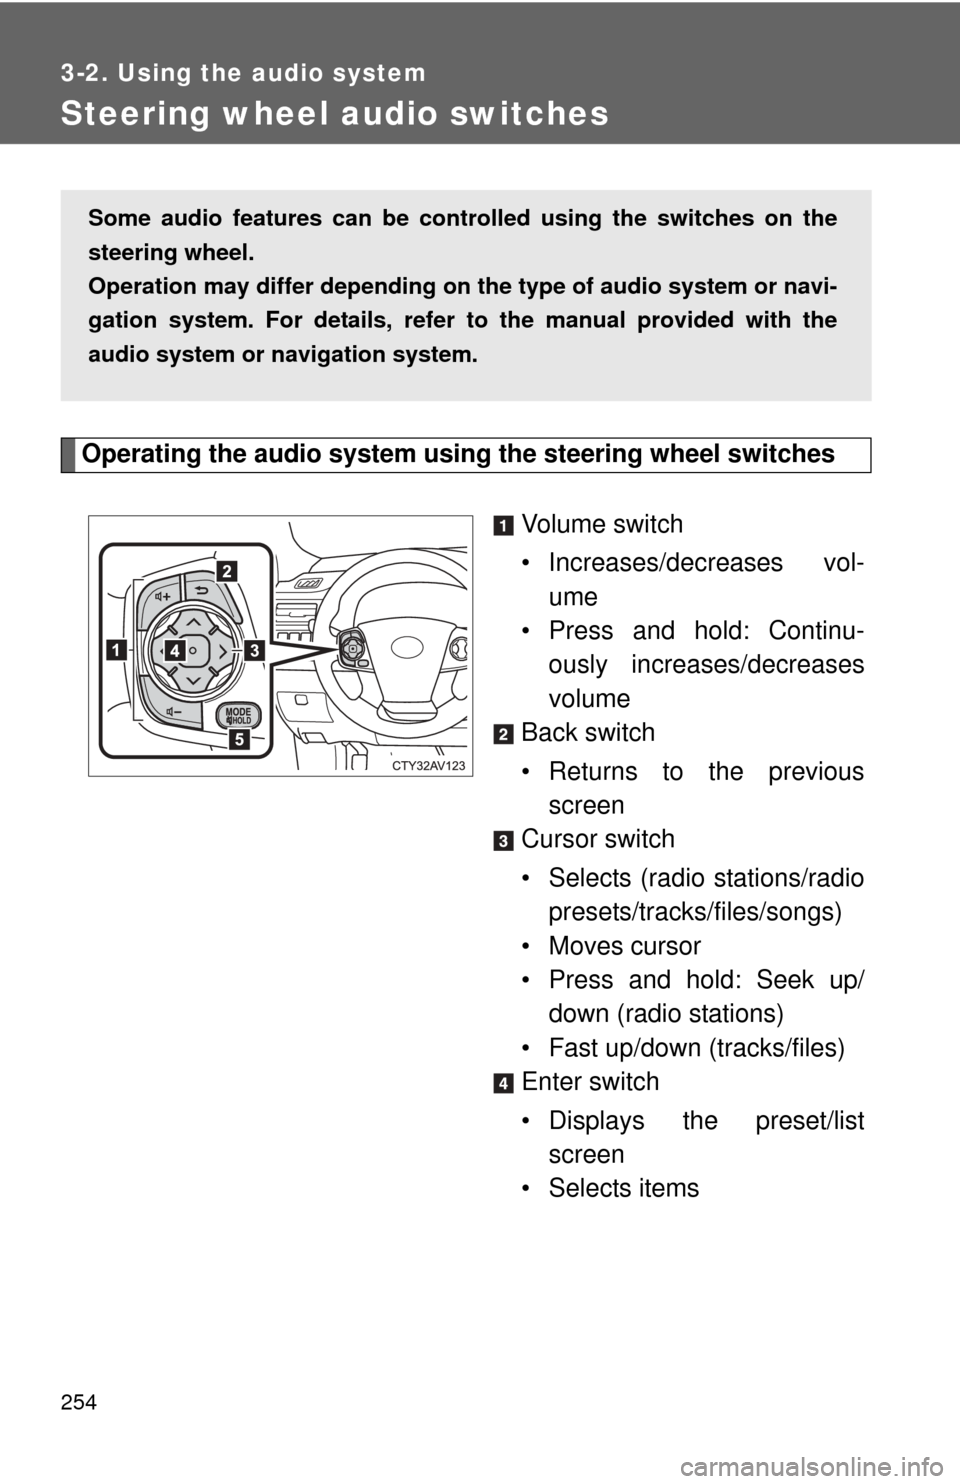
Operating the audio system using the steering wheel switchesVolume switch
• Increases/decreases vol-
ume
• Press and hold: Continu-
ously increases/decreases
volume
Back switch
• Returns to the previous screen
Cursor switch
• Selects (radio stations/radio presets/tracks/files/songs)
• Moves cursor
• Press and hold: Seek up/
down (radio stations)
• Fast up/down (tracks/files)
Enter switch
• Displays the preset/list screen
• Selects items
Some audio features can be cont rolled using the switches on the
steering wheel.
Operation may differ depending on th e type of audio system or navi-
gation system. For details, refer to the manual provided with the
audio system or navigation system.
Page 264 of 612
264
3-2. Using the audio system
Audio settings
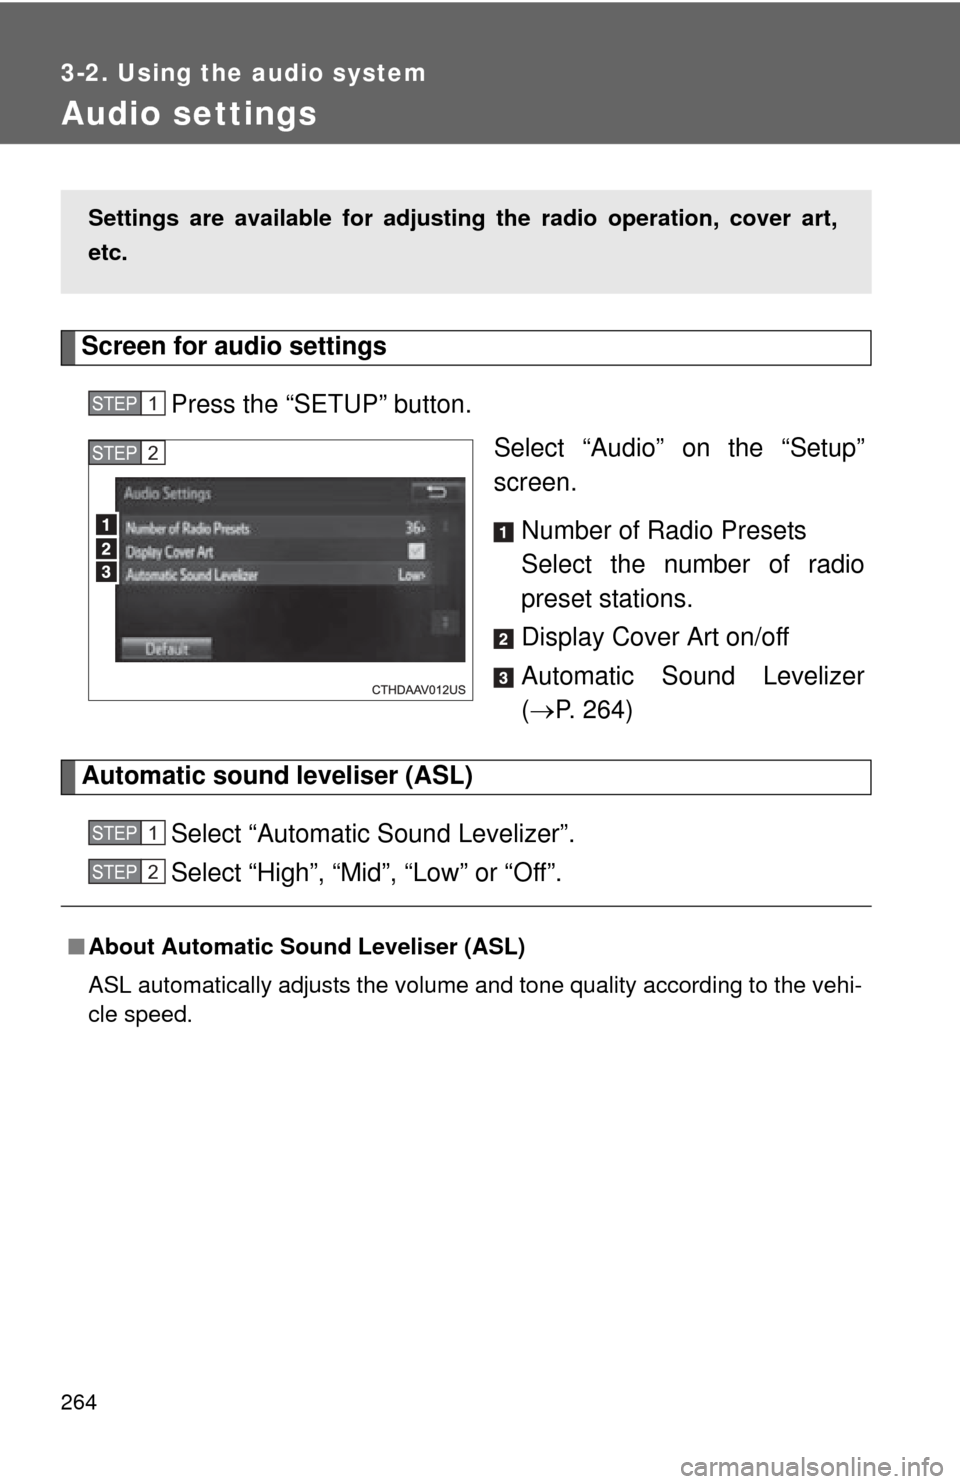
Screen for audio settingsPress the “SETUP” button. Select “Audio” on the “Setup”
screen.
Number of Radio Presets
Select the number of radio
preset stations.
Display Cover Art on/off
Automatic Sound Levelizer
( P. 264)
Automatic sound leveliser (ASL)
Select “Automatic Sound Levelizer”.
Select “High”, “Mid”, “Low” or “Off”.
Settings are available for adjusting the radio operation, cover art,
etc.
STEP1
STEP2
■About Automatic Sound Leveliser (ASL)
ASL automatically adjusts the volume and tone quality according to the vehi-
cle speed.
STEP1
STEP2
Page 272 of 612
272
3-2. Using the audio system
Radio operation
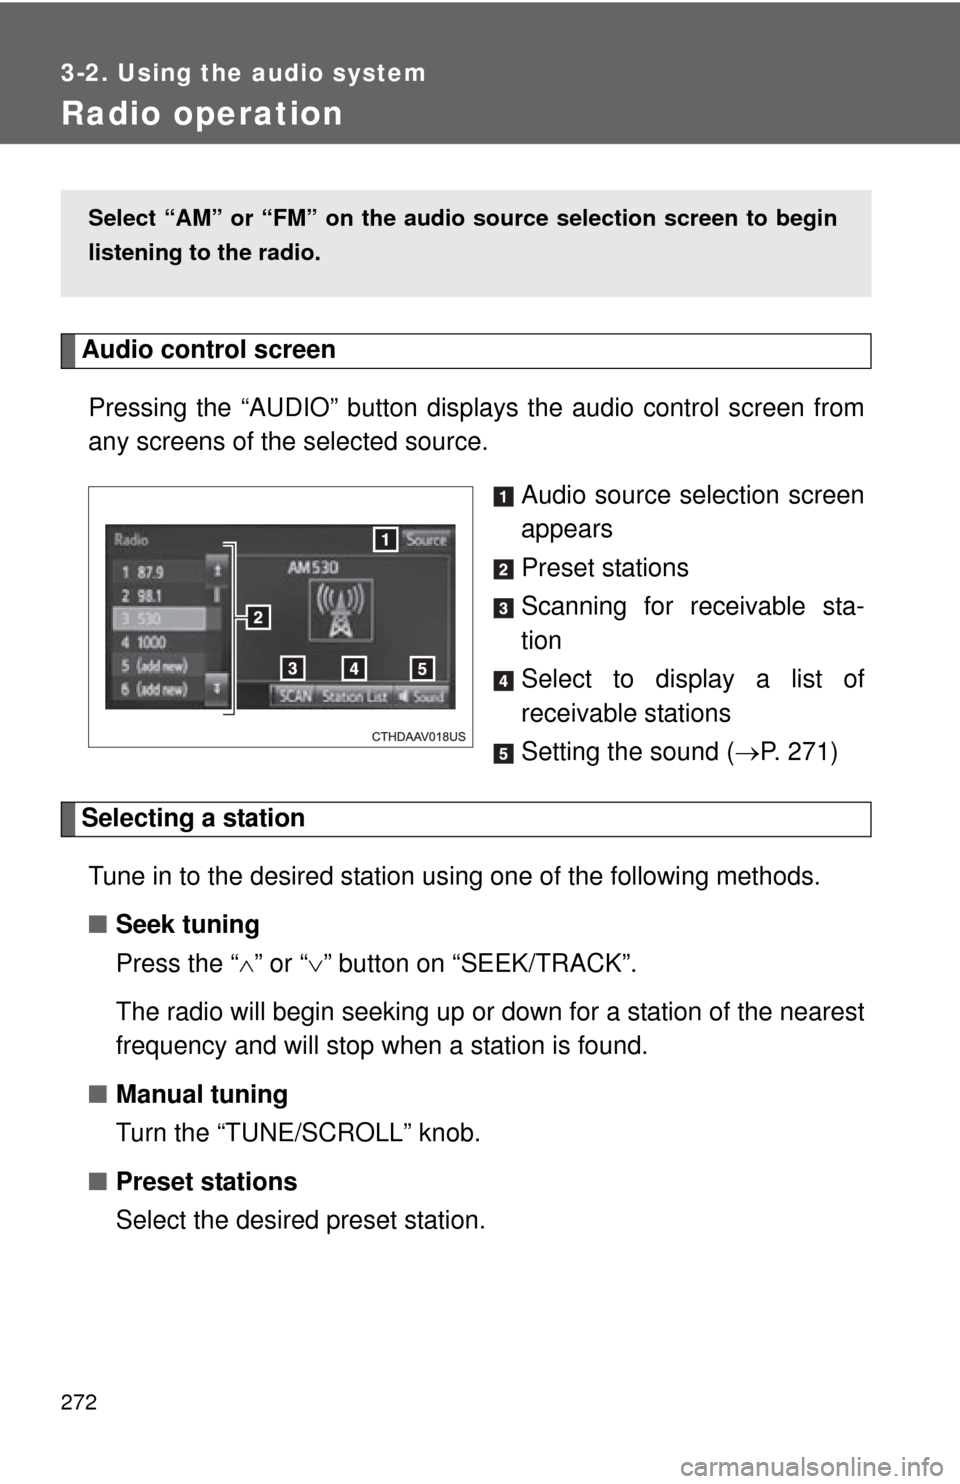
Audio control screenPressing the “AUDIO” button disp lays the audio control screen from
any screens of the selected source.
Audio source selection screen
appears
Preset stations
Scanning for receivable sta-
tion
Select to display a list of
receivable stations
Setting the sound (P. 271)
Selecting a station
Tune in to the desired station using one of the following methods.
■ Seek tuning
Press the “ ” or “ ” button on “SEEK/TRACK”.
The radio will begin seeking up or down for a station of the nearest
frequency and will stop when a station is found.
■ Manual tuning
Turn the “TUNE/SCROLL” knob.
■ Preset stations
Select the desired preset station.
Select “AM” or “FM” on the au dio source selection screen to begin
listening to the radio.
Page 273 of 612
273
3-2. Using the audio system
3
Interior features
Setting station presets
Search for desired stations by turning the “TUNE/SCROLL”
knob or pressing the “ ” or “ ” button on “SEEK/TRACK”.
Select “(add new)”
To change the preset station to a different one, select and hold the
preset station.
Select “Yes”.
Select “OK” after setting the new preset station.
■ Refreshing the station list
Select “Refresh” on the “Station List” screen.
To cancel the refresh, select “Cancel Refresh”.
■Reception sensitivity
●Maintaining perfect radio reception at all times is difficult due to the con-
tinually changing position of the antenna, differences in signal strength
and surrounding objects, such as trains, transmitters, etc.
● The radio antenna is mounted inside the rear window. To maintain clear
radio reception, do not attach metallic window tinting or other metallic
objects to the antenna wire mounted inside the rear window.
STEP1
STEP2
STEP3
STEP4
STEP1
Page 284 of 612
284 3-2. Using the audio system
●While connected to the system, the iPod cannot be operated with its own
controls. It is necessary to use the controls of the vehicle's audio system
instead.
● When the battery level of an iPod is very low, the iPod may not operate. If
so, charge the iPod before use.
● Compatible models ( P. 285)
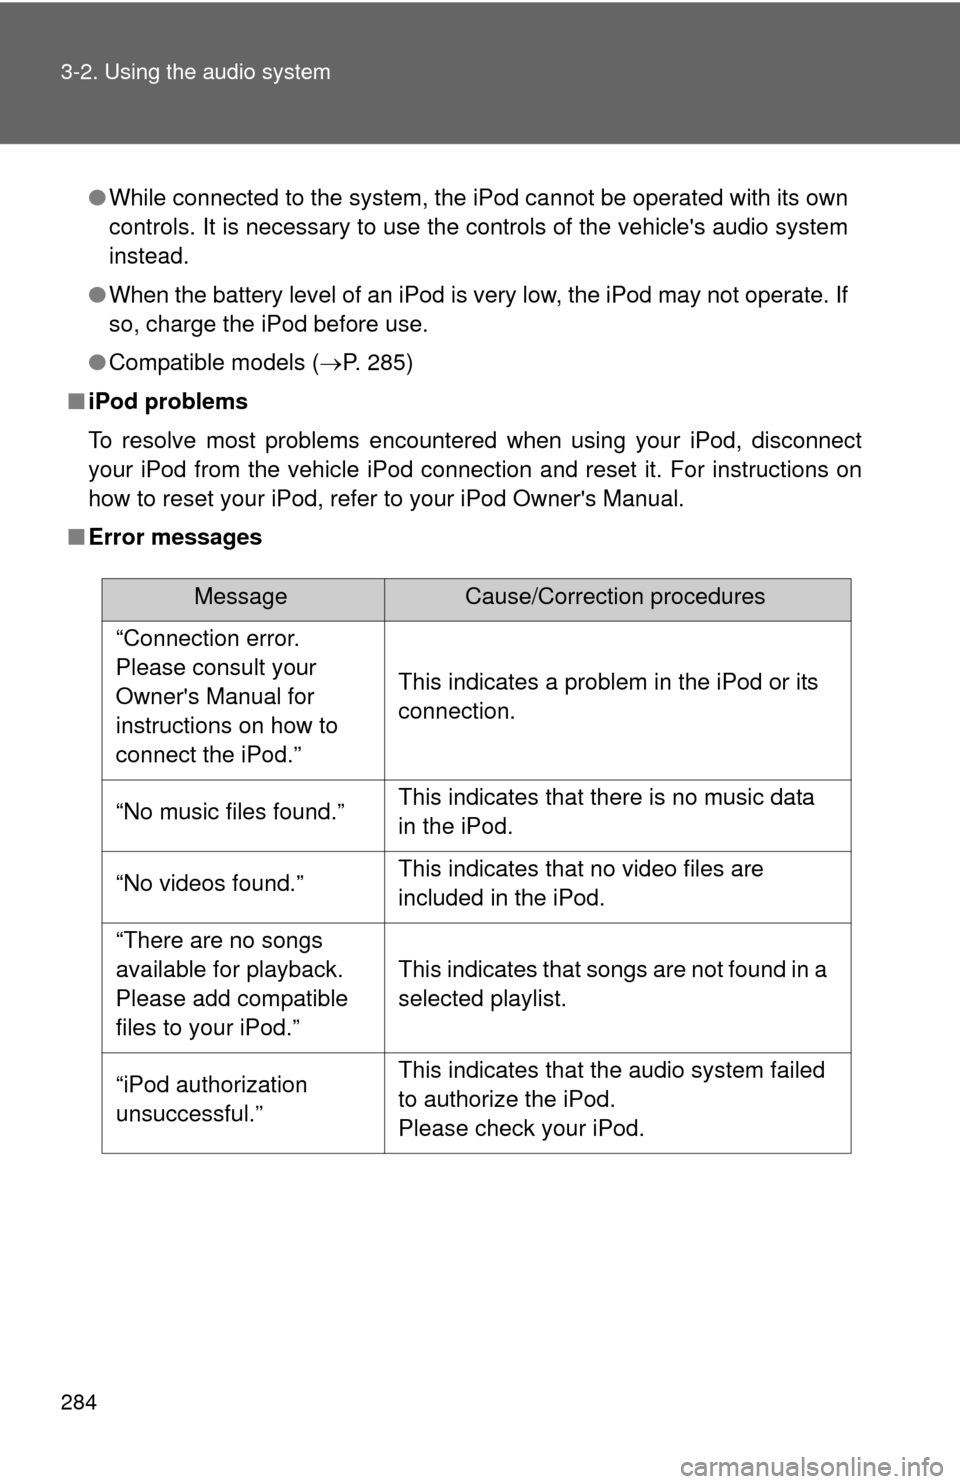
■ iPod problems
To resolve most problems encountered when using your iPod, disconnect
your iPod from the vehicle iPod connection and reset it. For instructions on
how to reset your iPod, refer to your iPod Owner's Manual.
■ Error messages
MessageCause/Correction procedures
“Connection error.
Please consult your
Owner's Manual for
instructions on how to
connect the iPod.”
This indicates a problem in the iPod or its
connection.
“No music files found.”This indicates that there is no music data
in the iPod.
“No videos found.”This indicates that no video files are
included in the iPod.
“There are no songs
available for playback.
Please add compatible
files to your iPod.”
This indicates that songs are not found in a
selected playlist.
“iPod authorization
unsuccessful.”This indicates that the audio system failed
to authorize the iPod.
Please check your iPod.