low beam TOYOTA CAMRY HYBRID 2018 Owners Manual (in English)
[x] Cancel search | Manufacturer: TOYOTA, Model Year: 2018, Model line: CAMRY HYBRID, Model: TOYOTA CAMRY HYBRID 2018Pages: 596, PDF Size: 10.25 MB
Page 93 of 596
932. Instrument cluster
2
Instrument cluster
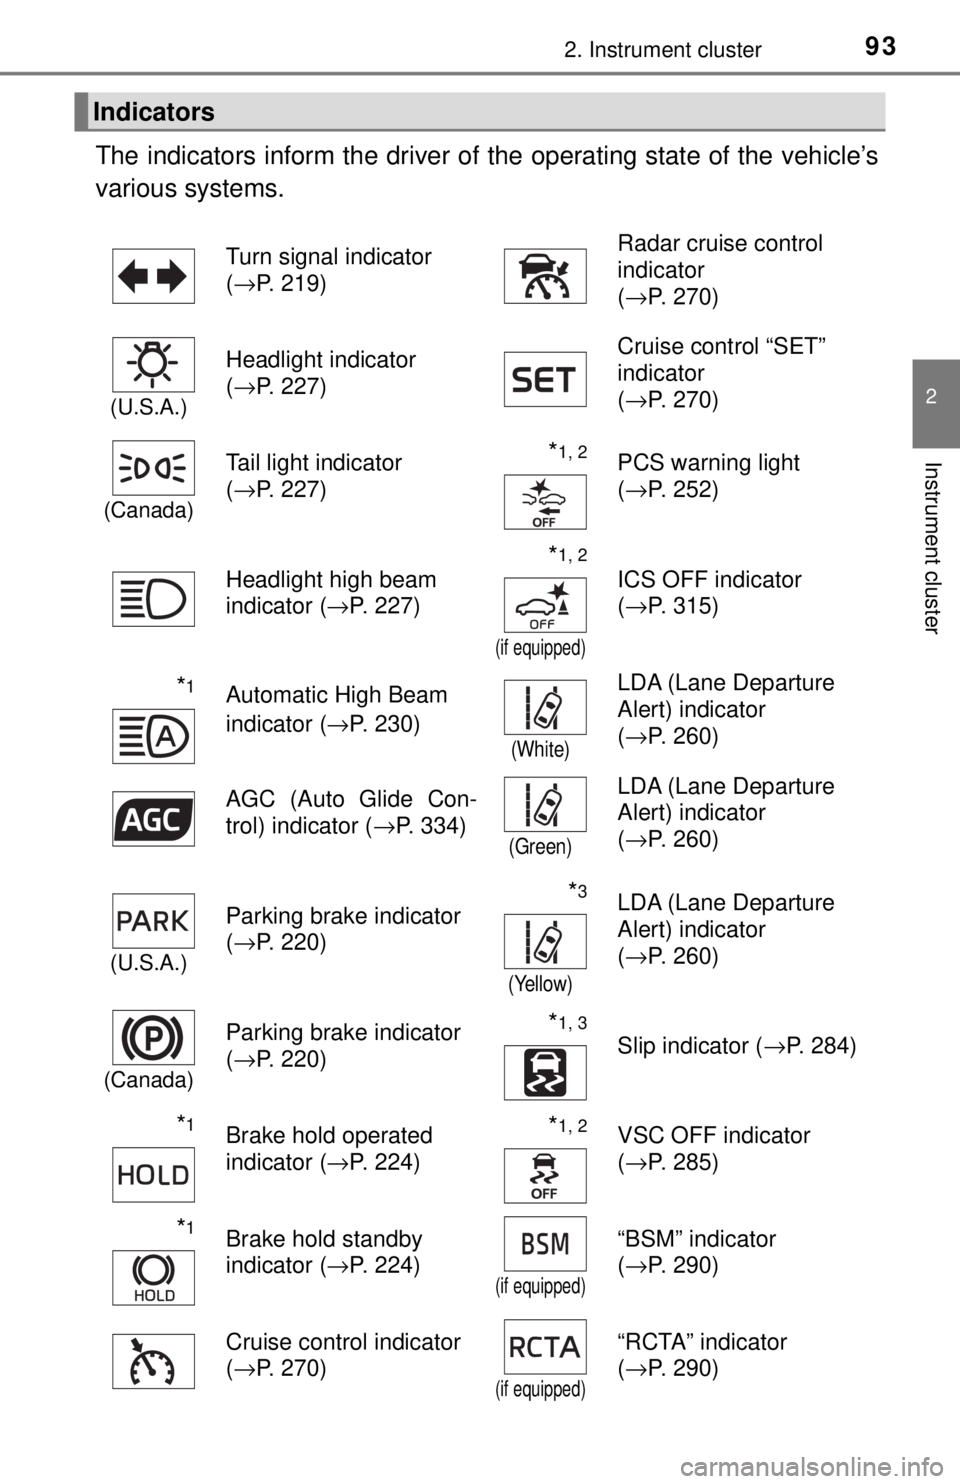
The indicators inform the driver of the operating state of the vehicle’s
various systems.
Indicators
Turn signal indicator
( →P. 219) Radar cruise control
indicator
(
→P. 270)
(U.S.A.)
Headlight indicator
(→P. 227) Cruise control “SET”
indicator
(
→P. 270)
(Canada)
Tail light indicator
(→P. 227) *1, 2PCS warning light
(→P. 252)
Headlight high beam
indicator ( →P. 227)
*1, 2
(if equipped)
ICS OFF indicator
(→P. 315)
*1Automatic High Beam
indicator ( →P. 230)
(White)
LDA (Lane Departure
Alert) indicator
(→P. 260)
AGC (Auto Glide Con-
trol) indicator ( →P. 334)
(Green)
LDA (Lane Departure
Alert) indicator
(→P. 260)
(U.S.A.)
Parking brake indicator
(→P. 220)*3
(Yellow)
LDA (Lane Departure
Alert) indicator
(→P. 260)
(Canada)
Parking brake indicator
(→P. 220)*1, 3
Slip indicator ( →P. 284)
*1Brake hold operated
indicator (→P. 224)*1, 2VSC OFF indicator
(→P. 285)
*1Brake hold standby
indicator ( →P. 224)
(if equipped)
“BSM” indicator
(→P. 290)
Cruise control indicator
( →P. 270)
(if equipped)
“RCTA” indicator
(→P. 290)
Page 227 of 596
227
4
Driving
4-3. Operating the lights and wipers
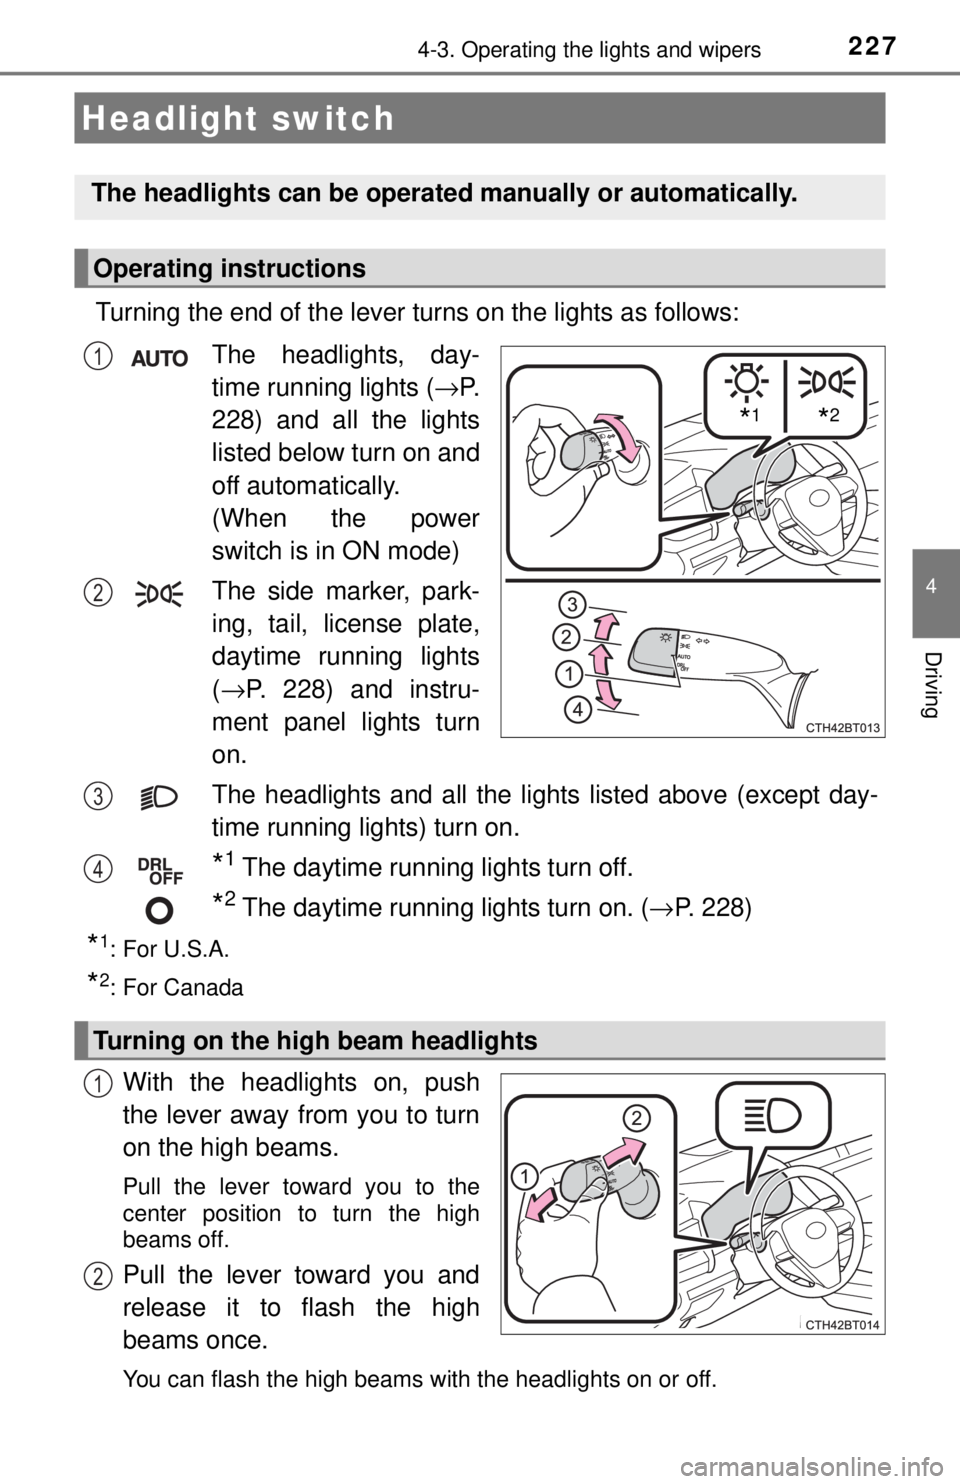
Turning the end of the lever turns on the lights as follows:The headlights, day-
time running lights
(→ P.
228) and all the lights
listed below turn on and
off automatically.
(When the power
switch is in ON mode)
The side marker, park-
ing, tail, license plate,
daytime running lights
( → P. 228) and instru-
ment panel lights turn
on.
The headlights and all the lights listed above (except day-
time running lights) turn on.
*1 The daytime running lights turn off.
*2 The daytime running lights turn on. ( → P. 228)
*1:For U.S.A.
*2: For Canada
With the headlights on, push
the lever away from you to turn
on the high beams.
Pull the lever toward you to the
center position to turn the high
beams off.
Pull the lever toward you and
release it to flash the high
beams once.
You can flash the high beams with the headlights on or off.
Headlight switch
The headlights can be operated manually or automatically.
Operating instructions
*1*2
1
2
3
4
Turning on the high beam headlights
1
2
Page 231 of 596
2314-3. Operating the lights and wipers
4
Driving
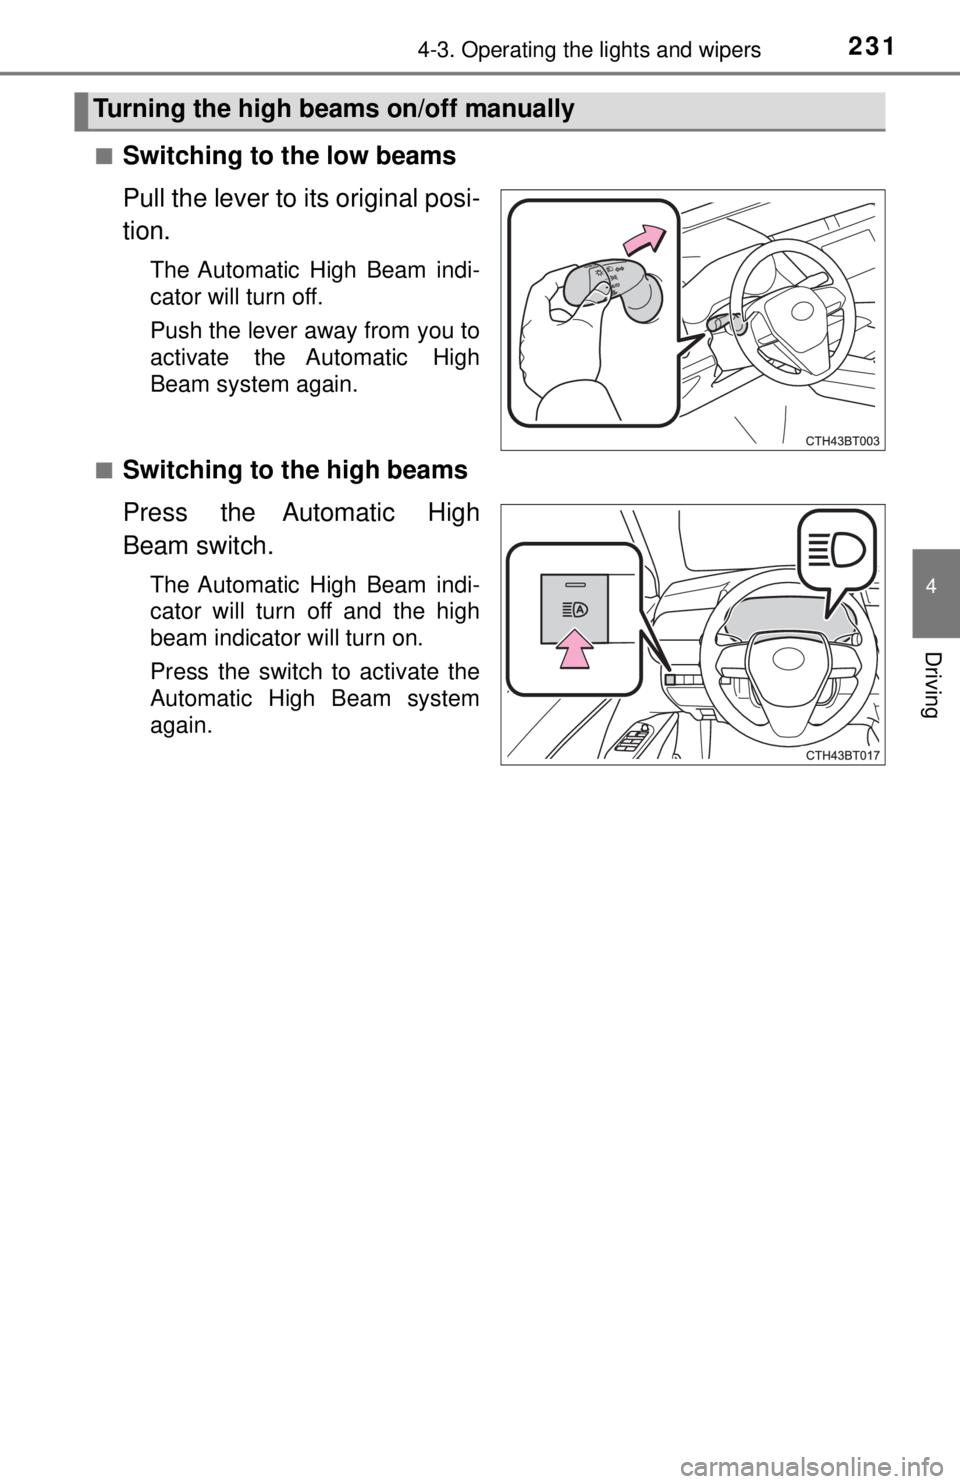
■Switching to the low beams
Pull the lever to its original posi-
tion.
The Automatic High Beam indi-
cator will turn off.
Push the lever away from you to
activate the Automatic High
Beam system again.
■
Switching to the high beams
Press the Automatic High
Beam switch.
The Automatic High Beam indi-
cator will turn off and the high
beam indicator will turn on.
Press the switch to activate the
Automatic High Beam system
again.
Turning the high beams on/off manually
Page 232 of 596

2324-3. Operating the lights and wipers
■Conditions to turn the high beams on/off automatically
●When all of the following conditions are met, the high beams will be turned
on automatically (after approximately 1 second):
• The vehicle speed is approximately 21 mph (34 km/h) or more.
• The area ahead of the vehicle is dark.
• There are no vehicles ahead with headlights or tail lights turned on.
• There are few streetlights on the road ahead.
● If any of the following conditions is met, the high beams will turn off automat-
ically:
• The vehicle speed is below approximately 17 mph (27 km/h).
• The area ahead of the vehicle is not dark.
• Vehicles ahead have their headlights or tail lights turned on.
• There are many streetlights on the road ahead.
■ Camera sensor detection information
●The high beams may not be automatically turned off in the following situa-
tions:
• When a vehicle suddenly appears from around a curve
• When the vehicle is cut in front of by another vehicle
• When vehicles ahead cannot be detected due to repeated curves, road
dividers or roadside trees
• When vehicles ahead appear in a faraway lane on a wide road
• When the lights of vehicles ahead are not on
● The high beams may be turned off if a vehicle ahead that is using fog lights
without its headlights turned on is detected.
● House lights, street lights, traffic signals, and illuminated billboards or signs
and other reflective objects may cause the high beams to change to the low
beams, or the low beams to remain on.
● The following factors may affect the amount of time taken for the high
beams to turn on or off:
• The brightness of the headlights, fog lights, and tail lights of vehicles
ahead
• The movement and direction of vehicles ahead
• When a vehicle ahead only has operational lights on one side
• When a vehicle ahead is a two-wheeled vehicle
• The condition of the road (gradient, curve, condition of the road surface,
etc.)
• The number of passengers and amount of luggage in the vehicle
● The high beams may turn on or off unexpectedly.
● Bicycles or similar vehicles may not be detected.
Page 233 of 596

2334-3. Operating the lights and wipers
4
Driving
●In the following situations the system may not be able to correctly detect the
surrounding brightness level. This may cause the low beams to remain on
or the high beams to flash or dazzle pedestrians or vehicles ahead. In such
a case, it is necessary to manually switch between the high and low beams.
• When driving in inclement weather (heavy rain, snow, fog, sandstorms,
etc.)
• When the windshield is obscured by fog, mist, ice, dirt, etc.
• When the windshield is cracked or damaged
• When the camera sensor is deformed or dirty
• When the temperature of the camera sensor is extremely high
• When the surrounding brightness level is equal to that of headlights, tai\
l
lights or fog lights
• When headlights or tail lights of vehicles ahead are turned off, dirty, changing color, or not aimed properly
• When the vehicle is hit by water, snow, dust, etc. from a preceding vehi- cle
• When driving through an area of in termittently changing brightness and
darkness
• When frequently and repeatedly driving ascending/descending roads, or roads with rough, bumpy or uneven surfaces (such as stone-paved
roads, gravel roads, etc.)
• When frequently and repeatedly taking curves or driving on a winding road
• When there is a highly reflective object ahead of the vehicle, such as a sign or mirror
• When the back of a preceding vehicle is highly reflective, such as a con-
tainer on a truck
• When the vehicle's headlights are damaged or dirty, or are not aimed properly
• When the vehicle is listing or titling due to a flat tire, a trailer being towed,
etc.
• When the headlights are changed between the high beams and low
beams repeatedly in an abnormal manner
• When the driver believes that the high beams may be flashing or dazzling pedestrians or other drivers
■ Temporarily lowering sensor sensitivity
The sensitivity of the sensor can be temporarily lowered.
Turn the power switch off while the following conditions are met.
• The headlight switch is in .
• The headlight switch lever is in high beam position.
Turn the power switch to the ON mode.
Within 5 seconds after , repeat pulling the headlight switch lever to the
original position then pushing it to the high beam position quickly 9 times,
then leave the lever in high beam position.
Automatic High Beam (headlights) may turn on even when the vehicle is
stopped.
1
2
32
Page 242 of 596
2424-5. Using the driving support systems
◆PCS (Pre-Collision System)
→P. 2 4 9
◆LDA (Lane Departure Alert with steering control)
→P. 2 6 0
◆Automatic High Beam
→P. 2 3 0
◆Dynamic radar cruise cont rol with full-speed range
→ P. 2 7 0
Toyota Safety Sense P
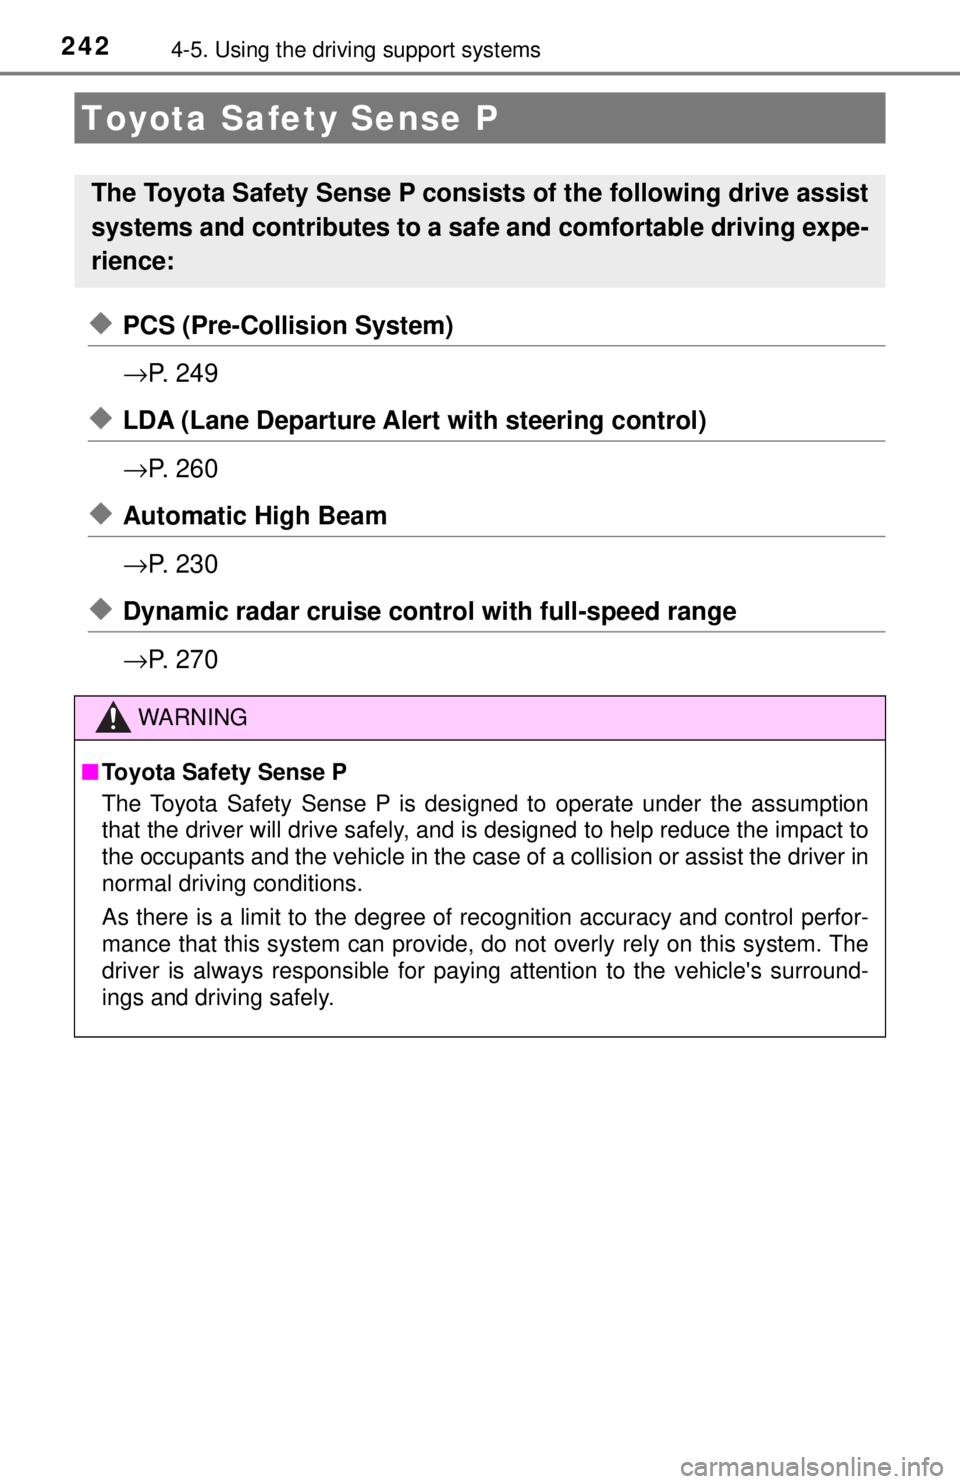
The Toyota Safety Sense P consists of the following drive assist
systems and contributes to a safe and comfortable driving expe-
rience:
WARNING
■Toyota Safety Sense P
The Toyota Safety Sense P is designed to operate under the assumption
that the driver will drive safely, and is designed to help reduce the impact to
the occupants and the vehicle in the case of a collision or assist the driver in
normal driving conditions.
As there is a limit to the degree of recognition accuracy and control perfor-
mance that this system can provide, do not overly rely on this system. The
driver is always responsible for paying attention to the vehicle's surround-
ings and driving safely.
Page 268 of 596

2684-5. Using the driving support systems
■Conditions in which functions may not operate properly
In the following situations, the camera sensor may not detect white (yellow)
lines and various functions may not operate normally.
●There are shadows on the road that run parallel with, or cover, the white
(yellow) lines.
● The vehicle is driven in an area without white (yellow) lines, such as in front
of a tollgate or checkpoint, or at an intersection, etc.
● The white (yellow) lines are cracked, “Botts’ dots”, “Raised pavement
marker” or stones are present.
● The white (yellow) lines cannot be seen or are difficult to see due to sand,
etc.
● The vehicle is driven on a road surface that is wet due to rain, puddles, etc.
● The traffic lines are yellow (which may be more difficult to recognize than
lines that are white).
● The white (yellow) lines cross over a curb, etc.
● The vehicle is driven on a bright surface, such as concrete.
● The vehicle is driven on a surface that is bright due to reflected light, etc.
● The vehicle is driven in an area where the brightness changes suddenly,
such as at the entrances and exits of tunnels, etc.
● Light from the headlights of an oncoming vehicle, the sun, etc. enters the
camera.
● The vehicle is driven where the road diverges, merges, etc.
● The vehicle is driven on a slope.
● The vehicle is driven on a road which tilts left or right, or a winding road.
● The vehicle is driven on an unpaved or rough road.
● The vehicle is driven around a sharp curve.
● The traffic lane is excessively narrow or wide.
● The vehicle is extremely tilted due to carrying heavy luggage or having
improper tire pressure.
● The distance to the preceding vehicle is extremely short.
● The vehicle is moving up and down a large amount due to road conditions
during driving (poor roads or road seams).
● The headlight lenses are dirty and emit a faint amount of light at night, or the
beam axis has deviated.
● The vehicle is struck by a crosswind.
● The vehicle has just changed lanes or crossed an intersection.
● Snow tires, etc. are equipped.
Page 494 of 596

4947-2. Steps to take in an emergency
■If “Auto Power Off to Conserve Battery” is displayed
This message is displayed when the power was cut off due to the automatic
power off function.
The next time the hybrid system is started, increase the engine speed sl\
ightly
and maintain it at that speed for approximately 5 minutes to recharge the 12-
volt battery.
■ If “A New Key has been Registered Contact Your Dealer for Details” is
displayed
This message will be displayed each time the driver’s door is opened when
the doors are unlocked from the outside for approximately one week after a
new electronic key has been registered.
If this message is displayed but you have not had a new electronic key regis-
tered, ask your Toyota dealer to check if an unknown electronic key (other
than those in your possession) has been registered.
■ When “Headlight System Malfunction Visit Your Dealer” is displayed
The following systems may be malfunctioning. Have the vehicle inspected by
your Toyota dealer immediately.
● The LED headlight system
● The automatic headlight leveling system (if equipped)
● Automatic High Beam
● AFS (Adaptive Front-lighting System) (if equipped)
■ “Front Camera Unavailable” or “Front Camera Vision Blocked Clean and
Demist Windshield” is displayed
The following systems may be suspended until the problem shown in the
message is resolved.
● PCS (Pre-Collision System)
● LDA (Lane Departure Alert with steering control)
● Dynamic radar cruise control with full-speed range
● Automatic High Beam
■ If “Maintenance Required Soon” is displayed
Indicates that all maintenance according to the driven distance on the mainte-
nance schedule
* should be performed soon.
Comes on approximately 4500 miles (7200 km) after the message has been
reset.
If necessary, perform maintenance. Please reset the message after the main-
tenance is performed. ( →P. 405)
*: Refer to the separate “Scheduled Maintenance Guide” or “Owner’s Manual
Supplement” for the maintenance interval applicable to your vehicle.
Page 505 of 596

5057-2. Steps to take in an emergency
7
When trouble arises
WARNING
■When using the compact spare tire
●Remember that the compact spare tire provided is specifically
designed for use with your vehicle. Do not use your compact spare tire
on another vehicle.
●Do not use more than one compact spare tires simultaneously.
●Replace the compact spare tire with a standard tire as soon as possi-
ble.
●Avoid sudden acceleration, abrupt steering, sudden braking and shift-
ing operations that cause sudden engine braking.
■When the compact spare tire is attached
The vehicle speed may not be correctly detected, and the following sys-
tems may not operate correctly:
*:If equipped
■Speed limit when using the compact spare tire
Do not drive at speeds in excess of 50 mph (80 km/h) when a compact
spare tire is installed on the vehicle.
The compact spare tire is not designed for driving at high speeds. Fail-
ure to observe this precaution may lead to an accident causing death or
serious injury.
■After using the tools and jack
Before driving, make sure all the tools and jack are securely in place in
their storage location to reduce the po ssibility of personal injury during a
collision or sudden braking.
• ABS & Brake assist
• VSC
•TRAC
• EPS
• Automatic High Beam
•AFS (Adaptive Front-lighting
System)
*
• Dynamic radar cruise control with full-speed range
• LDA (Lane Departure Alert with steering control) • PCS (Pre-Collision System)
• Tire pressure warning system
• BSM (Blind Spot Monitor)
*
• Intuitive parking assist*
• Intelligent Clearance Sonar
(ICS)
*
• Rear view monitor system*
• Toyota parking assist monitor*
• Panoramic view monitor*
• Navigation system*
Page 531 of 596
5318-1. Specifications
8
Vehicle specifications
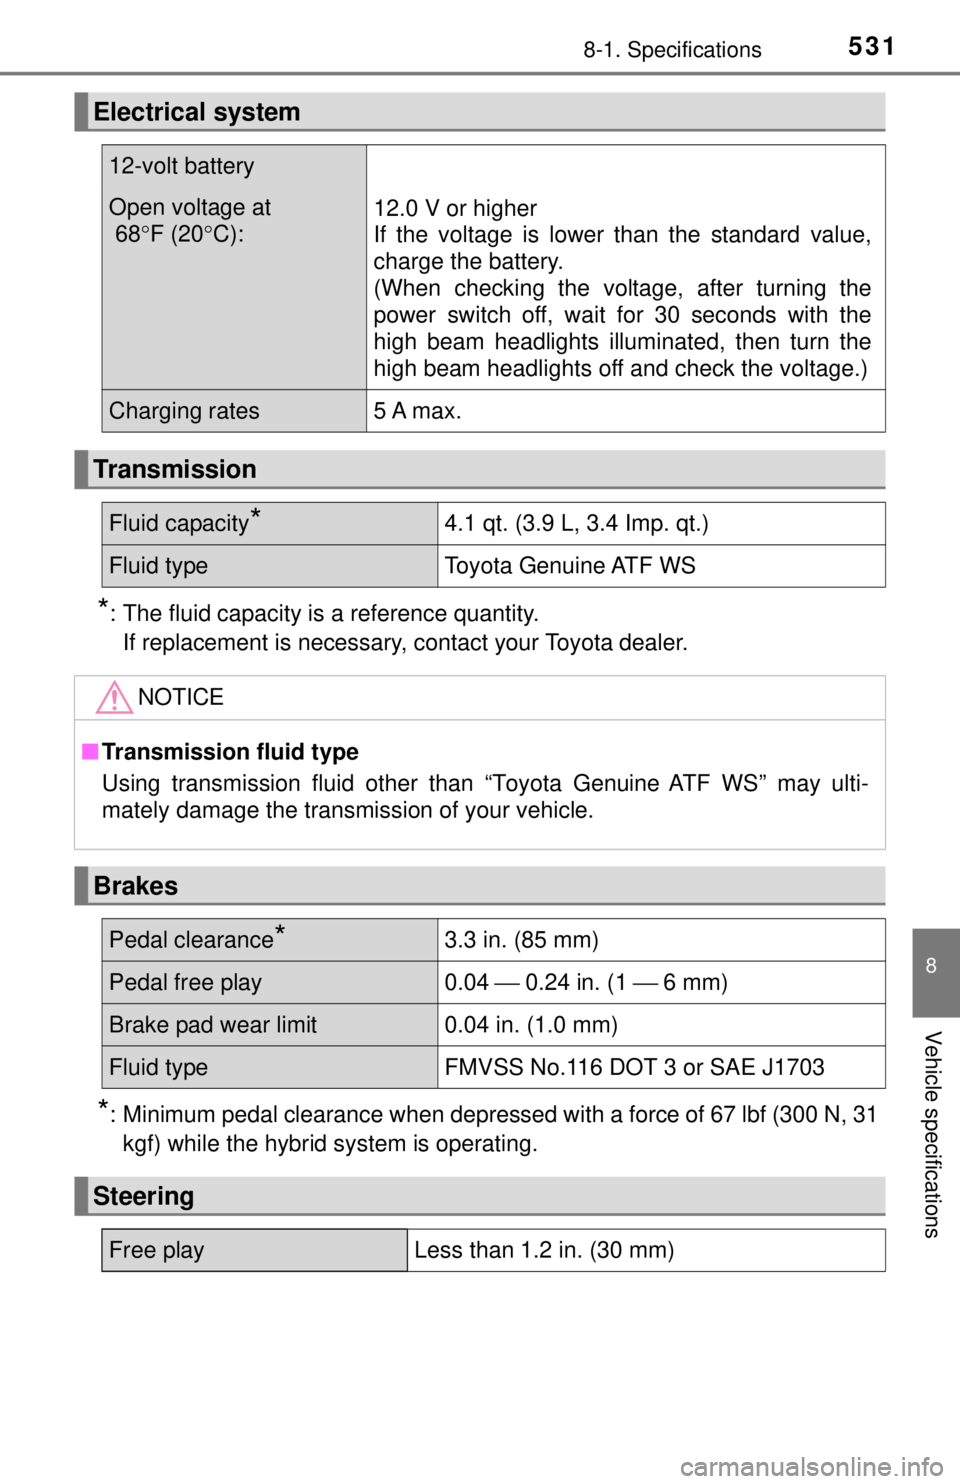
*: The fluid capacity is a reference quantity. If replacement is necessary, contact your Toyota dealer.
*: Minimum pedal clearance when depressed with a force of 67 lbf (300 N, 31kgf) while the hybrid system is operating.
Electrical system
12-volt battery
Open voltage at
68 °F (20 °C):12.0 V or higher
If the voltage is lower than the standard value,
charge the battery.
(When checking the voltage, after turning the
power switch off, wait for 30 seconds with the
high beam headlights illuminated, then turn the
high beam headlights off and check the voltage.)
Charging rates5 A max.
Transmission
Fluid capacity*4.1 qt. (3.9 L, 3.4 Imp. qt.)
Fluid type Toyota Genuine ATF WS
NOTICE
■Transmission fluid type
Using transmission fluid other than “Toyota Genuine ATF WS” may ulti-
mately damage the transmission of your vehicle.
Brakes
Pedal clearance*3.3 in. (85 mm)
Pedal free play 0.04 ⎯ 0.24 in. (1 ⎯ 6 mm)
Brake pad wear limit0.04 in. (1.0 mm)
Fluid type FMVSS No.116 DOT 3 or SAE J1703
Steering
Free playLess than 1.2 in. (30 mm)