tow TOYOTA CAMRY HYBRID 2021 (in English) Owner's Guide
[x] Cancel search | Manufacturer: TOYOTA, Model Year: 2021, Model line: CAMRY HYBRID, Model: TOYOTA CAMRY HYBRID 2021Pages: 624, PDF Size: 15.98 MB
Page 395 of 624
3955-3. Using the storage features
5
Interior features
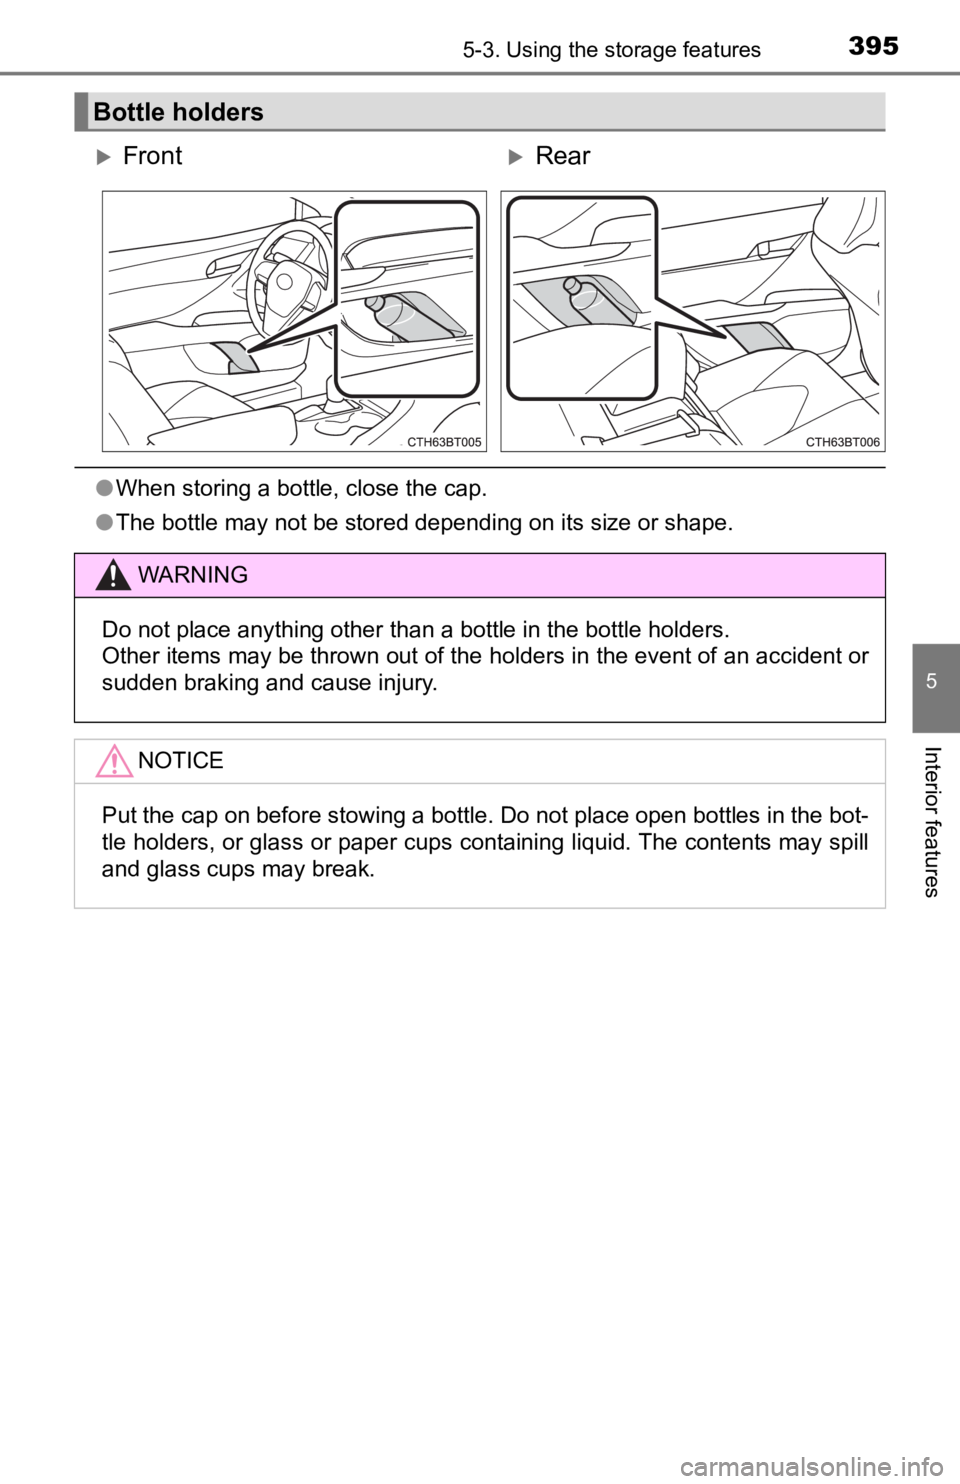
●When storing a bottle, close the cap.
● The bottle may not be stored depending on its size or shape.
Bottle holders
FrontRear
WARNING
Do not place anything other than a bottle in the bottle holders .
Other items may be thrown out of the holders in the event of an accident or
sudden braking and cause injury.
NOTICE
Put the cap on before stowing a bottle. Do not place open bottles in the bot-
tle holders, or glass or paper cups containing liquid. The cont ents may spill
and glass cups may break.
Page 406 of 624
4065-4. Other interior features
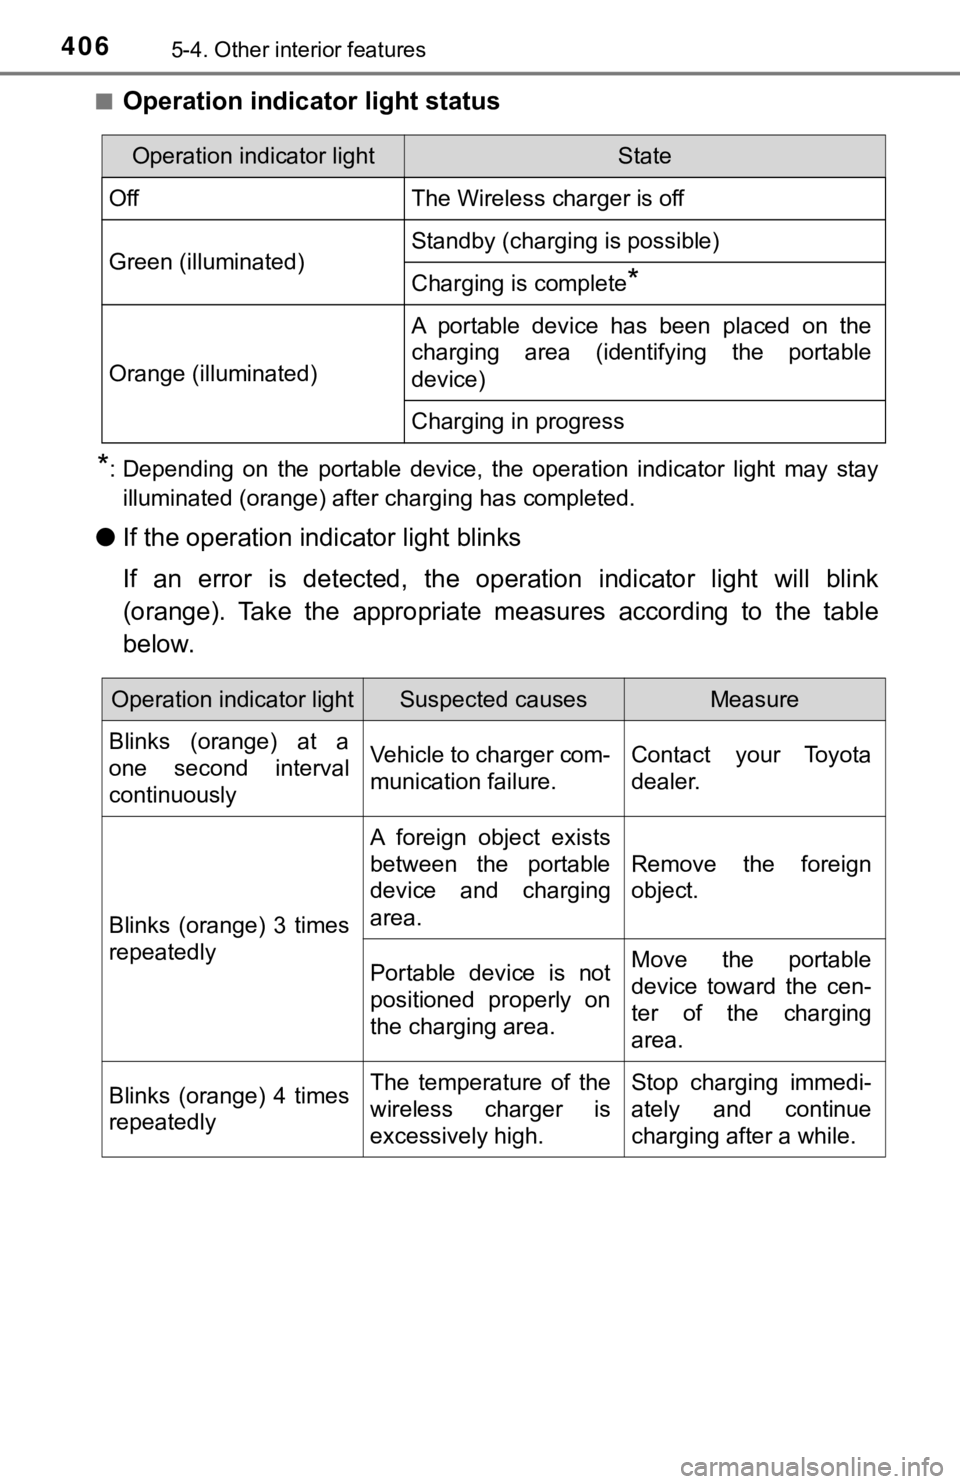
■Operation indicator light status
*: Depending on the portable device, the operation indicator light may stay
illuminated (orange) after charging has completed.
● If the operation indi cator light blinks
If an error is detected, the operation indicator light will bli nk
(orange). Take the appropriate measures according to the table
below.
Operation indicator lightState
OffThe Wireless charger is off
Green (illuminated)Standby (charging is possible)
Charging is complete*
Orange (illuminated)
A portable device has been placed on the
charging area (identifying the portable
device)
Charging in progress
Operation indicator lightSuspected causesMeasure
Blinks (orange) at a
one second interval
continuously Vehicle to charger com-
munication failure.
Contact your Toyota
dealer.
Blinks (orange) 3 times
repeatedly A foreign object exists
between the portable
device and charging
area.
Remove the foreign
object.
Portable device is not
positioned properly on
the charging area. Move the portable
device toward the cen-
ter of the charging
area.
Blinks (orange) 4 times
repeatedly The temperature of the
wireless charger is
excessively high.Stop charging immedi-
ately and continue
charging after a while.
Page 412 of 624
4125-4. Other interior features
NOTICE
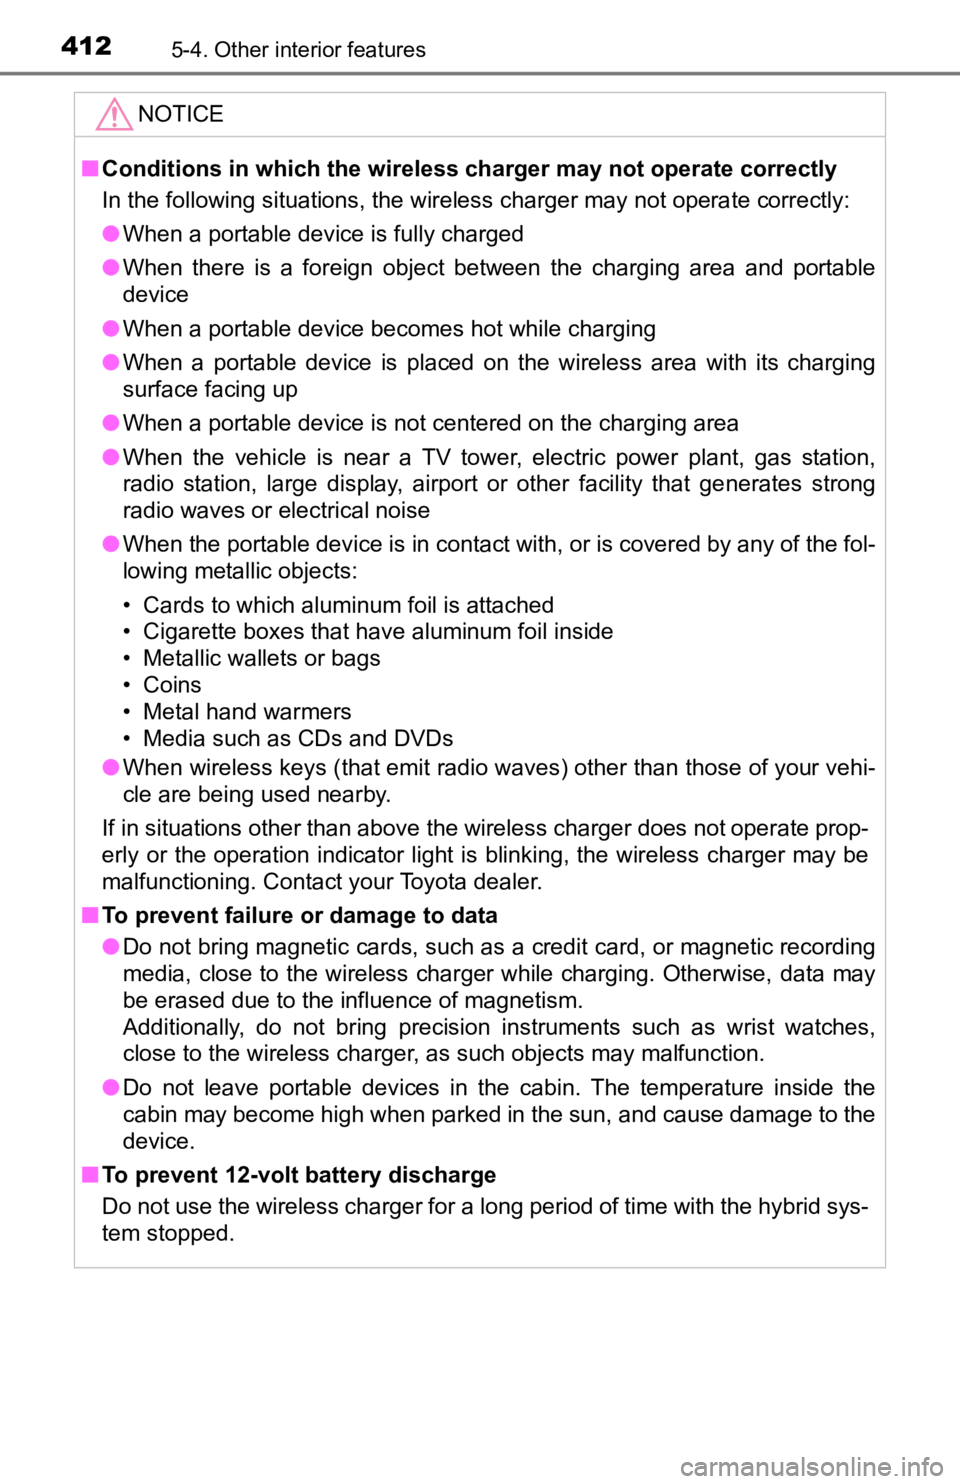
■Conditions in which the wireless charger may not operate correctly
In the following situations, the wireless charger may not operate correctly:
● When a portable device is fully charged
● When there is a foreign object between the charging area and portable
device
● When a portable device becomes hot while charging
● When a portable device is placed on the wireless area with its charging
surface facing up
● When a portable device is not centered on the charging area
● When the vehicle is near a TV tower, electric power plant, gas station,
radio station, large display, airport or other facility that ge nerates strong
radio waves or electrical noise
● When the portable device is in contact with, or is covered by a ny of the fol-
lowing metallic objects:
• Cards to which aluminum foil is attached
• Cigarette boxes that have aluminum foil inside
• Metallic wallets or bags
• Coins
• Metal hand warmers
• Media such as CDs and DVDs
● When wireless keys (that emit radio waves) other than those of your vehi-
cle are being used nearby.
If in situations other than above the wireless charger does not operate prop-
erly or the operation indicator light is blinking, the wireless charger may be
malfunctioning. Contact your Toyota dealer.
■ To prevent failure or damage to data
● Do not bring magnetic cards, such as a credit card, or magnetic recording
media, close to the wireless charger while charging. Otherwise, data may
be erased due to the influence of magnetism.
Additionally, do not bring precision instruments such as wrist watches,
close to the wireless charger, as such objects may malfunction.
● Do not leave portable devices in the cabin. The temperature ins ide the
cabin may become high when parked in the sun, and cause damage to the
device.
■ To prevent 12-volt battery discharge
Do not use the wireless charger for a long period of time with the hybrid sys-
tem stopped.
Page 438 of 624
4386-3. Do-it-yourself maintenance
Do-it-yourself ser vice precautions
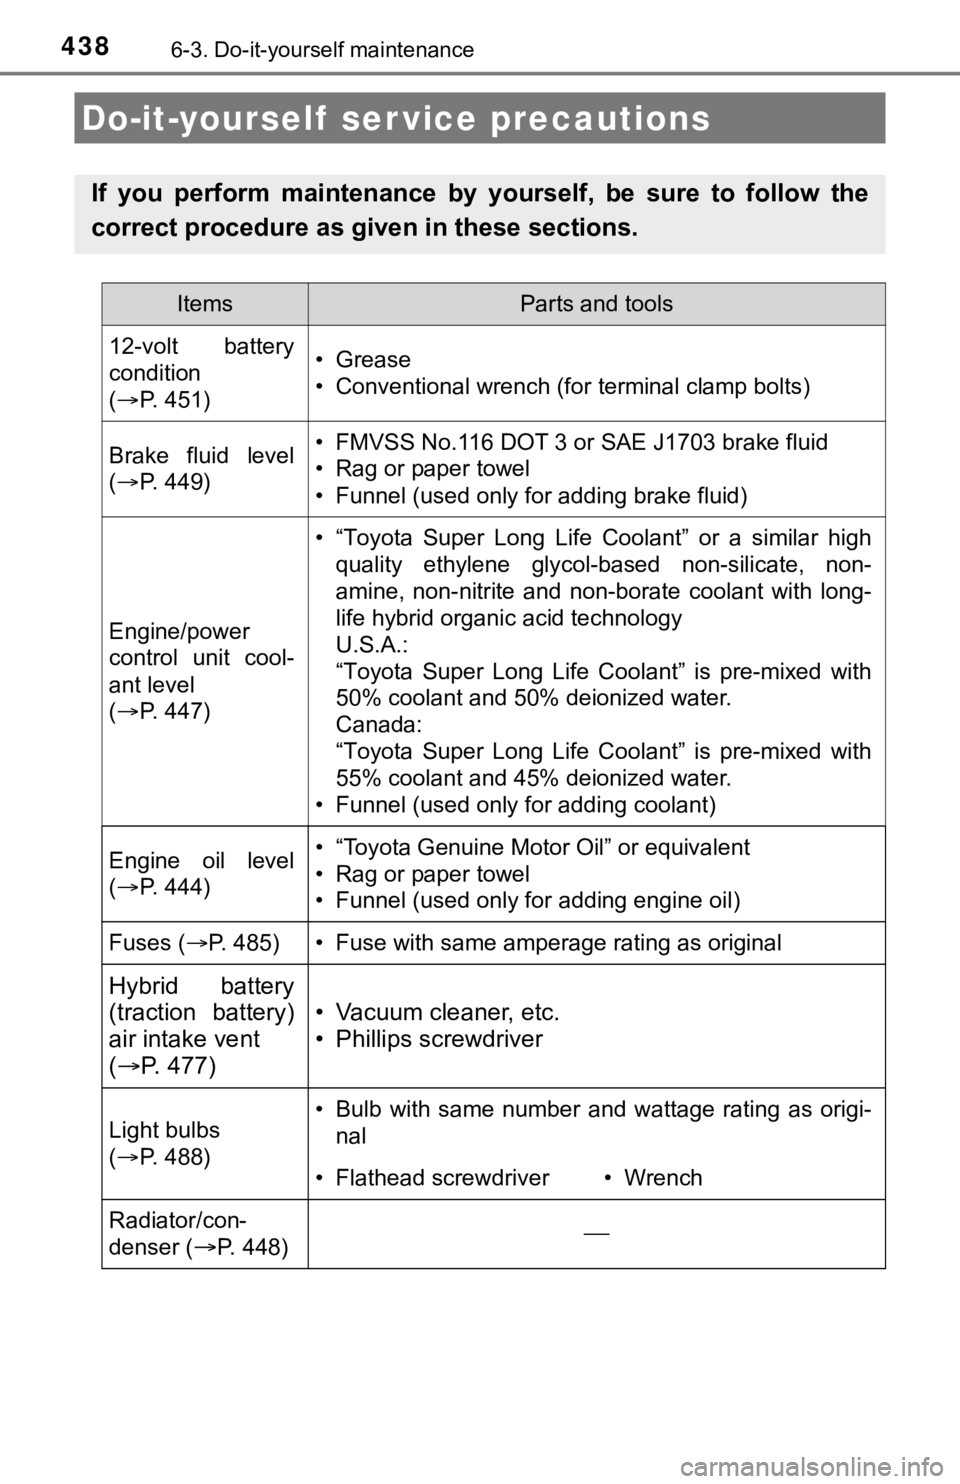
If you perform maintenance by yourself, be sure to follow the
correct procedure as given in these sections.
ItemsParts and tools
12-volt battery
condition
( P. 451)•Grease
• Conventional wrench (for terminal clamp bolts)
Brake fluid level
( P. 449)• FMVSS No.116 DOT 3 or SAE J1703 brake fluid
• Rag or paper towel
• Funnel (used only for adding brake fluid)
Engine/power
control unit cool-
ant level
( P. 447)
• “Toyota Super Long Life Coolant” or a similar high
quality ethylene glycol-based non-silicate, non-
amine, non-nitrite and non-borate coolant with long-
life hybrid organic acid technology
U.S.A.:
“Toyota Super Long Life Coolant” is pre-mixed with
50% coolant and 50% deionized water.
Canada:
“Toyota Super Long Life Coolant” is pre-mixed with
55% coolant and 45% deionized water.
• Funnel (used only for adding coolant)
Engine oil level
( P. 444)• “Toyota Genuine Motor Oil” or equivalent
• Rag or paper towel
• Funnel (used only for adding engine oil)
Fuses ( P. 485)• Fuse with same amperage rating as original
Hybrid battery
(traction battery)
air intake vent
( P. 477)
• Vacuum cleaner, etc.
• Phillips screwdriver
Light bulbs
( P. 488)• Bulb with same number and wattage rating as origi-
nal
• Flathead screwdriver• Wrench
Radiator/con-
denser (
P. 448)
Page 463 of 624

4636-3. Do-it-yourself maintenance
6
Maintenance and care
■Situations in which the tire pressure warning system may not oper-
ate properly
●In the following situations, the tire pressure warning system m ay not
operate properly.
• If non-genuine Toyota wheels are used.
• If a tire has been replaced with a tire that is not an OE (Ori ginal
Equipment) tire.
• If a tire has been replaced with a tire that is not of the spe cified size.
• If tire chains, e tc. are installed.
• If a window tint that affects r adio wave signals is installed.
• If there is a lot of snow or ice on the vehicle, particularly around the
wheels or wheel housings.
• If the tire inflation pressure is much higher than the specifi ed level.
• If wheels not equipped with tire pressure warning valve and tr ansmit-
ter are used.
• If the ID codes of the tire pre ssure warning valve and transmi tters are
not registered in the tire pressure warning computer.
●Performance may be affected in the following situations.
• When driving near a TV tower, electric power plant, gas statio n, radio
station, large display, airport or other facilit y that generates strong
radio waves or electrical noise
• When carrying a portable radio, cellular phone, cordless phone or
other wireless communication device
Vehicles with a tire inflation pressure display function: If ti re position
information is not correctly displayed due to the radio wave co nditions,
the display may be corrected by changing the location of the ve hicle as
the radio wave conditions may change.
●When the vehicle is stopped, the time taken for the warning to start or
turn off may be longer.
●When the inflation pressure of a tire drops rapidly, for exampl e when a
tire has burst, the warning may not operate.
Page 478 of 624
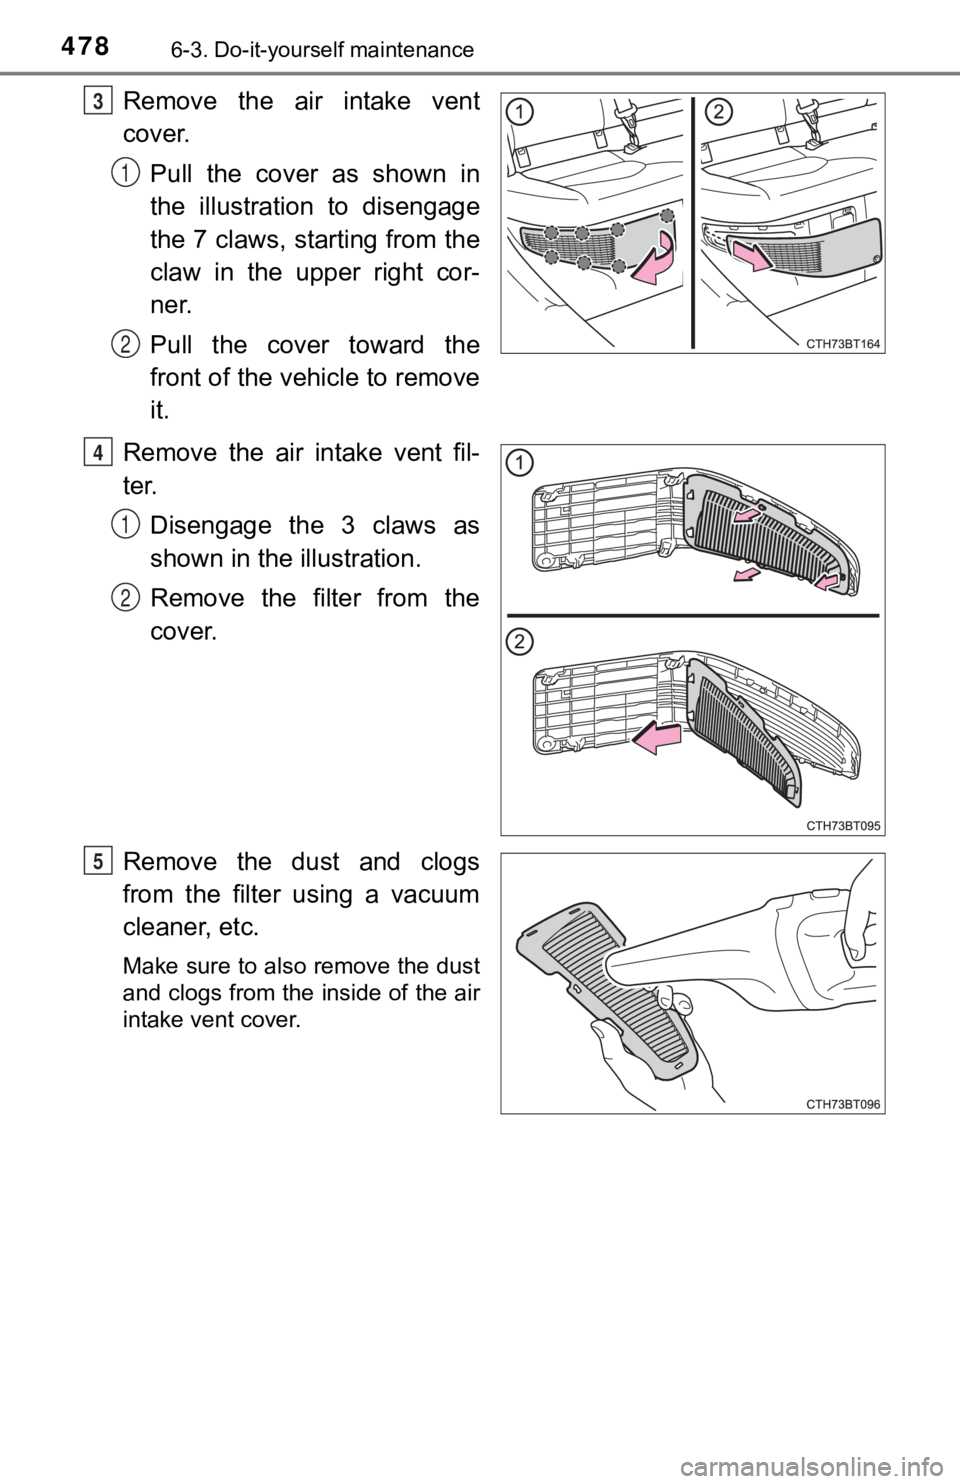
4786-3. Do-it-yourself maintenance
Remove the air intake vent
cover.Pull the cover as shown in
the illustration to disengage
the 7 claws, starting from the
claw in the upper right cor-
ner.
Pull the cover toward the
front of the vehicle to remove
it.
Remove the air intake vent fil-
ter. Disengage the 3 claws as
shown in the illustration.
Remove the filter from the
cover.
Remove the dust and clogs
from the filter using a vacuum
cleaner, etc.
Make sure to also remove the dust
and clogs from the inside of the air
intake vent cover.
3
1
2
4
1
2
5
Page 483 of 624
4836-3. Do-it-yourself maintenance
6
Maintenance and care
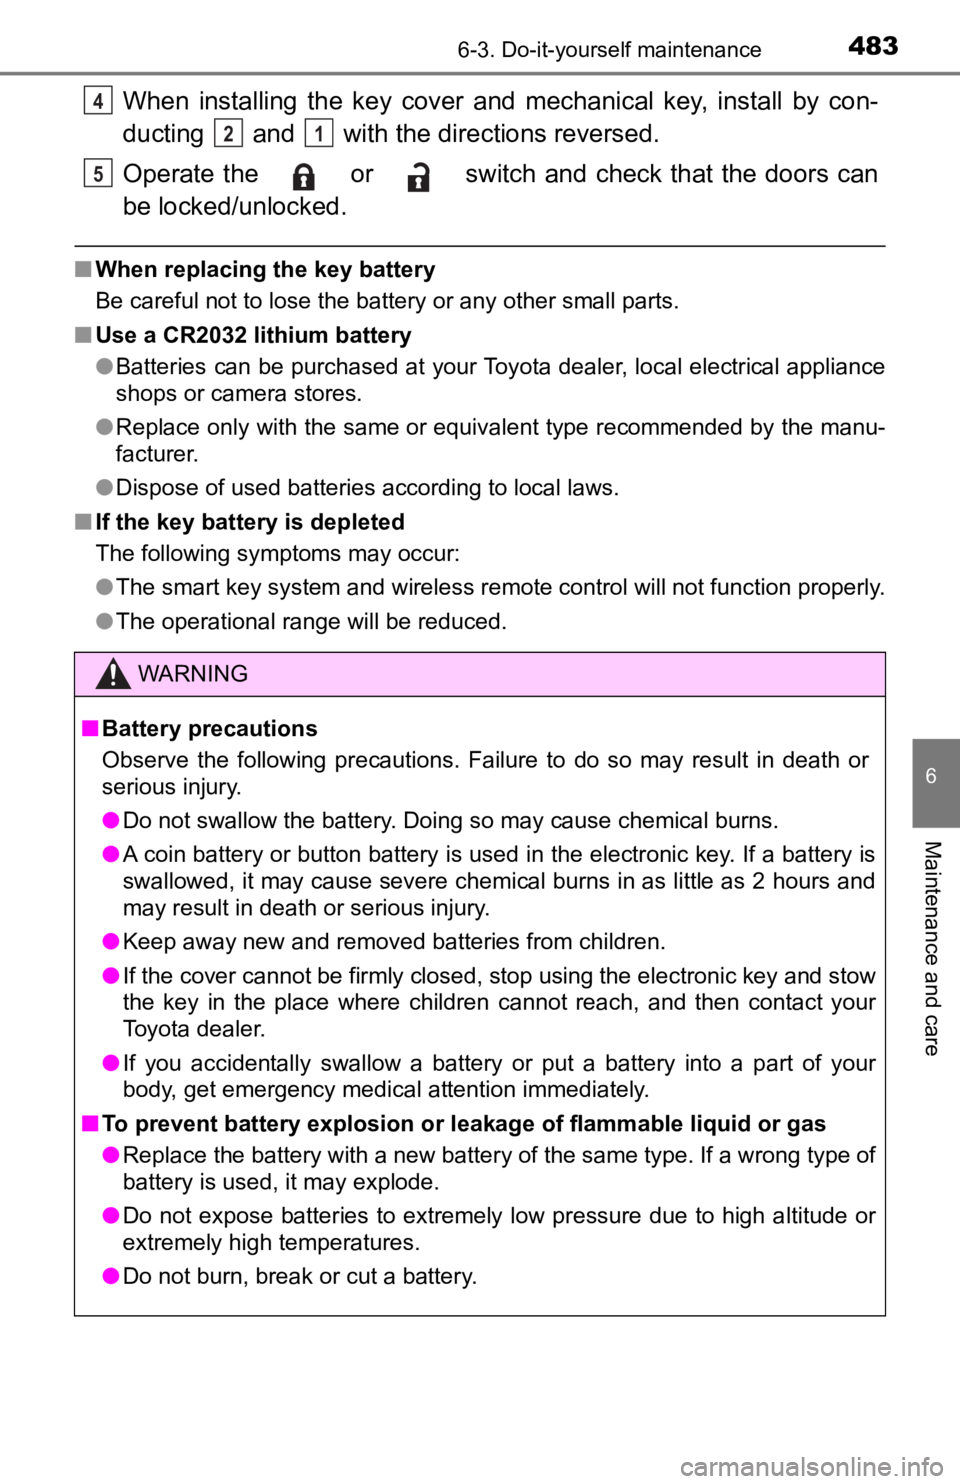
When installing the key cover and mechanical key, install by con-
ducting and with the directions reversed.
Operate the or switch and check that the doors can
be locked/unlocked.
■When replacing the key battery
Be careful not to lose the battery or any other small parts.
■ Use a CR2032 lithium battery
●Batteries can be purchased at your Toyota dealer, local electrical appliance
shops or camera stores.
● Replace only with the same or equivalent type recommended by the manu-
facturer.
● Dispose of used batteries according to local laws.
■ If the key battery is depleted
The following symptoms may occur:
●The smart key system and wireless remote control will not funct ion properly.
● The operational range will be reduced.
WARNING
■ Battery precautions
Observe the following precautions. Failure to do so may result in death or
serious injury.
● Do not swallow the battery. Doing so may cause chemical burns.
● A coin battery or button battery is used in the electronic key. If a battery is
swallowed, it may cause severe chemical burns in as little as 2 hours and
may result in death or serious injury.
● Keep away new and removed batteries from children.
● If the cover cannot be firmly closed, stop using the electronic key and stow
the key in the place where children cannot reach, and then contact your
Toyota dealer.
● If you accidentally swallow a battery or put a battery into a part of your
body, get emergency medical attention immediately.
■ To prevent battery explosion or leakage of flammable liquid or gas
● Replace the battery with a new battery of the same type. If a w rong type of
battery is used, it may explode.
● Do not expose batteries to extremely low pressure due to high altitude or
extremely high temperatures.
● Do not burn, break or cut a battery.
4
21
5
Page 495 of 624
4956-3. Do-it-yourself maintenance
6
Maintenance and care
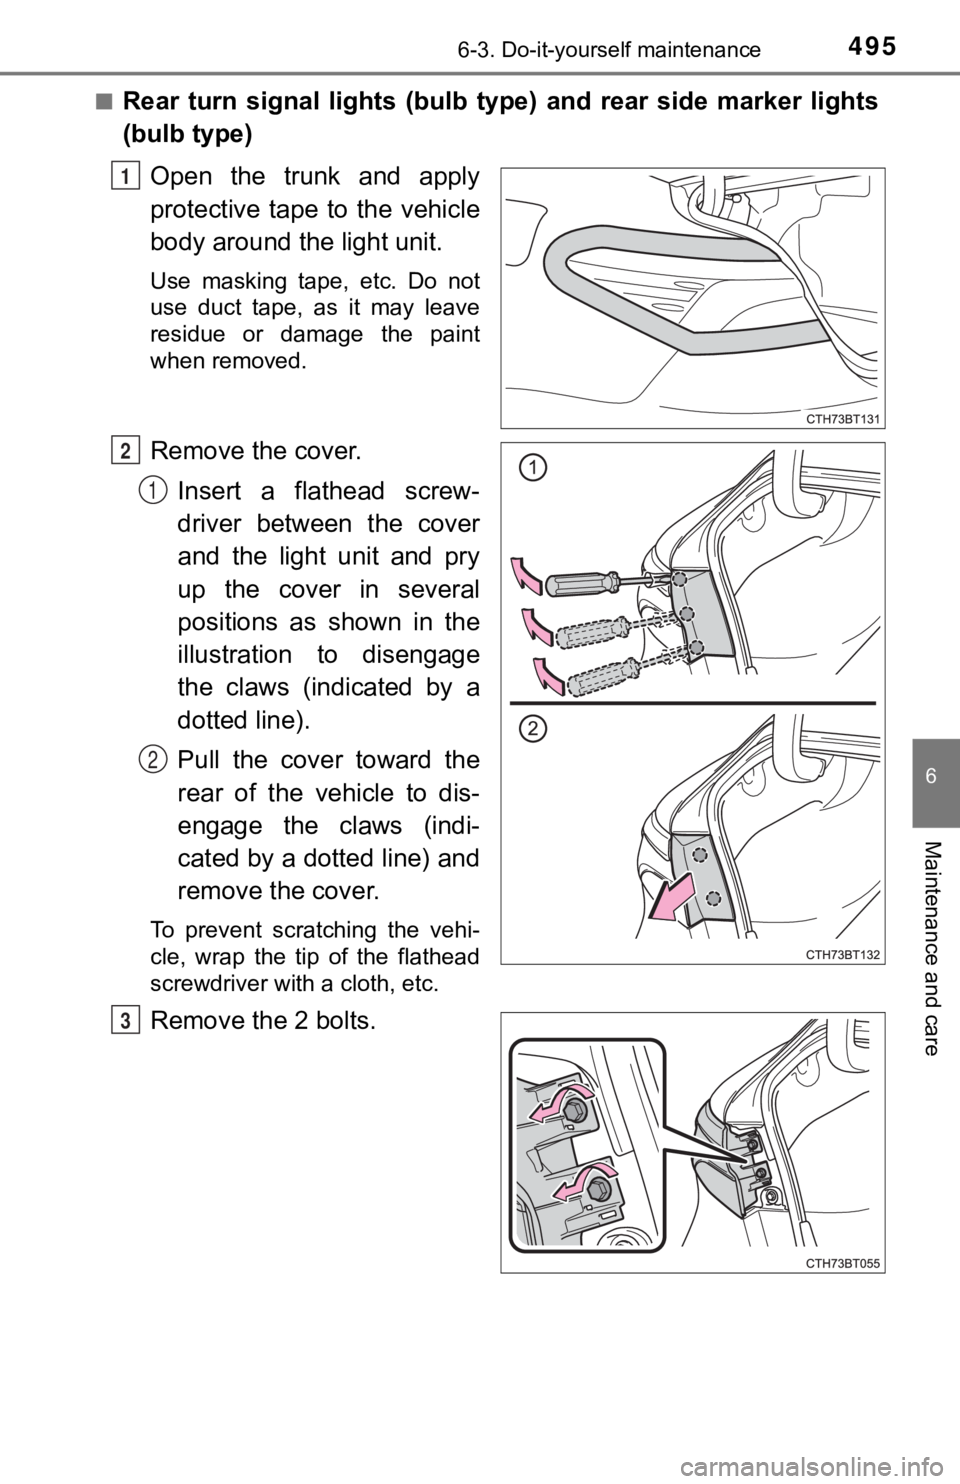
■Rear turn signal lights (bulb type) and rear side marker lights
(bulb type)Open the trunk and apply
protective tape to the vehicle
body around the light unit.
Use masking tape, etc. Do not
use duct tape, as it may leave
residue or damage the paint
when removed.
Remove the cover.Insert a flathead screw-
driver between the cover
and the light unit and pry
up the cover in several
positions as shown in the
illustration to disengage
the claws (indicated by a
dotted line).
Pull the cover toward the
rear of the vehicle to dis-
engage the claws (indi-
cated by a dotted line) and
remove the cover.
To prevent scratching the vehi-
cle, wrap the tip of the flathead
screwdriver with a cloth, etc.
Remove the 2 bolts.
1
2
1
2
3
Page 496 of 624
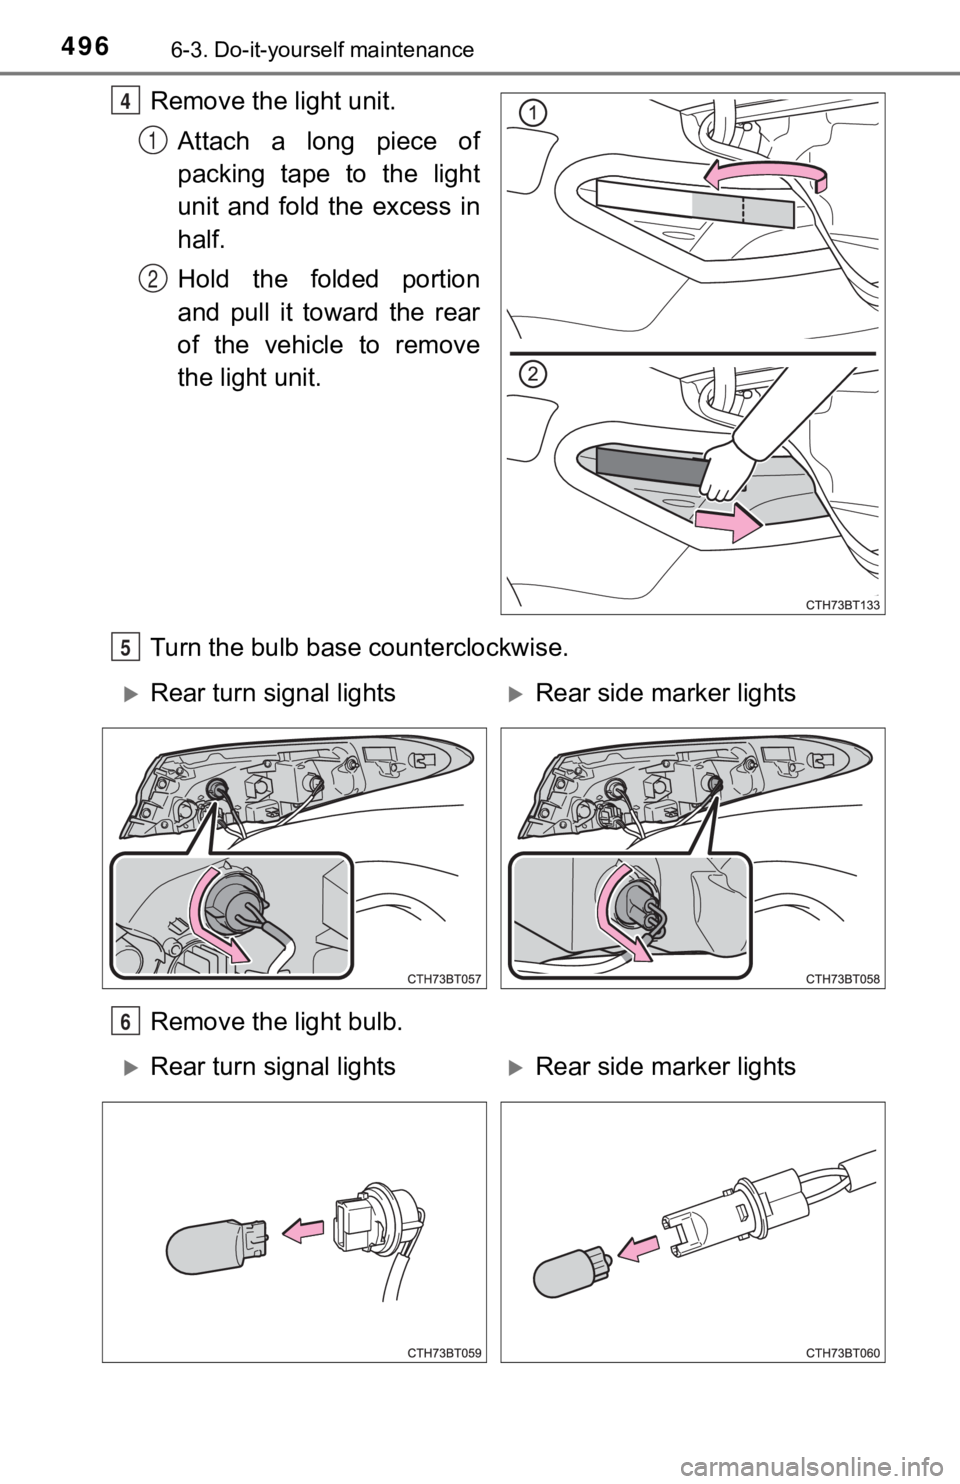
4966-3. Do-it-yourself maintenance
Remove the light unit.Attach a long piece of
packing tape to the light
unit and fold the excess in
half.
Hold the folded portion
and pull it toward the rear
of the vehicle to remove
the light unit.
Turn the bulb base counterclockwise.
Remove the light bulb.4
1
2
5
Rear turn signal lightsRear side ma rker lights
6
Rear turn signal lightsRear side marker lights
Page 497 of 624
4976-3. Do-it-yourself maintenance
6
Maintenance and care
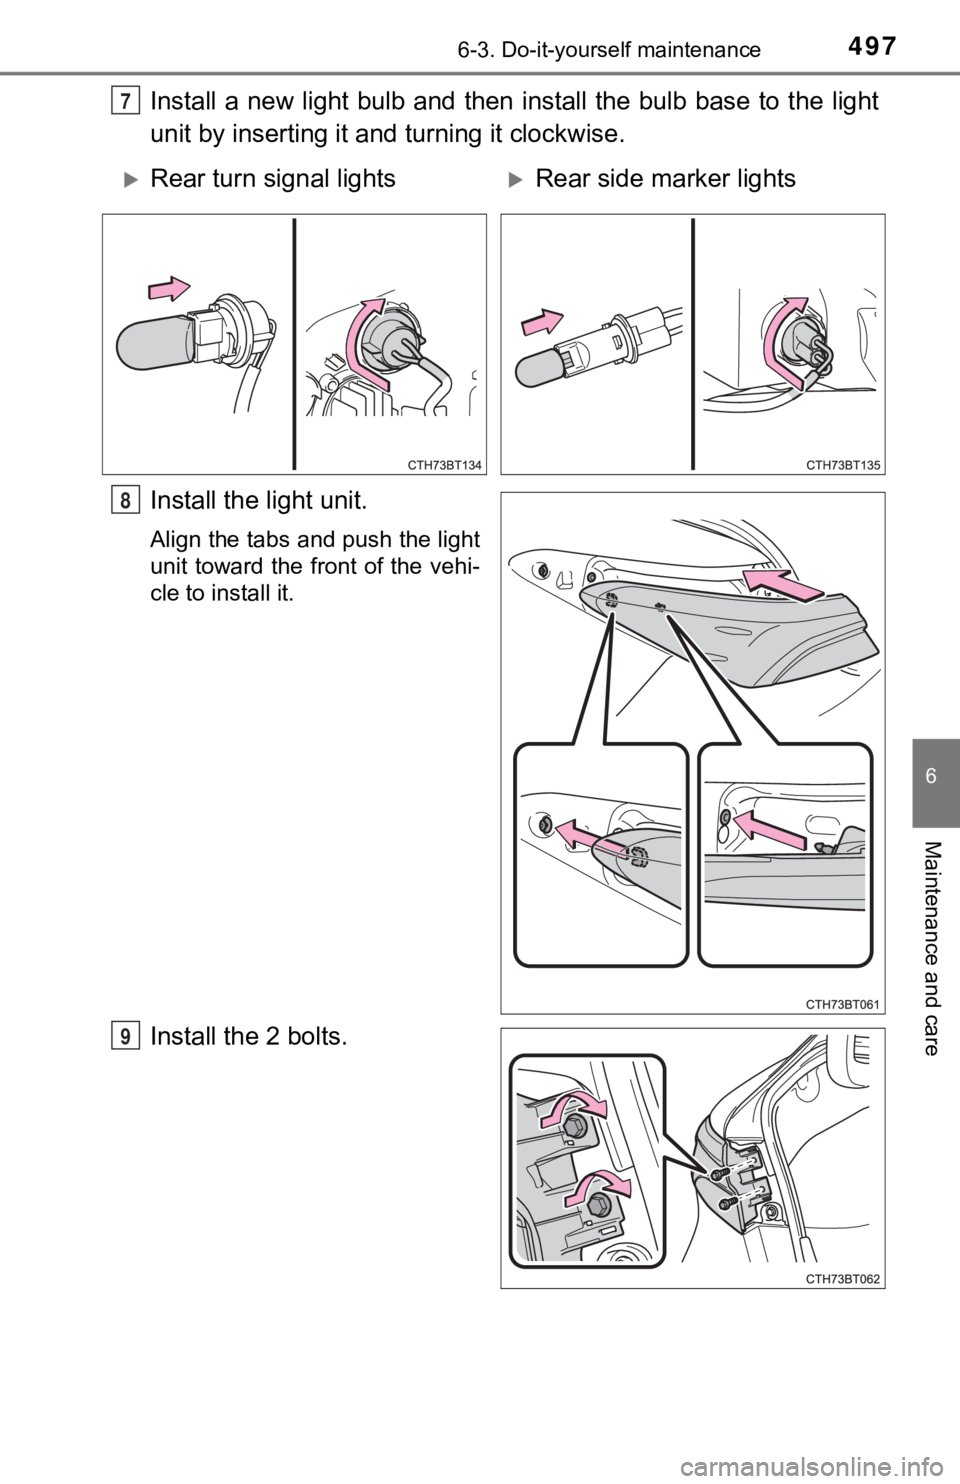
Install a new light bulb and then install the bulb base to the light
unit by inserting it and turning it clockwise.
Install the light unit.
Align the tabs and push the light
unit toward the front of the vehi-
cle to install it.
Install the 2 bolts.
7
Rear turn signal lightsRear side ma rker lights
8
9