Button TOYOTA COROLLA 2014 11.G Owner's Manual
[x] Cancel search | Manufacturer: TOYOTA, Model Year: 2014, Model line: COROLLA, Model: TOYOTA COROLLA 2014 11.GPages: 612, PDF Size: 12.58 MB
Page 124 of 612
1243-3. Adjusting the seats
COROLLA_TMMMS_TMMC_U (OM12F00U)
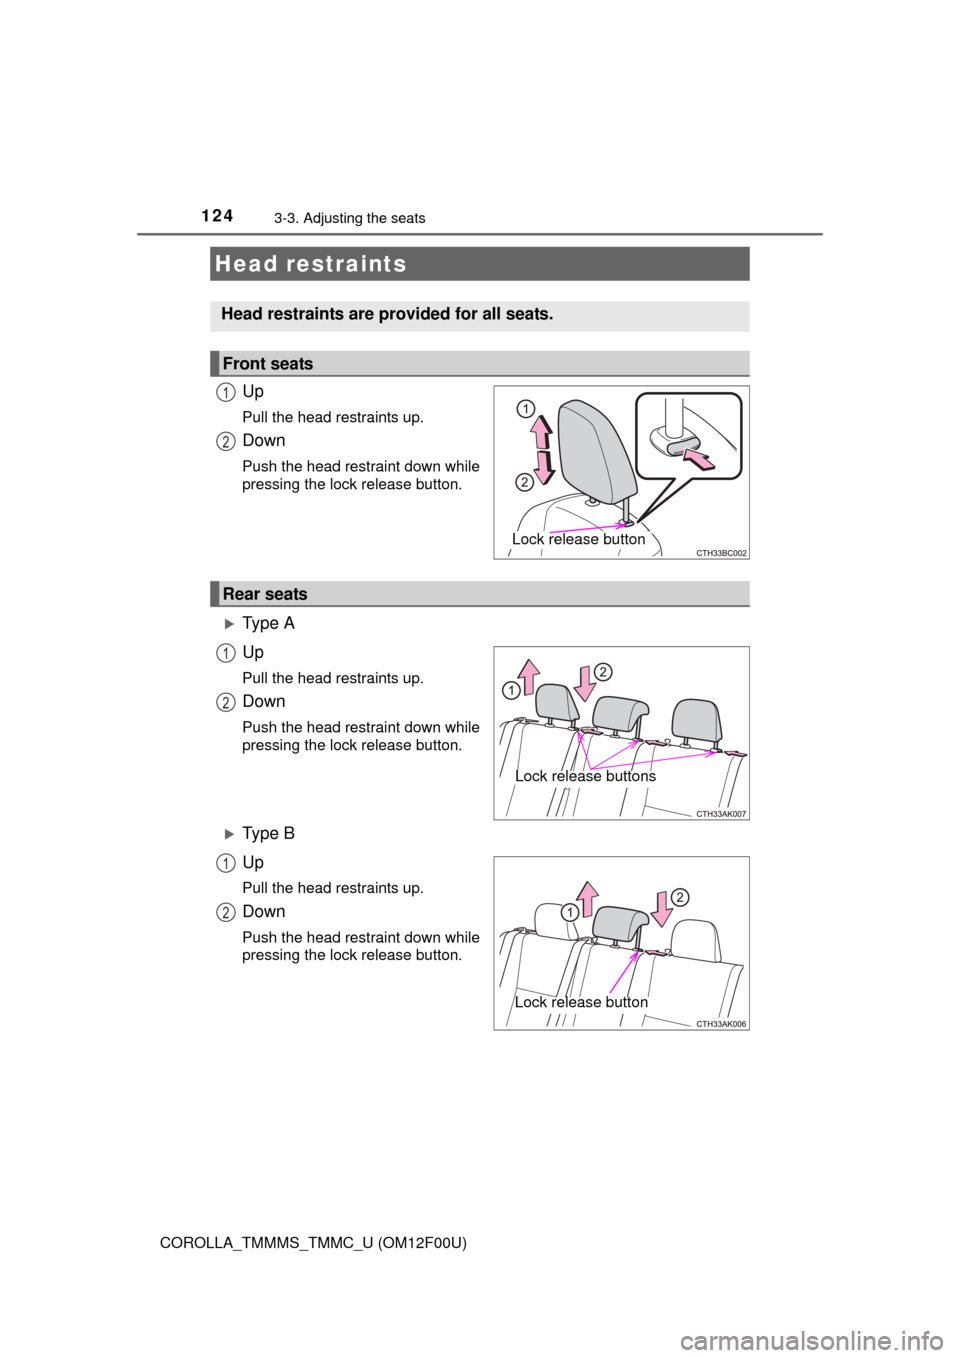
Up
Pull the head restraints up.
Down
Push the head restraint down while
pressing the lock release button.
Ty p e A
Up
Pull the head restraints up.
Down
Push the head restraint down while
pressing the lock release button.
Ty p e B
Up
Pull the head restraints up.
Down
Push the head restraint down while
pressing the lock release button.
Head restraints
Head restraints are provided for all seats.
Front seats
Lock release button
1
2
Rear seats
Lock release buttons
1
2
Lock release button
1
2
Page 125 of 612
1253-3. Adjusting the seats
3
Operation of each component
COROLLA_TMMMS_TMMC_U (OM12F00U)
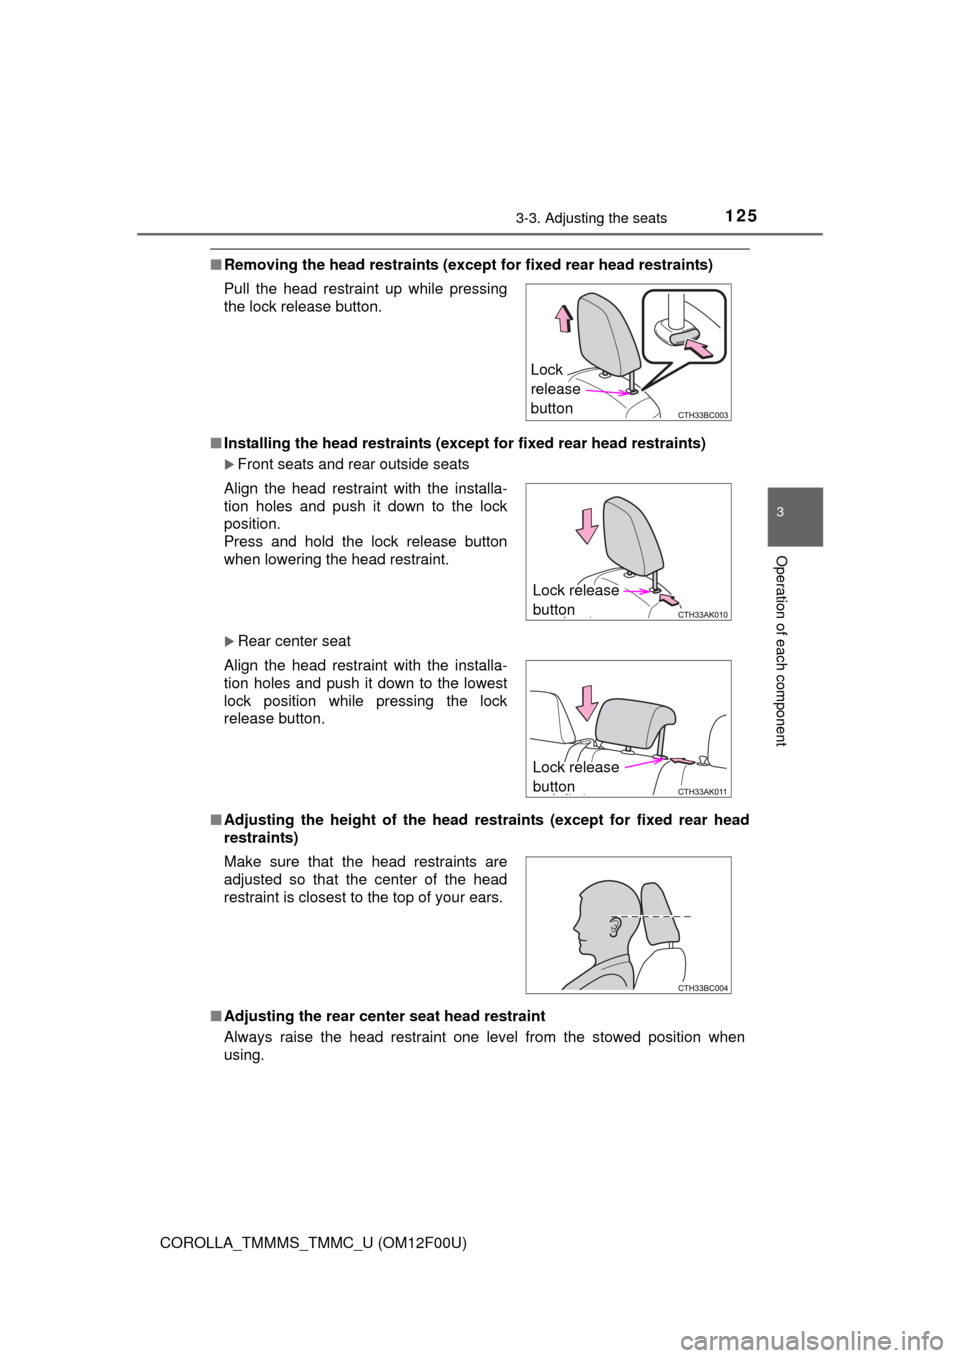
■Removing the head restraints (except for fixed rear head restraints)
■Installing the head restraints (except for fixed rear head restraints)
Front seats and rear outside seats
Rear center seat
■Adjusting the height of the head restraints (except for fixed rear head
restraints)
■Adjusting the rear center seat head restraint
Always raise the head restraint one level from the stowed position when
using. Pull the head restraint up while pressing
the lock release button.
Align the head restraint with the installa-
tion holes and push it down to the lock
position.
Press and hold the lock release button
when lowering the head restraint.
Align the head restraint with the installa-
tion holes and push it down to the lowest
lock position while pressing the lock
release button.
Make sure that the head restraints are
adjusted so that the center of the head
restraint is closest to the top of your ears.
Lock
release
button
Lock release
button
Lock release
button
Page 130 of 612
1303-4. Adjusting the steering wheel and mirrors
COROLLA_TMMMS_TMMC_U (OM12F00U)
Auto anti-glare inside rear view mirror
Responding to the level of brightness of the headlights of vehicles
behind, the reflected light is automatically reduced.
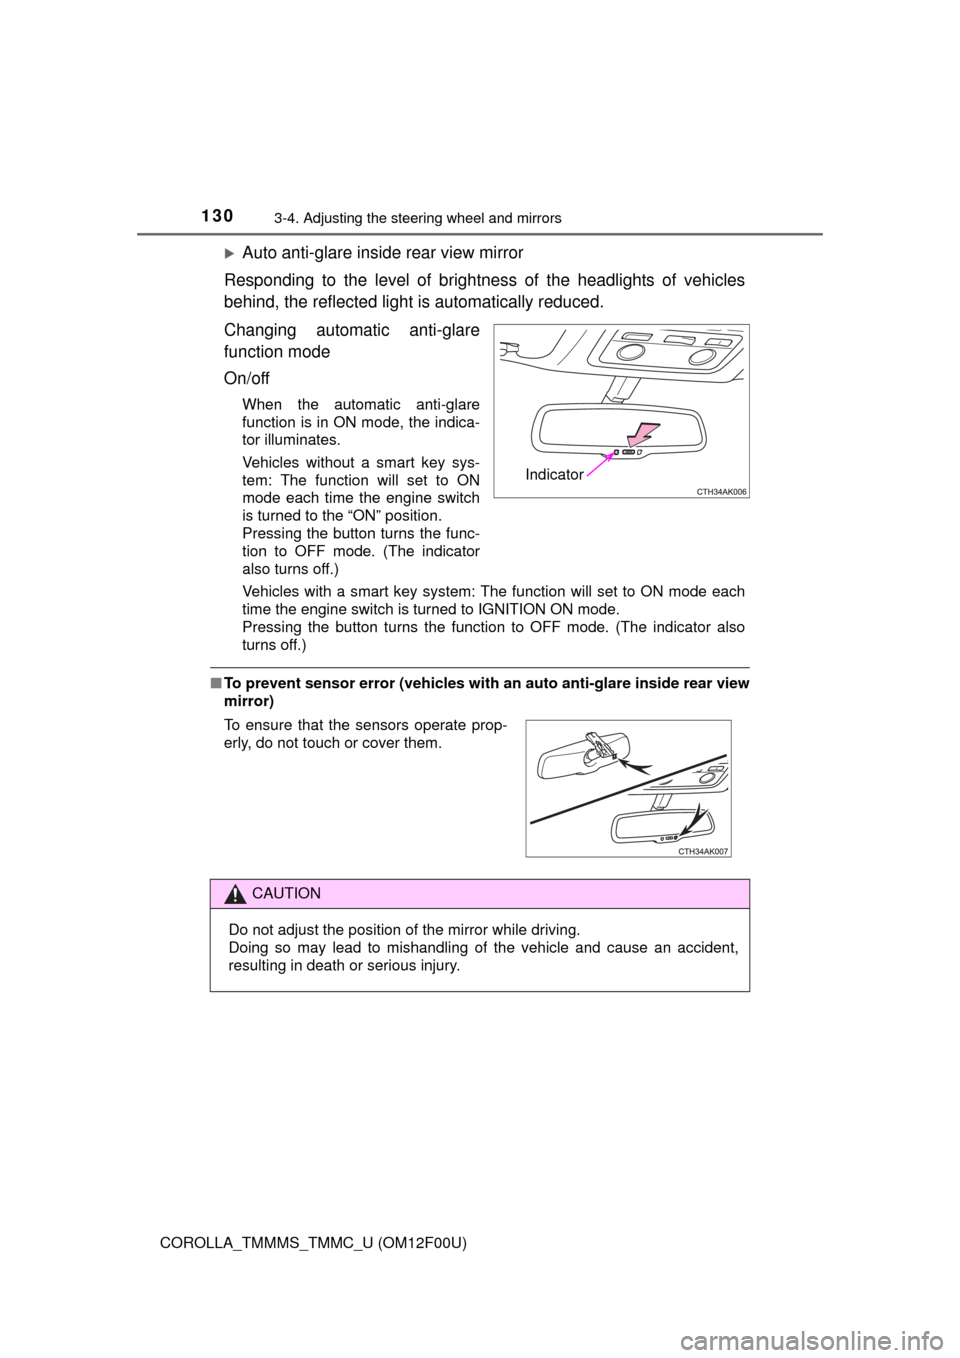
Changing automatic anti-glare
function mode
On/off
When the automatic anti-glare
function is in ON mode, the indica-
tor illuminates.
Vehicles without a smart key sys-
tem: The function will set to ON
mode each time the engine switch
is turned to the “ON” position.
Pressing the button turns the func-
tion to OFF mode. (The indicator
also turns off.)
Vehicles with a smart key system: The function will set to ON mode each
time the engine switch is turned to IGNITION ON mode.
Pressing the button turns the function to OFF mode. (The indicator also
turns off.)
■To prevent sensor error (vehicles with an auto anti-glare inside rear view
mirror)
Indicator
To ensure that the sensors operate prop-
erly, do not touch or cover them.
CAUTION
Do not adjust the position of the mirror while driving.
Doing so may lead to mishandling of the vehicle and cause an accident,
resulting in death or serious injury.
Page 183 of 612
1834-2. Driving procedures
4
Driving
COROLLA_TMMMS_TMMC_U (OM12F00U)
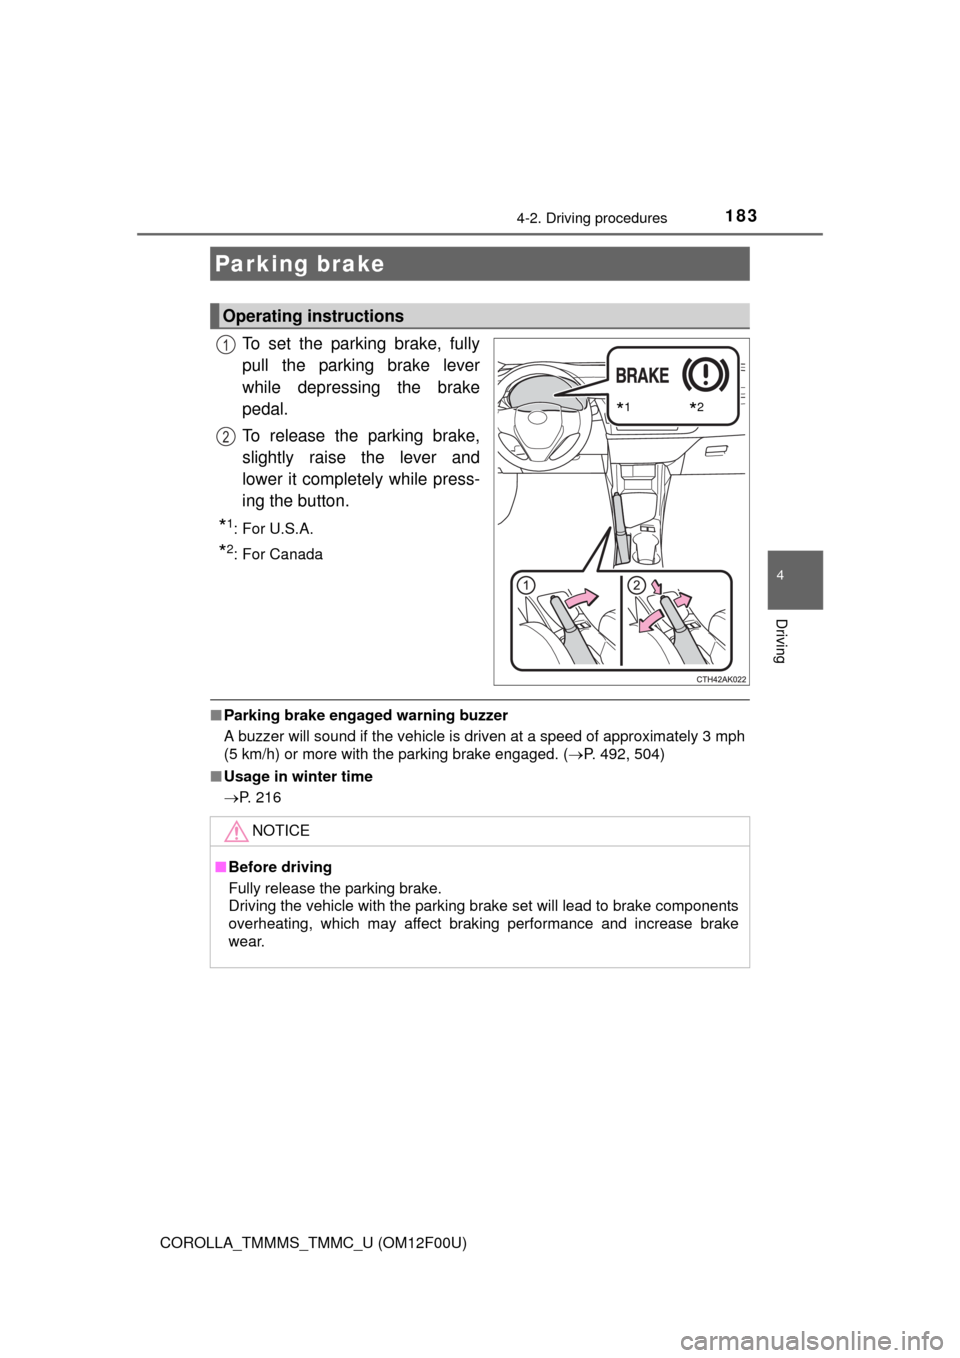
To set the parking brake, fully
pull the parking brake lever
while depressing the brake
pedal.
To release the parking brake,
slightly raise the lever and
lower it completely while press-
ing the button.
*1:For U.S.A.
*2: For Canada
■Parking brake engaged warning buzzer
A buzzer will sound if the vehicle is driven at a speed of approximately 3 mph
(5 km/h) or more with the parking brake engaged. (P. 492, 504)
■Usage in winter time
P. 216
Parking brake
Operating instructions
*1*2
1
2
NOTICE
■Before driving
Fully release the parking brake.
Driving the vehicle with the parking brake set will lead to brake components
overheating, which may affect braking performance and increase brake
wear.
Page 197 of 612
197
4
Driving
COROLLA_TMMMS_TMMC_U (OM12F00U)
4-5. Using the driving support systems
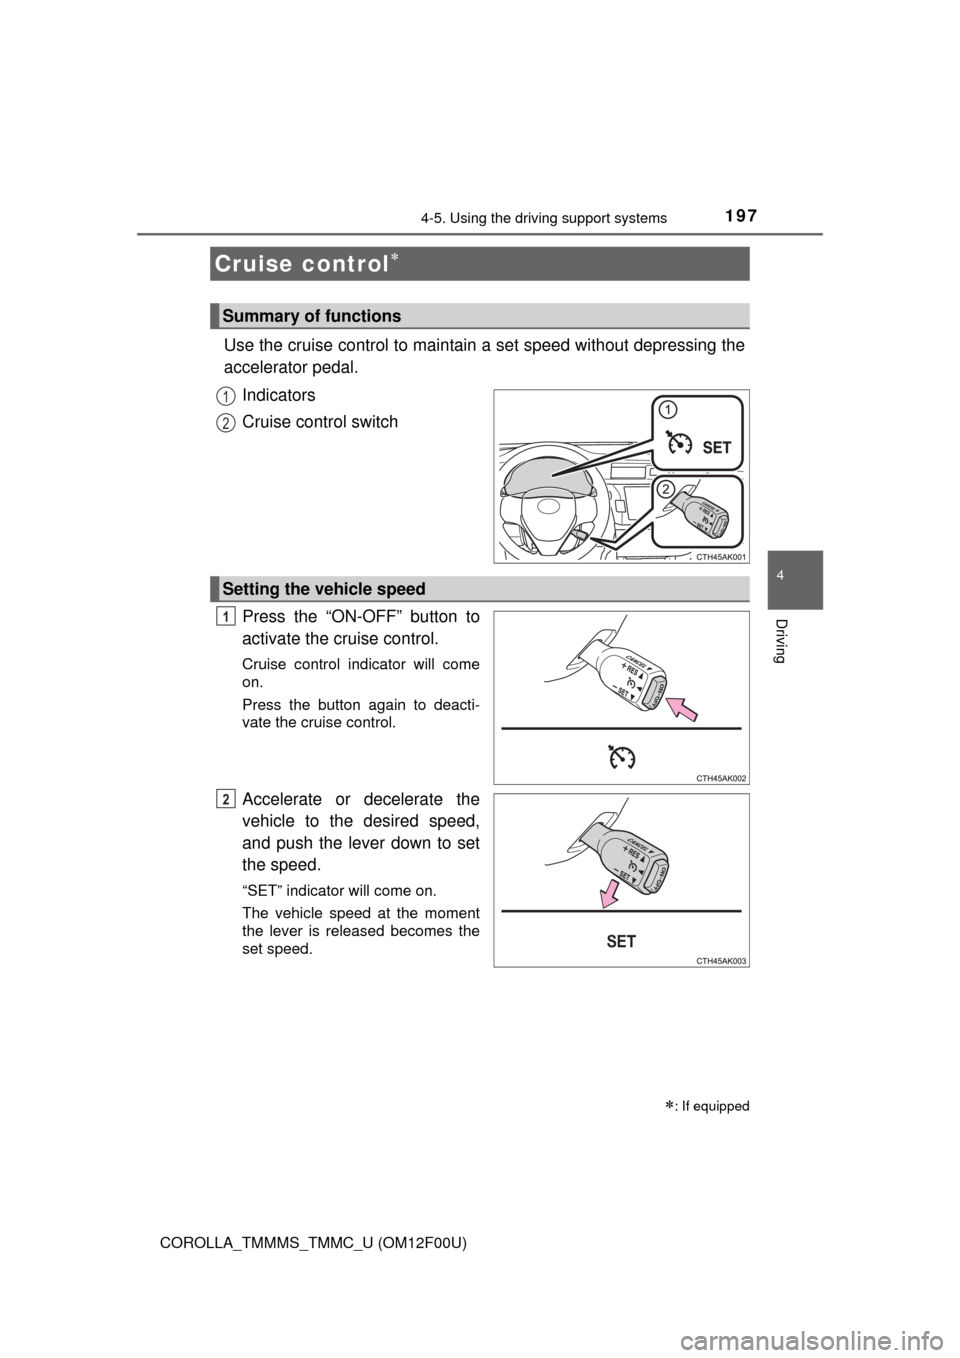
Use the cruise control to maintain a set speed without depressing the
accelerator pedal.
Indicators
Cruise control switch
Press the “ON-OFF” button to
activate the cruise control.
Cruise control indicator will come
on.
Press the button again to deacti-
vate the cruise control.
Accelerate or decelerate the
vehicle to the desired speed,
and push the lever down to set
the speed.
“SET” indicator will come on.
The vehicle speed at the moment
the lever is released becomes the
set speed.
Cruise control
: If equipped
Summary of functions
1
2
Setting the vehicle speed
1
2
Page 199 of 612

1994-5. Using the driving support systems
4
Driving
COROLLA_TMMMS_TMMC_U (OM12F00U)
■Cruise control can be set when
Vehicles with an automatic transmission
●The shift lever is in the D or range 3.
●Vehicle speed is above approximately 25 mph (40 km/h).
Vehicles with a continuously variable transmission (without paddle shift
switches)
●The shift lever is in the D or S.
●Vehicle speed is above approximately 25 mph (40 km/h).
Vehicles with a continuously variable transmission (with paddle shift
switches)
●The shift lever is in the D or range 4 or higher of M has been selected.
●Range 4 or higher has been selected by using the paddle shift.
●Vehicle speed is above approximately 25 mph (40 km/h).
Vehicles with a manual transmission
Vehicle speed is above approximately 25 mph (40 km/h).
■Accelerating after setting the vehicle speed
●The vehicle can be accelerated normally. After acceleration, the set speed
resumes.
●Even without canceling the cruise control, the set speed can be increased
by first accelerating the vehicle to the desired speed and then pushing the
lever down to set the new speed.
■Automatic cruise control cancelation
Cruise control will stop maintaining the vehicle speed in any of the following
situations.
●Actual vehicle speed falls more than approximately 10 mph (16 km/h) below
the preset vehicle speed.
At this time, the memorized set speed is not retained.
●Actual vehicle speed is below approximately 25 mph (40 km/h).
●VSC is activated.
■If the cruise control indicator light comes on in yellow
Press the “ON-OFF” button once to deactivate the system, and then press
the button again to reactivate the system.
If the cruise control speed cannot be set or if the cruise control cancels imme-
diately after being activated, there may be a malfunction in the cruise control
system. Have the vehicle inspected by your Toyota dealer.
Page 200 of 612

2004-5. Using the driving support systems
COROLLA_TMMMS_TMMC_U (OM12F00U)
CAUTION
■To avoid operating the cruise control by mistake
Switch the cruise control off using the “ON-OFF” button when not in use.
■Situations unsuitable for cruise control
Do not use cruise control in any of the following situations.
Doing so may result in loss of control and could cause an accident resulting
in death or serious injury.
●In heavy traffic
●On roads with sharp bends
●On winding roads
●On slippery roads, such as those covered with rain, ice or snow
●On steep hills
Vehicle speed may exceed the set speed when driving down a steep hill.
●During emergency towing
Page 230 of 612
230
COROLLA_TMMMS_TMMC_U (OM12F00U)
5-3. Using the radio
Search for a desired station by turning or pressing or
.
Press and hold a desired station selector button until you hear a
beep.
Radio operation
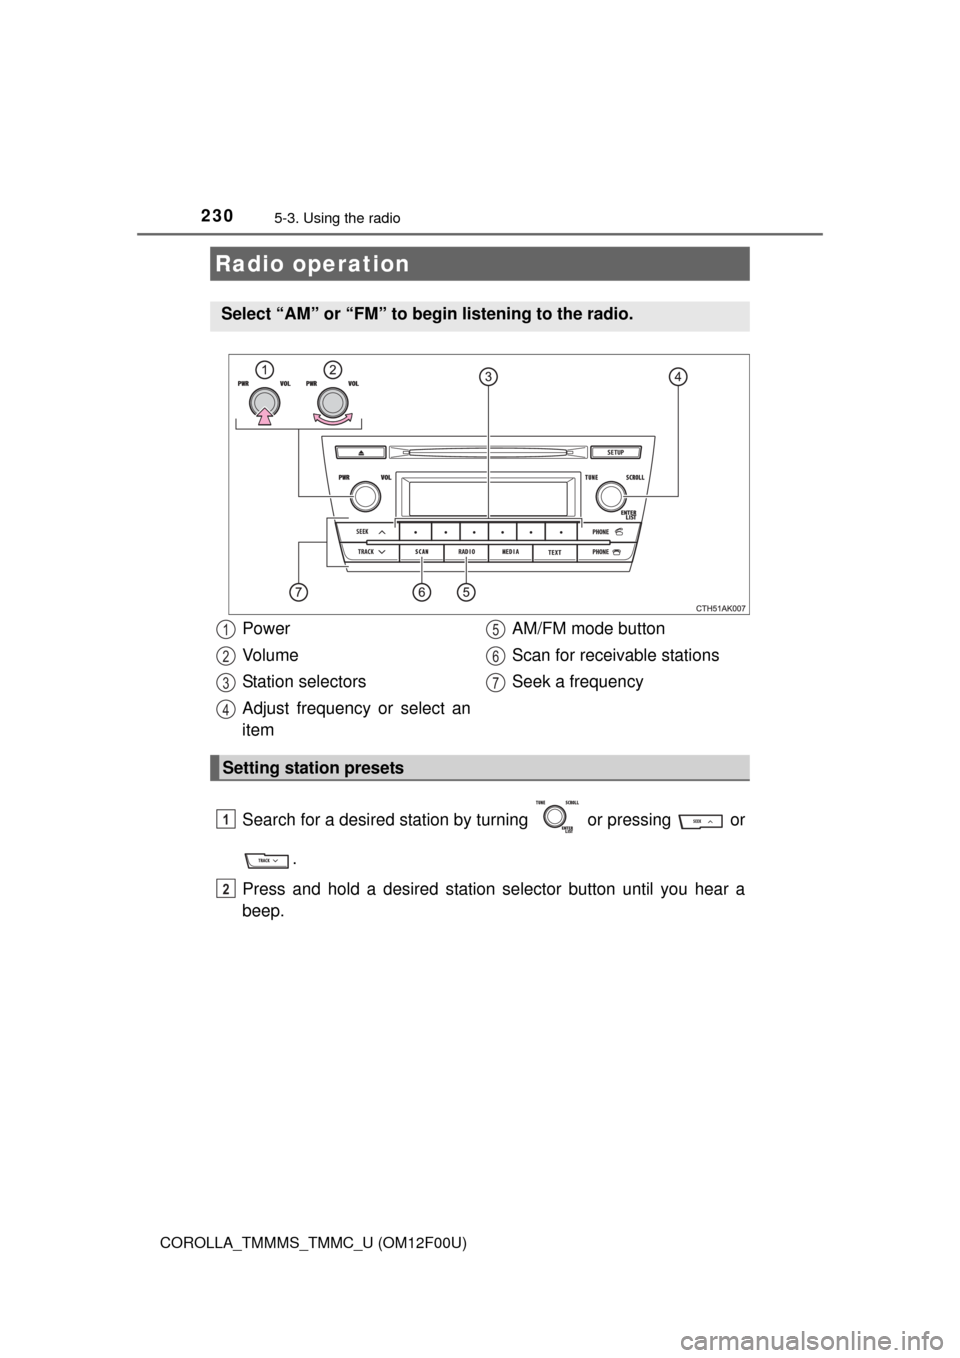
Select “AM” or “FM” to begin listening to the radio.
Power
Vo l u m e
Station selectors
Adjust frequency or select an
itemAM/FM mode button
Scan for receivable stations
Seek a frequency
Setting station presets
1
2
3
4
5
6
7
1
2
Page 260 of 612
2605-6. Using Bluetooth® devices
COROLLA_TMMMS_TMMC_U (OM12F00U)
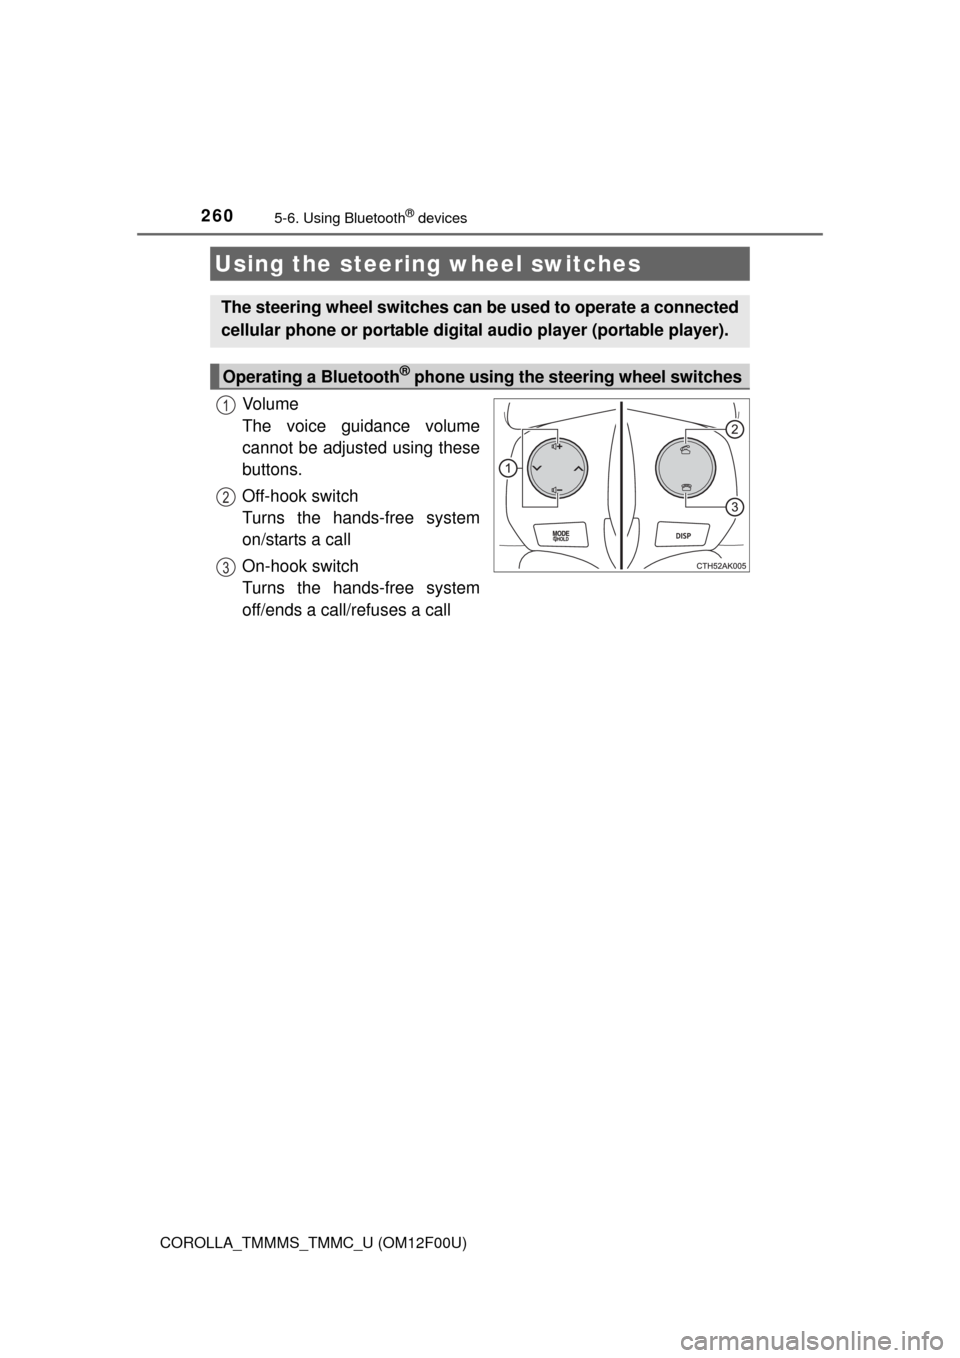
Vo l u m e
The voice guidance volume
cannot be adjusted using these
buttons.
Off-hook switch
Turns the hands-free system
on/starts a call
On-hook switch
Turns the hands-free system
off/ends a call/refuses a call
Using the steering wheel switches
The steering wheel switches can be used to operate a connected
cellular phone or portable digital audio player (portable player).
Operating a Bluetooth® phone using the steering wheel switches
1
2
3
Page 267 of 612
2675-7. “SET UP” menu
5
Interior features
COROLLA_TMMMS_TMMC_U (OM12F00U)
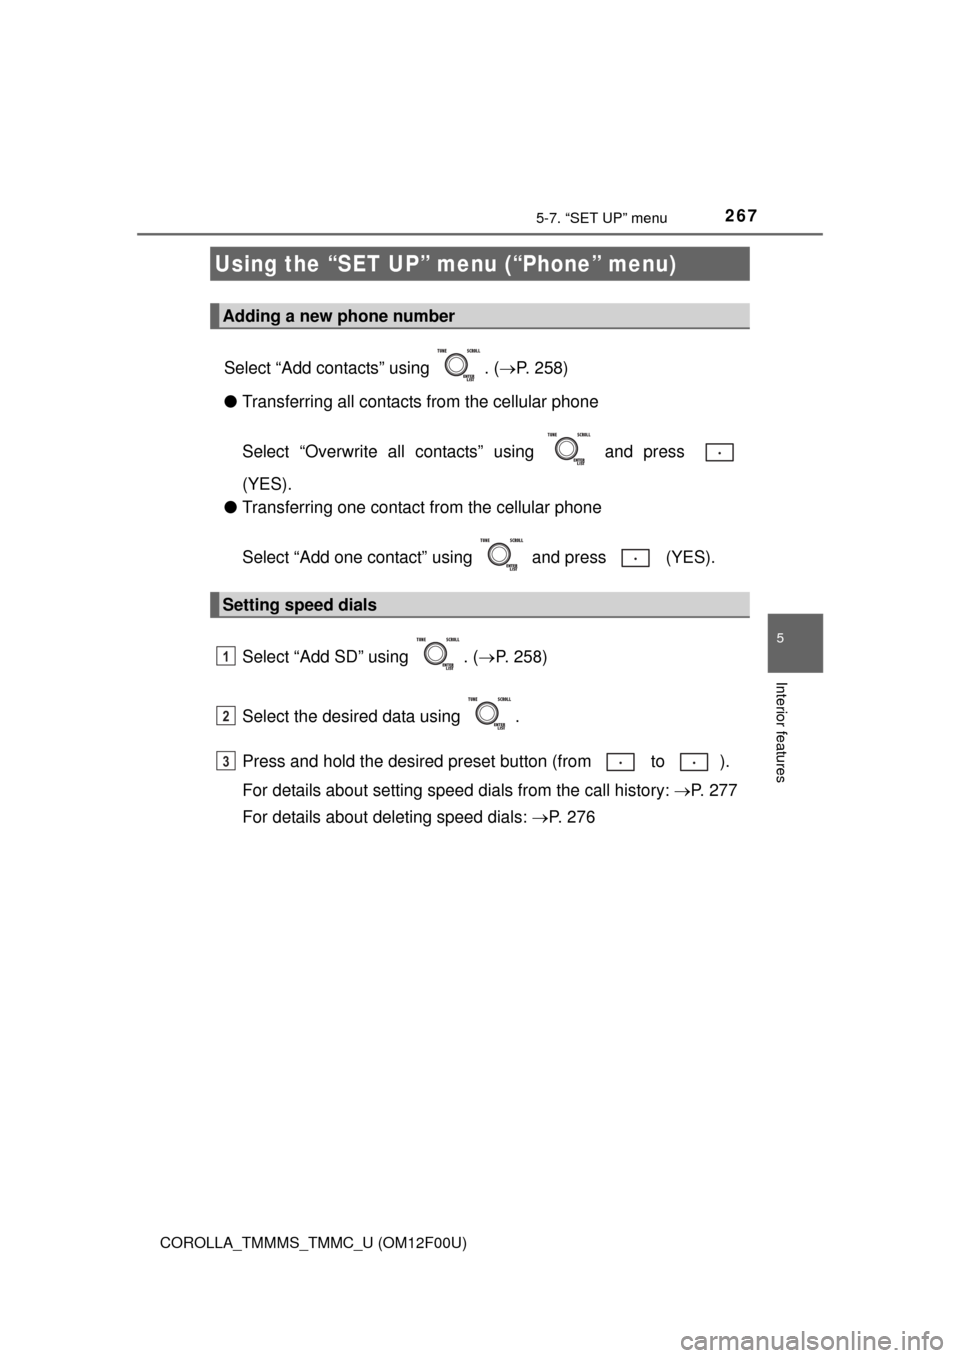
Select “Add contacts” using . (P. 258)
●Transferring all contacts from the cellular phone
Select “Overwrite all contacts” using and press
(YES).
●Transferring one contact from the cellular phone
Select “Add one contact” using and press (YES).
Select “Add SD” using . (P. 258)
Select the desired data using .
Press and hold the desired preset button (from to ).
For details about setting speed dials from the call history: P. 277
For details about deleting speed dials: P. 2 7 6
Using the “SET UP” menu (“Phone” menu)
Adding a new phone number
Setting speed dials
1
2
3