lights TOYOTA COROLLA 2020 (in English) User Guide
[x] Cancel search | Manufacturer: TOYOTA, Model Year: 2020, Model line: COROLLA, Model: TOYOTA COROLLA 2020Pages: 588, PDF Size: 13.49 MB
Page 42 of 588
421-1. For safe use
COROLLA_U
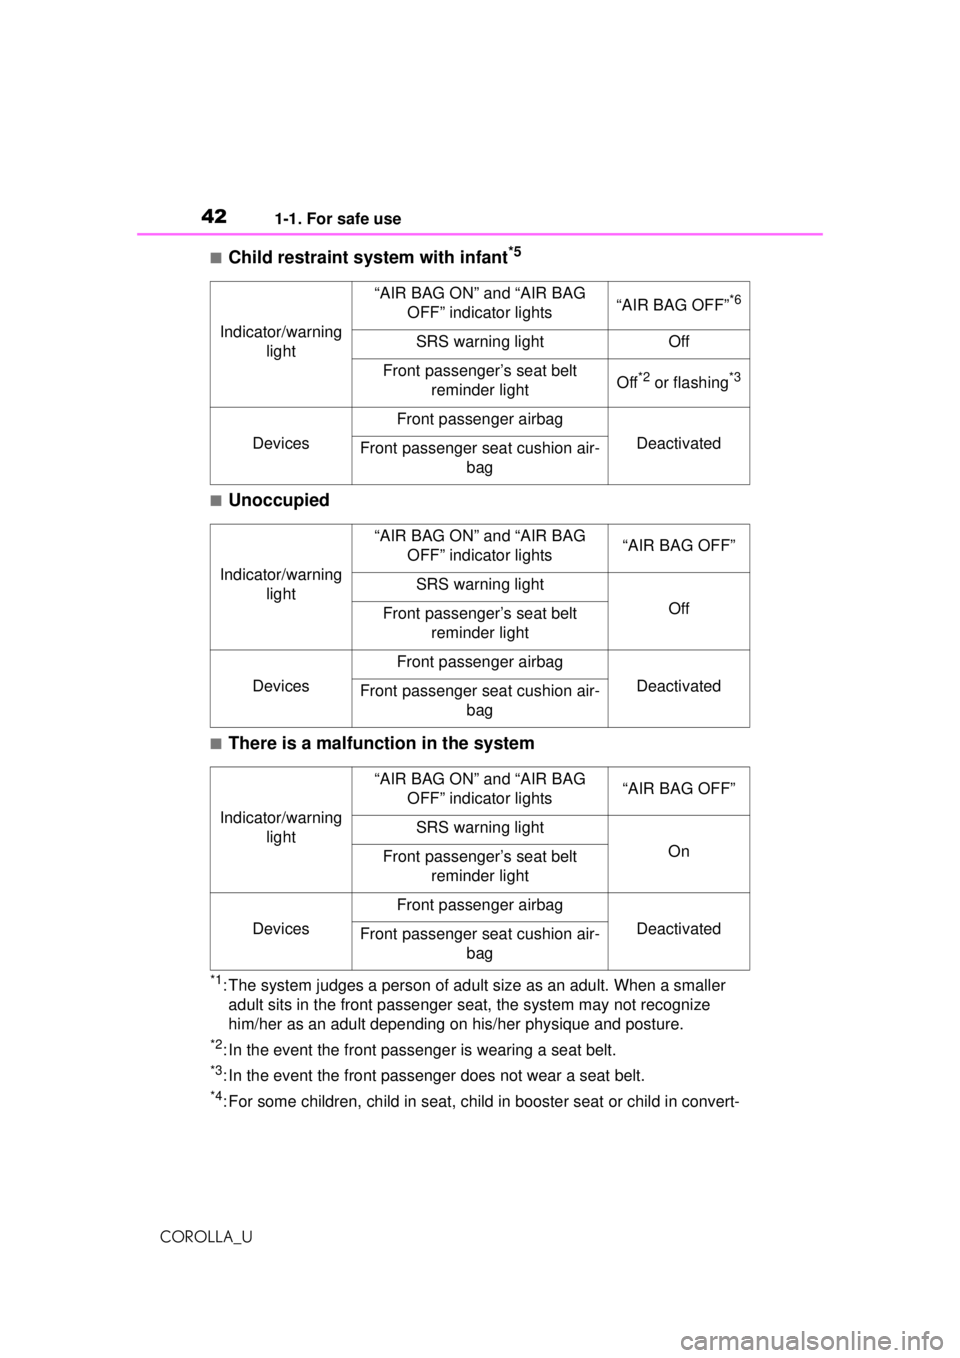
■Child restraint system with infant*5
■Unoccupied
■There is a malfunction in the system
*1: The system judges a person of adult size as an adult. When a smaller adult sits in the front passenger seat, the system may not recognize
him/her as an adult depending on his/her physique and posture.
*2: In the event the front passenger is wearing a seat belt.
*3: In the event the front passenger does not wear a seat belt.
*4: For some children, child in seat, child in booster seat or child in convert-
Indicator/warning
light
“AIR BAG ON” and “AIR BAG OFF” indicator lights“AIR BAG OFF”*6
SRS warning lightOff
Front passenger’s seat belt reminder lightOff*2 or flashing*3
Devices
Front passenger airbag
DeactivatedFront passenger seat cushion air- bag
Indicator/warning light
“AIR BAG ON” and “AIR BAG OFF” indicator lights“AIR BAG OFF”
SRS warning light
OffFront passenger’s seat belt reminder light
Devices
Front passenger airbag
DeactivatedFront passenger seat cushion air- bag
Indicator/warning light
“AIR BAG ON” and “AIR BAG OFF” indicator lights“AIR BAG OFF”
SRS warning light
OnFront passenger’s seat belt reminder light
Devices
Front passenger airbag
DeactivatedFront passenger seat cushion air- bag
Page 71 of 588
71
COROLLA_U
2
2
Vehicle status information and indicators
Vehicle status informationand indicators
.2-1. Instrument cluster
Warning lights and indica-tors ............................... 72
Gauges and meters (4.2-inch display) .......... 77
Gauges and meters (7-inch display) ......................... 81
Multi-information display ..................................... 86
Fuel consumption informa- tion ............................... 92
Page 72 of 588
722-1. Instrument cluster
COROLLA_U
2-1.Instrument cluster
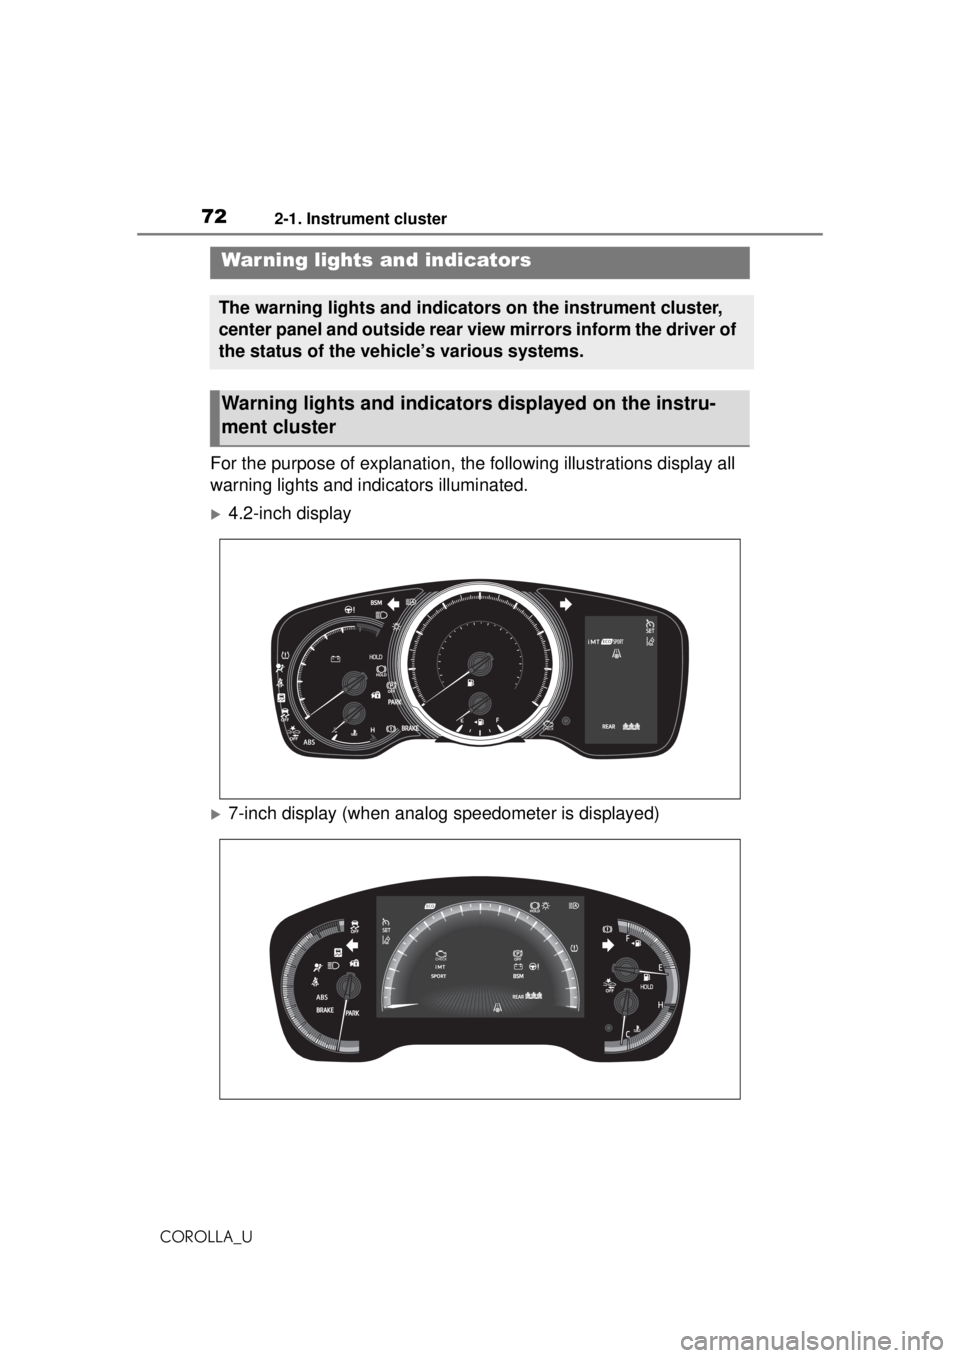
For the purpose of explanation, the following illustrations display all
warning lights and indicators illuminated.
4.2-inch display
7-inch display (when analog speedometer is displayed)
War ning lights and indicators
The warning lights and indicators on the instrument cluster,
center panel and outside rear view mirrors inform the driver of
the status of the vehicle’s various systems.
Warning lights and indicators displayed on the instru-
ment cluster
Page 73 of 588
732-1. Instrument cluster
COROLLA_U
2
Vehicle status information and indicators
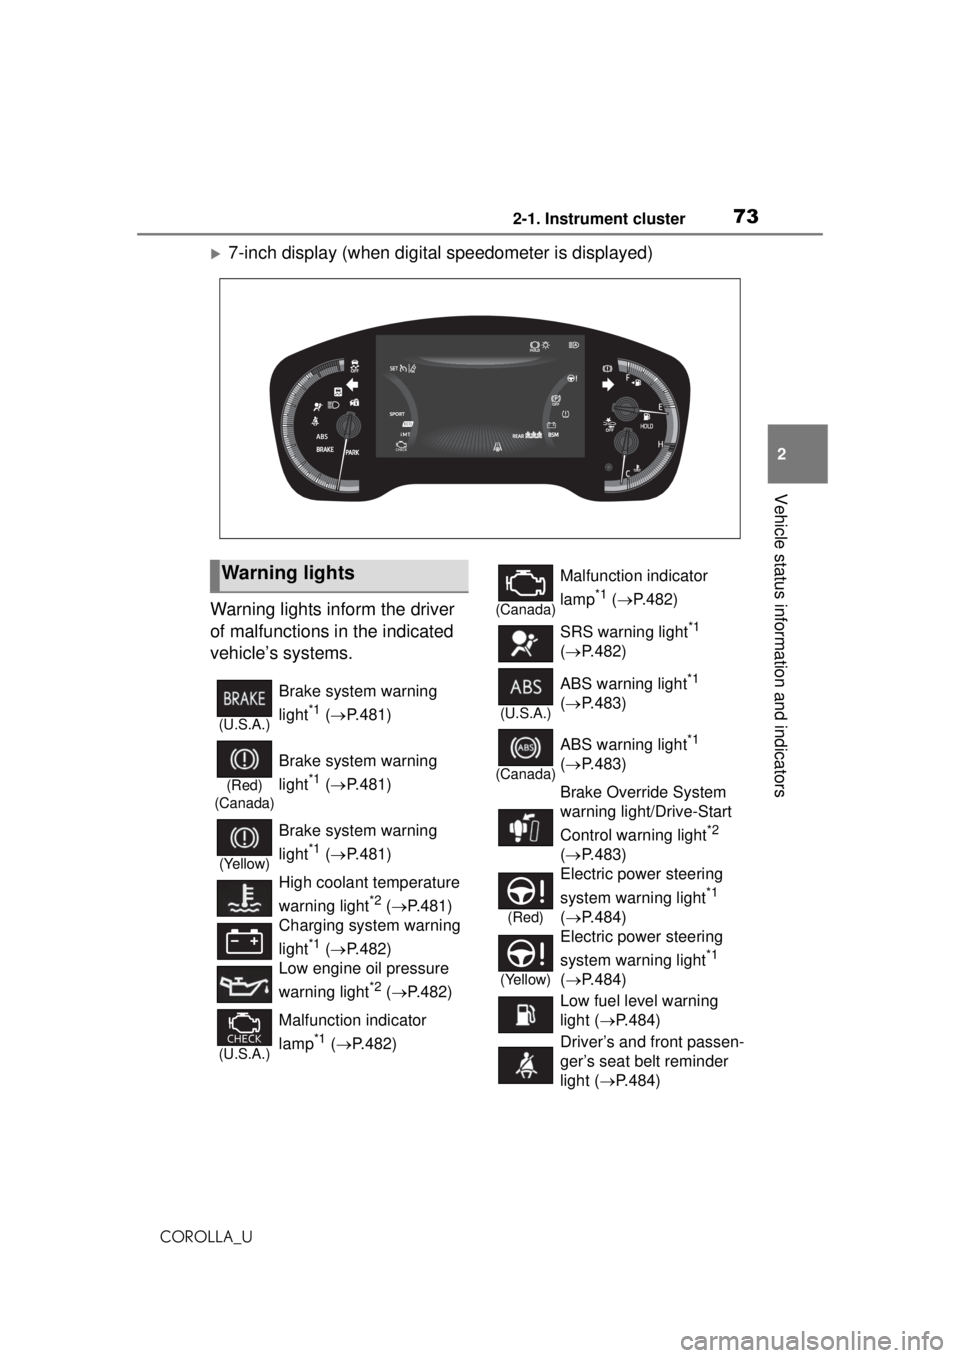
7-inch display (when digital speedometer is displayed)
Warning lights inform the driver
of malfunctions in the indicated
vehicle’s systems.
Warning lights
(U.S.A.)
Brake system warning
light
*1 ( P.481)
(Red)
(Canada)
Brake system warning
light
*1 ( P.481)
(Yellow)
Brake system warning
light
*1 ( P.481)
High coolant temperature
warning light
*2 ( P.481)
Charging system warning
light
*1 ( P.482)
Low engine oil pressure
warning light
*2 ( P.482)
(U.S.A.)
Malfunction indicator
lamp
*1 ( P.482)
(Canada)
Malfunction indicator
lamp
*1 ( P.482)
SRS warning light
*1
( P.482)
(U.S.A.)
ABS warning light*1
( P.483)
(Canada)
ABS warning light*1
( P.483)
Brake Override System
warning light/Drive-Start
Control warning light
*2
( P.483)
(Red)
Electric power steering
system warning light
*1
( P.484)
(Yellow)
Electric power steering
system warning light
*1
( P.484)
Low fuel level warning
light ( P.484)
Driver’s and front passen-
ger’s seat belt reminder
light ( P.484)
Page 74 of 588

742-1. Instrument cluster
COROLLA_U
*1: These lights come on when the engine switch is turned to ON to
indicate that a system check is
being performed. They will turn
off after the engine is started, or
after a few seconds. There may
be a malfunction in a system if
the lights do not come on, or turn
off. Have the vehicle inspected
by your Toyota dealer.
*2: This light illuminates on the multi-information display.
The indicators inform the driver
of the operating state of the
vehicle’s various systems.
Rear passengers’
seat belt reminder
lights ( P.485)
Tire pressure warning
light
*1 (if equipped)
( P.485)
(Orange)
LTA indicator (if equipped)
( P.485)
LDA indicator (if equipped)
( P.485)
(Flashes
or illumi- nates)PCS warning light*1
( P.486)
Slip indicator
*1 ( P.486)
(Flashes)
(U.S.A.)
Parking brake indicator
( P.486)
(Flashes)
(Canada)
Parking brake indicator
( P.486)
(Flashes)
Brake hold operated indi-
cator
*1 (if equipped)
( P.487)
(Orange)
iMT indicator*1 (if
equipped) ( P.487)
WARNING
■If a safety system warning
light does not come on
Should a safety system light such
as the ABS and SRS warning light
not come on when you start the
engine, this could mean that
these systems are not available to
help protect you in an accident,
which could result in death or seri-
ous injury. Have the vehicle
inspected by your Toyota dealer
immediately if this occurs.
Indicators
Turn signal indicator
( P.162)
(U.S.A.)
Headlight indicator
( P.170)
(Canada)
Tail light indicator
( P.170)
Headlight high beam indi-
cator ( P.172)
Automatic High Beam
indicator ( P.173)
PCS warning light
*1, 2
( P.189)
Cruise contro l indicator
( P.213, 223)
Dynamic radar cruise con-
trol indicator ( P.213,
223)
Cruise control “SET” indi-
cator ( P.213, 223)
Page 75 of 588
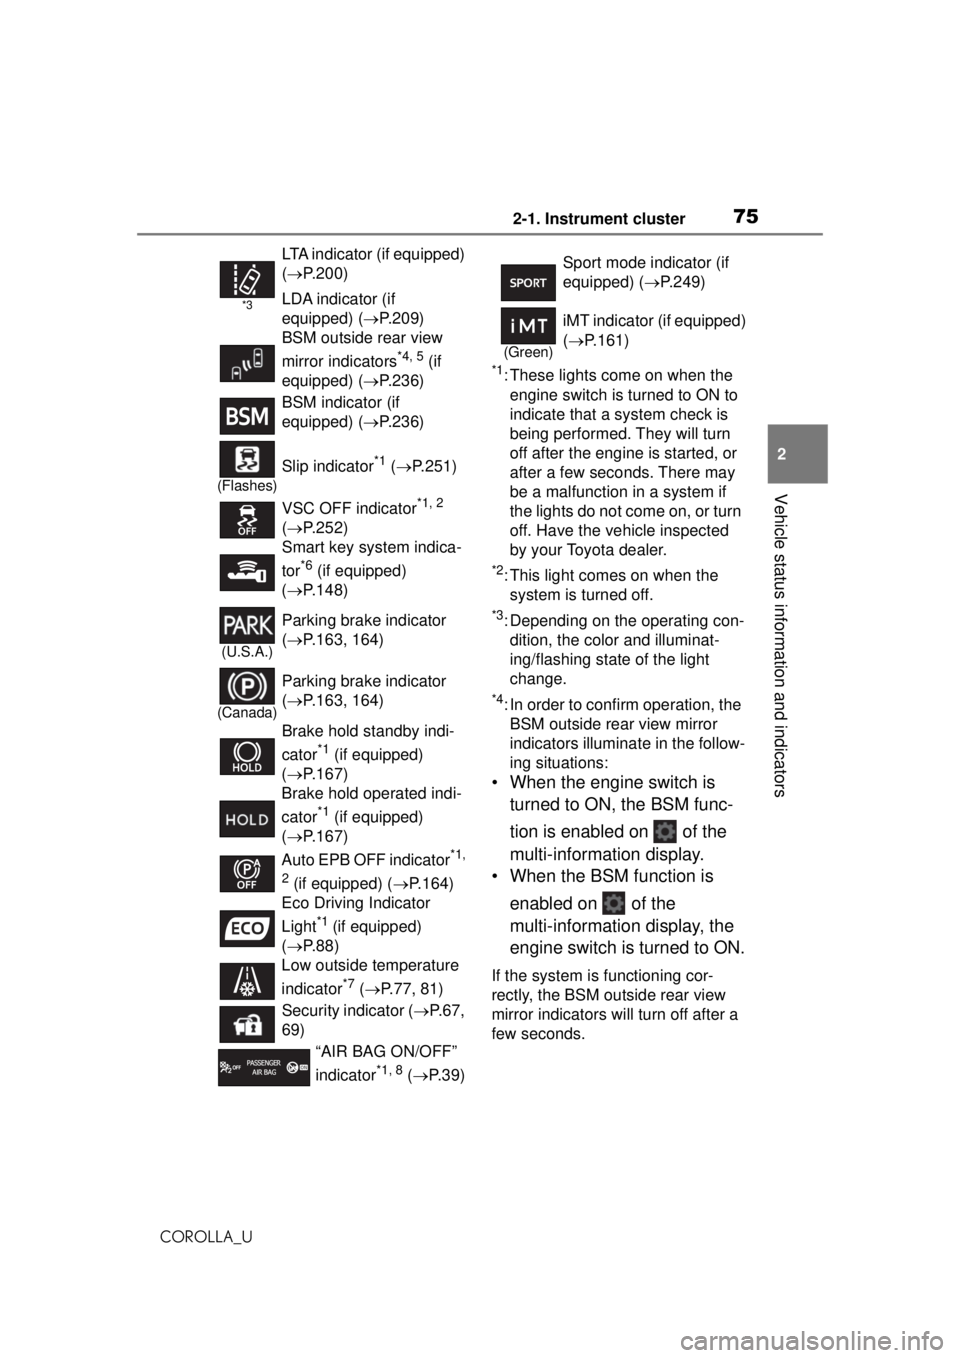
752-1. Instrument cluster
COROLLA_U
2
Vehicle status information and indicators
*1: These lights come on when the engine switch is turned to ON to
indicate that a system check is
being performed. They will turn
off after the engine is started, or
after a few sec onds. There may
be a malfunction in a system if
the lights do not come on, or turn
off. Have the vehicle inspected
by your Toyota dealer.
*2: This light comes on when the system is turned off.
*3: Depending on the operating con-dition, the color and illuminat-
ing/flashing state of the light
change.
*4: In order to confirm operation, the BSM outside rear view mirror
indicators illumina te in the follow-
ing situations:
• When the engine switch is
turned to ON, the BSM func-
tion is enabled on of the
multi-information display.
• When the BSM function is
enabled on of the
multi-information display, the
engine switch is turned to ON.
If the system is functioning cor-
rectly, the BSM outside rear view
mirror indicators will turn off after a
few seconds.
*3
LTA indicator (if equipped)
( P.200)
LDA indicator (if
equipped) ( P.209)
BSM outside rear view
mirror indicators
*4, 5 (if
equipped) ( P.236)
BSM indicator (if
equipped) ( P.236)
(Flashes)
Slip indicator*1 ( P.251)
VSC OFF indicator
*1, 2
( P.252)
Smart key system indica-
tor
*6 (if equipped)
( P.148)
(U.S.A.)
Parking brake indicator
( P.163, 164)
(Canada)
Parking brake indicator
( P.163, 164)
Brake hold standby indi-
cator
*1 (if equipped)
( P.167)
Brake hold operated indi-
cator
*1 (if equipped)
( P.167)
Auto EPB OFF indicator
*1,
2
(if equipped) ( P.164)
Eco Driving Indicator
Light
*1 (if equipped)
( P.88)
Low outside temperature
indicator
*7 ( P.77, 81)
Security indicator ( P.67,
69)
“AIR BAG ON/OFF”
indicator
*1, 8 ( P. 3 9 )
Sport mode indicator (if
equipped) ( P.249)
(Green)
iMT indicator (if equipped)
( P.161)
Page 79 of 588
792-1. Instrument cluster
COROLLA_U
2
Vehicle status information and indicators
different distances independently.
To reset, display the desired trip
meter and press and hold the dis-
play change button.
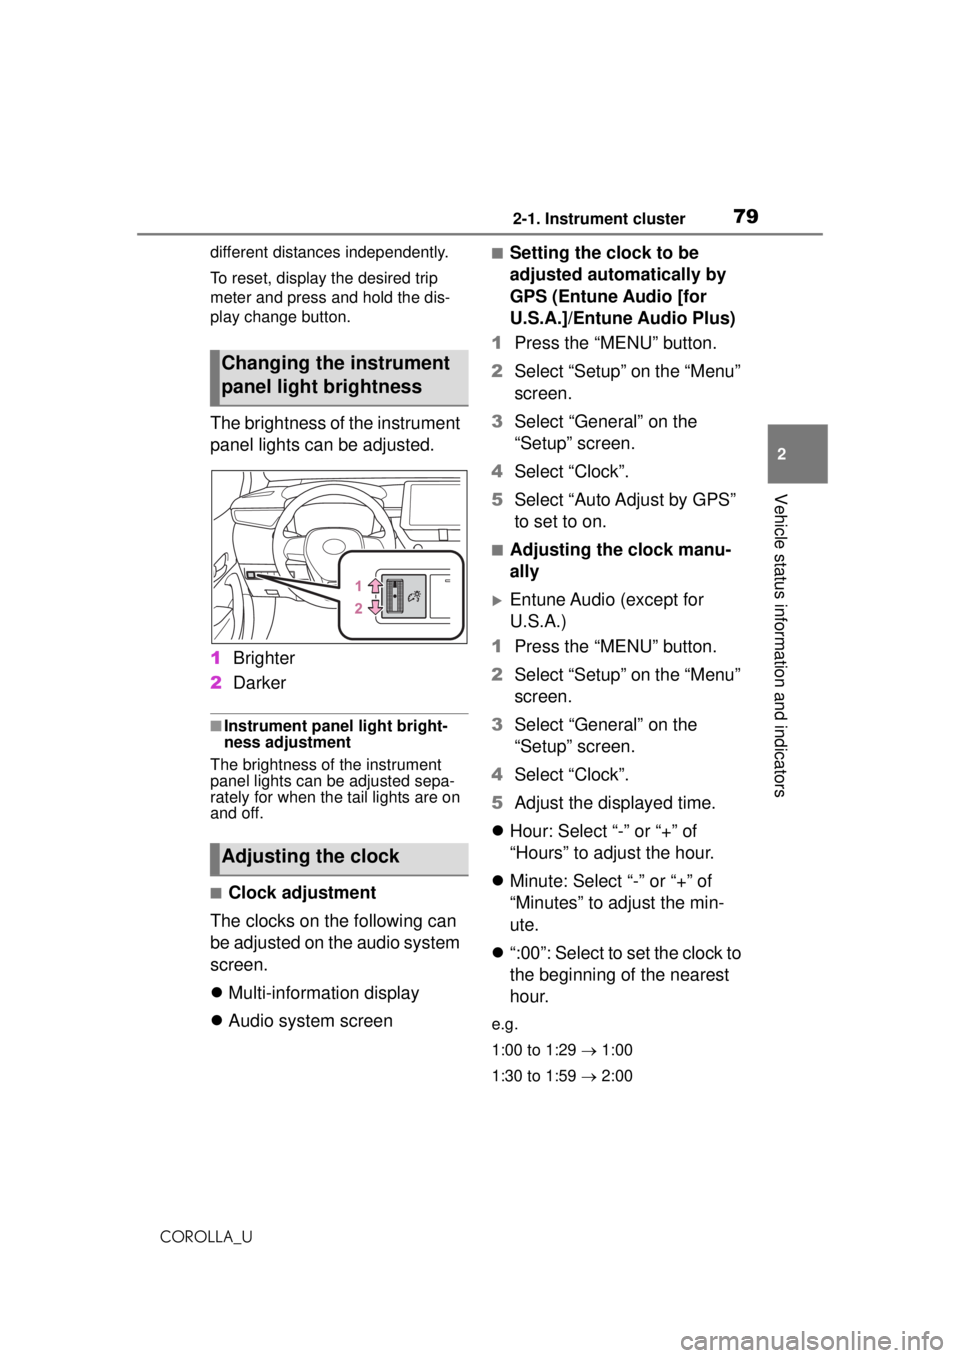
The brightness of the instrument
panel lights can be adjusted.
1 Brighter
2 Darker
■Instrument panel light bright-
ness adjustment
The brightness of the instrument
panel lights can be adjusted sepa-
rately for when the tail lights are on
and off.
■Clock adjustment
The clocks on the following can
be adjusted on the audio system
screen.
Multi-information display
Audio system screen
■Setting the clock to be
adjusted automatically by
GPS (Entune Audio [for
U.S.A.]/Entune Audio Plus)
1 Press the “MENU” button.
2 Select “Setup” on the “Menu”
screen.
3 Select “General” on the
“Setup” screen.
4 Select “Clock”.
5 Select “Auto Adjust by GPS”
to set to on.
■Adjusting the clock manu-
ally
Entune Audio (except for
U.S.A.)
1 Press the “MENU” button.
2 Select “Setup” on the “Menu”
screen.
3 Select “General” on the
“Setup” screen.
4 Select “Clock”.
5 Adjust the displayed time.
Hour: Select “-” or “+” of
“Hours” to adjust the hour.
Minute: Select “-” or “+” of
“Minutes” to adjust the min-
ute.
“:00”: Select to set the clock to
the beginning of the nearest
hour.
e.g.
1:00 to 1:29 1:00
1:30 to 1:59 2:00
Changing the instrument
panel light brightness
Adjusting the clock
Page 84 of 588
842-1. Instrument cluster
COROLLA_Udifferent distances independently.
To reset, display the desired trip
meter and press and hold the dis-
play change button.
The brightness of the instrument
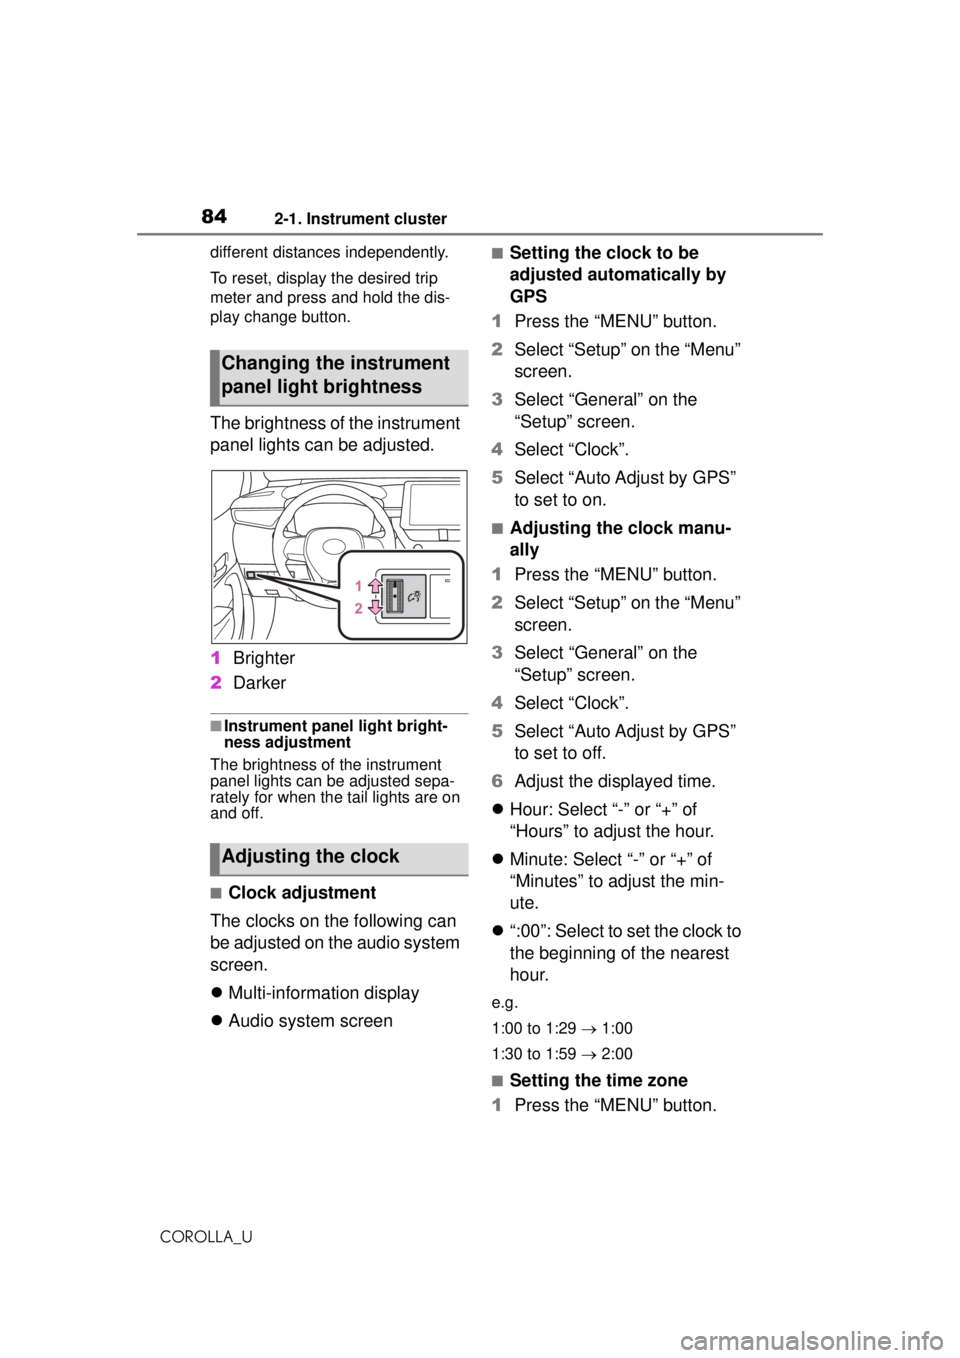
panel lights can be adjusted.
1
Brighter
2 Darker
■Instrument panel light bright-
ness adjustment
The brightness of the instrument
panel lights can be adjusted sepa-
rately for when the tail lights are on
and off.
■Clock adjustment
The clocks on the following can
be adjusted on the audio system
screen.
Multi-information display
Audio system screen
■Setting the clock to be
adjusted automatically by
GPS
1 Press the “MENU” button.
2 Select “Setup” on the “Menu”
screen.
3 Select “General” on the
“Setup” screen.
4 Select “Clock”.
5 Select “Auto Adjust by GPS”
to set to on.
■Adjusting the clock manu-
ally
1 Press the “MENU” button.
2 Select “Setup” on the “Menu”
screen.
3 Select “General” on the
“Setup” screen.
4 Select “Clock”.
5 Select “Auto Adjust by GPS”
to set to off.
6 Adjust the displayed time.
Hour: Select “-” or “+” of
“Hours” to adjust the hour.
Minute: Select “-” or “+” of
“Minutes” to adjust the min-
ute.
“:00”: Select to set the clock to
the beginning of the nearest
hour.
e.g.
1:00 to 1:29 1:00
1:30 to 1:59 2:00
■Setting the time zone
1 Press the “MENU” button.
Changing the instrument
panel light brightness
Adjusting the clock
Page 99 of 588
993-1. Key information
COROLLA_U
3
Before driving
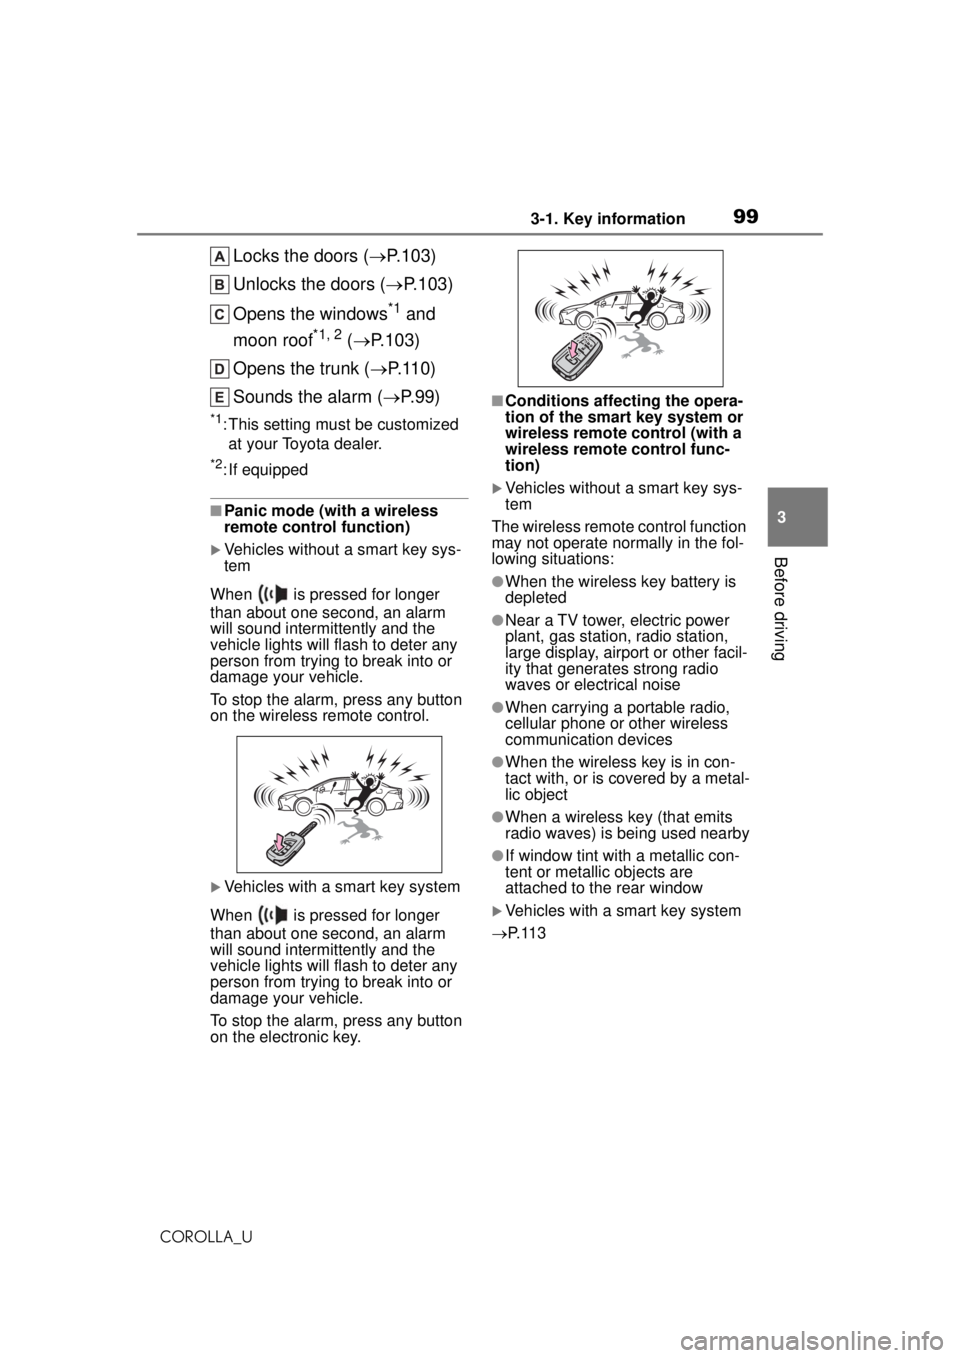
Locks the doors ( P.103)
Unlocks the doors ( P.103)
Opens the windows
*1 and
moon roof
*1, 2 ( P.103)
Opens the trunk ( P. 1 1 0 )
Sounds the alarm ( P. 9 9 )
*1: This setting must be customized
at your Toyota dealer.
*2: If equipped
■Panic mode (with a wireless
remote control function)
Vehicles without a smart key sys-
tem
When is pressed for longer
than about one second, an alarm
will sound intermittently and the
vehicle lights will flash to deter any
person from trying to break into or
damage your vehicle.
To stop the alarm, press any button
on the wireless remote control.
Vehicles with a smart key system
When is pressed for longer
than about one second, an alarm
will sound intermittently and the
vehicle lights will flash to deter any
person from trying to break into or
damage your vehicle.
To stop the alarm, press any button
on the electronic key.
■Conditions affecting the opera-
tion of the smart key system or
wireless remote control (with a
wireless remote control func-
tion)
Vehicles without a smart key sys-
tem
The wireless remote control function
may not operate normally in the fol-
lowing situations:
●When the wireless key battery is
depleted
●Near a TV tower, electric power
plant, gas station, radio station,
large display, airport or other facil-
ity that generates strong radio
waves or electrical noise
●When carrying a portable radio,
cellular phone or other wireless
communication devices
●When the wireless key is in con-
tact with, or is covered by a metal-
lic object
●When a wireless key (that emits
radio waves) is being used nearby
●If window tint with a metallic con-
tent or metallic objects are
attached to the rear window
Vehicles with a smart key system
P. 1 1 3
Page 124 of 588
1243-4. Adjusting the steering wheel and mirrors
COROLLA_U
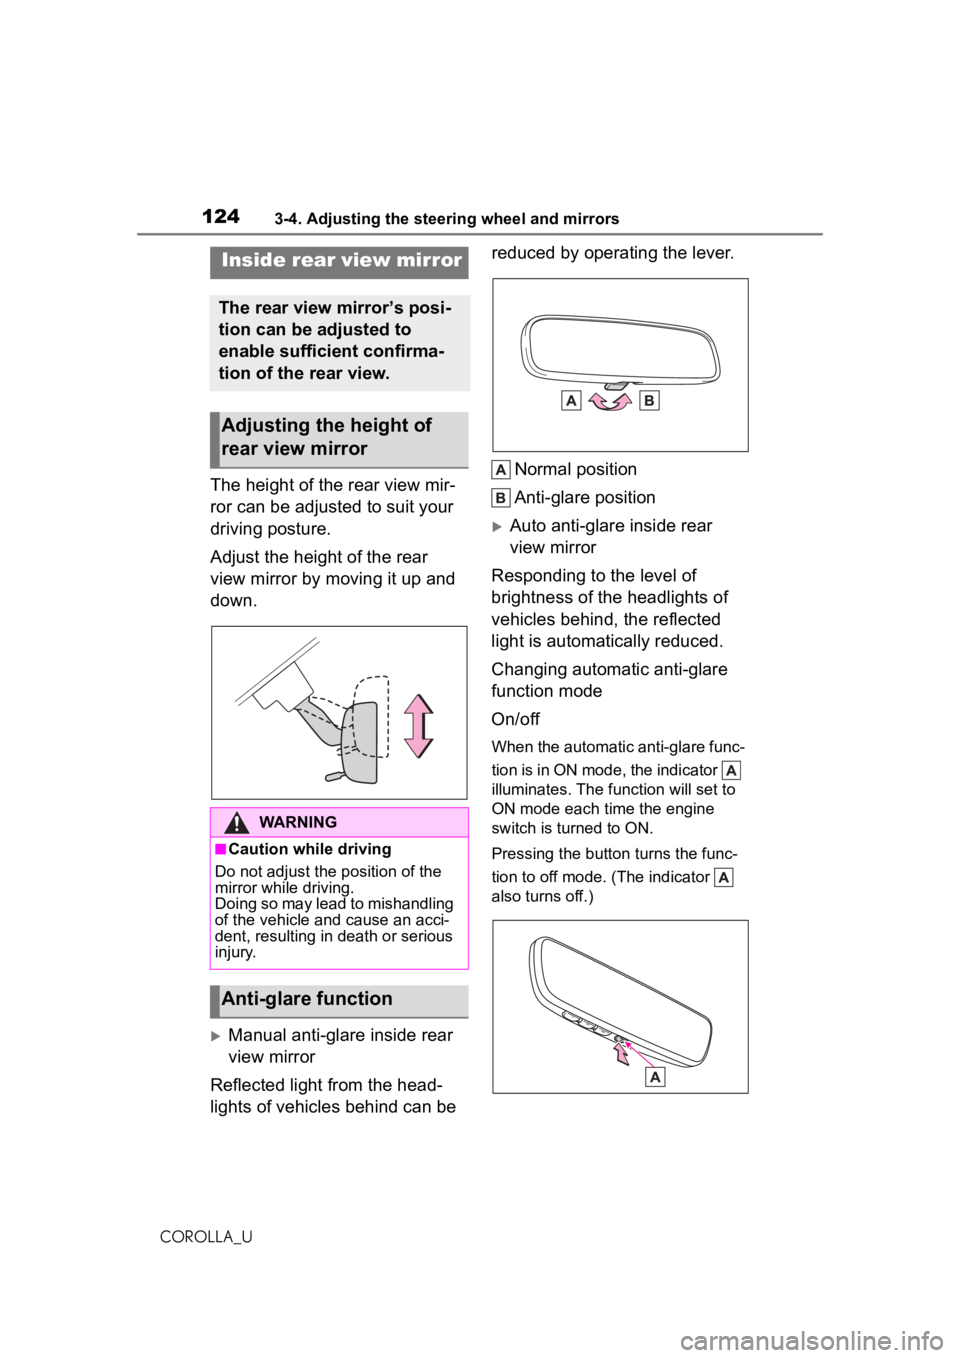
The height of the rear view mir-
ror can be adjusted to suit your
driving posture.
Adjust the height of the rear
view mirror by moving it up and
down.
Manual anti-glare inside rear
view mirror
Reflected light from the head-
lights of vehicles behind can be reduced by operating the lever.
Normal position
Anti-glare position
Auto anti-glare inside rear
view mirror
Responding to the level of
brightness of the headlights of
vehicles behind, the reflected
light is automatically reduced.
Changing automatic anti-glare
function mode
On/off
When the automatic anti-glare func-
tion is in ON mode, the indicator
illuminates. The function will set to
ON mode each time the engine
switch is turned to ON.
Pressing the button turns the func-
tion to off mode. (The indicator
also turns off.)
Inside rear view mirror
The rear view mirror’s posi-
tion can be adjusted to
enable sufficient confirma-
tion of the rear view.
Adjusting the height of
rear view mirror
WARNING
■Caution while driving
Do not adjust the position of the
mirror while driving.
Doing so may lead to mishandling
of the vehicle and cause an acci-
dent, resulting in death or serious
injury.
Anti-glare function