height TOYOTA COROLLA 2020 Owners Manual (in English)
[x] Cancel search | Manufacturer: TOYOTA, Model Year: 2020, Model line: COROLLA, Model: TOYOTA COROLLA 2020Pages: 588, PDF Size: 13.49 MB
Page 27 of 588
271-1. For safe use
COROLLA_U
1
For safety and security
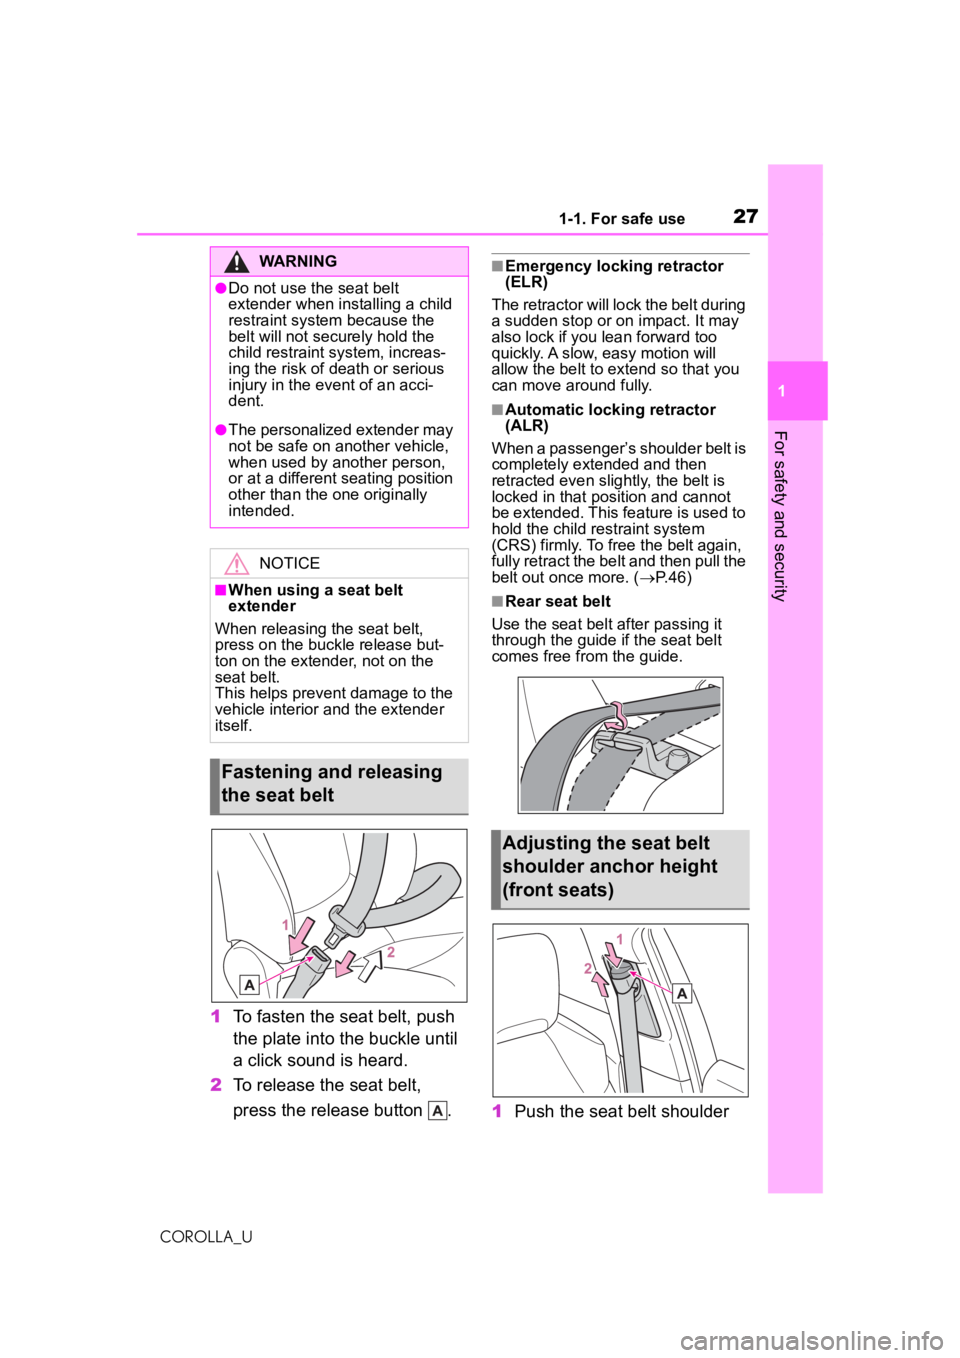
1 To fasten the seat belt, push
the plate into the buckle until
a click sound is heard.
2 To release the seat belt,
press the release button .
■Emergency locking retractor
(ELR)
The retractor will lock the belt during
a sudden stop or on impact. It may
also lock if you lean forward too
quickly. A slow, easy motion will
allow the belt to extend so that you
can move around fully.
■Automatic locking retractor
(ALR)
When a passenger’s shoulder belt is
completely extended and then
retracted even slightly, the belt is
locked in that position and cannot
be extended. This feature is used to
hold the child restraint system
(CRS) firmly. To free the belt again,
fully retract the belt and then pull the
belt out once more. ( P. 4 6 )
■Rear seat belt
Use the seat belt after passing it
through the guide if the seat belt
comes free from the guide.
1 Push the seat belt shoulder
WARNING
●Do not use the seat belt
extender when installing a child
restraint system because the
belt will not securely hold the
child restraint system, increas-
ing the risk of death or serious
injury in the event of an acci-
dent.
●The personalized extender may
not be safe on another vehicle,
when used by another person,
or at a different seating position
other than the one originally
intended.
NOTICE
■When using a seat belt
extender
When releasing the seat belt,
press on the buckle release but-
ton on the extender, not on the
seat belt.
This helps prevent damage to the
vehicle interior and the extender
itself.
Fastening and releasing
the seat belt
Adjusting the seat belt
shoulder anchor height
(front seats)
Page 28 of 588
281-1. For safe use
COROLLA_U
anchor down while pressing
the release button .
2 Push the seat belt shoulder
anchor up.
Move the height adjuster up and
down as needed until you hear a
click.
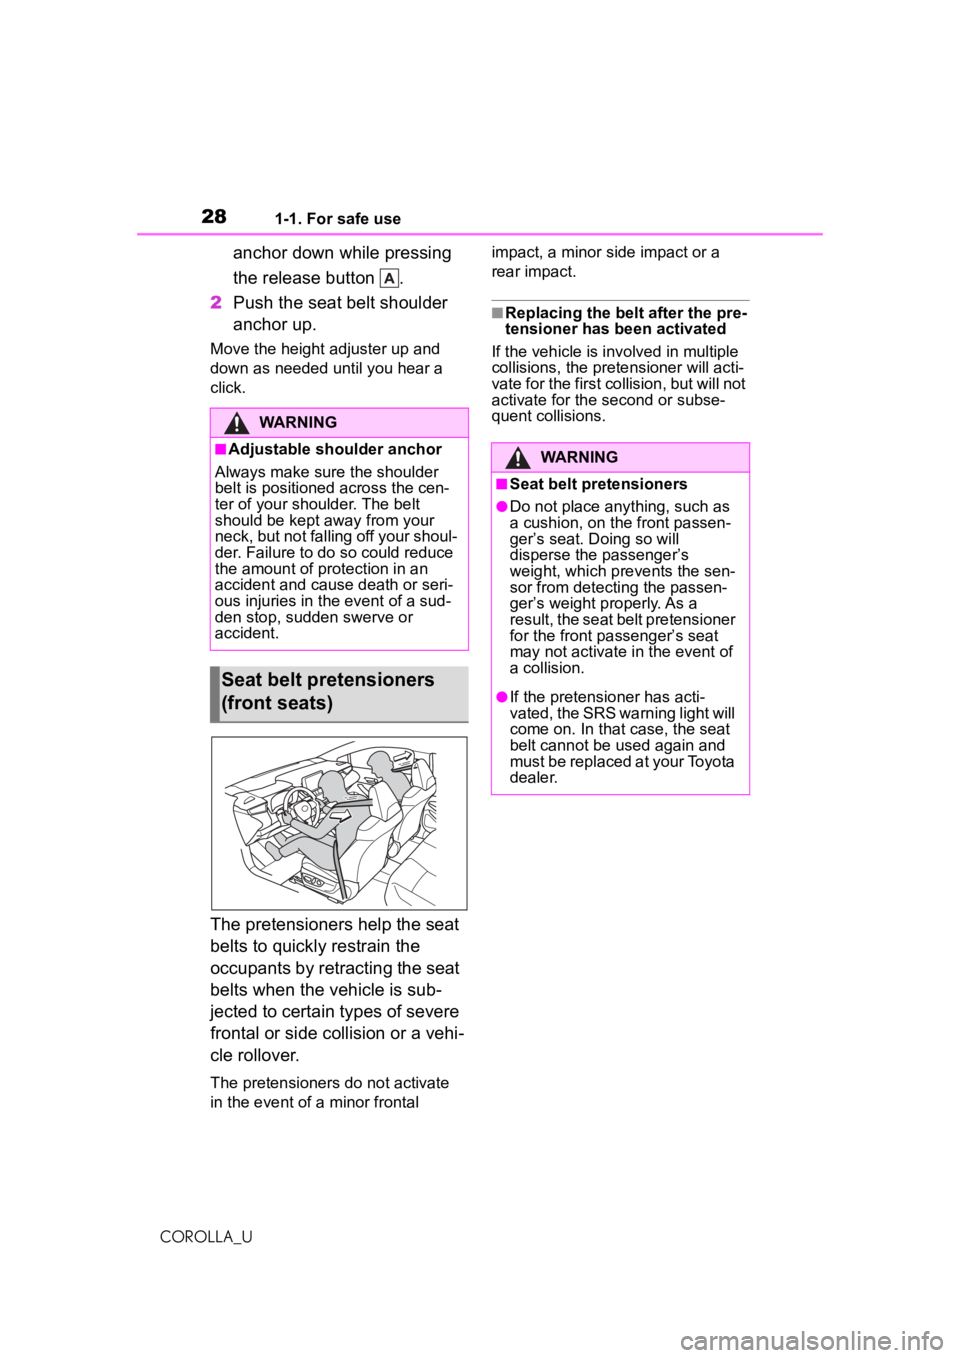
The pretensioners help the seat
belts to quickly restrain the
occupants by retracting the seat
belts when the vehicle is sub-
jected to certain types of severe
frontal or side collision or a vehi-
cle rollover.
The pretensioners do not activate
in the event of a minor frontal impact, a minor side impact or a
rear impact.
■Replacing the belt after the pre-
tensioner has been activated
If the vehicle is in volved in multiple
collisions, the pretensioner will acti-
vate for the first collision, but will not
activate for the second or subse-
quent collisions.
WARNING
■Adjustable shoulder anchor
Always make sure the shoulder
belt is positioned across the cen-
ter of your shoulder. The belt
should be kept away from your
neck, but not falling off your shoul-
der. Failure to do so could reduce
the amount of protection in an
accident and cause death or seri-
ous injuries in the event of a sud-
den stop, sudden swerve or
accident.
Seat belt pretensioners
(front seats)
WARNING
■Seat belt pretensioners
●Do not place anything, such as
a cushion, on the front passen-
ger’s seat. Doing so will
disperse the passenger’s
weight, which prevents the sen-
sor from detecting the passen-
ger’s weight properly. As a
result, the seat belt pretensioner
for the front passenger’s seat
may not activate in the event of
a collision.
●If the pretensioner has acti-
vated, the SRS warning light will
come on. In that case, the seat
belt cannot be used again and
must be replaced at your Toyota
dealer.
Page 50 of 588
501-2. Child safety
COROLLA_U
ward.
If the passenger seat height
can be adjusted, Adjust the
seat height to the upper most
position.
Adjust the seatback angle to
the most upright position.
If there is a gap between the child
seat and the seatback, adjust the
seatback angle until good contact is
achieved.
If the head restraint interferes
with the child restraint system
installation and the head
restraint can be removed,
remove the head restraint.
Otherwise, put the head restraint in
the upper most position.
WARNING
■When using a child restraint
system
Observe the following precau-
tions.
Failure to do so may result in
death or serious injury.
●Never install a re ar-facing child
restraint system on the front
passenger seat even if the “AIR
BAG OFF” indicator light is illu-
minated. In the event of an acci-
dent, the force of the rapid
inflation of the front passenger
airbag can cause death or seri-
ous injury to the child if the
rear-facing child restraint sys-
tem is installed on the front pas-
senger seat.
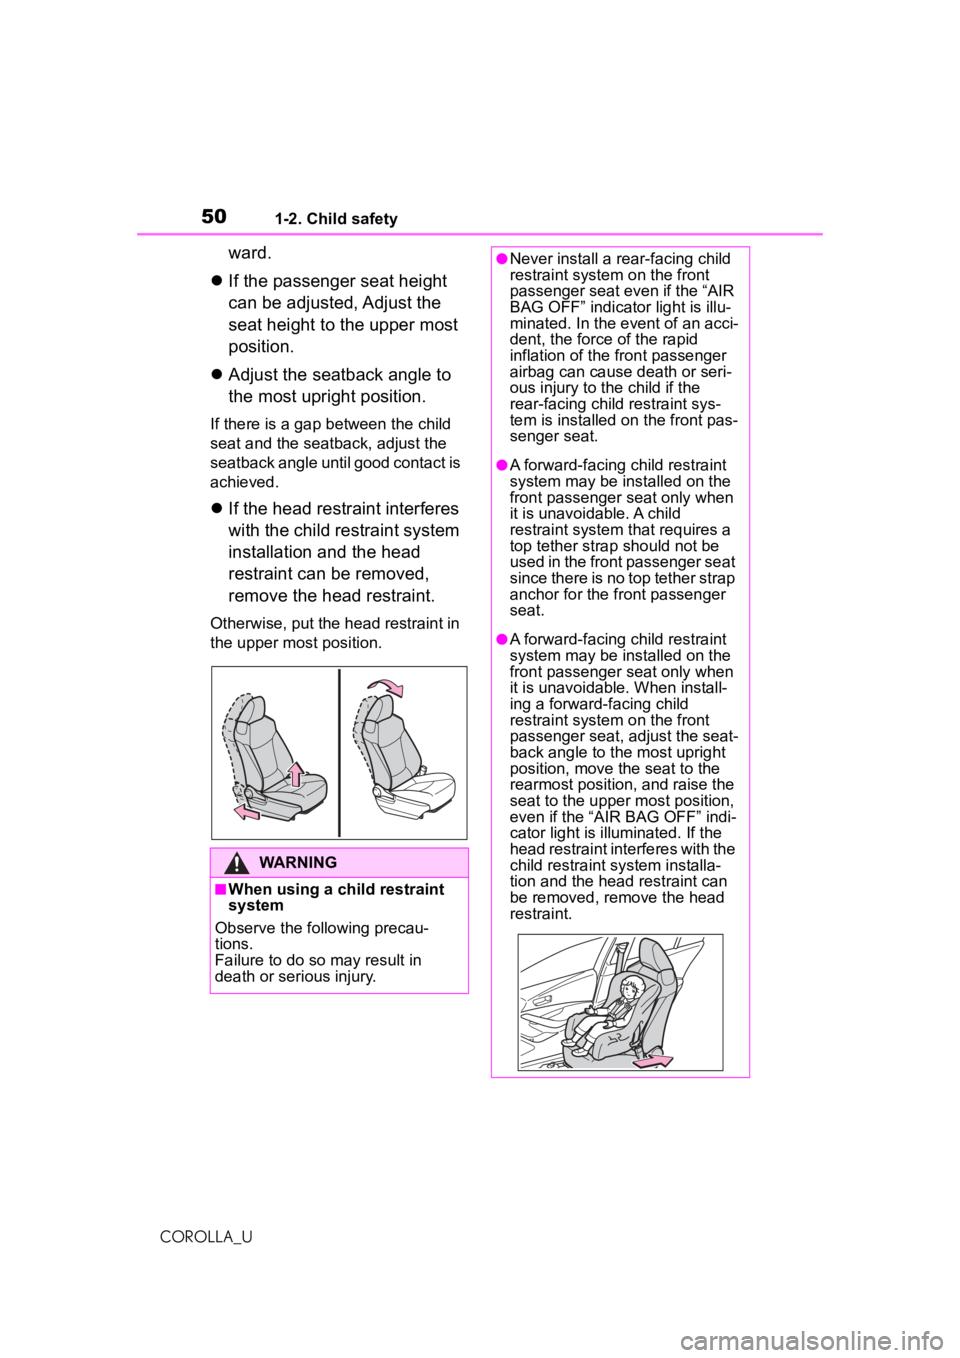
●A forward-facing child restraint
system may be installed on the
front passenger seat only when
it is unavoidable. A child
restraint system that requires a
top tether strap should not be
used in the front passenger seat
since there is no top tether strap
anchor for the front passenger
seat.
●A forward-facing child restraint
system may be installed on the
front passenger seat only when
it is unavoidable. When install-
ing a forward-facing child
restraint system on the front
passenger seat, adjust the seat-
back angle to the most upright
position, move the seat to the
rearmost position, and raise the
seat to the upper most position,
even if the “AIR BAG OFF” indi-
cator light is illuminated. If the
head restraint interferes with the
child restraint system installa-
tion and the head restraint can
be removed, remove the head
restraint.
Page 118 of 588
1183-3. Adjusting the seats
COROLLA_U
3-3.Adjusting the seats
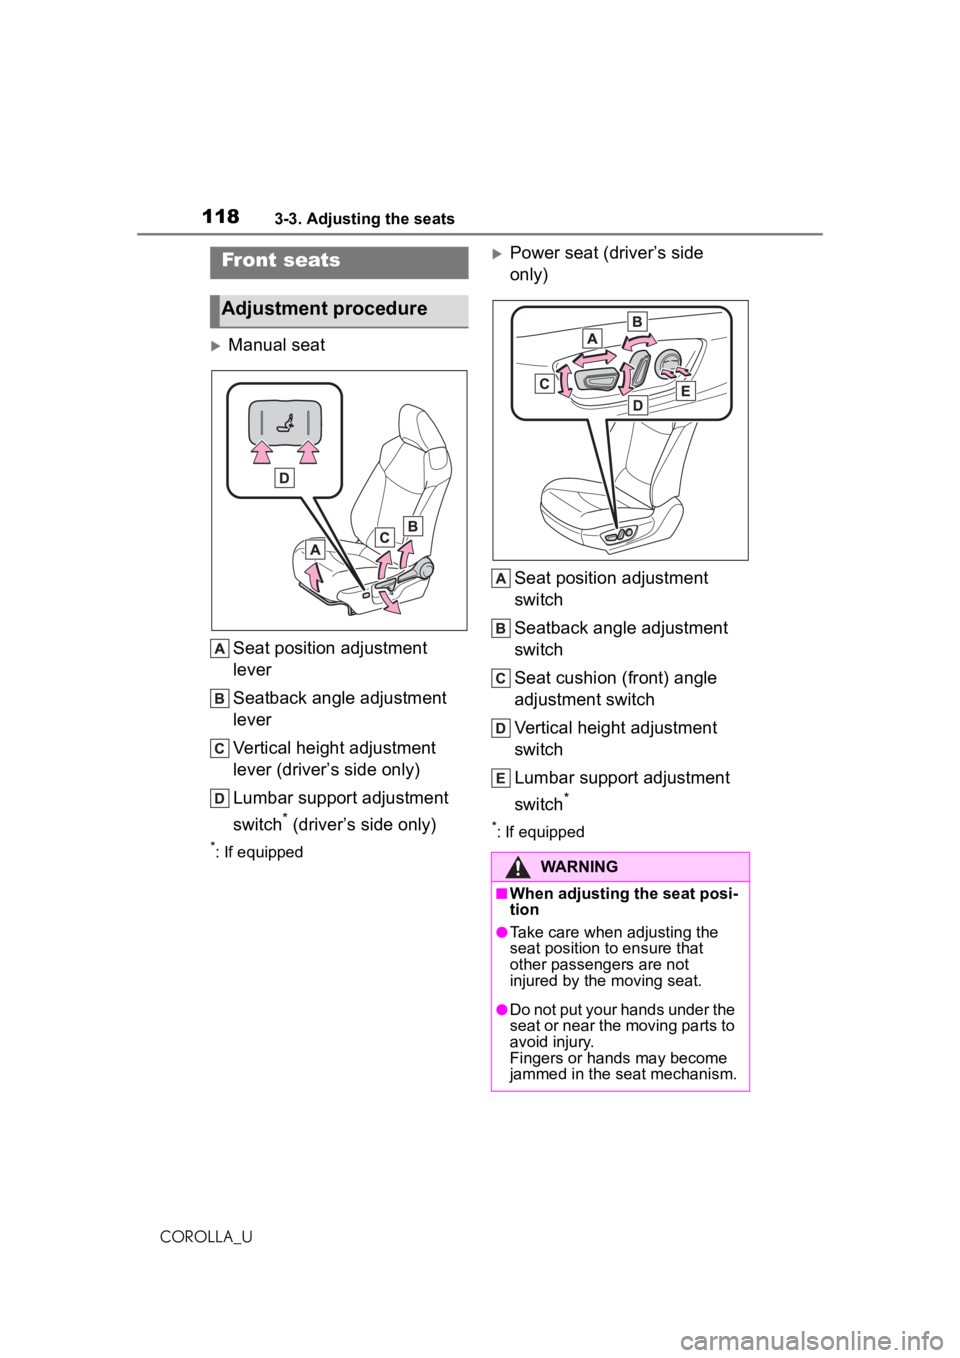
Manual seatSeat position adjustment
lever
Seatback angle adjustment
lever
Vertical height adjustment
lever (driver’s side only)
Lumbar support adjustment
switch
* (driver’s side only)
*: If equipped
Power seat (driver’s side
only)Seat position adjustment
switch
Seatback angle adjustment
switch
Seat cushion (front) angle
adjustment switch
Vertical height adjustment
switch
Lumbar support adjustment
switch
*
*: If equipped
Front seats
Adjustment procedure
WARNING
■When adjusting the seat posi-
tion
●Take care when adjusting the
seat position to ensure that
other passengers are not
injured by the moving seat.
●Do not put your hands under the
seat or near the moving parts to
avoid injury.
Fingers or hands may become
jammed in the seat mechanism.
Page 121 of 588
1213-3. Adjusting the seats
COROLLA_U
3
Before driving
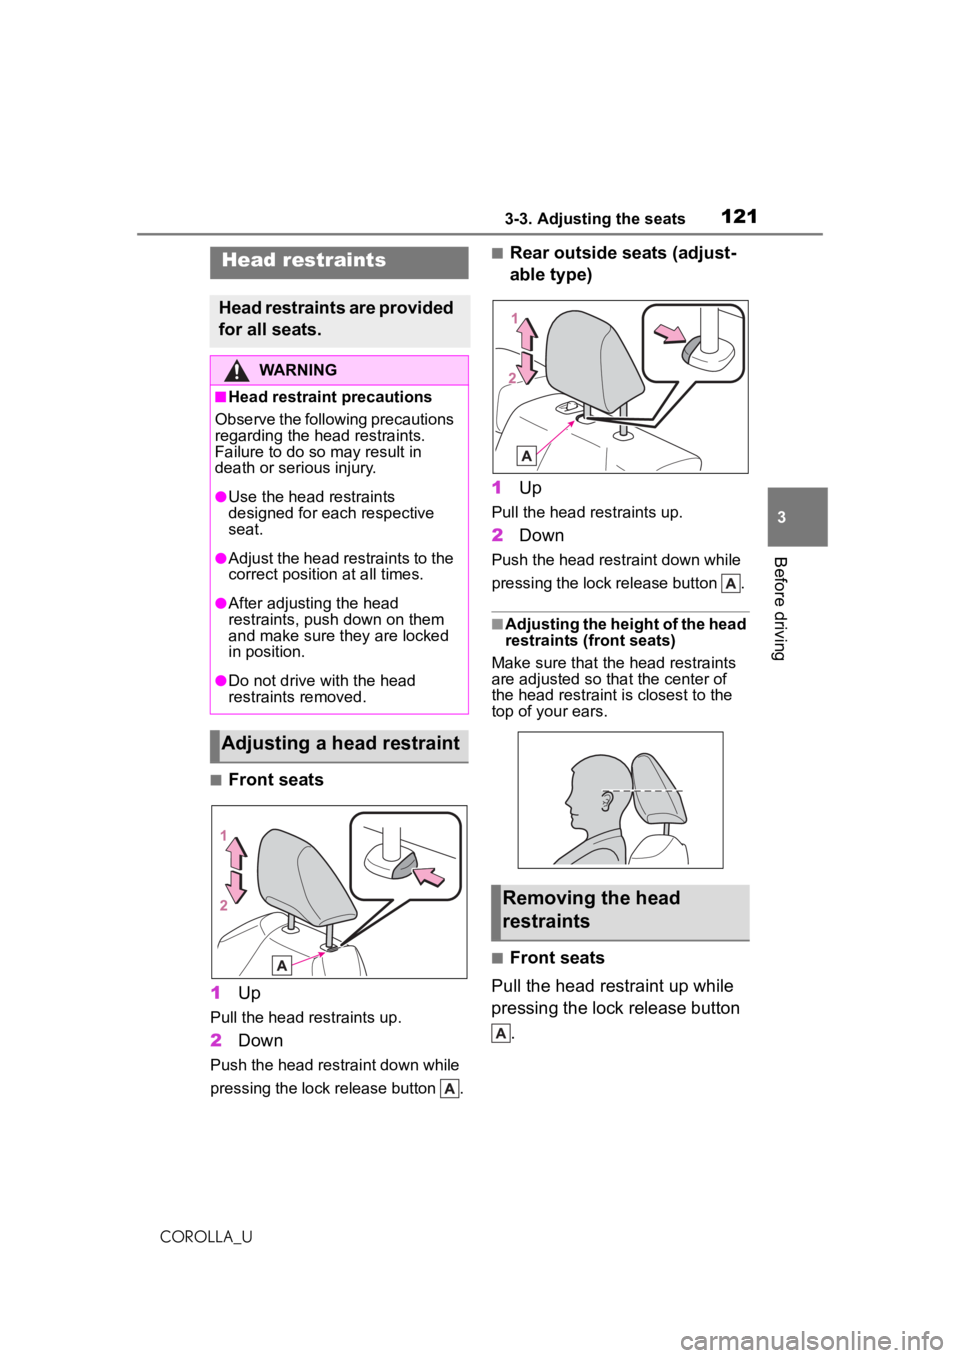
■Front seats
1 Up
Pull the head restraints up.
2 Down
Push the head restraint down while
pressing the lock release button .
■Rear outside seats (adjust-
able type)
1 Up
Pull the head restraints up.
2 Down
Push the head restraint down while
pressing the lock release button .
■Adjusting the height of the head
restraints (front seats)
Make sure that the head restraints
are adjusted so that the center of
the head restraint is closest to the
top of your ears.
■Front seats
Pull the head restraint up while
pressing the lock release button .
Head restraints
Head restraints are provided
for all seats.
WARNING
■Head restraint precautions
Observe the following precautions
regarding the head restraints.
Failure to do so may result in
death or serious injury.
●Use the head restraints
designed for each respective
seat.
●Adjust the head restraints to the
correct position at all times.
●After adjusting the head
restraints, push down on them
and make sure they are locked
in position.
●Do not drive with the head
restraints removed.
Adjusting a head restraint
Removing the head
restraints
Page 124 of 588
1243-4. Adjusting the steering wheel and mirrors
COROLLA_U
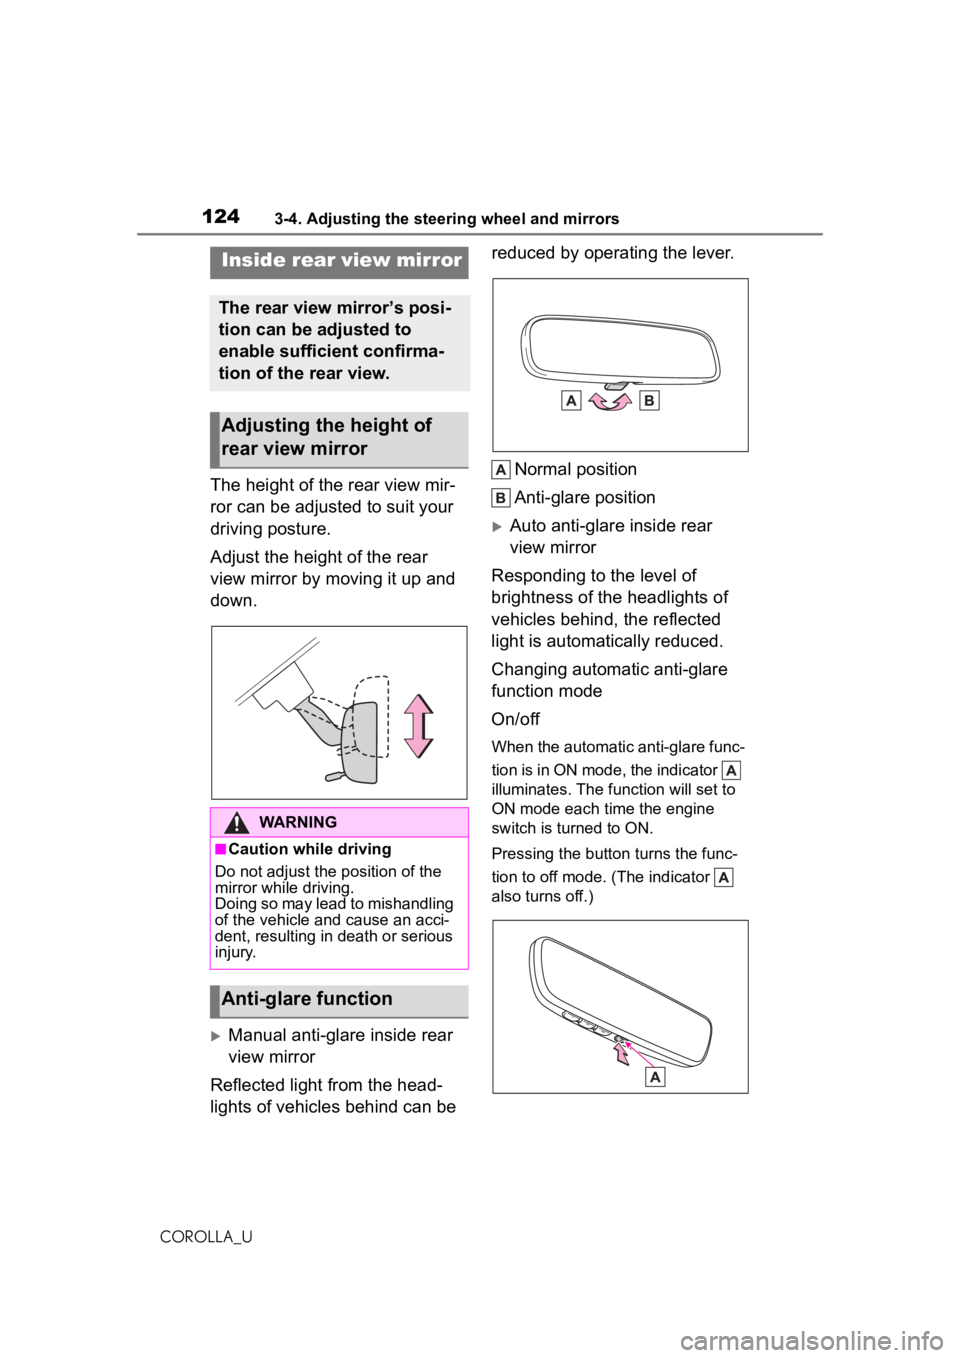
The height of the rear view mir-
ror can be adjusted to suit your
driving posture.
Adjust the height of the rear
view mirror by moving it up and
down.
Manual anti-glare inside rear
view mirror
Reflected light from the head-
lights of vehicles behind can be reduced by operating the lever.
Normal position
Anti-glare position
Auto anti-glare inside rear
view mirror
Responding to the level of
brightness of the headlights of
vehicles behind, the reflected
light is automatically reduced.
Changing automatic anti-glare
function mode
On/off
When the automatic anti-glare func-
tion is in ON mode, the indicator
illuminates. The function will set to
ON mode each time the engine
switch is turned to ON.
Pressing the button turns the func-
tion to off mode. (The indicator
also turns off.)
Inside rear view mirror
The rear view mirror’s posi-
tion can be adjusted to
enable sufficient confirma-
tion of the rear view.
Adjusting the height of
rear view mirror
WARNING
■Caution while driving
Do not adjust the position of the
mirror while driving.
Doing so may lead to mishandling
of the vehicle and cause an acci-
dent, resulting in death or serious
injury.
Anti-glare function
Page 193 of 588
1934-5. Using the driving support systems
COROLLA_U
4
Driving
swerving, acceleration or deceler-
ation)
• When your vehicle approaches a
detectable object rapidly
• When a detectable object is not directly in front of your vehicle
• When a detectable object is near a wall, fence, guardrail, manhole
cover, vehicle, steel plate on the
road, etc.
• When a detectable object is under
a structure
• When part of a detectable object is hidden by an object, such as
large baggage, an umbrella, or
guardrail
• When multiple de tectable objects
are close together
• If the sun or other light is shining directly on a detectable object
• When a detectable object is a shade of white and looks
extremely bright
• When a detectable object appears to be nearly the same color or
brightness as its surroundings
• If a detectable object cuts or sud- denly emerges in front of your
vehicle
• When the front of your vehicle is hit by water, snow, dust, etc.
• When a very bright light ahead,
such as the sun or the headlights
of oncoming traffic, shines directly
into the front camera
• When approaching the side or front of a vehicle ahead
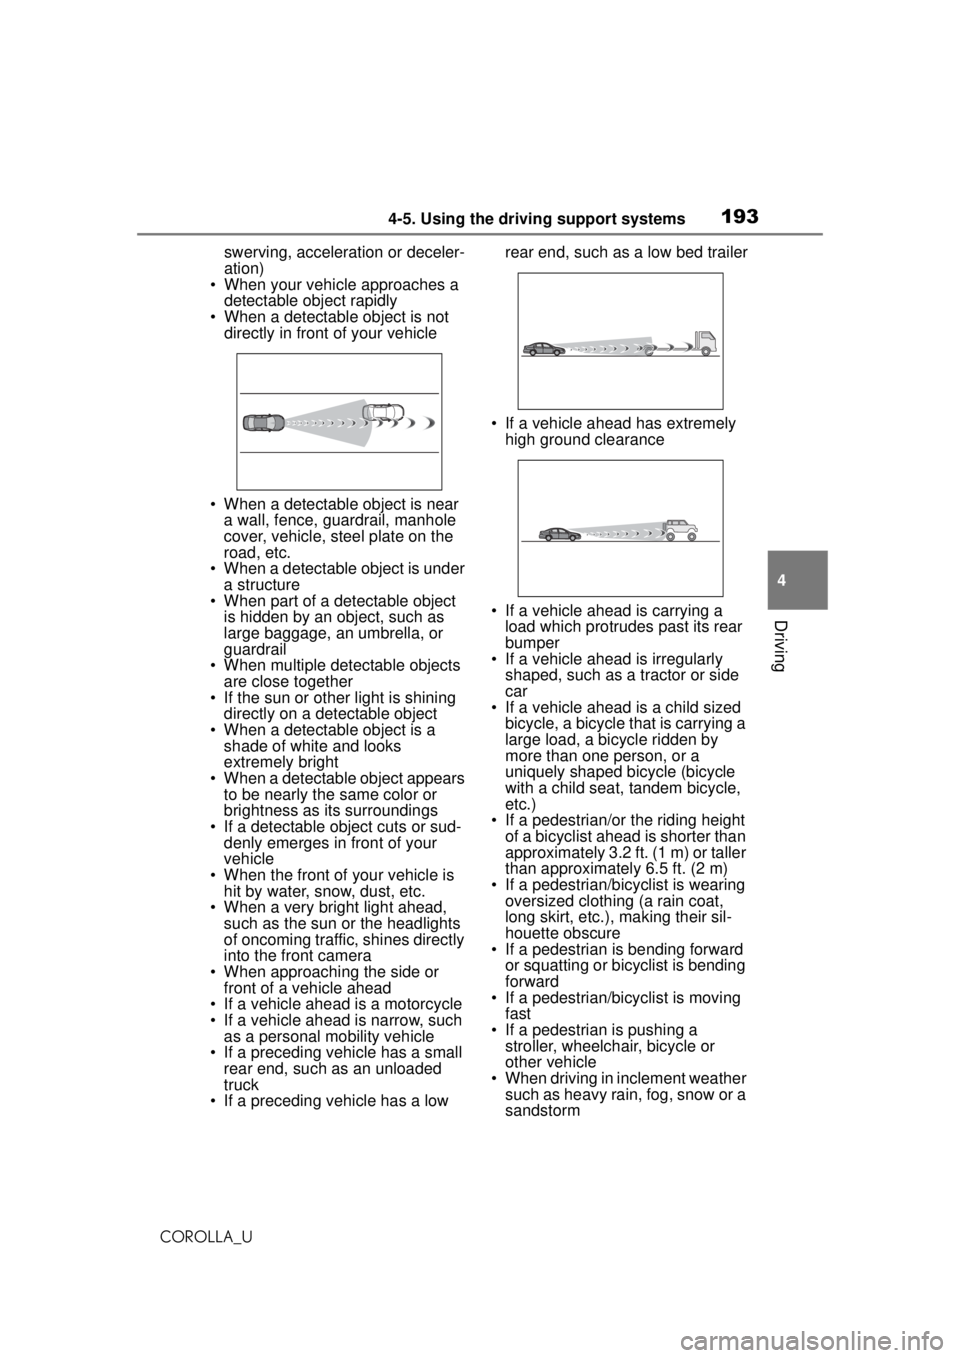
• If a vehicle ahead is a motorcycle
• If a vehicle ahead is narrow, such as a personal mobility vehicle
• If a preceding vehicle has a small rear end, such as an unloaded
truck
• If a preceding vehicle has a low rear end, such as a low bed trailer
• If a vehicle ahead has extremely high ground clearance
• If a vehicle ahead is carrying a load which protrudes past its rear
bumper
• If a vehicle ahead is irregularly
shaped, such as a tractor or side
car
• If a vehicle ahead is a child sized
bicycle, a bicycle that is carrying a
large load, a bicycle ridden by
more than one person, or a
uniquely shaped bicycle (bicycle
with a child seat, tandem bicycle,
etc.)
• If a pedestrian/or the riding height of a bicyclist ahead is shorter than
approximately 3.2 ft. (1 m) or taller
than approximately 6.5 ft. (2 m)
• If a pedestrian/bicyclist is wearing oversized clothing (a rain coat,
long skirt, etc.), making their sil-
houette obscure
• If a pedestrian is bending forward
or squatting or bicyclist is bending
forward
• If a pedestrian/bicyclist is moving
fast
• If a pedestrian is pushing a stroller, wheelchair, bicycle or
other vehicle
• When driving in inclement weather such as heavy rain, fog, snow or a
sandstorm
Page 241 of 588
2414-5. Using the driving support systems
COROLLA_U
4
Driving
uneven surfaces
• When vehicle lanes are wide, or when driving on the edge of a
lane, and the vehicle in an adja-
cent lane is far away from your
vehicle
• When an accessory (such as a bicycle carrier) is installed to the
rear of the vehicle
• When there is a significant differ- ence in height between your vehi-
cle and the vehicle that enters the
detection area
• Immediately after the Blind Spot Monitor is turned on
●Instances of the Blind Spot Moni-
tor unnecessarily detecting a vehi-
cle and/or object may increase in
the following situations:
• When the sensor is misaligned
due to a strong impact to the sen-
sor or its surrounding area
• When the distance between your
vehicle and a guardrail, wall, etc.
that enters the detection area is
short
• When driving up and down con- secutive steep inclines, such as
hills, dips in the road, etc.
• When vehicle lanes are narrow, or when driving on the edge of a
lane, and a vehicle traveling in a
lane other than the adjacent lanes
enters the detection area
• When driving on roads with sharp
bends, consecutive curves, or
uneven surfaces
• When the tires are slipping or
spinning
• When the distance between your vehicle and a following vehicle is
short
• When an accessory (such as a bicycle carrier) is installed to the
rear of the vehicle
The rear view image is dis-
played when the shift lever is in
R and the engine switch is in
ON.
Rear view monitor sys-
tem
Entune Audio
The rear view monitor sys-
tem assists the driver by
displaying an image of the
view behind the vehicle with
fixed guide lines on the
screen while backing up, for
example while parking.
The screen illustrations
used in this text are
intended as examples, and
may differ from the image
that is actually displayed on
the screen.
Entune Audio Plus or
Entune Premium Audio
Owners of models equipped
with a navigation/multime-
dia system should refer to
the “NAVIGATION AND
MULTIMEDIA SYSTEM
OWNER’S MANUAL”.
System overview
Page 505 of 588
5058-2. Steps to take in an emergency
COROLLA_U
8
When trouble arises
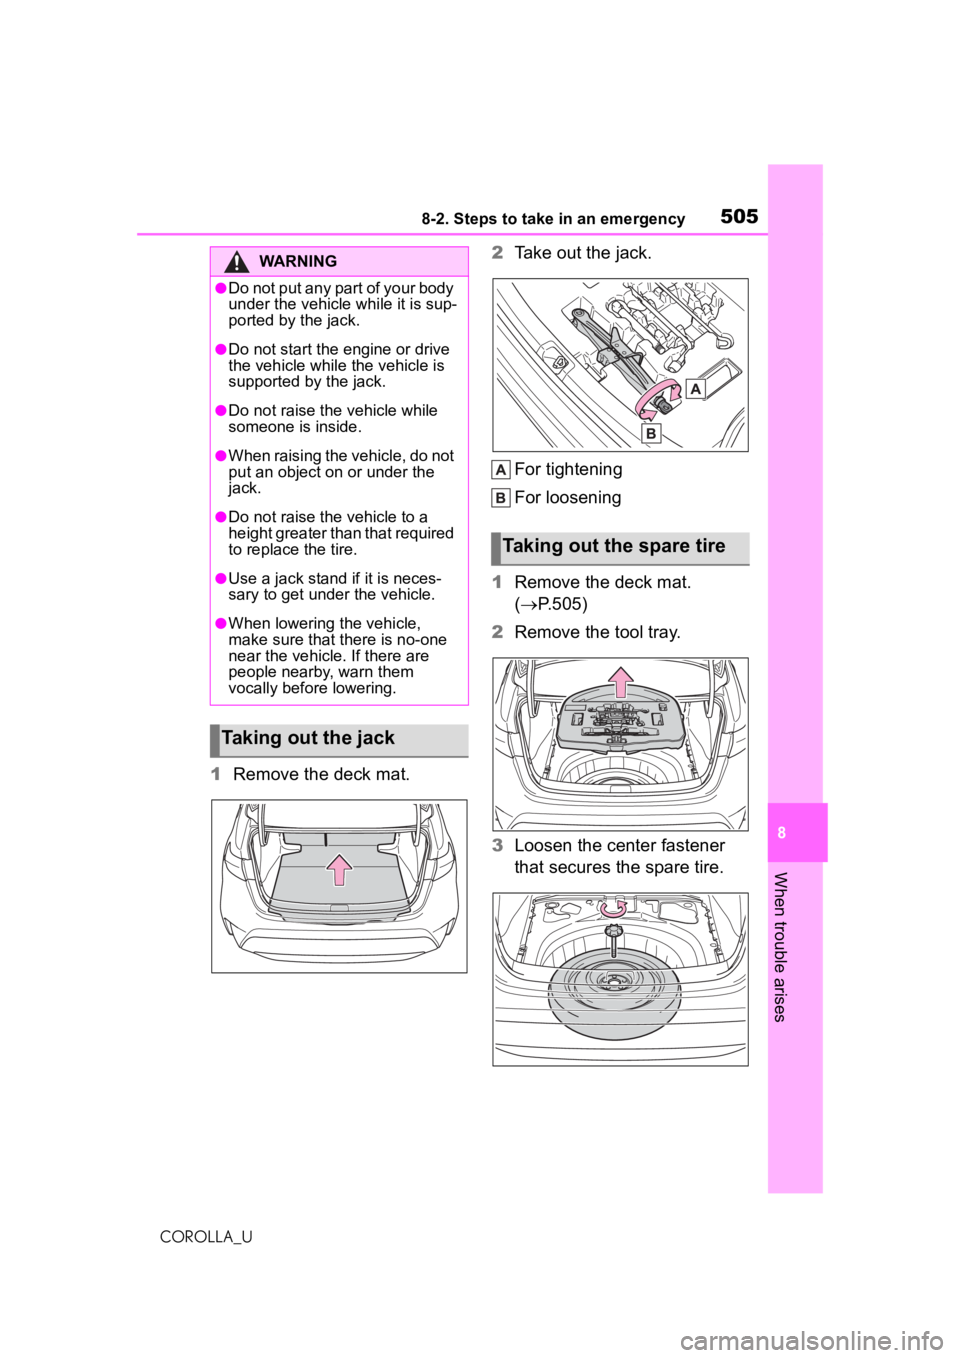
1 Remove the deck mat. 2
Take out the jack.
For tightening
For loosening
1 Remove the deck mat.
( P.505)
2 Remove the tool tray.
3 Loosen the center fastener
that secures the spare tire.
WARNING
●Do not put any part of your body
under the vehicle while it is sup-
ported by the jack.
●Do not start the engine or drive
the vehicle while the vehicle is
supported by the jack.
●Do not raise the vehicle while
someone is inside.
●When raising the vehicle, do not
put an object on or under the
jack.
●Do not raise the vehicle to a
height greater than that required
to replace the tire.
●Use a jack stand if it is neces-
sary to get under the vehicle.
●When lowering the vehicle,
make sure that there is no-one
near the vehicle. If there are
people nearby, warn them
vocally before lowering.
Taking out the jack
Taking out the spare tire
Page 524 of 588
5249-1. Specifications
COROLLA_U
9-1.Specifications
*1: Unladen vehicles
*2: 1.8 L 4-cylinder (2ZR-FAE) engine
*3: 2.0 L 4-cylinder (M20A-FKS) engine
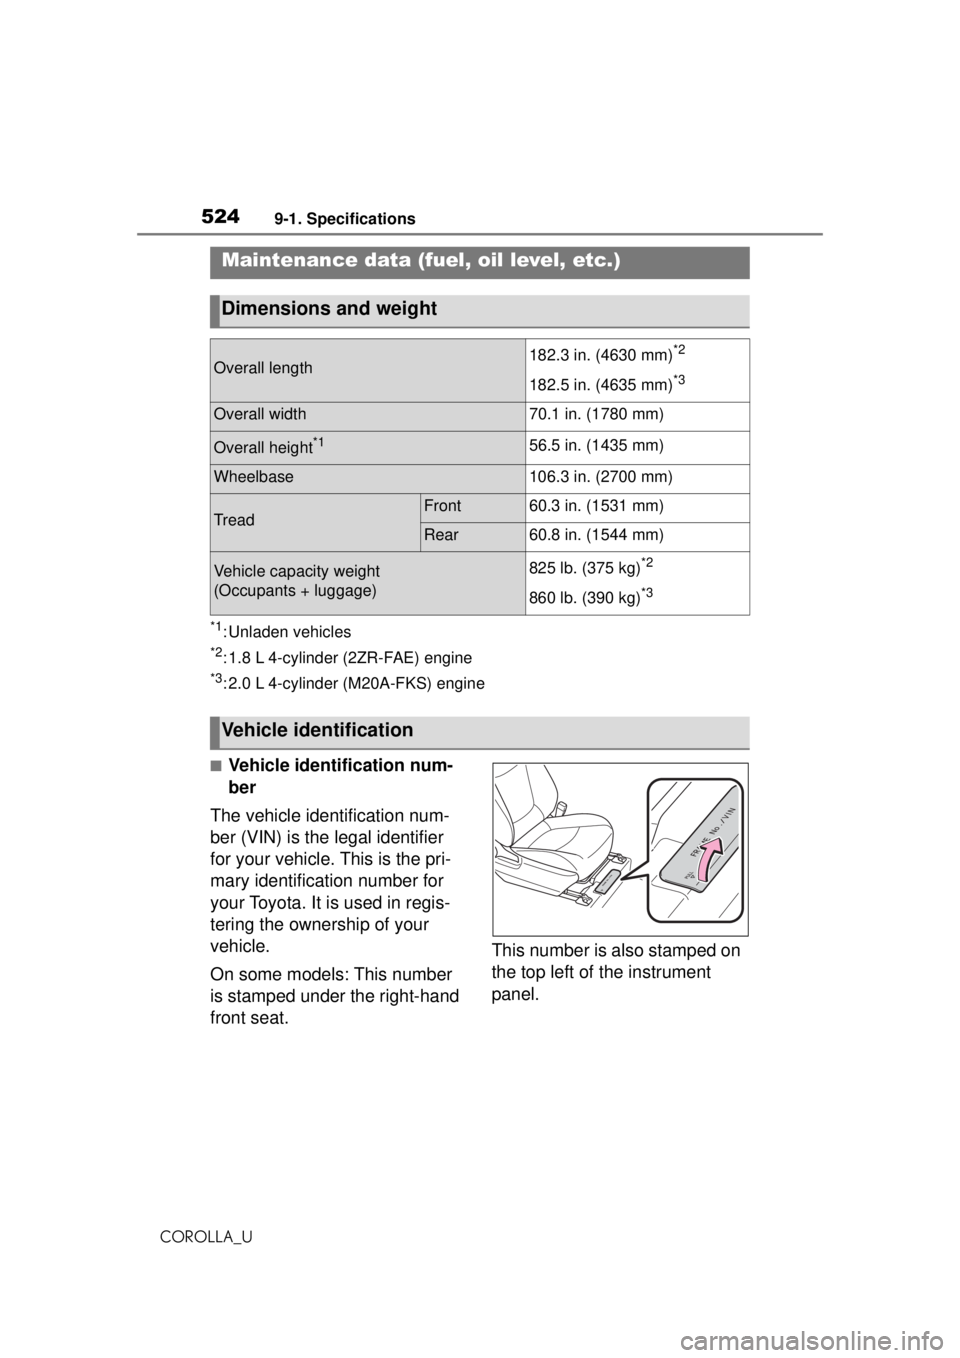
■Vehicle identification num-
ber
The vehicle identification num-
ber (VIN) is the legal identifier
for your vehicle. This is the pri-
mary identification number for
your Toyota. It is used in regis-
tering the ownership of your
vehicle.
On some models: This number
is stamped under the right-hand
front seat. This number is also stamped on
the top left of the instrument
panel.
Maintenance data (fuel, oil level, etc.)
Dimensions and weight
Overall length182.3 in. (4630 mm)*2
182.5 in. (4635 mm)*3
Overall width70.1 in. (1780 mm)
Overall height*156.5 in. (1435 mm)
Wheelbase106.3 in. (2700 mm)
TreadFront60.3 in. (1531 mm)
Rear60.8 in. (1544 mm)
Vehicle capacity weight
(Occupants + luggage)825 lb. (375 kg)*2
860 lb. (390 kg)*3
Vehicle identification