start stop button TOYOTA COROLLA 2021 Owners Manual (in English)
[x] Cancel search | Manufacturer: TOYOTA, Model Year: 2021, Model line: COROLLA, Model: TOYOTA COROLLA 2021Pages: 624, PDF Size: 20.3 MB
Page 83 of 624
831-4. Theft deterrent system
1
For safety and security
COROLLA_U
hood, and lock all the doors.
The system will set automati-
cally after 30 seconds.
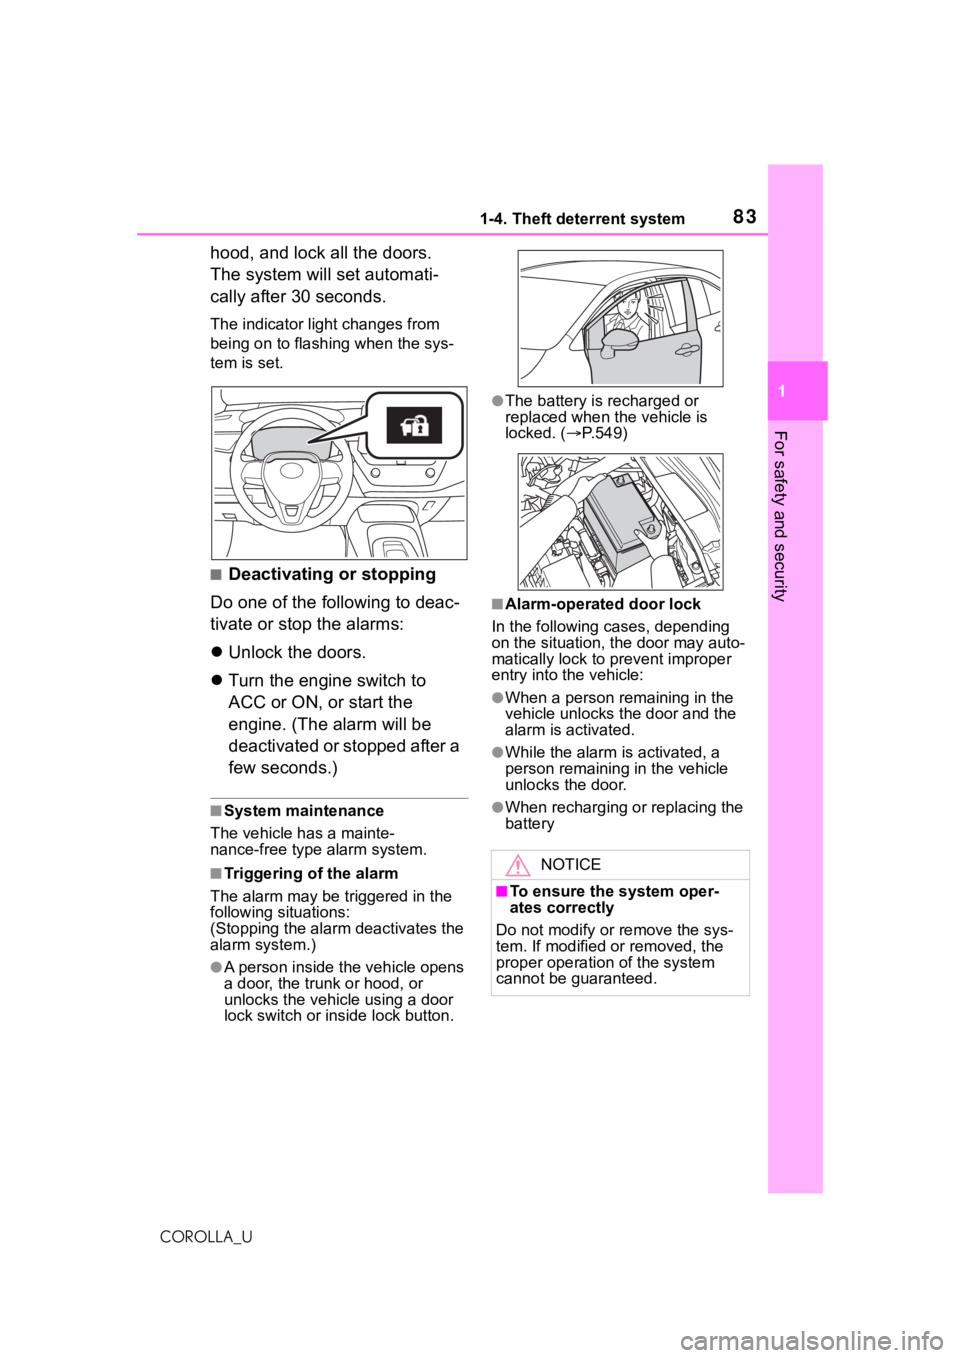
The indicator light changes from
being on to flashing when the sys-
tem is set.
■Deactivating or stopping
Do one of the following to deac-
tivate or stop the alarms:
Unlock the doors.
Turn the engine switch to
ACC or ON, or start the
engine. (The alarm will be
deactivated or stopped after a
few seconds.)
■System maintenance
The vehicle has a mainte-
nance-free type alarm system.
■Triggering of the alarm
The alarm may be triggered in the
following situations:
(Stopping the alarm deactivates the
alarm system.)
●A person inside the vehicle opens
a door, the trunk or hood, or
unlocks the vehicle using a door
lock switch or inside lock button.
●The battery is recharged or
replaced when the vehicle is
locked. ( P.549)
■Alarm-operated door lock
In the following cases, depending
on the situation, the door may auto-
matically lock to prevent improper
entry into the vehicle:
●When a person remaining in the
vehicle unlocks the door and the
alarm is activated.
●While the alarm i s activated, a
person remaining in the vehicle
unlocks the door.
●When recharging or replacing the
battery
NOTICE
■To ensure the system oper-
ates correctly
Do not modify or remove the sys-
tem. If modified or removed, the
proper operation of the system
cannot be guaranteed.
Page 127 of 624
1273-2. Opening, closing and locking the doors
3
Before driving
COROLLA_Ubeen used for 5 days or longer.
●If the smart key system has not
been used for 14 days or longer,
the doors cann
ot be unlocked
from any door except the driver’s
door. In this case, hold the driver’s
door handle, or use the wireless
remote control or mechanical key
to unlock the doors.
■Electronic key battery-saving
function
When battery-savi ng mode is set,
battery depletion is minimized by
stopping the electronic key from
receiving radio waves.
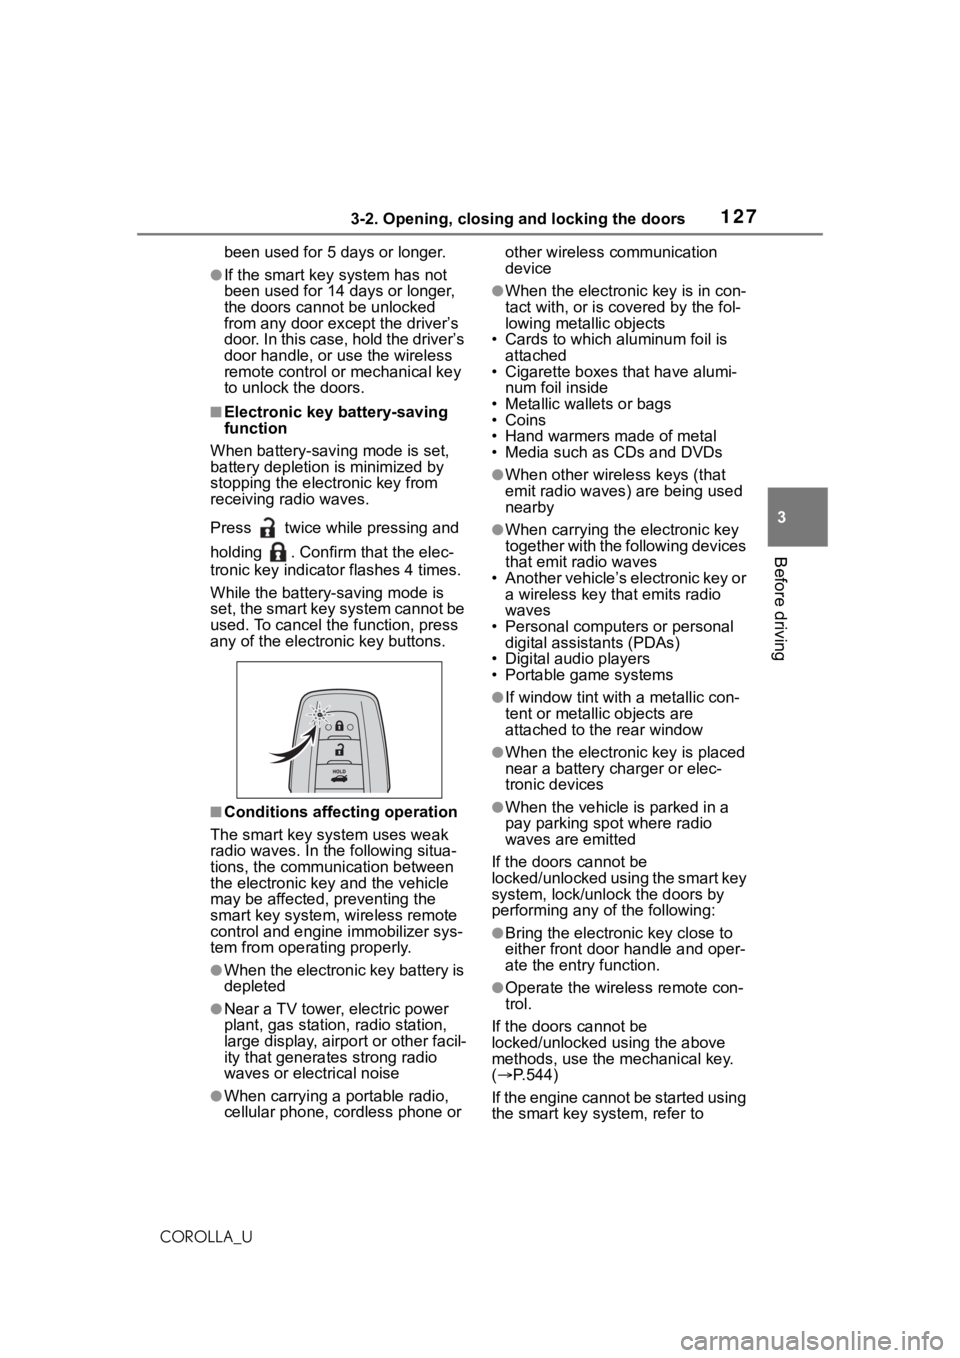
Press twice while pressing and
holding . Confirm that the elec-
tronic key indicator flashes 4 times.
While the battery-saving mode is
set, the smart key system cannot be
used. To cancel the function, press
any of the electronic key buttons.
■Conditions affecting operation
The smart key system uses weak
radio waves. In the following situa-
tions, the communication between
the electronic key and the vehicle
may be affected, preventing the
smart key system, wireless remote
control and engine immobilizer sys-
tem from operating properly.
●When the electronic key battery is
depleted
●Near a TV tower, electric power
plant, gas station , radio station,
large display, airpo rt or other facil-
ity that generates strong radio
waves or electrical noise
●When carrying a portable radio,
cellular phone, cordless phone or other wireless communication
device
●When the electronic key is in con-
tact with, or is c
overed by the fol-
lowing metallic objects
• Cards to which aluminum foil is
attached
• Cigarette boxes that have alumi-
num foil inside
• Metallic wallets or bags
•Coins
• Hand warmers made of metal
• Media such as CDs and DVDs
●When other wirel ess keys (that
emit radio waves) are being used
nearby
●When carrying the electronic key
together with the following devices
that emit radio waves
• Another vehicle’s electronic key or a wireless key that emits radio
waves
• Personal computers or personal digital assistants (PDAs)
• Digital audio players
• Portable game systems
●If window tint wit h a metallic con-
tent or metallic objects are
attached to the rear window
●When the electronic key is placed
near a battery charger or elec-
tronic devices
●When the vehicle is parked in a
pay parking spot where radio
waves are emitted
If the doors cannot be
locked/unlocked using the smart key
system, lock/unlock the doors by
performing any of the following:
●Bring the electronic key close to
either front door handle and oper-
ate the entry function.
●Operate the wireless remote con-
trol.
If the doors cannot be
locked/unlocked using the above
methods, use the mechanical key.
( P.544)
If the engine cannot be started using
the smart key system, refer to
Page 170 of 624
1704-2. Driving procedures
COROLLA_Ufull-speed rang
e will not be can-
celed. ( P.271)
■Restraining sudden start
(Drive-Start Control)
P. 1 5 2
■G AI-SHIFT
G AI-SHIFT automatically selects a
suitable gear for sporty driving
according to driver’s input and driv-
ing conditions. G AI-SHIFT operates
automatically when th e shift lever is
in D and sport mode is selected for
the driving mode. (Selecting normal
mode or shifting the shift lever to the
B position cancels this function.)
■After recharging/reconnecting
the battery
P. 5 4 9
■Continuously variable transmis-
sion fail-safe control
The system detects malfunctioning
parts targeted (all of the solenoids
that perform the shifting function) by
the On-Board Diagnostics, and per-
forms fail-safe mechanisms, such
as restricting the shifting function or
transmission ratio control.
In this event, the malfunction indica-
tor lamp turns on.
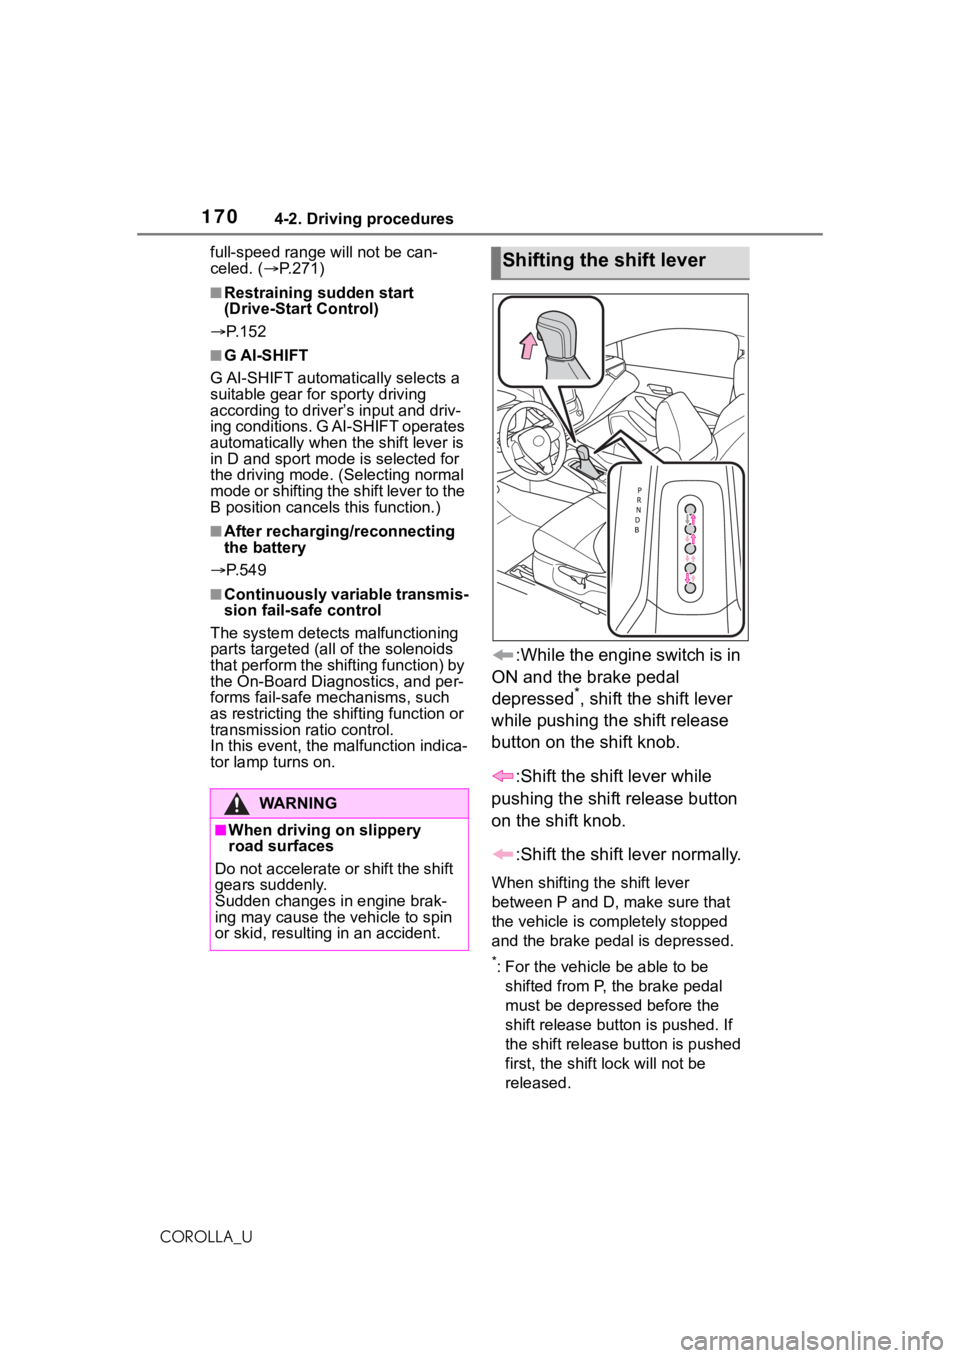
:While the engine switch is in
ON and the brake pedal
depressed
*, shift the shift lever
while pushing the shift release
button on the shift knob.
:Shift the shift lever while
pushing the shift release button
on the shift knob.
:Shift the shift lever normally.
When shifting the shift lever
between P and D, make sure that
the vehicle is completely stopped
and the brake pe dal is depressed.
*: For the vehicle be able to be
shifted from P, the brake pedal
must be depressed before the
shift release button is pushed. If
the shift release button is pushed
first, the shift lock will not be
released.
WA R N I N G
■When driving on slippery
road surfaces
Do not accelerate o r shift the shift
gears suddenly.
Sudden changes in engine brak-
ing may cause the vehicle to spin
or skid, resulting in an accident.
Shifting the shift lever
Page 173 of 624
1734-2. Driving procedures
4
Driving
COROLLA_U
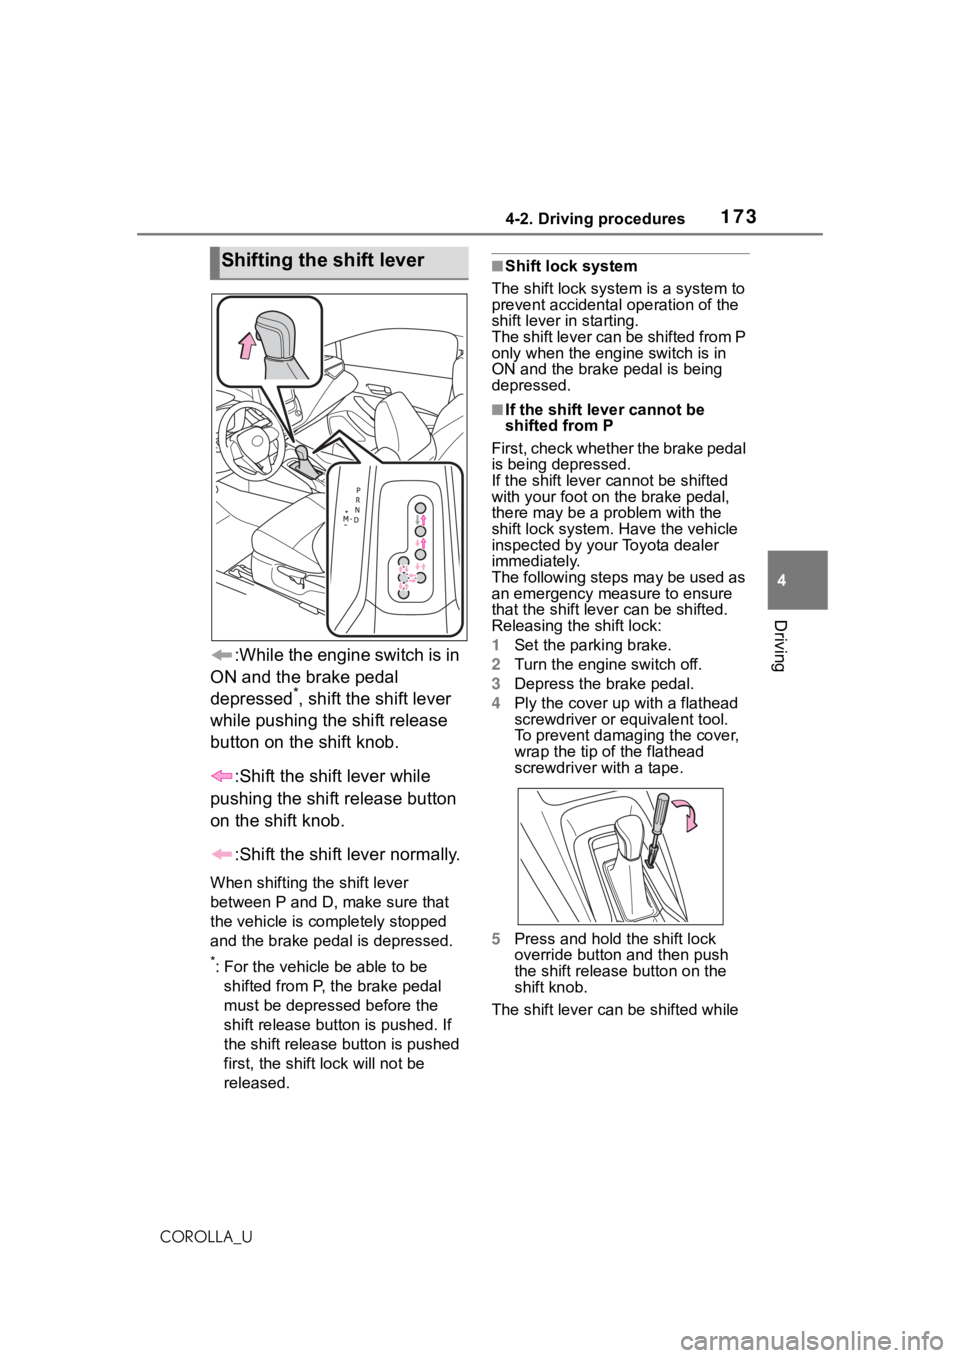
:While the engine switch is in
ON and the brake pedal
depressed
*, shift the shift lever
while pushing the shift release
button on the shift knob.
:Shift the shift lever while
pushing the shift release button
on the shift knob.
:Shift the shift lever normally.
When shifting the shift lever
between P and D, make sure that
the vehicle is completely stopped
and the brake pedal is depressed.
*: For the vehicle be able to be
shifted from P, the brake pedal
must be depresse d before the
shift release button is pushed. If
the shift release button is pushed
first, the shift lock will not be
released.
■Shift lock system
The shift lock syste m is a system to
prevent accidental operation of the
shift lever in starting.
The shift lever can be shifted from P
only when the engi ne switch is in
ON and the brake pedal is being
depressed.
■If the shift lever cannot be
shifted from P
First, check whether the brake pedal
is being depressed.
If the shift lever cannot be shifted
with your foot on the brake pedal,
there may be a p roblem with the
shift lock system. Have the vehicle
inspected by your Toyota dealer
immediately.
The following steps may be used as
an emergency measure to ensure
that the shift lev er can be shifted.
Releasing the shift lock:
1 Set the parking brake.
2 Turn the engine switch off.
3 Depress the brake pedal.
4 Ply the cover up with a flathead
screwdriver or equivalent tool.
To prevent damaging the cover,
wrap the tip of the flathead
screwdriver with a tape.
5 Press and hold the shift lock
override button and then push
the shift release button on the
shift knob.
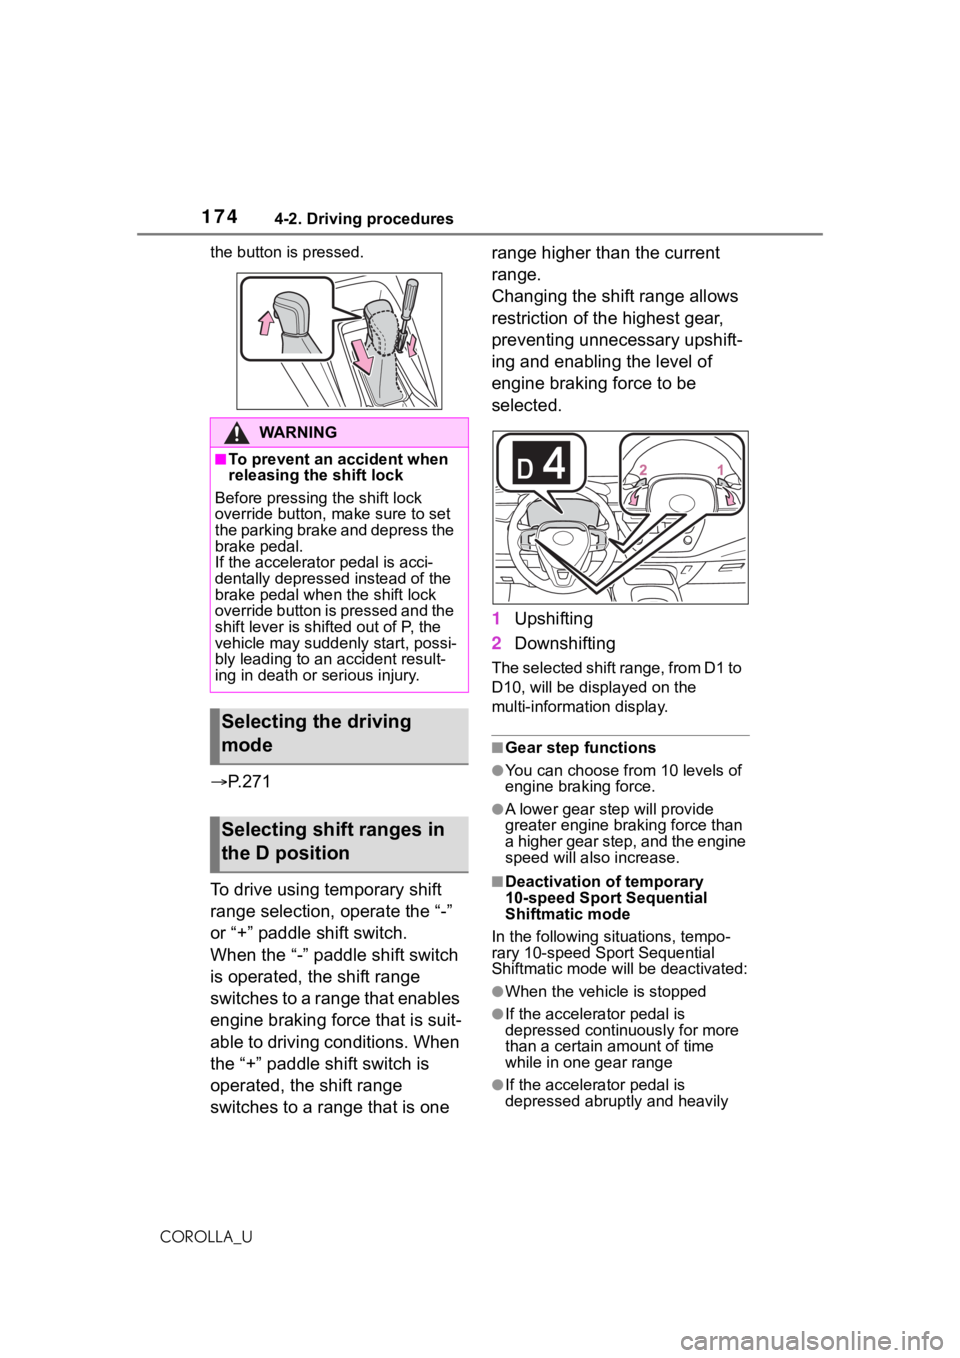
The shift lever can be shifted while
Shifting the shift lever
Page 174 of 624
1744-2. Driving procedures
COROLLA_Uthe button is pressed.
P. 2 7 1
To drive using temporary shift
range selection, operate the “-”
or “+” paddle shift switch.
When the “-” paddle shift switch
is operated, the shift range
switches to a range that enables
engine braking force that is suit-
able to driving conditions. When
the “+” paddle shift switch is
operated, the shift range
switches to a range that is one range higher than the current
range.
Changing the shift range allows
restriction of the highest gear,
preventing unnecessary upshift-
ing and enabling the level of
engine braking force to be
selected.
1
Upshifting
2 Downshifting
The selected shift range, from D1 to
D10, will be displayed on the
multi-information display.
■Gear step functions
●You can choose from 10 levels of
engine braking force.
●A lower gear step will provide
greater engine braking force than
a higher gear step, and the engine
speed will also increase.
■Deactivation of temporary
10-speed Sport Sequential
Shiftmatic mode
In the following situations, tempo-
rary 10-speed Sport Sequential
Shiftmatic mode will be deactivated:
●When the vehicle is stopped
●If the accelerator pedal is
depressed continuously for more
than a certain a mount of time
while in one gear range
●If the accelerator pedal is
depressed abruptly and heavily
WA R N I N G
■To prevent an accident when
releasing the shift lock
Before pressing the shift lock
override button, make sure to set
the parking brake and depress the
brake pedal.
If the accelerator pedal is acci-
dentally depressed instead of the
brake pedal when the shift lock
override button is pressed and the
shift lever is shifted out of P, the
vehicle may suddenly start, possi-
bly leading to an accident result-
ing in death or serious injury.
Selecting the driving
mode
Selecting shift ranges in
the D position
Page 184 of 624
1844-2. Driving procedures
COROLLA_U
*: If equipped
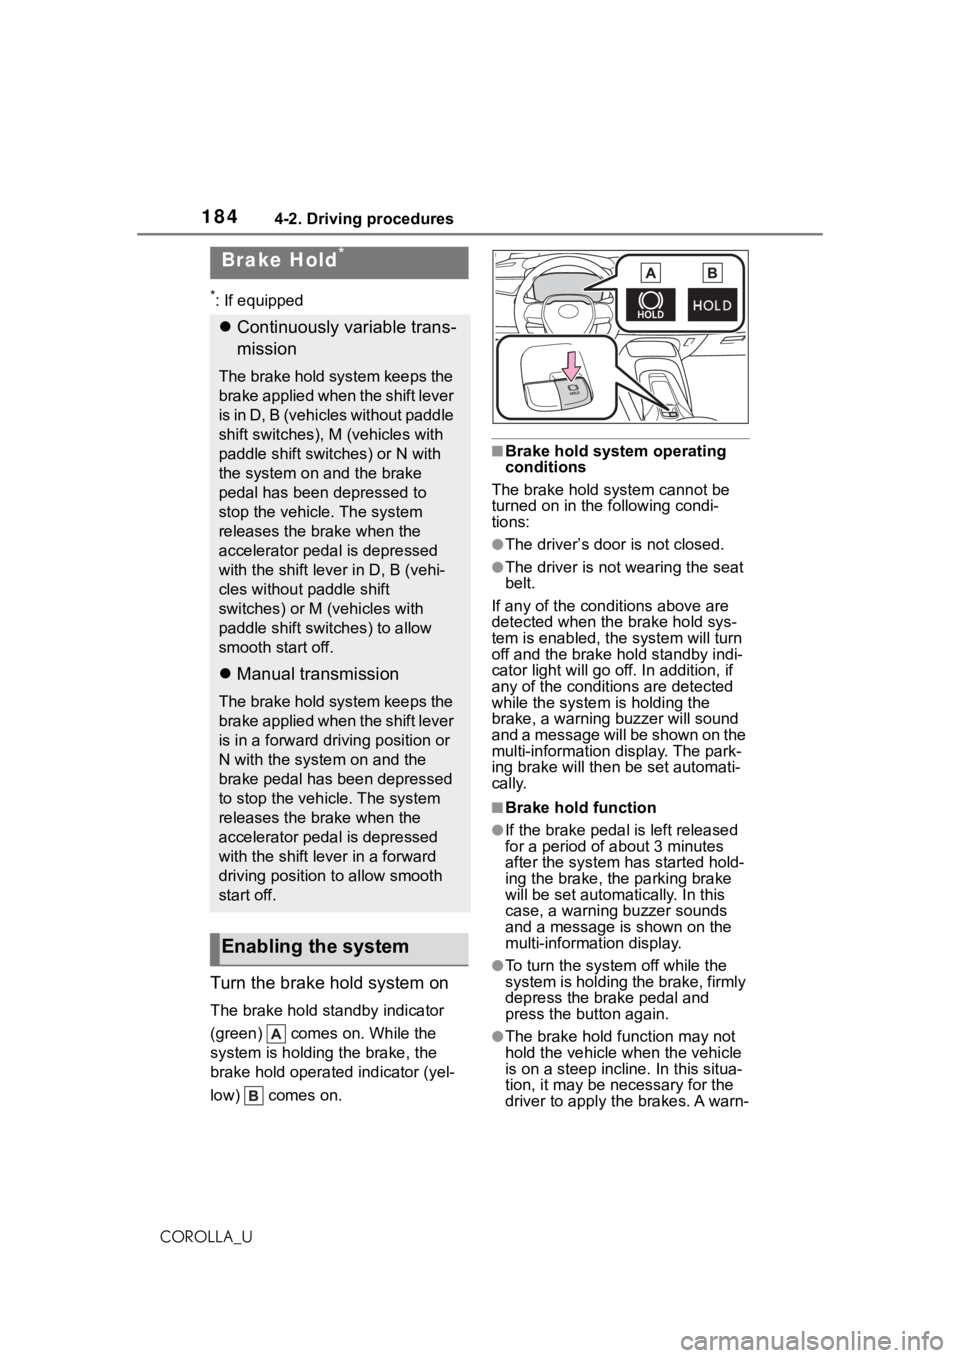
Turn the brake hold system on
The brake hold standby indicator
(green) comes on. While the
system is holding the brake, the
brake hold operated indicator (yel-
low) comes on.
■Brake hold system operating
conditions
The brake hold system cannot be
turned on in the following condi-
tions:
●The driver’s door is not closed.
●The driver is not wearing the seat
belt.
If any of the cond itions above are
detected when the brake hold sys-
tem is enabled, the system will turn
off and the brake hold standby indi-
cator light will go off. In addition, if
any of the conditions are detected
while the system is holding the
brake, a warning buzzer will sound
and a message will be shown on the
multi-information display. The park-
ing brake will then be set automati-
cally.
■Brake hold function
●If the brake pedal is left released
for a period of about 3 minutes
after the system has started hold-
ing the brake, the parking brake
will be set automatically. In this
case, a warning buzzer sounds
and a message is shown on the
multi-information display.
●To turn the system off while the
system is holding the brake, firmly
depress the brake pedal and
press the button again.
●The brake hold function may not
hold the vehicle when the vehicle
is on a steep incline. In this situa-
tion, it may be ne cessary for the
driver to apply the brakes. A warn-
Brake Hold*
Continuously variable trans-
mission
The brake hold system keeps the
brake applied when the shift lever
is in D, B (vehicles without paddle
shift switches), M (vehicles with
paddle shift switches) or N with
the system on and the brake
pedal has been depressed to
stop the vehicle. The system
releases the brake when the
accelerator pedal is depressed
with the shift lever in D, B (vehi-
cles without paddle shift
switches) or M (vehicles with
paddle shift switches) to allow
smooth start off.
Manual transmission
The brake hold system keeps the
brake applied when the shift lever
is in a forward driving position or
N with the system on and the
brake pedal has been depressed
to stop the vehicle. The system
releases the brake when the
accelerator pedal is depressed
with the shift lever in a forward
driving position to allow smooth
start off.
Enabling the system
Page 448 of 624
4486-4. Other interior features
COROLLA_U
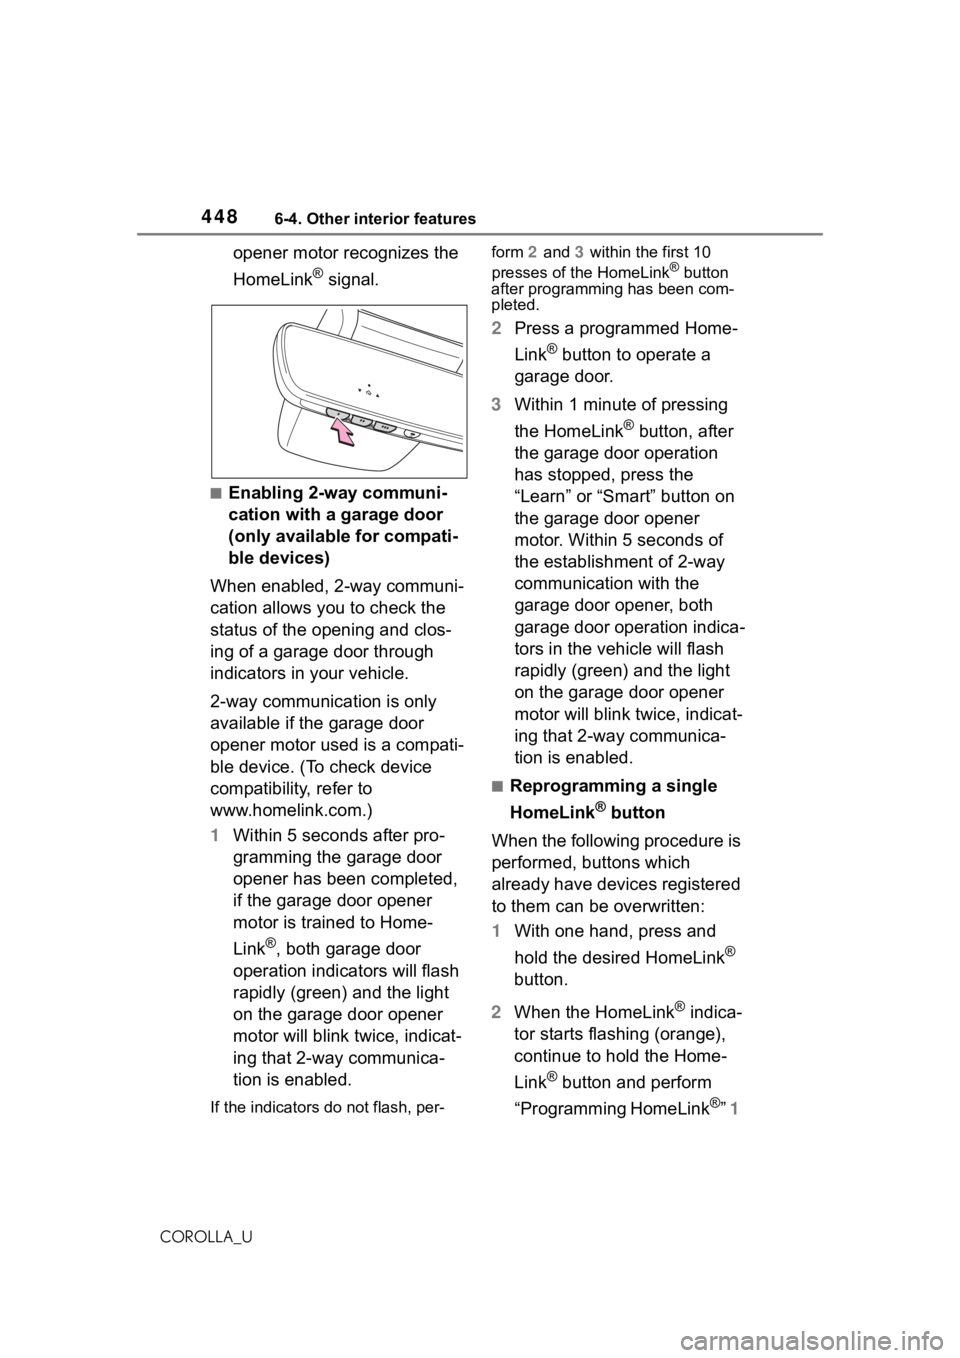
opener motor recognizes the
HomeLink
® signal.
■Enabling 2-way communi-
cation with a garage door
(only available for compati-
ble devices)
When enabled, 2-way communi-
cation allows you to check the
status of the opening and clos-
ing of a garage door through
indicators in your vehicle.
2-way communication is only
available if the garage door
opener motor used is a compati-
ble device. (To check device
compatibility, refer to
www.homelink.com.)
1 Within 5 seconds after pro-
gramming the garage door
opener has been completed,
if the garage door opener
motor is trained to Home-
Link
®, both garage door
operation indicators will flash
rapidly (green) and the light
on the garage door opener
motor will blink twice, indicat-
ing that 2-way communica-
tion is enabled.
If the indicators do not flash, per- form
2 and 3 within the first 10
presses of the HomeLink
® button
after programming has been com-
pleted.
2 Press a programmed Home-
Link
® button to operate a
garage door.
3 Within 1 minute of pressing
the HomeLink
® button, after
the garage door operation
has stopped, press the
“Learn” or “Smart” button on
the garage door opener
motor. Within 5 seconds of
the establishment of 2-way
communication with the
garage door opener, both
garage door operation indica-
tors in the vehicle will flash
rapidly (green) and the light
on the garage door opener
motor will blink twice, indicat-
ing that 2-way communica-
tion is enabled.
■Reprogramming a single
HomeLink
® button
When the following procedure is
performed, buttons which
already have devices registered
to them can be overwritten:
1 With one hand, press and
hold the desired HomeLink
®
button.
2 When the HomeLink
® indica-
tor starts flashing (orange),
continue to hold the Home-
Link
® button and perform
“Programming HomeLink
®” 1
Page 612 of 624

612Alphabetical Index
COROLLA_UGeneral button (Setup screen)
....................................... 288, 321
General settings ..................... 321 Displaying the general settings screen ................................ 321
General settings screen ....... 321
Glove box ................................ 431
Glove box light ....................... 431
H
Hands-free system ................. 373
Head restraints ....................... 136
Headlights Adaptive Front-lighting System (AFS) .................................. 188
Automatic High Beam system ........................................... 189
Light switch .......................... 186
Headlights/daytime running lightsReplacing light bulbs ............ 496
Heated steering wheel ........... 426
Heaters Automatic air conditioning sys-tem ..................................... 421
Heated steering wheel ......... 426
Manual air conditioning system ........................................... 416
Outside rear view mirrors ... 418, 422
Seat heaters ......................... 426
High mounted stoplight Replacing light bulbs ............ 496
Hill-start assist control .......... 272
HOME button .......................... 292
Home screen ........................... 292
Hood Open .................................... 464
Hooks Coat hooks ........................... 443
Retaining hooks (floor mat) .... 24
Horn ......................................... 138
I
I/M test .....................................461
Identification Engine ..................................557
Vehicle ..................................557
Ignition switch (engine switch) .......................................163, 164Auto power off fun ction .........168
Changing the engine switch modes.................................167
If your vehicle has to be stopped in an emergency .................502
Illuminated entry system .......429
Indicators ..................................88
Info button (Menu screen) .....285
Initial screen............................289 Caution screen .....................289
Restarting the system ...........289
Initialization Items to initialize ...................589
Maintenance .........................458
Power windows ....................142
Tire pressure w arning system
...........................................481
Inside rear view m irror ...........139
Instrument panel light control93, 98
Interior lights...........................428 Front interior light .................428
Rear interior light ..................428
Wattage ................................566
Internet radio...........................338
iPod/iPhone(Apple Carplay) ..341
J
Jack Positioning a floor jack .........465
Vehicle-equipped jack ..525, 535
Jack handle .....................525, 535
Jam protection function Moon roof .............................145
Page 617 of 624

617Alphabetical Index
COROLLA_UInside rear view mirror.......... 140
LDA (Lane Departure Alert with
steering control) ................. 221
LTA (Lane Tracing Assist) ..... 211
Radar sensor................ 196, 255
RCTA .................................... 259
Service Connect ..................... 407
Service reminder message .... 458
Setup button (Menu screen) 285, 288
Setup screen ........................... 288
Shift lever Continuously variable transmis-sion............................. 169, 172
If the shift lever cannot be shifted from P......................... 171, 173
Manual transmission ............ 176
Shift lock system............ 171, 173
Side airbags .............................. 31
Side marker lights Light switch .......................... 186
Replacing light bulbs ............ 497
Wattage ................................ 566
Side mirrors Adjustment ........................... 140
BSM (Blind Spot Monitor)..... 253
Folding ................................. 141
RCTA function ...................... 258
Side turn signal lights Replacing light bulbs ............ 496
Turn signal lever ................... 179
Side windows ...... ................... 142
SiriusXM (SXM) ....................... 333
Smart key system Antenna location .................. 125
Entry functions ..................... 117
Starting the engine ............... 164
Snow tires ............................... 277
Spare tire ................................. 534 Inflation pressure.................. 564
Storage location ................... 535
Spark plug ............................... 561 Specifications .........................556
Speedometer .......................91, 95
Status icon ..............................286
Status icon explanation ........286
Steering lock Column lock release .....163, 165
Steering lock system warning message .............................165
Steering switch ...............349, 364 Audio switch .........................349
Talk switch ............................364
Steering wheel Adjustment ...........................138
Heated steering wheel..........426
Meter control switches..........101
Stop lights Replacing light bulbs ............496
Storage features ... ..................430
Stuck If the vehicle becomes stuck 553
Sun visors ...............................442
Sunshade Roof ......................................145
Switches Automatic High Beam system...........................................189
Brake Hold switch .................184
Display change button ......92, 97
Door lock switches ...............120
Driving mode select switch ...271
Dynamic radar cruise control switch .................................240
Dynamic radar cruise control with full-speed range switch230
Emergency flashers switch...502
Engine switch ...............163, 164
Garage door opener switches ...........................................444
Heated steering wheel switch ...........................................426
Ignition switch ...............163, 164