antenna TOYOTA COROLLA 2022 Owners Manual (in English)
[x] Cancel search | Manufacturer: TOYOTA, Model Year: 2022, Model line: COROLLA, Model: TOYOTA COROLLA 2022Pages: 678, PDF Size: 147.24 MB
Page 8 of 678
6
Please note that this manual
applies to all models and explains
all equipment, including options.
Therefore, you may find some
explanations for equipment not
installed on your vehicle.
All specifications provided in this
manual are current at the time of
printing. However, because of the
Toyota policy of continual product
improvement, we reserve the right
to make changes at any time with-
out notice.
Depending on specifications, the
vehicle shown in the illustrations
may differ from your vehicle in
terms of equipment.
Both genuine Toyota and a wide
variety of other spare parts and
accessories for Toyota vehicles are
currently available on the market.
Should it be determined that any of
the genuine Toyota parts or acces-
sories supplied with the vehicle
need to be replaced, Toyota recom-
mends that genuine Toyota parts or
accessories, be used to replace
them. Other parts or accessories of
matching quality can also be used.
Toyota cannot accept any liability or
guarantee spare parts and acces-
sories which are not genuine
Toyota products, nor for replace-
ment or installati on involving such
parts. In addition, damage or per-
formance problems resulting from
the use of non-genuine Toyota
spare parts or accessories may not
be covered under warranty.
The installation of an RF-transmit-
ter system in your vehicle could
affect electronic systems such as:
Multiport fuel injection sys-
tem/sequential multiport fuel
injection system
Toyota Safety Sense (if
equipped)
Cruise control system (if
equipped)
Anti-lock brake system
SRS airbag system
Seat belt pretensioner system
Be sure to check with any author-
ized Toyota retailer or Toyota
authorized repairer, or any reliable
repairer for precautionary meas-
ures or special instructions regard-
ing installation of an RF-transmitter
system.
Further information regarding fre-
quency bands, power levels,
antenna positions and installation
provisions for the installation of
For your infor mation
Main Owner’s Manual
Accessories, spare parts
and modification of your
To y o t a
Installation of an RF-trans-
mitter system
Page 68 of 678
661-3. Emergency assistance
WA R N I N G
• When any related equipment (such
as the “SOS” button panel, indicator
lights, microphone, speaker, DCM, antenna, or any wires connecting
the equipment) is malfunctioning,
damaged or broken, the Emer- gency Call cannot be made.
• During an Emergency Call, the sys-
tem makes repeated attempts to connect to the eCall control center.
However, if it cannot connect to the
eCall control center due to poor radio wave reception, the system
may not be able to connect to the
cellular network and the call may finish without connecting. The red
indicator light will blink for approxi-
mately 30 seconds to indicate this disconnection.
●If the battery’s voltage decreases or there is a disconnection, the system
may not be able to connect to the
eCall control center.
■When the Emergency Call sys-
tem is replaced with a new one
The Emergency Call system should
be registered. Contact any authorized
Toyota retailer or Toyota authorized repairer, or any reliable repairer.
■For your safety
●Please drive safely.
The function of this system is to
assist you in making the Emer- gency Call in case of accidents
such as traffic accidents or sudden
medical emergencies, and it does not protect the driver or passengers
in any way. Please drive safely and
fasten your seatbelts at all times for your safety.
●In case of an emergency, make lives the top priority.
●If you smell anything burning or other unusual smells, leave the
vehicle and evacuate to a safe area
immediately.
●If the airbags deploy when the sys-
tem is operating normally, the sys- tem makes emergency call. The
system also makes emergency call
when the vehicle is struck from the rear or rolls over, even if the airbags
do not deploy.
●For safety, do not make the Emer-
gency Call while driving.
Making calls during driving may cause mishandling of the steering
wheel, which may lead to unex-
pected accidents. Stop the vehicle and confirm the
safety of your surroundings before
making the Emergency Call.
●When changing fuses, please use
the specified fuses. Using other fuses may cause ignition or smoke
in the circuit and lead to a fire.
●Using the system while there is
smoke or an unusual smell may
cause a fire. Stop using the system immediately and consult any
authorized Toyota retailer or Toyota
authorized repairer, or any reliable repairer.
NOTICE
■To prevent damage
Do not pour any liquids onto the
“SOS” button panel, etc. and do not impact it.
Page 123 of 678
121
3
3-2. Opening, closing and locking the doors
Before driving
*: If equipped
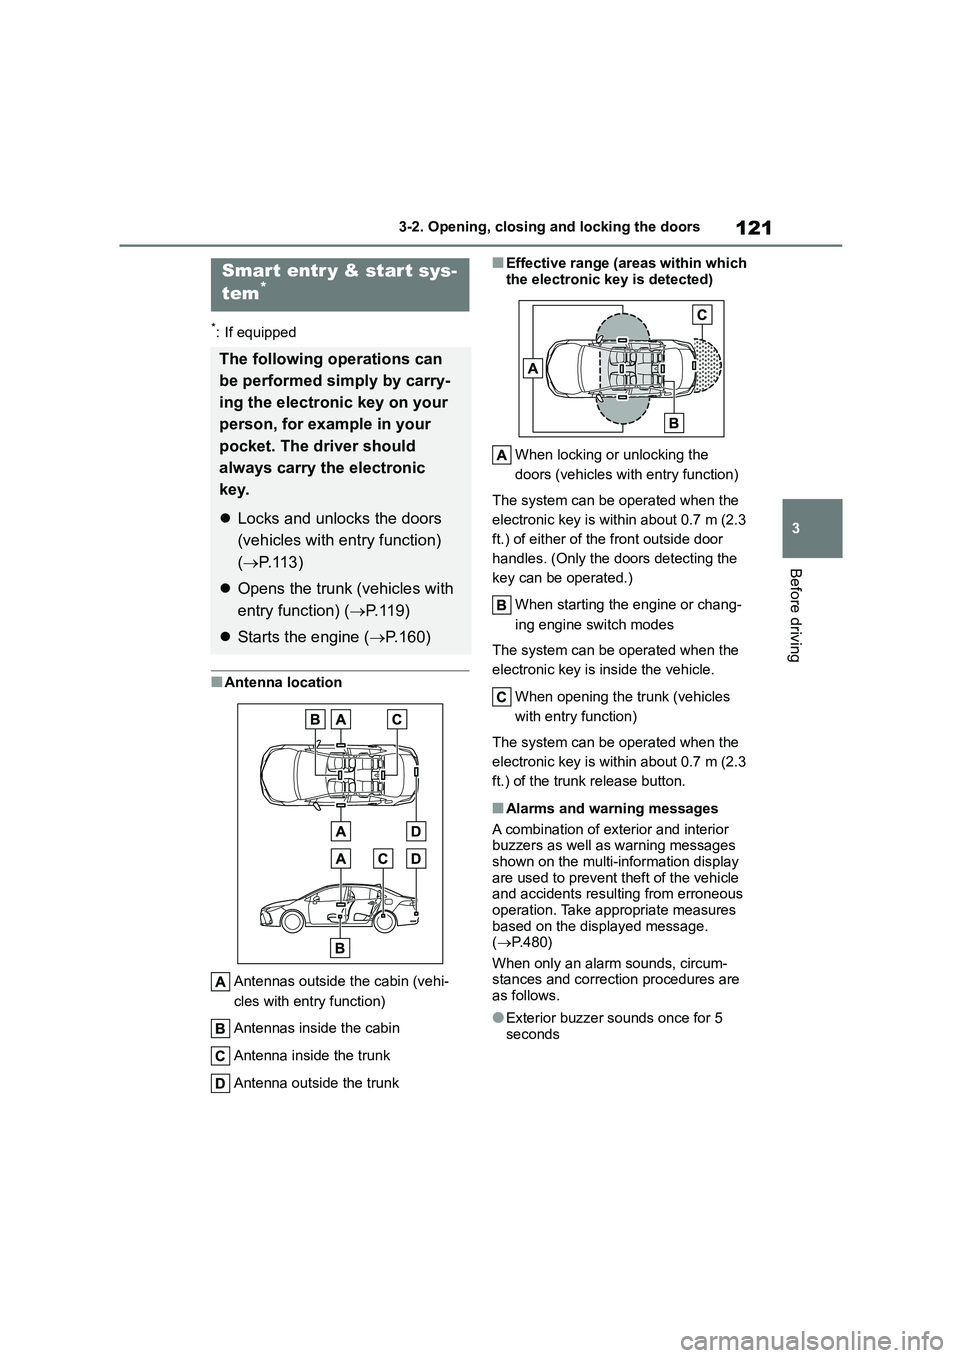
■Antenna location
Antennas outside the cabin (vehi-
cles with entry function)
Antennas inside the cabin
Antenna inside the trunk
Antenna outside the trunk
■Effective range (areas within which
the electronic key is detected)
When locking or unlocking the
doors (vehicles with entry function)
The system can be operated when the
electronic key is within about 0.7 m (2.3
ft.) of either of the front outside door
handles. (Only the doors detecting the
key can be operated.)
When starting the engine or chang-
ing engine switch modes
The system can be operated when the
electronic key is inside the vehicle.
When opening the trunk (vehicles
with entry function)
The system can be operated when the
electronic key is within about 0.7 m (2.3
ft.) of the trunk release button.
■Alarms and warning messages
A combination of exterior and interior buzzers as well as warning messages
shown on the multi-information display
are used to prevent theft of the vehicle and accidents resulting from erroneous
operation. Take appropriate measures
based on the displayed message. ( P.480)
When only an alarm sounds, circum-
stances and correction procedures are as follows.
●Exterior buzzer sounds once for 5 seconds
Smart entr y & start sys-
tem*
The following operations can
be performed simply by carry-
ing the electronic key on your
person, for example in your
pocket. The driver should
always carry the electronic
key.
Locks and unlocks the doors
(vehicles with entry function)
( P.113)
Opens the trunk (vehicles with
entry function) ( P. 1 1 9 )
Starts the engine (P.160)
Page 125 of 678
123
3
3-2. Opening, closing and locking the doors
Before driving
with, or is covered by the following
metallic objects • Cards to which aluminum foil is
attached
• Cigarette boxes that have aluminum foil inside
• Metallic wallets or bags
•Coins • Hand warmers made of metal
• Media such as CDs and DVDs
●When other wireless keys (that emit
radio waves) are being used nearby
●When carrying the electronic key
together with the following devices
that emit radio waves • Another vehicle’s electronic key or a
wireless key that emits radio waves
• Personal computers or personal digi- tal assistants (PDAs)
• Digital audio players
• Portable game systems
●If window tint with a metallic content or
metallic objects are attached to the rear window
●When the electronic key is placed near a battery charger or electronic
devices
●When the vehicle is parked in a pay
parking spot where radio waves are
emitted
If the doors cannot be locked/unlocked
using the smart en try & start system,
lock/unlock the doors by performing any of the following (vehicles with entry func-
tion):
●Bring the electronic key close to either
front door handle and operate the
entry function.
●Operate the wireless remote control.
If the doors cannot be locked/unlocked
using the above methods, use the mechanical key. ( P.512)
If the engine cannot be started using the
smart entry & start system refer to P.512.
■Note for the entr y function (if
equipped)
●Even when the electronic key is within
the effective range (detection areas),
the system may not operate properly in the following cases:
• The electronic key is too close to the
window or outside door handle, near the ground, or in a high place when
the doors are locked or unlocked.
• The electronic key is near the ground or in a high place, or too close to the
center of the rear bumper when the
trunk is opened. • The electronic key is on the instru-
ment panel, rear package tray or floor,
or in the door pockets or glove box when the engine is started or engine
switch modes are changed.
●Do not leave the electronic key on top
of the instrument panel or near the
door pockets when exiting the vehicle. Depending on the radio wave recep-
tion conditions, it may be detected by
the antenna outside the cabin and the door will become lockable from the
outside, possibly trapping the elec-
tronic key inside the vehicle.
●As long as the electronic key is within
the effective range, the doors may be locked or unlocked by anyone. How-
ever, only the doors detecting the
electronic key can be used to unlock the vehicle.
●Even if the electronic key is not inside the vehicle, it may be possible to start
the engine if the electronic key is near
the window.
●The doors may unlock or lock if a
large amount of water splashes on the door handle, such as in the rain or in a
car wash when the electronic key is
within the effective range. (The doors will automatically be locked after
approximately 30 seconds if the doors
are not opened and closed.)
●If the wireless remote control is used
to lock the doors when the electronic
key is near the vehicle, there is a pos- sibility that the door may not be
unlocked by the entry function. (Use
the wireless remote control to unlock the doors.)
Page 127 of 678
125
3
3-2. Opening, closing and locking the doors
Before driving
WA R N I N G
■Caution regarding interference
with electronic devices
●People with implantable cardiac pacemakers, cardiac
resynchronization therapy-pace-
makers or implantable cardioverter defibrillators should maintain a rea-
sonable distance between them-
selves and the smart entry & start
system antennas. ( P.121) The radio waves may affect the
operation of such devices. If neces-
sary, the entry function can be disa- bled. Ask any authorized Toyota
retailer or Toyota authorized
repairer, or any reliable repairer for details, such as the frequency of
radio waves and timing of the emit-
ted radio waves. Then, consult your doctor to see if you should disable
the entry function.
●Users of any electrical medical
device other than implantable car-
diac pacemakers, cardiac resynchronization therapy-pace-
makers or implantable cardioverter
defibrillators should consult the manufacturer of the device for infor-
mation about its operation under
the influence of radio waves. Radio waves could have unex-
pected effects on the operation of
such medical devices.
Ask any authorized Toyota retailer or
Toyota authorized repairer, or any reli- able repairer for details on disabling
the entry function.
Page 266 of 678
2644-5. Using the driving support systems
on the multi-information display and
head-up display (if equipped)
depending on the position and dis-
tance to the object.
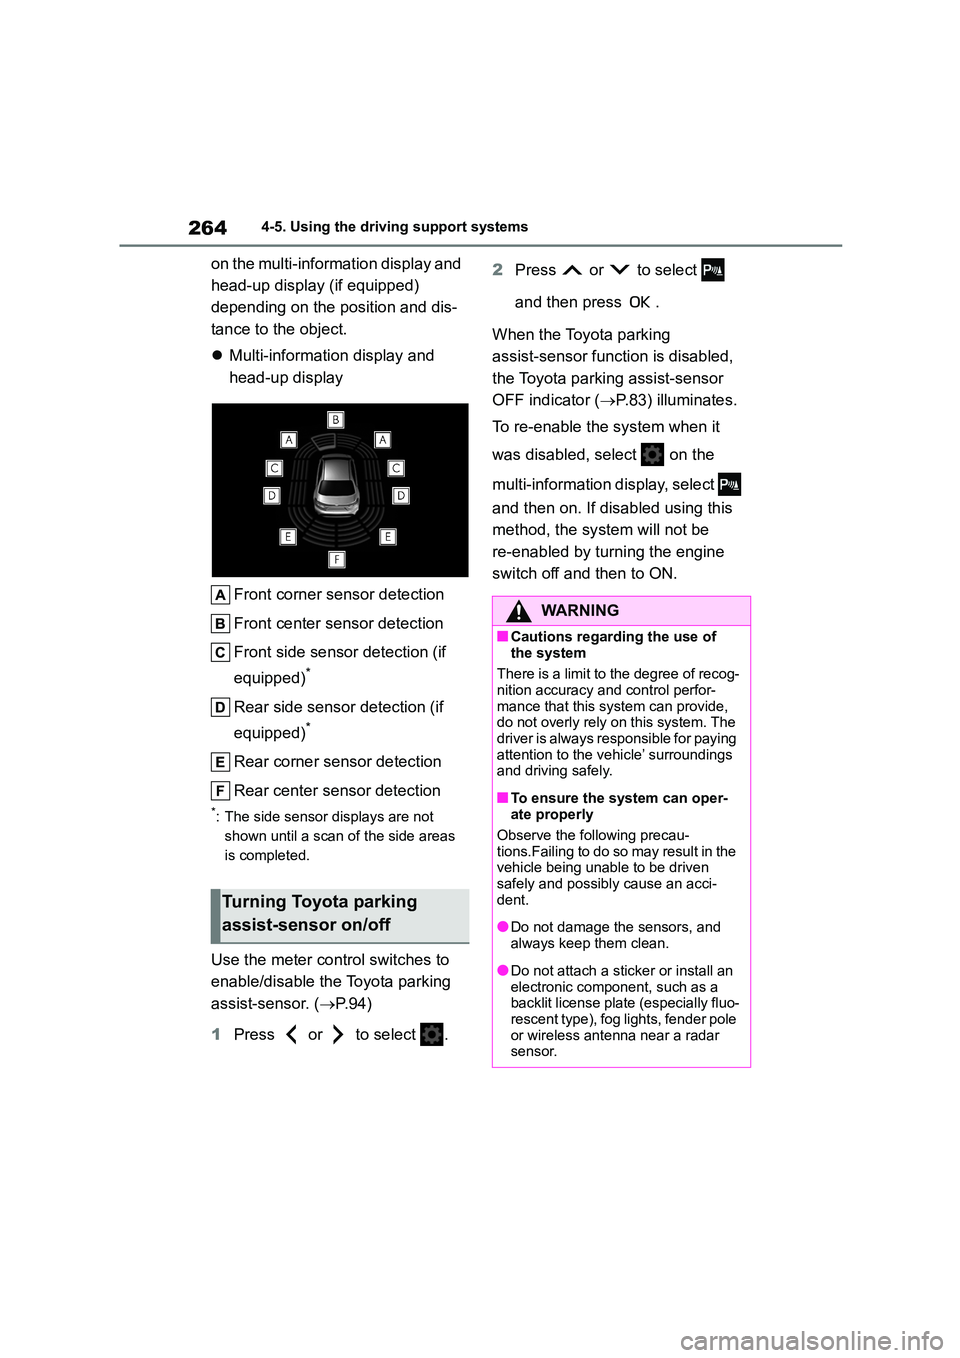
Multi-information display and
head-up display
Front corner sensor detection
Front center sensor detection
Front side sensor detection (if
equipped)*
Rear side sensor detection (if
equipped)*
Rear corner sensor detection
Rear center sensor detection
*: The side sensor displays are not
shown until a scan of the side areas
is completed.
Use the meter control switches to
enable/disable the Toyota parking
assist-sensor. ( P. 9 4 )
1 Press or to select .
2 Press or to select
and then press .
When the Toyota parking
assist-sensor function is disabled,
the Toyota parking assist-sensor
OFF indicator ( P.83) illuminates.
To re-enable the system when it
was disabled, select on the
multi-information di splay, select
and then on. If disabled using this
method, the sy stem will not be
re-enabled by turning the engine
switch off and then to ON.
Turning Toyota parking
assist-sensor on/off
WA R N I N G
■Cautions regarding the use of
the system
There is a limit to the degree of recog- nition accuracy and control perfor-
mance that this system can provide,
do not overly rely on this system. The driver is always responsible for paying
attention to the vehicle’ surroundings
and driving safely.
■To ensure the system can oper-
ate properly
Observe the following precau-
tions.Failing to do so may result in the
vehicle being unable to be driven safely and possibly cause an acci-
dent.
●Do not damage the sensors, and
always keep them clean.
●Do not attach a sti cker or install an
electronic component, such as a
backlit license plate (especially fluo- rescent type), fog lights, fender pole
or wireless antenna near a radar
sensor.
Page 333 of 678
331
5
5-3. Using the radio
Audio system
5-3.Using the radio
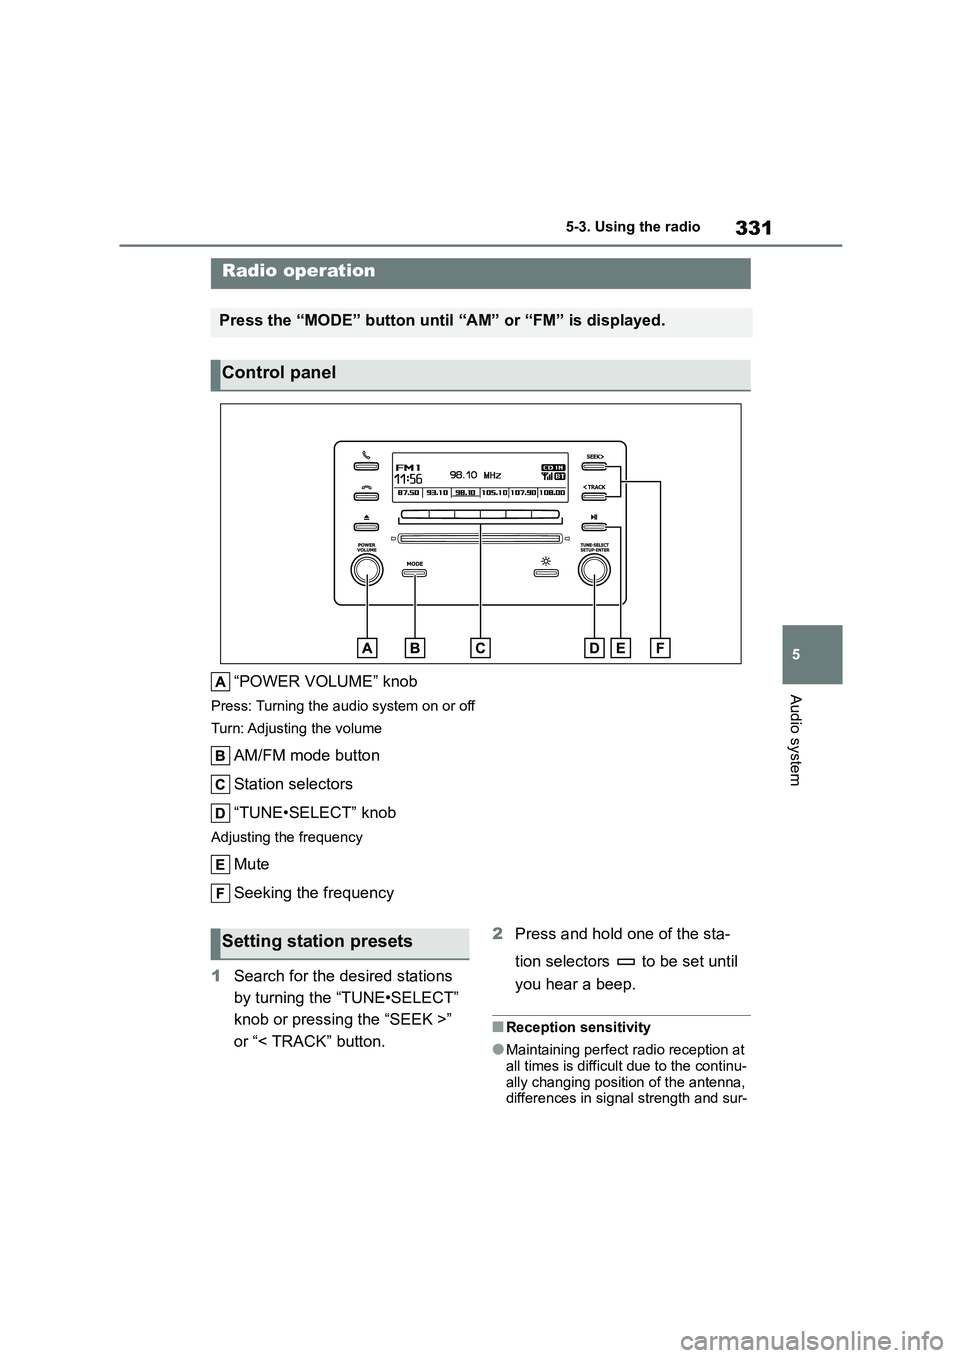
“POWER VOLUME” knob
Press: Turning the audio system on or off
Turn: Adjusting the volume
AM/FM mode button
Station selectors
“TUNE•SELECT” knob
Adjusting the frequency
Mute
Seeking the frequency
1 Search for the desired stations
by turning the “TUNE•SELECT”
knob or pressing the “SEEK >”
or “< TRACK” button.
2 Press and hold one of the sta-
tion selectors to be set until
you hear a beep.
■Reception sensitivity
●Maintaining perfect radio reception at
all times is difficult due to the continu-
ally changing position of the antenna, differences in signal strength and sur-
Radio operation
Press the “MODE” button until “AM” or “FM” is displayed.
Control panel
Setting station presets
Page 334 of 678
3325-3. Using the radio
rounding objects, such as trains,
transmitters, etc.
●The radio antenna is mounted inside
the rear window.
Page 379 of 678
377
5
5-10. Bluetooth®
Audio system
WA R N I N G
■While driving
Do not operate the portable audio
player, cellular phone or connect a
device to the Bluetooth® system.
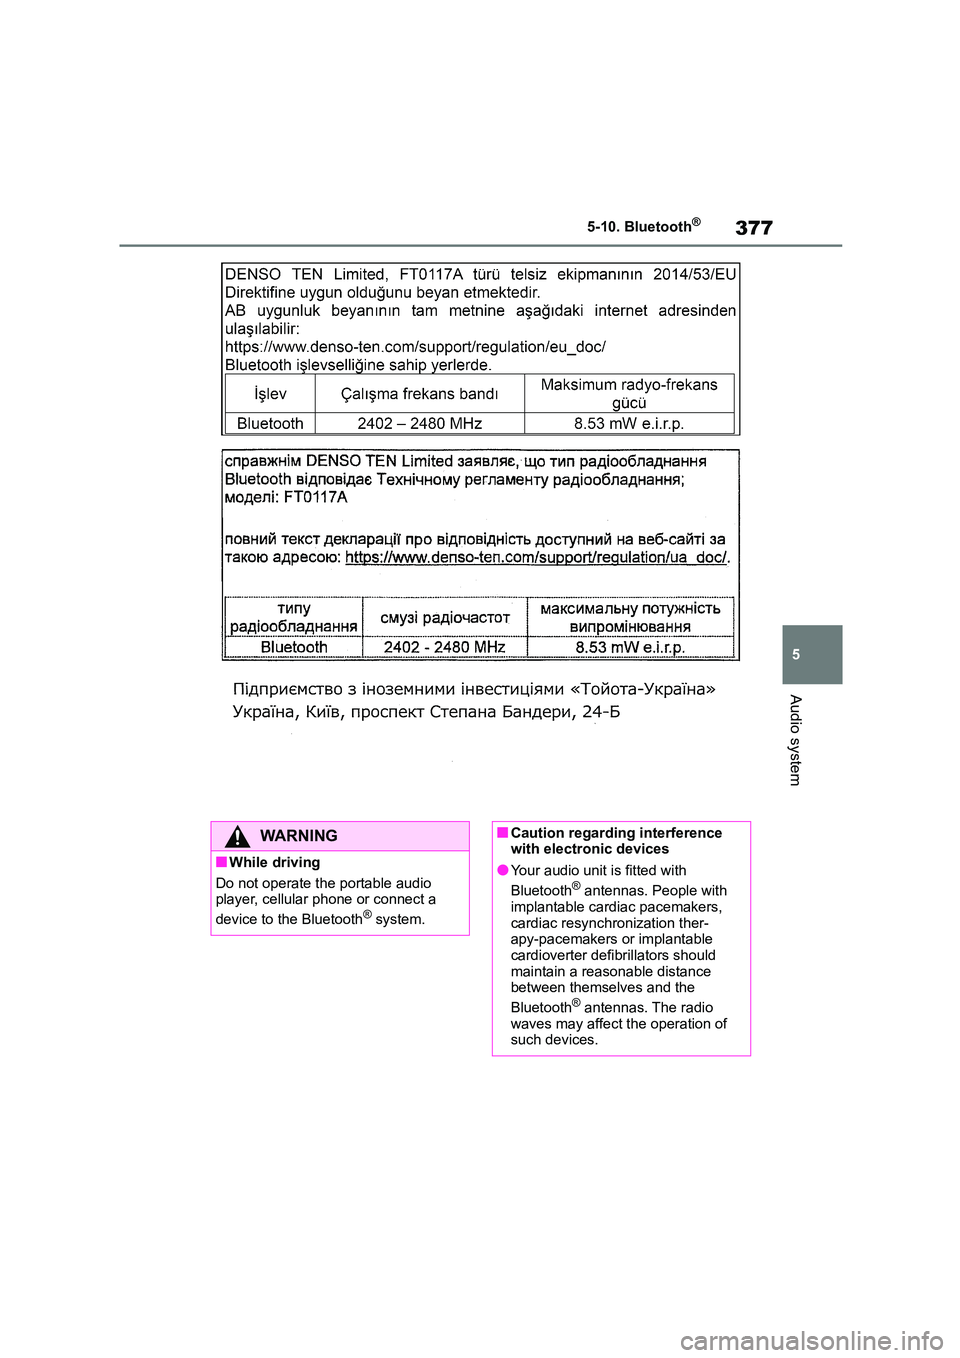
■Caution regarding interference with electronic devices
●Your audio unit is fitted with
Bluetooth® antennas. People with
implantable cardiac pacemakers, cardiac resynchronization ther-
apy-pacemakers or implantable
cardioverter defibrillators should
maintain a reasonable distance between themselves and the
Bluetooth® antennas. The radio
waves may affect the operation of such devices.
Page 416 of 678
4147-1. Maintenance and care
Remove dirt using a
water-dampened soft cloth or
synthetic chamois.
Wipe the surface with a dry, soft
cloth to remove any remaining
moisture.
■Cleaning the areas with satin-finish
metal accents
The metal areas use a layer of real
metal for the surface. It is necessary to
clean them regularly. If dirty areas are
left uncleaned for long periods of time, they may be difficult to clean.
Remove dirt and dust using a
vacuum cleaner.
Wipe off any excess dirt and dust
with a soft cloth dampened with
diluted detergent.
Use a diluted water solution of approxi-
mately 5% neutral wool detergent.
Wring out any excess water from
NOTICE
●Do not use polish wax or polish
cleaner. The instrument panel’s or
other interior part’s painted surface may be damaged.
■Preventing damage to leather surfaces
Observe the following precautions to
avoid damage to and deterioration of
leather surfaces:
●Remove any dust or dirt from
leather surfaces immediately.
●Do not expose the vehicle to direct
sunlight for extended periods of
time. Park the vehicle in the shade, especially during summer.
●Do not place items made of vinyl, plastic, or containing wax on the
upholstery, as they may stick to the
leather surface if the vehicle interior heats up significantly.
■Water on the floor
Do not wash the vehicle floor with
water.
Vehicle systems such as the audio system may be damaged if water
comes into contact with electrical
components such as the audio sys- tem above or under the floor of the
vehicle. Water may also cause the
body to rust.
■When cleaning the inside of the
windshield (vehicles with Toyota Safety Sense)
Do not allow glass cleaner to contact
the lens. Also, do not touch the lens. (P.190)
■Cleaning the inside of the rear window
●Do not use glass cleaner to clean
the rear window, as this may cause damage to the rear window defog-
ger heater wires or antenna. Use a
cloth dampened with lukewarm water to gently wipe the window
clean. Wipe the window in strokes
running parallel to the heater wires or antenna.
●Be careful not to scratch or damage the heater wires or antenna.
Cleaning the areas with
satin-finish metal accents
Cleaning the leather areas