clock TOYOTA COROLLA 2022 Owners Manual (in English)
[x] Cancel search | Manufacturer: TOYOTA, Model Year: 2022, Model line: COROLLA, Model: TOYOTA COROLLA 2022Pages: 678, PDF Size: 147.24 MB
Page 87 of 678
85
2
2-1. Instrument cluster
Vehicle status information and indicators
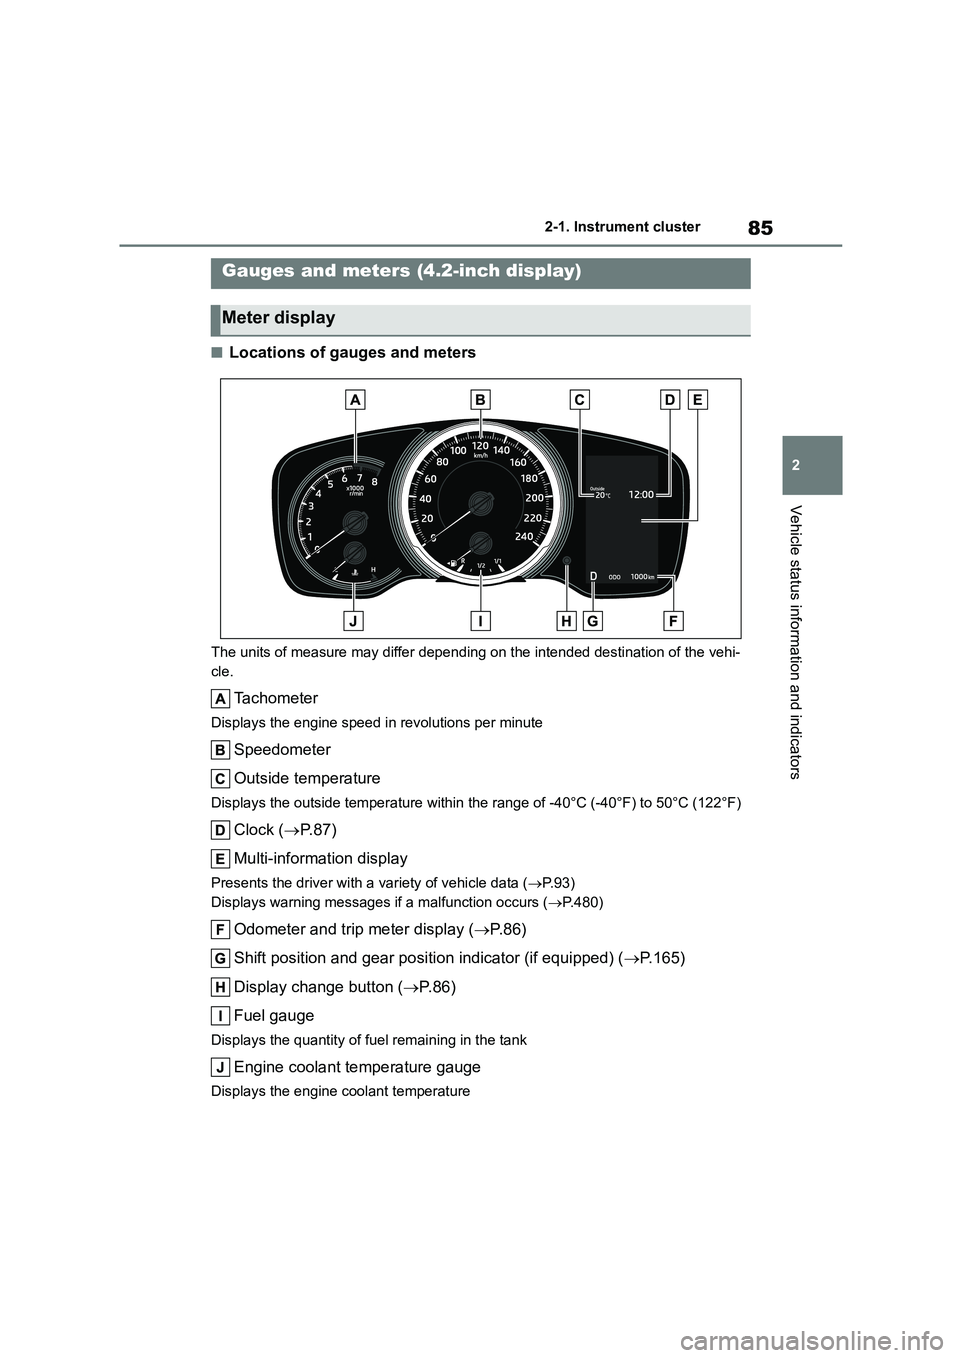
■Locations of gauges and meters
The units of measure may differ depending on the intended destination of the vehi-
cle.
Tachometer
Displays the engine speed in revolutions per minute
Speedometer
Outside temperature
Displays the outside temperature within the range of -40°C (-40°F) to 50°C (122°F)
Clock ( P. 8 7 )
Multi-information display
Presents the driver with a variety of vehicle data ( P. 9 3 )
Displays warning messages if a malfunction occurs ( P.480)
Odometer and trip meter display (P. 8 6 )
Shift position and gear position indicator (if equipped) ( P.165)
Display change button ( P. 8 6 )
Fuel gauge
Displays the quantity of fuel remaining in the tank
Engine coolant temperature gauge
Displays the engine coolant temperature
Gauges and meters (4.2-inch display)
Meter display
Page 89 of 678
87
2
2-1. Instrument cluster
Vehicle status information and indicators
lights are on and off.
• To adjust the brightness, display the
meter light control display and press
and hold the display change button.
■Adjusting the minute to “00”
1 Press or to select of
the multi-information display.
2 Press or to select “Clock
: 00”.
Press the to set the clock to
the beginning of the nearest hour.
e.g.
1:00 to 1:29 1:00
1:30 to 1:59 2:00
■Changing the clock
1 Press or to select of
the multi-information display.
2 Press or to select “Clock
: 00”.
3 Press and hold the .
4 Press or to select an
item to be changed.
5 Press or to change the
setting.
The following can be changed:
12-hour/24-hour format
Hour
Minute
■Clock adjustment
The clocks on the following can be
adjusted on the audio system
screen.
Multi-information display
Audio system screen
For details, refer to “Navigation and
multimedia system Owner’s manual” or
“Multimedia Owner’s Manual”.
■Clock settings screen (vehicles
with navigation/multimedia system)
If “Clock : 00” is displayed when is
selected on the multi-information dis-
play, the system may be malfunctioning.
Have the vehicle inspected by any authorized Toyota retailer or Toyota
authorized repairer, or any reliable
repairer.
Adjusting the clock (vehi-
cles without navigation/mul-
timedia system)
Adjusting the clock (vehi-
cles with navigation/multi-
media system)
Page 90 of 678
882-1. Instrument cluster
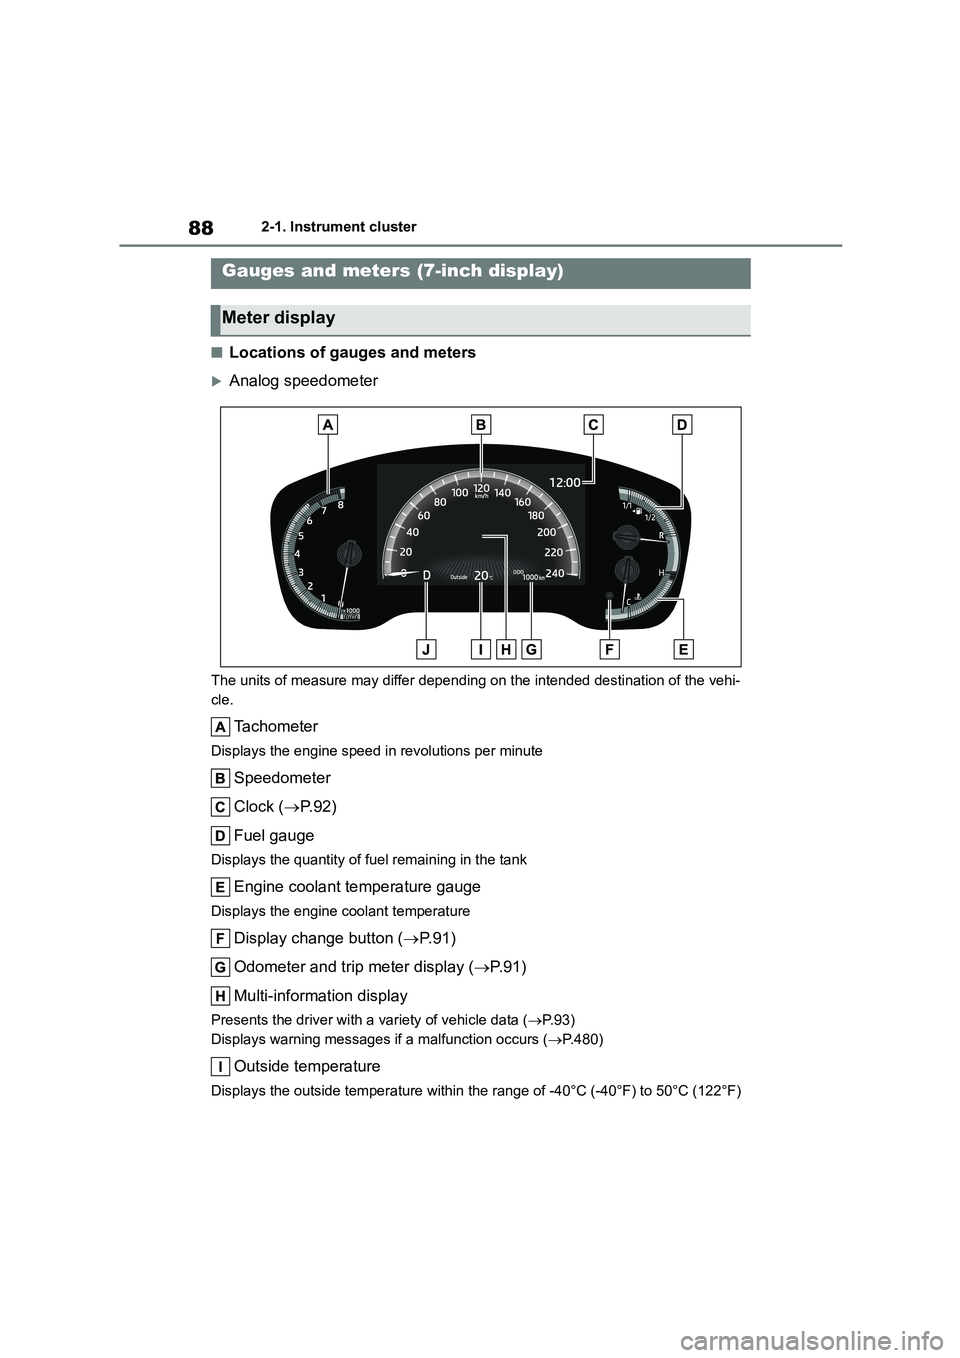
■Locations of gauges and meters
Analog speedometer
The units of measure may differ depending on the intended destination of the vehi-
cle.
Tachometer
Displays the engine speed in revolutions per minute
Speedometer
Clock ( P. 9 2 )
Fuel gauge
Displays the quantity of fuel remaining in the tank
Engine coolant temperature gauge
Displays the engine coolant temperature
Display change button ( P. 9 1 )
Odometer and trip meter display ( P. 9 1 )
Multi-information display
Presents the driver with a variety of vehicle data ( P. 9 3 )
Displays warning messages if a malfunction occurs ( P.480)
Outside temperature
Displays the outside temperature within the range of -40°C (-40°F) to 50°C (122°F)
Gauges and meters (7-inch display)
Meter display
Page 91 of 678
89
2
2-1. Instrument cluster
Vehicle status information and indicators
Shift position and gear position indicator (if equipped) ( P.165)
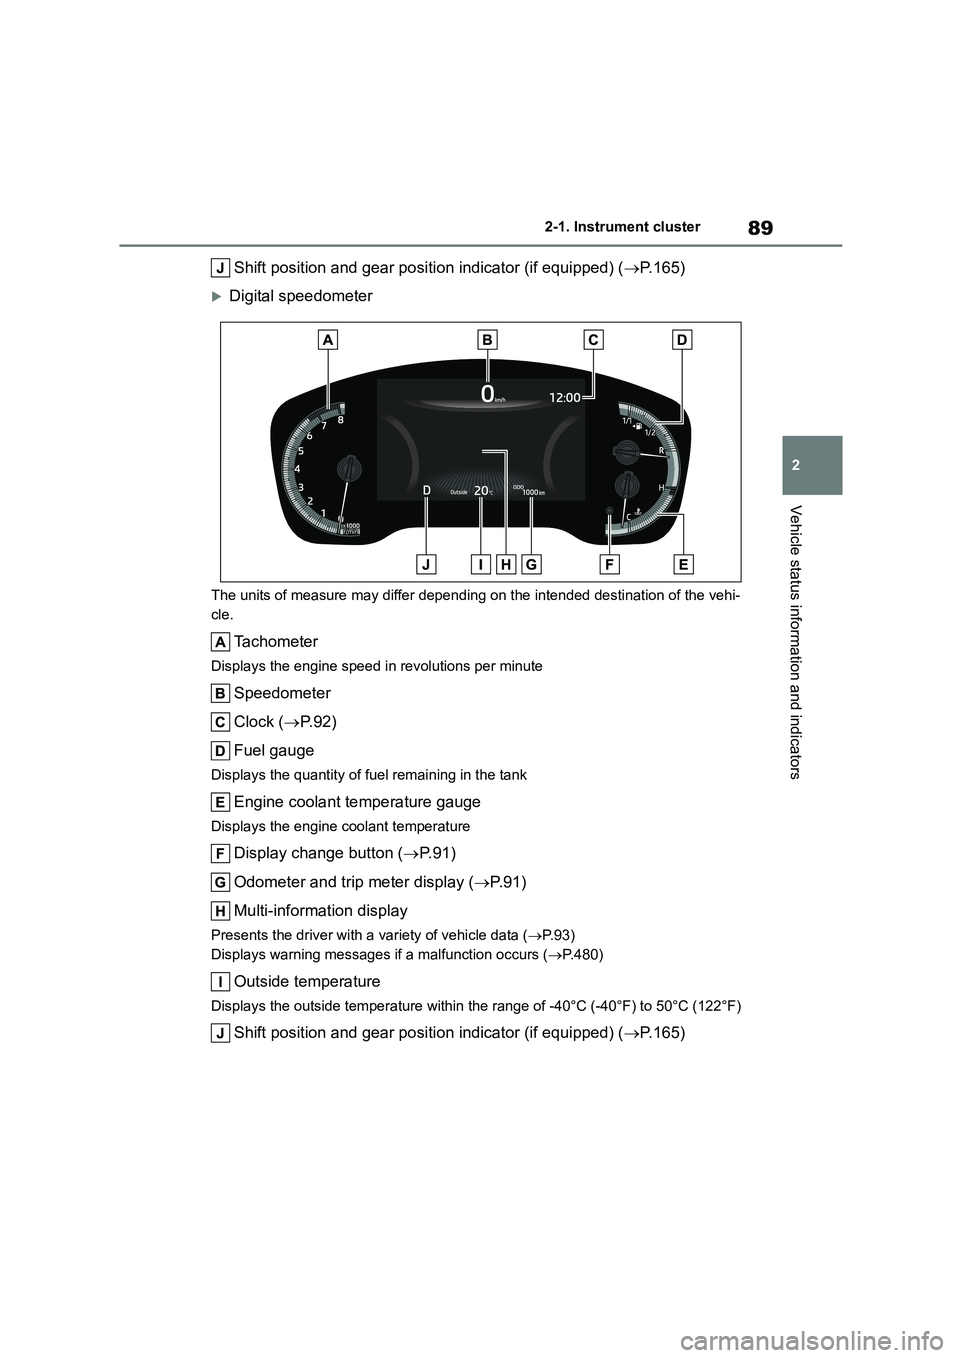
Digital speedometer
The units of measure may differ depending on the intended destination of the vehi-
cle.
Tachometer
Displays the engine speed in revolutions per minute
Speedometer
Clock ( P. 9 2 )
Fuel gauge
Displays the quantity of fuel remaining in the tank
Engine coolant temperature gauge
Displays the engine coolant temperature
Display change button ( P. 9 1 )
Odometer and trip meter display ( P. 9 1 )
Multi-information display
Presents the driver with a variety of vehicle data ( P. 9 3 )
Displays warning messages if a malfunction occurs ( P.480)
Outside temperature
Displays the outside temperature within the range of -40°C (-40°F) to 50°C (122°F)
Shift position and gear position indicator (if equipped) (P.165)
Page 92 of 678
902-1. Instrument cluster
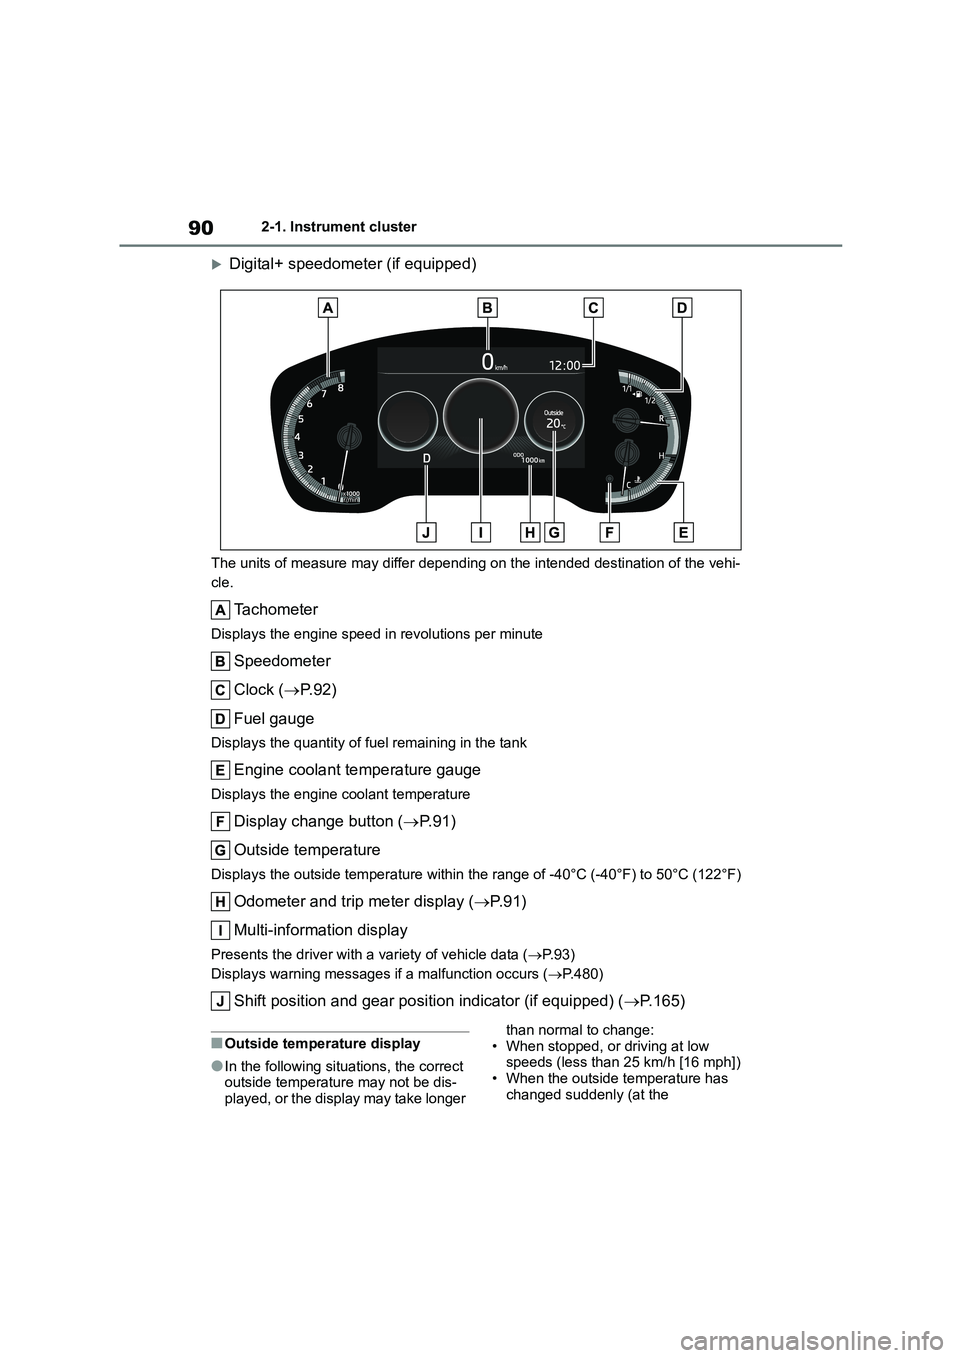
Digital+ speedometer (if equipped)
The units of measure may differ depending on the intended destination of the vehi-
cle.
Tachometer
Displays the engine speed in revolutions per minute
Speedometer
Clock ( P. 9 2 )
Fuel gauge
Displays the quantity of fuel remaining in the tank
Engine coolant temperature gauge
Displays the engine coolant temperature
Display change button ( P. 9 1 )
Outside temperature
Displays the outside temperature within the range of -40°C (-40°F) to 50°C (122°F)
Odometer and trip meter display ( P. 9 1 )
Multi-information display
Presents the driver with a variety of vehicle data ( P. 9 3 )
Displays warning messages if a malfunction occurs ( P.480)
Shift position and gear position indicator (if equipped) (P.165)
■Outside temperature display
●In the following situations, the correct outside temperature may not be dis-
played, or the display may take longer
than normal to change: • When stopped, or driving at low
speeds (less than 25 km/h [16 mph])
• When the outside temperature has changed suddenly (at the
Page 94 of 678
922-1. Instrument cluster
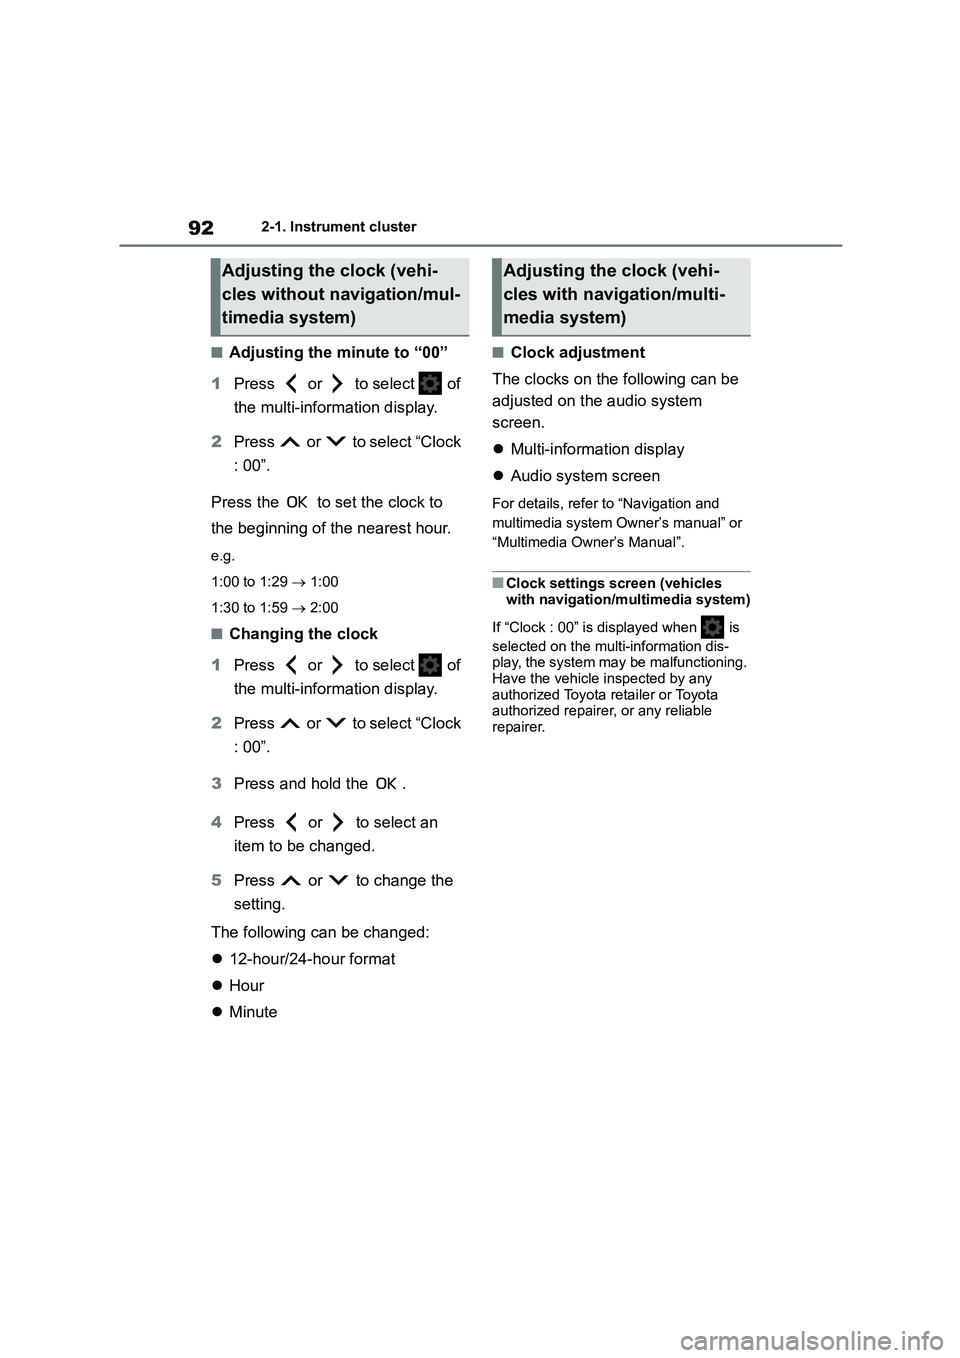
■Adjusting the minute to “00”
1 Press or to select of
the multi-information display.
2 Press or to select “Clock
: 00”.
Press the to set the clock to
the beginning of the nearest hour.
e.g.
1:00 to 1:29 1:00
1:30 to 1:59 2:00
■Changing the clock
1 Press or to select of
the multi-information display.
2 Press or to select “Clock
: 00”.
3 Press and hold the .
4 Press or to select an
item to be changed.
5 Press or to change the
setting.
The following can be changed:
12-hour/24-hour format
Hour
Minute
■Clock adjustment
The clocks on the following can be
adjusted on the audio system
screen.
Multi-information display
Audio system screen
For details, refer to “Navigation and
multimedia system Owner’s manual” or
“Multimedia Owner’s Manual”.
■Clock settings screen (vehicles
with navigation/multimedia system)
If “Clock : 00” is displayed when is
selected on the multi-information dis-
play, the system may be malfunctioning.
Have the vehicle inspected by any authorized Toyota retailer or Toyota
authorized repairer, or any reliable
repairer.
Adjusting the clock (vehi-
cles without navigation/mul-
timedia system)
Adjusting the clock (vehi-
cles with navigation/multi-
media system)
Page 100 of 678
982-1. Instrument cluster
• Average vehicle speed: Displays the
average vehicle speed since the dis-
play was reset*
*: To reset, display the desired item and
press and hold the meter control
switch.
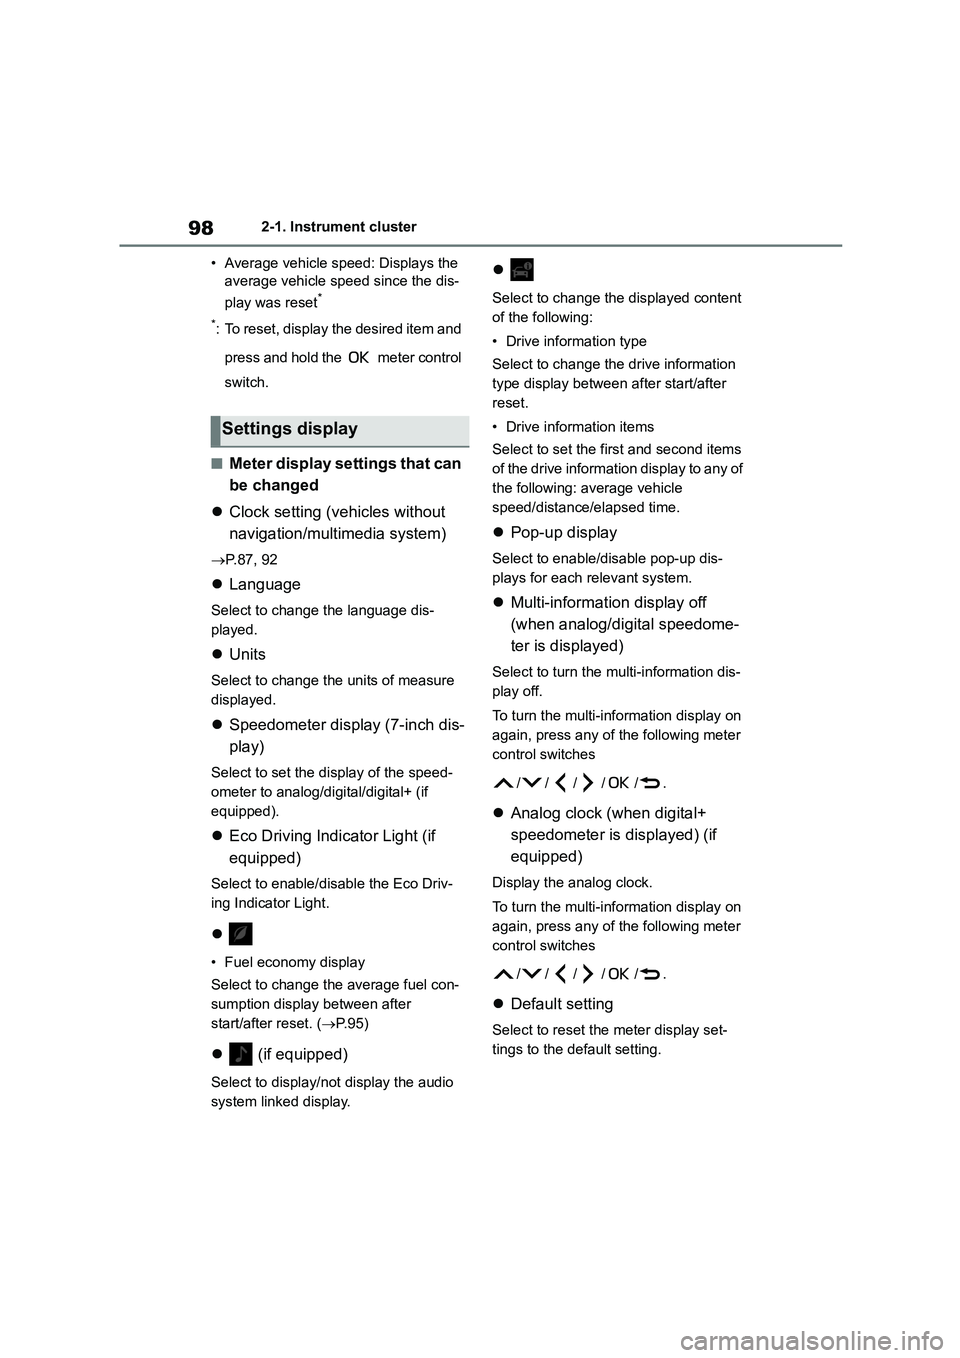
■Meter display settings that can
be changed
Clock setting (vehicles without
navigation/multimedia system)
P.87, 92
Language
Select to change the language dis-
played.
Units
Select to change the units of measure
displayed.
Speedometer display (7-inch dis-
play)
Select to set the display of the speed-
ometer to analog/digital/digital+ (if
equipped).
Eco Driving Indicator Light (if
equipped)
Select to enable/disable the Eco Driv-
ing Indicator Light.
• Fuel economy display
Select to change the average fuel con-
sumption display between after
start/after reset. ( P. 9 5 )
(if equipped)
Select to display/not display the audio
system linked display.
Select to change the displayed content
of the following:
• Drive information type
Select to change the drive information
type display between after start/after
reset.
• Drive information items
Select to set the first and second items
of the drive information display to any of
the following: average vehicle
speed/distance/elapsed time.
Pop-up display
Select to enable/disable pop-up dis-
plays for each relevant system.
Multi-information display off
(when analog/digital speedome-
ter is displayed)
Select to turn the multi-information dis-
play off.
To turn the multi-information display on
again, press any of the following meter
control sw itches
//// /.
Analog clock (when digital+
speedometer is displayed) (if
equipped)
Display the analog clock.
To turn the multi-information display on
again, press any of the following meter
control sw itches
//// /.
Default setting
Select to reset the meter display set-
tings to the default setting.
Settings display
Page 158 of 678
1564-1. Before driving
Your vehicle will handle differently
when towing a trailer. In order to
avoid accident, death or serious
injury, keep the fo llowing in mind
when towing:
■Checking connections
between trailer and lights
Stop the vehicle and check the
operation of the connection
between the trailer and lights after
driving for a brief period as well as
before starting off.
■Practicing driving with a cou-
pled trailer
Get the feel for turning, stopping
and reversing with the trailer
coupled by practicing in an area
with no or light traffic.
When reversing with a coupled
trailer, hold the section of the
steering wheel nearest to you
and rotate clockw ise to turn the
trailer left or counterclockwise to
turn it right. Always rotate a little
at a time to prevent steering
error. Have someone guide you
when reversing to lessen the risk
of an accident.
■Increasing vehicle-to-vehicle
distance
At a speed of 10 km/h (6 mph), the
distance to the vehicle running
ahead of you should be equivalent
to or greater than the combined
length of your vehicle and trailer.
Avoid sudden braking that may
cause skidding. Otherwise, the
vehicle may spin out of control. This
is especially true when driving on
wet or slippery road surfaces.
■Sudden acceleration/steering
input/cornering
Executing sharp turns when towing
may result in th e trailer colliding
with your vehicle. Decelerate well in
advance when approaching turns
and take them slowly and carefully
to avoid sudden braking.
■Important points regarding
turning
The wheels of the tr ailer will travel
closer to the inside of the curve
than the wheels of the vehicle. To
make allowance for this, take the
turns wider than you would nor-
mally do.
■Important points regarding
stability
Vehicle movement resulting from
uneven road surfaces and strong
crosswinds will affect handling. The
vehicle may also be rocked by
passing buses or large trucks. Fre-
quently check behind when moving
alongside such vehicles. As soon
as such vehicle movement occurs,
immediately start to decelerate
smoothly by slowly applying the
brakes. Always steer the vehicle
straight ahead while braking.
■Passing other vehicles
Consider the total combined length
Guidance
Page 342 of 678
3405-5. Using an external device
Pause/playback
Selecting a song, fast-forwarding or rewinding
1 Press (Browse) to select
iPod play mode.
2 Turning the “TUNE•SELECT”
knob clockwise changes the
play mode in the following order:
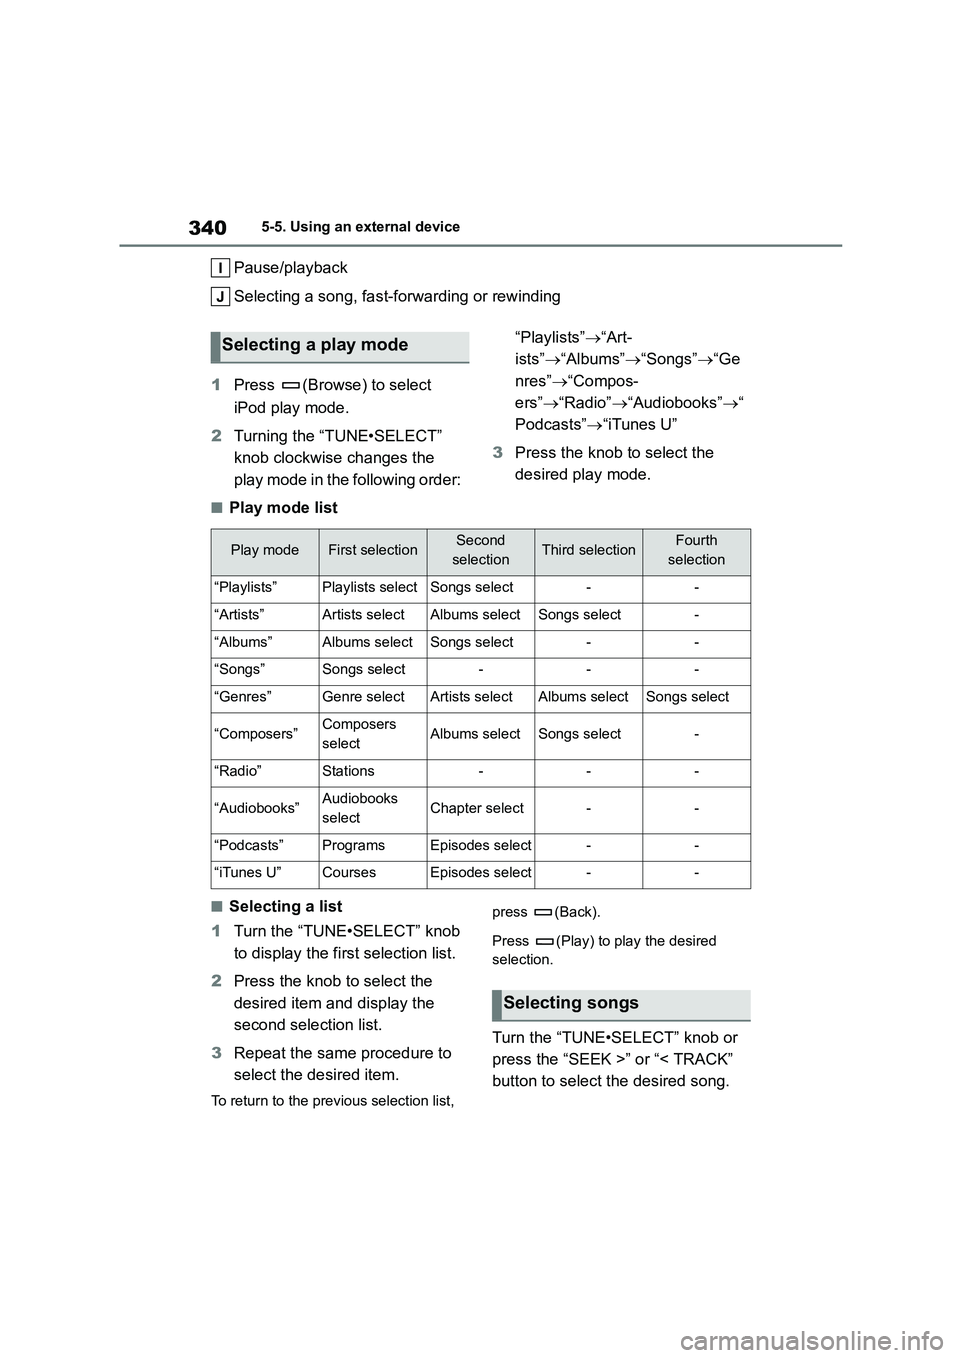
“Playlists” “Art-
ists” “Albums”“Songs”“Ge
nres” “Compos-
ers” “Radio”“Audiobooks”“
Podcasts” “iTunes U”
3 Press the knob to select the
desired play mode.
■Play mode list
■Selecting a list
1 Turn the “TUNE•SELECT” knob
to display the fi rst selection list.
2 Press the knob to select the
desired item and display the
second selection list.
3 Repeat the same procedure to
select the desired item.
To return to the previous selection list,
press (Back).
Press (Play) to play the desired
selection.
Turn the “TUNE•SELECT” knob or
press the “SEEK >” or “< TRACK”
button to select the desired song.
Selecting a play mode
Play modeFirst selectionSecond
selectionThird selectionFourth
selection
“Playlists”Playlists selectSongs select--
“Artists”Artists selectAlbums selectSongs select-
“Albums”Albums selectSongs select--
“Songs”Songs select---
“Genres”Genre selectArtists selectAlbums selectSongs select
“Composers”Composers
selectAlbums selectSongs select-
“Radio”Stations---
“Audiobooks”Audiobooks
selectChapter select--
“Podcasts”ProgramsEpisodes select--
“iTunes U”CoursesEpisodes select--
Selecting songs
Page 363 of 678
361
5
5-7. “SETUP” menu
Audio system
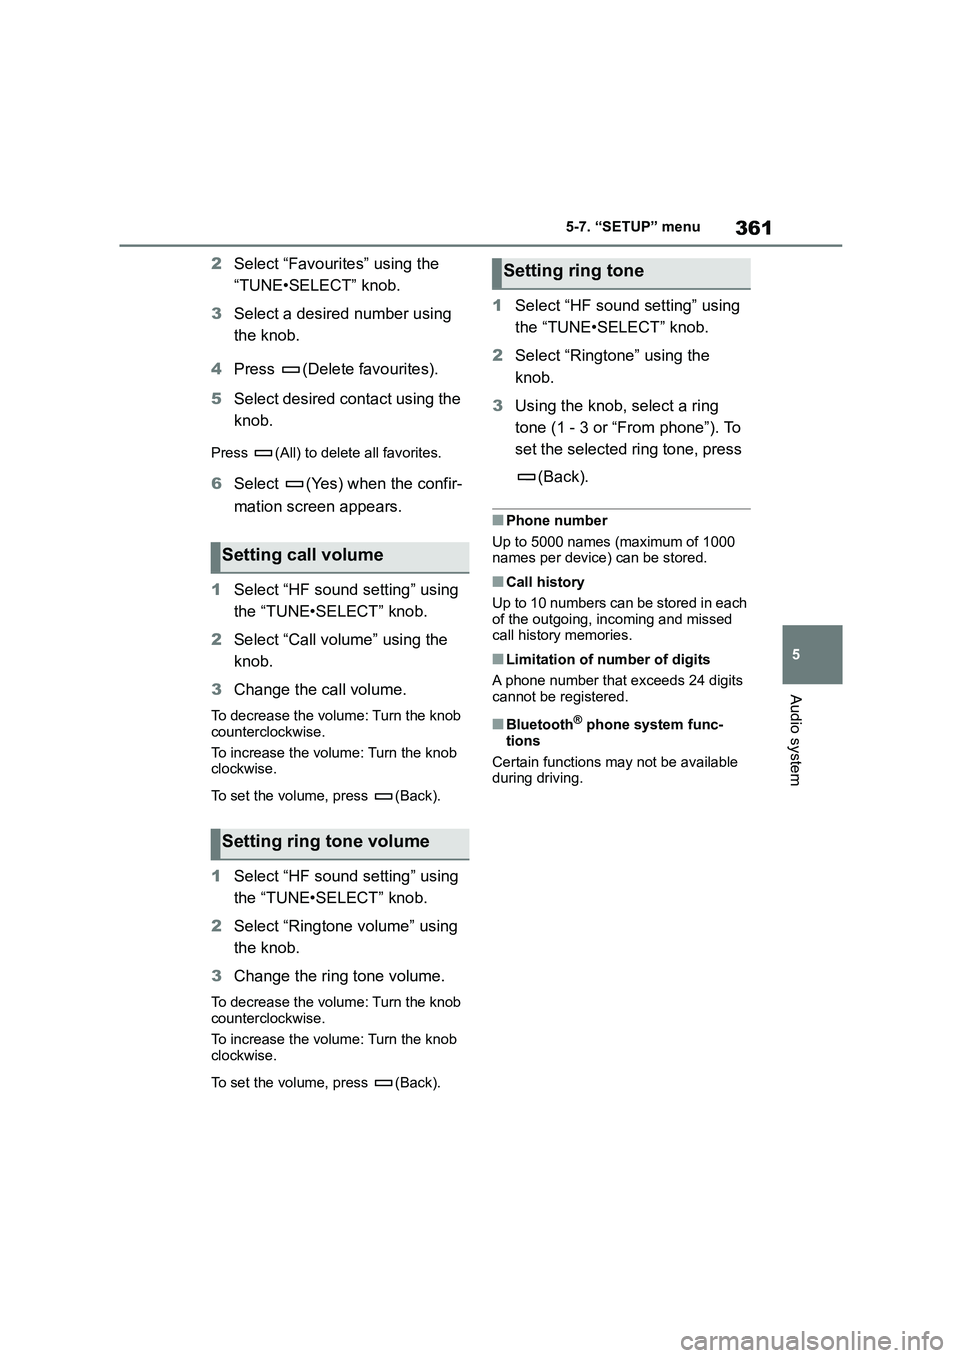
2 Select “Favourites” using the
“TUNE•SELECT” knob.
3 Select a desired number using
the knob.
4 Press (Delete favourites).
5 Select desired contact using the
knob.
Press (All) to delete all favorites.
6 Select (Yes) when the confir-
mation screen appears.
1 Select “HF sound setting” using
the “TUNE•SELECT” knob.
2 Select “Call volume” using the
knob.
3 Change the call volume.
To decrease the volume: Turn the knob
counterclockwise.
To increase the volume: Turn the knob clockwise.
To set the volume, press (Back).
1 Select “HF sound setting” using
the “TUNE•SELECT” knob.
2 Select “Ringtone volume” using
the knob.
3 Change the ring tone volume.
To decrease the volume: Turn the knob counterclockwise.
To increase the volume: Turn the knob
clockwise.
To set the volume, press (Back).
1 Select “HF sound setting” using
the “TUNE•SELECT” knob.
2 Select “Ringtone” using the
knob.
3 Using the knob, select a ring
tone (1 - 3 or “From phone”). To
set the selected ring tone, press
(Back).
■Phone number
Up to 5000 names (maximum of 1000
names per device) can be stored.
■Call history
Up to 10 numbers can be stored in each
of the outgoing, incoming and missed
call history memories.
■Limitation of number of digits
A phone number that exceeds 24 digits
cannot be registered.
■Bluetooth® phone system func-
tions
Certain functions may not be available
during driving.
Setting call volume
Setting ring tone volume
Setting ring tone