headlights TOYOTA COROLLA 2022 Owners Manual (in English)
[x] Cancel search | Manufacturer: TOYOTA, Model Year: 2022, Model line: COROLLA, Model: TOYOTA COROLLA 2022Pages: 678, PDF Size: 147.24 MB
Page 14 of 678
12Pictorial index
To prevent freezing (windshield wiper de-icer)*2......................P.383, 390
Fuel filler door ................................................................................P.188
Refueling method .............................................................................P.189
Fuel type/fuel tank capacity .............................................................P.526
Tires ................................................................................................P.429
Tire size/inflation pressure ...............................................................P.533
Winter tires/tire chains .....................................................................P.321
Checking/rotation/tire pressure warn ing system ..............................P.429
Coping with flat tires.................................................................P.482, 498
Hood ................................................................................................P.419
Opening ...........................................................................................P.419
Engine oil .........................................................................................P.527
Coping with overheating ..................................................................P.518
Headlights/front position lights/daytime running lights/turn signal
lights .......................................................................................P.171, 178
Front fog lights*2............................................................................P.183
Stop lights/tail lights/turn signal lights................................P.171, 178
License plate lights........................................................................P.178
Tail light ..........................................................................................P.178
Rear fog light*3...............................................................................P.183
Back-up light*4
Shifting the shift position to R ..................................................P.165, 169
Tail light ..........................................................................................P.178
Rear fog light*4...............................................................................P.183
Back-up light*3
Shifting the shift position to R ..................................................P.165, 169
*1: Vehicles with a smart entry & start system
*2: If equipped
*3: Right-hand drive vehicles
*4: Left-hand drive vehicles
Light bulbs of the exterior lights for driving
(Replacing method: P.455, Watts: P.535)
Page 16 of 678
14Pictorial index
Display ...............................................................................................P.93
When a warning message is displayed............................................P.480
Parking brake*4..............................................................................P.172
Applying/releasing............................................................................P.172
Precautions for winter season..........................................................P.322
Warning light/message.............................................................P.172, 471
Turn signal lever ............................................................................P.171
Headlight switch ............................................................................P.178
Headlights/front position lights/tail lights/daytime running lights ......P.178
Front fog lights*4/rear fog light .........................................................P.183
Windshield wiper and washer switch ..........................................P.184
Usage...............................................................................................P.184
Adding washer fluid..........................................................................P.428
Emergency flasher switch.............................................................P.462
Hood lock release lever .................................................................P.419
Tilt and telescopic steering lock release lever ............................P.131
Air conditioning system ........................................................P.380, 385
Usage.......................................................................................P.380, 385
Rear window defogger .............................................................P.381, 388
Audio system*4, 5...........................................................................P.326
*1: Vehicles without a smart entry & start system
*2: Vehicles with a smart entry & start system
*3: Vehicles with a Multidrive
*4: If equipped
*5: Vehicles with navigation/mu ltimedia system, refer to “Navigation and multimedia
system Owner’s manual” or “Multimedia Owner’s Manual”.
Page 23 of 678
21Pictorial index
Display ...............................................................................................P.93
When a warning message is displayed............................................P.480
Turn signal lever ............................................................................P.171
Headlight switch ............................................................................P.178
Headlights/front position lights/tail lights/daytime running lights ......P.178
Front fog lights*4/rear fog light .........................................................P.183
Windshield wiper and washer switch ..........................................P.184
Usage...............................................................................................P.184
Adding washer fluid..........................................................................P.428
Emergency flasher switch.............................................................P.462
Hood lock release lever .................................................................P.419
Tilt and telescopic steering lock release lever ............................P.131
Air conditioning system ........................................................P.380, 385
Usage.......................................................................................P.380, 385
Rear window defogger .............................................................P.381, 388
Audio system*4, 5...........................................................................P.326
*1: Vehicles without a smart entry & start system
*2: Vehicles with a smart entry & start system
*3: Vehicles with a Multidrive
*4: If equipped
*5: Vehicles with navigation/mu ltimedia system, refer to “Navigation and multimedia
system Owner’s manual” or “Multimedia Owner’s Manual”.
Page 134 of 678
1323-4. Adjusting the steering wheel and mirrors
The height of the rear view mirror
can be adjusted to suit your driving
posture.
Adjust the height of the rear view
mirror by moving it up and down.
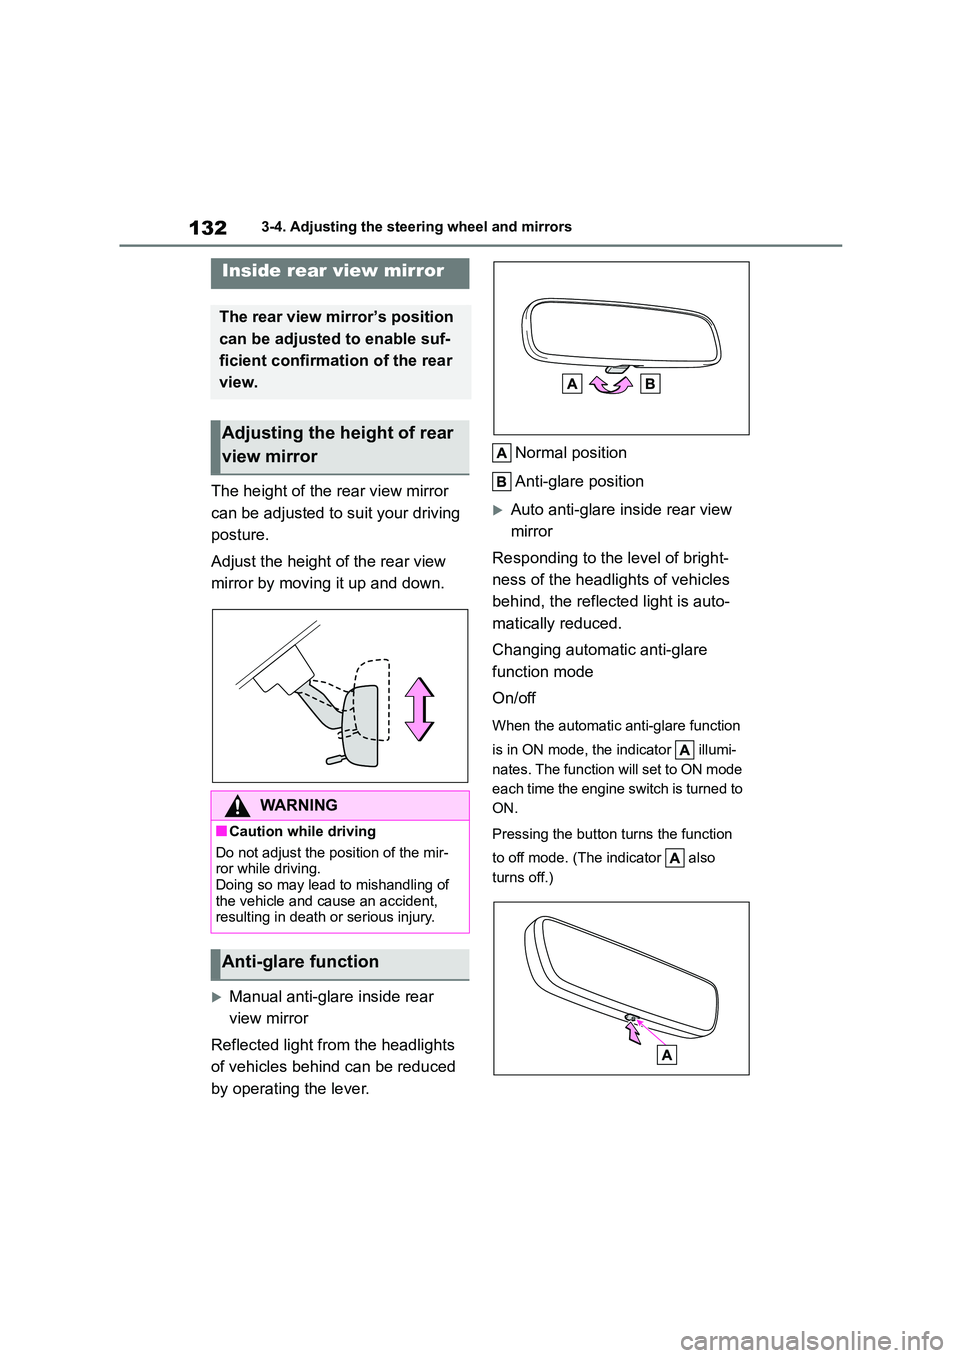
Manual anti-glare inside rear
view mirror
Reflected light from the headlights
of vehicles behind can be reduced
by operating the lever.
Normal position
Anti-glare position
Auto anti-glare inside rear view
mirror
Responding to the level of bright-
ness of the headlig hts of vehicles
behind, the reflected light is auto-
matically reduced.
Changing automatic anti-glare
function mode
On/off
When the automatic anti-glare function
is in ON mode, the indicator illumi-
nates. The function will set to ON mode
each time the engine switch is turned to
ON.
Pressing the button turns the function
to off mode. (The indicator also
turns off.)
Inside rear view mirror
The rear view mirror’s position
can be adjusted to enable suf-
ficient confirmation of the rear
view.
Adjusting the height of rear
view mirror
WA R N I N G
■Caution while driving
Do not adjust the position of the mir-
ror while driving. Doing so may lead to mishandling of
the vehicle and cause an accident,
resulting in death or serious injury.
Anti-glare function
Page 180 of 678
1784-3. Operating the lights and wipers
4-3.Operating the lights and wipers
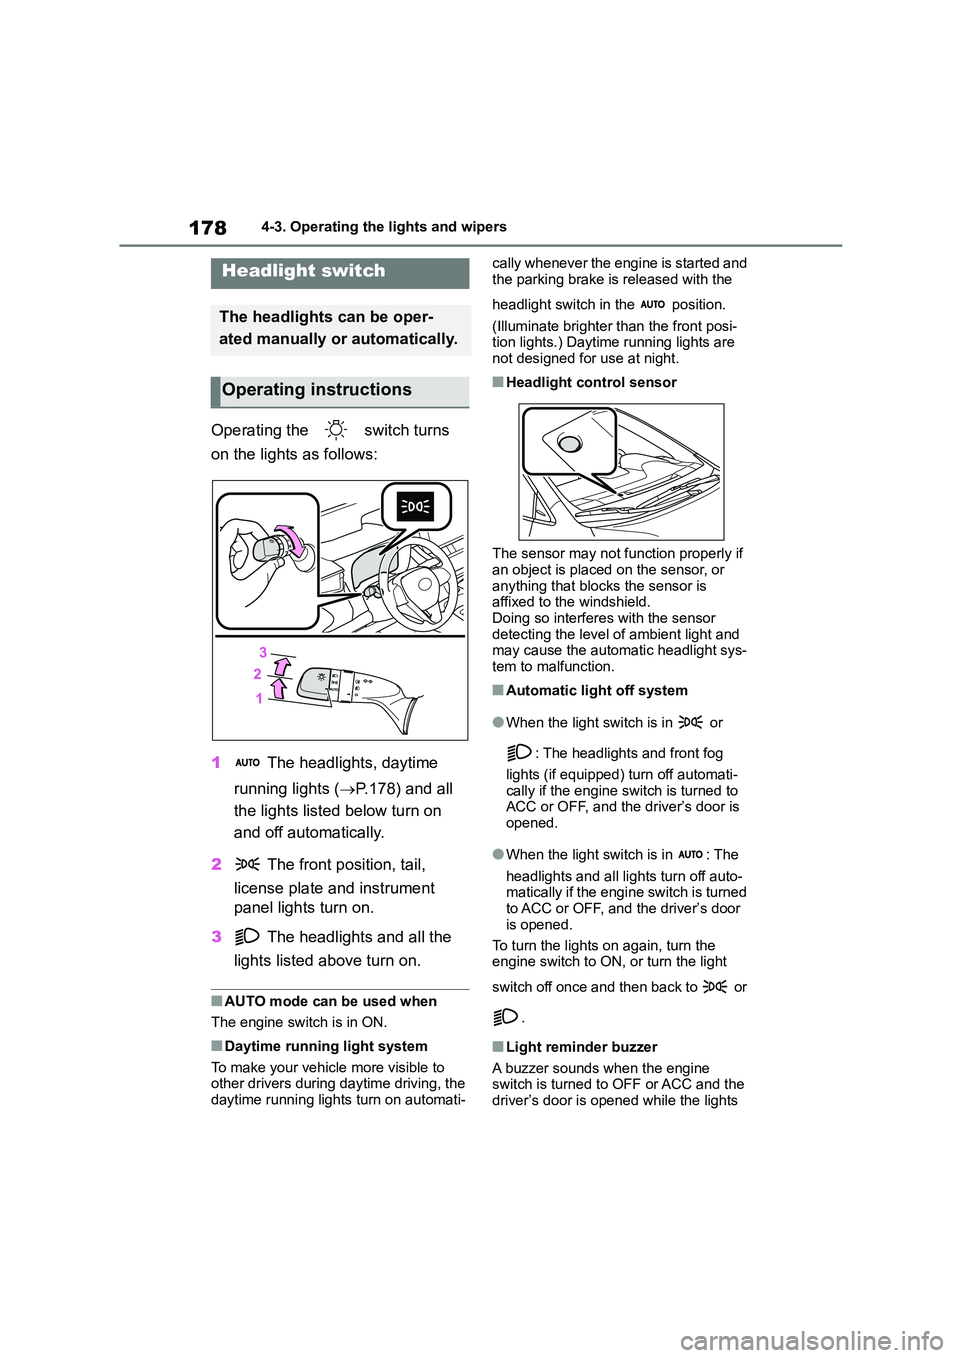
Operating the switch turns
on the lights as follows:
1 The headlights, daytime
running lights ( P.178) and all
the lights listed below turn on
and off automatically.
2 The front position, tail,
license plate and instrument
panel lights turn on.
3 The headlights and all the
lights listed above turn on.
■AUTO mode can be used when
The engine switch is in ON.
■Daytime running light system
To make your vehicle more visible to
other drivers during daytime driving, the daytime running lights turn on automati-
cally whenever the engine is started and
the parking brake is released with the
headlight switch in the position.
(Illuminate brighter than the front posi-
tion lights.) Daytime running lights are not designed for use at night.
■Headlight control sensor
The sensor may not function properly if an object is placed on the sensor, or
anything that blo cks the sensor is
affixed to the windshield. Doing so interferes with the sensor
detecting the level of ambient light and
may cause the autom atic headlight sys- tem to malfunction.
■Automatic light off system
●When the light switch is in or
: The headlights and front fog
lights (if equipped) turn off automati-
cally if the engine switch is turned to ACC or OFF, and the driver’s door is
opened.
●When the light switch is in : The
headlights and all lights turn off auto-
matically if the engine switch is turned to ACC or OFF, and the driver’s door
is opened.
To turn the lights on again, turn the engine switch to ON, or turn the light
switch off once and then back to or
.
■Light reminder buzzer
A buzzer sounds when the engine switch is turned to OFF or ACC and the
driver’s door is opened while the lights
Headlight switch
The headlights can be oper-
ated manually or automatically.
Operating instructions
Page 181 of 678
179
4
4-3. Operating the lights and wipers
Driving
are turned on.
■Battery-saving function
In order to prevent the battery of the vehicle from discharging, if the light
switch is in the or position
when the engine switch is turned off the battery saving function will operate and
automatically turn off all the lights after
approximately 20 minutes. When the engine switch is turned to ON, the bat-
tery-saving function will be disabled.
When any of the following are per- formed, the battery-saving function is
canceled once and then reactivated. All
the lights will turn off automatically 20 minutes after the battery- saving func-
tion has been reactivated:
●When the headlight switch is operated
●When a door is opened or closed
■Customization
Some functions can be customized.
( P.538)
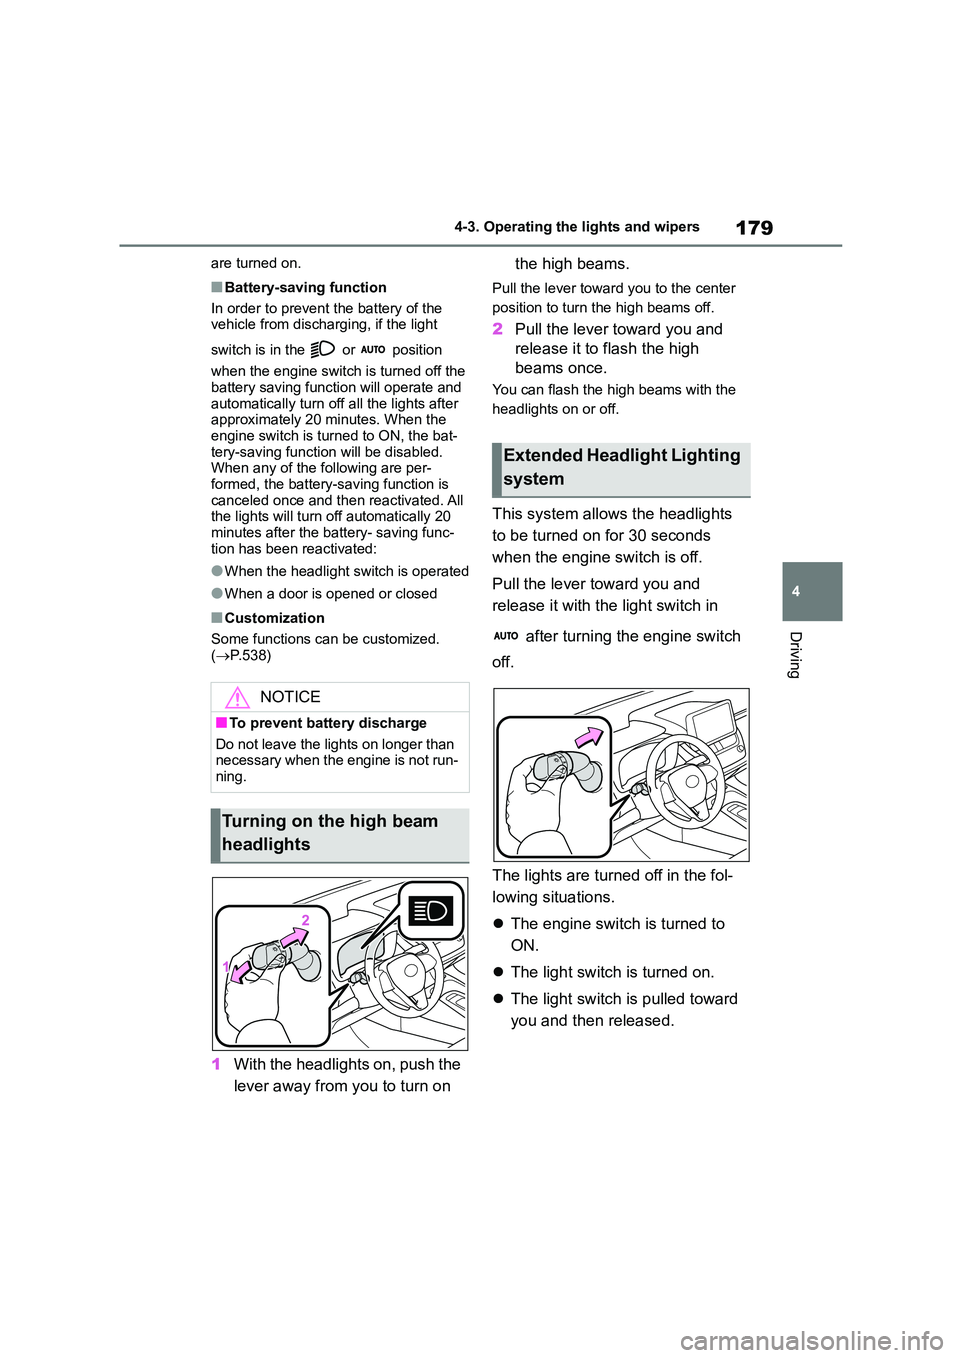
1With the headlights on, push the
lever away from you to turn on
the high beams.
Pull the lever toward you to the center
position to turn the high beams off.
2 Pull the lever toward you and
release it to flash the high
beams once.
You can flash the high beams with the
headlights on or off.
This system allows the headlights
to be turned on for 30 seconds
when the engine switch is off.
Pull the lever toward you and
release it with the light switch in
after turning the engine switch
off.
The lights are turned off in the fol-
lowing situations.
The engine switch is turned to
ON.
The light switch is turned on.
The light switch is pulled toward
you and then released.
NOTICE
■To prevent battery discharge
Do not leave the lights on longer than necessary when the engine is not run-
ning.
Turning on the high beam
headlights
Extended Headlight Lighting
system
Page 182 of 678
1804-3. Operating the lights and wipers
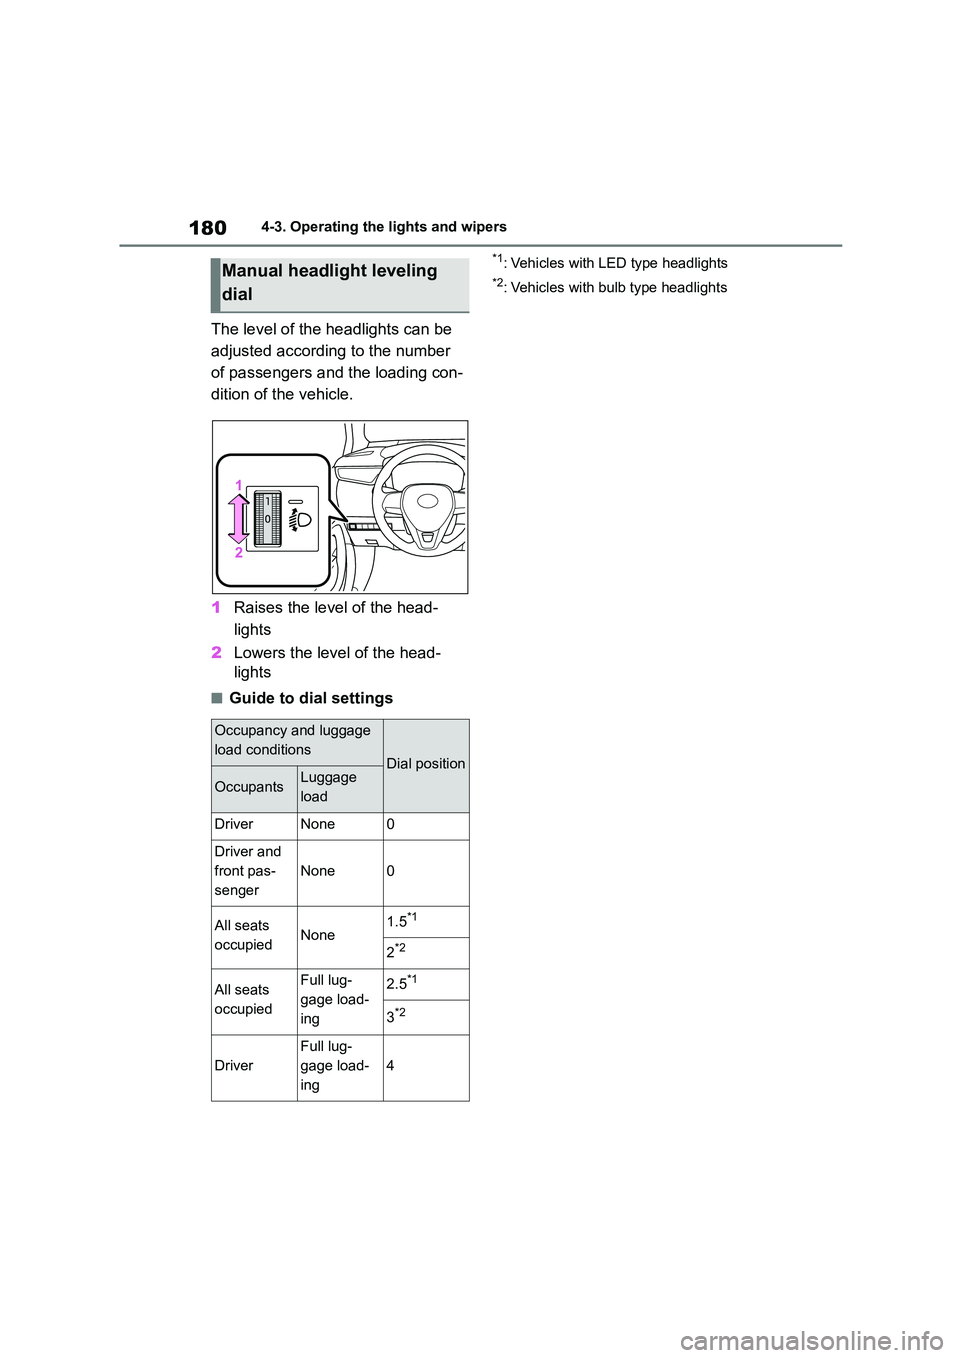
The level of the headlights can be
adjusted according to the number
of passengers and the loading con-
dition of the vehicle.
1 Raises the level of the head-
lights
2 Lowers the level of the head-
lights
■Guide to dial settings
*1: Vehicles with LED type headlights
*2: Vehicles with bulb type headlightsManual headlight leveling
dial
Occupancy and luggage
load conditionsDial position
OccupantsLuggage
load
DriverNone0
Driver and
front pas-
senger
None0
All seats
occupiedNone1.5*1
2*2
All seats
occupied
Full lug-
gage load-
ing
2.5*1
3*2
Driver
Full lug-
gage load-
ing
4
Page 183 of 678
181
4
4-3. Operating the lights and wipers
Driving
*: If equipped
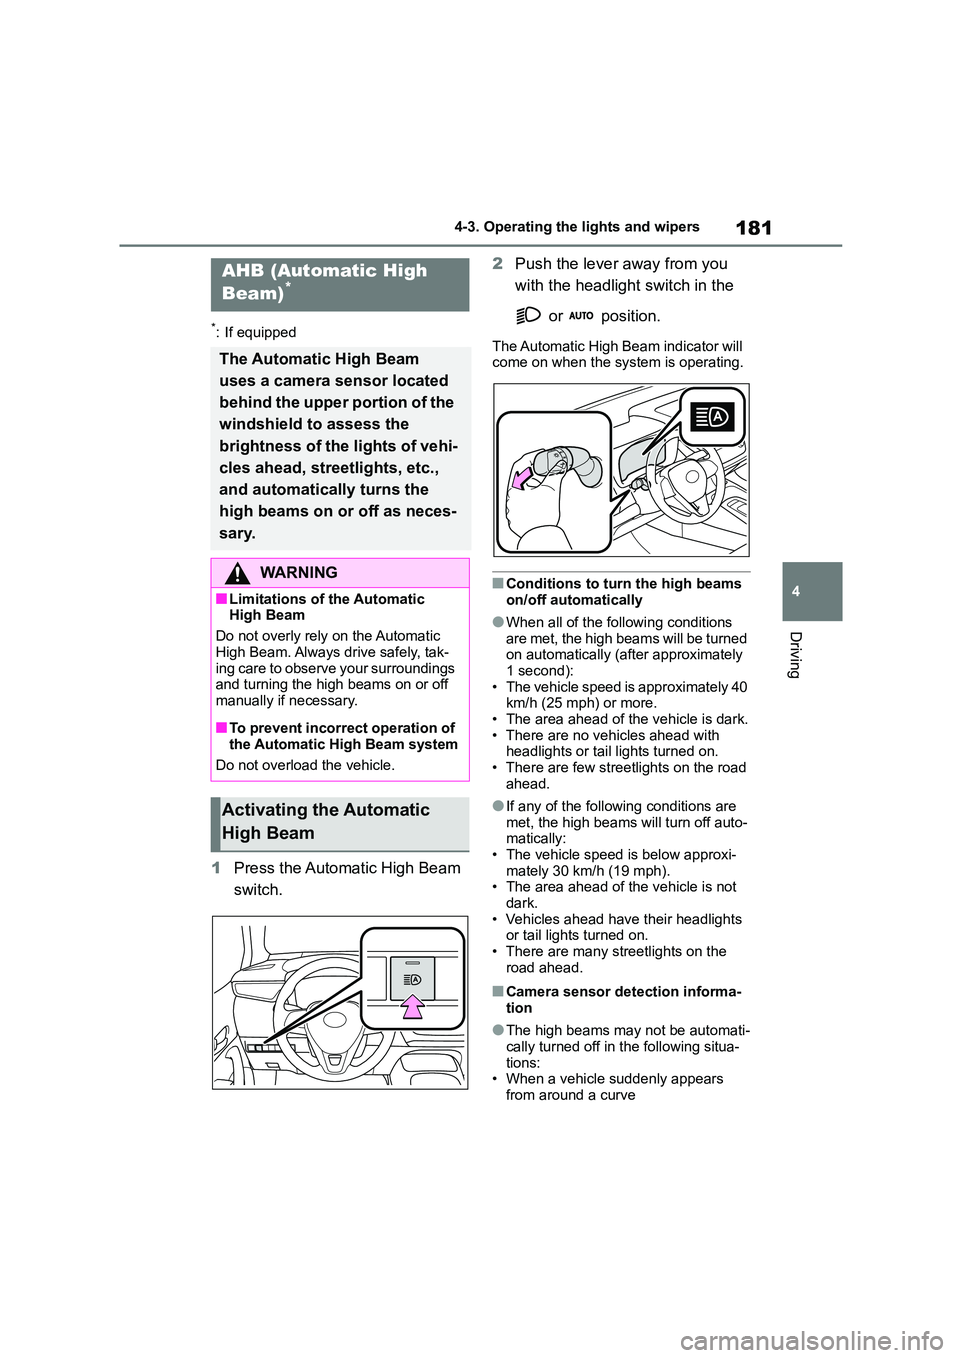
1 Press the Automatic High Beam
switch.
2 Push the lever away from you
with the headlight switch in the
or position.
The Automatic High Beam indicator will
come on when the system is operating.
■Conditions to turn the high beams
on/off automatically
●When all of the following conditions
are met, the high beams will be turned on automatically (after approximately
1 second):
• The vehicle speed is approximately 40 km/h (25 mph) or more.
• The area ahead of the vehicle is dark.
• There are no vehicles ahead with headlights or tail lights turned on.
• There are few streetlights on the road
ahead.
●If any of the following conditions are
met, the high beams will turn off auto- matically:
• The vehicle speed is below approxi-
mately 30 km/h (19 mph). • The area ahead of the vehicle is not
dark.
• Vehicles ahead have their headlights or tail lights turned on.
• There are many streetlights on the
road ahead.
■Camera sensor detection informa-
tion
●The high beams may not be automati-
cally turned off in the following situa- tions:
• When a vehicle suddenly appears
from around a curve
AHB (Automatic High
Beam)*
The Automatic High Beam
uses a camera sensor located
behind the upper portion of the
windshield to assess the
brightness of the lights of vehi-
cles ahead, streetlights, etc.,
and automatically turns the
high beams on or off as neces-
sary.
WA R N I N G
■Limitations of the Automatic High Beam
Do not overly rely on the Automatic
High Beam. Always drive safely, tak- ing care to observe your surroundings
and turning the high beams on or off
manually if necessary.
■To prevent incorrect operation of
the Automatic High Beam system
Do not overload the vehicle.
Activating the Automatic
High Beam
Page 184 of 678
1824-3. Operating the lights and wipers
• When the vehicle is cut in front of by
another vehicle • When vehicles ahead cannot be
detected due to repeated curves, road
dividers or roadside trees • When vehicles ahead appear in a far-
away lane on a wide road
• When the lights of vehicles ahead are not on
●The high beams may be turned off if a vehicle ahead that is using fog lights
without its headlights turned on is
detected.
●House lights, streetlights, traffic sig-
nals, and illuminated billboards or signs and other reflective objects may
cause the high beams to change to
the low beams, or the low beams to remain on.
●The following factors may affect the amount of time taken for the high
beams to turn on or off:
• The brightness of the headlights, fog lights, and tail lights of vehicles ahead
• The movement and direction of vehi-
cles ahead • When a vehicle ahead only has oper-
ational lights on one side
• When a vehicle ahead is a two-wheeled vehicle
• The condition of the road (gradient,
curve, condition of the road surface, etc.)
• The number of passengers and
amount of luggage in the vehicle
●The high beams may turn on or off
unexpectedly.
●Bicycles or similar vehicles may not
be detected.
●In the following sit uations the system
may not be able to correctly detect the
surrounding brightness level. This may cause the low beams to remain
on or the high beams to flash or daz-
zle pedestrians or vehicles ahead. In such a case, it is necessary to manu-
ally switch between the high and low
beams. • When driving in inclement weather
(heavy rain, snow, fog, sandstorms,
etc.)
• When the windshield is obscured by fog, mist, ice, dirt, etc.
• When the windshield is cracked or
damaged • When the camera sensor is deformed
or dirty
• When the temperature of the camera sensor is extremely high
• When the surrounding brightness
level is equal to that of headlights, tail lights or fog lights
• When headlights or tail lights of vehi-
cles ahead are turned off, dirty, chang- ing color, or not aimed properly
• When the vehicle is hit by water,
snow, dust, etc. from a preceding vehicle
• When driving through an area of inter-
mittently changing brightness and darkness
• When frequently and repeatedly driv-
ing ascending/descending roads, or roads with rough, bumpy or uneven
surfaces (such as stone-paved roads,
gravel roads, etc.) • When frequently and repeatedly tak-
ing curves or driving on a winding
road • When there is a highly reflective
object ahead of the vehicle, such as a
sign or mirror • When the back of a preceding vehicle
is highly reflective, such as a con-
tainer on a truck • When the vehicle’s headlights are
damaged or dirty, or are not aimed
properly • When the vehicle is listing or titling
due to a flat tire, a trailer being towed,
etc. • When the headlights are changed
between the high beams and low
beams repeatedly in an abnormal
manner • When the driver believes that the high
beams may be flashing or dazzling
pedestrians or other drivers
Page 186 of 678
1844-3. Operating the lights and wipers
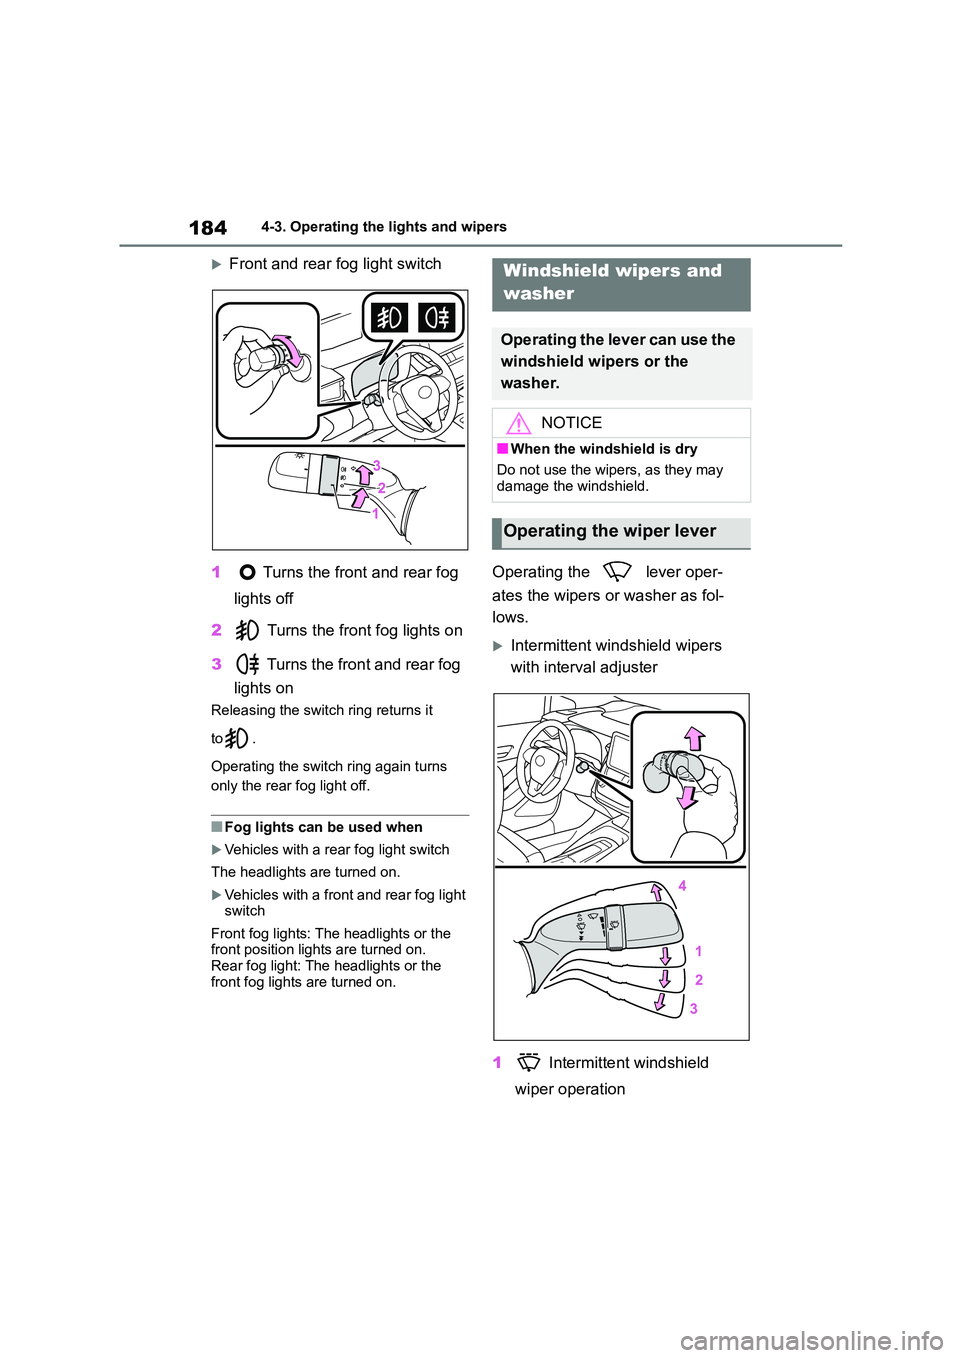
Front and rear fog light switch
1 Turns the front and rear fog
lights off
2 Turns the front fog lights on
3 Turns the front and rear fog
lights on
Releasing the switch ring returns it
to .
Operating the switch ring again turns
only the rear fog light off.
■Fog lights can be used when
Vehicles with a rear fog light switch
The headlights are turned on.
Vehicles with a front and rear fog light
switch
Front fog lights: The headlights or the
front position lights are turned on.
Rear fog light: The headlights or the front fog lights are turned on.
Operating the lever oper-
ates the wipers or washer as fol-
lows.
Intermittent wind shield wipers
with interval adjuster
1 Intermittent windshield
wiper operation
Windshield wipers and
washer
Operating the lever can use the
windshield wipers or the
washer.
NOTICE
■When the windshield is dry
Do not use the wipers, as they may
damage the windshield.
Operating the wiper lever