stop start TOYOTA COROLLA 2022 Owners Manual (in English)
[x] Cancel search | Manufacturer: TOYOTA, Model Year: 2022, Model line: COROLLA, Model: TOYOTA COROLLA 2022Pages: 678, PDF Size: 147.24 MB
Page 7 of 678
5TABLE OF CONTENTS
1
6
5
4
3
2
9
8
7
If your vehicle has to be stopped
in an emergency ............... 462
If the vehicle is submerged or
water on the road is rising
.......................................... 464
8-2. Steps to take in an emergency
If your vehicle needs to be towed
.......................................... 465
If you think something is wrong
.......................................... 469
Fuel pump shut off system
.......................................... 470
If a warning light turns on or a
warning buzzer sounds ..... 471
If a warning message is dis-
played ............................... 480
If you have a flat tire (vehicles
with an emergency tire punc-
ture repair kit) ................... 482
If you have a flat tire (vehicles
with a spare tire) ............... 498
If the engine will not start .... 509
If you lose your keys ........... 511
If the electronic key does not
operate properly ............... 511
If the vehicle battery is dis-
charged............................. 513
If your vehicle overheats ..... 518
If the vehicle becomes stuck
.......................................... 520
9-1. Specifications
Maintenance data (fuel, oil level,
etc.)................................... 524
Fuel information .................. 537
9-2. Customization
Customizable features ........ 538
9-3. Initialization
Items to initialize ................. 547
What to do if... (Troubleshooting)
.......................................... 550
Alphabetical Index .............. 553
9Vehicle specifications
Index
Page 14 of 678
12Pictorial index
To prevent freezing (windshield wiper de-icer)*2......................P.383, 390
Fuel filler door ................................................................................P.188
Refueling method .............................................................................P.189
Fuel type/fuel tank capacity .............................................................P.526
Tires ................................................................................................P.429
Tire size/inflation pressure ...............................................................P.533
Winter tires/tire chains .....................................................................P.321
Checking/rotation/tire pressure warn ing system ..............................P.429
Coping with flat tires.................................................................P.482, 498
Hood ................................................................................................P.419
Opening ...........................................................................................P.419
Engine oil .........................................................................................P.527
Coping with overheating ..................................................................P.518
Headlights/front position lights/daytime running lights/turn signal
lights .......................................................................................P.171, 178
Front fog lights*2............................................................................P.183
Stop lights/tail lights/turn signal lights................................P.171, 178
License plate lights........................................................................P.178
Tail light ..........................................................................................P.178
Rear fog light*3...............................................................................P.183
Back-up light*4
Shifting the shift position to R ..................................................P.165, 169
Tail light ..........................................................................................P.178
Rear fog light*4...............................................................................P.183
Back-up light*3
Shifting the shift position to R ..................................................P.165, 169
*1: Vehicles with a smart entry & start system
*2: If equipped
*3: Right-hand drive vehicles
*4: Left-hand drive vehicles
Light bulbs of the exterior lights for driving
(Replacing method: P.455, Watts: P.535)
Page 15 of 678
13Pictorial index
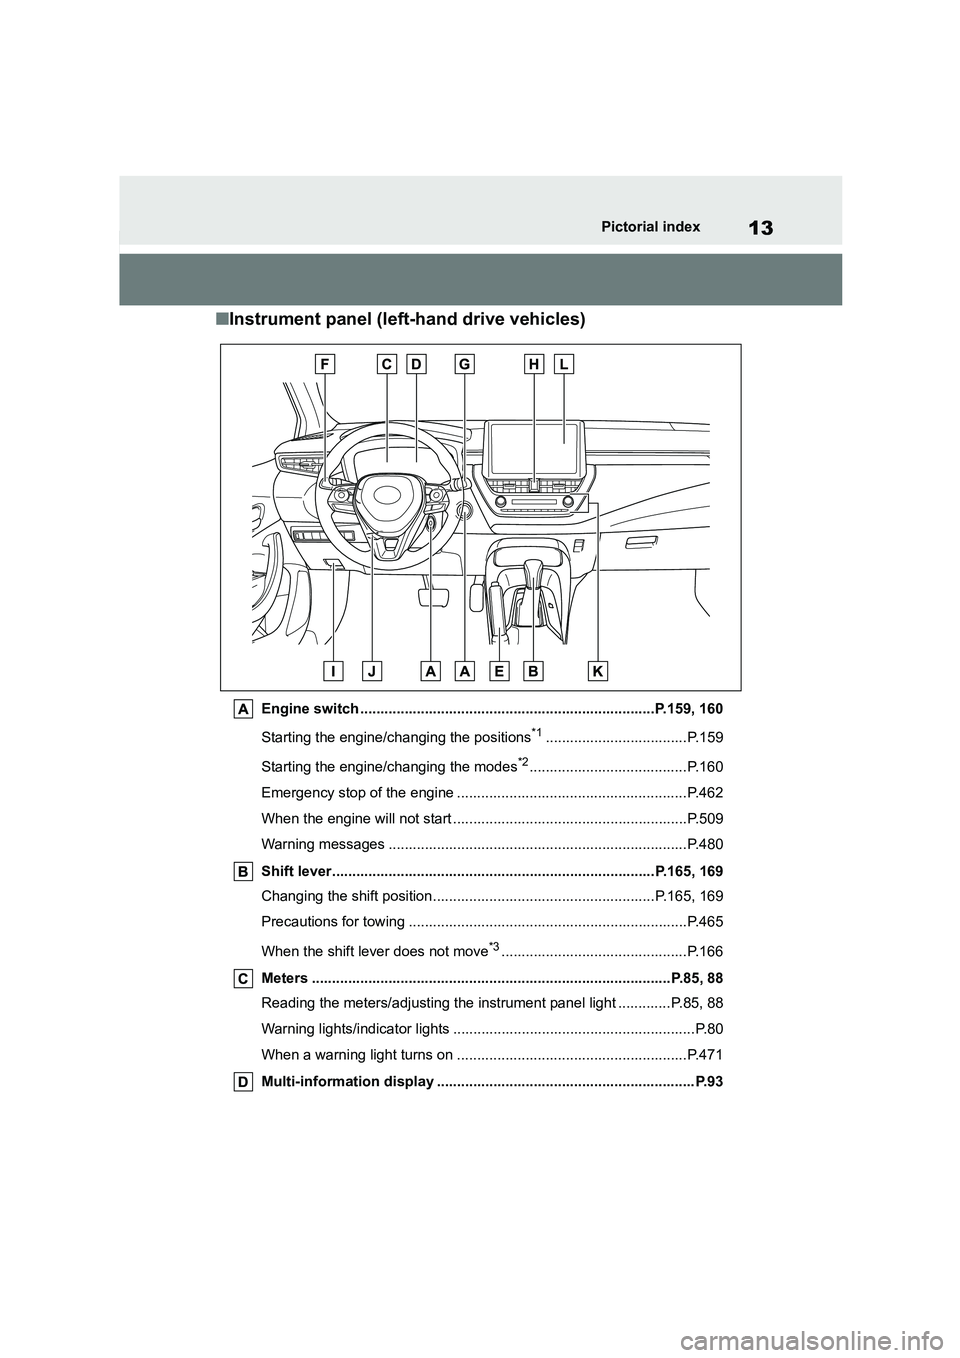
■Instrument panel (left-hand drive vehicles)
Engine switch .........................................................................P.159, 160
Starting the engine/changing the positions*1...................................P.159
Starting the engine/changing the modes*2.......................................P.160
Emergency stop of the engine .........................................................P.462
When the engine will not start ..........................................................P.509
Warning messages ..........................................................................P.480
Shift lever................................................................................P.165, 169
Changing the shift position.......................................................P.165, 169
Precautions for towing .....................................................................P.465
When the shift lever does not move*3..............................................P.166
Meters .........................................................................................P.85, 88
Reading the meters/adjusting the instrument panel light ............. P.85, 88
Warning lights/indicator lights ............................................................P.80
When a warning light turns on .........................................................P.471
Multi-information display ................................................................P.93
Page 22 of 678
20Pictorial index
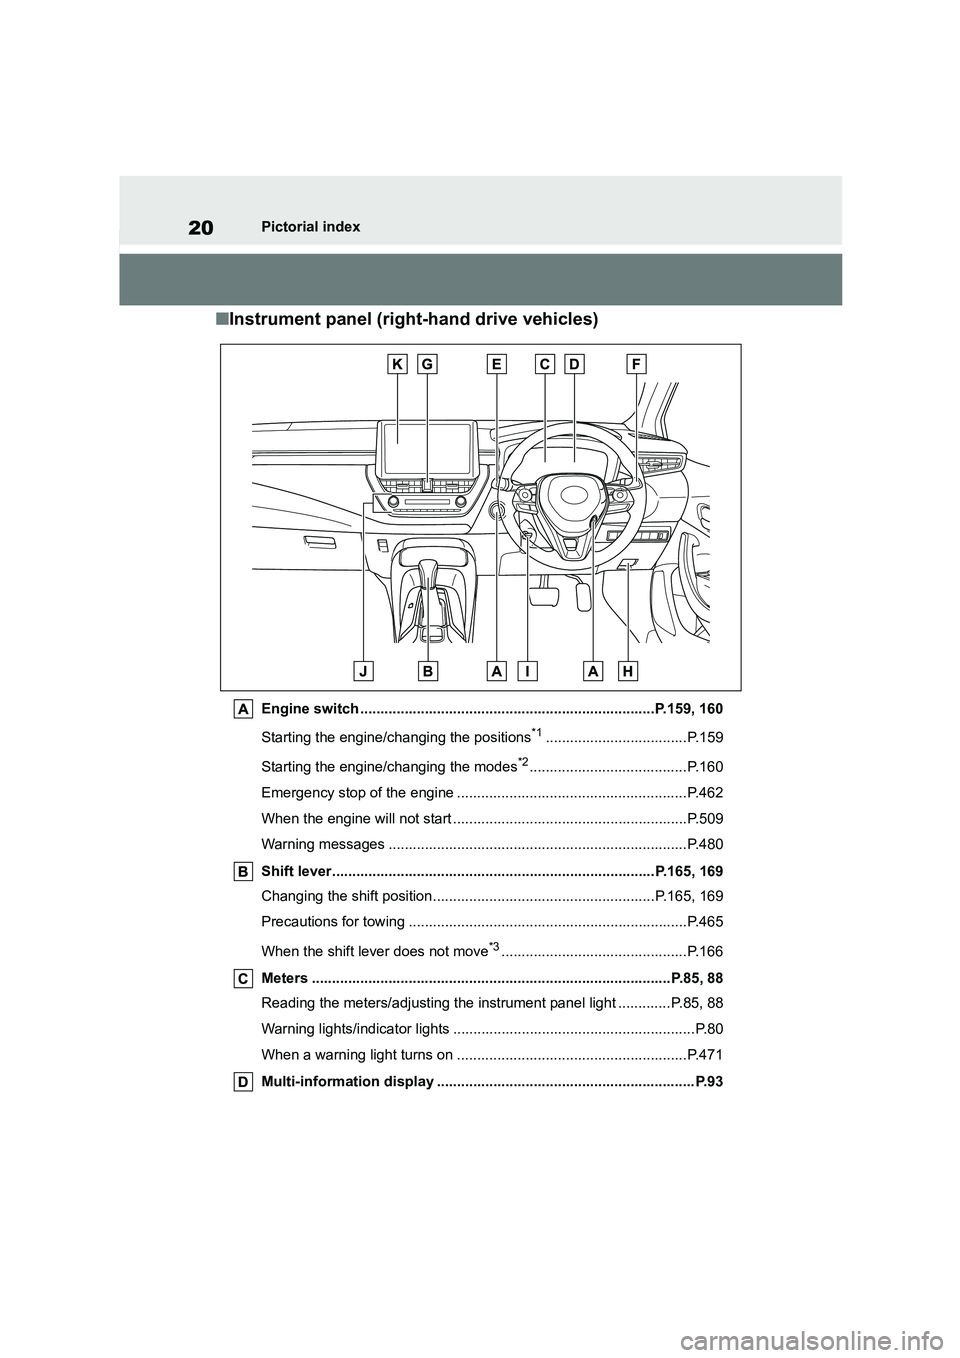
■Instrument panel (right-hand drive vehicles)
Engine switch .........................................................................P.159, 160
Starting the engine/changing the positions*1...................................P.159
Starting the engine/changing the modes*2.......................................P.160
Emergency stop of the engine .........................................................P.462
When the engine will not start ..........................................................P.509
Warning messages ..........................................................................P.480
Shift lever................................................................................P.165, 169
Changing the shift position.......................................................P.165, 169
Precautions for towing .....................................................................P.465
When the shift lever does not move*3..............................................P.166
Meters .........................................................................................P.85, 88
Reading the meters/adjusting the instrument panel light ............. P.85, 88
Warning lights/indicator lights ............................................................P.80
When a warning light turns on .........................................................P.471
Multi-information display ................................................................P.93
Page 30 of 678
281-1. For safe use
1-1.For safe use
Use only floor mats designed spe-
cifically for vehicles of the same
model and model year as your vehi-
cle. Fix them securely in place onto
the carpet.
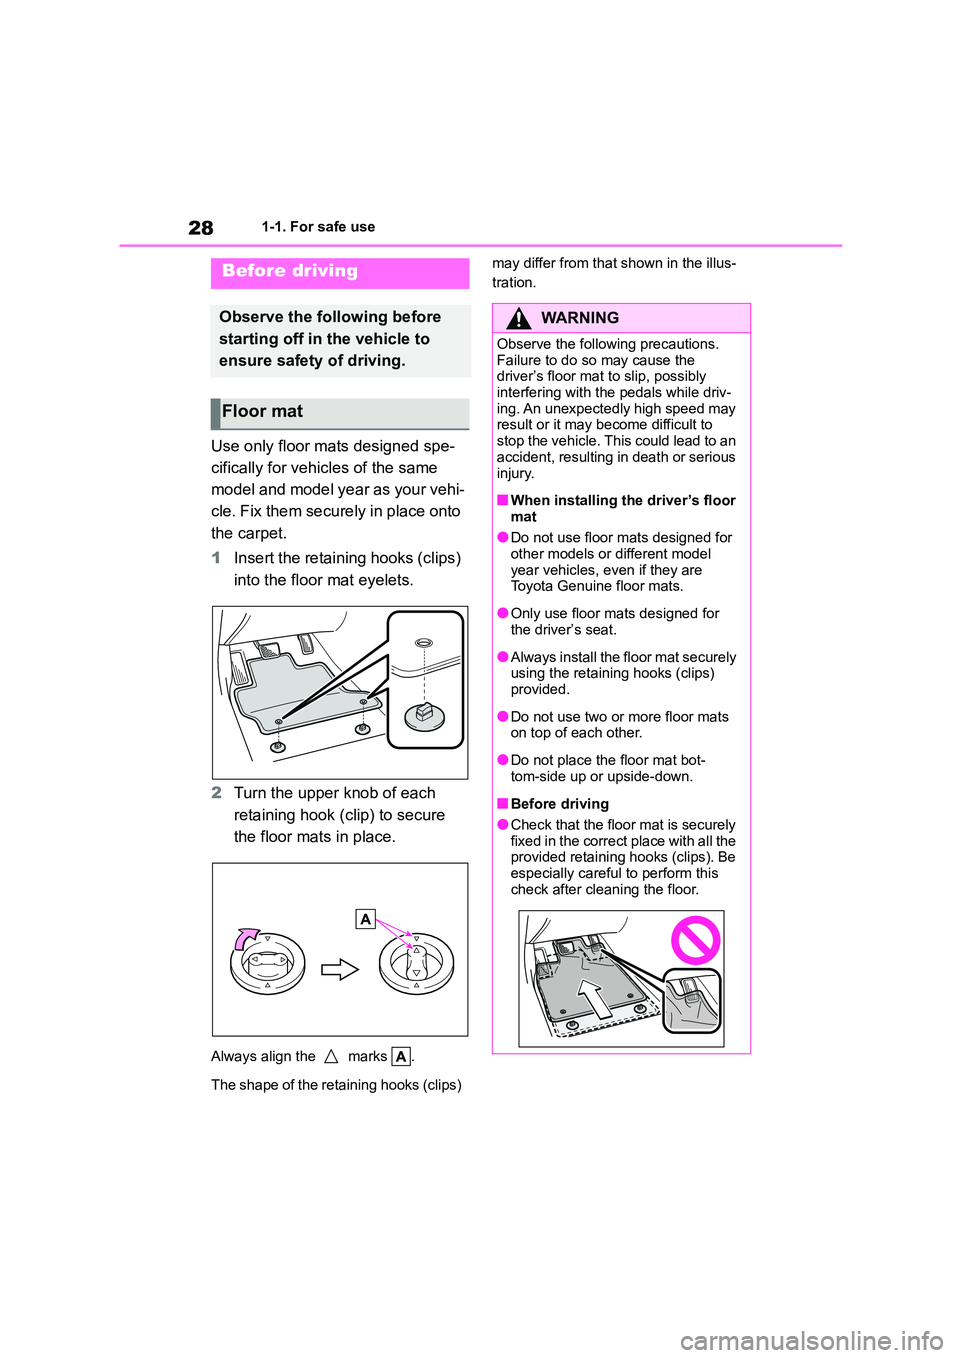
1 Insert the retaining hooks (clips)
into the floor mat eyelets.
2 Turn the upper knob of each
retaining hook (clip) to secure
the floor mats in place.
Always align the marks .
The shape of the retaining hooks (clips)
may differ from that shown in the illus-
tration.Before driving
Observe the following before
starting off in the vehicle to
ensure safety of driving.
Floor mat
WA R N I N G
Observe the following precautions.
Failure to do so may cause the driver’s floor mat to slip, possibly
interfering with the pedals while driv-
ing. An unexpectedly high speed may result or it may become difficult to
stop the vehicle. This could lead to an
accident, resulting in death or serious
injury.
■When installing the driver’s floor
mat
●Do not use floor mats designed for
other models or different model
year vehicles, even if they are Toyota Genuine floor mats.
●Only use floor mats designed for the driver’s seat.
●Always install the floor mat securely using the retaining hooks (clips)
provided.
●Do not use two or more floor mats
on top of each other.
●Do not place the floor mat bot-
tom-side up or upside-down.
■Before driving
●Check that the floor mat is securely
fixed in the correct place with all the provided retaining hooks (clips). Be
especially careful to perform this
check after cleaning the floor.
Page 32 of 678
301-1. For safe use
Make sure that all occupants are
wearing their seat belts before driv-
ing the vehicle. ( P. 3 1 )
Use a child restraint system appro-
priate for the child until the child
becomes large enough to properly
wear the vehicle’s seat belt.
( P. 4 7 )
Make sure that you can see back-
ward clearly by adjusting the inside
and outside rear view mirrors prop-
erly. ( P.132, 133)
WA R N I N G
●Do not adjust the position of the
driver’s seat while driving.
Doing so could cause the driver to lose control of the vehicle.
●Do not place a cushion between the driver or passenger and the
seatback.
A cushion may prevent correct pos-
ture from being achieved, and reduce the effectiveness of the seat
belt and head restraint.
●Do not place anything under the
front seats.
Objects placed under the front seats may become jammed in the
seat tracks and stop the seat from
locking in place. This may lead to an accident and the adjustment
mechanism may also be damaged.
●Always observe the legal speed
limit when driving on public roads.
●When driving over long distances,
take regular breaks before you start
to feel tired. Also, if you feel tired or sleepy while
driving, do not force yourself to con-
tinue driving and take a break immediately.
●Take care when adjusting the seat position to ensure that other pas-
sengers are not injured by the mov-
ing seat.
●When adjusting the seat position,
do not put your hands under the seat or near the moving parts to
avoid injury. Fingers or hands may
become jammed in the seat mecha- nism.
Correct use of the seat belts
Adjusting the mirrors
Page 76 of 678
741-4. Theft deterrent system
1-4.Theft deterrent system
Vehicles without a smart entry &
start system
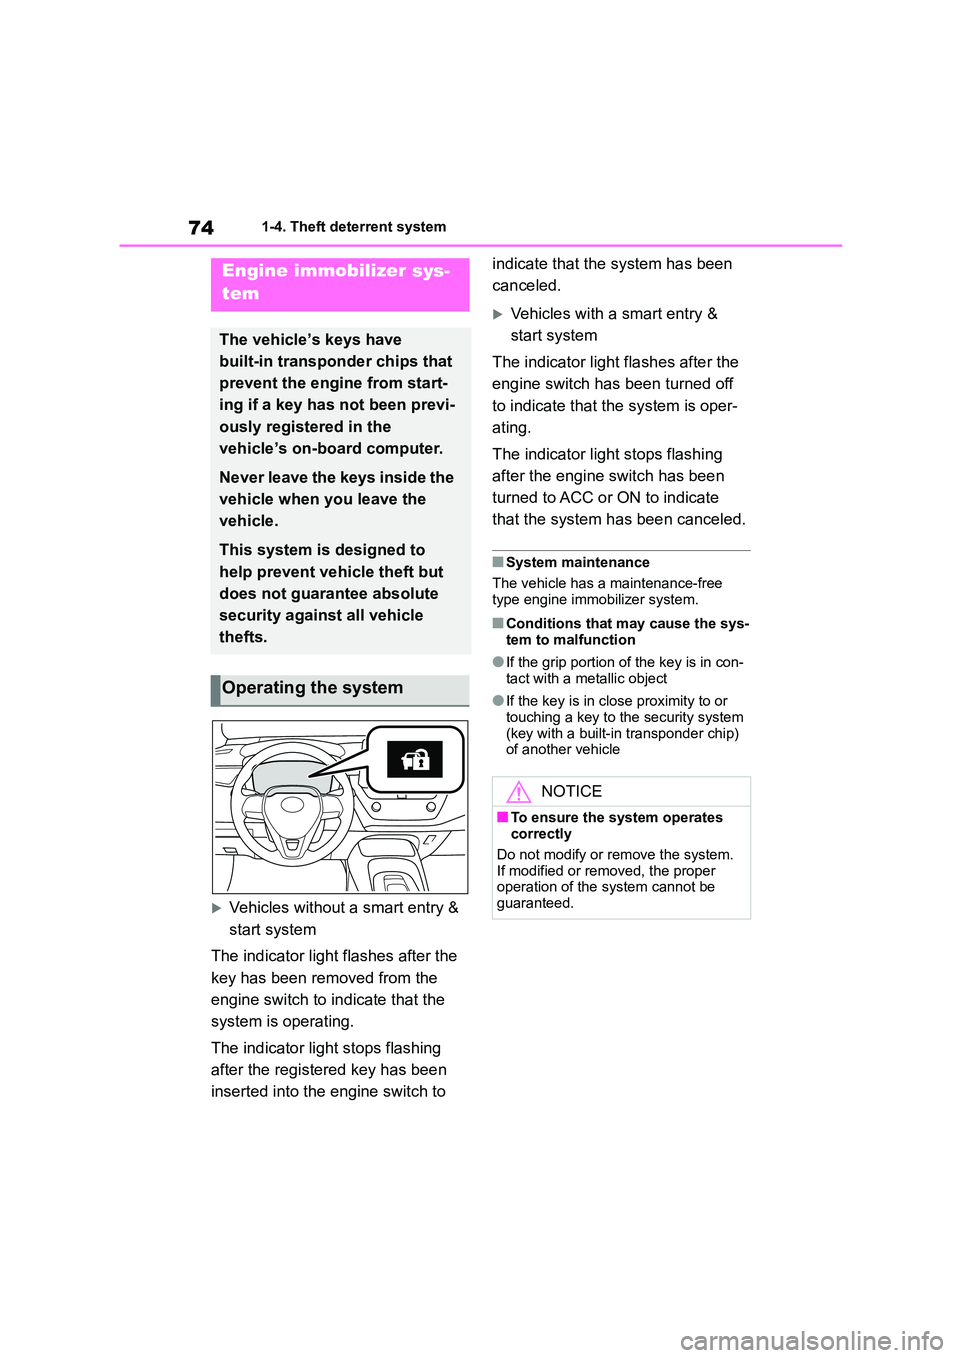
The indicator light flashes after the
key has been removed from the
engine switch to indicate that the
system is operating.
The indicator light stops flashing
after the registered key has been
inserted into the engine switch to
indicate that the system has been
canceled.
Vehicles with a smart entry &
start system
The indicator light flashes after the
engine switch has been turned off
to indicate that the system is oper-
ating.
The indicator light stops flashing
after the engine switch has been
turned to ACC or ON to indicate
that the system has been canceled.
■System maintenance
The vehicle has a maintenance-free
type engine immobilizer system.
■Conditions that may cause the sys-
tem to malfunction
●If the grip portion of the key is in con-
tact with a metallic object
●If the key is in close proximity to or
touching a key to the security system (key with a built-in transponder chip)
of another vehicle
Engine immobilizer sys-
tem
The vehicle’s keys have
built-in transponder chips that
prevent the engine from start-
ing if a key has not been previ-
ously registered in the
vehicle’s on-board computer.
Never leave the keys inside the
vehicle when you leave the
vehicle.
This system is designed to
help prevent vehicle theft but
does not guarantee absolute
security against all vehicle
thefts.
Operating the system
NOTICE
■To ensure the system operates
correctly
Do not modify or remove the system.
If modified or removed, the proper
operation of the system cannot be guaranteed.
Page 78 of 678
761-4. Theft deterrent system
*: If equipped
■Items to check before locking
the vehicle
To prevent unexpected triggering of
the alarm and vehicle theft, make
sure of the following:
Nobody is in the vehicle.
The windows and moon roof (if
equipped) are closed before the
alarm is set.
No valuables or other personal
items are left in the vehicle.
■Setting
Close the doors, trunk and hood,
and lock all the doors using the
entry function (if equipped) or wire-
less remote contro l. The system will
set automatically after 30 seconds.
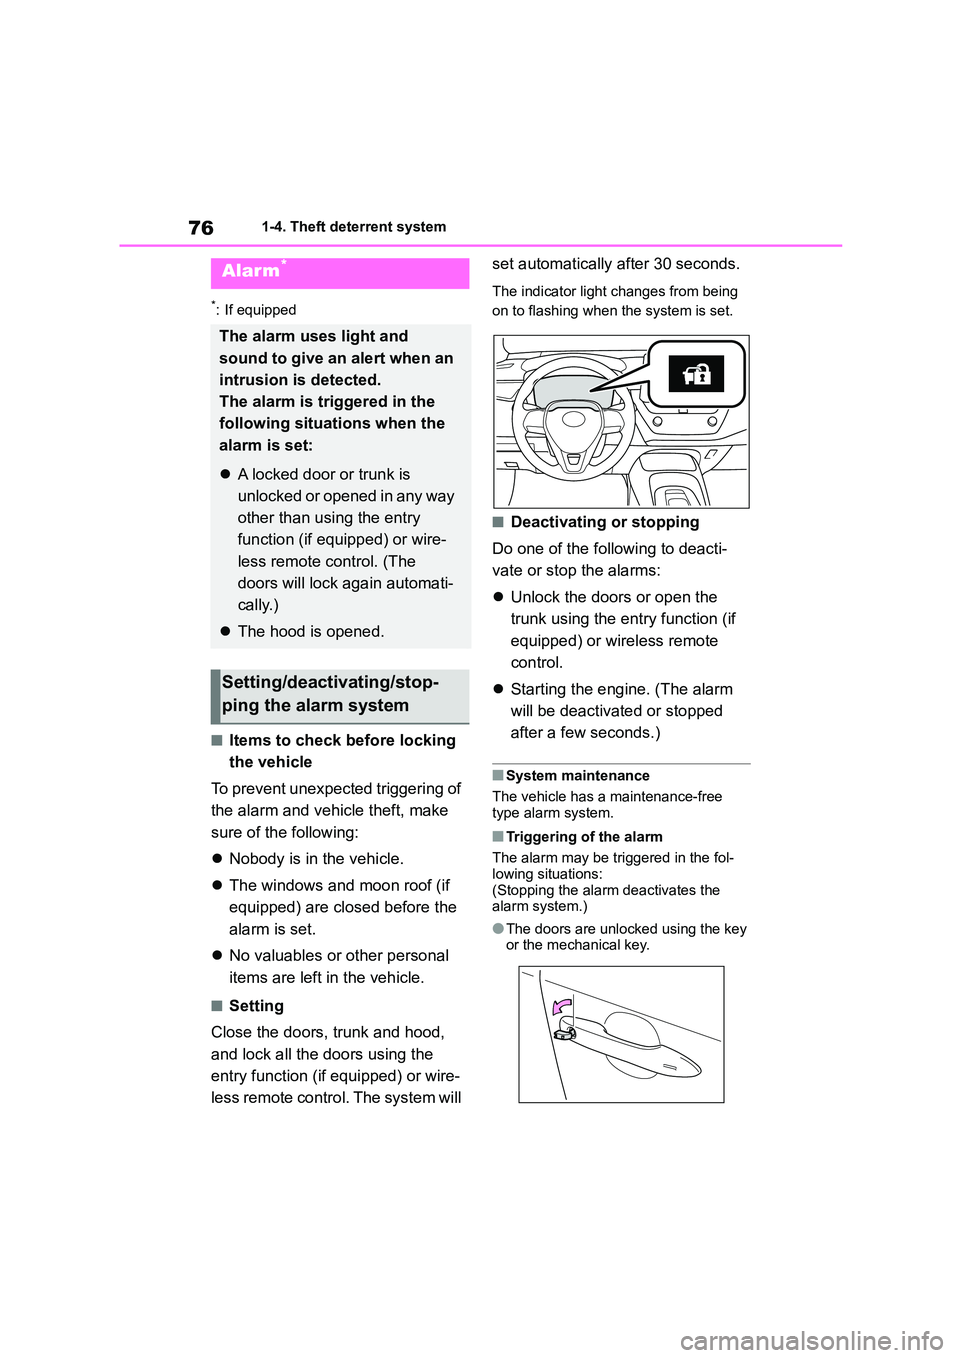
The indicator light changes from being
on to flashing when the system is set.
■Deactivating or stopping
Do one of the following to deacti-
vate or stop the alarms:
Unlock the doors or open the
trunk using the entry function (if
equipped) or wireless remote
control.
Starting the engine. (The alarm
will be deactiva ted or stopped
after a few seconds.)
■System maintenance
The vehicle has a maintenance-free
type alarm system.
■Triggering of the alarm
The alarm may be triggered in the fol-
lowing situations:
(Stopping the alarm deactivates the alarm system.)
●The doors are unlocked using the key or the mechanical key.
Alarm*
The alarm uses light and
sound to give an alert when an
intrusion is detected.
The alarm is triggered in the
following situations when the
alarm is set:
A locked door or trunk is
unlocked or opened in any way
other than using the entry
function (if equipped) or wire-
less remote control. (The
doors will lock again automati-
cally.)
The hood is opened.
Setting/deactivating/stop-
ping the alarm system
Page 98 of 678
962-1. Instrument cluster
driven may differ from that displayed.
When only a small amount of fuel is
added to the tank, the display may not
be updated.
When refueling, turn the engine switch
off. If the vehicle is refueled without
turning the engine switch off, the dis-
play may not be updated.
The average fuel economy display
can be changed in . ( P. 9 8 )
Average fuel economy (after
start)
Displays the average fuel consumption
since engine start.
Average fuel economy (after
refuel)
Displays the average fuel consumption
since the vehicle was refueled.
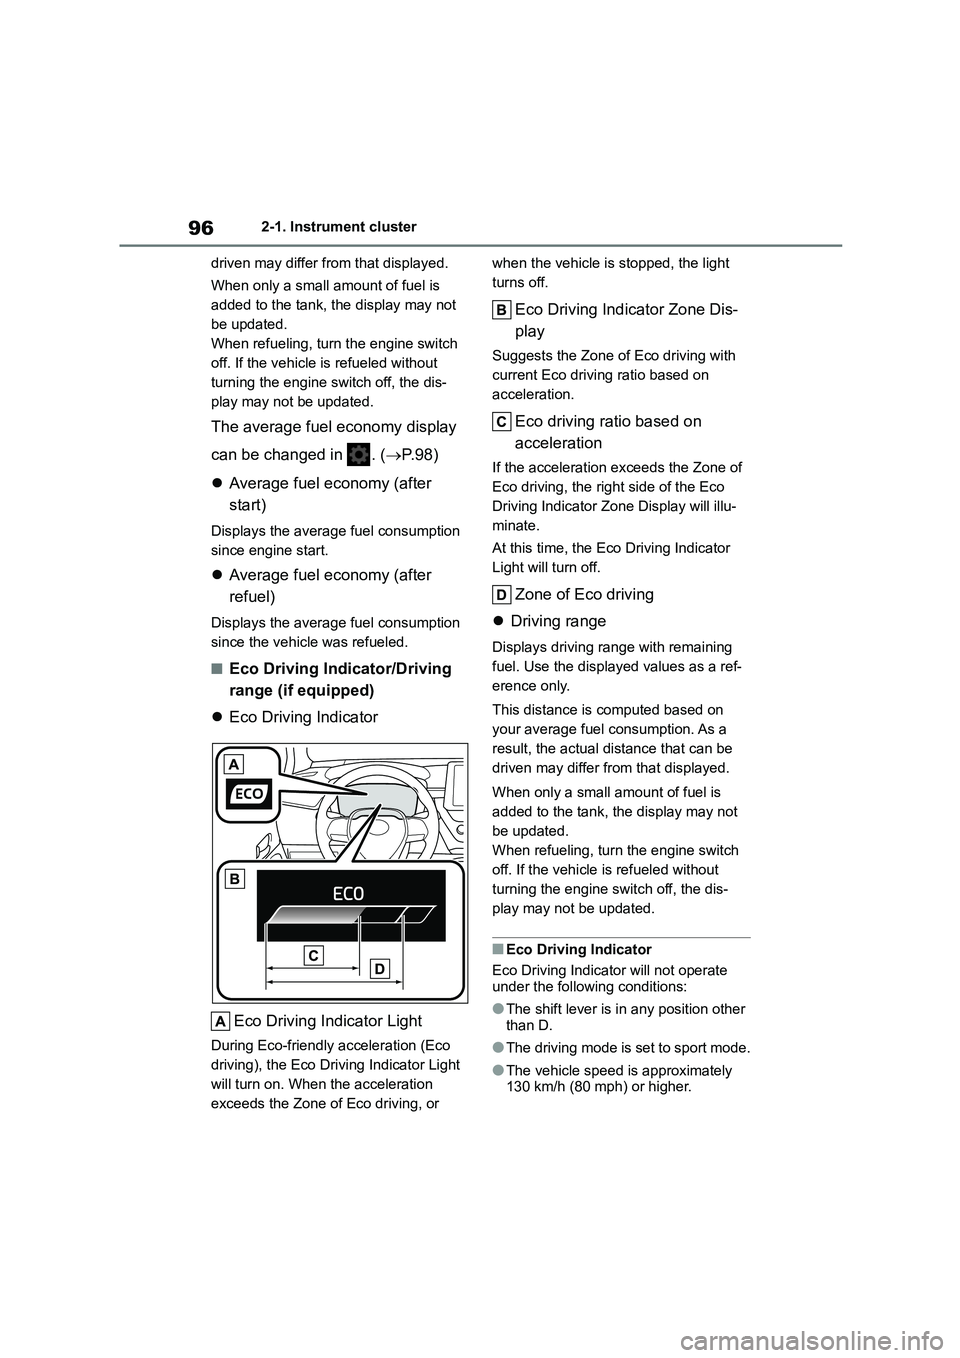
■Eco Driving Indicator/Driving
range (if equipped)
Eco Driving Indicator
Eco Driving Indicator Light
During Eco-friendly acceleration (Eco
driving), the Eco Driving Indicator Light
will turn on. When the acceleration
exceeds the Zone of Eco driving, or
when the vehicle is stopped, the light
turns off.
Eco Driving Indicator Zone Dis-
play
Suggests the Zone of Eco driving with
current Eco driving ratio based on
acceleration.
Eco driving ratio based on
acceleration
If the acceleration exceeds the Zone of
Eco driving, the right side of the Eco
Driving Indicator Zone Display will illu-
minate.
At this time, the Eco Driving Indicator
Light will turn off.
Zone of Eco driving
Driving range
Displays driving range with remaining
fuel. Use the displayed values as a ref-
erence only.
This distance is computed based on
your average fuel consumption. As a
result, the actual distance that can be
driven may differ from that displayed.
When only a small amount of fuel is
added to the tank, the display may not
be updated.
When refueling, turn the engine switch
off. If the vehicle is refueled without
turning the engine switch off, the dis-
play may not be updated.
■Eco Driving Indicator
Eco Driving Indicator will not operate under the following conditions:
●The shift lever is in any position other than D.
●The driving mode is set to sport mode.
●The vehicle speed is approximately
130 km/h (80 mph) or higher.
Page 111 of 678
109
3
3-1. Key information
Before driving
Vehicles with a smart entry & start
system
●The standard battery life is 1 to 2
years.
●If the battery becomes low, an alarm
will sound in the cabin and a message will be shown on the multi-information
display when the engine is stopped.
●To reduce key battery depletion when
the electronic key is to not be used for
long periods of time, set the electronic key to the batter y-saving mode.
( P.122)
●As the electronic key always receives
radio waves, the battery will become
depleted even if the electronic key is not used. The following symptoms
indicate that the electronic key battery
may be depleted. Replace the battery when necessary. ( P.449)
• The smart entry & start system or the
wireless remote control does not oper- ate.
• The detection area becomes smaller.
• The LED indicator on the key surface does not turn on.
●To avoid serious deterioration, do not leave the electronic key within 1 m (3
ft.) of the following electrical appli-
ances that produce a magnetic field: •TVs
• Personal computers
• Cellular phones, cordless phones and battery chargers
• Recharging cellular phones or cord-
less phones • Table lamps
• Induction cookers
●If the electronic key is near the vehicle
for longer than necessary, even if the
smart entry & start system is not oper-
ated, the key battery may become depleted faster than normal.
■Replacing the battery
P.449
■If “New Key Registered Contact
Your Dealer if You Did Not Register a New Key” is shown on the
multi-information display (vehicles
with a smart entry & start system)
This message will be displayed each
time the driver’s door is opened when
the doors are unlocked from the outside for approximately 10 days after a new
electronic key has been registered.
If this message is displayed but you have not had a new electronic key regis-
tered, ask any authorized Toyota retailer
or Toyota authorized repairer, or any reli- able repairer to check if an unknown
electronic key (other than those in your
possession) has been registered.
■If a wrong key is used
The key cylinder rotates freely, isolated
from the internal mechanism.
NOTICE
■To prevent key damage
●Do not drop the keys, subject them to strong shocks or bend them.
●Do not expose the keys to high temperatures for long periods of
time.
●Do not get the keys wet or wash
them in an ultrasonic washer etc.
●Vehicles with a smart entry & start
system: Do not attach metallic or
magnetic materials to the keys or place the keys close to such materi-
als.
●Do not disassemble the keys.
●Do not attach a sticker or anything else to the surface of the key.
●Vehicles with a smart entry & start system: Do not place the keys near
objects that produce magnetic
fields, such as TVs, audio systems and induction cookers.