tire type TOYOTA COROLLA 2022 Owners Manual (in English)
[x] Cancel search | Manufacturer: TOYOTA, Model Year: 2022, Model line: COROLLA, Model: TOYOTA COROLLA 2022Pages: 678, PDF Size: 147.24 MB
Page 14 of 678
12Pictorial index
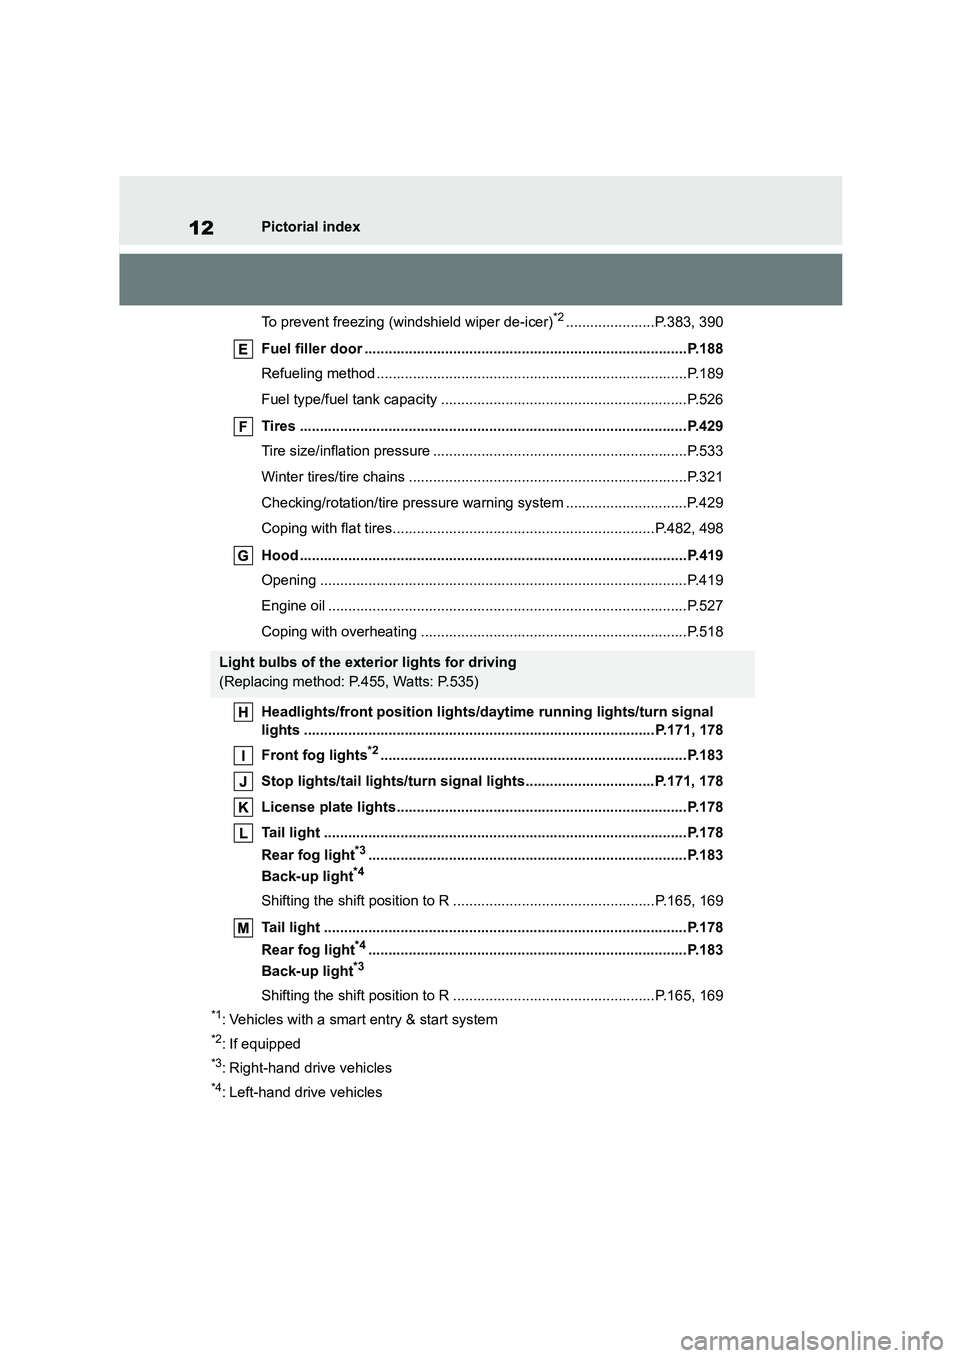
To prevent freezing (windshield wiper de-icer)*2......................P.383, 390
Fuel filler door ................................................................................P.188
Refueling method .............................................................................P.189
Fuel type/fuel tank capacity .............................................................P.526
Tires ................................................................................................P.429
Tire size/inflation pressure ...............................................................P.533
Winter tires/tire chains .....................................................................P.321
Checking/rotation/tire pressure warn ing system ..............................P.429
Coping with flat tires.................................................................P.482, 498
Hood ................................................................................................P.419
Opening ...........................................................................................P.419
Engine oil .........................................................................................P.527
Coping with overheating ..................................................................P.518
Headlights/front position lights/daytime running lights/turn signal
lights .......................................................................................P.171, 178
Front fog lights*2............................................................................P.183
Stop lights/tail lights/turn signal lights................................P.171, 178
License plate lights........................................................................P.178
Tail light ..........................................................................................P.178
Rear fog light*3...............................................................................P.183
Back-up light*4
Shifting the shift position to R ..................................................P.165, 169
Tail light ..........................................................................................P.178
Rear fog light*4...............................................................................P.183
Back-up light*3
Shifting the shift position to R ..................................................P.165, 169
*1: Vehicles with a smart entry & start system
*2: If equipped
*3: Right-hand drive vehicles
*4: Left-hand drive vehicles
Light bulbs of the exterior lights for driving
(Replacing method: P.455, Watts: P.535)
Page 265 of 678
263
4
4-5. Using the driving support systems
Driving
• When an accessory (such as a bicycle
carrier) is installed to the rear of the vehicle
• When there is a significant difference
in height between your vehicle and the vehicle that enters the detection
area
• Immediately after the Blind Spot Moni- tor is turned on
●Instances of the Blind Spot Monitor unnecessarily detecting a vehicle
and/or object may increase in the fol-
lowing situations: • When the sensor is misaligned due to
a strong impact to the sensor or its
surrounding area • When the distance between your vehi-
cle and a guardrail, wall, etc. that
enters the detection area is short • When driving up and down consecu-
tive steep inclines, such as hills, dips
in the road, etc. • When vehicle lanes are narrow, or
when driving on the edge of a lane,
and a vehicle traveling in a lane other than the adjacent lanes enters the
detection area
• When driving on roads with sharp bends, consecutive curves, or uneven
surfaces
• When the tires are slipping or spinning • When the distance between your vehi-
cle and a following vehicle is short
• When an accessory (such as a bicycle carrier) is installed to the rear of the
vehicle
*: If equipped
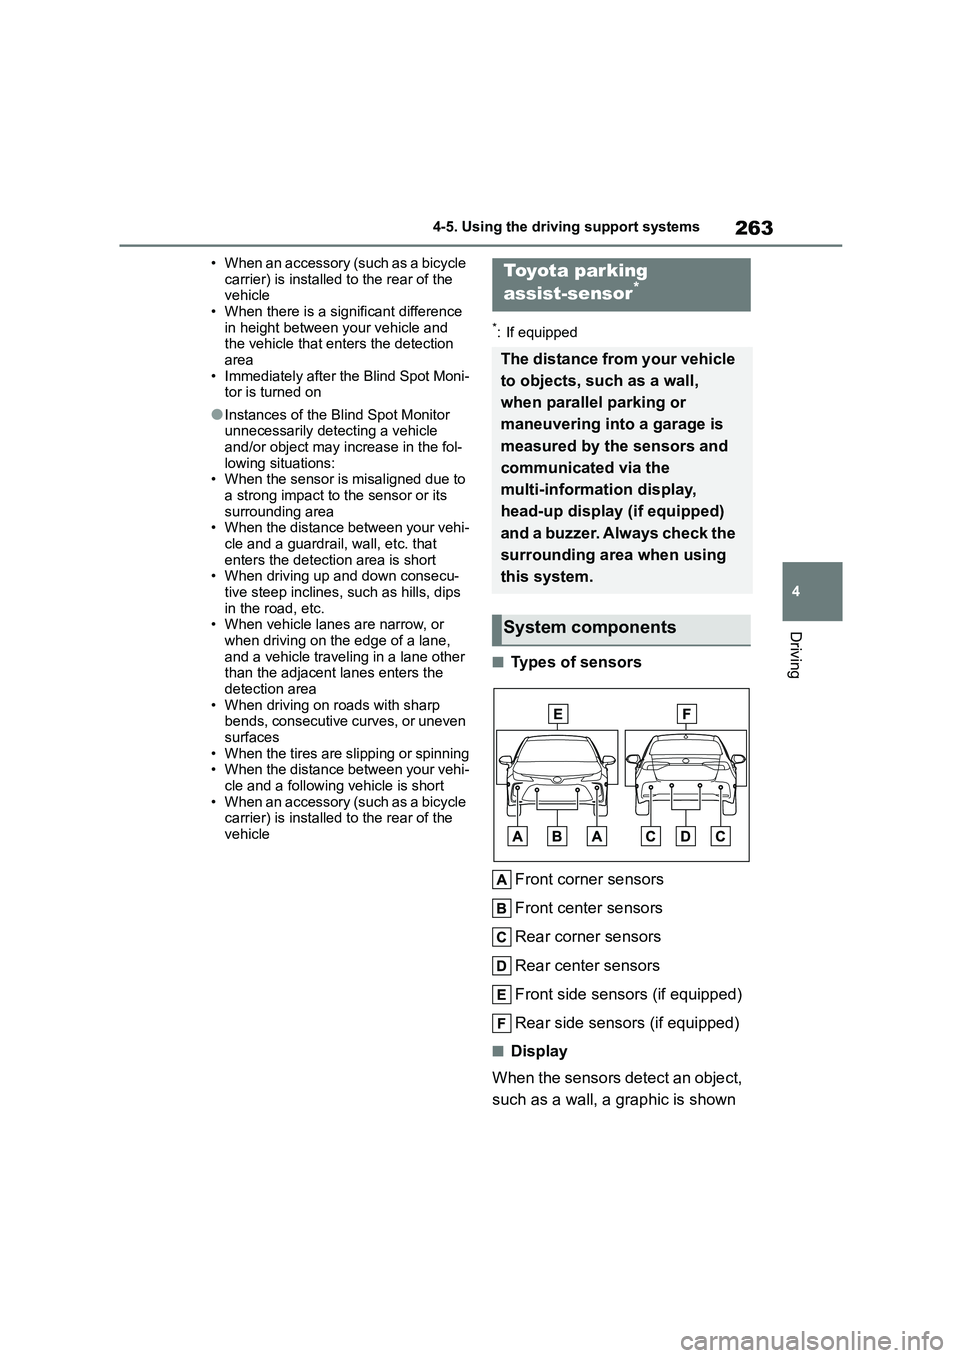
■Types of sensors
Front corner sensors
Front center sensors
Rear corner sensors
Rear center sensors
Front side sensors (if equipped)
Rear side sensors (if equipped)
■Display
When the sensors detect an object,
such as a wall, a graphic is shown
Toyota parking
assist-sensor*
The distance from your vehicle
to objects, such as a wall,
when parallel parking or
maneuvering into a garage is
measured by the sensors and
communicated via the
multi-information display,
head-up display (if equipped)
and a buzzer. Always check the
surrounding area when using
this system.
System components
Page 325 of 678
![TOYOTA COROLLA 2022 Owners Manual (in English) 323
4
4-6. Driving tips
Driving
Side chain (3 mm [0.12 in.] in
diameter)
Side chain (10 mm [0.39 in.] in
width)
Side chain (30 mm [1.18 in.] in
length)
Cross chain (4 mm [0.16 in.] in
diam](/img/14/48490/w960_48490-324.png "TOYOTA COROLLA 2022 Owners Manual (in English) 323
4
4-6. Driving tips
Driving
Side chain (3 mm [0.12 in.] in
diameter)
Side chain (10 mm [0.39 in.] in
width)
Side chain (30 mm [1.18 in.] in
length)
Cross chain (4 mm [0.16 in.] in
diam")
323
4
4-6. Driving tips
Driving
Side chain (3 mm [0.12 in.] in
diameter)
Side chain (10 mm [0.39 in.] in
width)
Side chain (30 mm [1.18 in.] in
length)
Cross chain (4 mm [0.16 in.] in
diameter)
Cross chain (14 mm [0.55 in.] in
width)
Cross chain (25 mm [0.98 in.] in
length)
Regulations regarding the use of
tire chains vary depending on loca-
tion and type of road. Always check
local regulations before installing
chains.
■Tire chain installation
Observe the following precautions when installing and removing chains:
●Install and remove tire chains in a safe location.
●Install tire chains on the front tires only. Do not install tire chains on the
rear tires.
●Install tire chains on the front tires as tightly as possible. Retighten chains
after driving 0.5 1.0 km (1/41/2
mile).
●Install tire chains following the instruc-
tions provided with the tire chains.
Regulations on the use of
tire chains
NOTICE
■Fitting tire chains
The tire pressure warning valves and
transmitters may not function cor- rectly when tire chains are fitted.
Page 447 of 678
445
7
7-3. Do-it-yourself maintenance
Maintenance and care
When replacing wheels, care
should be taken to ensure that they
are equivalent to those removed in
load capacity, diameter, rim width
and inset*.
Replacement wheels are available
at any authorized Toyota retailer or
Toyota authorized repairer, or any
reliable repairer.
*: Conventionally referred to as offset.
Toyota does not recommend using
the following:
Wheels of different sizes or types
Used wheels
Bent wheels that have been
straightened
■When replacing wheels
The wheels of your vehicle are equipped with tire pressure warning valves and
transmitters that allow the tire pressure
warning system to provide advance warning in the event of a loss in tire
inflation pressure. Whenever wheels are
replaced, the tire pressure warning valves and transmitters must be
installed. ( P.441)
WA R N I N G
●Uneven wear
●Poor handling
●Possibility of blowouts resulting
from overheated tires
●Air leaking from between tire and
wheel
●Wheel deformation and/or tire dam-
age
●Greater possibility of tire damage
while driving (due to road hazards,
expansion joints, sharp edges on the road, etc.)
NOTICE
■When inspecting and adjusting
tire inflation pressure
Be sure to put the tire valve caps back
on.
If a valve cap is not installed, dirt or moisture may get into the valve and
cause an air leak, resulting in
decreased tire inflation pressure.
Wheels
If a wheel is bent, cracked or
heavily corroded, it should be
replaced. Otherwise, the tire
may separate from the wheel
or cause a loss of handling
control.
Wheel selection
Page 468 of 678
4668-2. Steps to take in an emergency
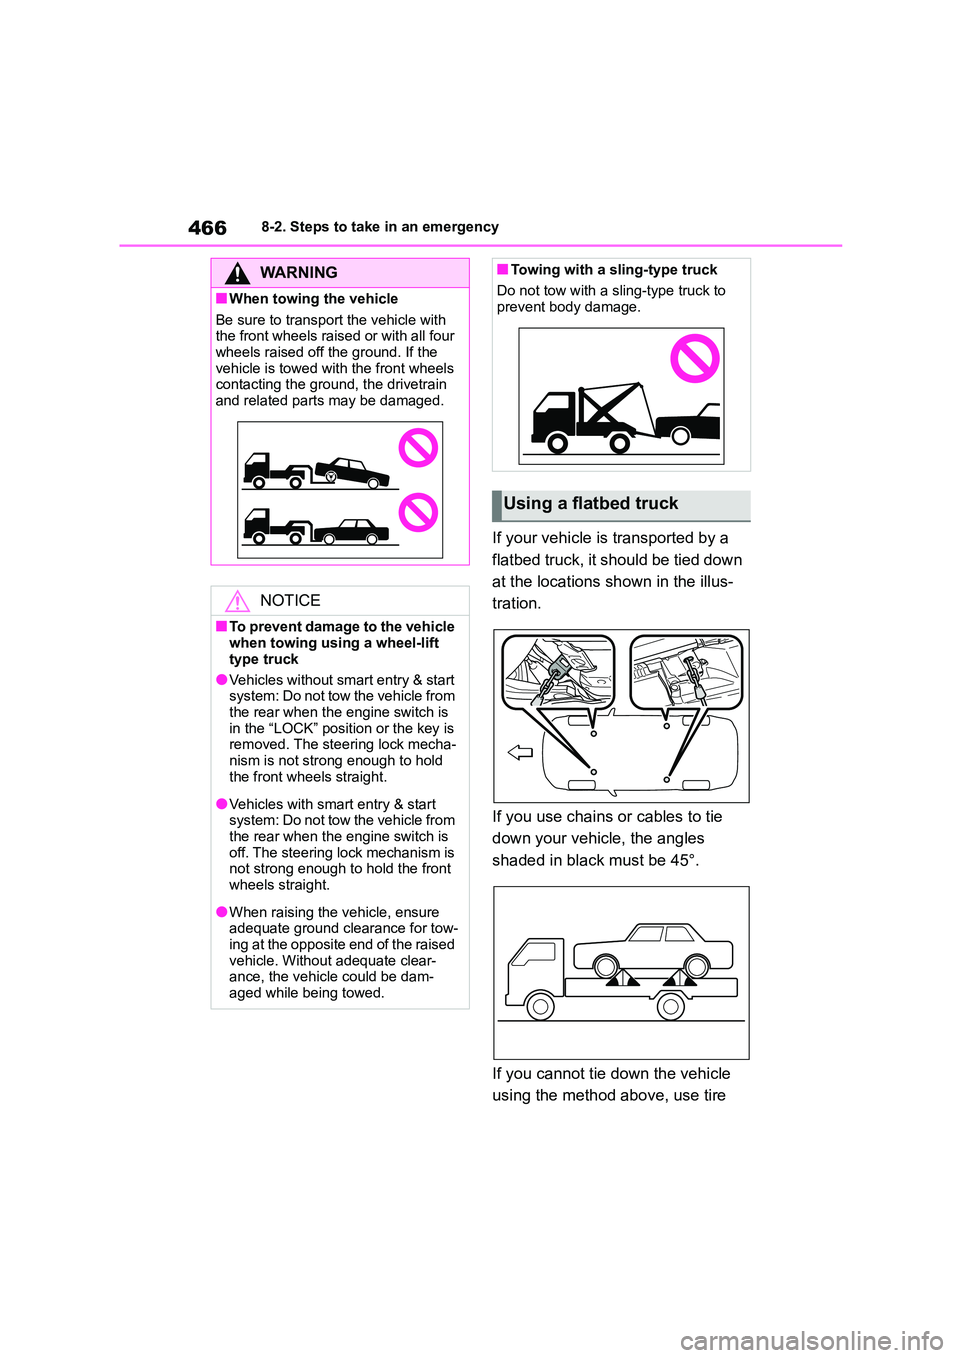
If your vehicle is transported by a
flatbed truck, it should be tied down
at the locations shown in the illus-
tration.
If you use chains or cables to tie
down your vehicle, the angles
shaded in black must be 45°.
If you cannot tie down the vehicle
using the method above, use tire
WA R N I N G
■When towing the vehicle
Be sure to transport the vehicle with
the front wheels raised or with all four wheels raised off the ground. If the
vehicle is towed with the front wheels
contacting the ground, the drivetrain and related parts may be damaged.
NOTICE
■To prevent damage to the vehicle
when towing using a wheel-lift
type truck
●Vehicles without smart entry & start
system: Do not tow the vehicle from
the rear when the engine switch is in the “LOCK” position or the key is
removed. The steering lock mecha-
nism is not strong enough to hold
the front wheels straight.
●Vehicles with smart entry & start
system: Do not tow the vehicle from the rear when the engine switch is
off. The steering lock mechanism is
not strong enough to hold the front wheels straight.
●When raising the vehicle, ensure adequate ground clearance for tow-
ing at the opposite end of the raised
vehicle. Without adequate clear- ance, the vehicle could be dam-
aged while being towed.
■Towing with a sling-type truck
Do not tow with a sling-type truck to
prevent body damage.
Using a flatbed truck
Page 486 of 678
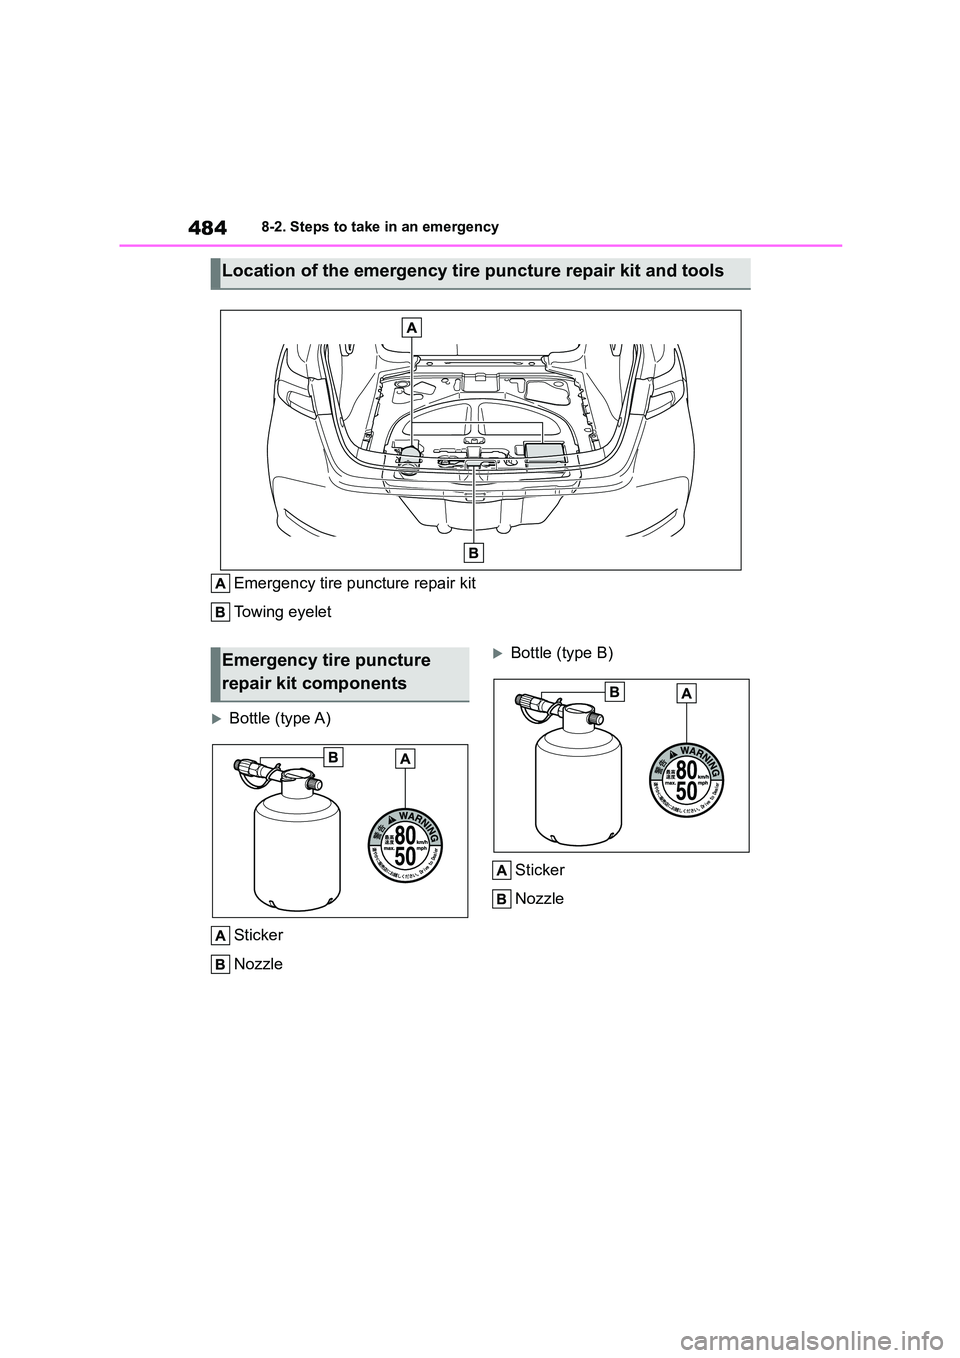
4848-2. Steps to take in an emergency
Emergency tire puncture repair kit
Towing eyelet
Bottle (type A)
Sticker
Nozzle
Bottle (type B)
Sticker
Nozzle
Location of the emergency tire puncture repair kit and tools
Emergency tire puncture
repair kit components
Page 487 of 678
485
8
8-2. Steps to take in an emergency
When trouble arises
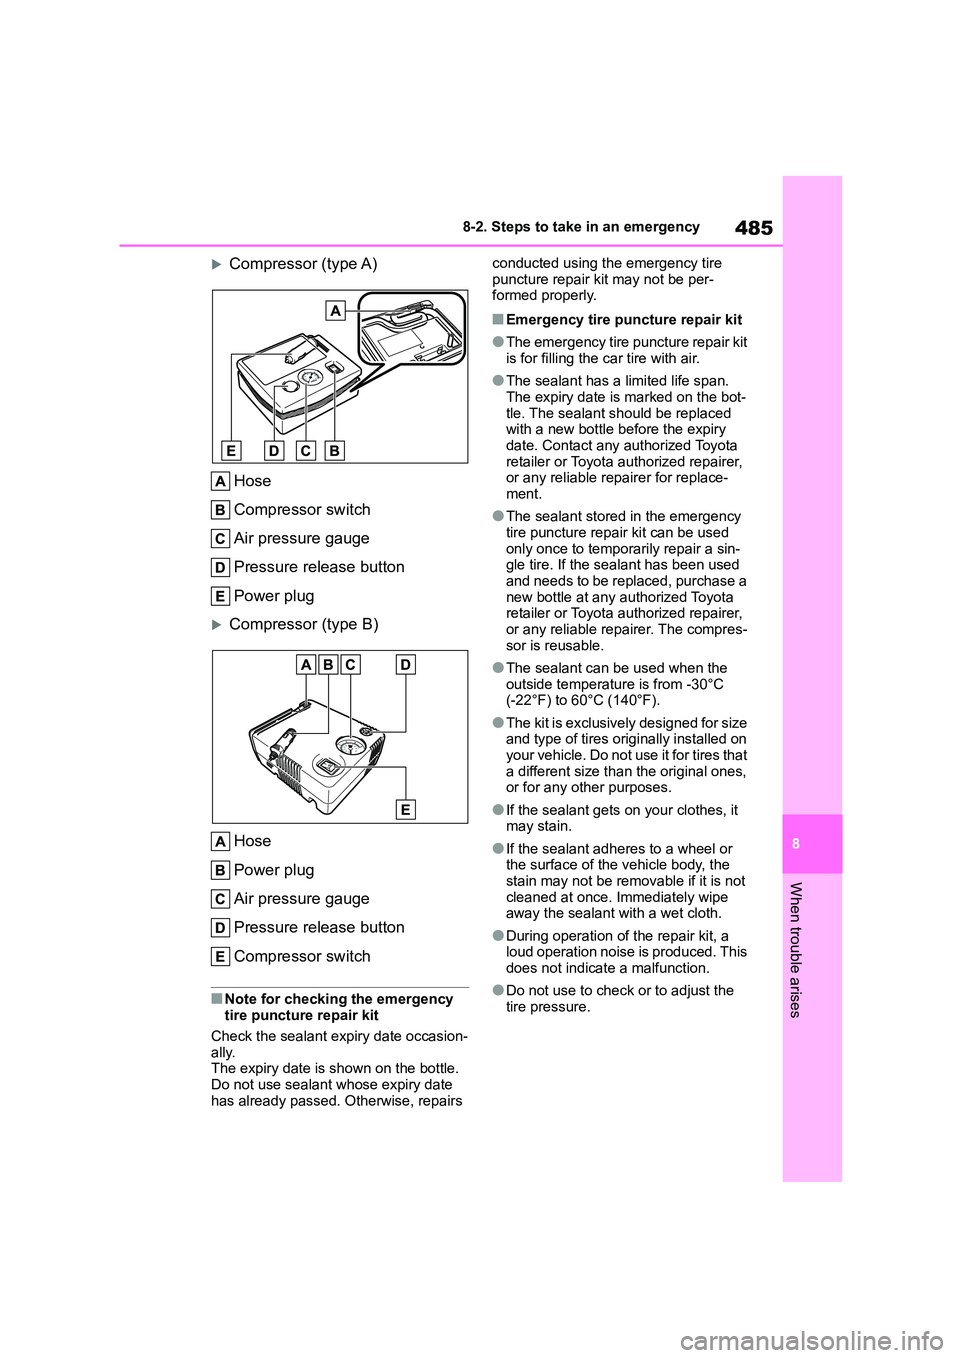
Compressor (type A)
Hose
Compressor switch
Air pressure gauge
Pressure release button
Power plug
Compressor (type B)
Hose
Power plug
Air pressure gauge
Pressure release button
Compressor switch
■Note for checking the emergency tire puncture repair kit
Check the sealant expiry date occasion-
ally. The expiry date is shown on the bottle.
Do not use sealant whose expiry date
has already passed. Otherwise, repairs
conducted using the emergency tire
puncture repair kit may not be per- formed properly.
■Emergency tire puncture repair kit
●The emergency tire puncture repair kit is for filling the car tire with air.
●The sealant has a limited life span. The expiry date is marked on the bot-
tle. The sealant should be replaced
with a new bottle before the expiry date. Contact any authorized Toyota
retailer or Toyota authorized repairer,
or any reliable repairer for replace- ment.
●The sealant stored in the emergency tire puncture repair kit can be used
only once to temporarily repair a sin-
gle tire. If the sealant has been used and needs to be replaced, purchase a
new bottle at any authorized Toyota
retailer or Toyota authorized repairer, or any reliable repairer. The compres-
sor is reusable.
●The sealant can be used when the
outside temperature is from -30°C
(-22°F) to 60°C (140°F).
●The kit is exclusively designed for size
and type of tires originally installed on your vehicle. Do not use it for tires that
a different size than the original ones,
or for any other purposes.
●If the sealant gets on your clothes, it
may stain.
●If the sealant adheres to a wheel or
the surface of the vehicle body, the stain may not be removable if it is not
cleaned at once. Immediately wipe
away the sealant with a wet cloth.
●During operation of the repair kit, a
loud operation noise is produced. This
does not indicate a malfunction.
●Do not use to check or to adjust the
tire pressure.
Page 493 of 678

491
8
8-2. Steps to take in an emergency
When trouble arises
fied air pressure is reached.
Drive for about 5 km (3 miles)
and then perform step 24.
27 Store the compressor in the
trunk.
28 Taking precautions to avoid sud-
den braking, sudden accelera-
tion and sharp turns, drive
carefully at under 80 km/h (50
mph) to the nearest any author-
ized Toyota reta iler or Toyota
authorized repairer, or any relia-
ble repairer for tire repair or
replacement.
When having the tire repaired or
replaced, make sure to tell any author-
ized Toyota retailer or Toyota author- ized repairer, or any reliable repairer
that the sealant is injected.
Type B
1 Take out the repair kit.
2 Attach the sticker provided with
the tire puncture repair kit to a
position easily seen from the
driver's seat.
3 Remove the valve cap from the
valve of the punctured tire.
4 Remove the cap from the noz-
zle.
5 Connect the nozzle to the valve.
Screw the end of the nozzle clockwise
as far as possible.
The bottle should hang vertically with- out contacting the ground. If the bottle
does not hang vertically, move the vehi-
cle so that the tire valve is located prop- erly.
Page 498 of 678

4968-2. Steps to take in an emergency
2 Check that the air pressure indicator
shows the specified air pressure.
If the air pressure is under the desig-
nated pressure, turn the compressor
switch on (type A) or (on) (type B)
again and repeat the inflation procedure
until the specified air pressure is
reached.
■After a tire is repaired with the emergency tire puncture repair kit
●The tire pressure warning valve and transmitter should be replaced.
●Even if the tire inflation pressure is at the recommended level, the tire pres-
sure warning light may come on/flash.
WA R N I N G
■Do not drive the vehicle with a
flat tire
Do not continue driving with a flat tire.
Driving even a short distance with a
flat tire can damage the tire and the wheel beyond repair.
Driving with a flat tire may cause a cir-
cumferential groove on the side wall. In such a case, t he tire may explode
when using a repair kit.
■When fixing the flat tire
●Stop your vehicle in a safe and flat
area.
●Do not touch the wheels or the area
around the brakes immediately after the vehicle has been driven.
After the vehicle has been driven,
the wheels and the area around the brakes may be extremely hot.
Touching these areas with hands,
feet or other body parts may result in burns.
●Connect the valve and hose securely with the tire installed on
the vehicle. If the hose is not prop-
erly connected to the valve, air leakage may occur as sealant may
be sprayed out.
●If the hose comes off the valve while inflating the tire, there is a risk
that the hose will move abruptly due
to air pressure.
●After inflation of the tire has com-
pleted, the sealant may splatter when the hose is disconnected or
some air is let out of the tire.
●Follow the operation procedure to
repair the tire. If the procedures not
followed, the sealant may spray out.
●Keep back from the tire while it is
being repaired, as there is a chance of it bursting while the repair opera-
tion is being performed. If you
notice any cracks or deformation of
the tire, turn off (type A) or (off)
(type B) the compressor switch and
stop the repair operation immedi- ately.
●The repair kit may overheat if oper-ated for a long period of time. Do
not operate the repair kit continu-
ously for more than 40 minutes.
●Parts of the repair kit become hot
during operation. Be careful when handling the repair kit during and
after operation. Do not touch the
metal part around the connecting area between the bottle and com-
pressor. It will be extremely hot.
●Do not attach the vehicle speed
warning sticker to an area other
than the one indicated. If the sticker is attached to an area where an
SRS airbag is located, such as the
pad of the steering wheel, it may
prevent the SRS airbag from oper- ating properly.
Page 537 of 678
535
9
9-1. Specifications
Vehicle specifications
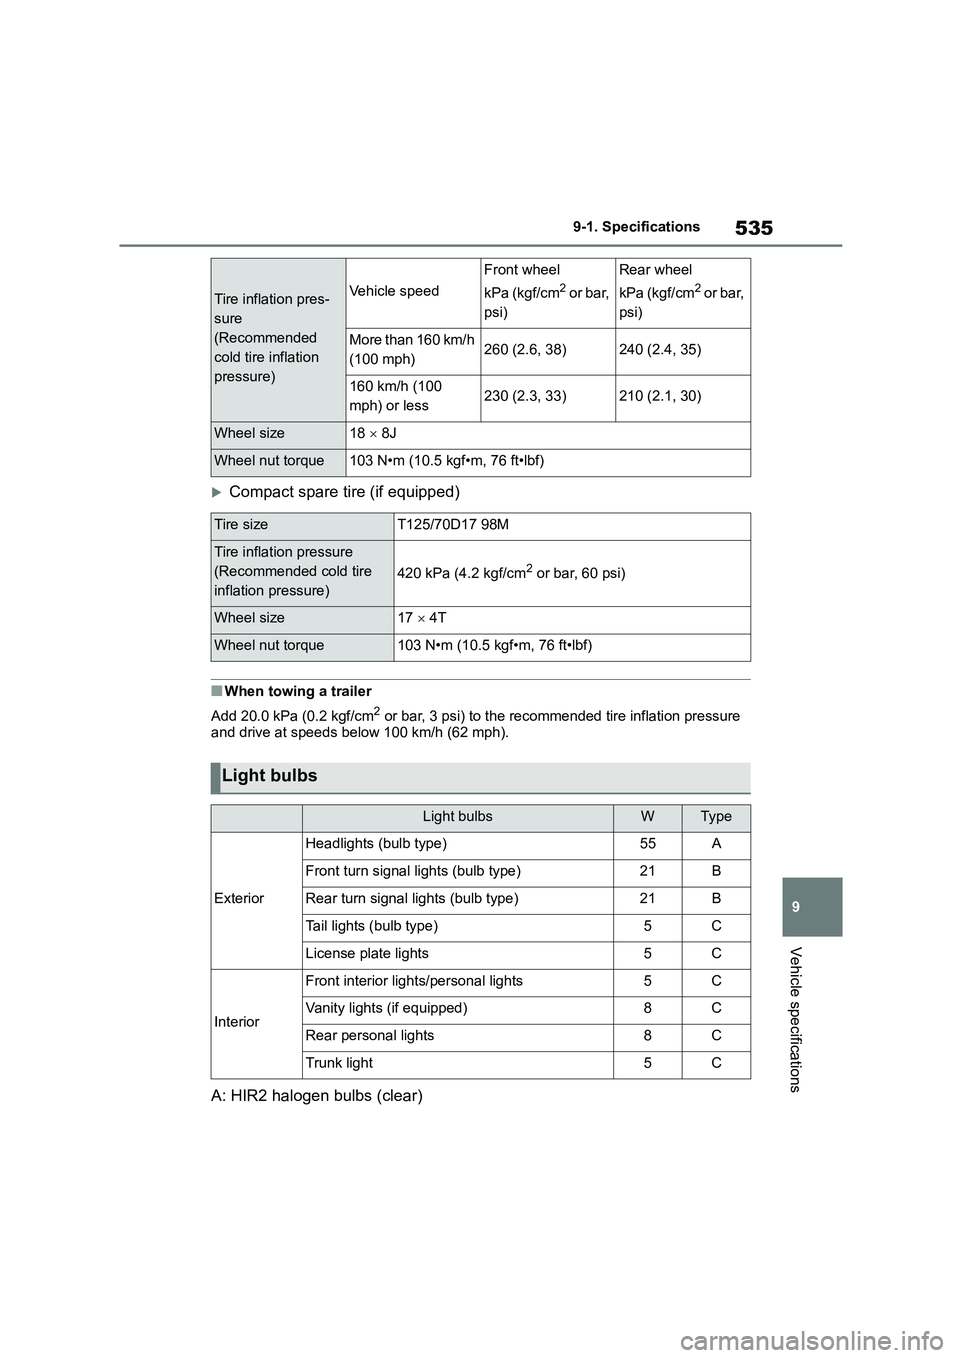
Compact spare tire (if equipped)
■When towing a trailer
Add 20.0 kPa (0.2 kgf/cm2 or bar, 3 psi) to the recommended tire inflation pressure
and drive at speeds below 100 km/h (62 mph).
A: HIR2 halogen bulbs (clear)
Tire inflation pres-
sure
(Recommended
cold tire inflation
pressure)
Vehicle speed
Front wheel
kPa (kgf/cm2 or bar,
psi)
Rear wheel
kPa (kgf/cm2 or bar,
psi)
More than 160 km/h
(100 mph)260 (2.6, 38)240 (2.4, 35)
160 km/h (100
mph) or less230 (2.3, 33)210 (2.1, 30)
Wheel size18 8J
Wheel nut torque103 N•m (10.5 kgf•m, 76 ft•lbf)
Tire sizeT125/70D17 98M
Tire inflation pressure
(Recommended cold tire
inflation pressure)
420 kPa (4.2 kgf/cm2 or bar, 60 psi)
Wheel size17 4T
Wheel nut torque103 N•m (10.5 kgf•m, 76 ft•lbf)
Light bulbs
Light bulbsWTy p e
Exterior
Headlights (bulb type)55A
Front turn signal lights (bulb type)21B
Rear turn signal lights (bulb type)21B
Tail lights (bulb type)5C
License plate lights5C
Interior
Front interior lights/personal lights5C
Vanity lights (if equipped)8C
Rear personal lights8C
Trunk light5C