weight TOYOTA COROLLA 2022 Owners Manual (in English)
[x] Cancel search | Manufacturer: TOYOTA, Model Year: 2022, Model line: COROLLA, Model: TOYOTA COROLLA 2022Pages: 678, PDF Size: 147.24 MB
Page 50 of 678

481-2. Child safety
• Fixed with a seat belt: P.59
• Fixed with an ISOFIX lower
anchorage: P.61
• Using a top tether anchorage:
P. 6 2
Prioritize and observe the warn-
ings, as well as the laws and reg-
ulations for child restraint
systems.
Use a child restraint system until
the child becomes large enough
to properly wear the vehicle’s
seat belt.
Choose a child restraint system
appropriate to the age and size
of the child.
Note that not all child restraint
systems can fit in all vehicles.
Before using or purchasing a
child restraint system, check the
compatibility of th e child restraint
system with seat positions.
( P. 5 2 )
Points to remember
WA R N I N G
■When a child is riding
Observe the following precautions.
Failure to do so may result in death or
serious injury.
●For effective protection in automo- bile accidents and sudden stops, a
child must be properly restrained,
using a seat belt or child restraint system which is corr ectly installed.
For installation details, refer to the
operation manual enclosed with the child restraint system. General
installation instruction is provided in
this manual.
●Toyota strongly urges the use of a
proper child rest raint system that conforms to the weight and size of
the child, installed on the rear seat.
According to accident statistics, the child is safer when properly
restrained in the rear seat than in
the front seat.
●Holding a child in your or someone
else’s arms is not a substitute for a child restraint system. In an acci-
dent, the child can be crushed
against the windshield or between the holder and the interior of the
vehicle.
■Handling the child restraint sys-
tem
If the child restraint system is not properly fixed in place, the child or
other passengers may be seriously
injured or even killed in the event of sudden braking, sudden swerving, or
an accident.
●If the vehicle were to receive a
strong impact from an accident,
etc., it is possible that the child restraint system has damage that is
not readily visible. In such cases,
do not reuse the restraint system.
Page 54 of 678
521-2. Child safety
■Child restraint system compat-
ibility for each seating posi-
tion
Compatibility of eac h seating posi-
tion with child restraint systems
( P.53) displays the type of child
restraint systems that can be used
and possible seating positions for
installation using symbols.
Also, the recommended child
restraint system that is suitable for
your child can be selected.
Otherwise, check [Recommended
child restraint systems and Com-
patibility table] for recommended
child restraint systems. ( P. 5 6 )
Check the selected child restraint
system together with the following
[Before confirming the compatibility
of each seating position with child
restraint systems].
■Before confirming the compat-
ibility of each seating position
with child restraint systems
1 Checking the child restraint sys-
tem standards.
Use a child restraint system that
conforms to UN(ECE) R44*1 or
UN(ECE) R129*1, 2.
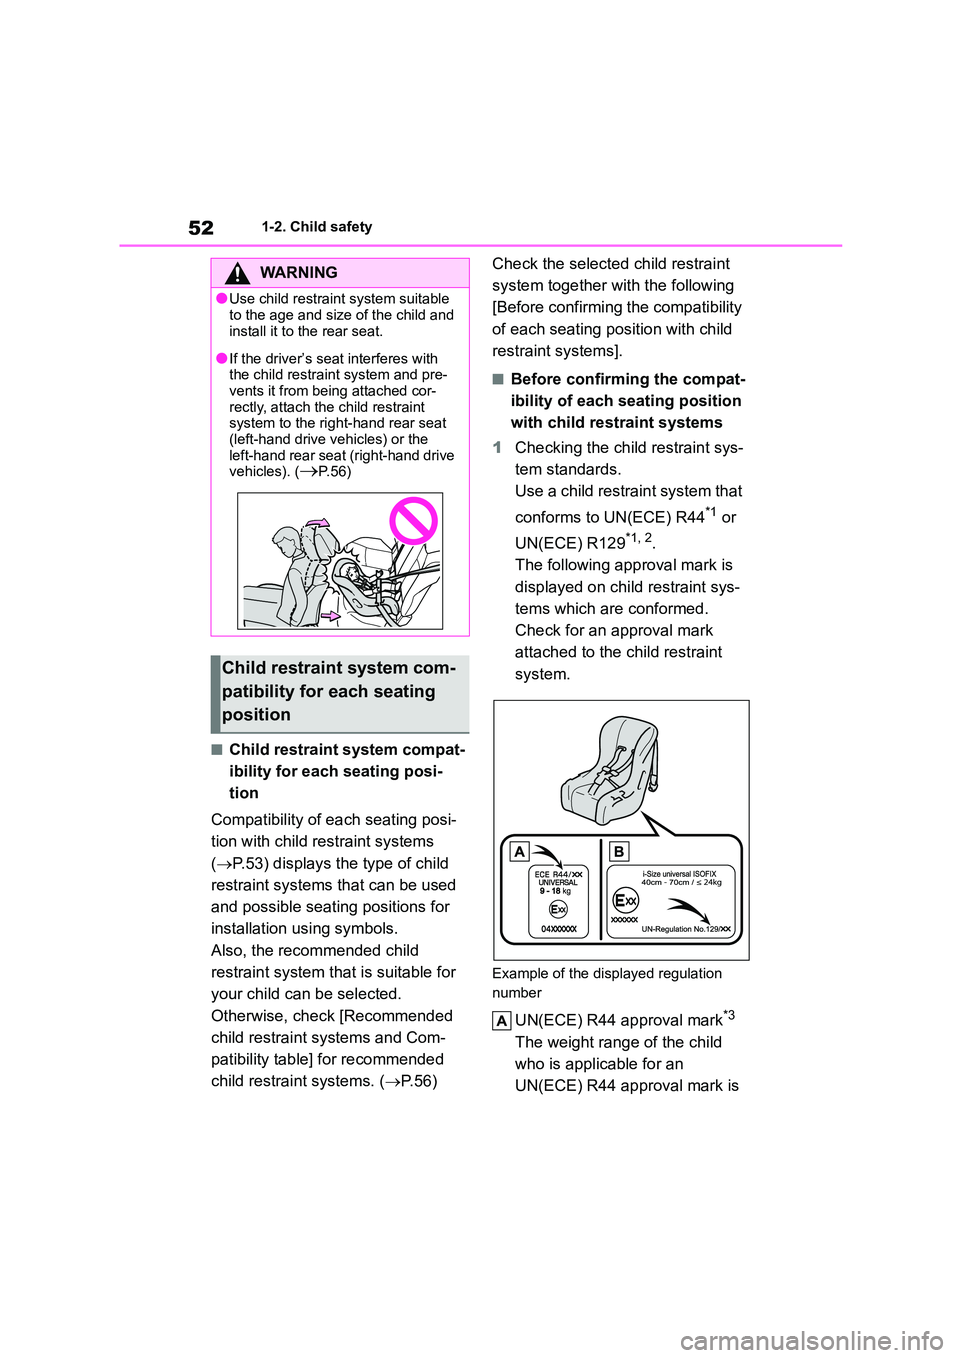
The following approval mark is
displayed on child restraint sys-
tems which are conformed.
Check for an approval mark
attached to the child restraint
system.
Example of the displayed regulation
number
UN(ECE) R44 approval mark*3
The weight range of the child
who is applicable for an
UN(ECE) R44 approval mark is
WA R N I N G
●Use child restraint system suitable
to the age and size of the child and
install it to the rear seat.
●If the driver’s seat interferes with
the child restraint system and pre- vents it from being attached cor-
rectly, attach the child restraint
system to the righ t-hand rear seat
(left-hand drive vehicles) or the left-hand rear seat (right-hand drive
vehicles). (P. 5 6 )
Child restraint system com-
patibility for each seating
position
Page 55 of 678
53
1
1-2. Child safety
For safety and security
indicated.
UN(ECE) R129 approval mark*3
The height range of the child
who is applicable as well as
available weights for an
UN(ECE) R129 approval mark
is indicated.
2 Checking the category of the
child restraint system.
Check the approval mark of the
child restraint system for which
of the following categories the
child restraint system is suitable.
Also, if there are any uncertain-
ties, check the user’s guide
included with th e child restraint
system or contact the retailer of
the child rest raint system.
• “universal”
• “semi-universal”
• “restricted”
• “vehicle specific”
*1: UN(ECE) R44 and UN(ECE) R129
are U.N. regulations for child
restraint systems.
*2: The child restraint systems men-
tioned in the table may not be availa-
ble outside of the EU area.
*3: The displayed mark may differ
depending on the product.
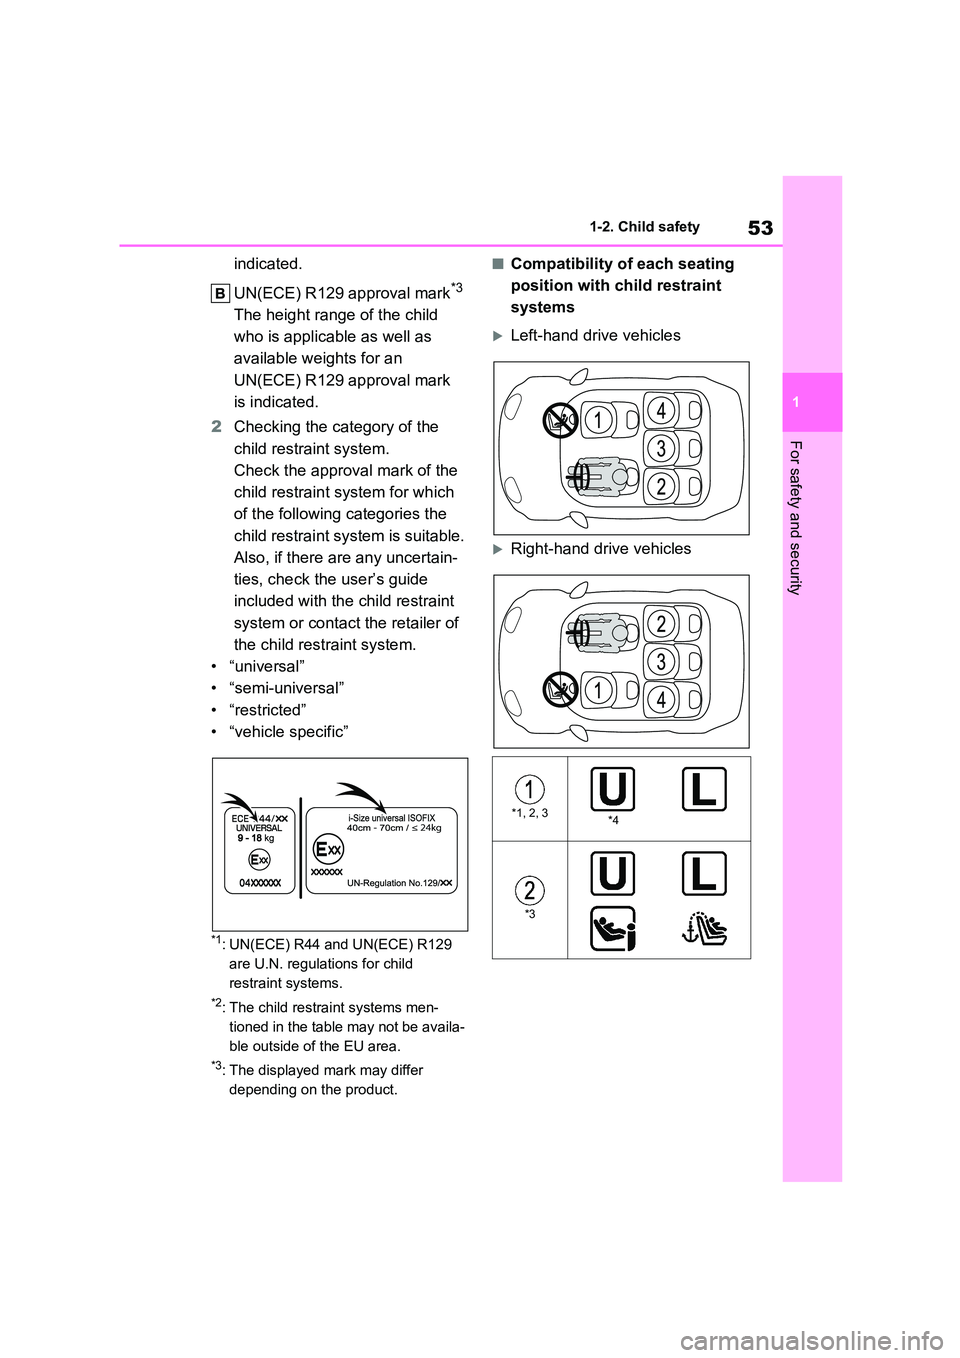
■Compatibility of each seating
position with child restraint
systems
Left-hand drive vehicles
Right-hand drive vehicles
*1, 2, 3*4
*3
Page 121 of 678
119
3
3-2. Opening, closing and locking the doors
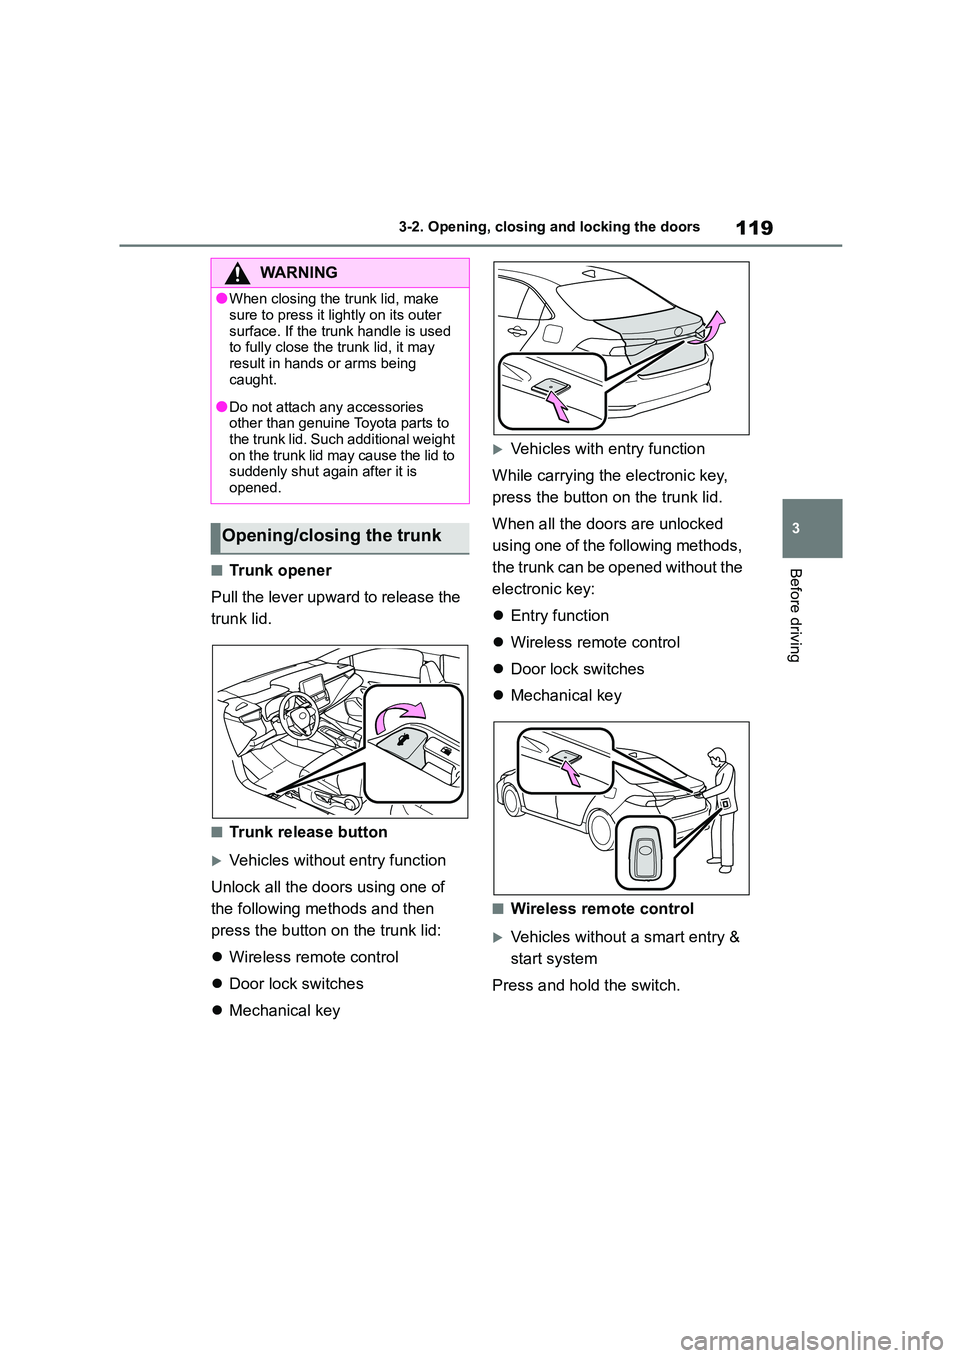
Before driving■Trunk opener
Pull the lever upward to release the
trunk lid.
■Trunk release button
Vehicles without entry function
Unlock all the doors using one of
the following methods and then
press the button on the trunk lid:
Wireless remote control
Door lock switches
Mechanical key
Vehicles with entry function
While carrying the electronic key,
press the button on the trunk lid.
When all the doors are unlocked
using one of the following methods,
the trunk can be opened without the
electronic key:
Entry function
Wireless remote control
Door lock switches
Mechanical key
■Wireless remote control
Vehicles without a smart entry &
start system
Press and hold the switch.
WA R N I N G
●When closing the trunk lid, make
sure to press it lightly on its outer
surface. If the trunk handle is used to fully close the trunk lid, it may
result in hands or arms being
caught.
●Do not attach any accessories
other than genuine Toyota parts to
the trunk lid. Such additional weight on the trunk lid may cause the lid to
suddenly shut again after it is
opened.
Opening/closing the trunk
Page 155 of 678
153
4
4-1. Before driving
Driving
Check the allowable towing capac-
ity, GVM (Gross Vehicle Mass),
MPAC (Maximum Permissible Axle
Capacity), and permissible drawbar
load before towing. ( P.524)
Toyota recommends the use of the
Toyota hitch/bracket for your vehi-
cle. Other products of a suitable
nature and comparable quality may
also be used.
For vehicles where the towing
device blocks any of the lights or
license plate, the following shall be
observed:
Do not use towing devices that
cannot be easily removed or
repositioned.
Towing devices must be
removed or repositioned when
not in use.
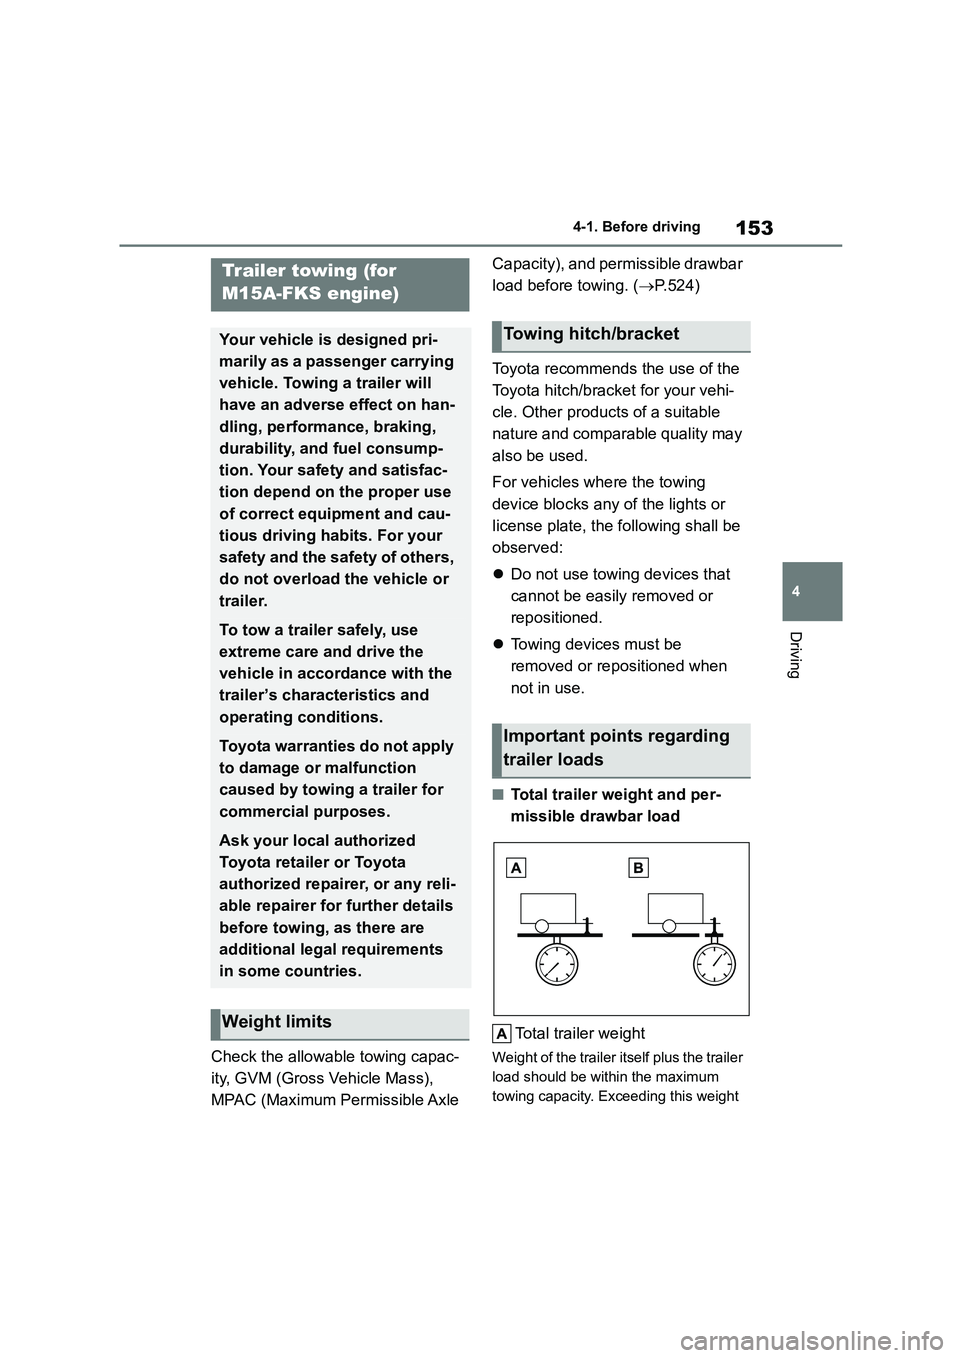
■Total trailer weight and per-
missible drawbar load
Total trailer weight
Weight of the trailer itself plus the trailer
load should be within the maximum
towing capacity. Exceeding this weight
Trailer towing (for
M15A-FKS engine)
Your vehicle is designed pri-
marily as a passenger carrying
vehicle. Towing a trailer will
have an adverse effect on han-
dling, performance, braking,
durability, and fuel consump-
tion. Your safety and satisfac-
tion depend on the proper use
of correct equipment and cau-
tious driving habits. For your
safety and the safety of others,
do not overload the vehicle or
trailer.
To tow a trailer safely, use
extreme care and drive the
vehicle in accordance with the
trailer’s characteristics and
operating conditions.
Toyota warranties do not apply
to damage or malfunction
caused by towing a trailer for
commercial purposes.
Ask your local authorized
Toyota retailer or Toyota
authorized repairer, or any reli-
able repairer for further details
before towing, as there are
additional legal requirements
in some countries.
Weight limits
Towing hitch/bracket
Important points regarding
trailer loads
Page 156 of 678
1544-1. Before driving
is dangerous. ( P.524)
When towing a trailer, use a friction
coupler or friction stabilizer (sway con-
trol device).
Permissible drawbar load
Allocate the trailer load so that the
drawbar load is greater than 25 kg
(55.1 lb.) or 4% of the towing capacity.
Do not let the drawbar load exceed the
indicated weight. ( P.524)
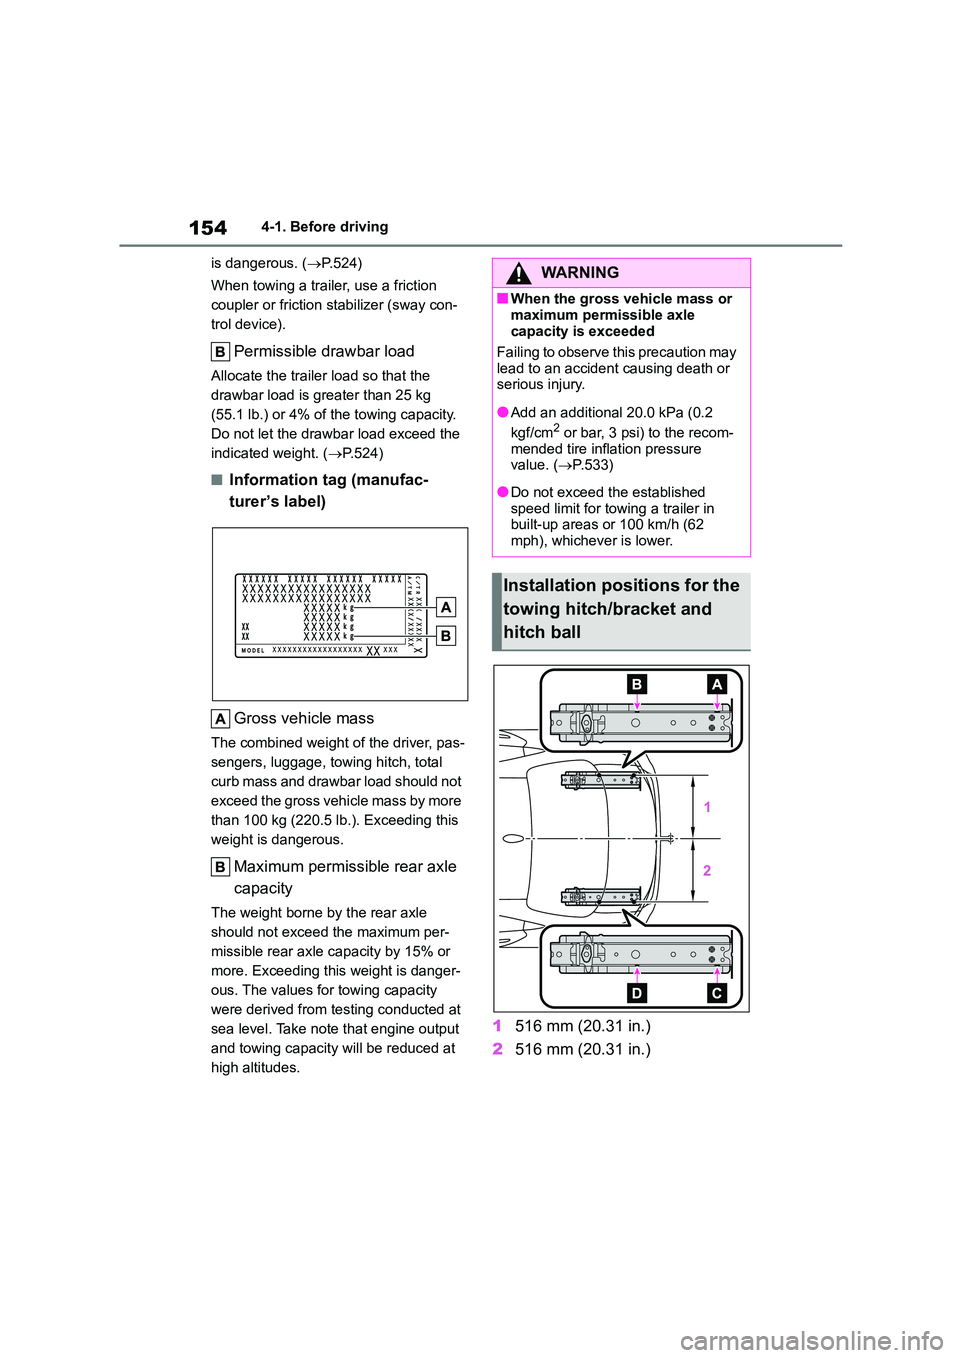
■Information tag (manufac-
turer’s label)
Gross vehicle mass
The combined weight of the driver, pas-
sengers, luggage, towing hitch, total
curb mass and drawbar load should not
exceed the gross vehicle mass by more
than 100 kg (220.5 lb.). Exceeding this
weight is dangerous.
Maximum permissible rear axle
capacity
The weight borne by the rear axle
should not exceed the maximum per-
missible rear axle capacity by 15% or
more. Exceeding this weight is danger-
ous. The values for towing capacity
were derived from testing conducted at
sea level. Take note that engine output
and towing capacity will be reduced at
high altitudes.
1 516 mm (20.31 in.)
2 516 mm (20.31 in.)
WA R N I N G
■When the gross vehicle mass or
maximum permissible axle
capacity is exceeded
Failing to observe this precaution may
lead to an accident causing death or
serious injury.
●Add an additional 20.0 kPa (0.2
kgf/cm2 or bar, 3 psi) to the recom-
mended tire inflation pressure
value. ( P.533)
●Do not exceed the established
speed limit for towing a trailer in built-up areas or 100 km/h (62
mph), whichever is lower.
Installation positions for the
towing hitch/bracket and
hitch ball
Page 157 of 678
155
4
4-1. Before driving
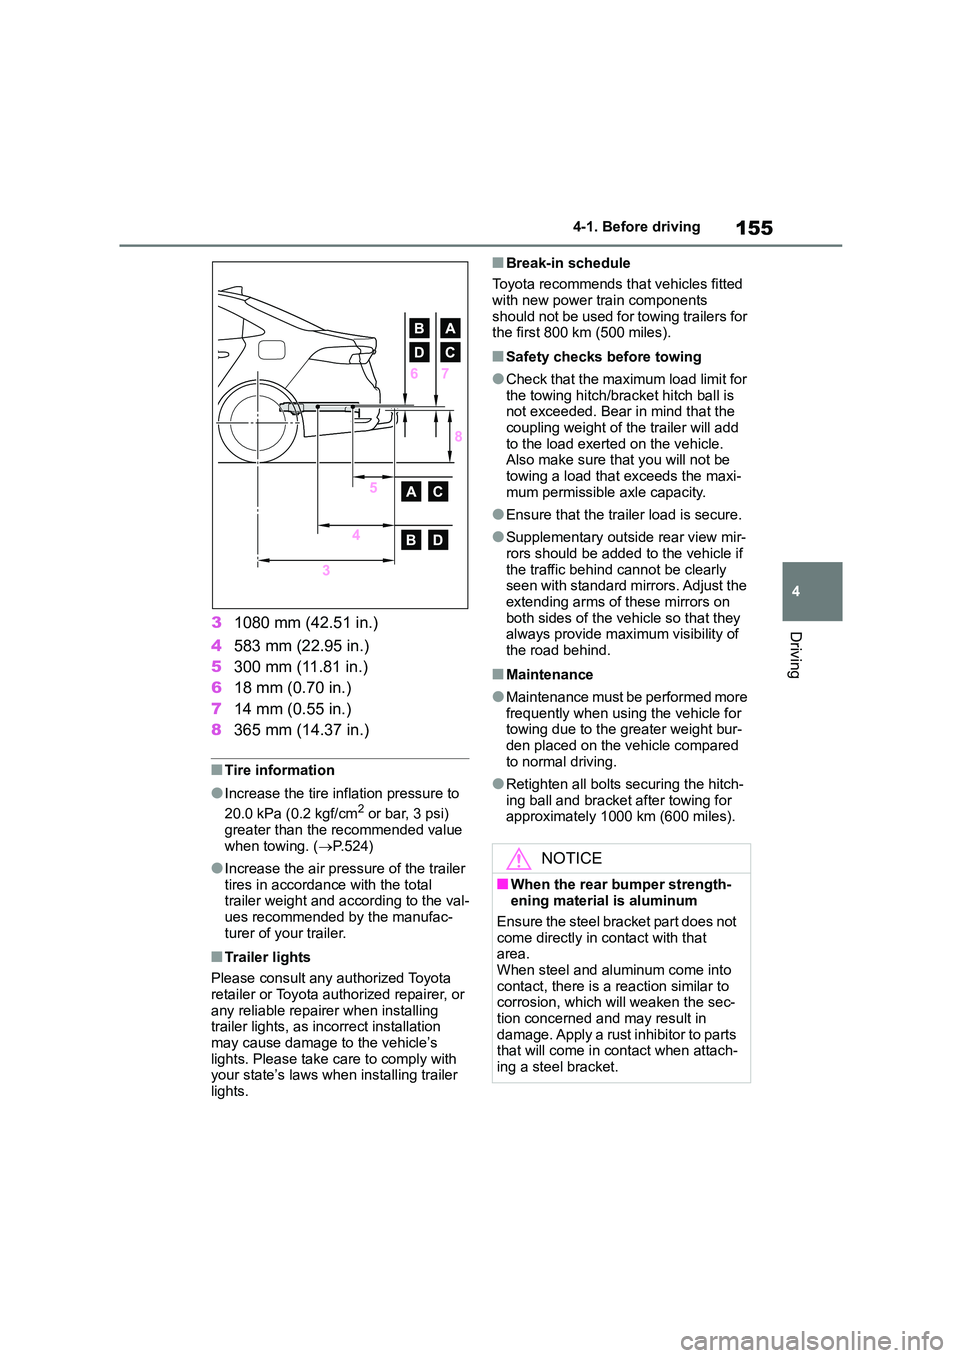
Driving3 1080 mm (42.51 in.)
4 583 mm (22.95 in.)
5 300 mm (11.81 in.)
6 18 mm (0.70 in.)
7 14 mm (0.55 in.)
8 365 mm (14.37 in.)
■Tire information
●Increase the tire inflation pressure to
20.0 kPa (0.2 kgf/cm2 or bar, 3 psi)
greater than the recommended value when towing. ( P.524)
●Increase the air pressure of the trailer tires in accordance with the total
trailer weight and according to the val-
ues recommended by the manufac- turer of your trailer.
■Trailer lights
Please consult any authorized Toyota
retailer or Toyota authorized repairer, or any reliable repairer when installing
trailer lights, as in correct installation
may cause damage to the vehicle’s lights. Please take care to comply with
your state’s laws when installing trailer
lights.
■Break-in schedule
Toyota recommends that vehicles fitted with new power train components
should not be used for towing trailers for
the first 800 km (500 miles).
■Safety checks before towing
●Check that the maximum load limit for
the towing hitch/bracket hitch ball is not exceeded. Bear in mind that the
coupling weight of the trailer will add
to the load exerted on the vehicle. Also make sure that you will not be
towing a load that exceeds the maxi-
mum permissible axle capacity.
●Ensure that the trailer load is secure.
●Supplementary outside rear view mir-
rors should be added to the vehicle if
the traffic behind cannot be clearly seen with standard mirrors. Adjust the
extending arms of these mirrors on
both sides of the vehicle so that they always provide maximum visibility of
the road behind.
■Maintenance
●Maintenance must be performed more
frequently when using the vehicle for
towing due to the greater weight bur- den placed on the vehicle compared
to normal driving.
●Retighten all bolts securing the hitch-
ing ball and bracket after towing for
approximately 1000 km (600 miles).
NOTICE
■When the rear bumper strength- ening material is aluminum
Ensure the steel bracket part does not
come directly in contact with that area.
When steel and aluminum come into
contact, there is a reaction similar to corrosion, which will weaken the sec-
tion concerned and may result in
damage. Apply a rust inhibitor to parts that will come in contact when attach-
ing a steel bracket.
Page 159 of 678
157
4
4-1. Before driving
Driving
of your vehicle and trailer and
ensure that the vehicle-to-vehicle
distance is sufficient before execut-
ing lane changes.
■Transmission information
Multidrive
To maintain engine braking effi-
ciency and charging system perfor-
mance when using engine braking,
do not use the transmission in D,
must be in M and select gear step 4
or lower. ( P. 1 6 5 )
Manual transmission
Refrain from driving in 6th gear to
maintain the effectiveness of
engine braking and to maintain
charging system performance.
■If the engine overheats
Towing a loaded trailer up a long,
steep incline in temperatures
exceeding 30°C (85°F) may result
in the engine overheating. If the
engine coolant temperature gauge
indicates that the engine is over-
heating, turn the air conditioning off
immediately, leave the road and
stop the vehicle in a safe place.
( P.518)
■When parking the vehicle
Always place wheel chocks under
the wheels of both the vehicle and
trailer. Firmly set the parking brake
and shift the shift lever to P
(Multidrive) and 1 or R (manual
transmission).
WA R N I N G
Follow all the instructions described in
this section. Failure to do so could
cause an accident resulting in death or serious injury.
■Trailer towing precautions
When towing, make sure that none of
the weight limits are exceeded.
( P.153)
■Vehicle speed in towing
Observe the legal maximum speeds
for trailer towing.
■Before descending hills or long
declines
Reduce speed and downshift. How-
ever, never downshift suddenly while
descending steep or long downhill grades.
■Operation of the brake pedal
Do not hold the brake pedal
depressed often or for long periods of
time. Doing so may result in the brake overheating or reduce braking effects.
■To avoid accident or injury
●Vehicles with a compact spare tire:
Do not tow a trailer when the com-
pact spare tire is installed on your vehicle.
●Vehicles with the emergency tire puncture repair kit: Do not tow a
trailer when the tire installed is
repaired with the emergency tire puncture repair kit.
●Do not use the following systems when trailer towing.
• Cruise control (if equipped)
• Dynamic radar cruise control (if
equipped)
• Dynamic radar cruise control with
full-speed range (if equipped)
Page 444 of 678
4427-3. Do-it-yourself maintenance
■The tire pressure warning sys-
tem must be init ialized in the
following circumstances:
When rotating front and rear tires
which have different tire inflation
pressures.
When changing the tire size.
When the tire inflation pressure
is changed such as when chang-
ing traveling speed or load
weight.
When the tire pressure warning
system is initialized , the current tire
inflation pressure is set as the
benchmark pressure.
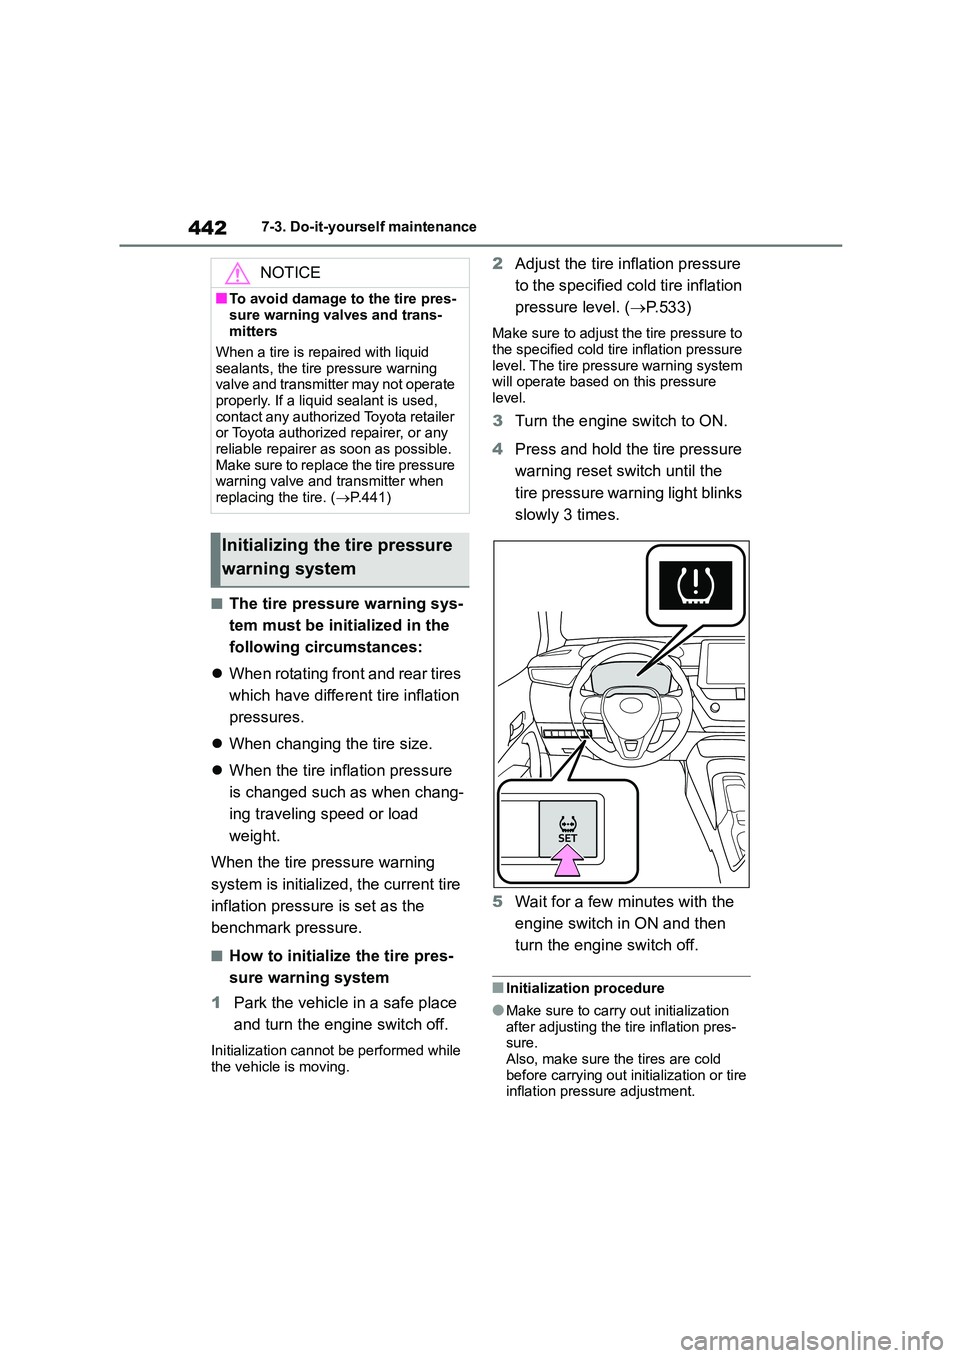
■How to initialize the tire pres-
sure warning system
1 Park the vehicle in a safe place
and turn the engine switch off.
Initialization cannot be performed while
the vehicle is moving.
2 Adjust the tire inflation pressure
to the specified co ld tire inflation
pressure level. ( P.533)
Make sure to adjust the tire pressure to
the specified cold tire inflation pressure level. The tire pressure warning system
will operate based on this pressure
level.
3 Turn the engine switch to ON.
4 Press and hold the tire pressure
warning reset switch until the
tire pressure warning light blinks
slowly 3 times.
5 Wait for a few minutes with the
engine switch in ON and then
turn the engine switch off.
■Initialization procedure
●Make sure to carry out initialization
after adjusting the tire inflation pres- sure.
Also, make sure the tires are cold
before carrying out initialization or tire inflation pressure adjustment.
NOTICE
■To avoid damage to the tire pres-
sure warning valves and trans-
mitters
When a tire is repaired with liquid
sealants, the tire pressure warning
valve and transmitter may not operate properly. If a liquid sealant is used,
contact any authorized Toyota retailer
or Toyota authorized repairer, or any
reliable repairer as soon as possible. Make sure to replace the tire pressure
warning valve and transmitter when
replacing the tire. ( P.441)
Initializing the tire pressure
warning system
Page 446 of 678
4447-3. Do-it-yourself maintenance
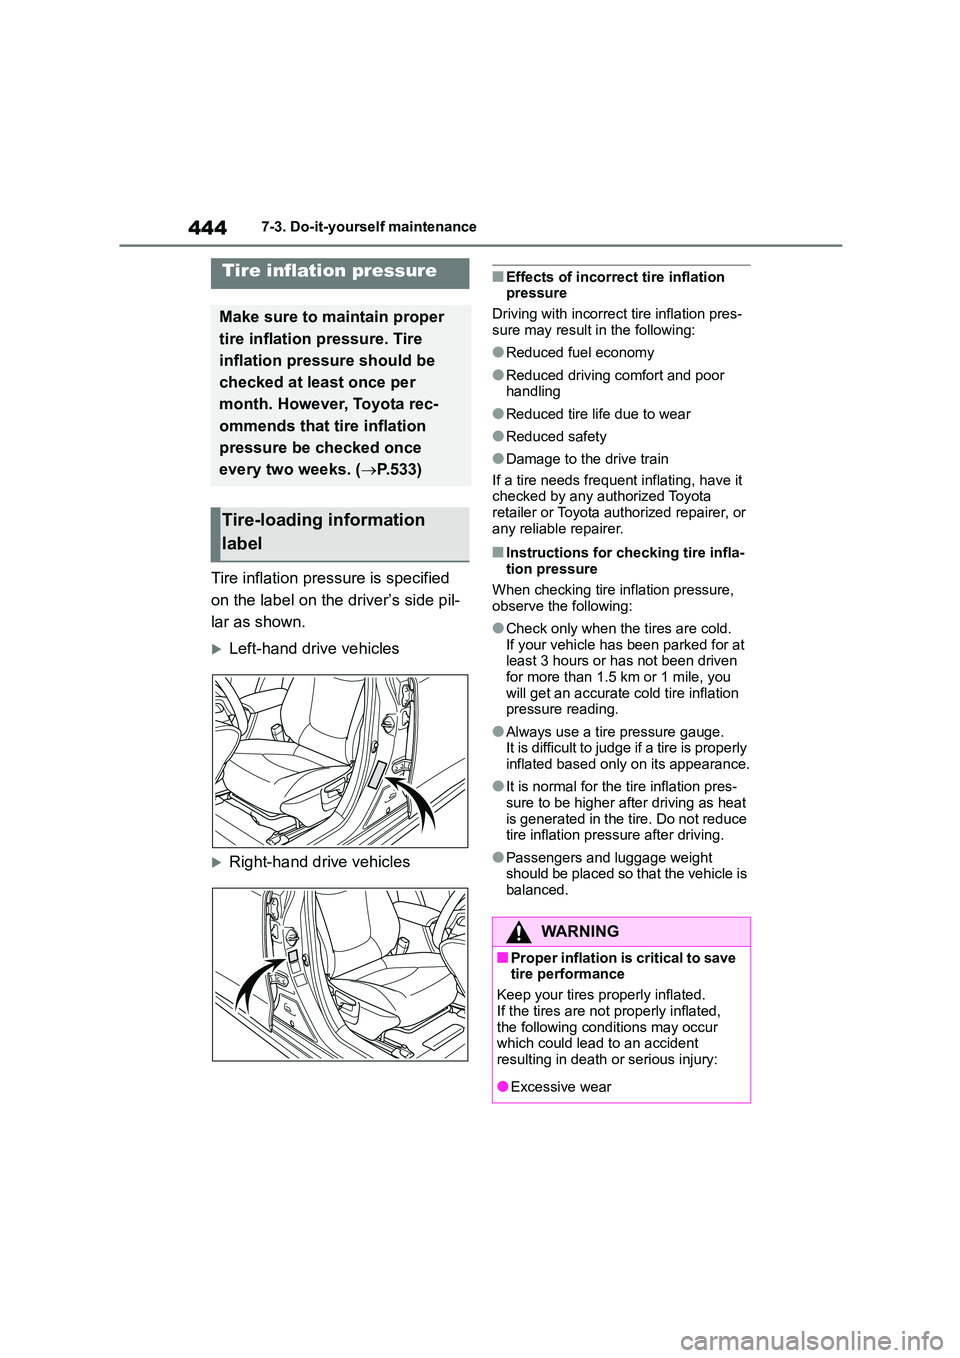
Tire inflation pressure is specified
on the label on the driver’s side pil-
lar as shown.
Left-hand drive vehicles
Right-hand drive vehicles
■Effects of incorrect tire inflation pressure
Driving with incorrect tire inflation pres-
sure may result in the following:
●Reduced fuel economy
●Reduced driving comfort and poor
handling
●Reduced tire life due to wear
●Reduced safety
●Damage to the drive train
If a tire needs frequent inflating, have it checked by any authorized Toyota
retailer or Toyota authorized repairer, or
any reliable repairer.
■Instructions for checking tire infla- tion pressure
When checking tire inflation pressure,
observe the following:
●Check only when the tires are cold.
If your vehicle has been parked for at least 3 hours or has not been driven
for more than 1.5 km or 1 mile, you
will get an accurate cold tire inflation pressure reading.
●Always use a tire pressure gauge.It is difficult to judge if a tire is properly
inflated based only on its appearance.
●It is normal for the tire inflation pres-
sure to be higher after driving as heat
is generated in the tire. Do not reduce
tire inflation pressure after driving.
●Passengers and luggage weight
should be placed so that the vehicle is balanced.
Tire inflation pressure
Make sure to maintain proper
tire inflation pressure. Tire
inflation pressure should be
checked at least once per
month. However, Toyota rec-
ommends that tire inflation
pressure be checked once
every two weeks. ( P.533)
Tire-loading information
label
WA R N I N G
■Proper inflation is critical to save
tire performance
Keep your tires properly inflated.
If the tires are not properly inflated,
the following conditions may occur which could lead to an accident
resulting in death or serious injury:
●Excessive wear