TOYOTA COROLLA CROSS 2023 Owners Manual
Manufacturer: TOYOTA, Model Year: 2023, Model line: COROLLA CROSS, Model: TOYOTA COROLLA CROSS 2023Pages: 500, PDF Size: 15.11 MB
Page 371 of 500
3716-3. Do-it-yourself maintenance
6
Maintenance and care
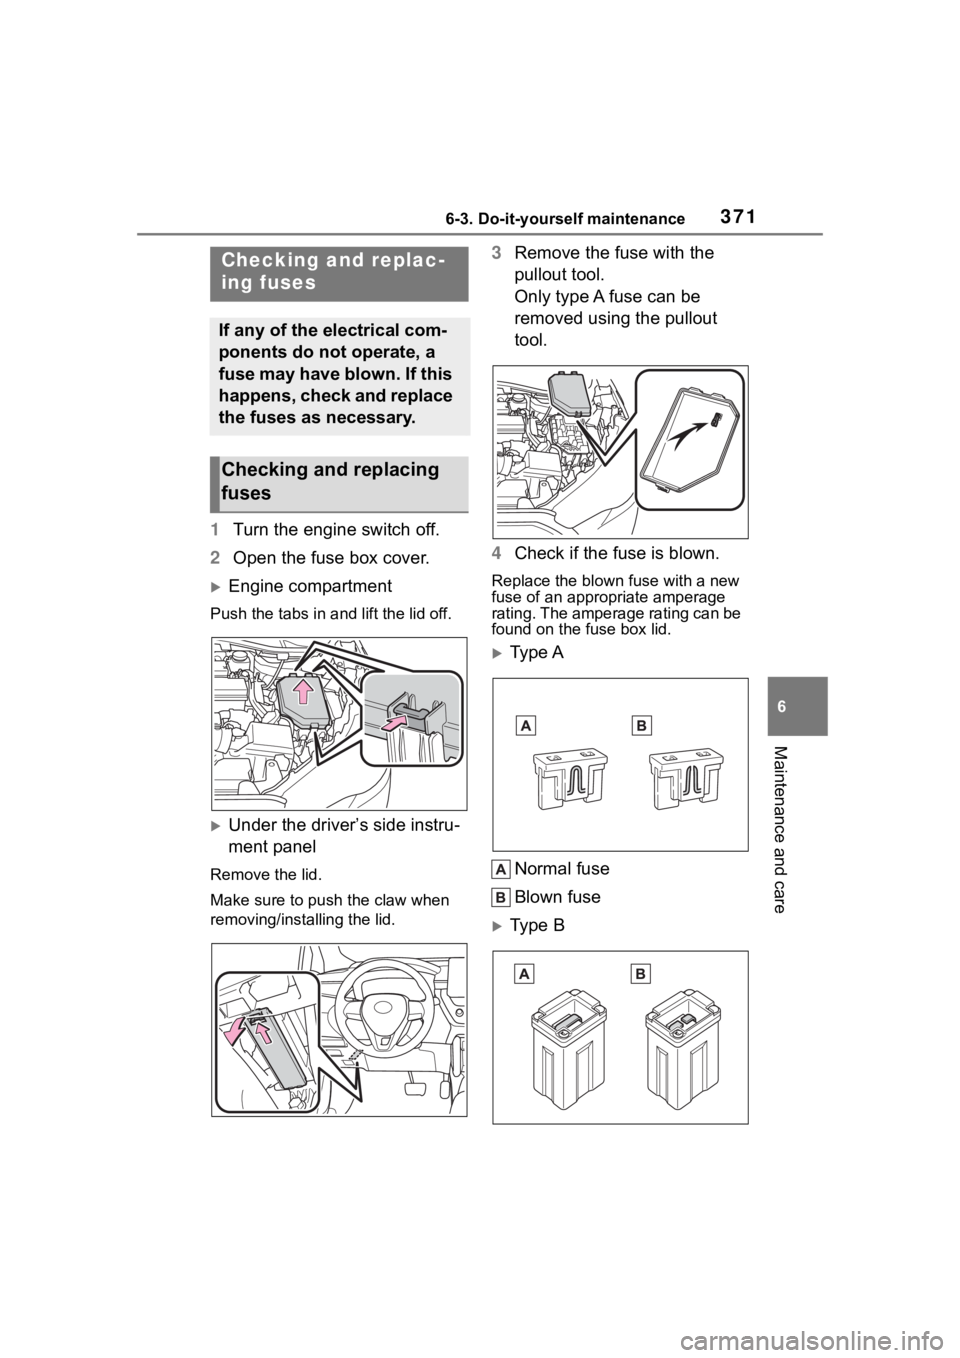
1Turn the engine switch off.
2 Open the fuse box cover.
Engine compartment
Push the tabs in and lift the lid off.
Under the driver’s side instru-
ment panel
Remove the lid.
Make sure to push the claw when
removing/installing the lid.
3Remove the fuse with the
pullout tool.
Only type A fuse can be
removed using the pullout
tool.
4 Check if the fuse is blown.
Replace the blown fuse with a new
fuse of an appropriate amperage
rating. The amperage rating can be
found on the fuse box lid.
Type A
Normal fuse
Blown fuse
Type B
Checking and replac-
ing fuses
If any of the electrical com-
ponents do not operate, a
fuse may have blown. If this
happens, check and replace
the fuses as necessary.
Checking and replacing
fuses
Page 372 of 500
3726-3. Do-it-yourself maintenance
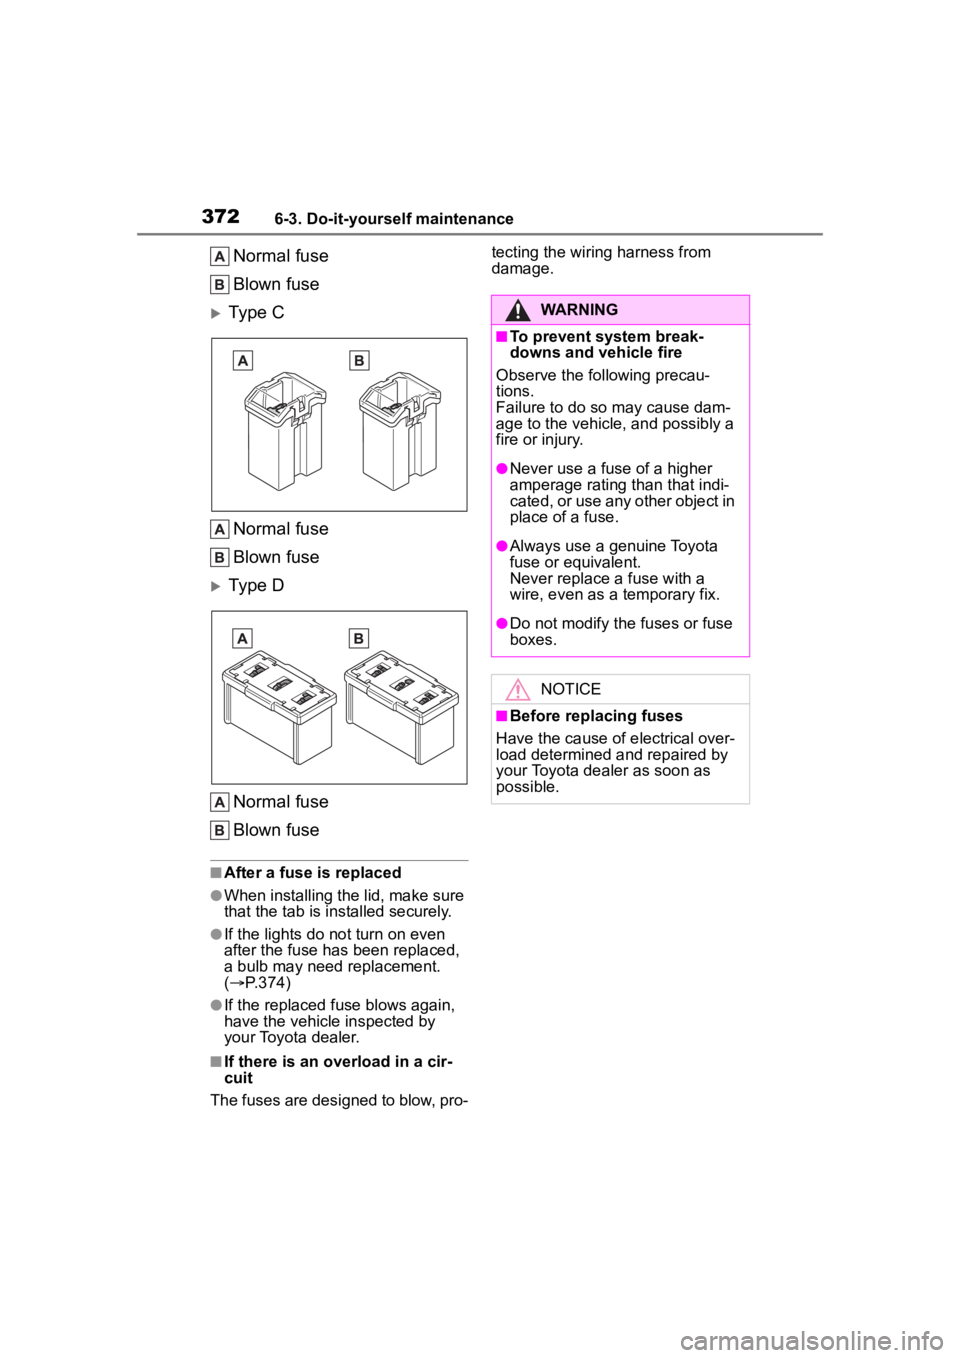
Normal fuse
Blown fuse
Type C
Normal fuse
Blown fuse
Type DNormal fuse
Blown fuse
■After a fuse is replaced
●When installing the lid, make sure
that the tab is installed securely.
●If the lights do n ot turn on even
after the fuse has been replaced,
a bulb may need replacement.
( P.374)
●If the replaced fuse blows again,
have the vehicle inspected by
your Toyota dealer.
■If there is an overload in a cir-
cuit
The fuses are designed to blow, pro- tecting the wiring harness from
damage.
WARNING
■To prevent system break-
downs and vehicle fire
Observe the following precau-
tions.
Failure to do so may cause dam-
age to the vehicle, and possibly a
fire or injury.
●Never use a fuse of a higher
amperage rating than that indi-
cated, or use any other object in
place of a fuse.
●Always use a genuine Toyota
fuse or equivalent.
Never replace a fuse with a
wire, even as a temporary fix.
●Do not modify the fuses or fuse
boxes.
NOTICE
■Before replacing fuses
Have the cause of electrical over-
load determined and repaired by
your Toyota dealer as soon as
possible.
Page 373 of 500
3736-3. Do-it-yourself maintenance
6
Maintenance and care
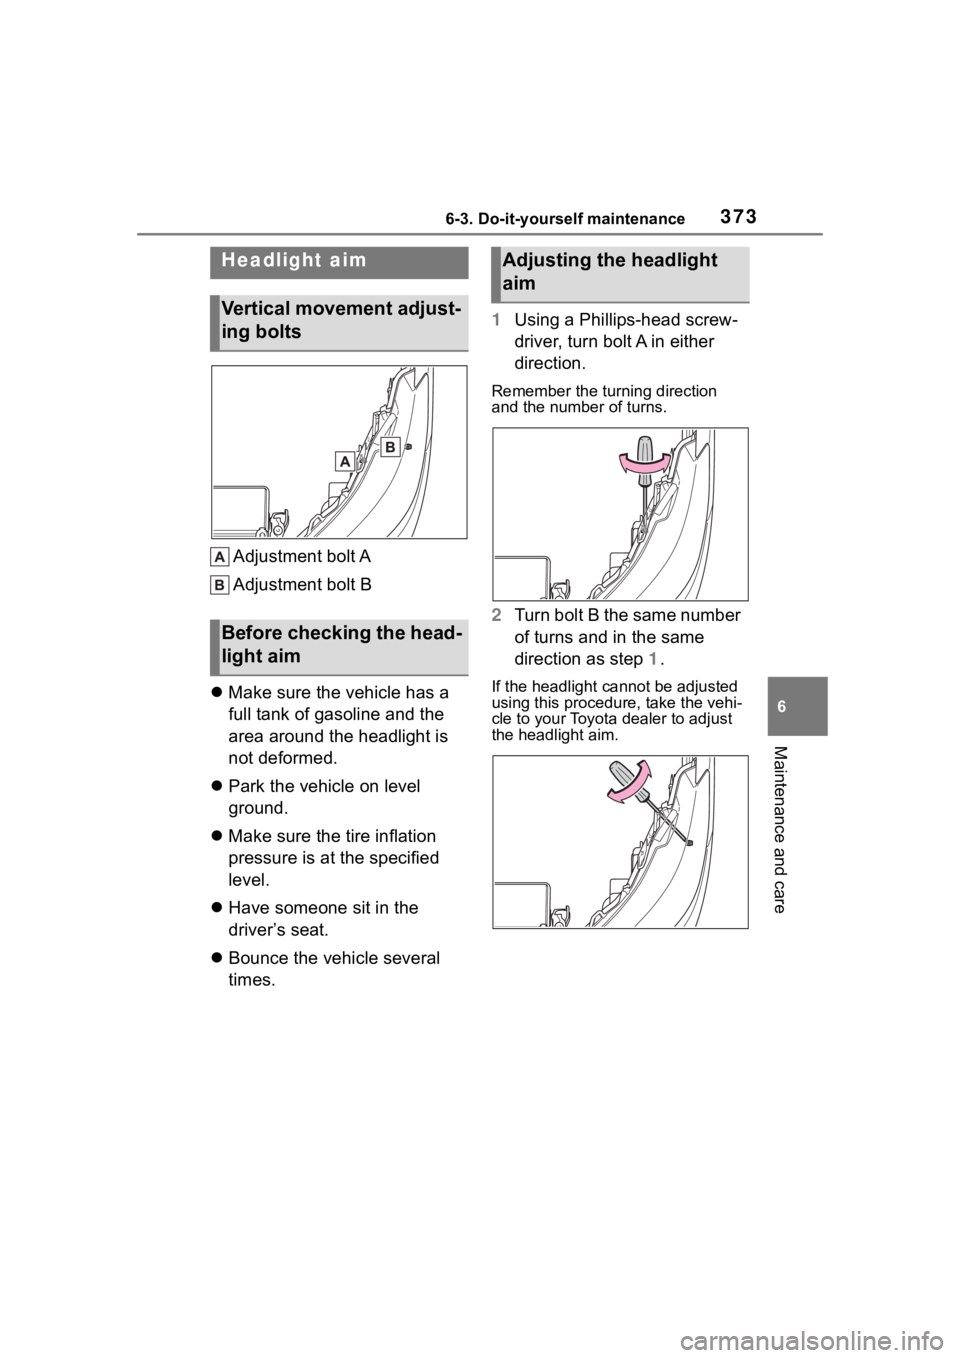
Adjustment bolt A
Adjustment bolt B
Make sure the vehicle has a
full tank of gasoline and the
area around the headlight is
not deformed.
Park the vehicle on level
ground.
Make sure the tire inflation
pressure is at the specified
level.
Have someone sit in the
driver’s seat.
Bounce the vehicle several
times. 1
Using a Phillips-head screw-
driver, turn bolt A in either
direction.
Remember the turning direction
and the number of turns.
2Turn bolt B the same number
of turns and in the same
direction as step 1.
If the headlight cannot be adjusted
using this procedu re, take the vehi-
cle to your Toyota dealer to adjust
the headlight aim.
Headlight aim
Vertical movement adjust-
ing bolts
Before checking the head-
light aim
Adjusting the headlight
aim
Page 374 of 500
3746-3. Do-it-yourself maintenance
Check the wattage of the light
bulb to be replaced. ( P.435)
P. 1 1 6
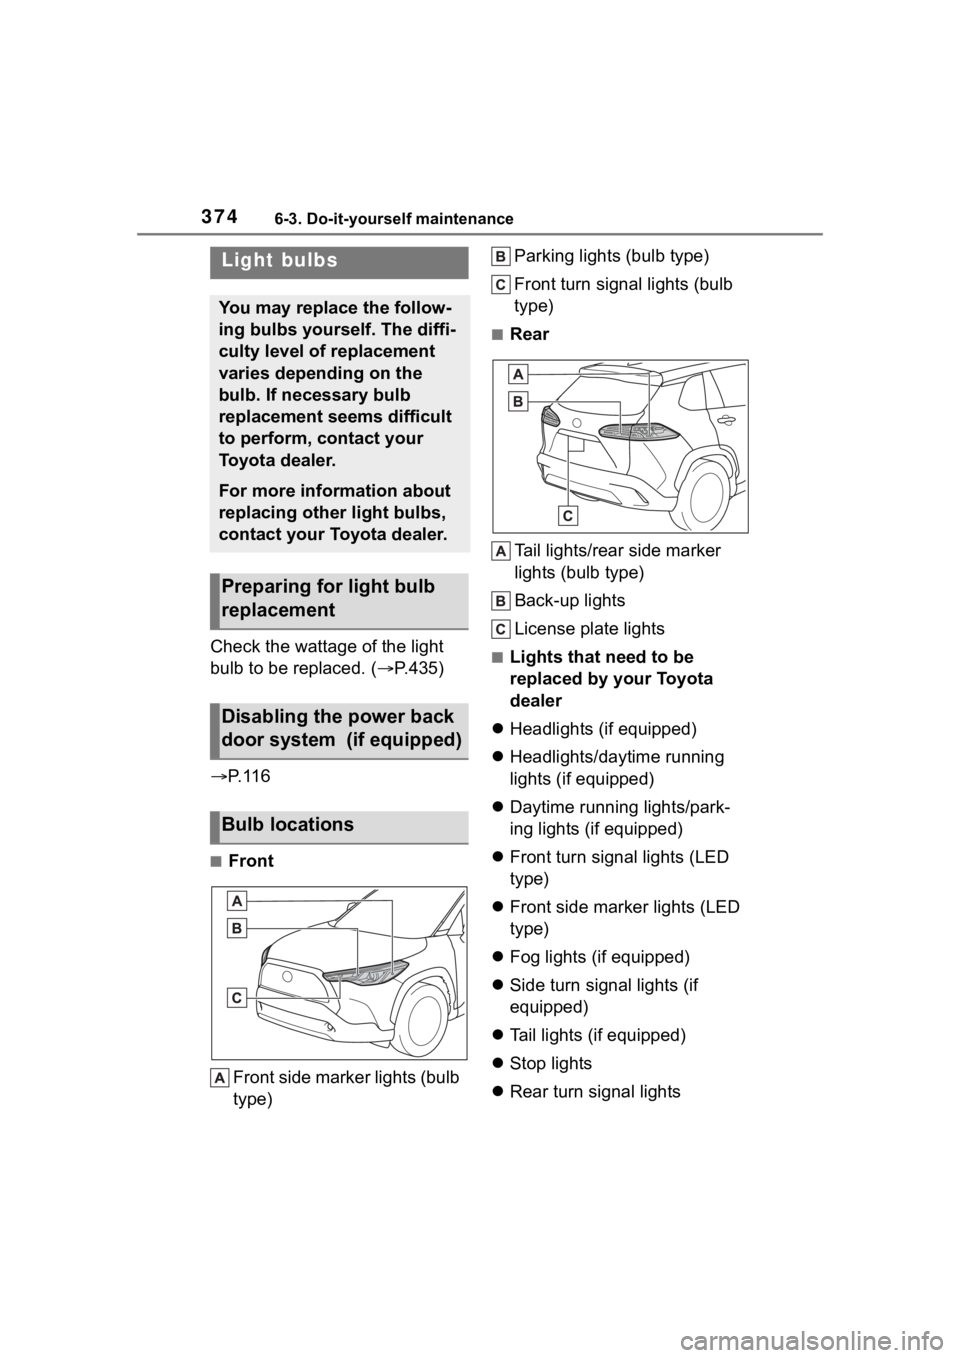
■Front
Front side marker lights (bulb
type) Parking lights (bulb type)
Front turn signal lights (bulb
type)
■Rear
Tail lights/rear side marker
lights (bulb type)
Back-up lights
License plate lights
■Lights that need to be
replaced by your Toyota
dealer
Headlights (if equipped)
Headlights/daytime running
lights (if equipped)
Daytime running lights/park-
ing lights (if equipped)
Front turn signal lights (LED
type)
Front side marker lights (LED
type)
Fog lights (if equipped)
Side turn signal lights (if
equipped)
Tail lights (if equipped)
Stop lights
Rear turn signal lights
Light bulbs
You may replace the follow-
ing bulbs yourself. The diffi-
culty level of replacement
varies depending on the
bulb. If necessary bulb
replacement seems difficult
to perform, contact your
Toyota dealer.
For more information about
replacing other light bulbs,
contact your Toyota dealer.
Preparing for light bulb
replacement
Disabling the power back
door system (if equipped)
Bulb locations
Page 375 of 500
3756-3. Do-it-yourself maintenance
6
Maintenance and care
High mounted stoplight
■LED light bulbs
The lights other than the following
lights each consist of a number of
LEDs. If any of the LEDs burn out,
take your vehicle to your Toyota
dealer to have the light replaced.
●Front side marker lights (bulb
type)
●Parking lights (bulb type)
●Front turn signal lights (bulb type)
●Tail lights/rear side marker lights
(bulb type)
●Back-up lights
●License plate lights
■Condensation build-up on the
inside of the lens
Temporary condensation build-up
on the inside of the headlight lens
does not indicate a malfunction.
Contact your Toyota dealer for more
information in the following situa-
tions:
●Large drops of water have built up
on the inside of the lens.
●Water has built up inside the
headlight.
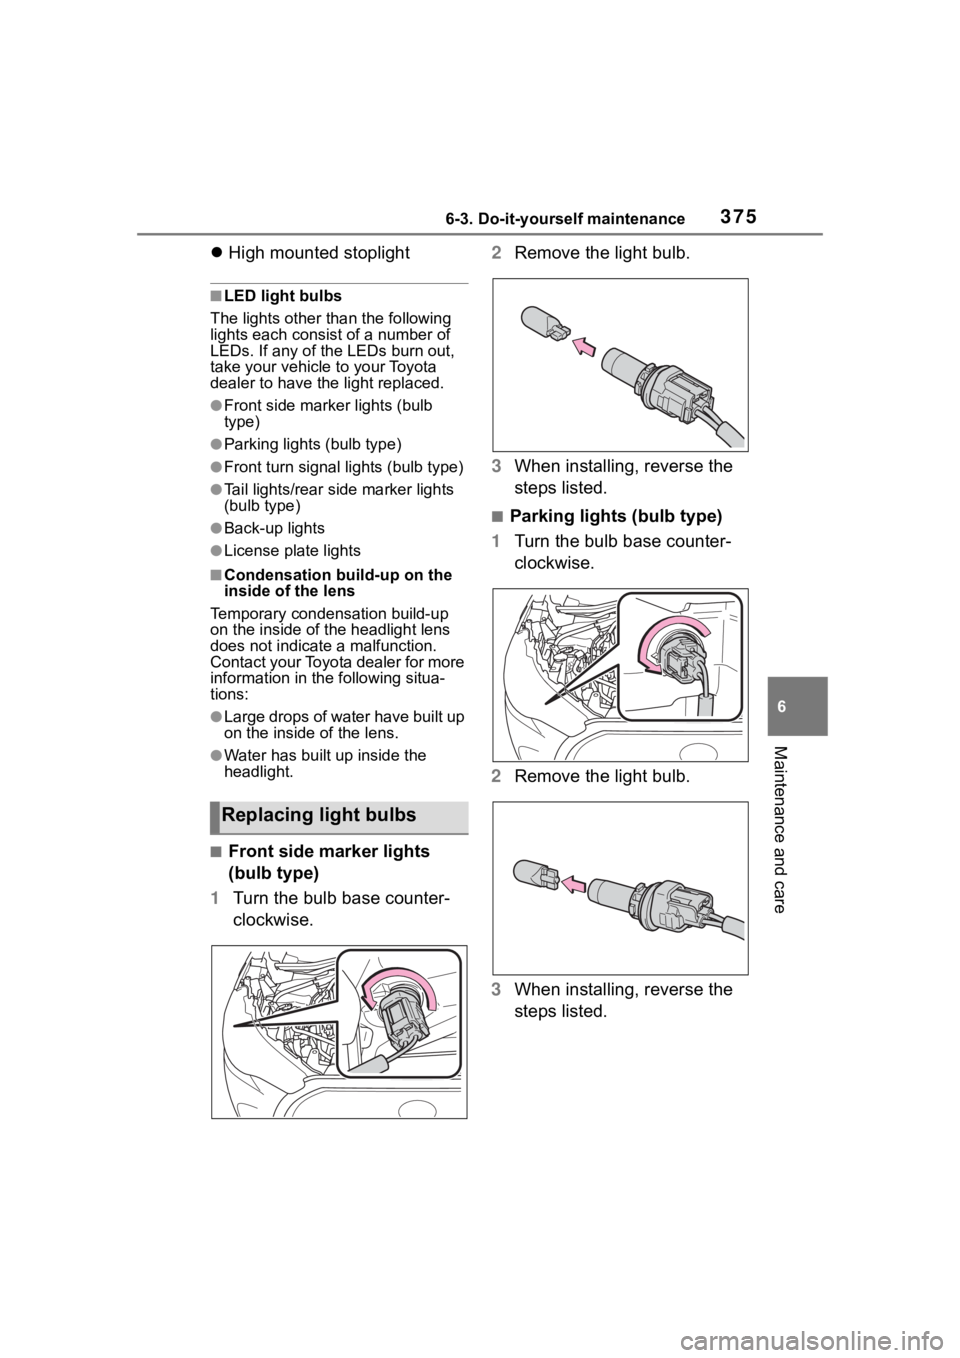
■Front side marker lights
(bulb type)
1 Turn the bulb base counter-
clockwise. 2
Remove the light bulb.
3 When installing, reverse the
steps listed.
■Parking lights (bulb type)
1 Turn the bulb base counter-
clockwise.
2 Remove the light bulb.
3 When installing, reverse the
steps listed.
Replacing light bulbs
Page 376 of 500
3766-3. Do-it-yourself maintenance
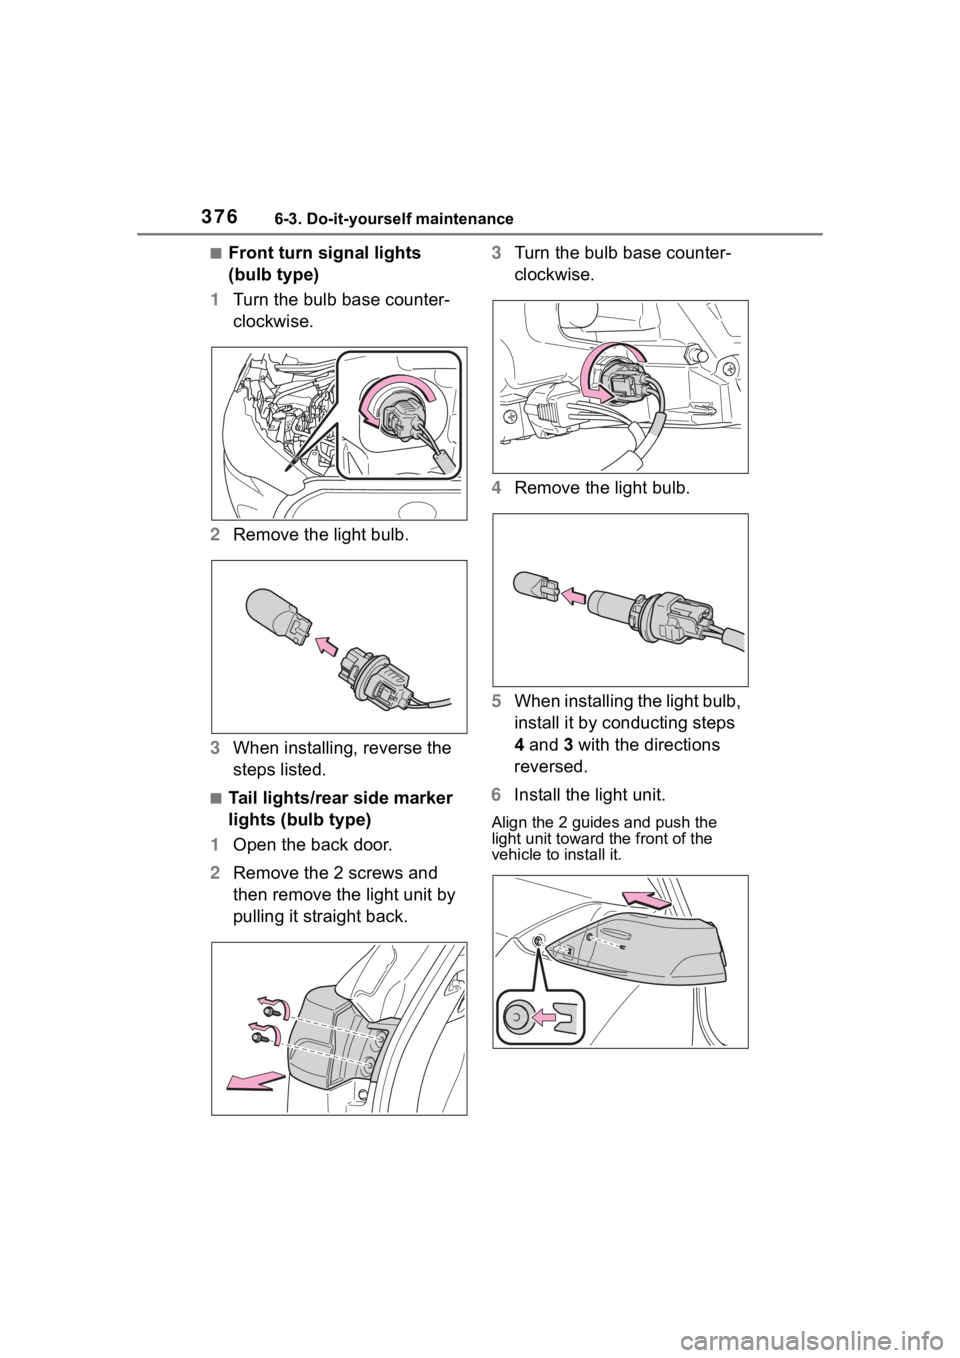
■Front turn signal lights
(bulb type)
1 Turn the bulb base counter-
clockwise.
2 Remove the light bulb.
3 When installing, reverse the
steps listed.
■Tail lights/rear side marker
lights (bulb type)
1 Open the back door.
2 Remove the 2 screws and
then remove the light unit by
pulling it straight back. 3
Turn the bulb base counter-
clockwise.
4 Remove the light bulb.
5 When installing the light bulb,
install it by conducting steps
4 and 3 with the directions
reversed.
6 Install the light unit.
Align the 2 guides and push the
light unit toward the front of the
vehicle to install it.
Page 377 of 500
3776-3. Do-it-yourself maintenance
6
Maintenance and care
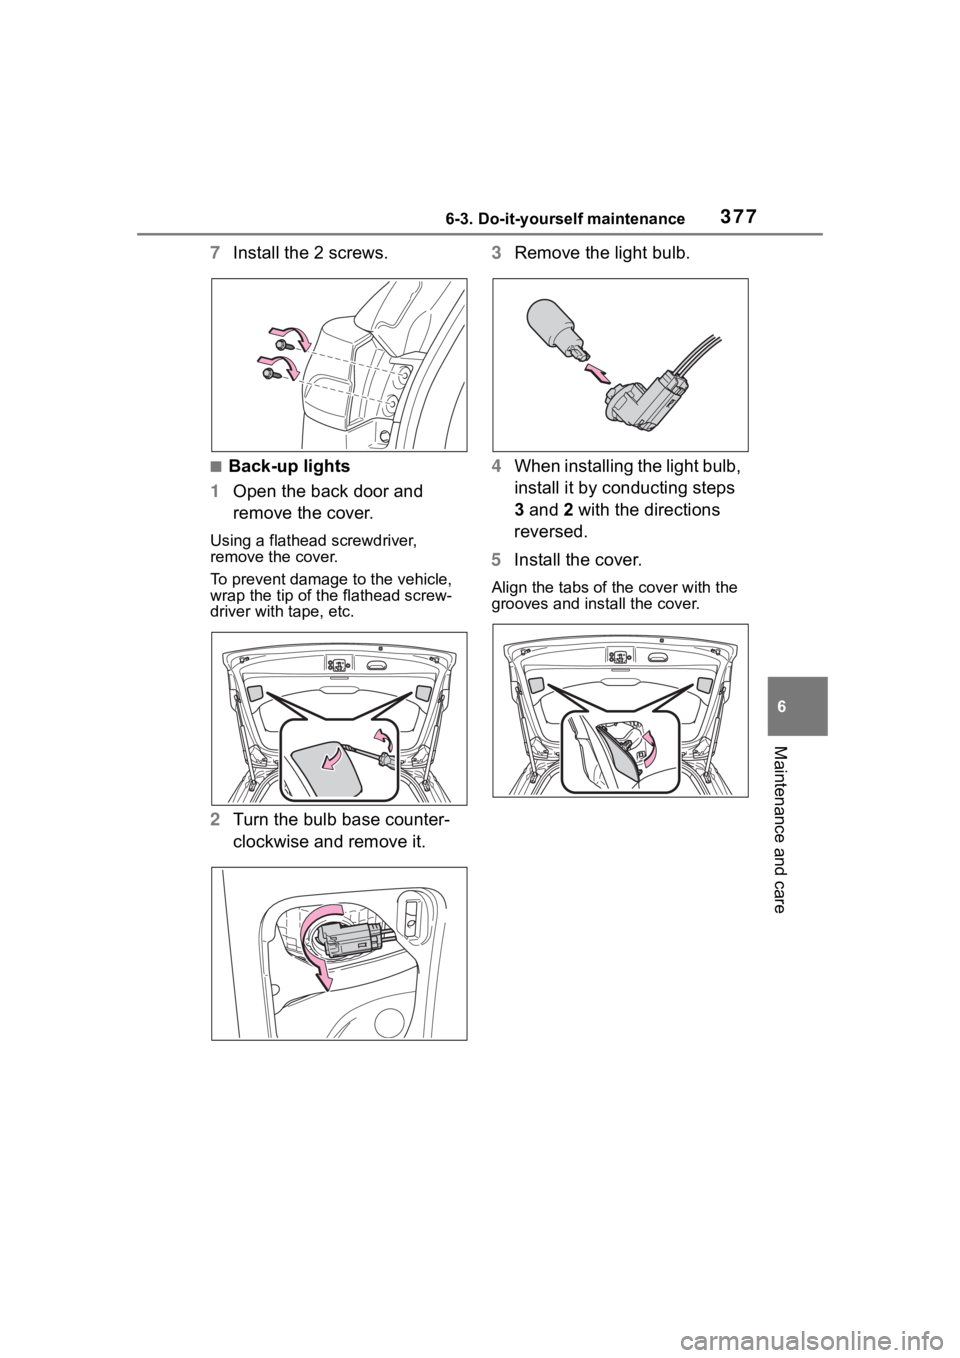
7Install the 2 screws.
■Back-up lights
1 Open the back door and
remove the cover.
Using a flathead screwdriver,
remove the cover.
To prevent damage to the vehicle,
wrap the tip of the flathead screw-
driver with tape, etc.
2Turn the bulb base counter-
clockwise and remove it. 3
Remove the light bulb.
4 When installing the light bulb,
install it by conducting steps
3 and 2 with the directions
reversed.
5 Install the cover.
Align the tabs of the cover with the
grooves and install the cover.
Page 378 of 500
3786-3. Do-it-yourself maintenance
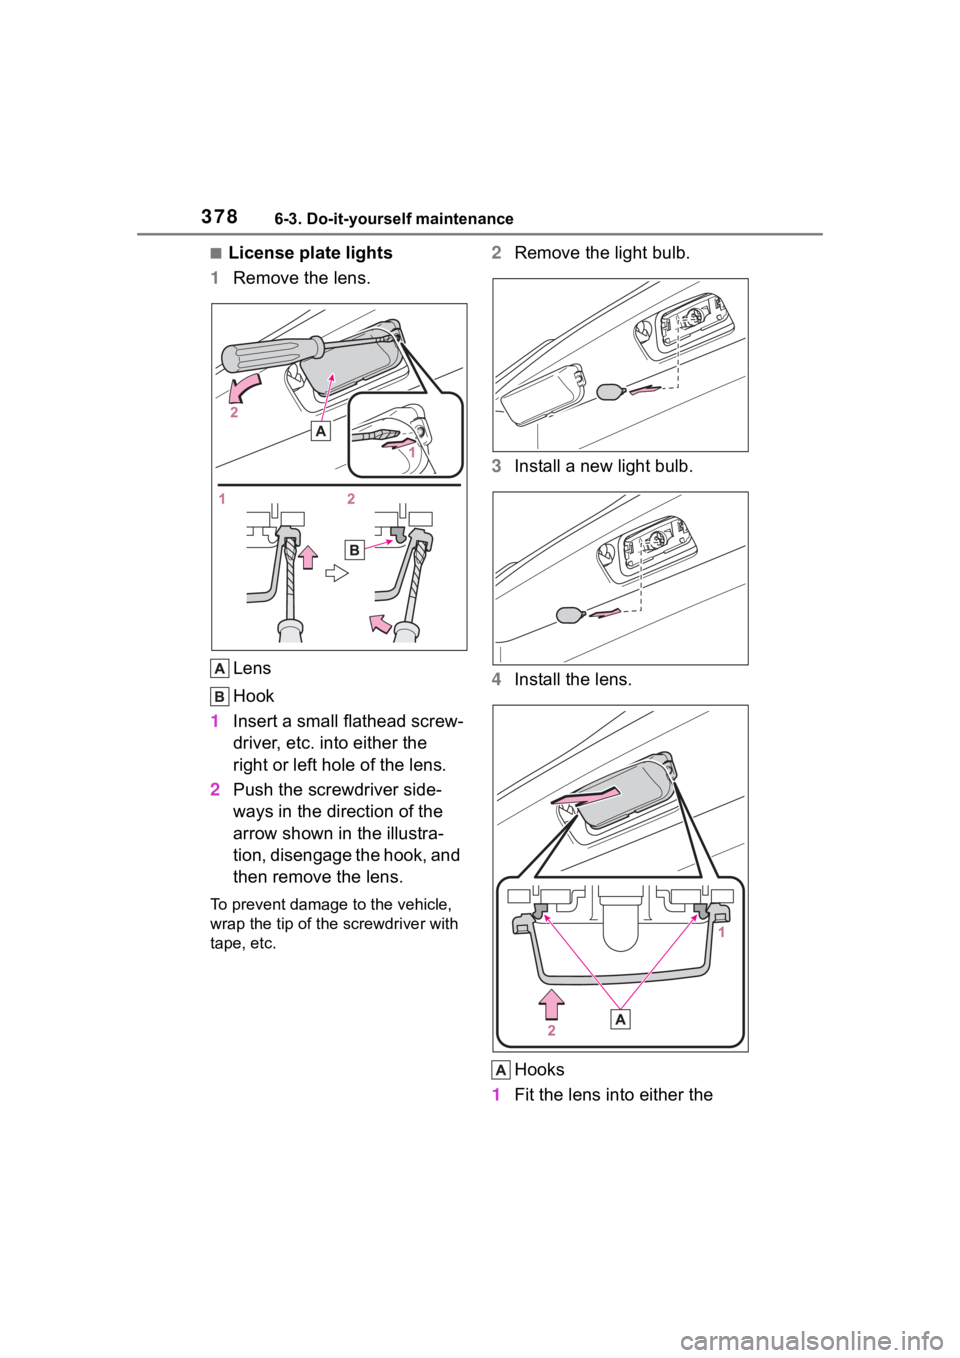
■License plate lights
1 Remove the lens.
Lens
Hook
1 Insert a small flathead screw-
driver, etc. into either the
right or left hole of the lens.
2 Push the screwdriver side-
ways in the direction of the
arrow shown in the illustra-
tion, disengage the hook, and
then remove the lens.
To prevent damage to the vehicle,
wrap the tip of the screwdriver with
tape, etc.
2Remove the light bulb.
3 Install a new light bulb.
4 Install the lens.
Hooks
1 Fit the lens into either the
Page 379 of 500
3796-3. Do-it-yourself maintenance
6
Maintenance and care
right or left hooks.
2 Push the lens into place.
After installation, confirm that the
lens is properly installed by gently
pulling it.
WARNING
■To prevent injury
Before performing any light bulb
replacement procedure, be sure
to turn the e ngine switch off. Fail-
ure to do so may result in burns
from hot compone nts or a part of
your body may get caught on an
operating component, possibly
causing serious injury.
■Replacing light bulbs
●Turn off the lights. Do not
attempt to replace the bulb
immediately after turning off the
lights. The bulbs become very
hot and may cause burns.
●Do not touch the glass portion
of the light bulb with bare
hands. When it is unavoidable
to hold the glass portion, use
and hold with a clean dry cloth
to avoid getting moisture and
oils on the bulb. Also, if the bulb
is scratched or dropped, it may
blow out or crack.
●Fully install light bulbs and any
parts used to secure them. Fail-
ure to do so may result in heat
damage, fire, or water entering
the light unit. This may damage
the lights or cause condensa-
tion to build up on the lens.
■To prevent damage or fire
●Make sure bulbs are fully
seated and locked.
●Check the wattage of the bulb
before installing to prevent heat
damage.
Page 380 of 500

3806-3. Do-it-yourself maintenance