tire size TOYOTA COROLLA CROSS HYBRID 2023 User Guide
[x] Cancel search | Manufacturer: TOYOTA, Model Year: 2023, Model line: COROLLA CROSS HYBRID, Model: TOYOTA COROLLA CROSS HYBRID 2023Pages: 516, PDF Size: 15.96 MB
Page 374 of 516
3746-3. Do-it-yourself maintenance
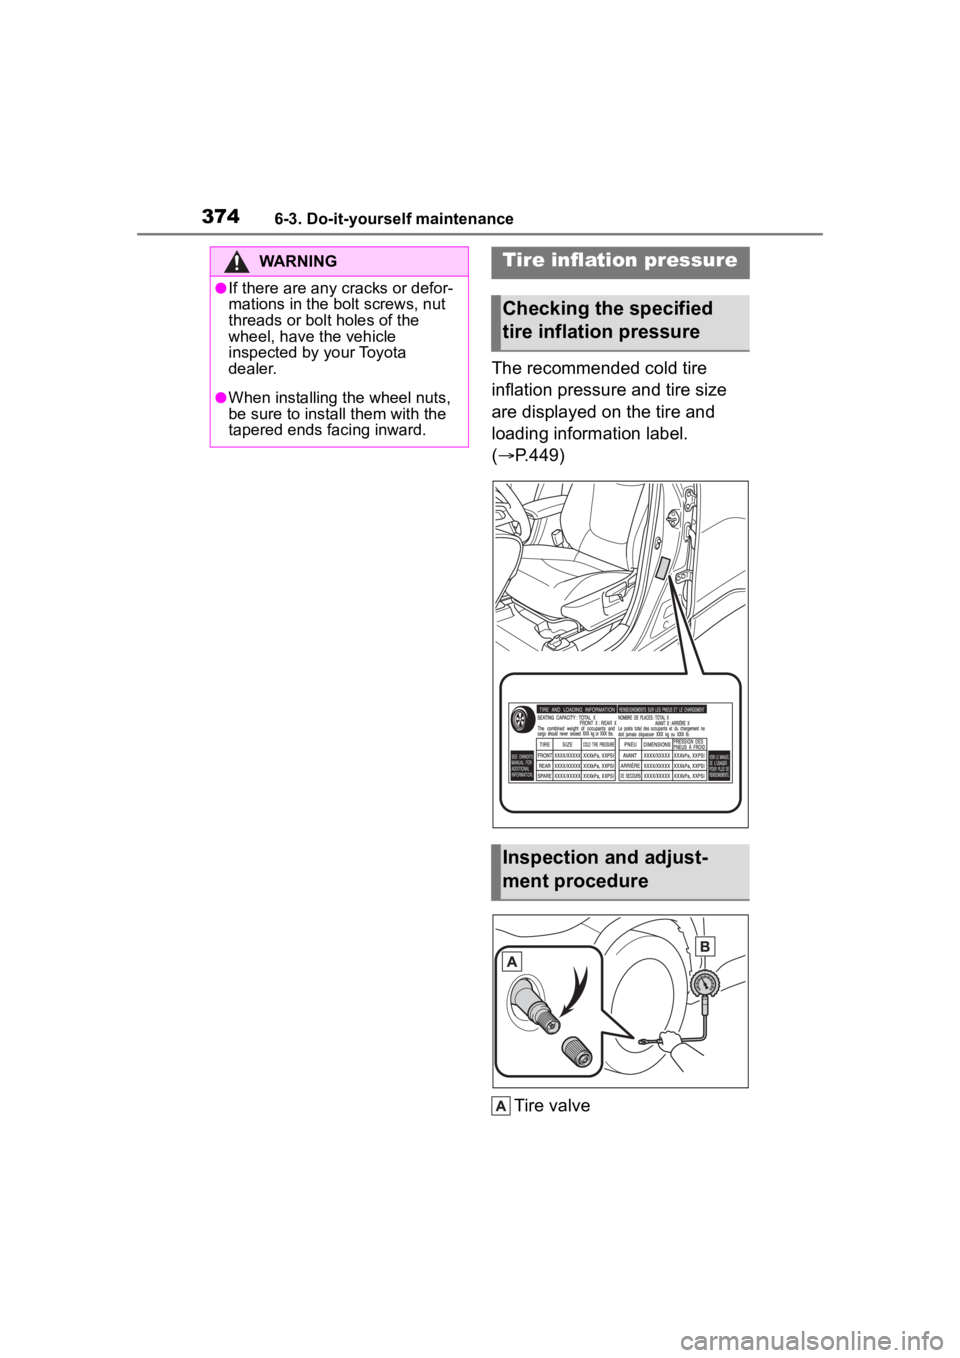
The recommended cold tire
inflation pressure and tire size
are displayed on the tire and
loading information label.
(P.449)
Tire valve
WARNING
●If there are any cracks or defor-
mations in the bolt screws, nut
threads or bolt holes of the
wheel, have the vehicle
inspected by your Toyota
dealer.
●When installing the wheel nuts,
be sure to install them with the
tapered ends facing inward.
Tire inflation pressure
Checking the specified
tire inflation pressure
Inspection and adjust-
ment procedure
Page 376 of 516
3766-3. Do-it-yourself maintenance
When replacing wheels, care
should be taken to ensure that
they are equivalent to those
removed in load capacity, diam-
eter, rim width and inset
*.
Replacement wheels are avail-
able at your Toyota dealer.
*: Conventionally referred to as off- set.
Toyota does not recommend
using the following:
Wheels of different sizes or
types
Used wheels
Bent wheels that have been
straightened
■When replacing wheels
The wheels of your vehicle are
equipped with tire pressure warning
valves and transmitters that allow
the tire pressure warning system to
provide advance warning in the
event of a loss in tire inflation pres-
sure. Whenever wheels are
replaced, the tire pressure warning
valves and transmitters must be
installed. ( P.363)
WARNING
●Greater possibility of tire dam-
age while driving (due to road
hazards, expansion joints,
sharp edges in the road, etc.)
NOTICE
■When inspecting and adjust-
ing tire inflation pressure
Be sure to put the tire valve caps
back on.
If a valve cap is not installed, dirt
or moisture may get into the valve
and cause an air leak, resulting in
decreased tire inflation pressure.
Wheels
If a wheel is bent, cracked or
heavily corroded, it should
be replaced. Otherwise, the
tire may separate from the
wheel or cause a loss of
handling control.
Wheel selection
Page 377 of 516
3776-3. Do-it-yourself maintenance
6
Maintenance and care
Use only Toyota wheel nuts
and wheel nut wrenches
designed for use with your
aluminum wheels.
When rotating, repairing or
changing your tires, check
that the wheel nuts are still
tight after driving 1000 miles
(1600 km).
Use only Toyota genuine bal-
ance weights or equivalent
and a plastic or rubber ham-
mer when balancing your
wheels.
WARNING
■When replacing wheels
●Do not use wheels that are a dif-
ferent size from those recom-
mended in the Owner’s Manual,
as this may result in a loss of
handling control.
●Never use an inner tube in a
leaking wheel which is designed
for a tubeless tire.
Doing so may result in an acci-
dent, causing death or serious
injury.
■When installing the wheel
nuts
Never use oil or grease on the
wheel bolts or wheel nuts.
Oil and grease may cause the
wheel nuts to be excessively tight-
ened, leading to bolt or disc wheel
damage. In addition, the oil or
grease can cause the wheel nuts
to loosen and the wheel may fall
off, causing an accident and
resulting in death or serious injury.
Remove any oil or grease from
the wheel bolts or wheel nuts.
■Use of defective wheels pro-
hibited
Do not use cracked or deformed
wheels. Doing so could cause the
tire to leak air during driving, pos-
sibly causing an accident.
NOTICE
■Replacing tire pressure warn-
ing valves and transmitters
●Because tire repair or replace-
ment may affect the tire pres-
sure warning valves and
transmitters, make sure to have
tires serviced by your Toyota
dealer or other qualified service
shop. In addition, make sure to
purchase your tire pressure
warning valves and transmit-
ters at your Toyota dealer.
●Ensure that only genuine Toyota
wheels are used on your vehi-
cle.
Tire pressure warning valves
and transmitters may not work
properly with non-genuine
wheels.
Aluminum wheel precau-
tions
Page 410 of 516
4107-2. Steps to take in an emergency
perature. In this case, adjusting the
tire inflation pressure will turn off the
warning light (after a few minutes).
■Conditions that the tire pres-
sure warning system may not
function properly
P. 3 6 2
WARNING
■If both the ABS and the brake
system warning lights remain
on
Stop your vehicle in a safe place
immediately and contact your Toy-
ota dealer.
The vehicle will become
extremely unstable during brak-
ing, and the ABS system may fail,
which could cause an accident
resulting in death or serious injury.
■When the electric power
steering system warning light
comes on
When the light comes on yellow,
the assist to the power steering is
restricted. When the light comes
on red, the assist to the power
steering is lost and handling oper-
ations of the steering wheel
become extremely heavy.
When steering wheel operations
are heavier than usual, grip the
steering wheel firmly and operate
it using more force than usual.
■If the tire pressure warning
light comes on
Be sure to observe the following
precautions.
Failure to do so could cause a
loss of vehicle control and result
in death or serious injury.
●Stop your vehicle in a safe place
as soon as possible. Adjust the
tire inflation pressure immedi-
ately.
●If the tire pressure warning light
comes on even after tire infla-
tion pressure adjustment, it is
probable that you have a flat
tire. Check the tires. If a tire is
flat, repair the flat tire by using
emergency tire puncture repair
kit.
●Avoid abrupt maneuvering and
braking.
If the vehicle tires deteriorate,
you could lose control of the
steering wheel or the brakes.
■If a blowout or sudden air
leakage should occur
The tire pressure warning system
may not activate immediately.
■Maintenance of the tires
Each tire, includi ng the spare (if
provided), should be checked
monthly when cold and inflated to
the inflation pressure recom-
mended by the vehicle manufac-
turer on the vehicle placard or tire
inflation pressure label (tire and
load information label). (If your
vehicle has tires of a different size
than the size indicated on the
vehicle placard or tire inflation
pressure label [tire and load infor-
mation label], you should deter-
mine the proper tire inflation
pressure for those tires.)
Page 420 of 516
4207-2. Steps to take in an emergency
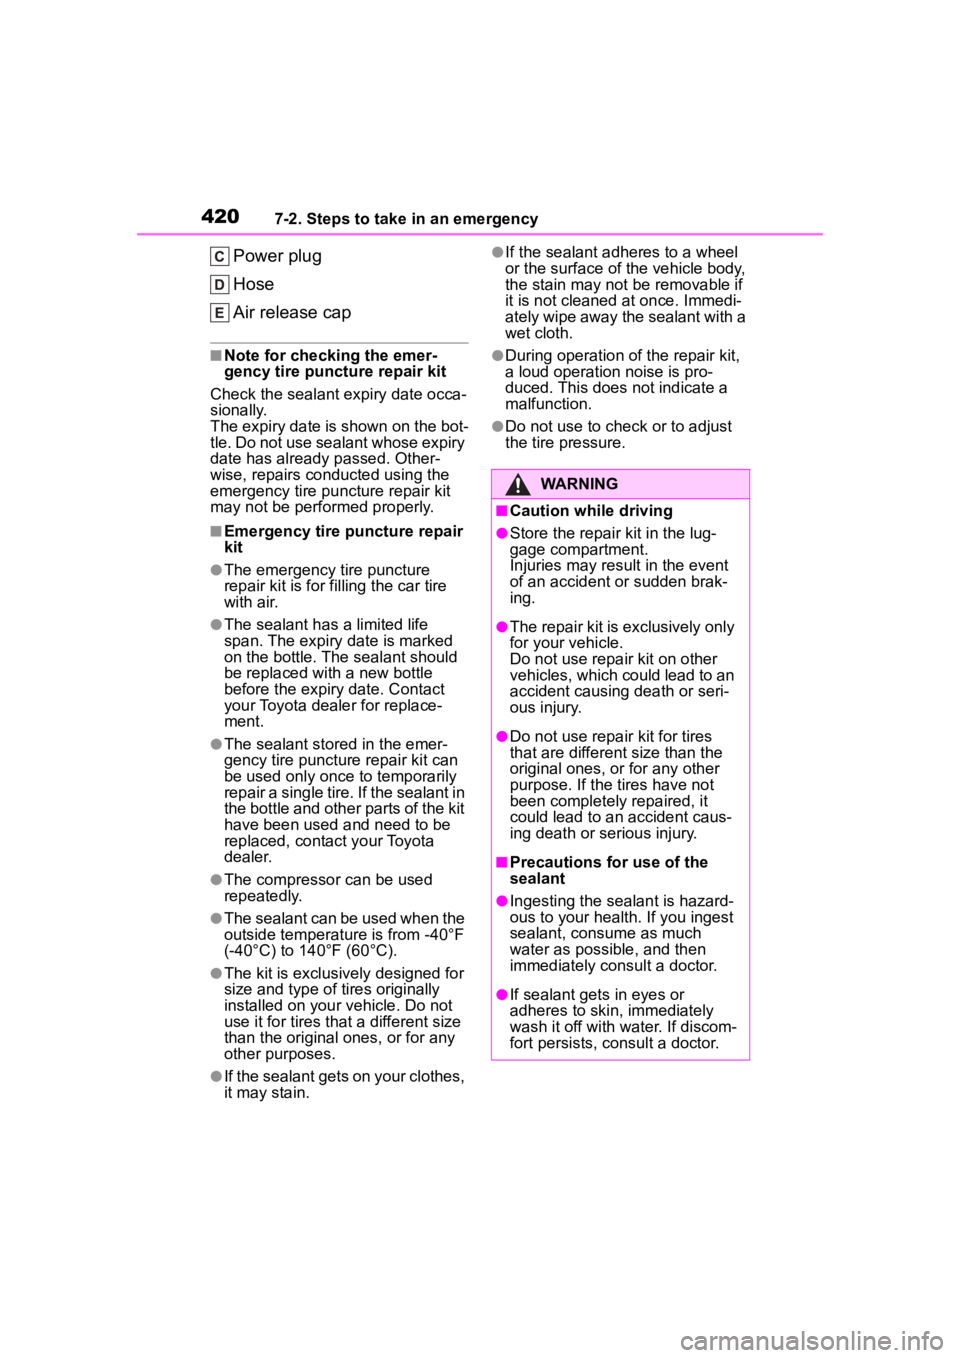
Power plug
Hose
Air release cap
■Note for checking the emer-
gency tire puncture repair kit
Check the sealant expiry date occa-
sionally.
The expiry date is shown on the bot-
tle. Do not use sealant whose expiry
date has already passed. Other-
wise, repairs conducted using the
emergency tire puncture repair kit
may not be performed properly.
■Emergency tire puncture repair
kit
●The emergency tire puncture
repair kit is for filling the car tire
with air.
●The sealant has a limited life
span. The expiry date is marked
on the bottle. The sealant should
be replaced with a new bottle
before the expiry date. Contact
your Toyota dealer for replace-
ment.
●The sealant stored in the emer-
gency tire puncture repair kit can
be used only once to temporarily
repair a single tire. If the sealant in
the bottle and other parts of the kit
have been used and need to be
replaced, contact your Toyota
dealer.
●The compressor can be used
repeatedly.
●The sealant can be used when the
outside temperature is from -40°F
(-40°C) to 140°F (60°C).
●The kit is exclusively designed for
size and type of tires originally
installed on your vehicle. Do not
use it for tires that a different size
than the original ones, or for any
other purposes.
●If the sealant gets on your clothes,
it may stain.
●If the sealant adhe res to a wheel
or the surface of the vehicle body,
the stain may not be removable if
it is not cleaned at once. Immedi-
ately wipe away the sealant with a
wet cloth.
●During operation of the repair kit,
a loud operation noise is pro-
duced. This does not indicate a
malfunction.
●Do not use to check or to adjust
the tire pressure.
WARNING
■Caution while driving
●Store the repair kit in the lug-
gage compartment.
Injuries may result in the event
of an accident or sudden brak-
ing.
●The repair kit is exclusively only
for your vehicle.
Do not use repair kit on other
vehicles, which could lead to an
accident causing death or seri-
ous injury.
●Do not use repair kit for tires
that are differen t size than the
original ones, or for any other
purpose. If the tires have not
been completely repaired, it
could lead to an accident caus-
ing death or serious injury.
■Precautions for use of the
sealant
●Ingesting the sealant is hazard-
ous to your health. If you ingest
sealant, consume as much
water as possible, and then
immediately consult a doctor.
●If sealant gets in eyes or
adheres to skin, immediately
wash it off with water. If discom-
fort persists, consult a doctor.
Page 449 of 516
4498-1. Specifications
8
Vehicle specifications
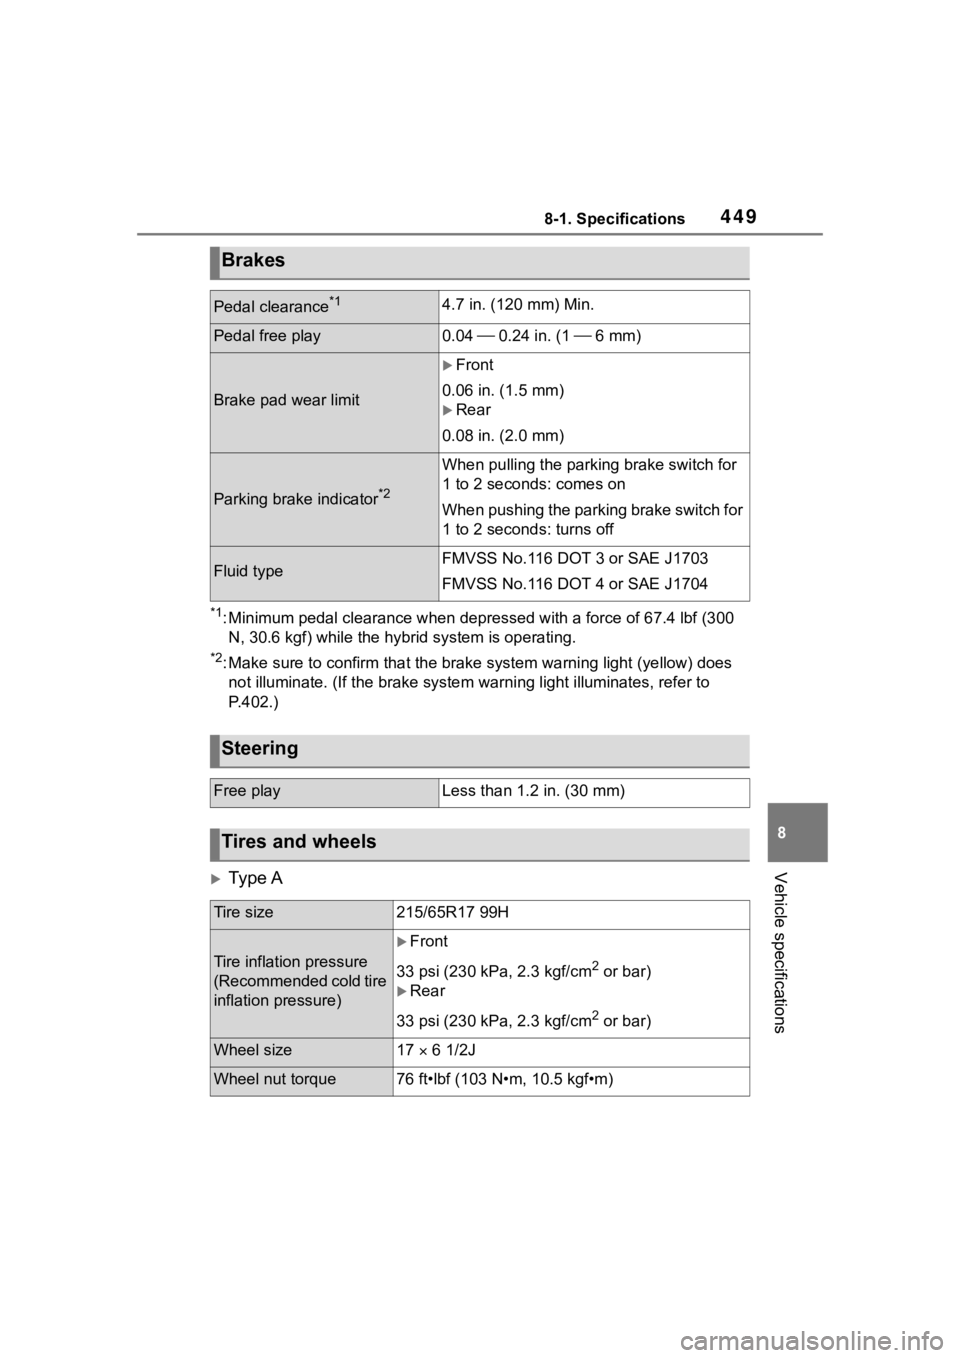
*1: Minimum pedal clearance when depressed with a force of 67.4 lbf (300
N, 30.6 kgf) while the hyb rid system is operating.
*2: Make sure to confirm that the brake system warning light (yell ow) does
not illuminate. (If th e brake system warning light illuminates, refer to
P.402.)
Ty p e A
Brakes
Pedal clearance*14.7 in. (120 mm) Min.
Pedal free play0.04 0.24 in. (1 6 mm)
Brake pad wear limit
Front
0.06 in. (1.5 mm)
Rear
0.08 in. (2.0 mm)
Parking brake indicator*2
When pulling th e parking brake switch for
1 to 2 seconds: comes on
When pushing the parking brake switch for
1 to 2 seconds: turns off
Fluid typeFMVSS No.116 DOT 3 or SAE J1703
FMVSS No.116 DOT 4 or SAE J1704
Steering
Free playLess than 1.2 in. (30 mm)
Tires and wheels
Tire size215/65R17 99H
Tire inflation pressure
(Recommended cold tire
inflation pressure)
Front
33 psi (230 kPa, 2.3 kgf/cm
2 or bar)
Rear
33 psi (230 kPa, 2.3 kgf/cm
2 or bar)
Wheel size17 6 1/2J
Wheel nut torque76 ft•lbf (103 N•m, 10.5 kgf•m)
Page 450 of 516
4508-1. Specifications
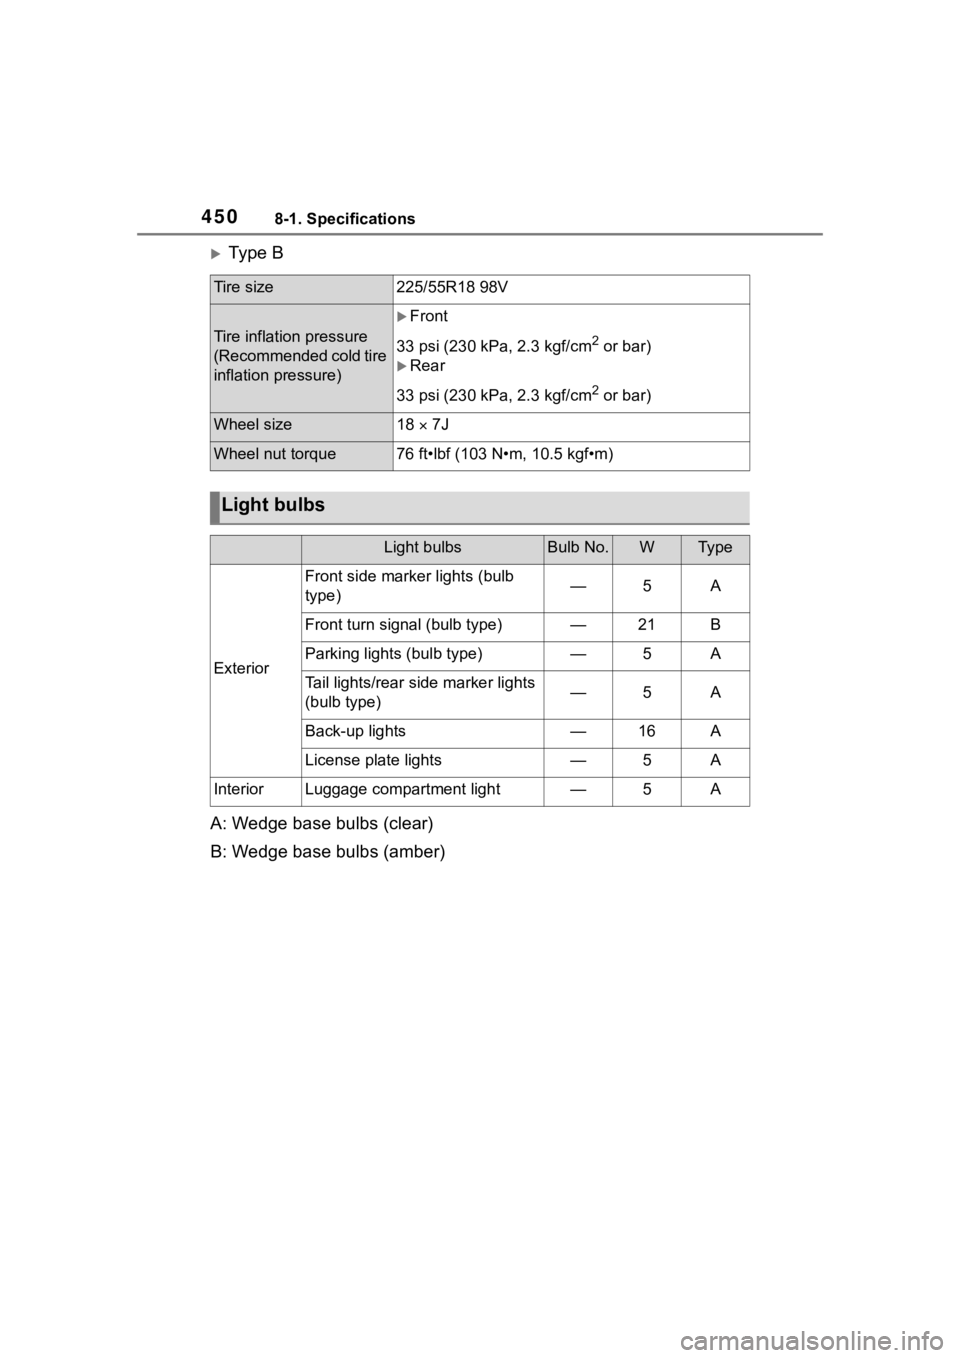
Ty p e B
A: Wedge base bulbs (clear)
B: Wedge base bulbs (amber)
Tire size225/55R18 98V
Tire inflation pressure
(Recommended cold tire
inflation pressure)
Front
33 psi (230 kPa, 2.3 kgf/cm
2 or bar)
Rear
33 psi (230 kPa, 2.3 kgf/cm
2 or bar)
Wheel size18 7J
Wheel nut torque76 ft•lbf (103 N•m, 10.5 kgf•m)
Light bulbs
Light bulbsBulb No.WTy p e
Exterior
Front side marker lights (bulb
type)—5A
Front turn signal (bulb type)—21B
Parking lights (bulb type)—5A
Tail lights/rear side marker lights
(bulb type)—5A
Back-up lights—16A
License plate lights—5A
InteriorLuggage compartment light—5A
Page 453 of 516
4538-1. Specifications
8
Vehicle specifications
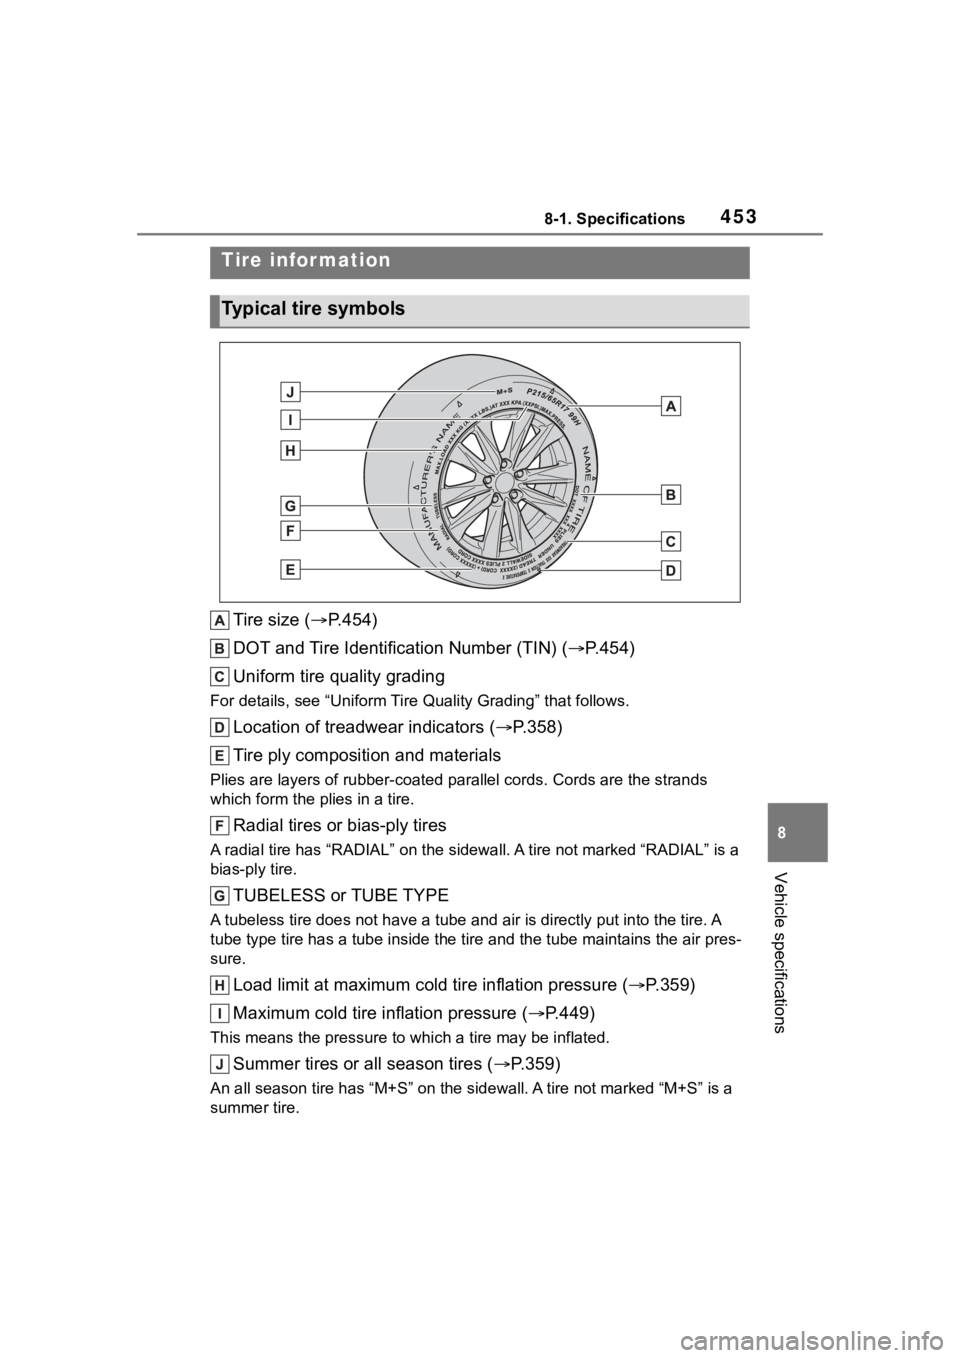
Tire size (P.454)
DOT and Tire Identification Number (TIN) ( P.454)
Uniform tire quality grading
For details, see “Uniform Tire Quality Grading” that follows.
Location of treadwear indicators ( P.358)
Tire ply composition and materials
Plies are layers of rubber-coat ed parallel cords. Cords are the strands
which form the pl ies in a tire.
Radial tires or bias-ply tires
A radial tire has “RADIAL” on th e sidewall. A tire not marked “RADIAL” is a
bias-ply tire.
TUBELESS or TUBE TYPE
A tubeless tire does not have a tube and air is directly put into the tire. A
tube type tire has a tube inside t he tire and the tube maintains the air pres-
sure.
Load limit at maximum cold tire inflation pressure (P.359)
Maximum cold tire inflation pressure ( P.449)
This means the pressure to w hich a tire may be inflated.
Summer tires or all season tires ( P.359)
An all season tire has “M+S” on the sidewal l. A tire not marked “M+S” is a
summer tire.
Tire information
Typical tire symbols
Page 454 of 516
4548-1. Specifications
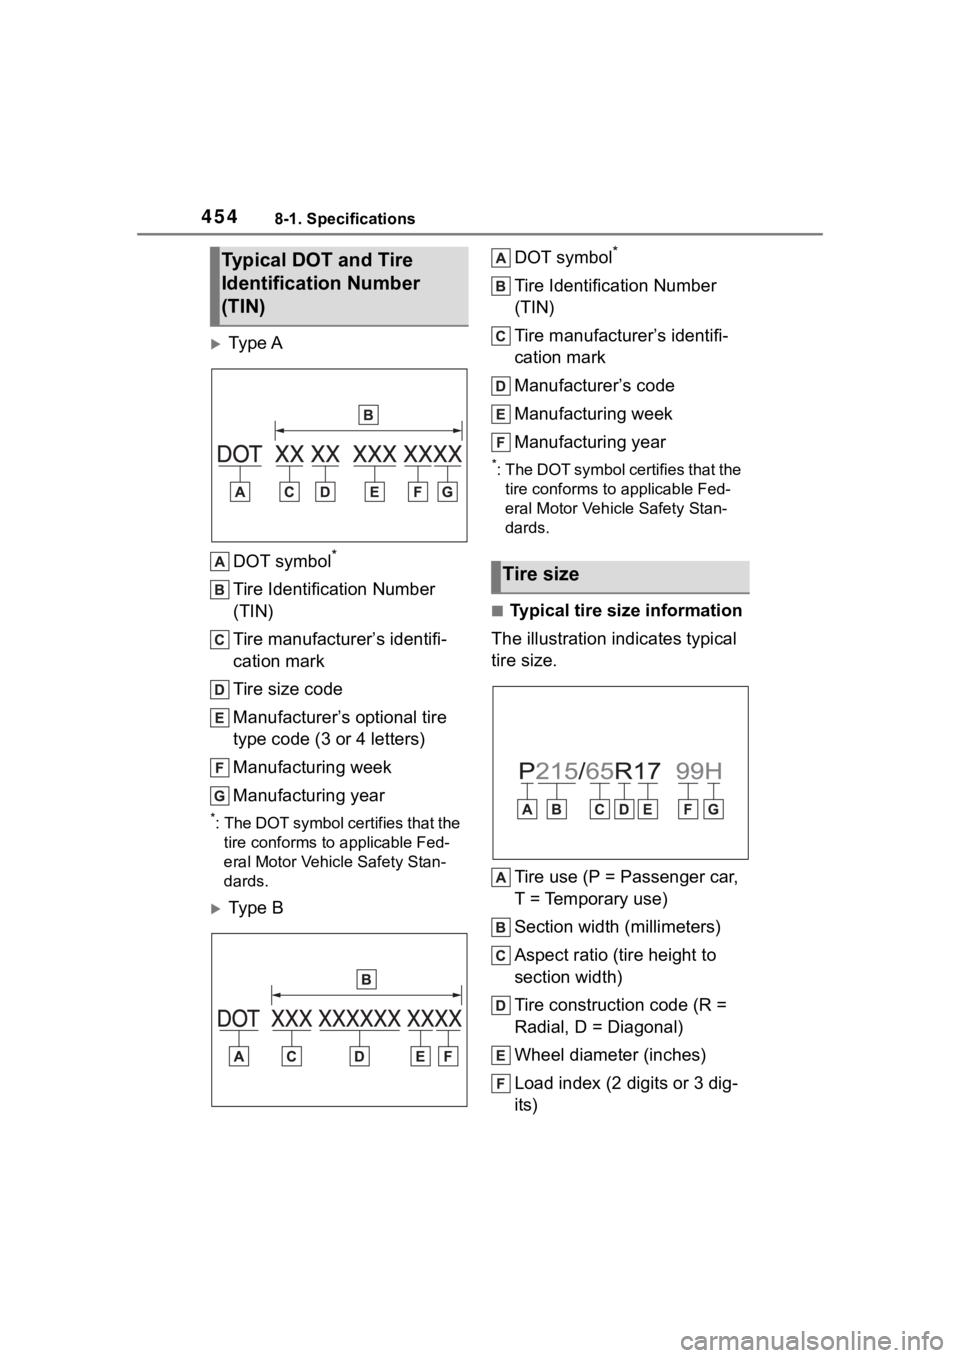
Ty p e ADOT symbol
*
Tire Identification Number
(TIN)
Tire manufacturer’s identifi-
cation mark
Tire size code
Manufacturer’s optional tire
type code (3 or 4 letters)
Manufacturing week
Manufacturing year
*: The DOT symbol certifies that the tire conforms to applicable Fed-
eral Motor Vehicle Safety Stan-
dards.
Ty p e B DOT symbol
*
Tire Identification Number
(TIN)
Tire manufacturer’s identifi-
cation mark
Manufacturer’s code
Manufacturing week
Manufacturing year
*: The DOT symbol ce
rtifies that the
tire conforms to applicable Fed-
eral Motor Vehicle Safety Stan-
dards.
■Typical tire size information
The illustration indicates typical
tire size.
Tire use (P = Passenger car,
T = Temporary use)
Section width (millimeters)
Aspect ratio (tire height to
section width)
Tire construction code (R =
Radial, D = Diagonal)
Wheel diameter (inches)
Load index (2 digits or 3 dig-
its)
Typical DOT and Tire
Identification Number
(TIN)
Tire size
Page 458 of 516
4588-1. Specifications
Rim diameter (Wheel diame-
ter)Nominal diameter of the bead seat
Rim size designationRim diameter and width
Rim type designationThe industry manufacturer’s designation
for a rim by style or code
Rim widthNominal distance between rim flanges
Vehicle capacity weight (Total
load capacity)The rated cargo and luggage load plus 150
lb. (68 kg) times the vehicle’s designated
seating capacity
Vehicle maximum load on the
tire
The load on an individual tire that is deter-
mined by distributing to each axle its share
of the maximum loaded vehicle weight,
and dividing by two
Vehicle normal load on the tire
The load on an individual tire that is deter-
mined by distributing to each axle its share
of curb weight, accessory weight, and nor-
mal occupant weight (distributed in accor-
dance with Table 1
* below), and dividing by
two
Weather sideThe surface area of the rim not covered by
the inflated tire
Bead
The part of the tire that is made of steel
wires, wrapped or rein forced by ply cords
and that is shaped to fit the rim
Bead separationA breakdown of the bond between compo-
nents in the bead
Bias ply tire
A pneumatic tire in which the ply cords that
extend to the beads are laid at alternate
angles substantially l ess than 90 degrees
to the centerlin e of the tread
Carcass
The tire structure, ex cept tread and side-
wall rubber which, when inflated, bears the
load
ChunkingThe breaking away of pieces of the tread
or sidewall
CordThe strands forming the plies in the tire
Tire related termMeaning