door lock TOYOTA COROLLA CROSS HYBRID 2023 Service Manual
[x] Cancel search | Manufacturer: TOYOTA, Model Year: 2023, Model line: COROLLA CROSS HYBRID, Model: TOYOTA COROLLA CROSS HYBRID 2023Pages: 516, PDF Size: 15.96 MB
Page 326 of 516
3265-4. Other interior features
*: If equipped
■HomeLink® programming pro-
cedure
The programming procedures can
also be found at the following URL.
Website: www.homelink.com/toyota
For support, contact customer sup-
port at the following.
Help Line: 1-800-355-3515
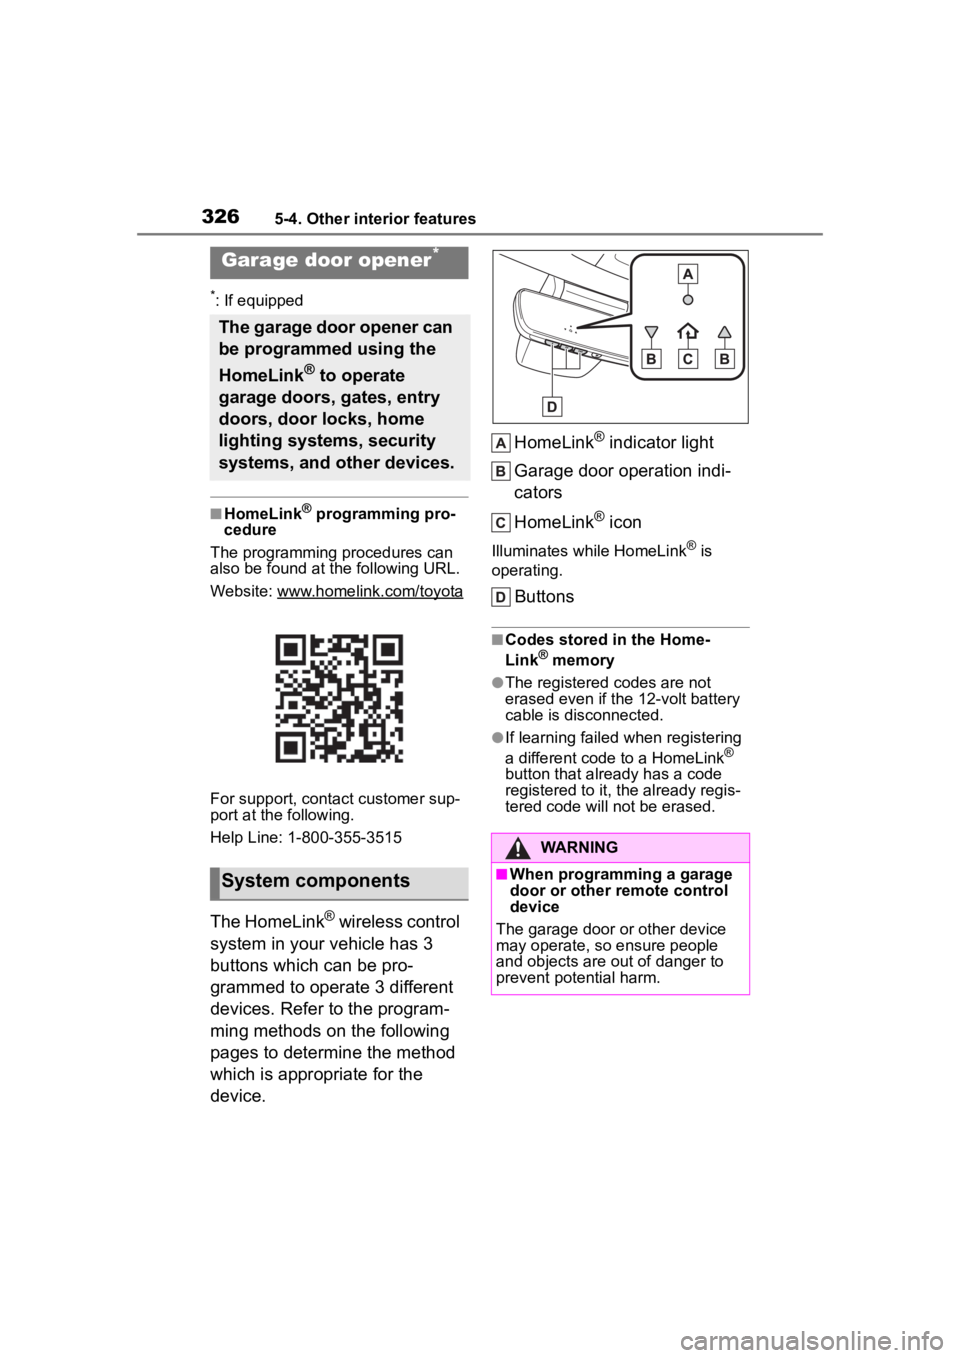
The HomeLink® wireless control
system in your vehicle has 3
buttons which can be pro-
grammed to operate 3 different
devices. Refer to the program-
ming methods on the following
pages to determine the method
which is appropriate for the
device. HomeLink
® indicator light
Garage door operation indi-
cators
HomeLink
® icon
Illuminates while HomeLink® is
operating.
Buttons
■Codes stored in the Home-
Link® memory
●The registered codes are not
erased even if the 12-volt battery
cable is disconnected.
●If learning failed when registering
a different code to a HomeLink®
button that already has a code
registered to it, the already regis-
tered code will not be erased.
Garage door opener*
The garage door opener can
be programmed using the
HomeLink
® to operate
garage doors, gates, entry
doors, door locks, home
lighting systems, security
systems, and other devices.
System components
WARNING
■When programming a garage
door or other remote control
device
The garage door or other device
may operate, so ensure people
and objects are out of danger to
prevent potential harm.
Page 334 of 516
3346-1. Maintenance and care
6-1.Maintenance and care
Working from top to bottom,
liberally apply water to the
vehicle body, wheel wells and
underside of the vehicle to
remove any dirt and dust.
Wash the vehicle body using
a sponge or soft cloth, such
as a chamois.
For hard-to-remove marks,
use car wash soap and rinse
thoroughly with water.
Wipe away any water.
Wax the vehicle when the
waterproof coating deterio-
rates.
If water does not bead on a clean
surface, apply wax when the vehi-
cle body is cool.
■Automatic car washes
●Before washing the vehicle:
• Fold the mirrors
• Turn off the power back door (if equipped)
Start washing from the front of the
vehicle. Extend the mirrors before
driving.
■High pressure car washes
As water may ent er the cabin, do
not bring the nozzle tip near the gaps around the doors or perimeter
of the windows, or spray these
areas continuously.
■When using a car wash
If the door handle becomes wet
while the electronic key is within the
effective range, the door may lock
and unlock repeatedly. In that case,
follow the following correction pro-
cedures to wash the vehicle:
●Place the key in a position 6 ft. (2
m) or more separate from the
vehicle while the vehicle is being
washed. (Take care to ensure that
the key is not stolen.)
●Set the electronic key to bat-
tery-saving mode to disable the
smart key system. ( P.130)
●If you need to release the parking
brake, turn off the brake hold sys-
tem, shift the shift lever to N, then
release the parking brake and set
the power switch to ACC.
( P.186)
■Wheels and wheel ornaments
●Remove any dirt immediately by
using a neutral detergent.
●Wash detergent off with water
immediately after use.
●To protect the paint from damage,
make sure to obs erve the follow-
ing precautions.
• Do not use acidic, alkaline or abrasive detergent
• Do not use hard brushes
• Do not use detergent on the wheels when they are hot, such
as after driving or parking in hot
weather
■Brake pads and calipers
Rust may form if the vehicle is
parked with wet brake pads or disc
rotors, causing them to stick. Before
parking the vehicle after it is
washed, drive slo wly and apply the
brakes several times to dry the
parts.
Cleaning and protect-
ing the vehicle exte-
rior
Perform cleaning in a man-
ner appropriate to each
component and its material.
Cleaning instructions
Page 343 of 516
3436-2. Maintenance
6
Maintenance and care
Brake pedal
• Does the brake pedal move
smoothly?
• Does the brake pedal have
appropriate
clearance from
the floor?
( P.449)
• Does the brake pedal have the
correct amount
of free play?
( P.449)
Brakes
• The vehicle
should not pull to
one side when
the brakes are
applied.
• The brakes should work
effectively.
• The brake pedal should not feel
spongy.
• The brake pedal should not get
too close to the
floor when the
brakes are
applied.
Head
restraints
Do the head
restraints move
smoothly and lock
securely?
Indica-
tors/buzzersDo the indicators
and buzzers func-
tion properly?
LightsDo all the lights
come on?
ItemsCheck points
Parking brake
• Does the park-ing brake oper-
ate normally?
• When parked on a slope and the
parking brake is
on, is the vehicle
securely
stopped?
Seat belts
• Do the seat belts operate
smoothly?
• The seat belts should not be
damaged.
Seats
Do the seat con-
trols operate prop-
erly?
Steering wheel
• Does the steer-ing wheel rotate
smoothly?
• Does the steer- ing wheel have
the correct
amount of free
play?
• There should not be any strange
sounds coming
from the steer-
ing wheel.
Vehicle exterior
ItemsCheck points
DoorsDo the doors oper-
ate smoothly?
Engine hood
Does the engine
hood lock system
work properly?
ItemsCheck points
Page 356 of 516
3566-3. Do-it-yourself maintenance
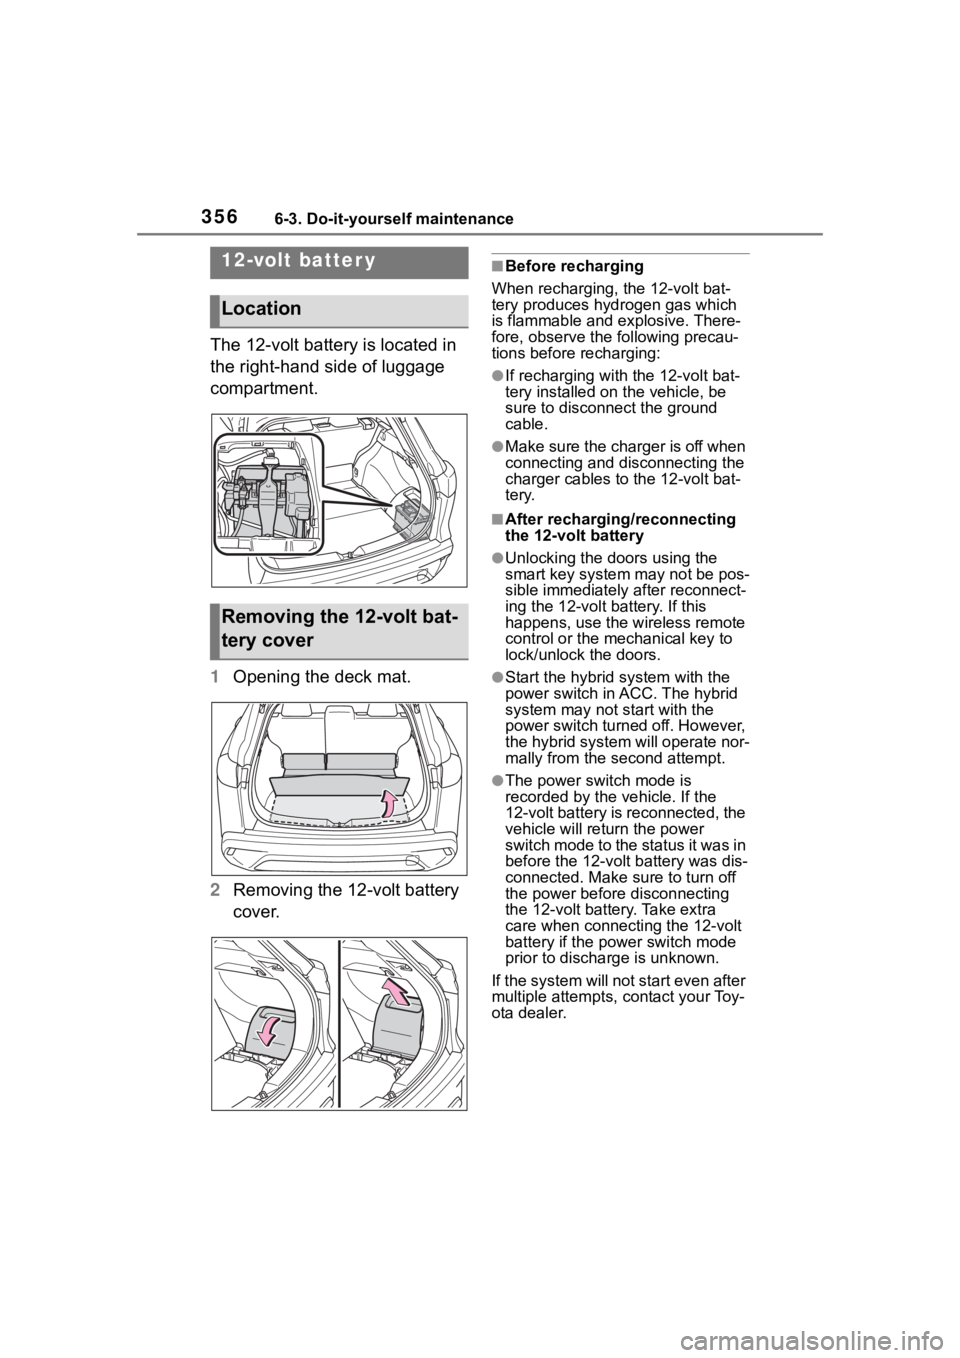
The 12-volt battery is located in
the right-hand side of luggage
compartment.
1Opening the deck mat.
2 Removing the 12-volt battery
cover.
■Before recharging
When recharging, the 12-volt bat-
tery produces hydrogen gas which
is flammable and explosive. There-
fore, observe the following precau-
tions before recharging:
●If recharging with the 12-volt bat-
tery installed on the vehicle, be
sure to disconnect the ground
cable.
●Make sure the charger is off when
connecting and disconnecting the
charger cables to the 12-volt bat-
tery.
■After recharging/reconnecting
the 12-volt battery
●Unlocking the doors using the
smart key system may not be pos-
sible immediately after reconnect-
ing the 12-volt battery. If this
happens, use the wireless remote
control or the mechanical key to
lock/unlock the doors.
●Start the hybrid system with the
power switch in ACC. The hybrid
system may not start with the
power switch turned off. However,
the hybrid system will operate nor-
mally from the second attempt.
●The power switch mode is
recorded by the vehicle. If the
12-volt battery is reconnected, the
vehicle will return the power
switch mode to the status it was in
before the 1 2-volt battery was dis-
connected. Make sure to turn off
the power before disconnecting
the 12-volt battery. Take extra
care when connecting the 12-volt
battery if the power switch mode
prior to discharge is unknown.
If the system will not start even after
multiple attempts, contact your Toy-
ota dealer.
12-volt batter y
Location
Removing the 12-volt bat-
tery cover
Page 383 of 516
3836-3. Do-it-yourself maintenance
6
Maintenance and care
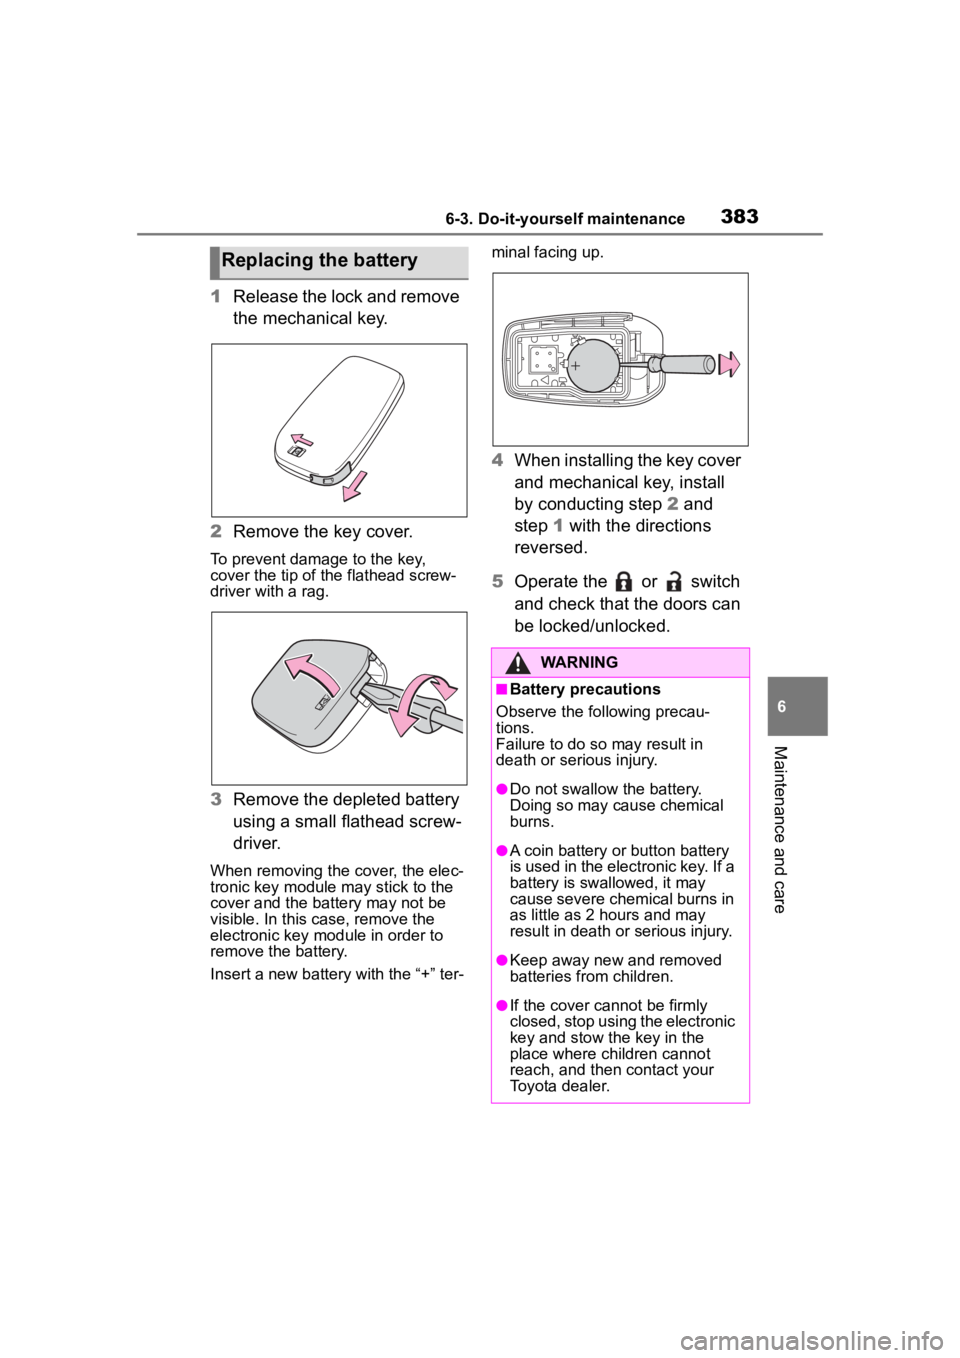
1Release the lock and remove
the mechanical key.
2 Remove the key cover.
To prevent damage to the key,
cover the tip of the flathead screw-
driver with a rag.
3Remove the depleted battery
using a small flathead screw-
driver.
When removing the cover, the elec-
tronic key module may stick to the
cover and the battery may not be
visible. In this case, remove the
electronic key module in order to
remove the battery.
Insert a new battery with the “+” ter- minal facing up.
4
When installing the key cover
and mechanical key, install
by conducting step 2 and
step 1 with the directions
reversed.
5 Operate the or switch
and check that the doors can
be locked/unlocked.
Replacing the battery
WARNING
■Battery precautions
Observe the following precau-
tions.
Failure to do so may result in
death or serious injury.
●Do not swallow the battery.
Doing so may cause chemical
burns.
●A coin battery or button battery
is used in the electronic key. If a
battery is swa llowed, it may
cause severe chemical burns in
as little as 2 hours and may
result in death or serious injury.
●Keep away new and removed
batteries from children.
●If the cover cannot be firmly
closed, stop using the electronic
key and stow the key in the
place where children cannot
reach, and then contact your
Toyota dealer.
Page 389 of 516
3896-3. Do-it-yourself maintenance
6
Maintenance and care
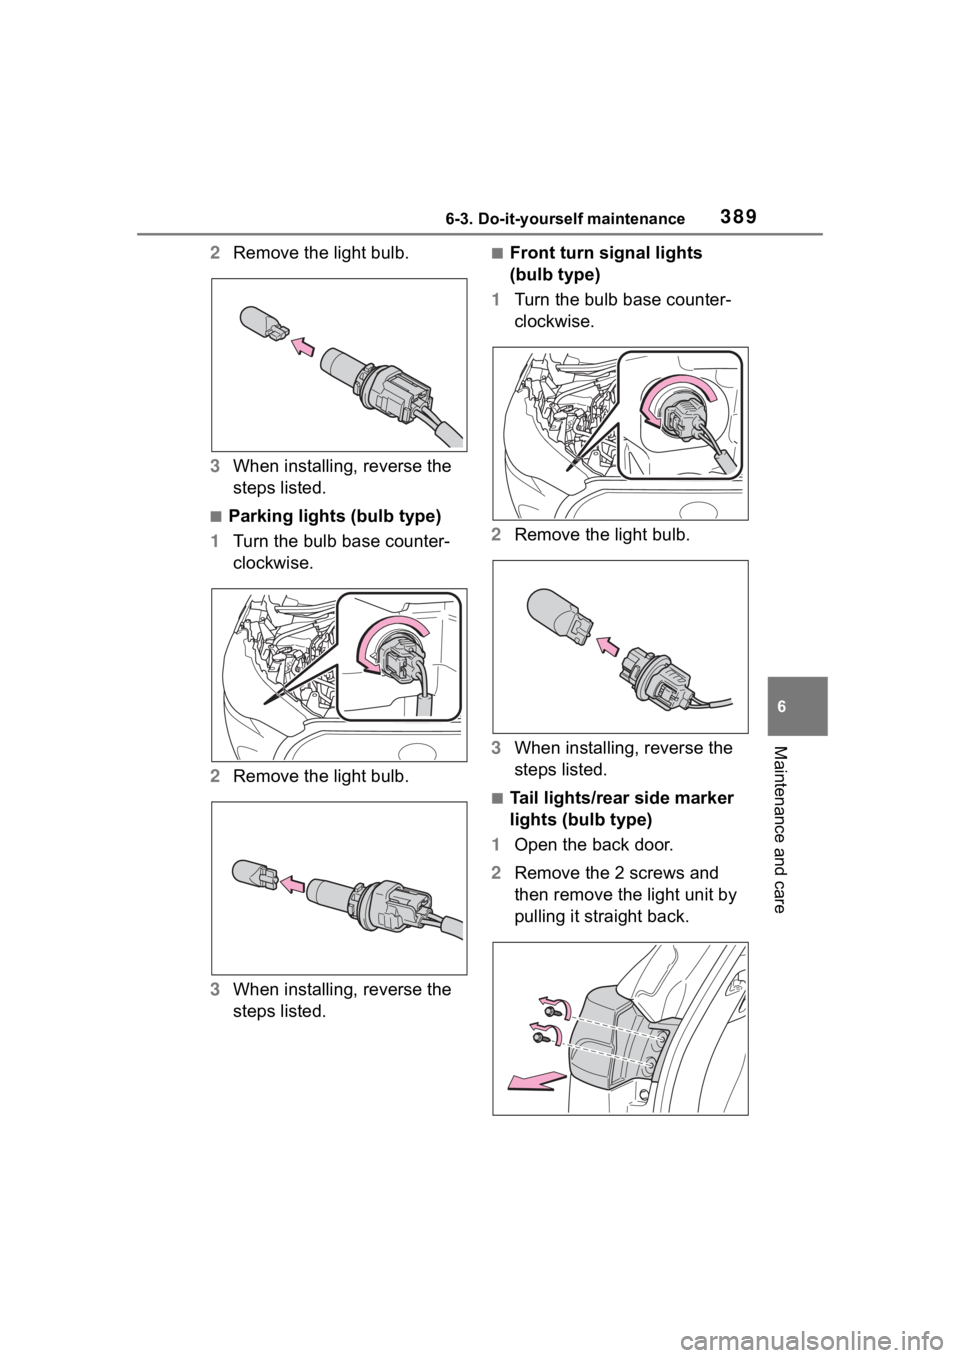
2Remove the light bulb.
3 When installing, reverse the
steps listed.
■Parking lights (bulb type)
1 Turn the bulb base counter-
clockwise.
2 Remove the light bulb.
3 When installing, reverse the
steps listed.
■Front turn signal lights
(bulb type)
1 Turn the bulb base counter-
clockwise.
2 Remove the light bulb.
3 When installing, reverse the
steps listed.
■Tail lights/rear side marker
lights (bulb type)
1 Open the back door.
2 Remove the 2 screws and
then remove the light unit by
pulling it straight back.
Page 390 of 516
3906-3. Do-it-yourself maintenance
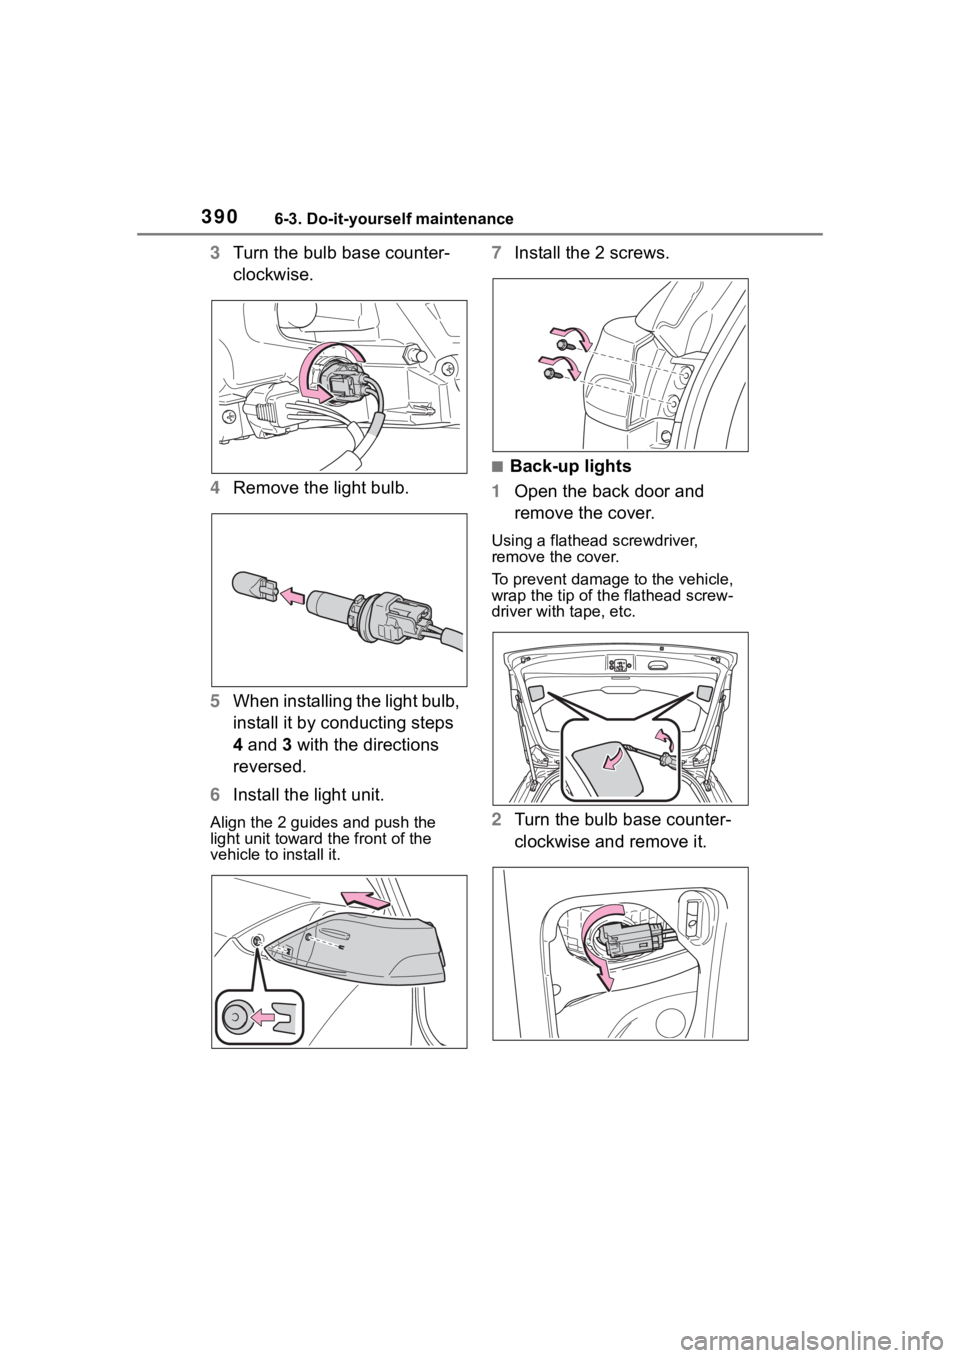
3Turn the bulb base counter-
clockwise.
4 Remove the light bulb.
5 When installing the light bulb,
install it by conducting steps
4 and 3 with the directions
reversed.
6 Install the light unit.
Align the 2 guides and push the
light unit toward the front of the
vehicle to install it.
7Install the 2 screws.
■Back-up lights
1 Open the back door and
remove the cover.
Using a flathead screwdriver,
remove the cover.
To prevent damage to the vehicle,
wrap the tip of th e flathead screw-
driver with tape, etc.
2 Turn the bulb base counter-
clockwise and remove it.
Page 414 of 516
4147-2. Steps to take in an emergency
equipped)
● BSM (Blind Spot Monitor) (if
equipped)
● RCTA (Rear Cross Traffic
Alert) (if equipped)
● Safe Exit Assist (if equipped)
●Intuitive parking assist (if
equipped)
● PKSB (Parking Support
Brake) (if equipped)
Follow the followi ng correction
methods.
• Check the voltage of the 12-volt battery
• Check the sensors that the Toyota Safety System 3.0 uses for foreign
matter covering them. Remove
them if any. ( P.207)
• Remove any dirt or foreign matter from the rear side radar sensors
• Close the back door
Indicates the sensors may not be
operating properly. ( P.207)
When problems are solved and the
sensors are operatio nal, this indica-
tion may disappear by itself.
■If “System Stopped Front Cam-
era Low Visibility See Owner’s
Manual” is displayed
Indicates one of the following sys-
tems is disabled.
●PCS (Pre-Collision system)
●LTA (Lane Tracing Assist)
●LDA (Lane Departure Alert)
●AHB (Automatic High Beam)
●Dynamic radar cruise control
●RSA (Road Sign Assist) (if
equipped)
Follow the followi ng correction
methods.
• Using the windshield wipers, remove the dirt o r foreign matter
from the windshield. • Using the air conditioning system,
defog the windshield.
• Close the hood, remove any stick- ers,etc. to clear the obstruction
infront of the front camera.
■If “System Stopped Front Cam-
era Out of Temperature Range
Wait until Normal Temperature”
is displayed
Indicates one of the following sys-
tems is disabled.
●PCS (Pre-Collision system)
●LTA (Lane Tracing Assist)
●LDA (Lane Departure Alert)
●AHB (Automatic High Beam)
●Dynamic radar cruise control
●RSA (Road Sign Assist) (if
equipped)
Follow the following correction
methods.
• If the front camer a is hot, such as
after the vehicle is parked in the
sun, use the air conditioning sys-
tem to decrease the temperature
around the front camera
• If a sunshade was used when the vehicle was parked, depending on
its type, the sunlight reflected from
the surface of the sunshade may
cause the temperature of the front
camera to become excessively
high
• If the front camera is cold, such after the vehicle is parked in an
extremely cold environment, use
the air conditioning system to
increase the temperature around
the front camera
■If “System Stopped Front Radar
Sensor Blocked Clean Radar
Sensor” is displayed
Indicates one of the following sys-
tems is disabled.
●PCS (Pre-Collision system)
●LTA (Lane Tracing Assist)
●LDA (Lane Departure Alert)
Page 431 of 516
4317-2. Steps to take in an emergency
7
When trouble arises
■When the electronic key does
not work properly
●Make sure that the smart key sys-
tem has not been deactivated in
the customization setting. If it is
off, turn the function on. (Custom-
izable features: P.463)
●Check if battery-saving mode is
set. If it is set, cancel the function.
( P.130)
●The electronic key function may
be suspended. ( P.112)
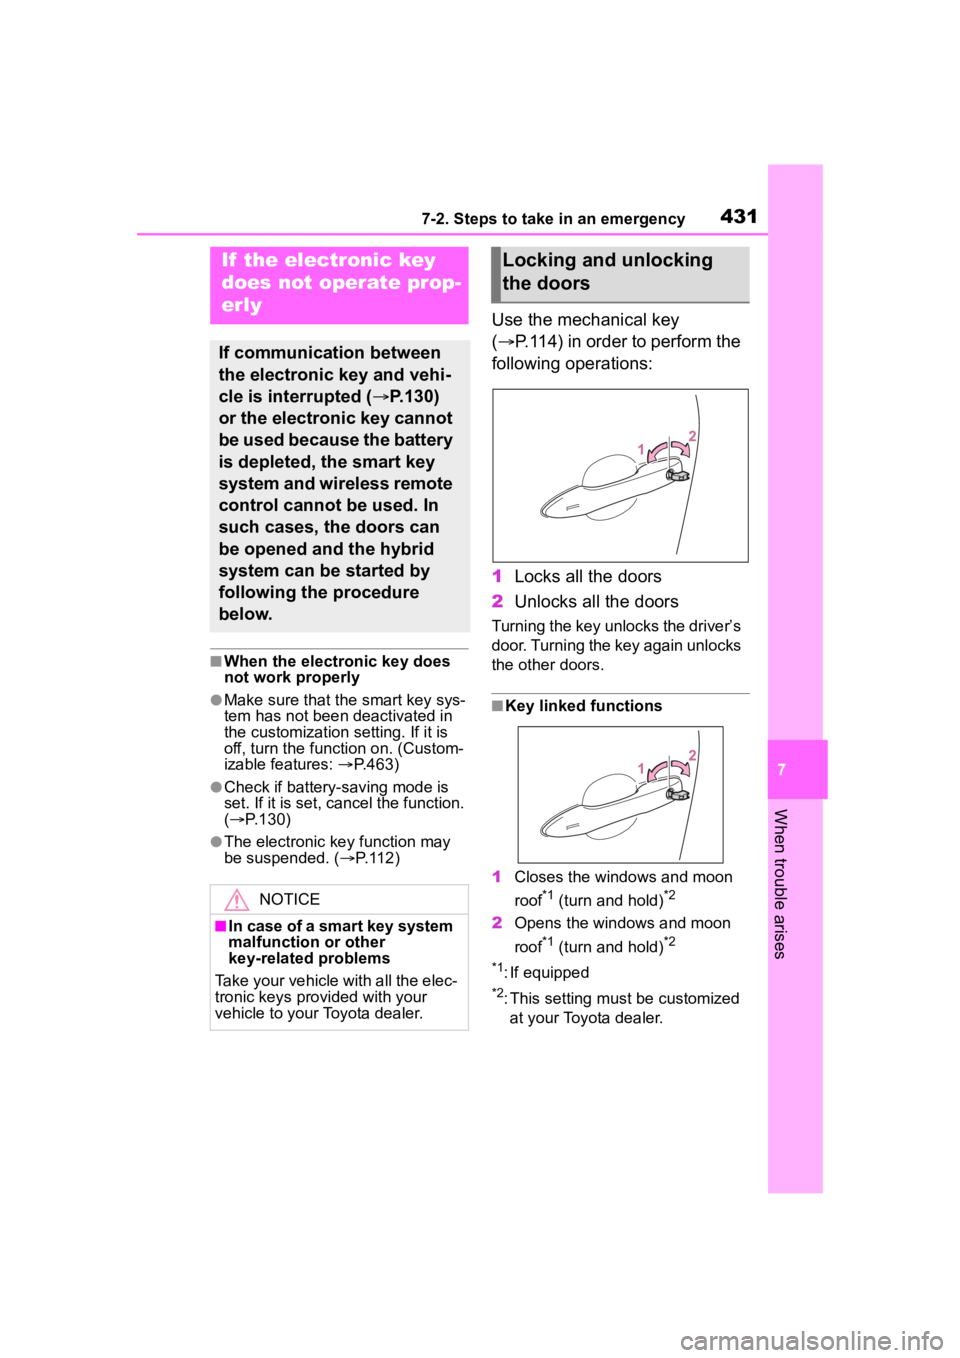
Use the mechanical key
( P.114) in order to perform the
following operations:
1 Locks all the doors
2 Unlocks all the doors
Turning the key unlocks the driver’s
door. Turning the key again unlocks
the other doors.
■Key linked functions
1 Closes the windows and moon
roof
*1 (turn and hold)*2
2Opens the windows and moon
roof
*1 (turn and hold)*2
*1
: If equipped
*2: This setting must be customized at your Toyota dealer.
If the electronic key
does not operate prop-
erly
If communication between
the electronic key and vehi-
cle is interrupted ( P.130)
or the electronic key cannot
be used because the battery
is depleted, the smart key
system and wireless remote
control cannot be used. In
such cases, the doors can
be opened and the hybrid
system can be started by
following the procedure
below.
NOTICE
■In case of a smart key system
malfunction or other
key-related problems
Take your vehicle with all the elec-
tronic keys provided with your
vehicle to your Toyota dealer.
Locking and unlocking
the doors
Page 433 of 516
4337-2. Steps to take in an emergency
7
When trouble arises
If you have a set of jumper (or
booster) cables and a second
vehicle with a 12-volt battery,
you can jump start your vehicle
by following the steps below.
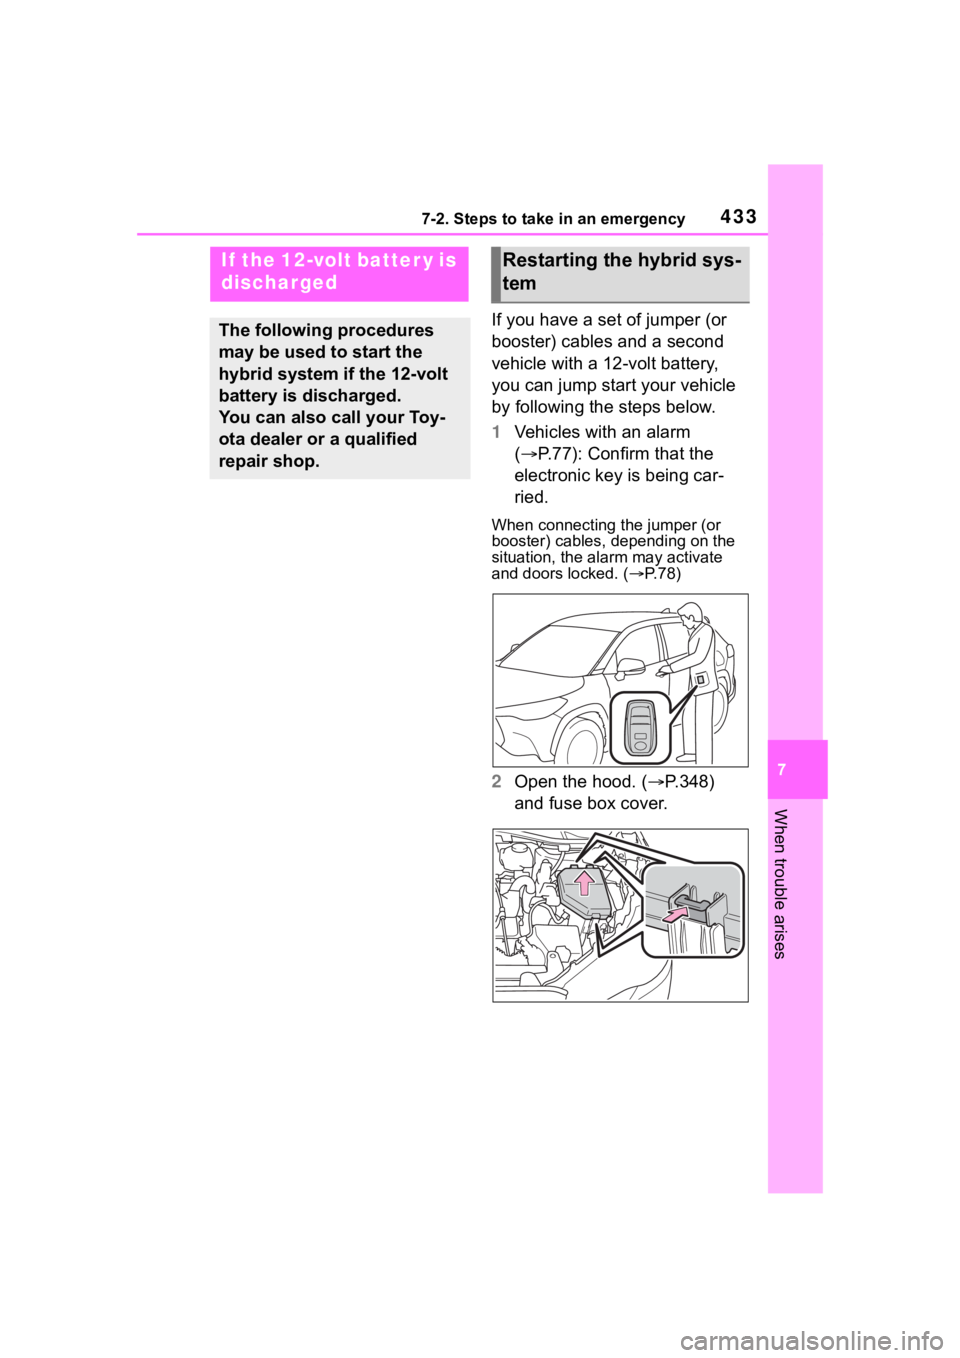
1Vehicles with an alarm
( P.77): Confirm that the
electronic key is being car-
ried.
When connecting the jumper (or
booster) cables, depending on the
situation, the alarm may activate
and doors locked. ( P. 7 8 )
2 Open the hood. ( P.348)
and fuse box cover.
If the 12-volt batter y is
discharged
The following procedures
may be used to start the
hybrid system if the 12-volt
battery is discharged.
You can also call your Toy-
ota dealer or a qualified
repair shop.
Restarting the hybrid sys-
tem