tow TOYOTA COROLLA CROSS HYBRID 2023 Service Manual
[x] Cancel search | Manufacturer: TOYOTA, Model Year: 2023, Model line: COROLLA CROSS HYBRID, Model: TOYOTA COROLLA CROSS HYBRID 2023Pages: 516, PDF Size: 15.96 MB
Page 275 of 516
2754-5. Using the driving support systems
4
Driving
The PKSB (Parking Support
Brake) system can be
enabled/disabled on of the
multi-information display.
(P.463)
When the PKSB (Parking Sup-
port Brake) function is off, the
driving assist information indica-
tor ( P.82) will illuminate.
When turned OFF (disabled), the
PKSB (Parking Supp ort Brake) will
be disabled and will not be enabled
until the setting is changed to ON
again in multi-information display.
(The function will no t be reenabled
by operating the power switch.)
If the hybrid system output restric-
tion control or brake control oper-
ates, a buzzer will sound and a
WARNING
■When to disable the PKSB
(Parking Support Brake) sys-
tem
In the following situations, disable
the PKSB (Parking Support
Brake) as the system may oper-
ate even though there is no possi-
bility of a collision.
●When inspecting the vehicle
using a chassis roller, chassis
dynamo or free roller
●When loading the vehicle onto a
boat, truck or other transport
vessel
●If the suspension has been
modified or tires of a size other
than specified are installed
●If the front of the vehicle is
raised or lowered due to the
carried load
●When equipment that may
obstruct a sensor is installed,
such as a towing eyelet, bumper
protector (an additional trim
strip, etc.), bicycle carrier, or
snow plow
●When using automatic car
washing devices
●If the vehicle cannot be driven in
a stable manner, such as when
the vehicle has been in an acci-
dent or is malfunctioning
●When the vehicle is driven in a
sporty manner or off-road
●When the tires are not properly
inflated
●When the tires are very worn
●When a tire chains or an emer-
gency tire puncture repair kit is
used
●When your vehicle is towing a
trailer or during emergency tow-
ing
■Precautions for the suspen-
sion
Do not modify the suspension of
the vehicle. If the height or tilt of
the vehicle is c hanged, the sen-
sors may not be able to detect
detectable objects and the system
may not operate correctly, possi-
bly leading to an accident.
Enabling/Disabling the
PKSB (Parking Support
Brake)
Displays and buzzers for
hybrid system output
restriction control and
brake control
Page 295 of 516
2954-6. Driving tips
4
Driving
NOTICE
■To prevent water damage
Take all necessary safety mea-
sures to ensure that water dam-
age to the hybrid battery (traction
battery), hybrid s ystem or other
components does not occur.
●Water entering the engine com-
partment may cause severe
damage to the hybrid system.
Water entering the interior may
cause the hybrid battery (trac-
tion battery) stowed under the
rear seats to short circuit.
●Water entering the hybrid trans-
mission will cause deterioration
in transmission quality. The mal-
function indicator may come on,
and the vehicle may not be driv-
able.
●Water can wash the grease
from wheel bearings, causing
rusting and premature failure,
and may also enter the differen-
tials and hybrid transmission,
reducing the gea r oil’s lubricat-
ing qualities.
■When you drive through
water
If driving through water, such as
when crossing shallow streams,
first check the depth of the water
and the bottom of the riverbed for
firmness. Drive slowly and avoid
deep water.
■Inspection after off-road driv-
ing
●Sand and mud that has accu-
mulated around brake discs
may affect braking efficiency
and may damage brake system
components.
●Always perform a maintenance
inspection aft er each day of
off-road driving that has taken
you through rough terrain, sand,
mud, or water. For scheduled
maintenance information, refer
to the “Scheduled Maintenance
Guide” or “Owner’s Manual
Supplement”.
Page 313 of 516
3135-3. Using the storage features
5
Interior features
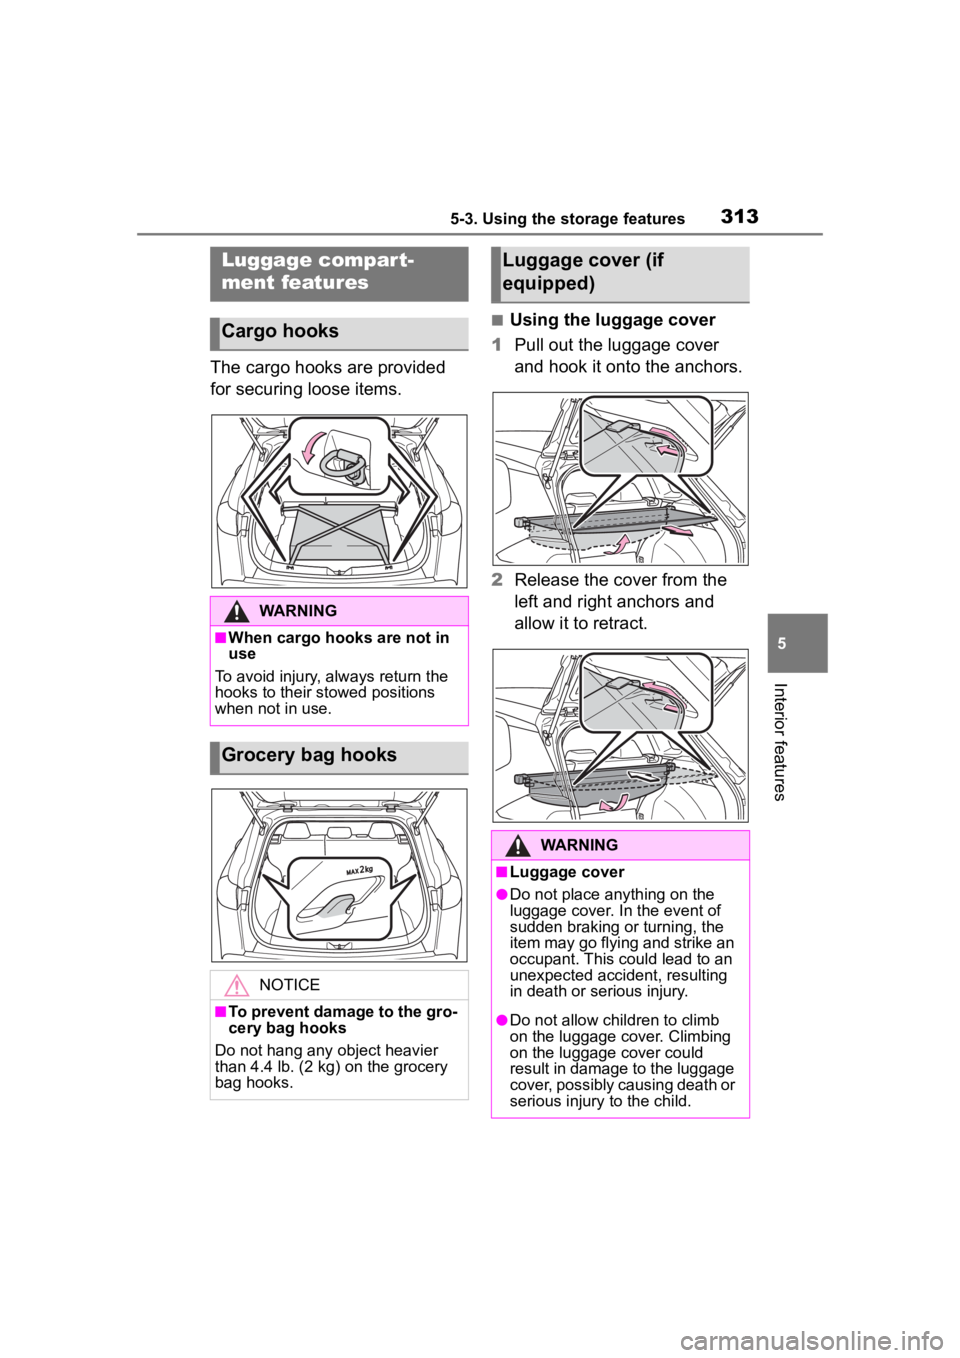
The cargo hooks are provided
for securing loose items.
■Using the luggage cover
1 Pull out the luggage cover
and hook it onto the anchors.
2 Release the cover from the
left and right anchors and
allow it to retract.
Luggage compart-
ment features
Cargo hooks
WARNING
■When cargo hooks are not in
use
To avoid injury, always return the
hooks to their stowed positions
when not in use.
Grocery bag hooks
NOTICE
■To prevent damage to the gro-
cery bag hooks
Do not hang any object heavier
than 4.4 lb. (2 kg ) on the grocery
bag hooks.
Luggage cover (if
equipped)
WARNING
■Luggage cover
●Do not place anything on the
luggage cover. In the event of
sudden braking or turning, the
item may go flying and strike an
occupant. This could lead to an
unexpected accident, resulting
in death or serious injury.
●Do not allow children to climb
on the luggage cover. Climbing
on the luggage cover could
result in damage to the luggage
cover, possibly causing death or
serious injury to the child.
Page 322 of 516
3225-4. Other interior features
charging tray is 95°F (35°C) or
more due to being in direct sun-
light, etc.
●When a portable device is placed
with its charging surface facing up
●When a portable device is not
centered on the charging area
●When a portable device is larger
than the charging tray
●When a foldable portable device is
placed outside of the charging
area
●When the vehicle is near a TV
tower, electric power plant, fuel
station, radio station, large dis-
play, airport, or other facility that
generates strong radio waves or
electrical noise
●When the any of the following
objects, with a thickness of 0.08
in. (2 mm) or more, are between
the charging surface of a portable
device and the charging are:
• Cases or covers a ttached with an
uneven or tilted surface, so that
the charging side is not flat
• Thick cases or covers
• Thick decorations
• Accessories, such as finger rings, straps, etc.
●When the portable device is in
contact with, or is covered by any
of the following metallic objects:
• Cases which have magnet in it on the charging side of the portable
device
• Cards covered with metal, such as aluminum foil
• Cigarette boxes that have alumi- num foil inside
• Metallic wallets or bags
• Coins
• Heat packs
• Recorded media such as CDs and DVDs
• Metallic decorations
• Metallic cases or covers
●When wireless keys (that emit
radio waves) other than those of
your vehicle are being used
nearby
●When 2 or more portable devices
are placed on the charging tray at
the same time
In situations other than above, if the
wireless charger does not operate
properly or the operation indicator
light blinks continuously, the wire-
less charger may be malfunctioning.
Contact your Toyota dealer.
■Cleaning the wireless charger
P.337
WARNING
■Caution while driving
When charging a portable device
while driving, for safety reasons,
the driver should not operate the
portable device.
■Precautions for when driving
Do not charge sma ll, lightweight
portable devices, such as wireless
earbuds, while driving. Light-
weight devices may fly off of the
charging tray, possibly leading to
an accident.
■Caution regarding interfer-
ence with electronic devices
People with implantable cardiac
pacemakers, cardiac resynchroni-
zation therapy pacemakers or
implantable cardioverter def ibrilla-
tors, as well as any other electri-
cal medical device, should consult
their physician about the usage of
the wireless charger.
Operations of th e wireless char-
ger may have an affect on medi-
cal devices.
Page 346 of 516
3466-3. Do-it-yourself maintenance
6-3.Do-it-yourself maintenance
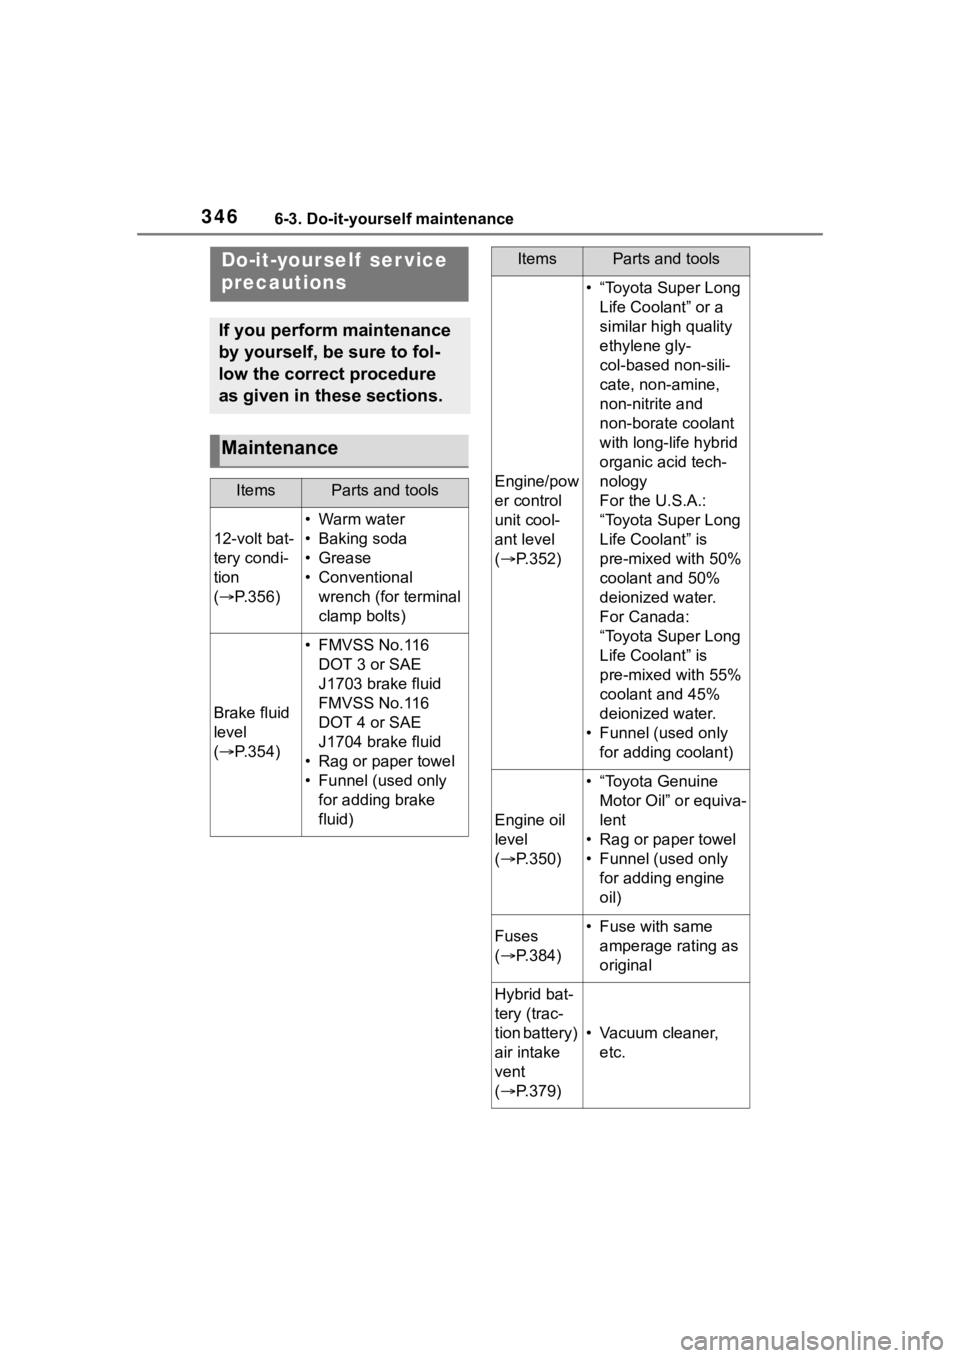
Do-it-yourself ser vice
precautions
If you perform maintenance
by yourself, be sure to fol-
low the correct procedure
as given in these sections.
Maintenance
ItemsParts and tools
12-volt bat-
tery condi-
tion
( P.356)
•Warm water
• Baking soda
•Grease
• Conventional
wrench (for terminal
clamp bolts)
Brake fluid
level
( P.354)
• FMVSS No.116
DOT 3 or SAE
J1703 brake fluid
FMVSS No.116
DOT 4 or SAE
J1704 brake fluid
• Rag or paper towel
• Funnel (used only for adding brake
fluid)
Engine/pow
er control
unit cool-
ant level
( P.352)
• “Toyota Super Long
Life Coolant” or a
similar high quality
ethylene gly-
col-based non-sili-
cate, non-amine,
non-nitrite and
non-borate coolant
with long-life hybrid
organic acid tech-
nology
For the U.S.A.:
“Toyota Super Long
Life Coolant” is
pre-mixed with 50%
coolant and 50%
deionized water.
For Canada:
“Toyota Super Long
Life Coolant” is
pre-mixed with 55%
coolant and 45%
deionized water.
• Funnel (used only for adding coolant)
Engine oil
level
( P.350)
• “Toyota Genuine
Motor Oil” or equiva-
lent
• Rag or paper towel
• Funnel (used only for adding engine
oil)
Fuses
( P.384)• Fuse with same
amperage rating as
original
Hybrid bat-
tery (trac-
tion battery)
air intake
vent
( P.379)
• Vacuum cleaner,
etc.
ItemsParts and tools
Page 352 of 516
3526-3. Do-it-yourself maintenance
■Engine oil consumption
A certain amount of engine oil will
be consumed while driving. In the
following situatio ns, oil consump-
tion may increase, and engine oil
may need to be ref illed in between
oil maintenance intervals.
●When the engine is new, for
example directly after purchasing
the vehicle or after replacing the
engine
●If low quality oil or oil of an inap-
propriate viscosity is used
●When driving at high engine
speeds or with a heavy load,
when towing, or when driving
while accelerating o r decelerating
frequently
●When leaving the engine idling for
a long time, or wh en driving fre-
quently through heavy traffic
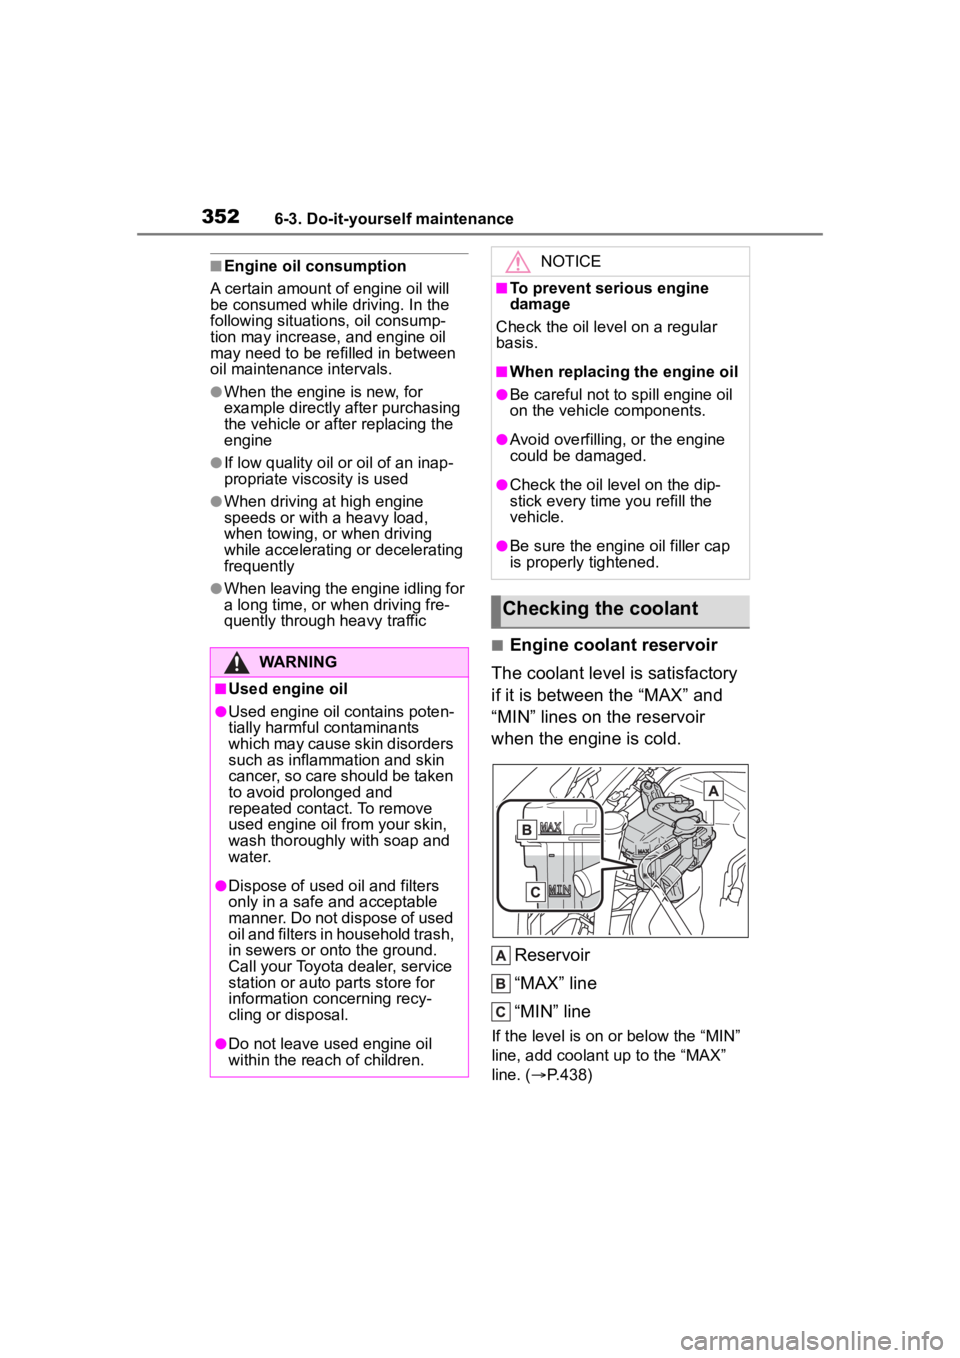
■Engine coolant reservoir
The coolant level is satisfactory
if it is between the “MAX” and
“MIN” lines on the reservoir
when the engine is cold.
Reservoir
“MAX” line
“MIN” line
If the level is on or below the “MIN”
line, add coolant up to the “MAX”
line. ( P.438)
WARNING
■Used engine oil
●Used engine oil contains poten-
tially harmful contaminants
which may cause skin disorders
such as inflammation and skin
cancer, so care should be taken
to avoid prolonged and
repeated contact. To remove
used engine oil from your skin,
wash thoroughly with soap and
water.
●Dispose of used oil and filters
only in a safe an d acceptable
manner. Do not dispose of used
oil and filters in household trash,
in sewers or onto the ground.
Call your Toyota dealer, service
station or auto parts store for
information concerning recy-
cling or disposal.
●Do not leave used engine oil
within the rea ch of children.
NOTICE
■To prevent serious engine
damage
Check the oil le vel on a regular
basis.
■When replacing the engine oil
●Be careful not to spill engine oil
on the vehicle components.
●Avoid overfilling, or the engine
could be damaged.
●Check the oil level on the dip-
stick every time you refill the
vehicle.
●Be sure the engine oil filler cap
is properly tightened.
Checking the coolant
Page 362 of 516
3626-3. Do-it-yourself maintenance
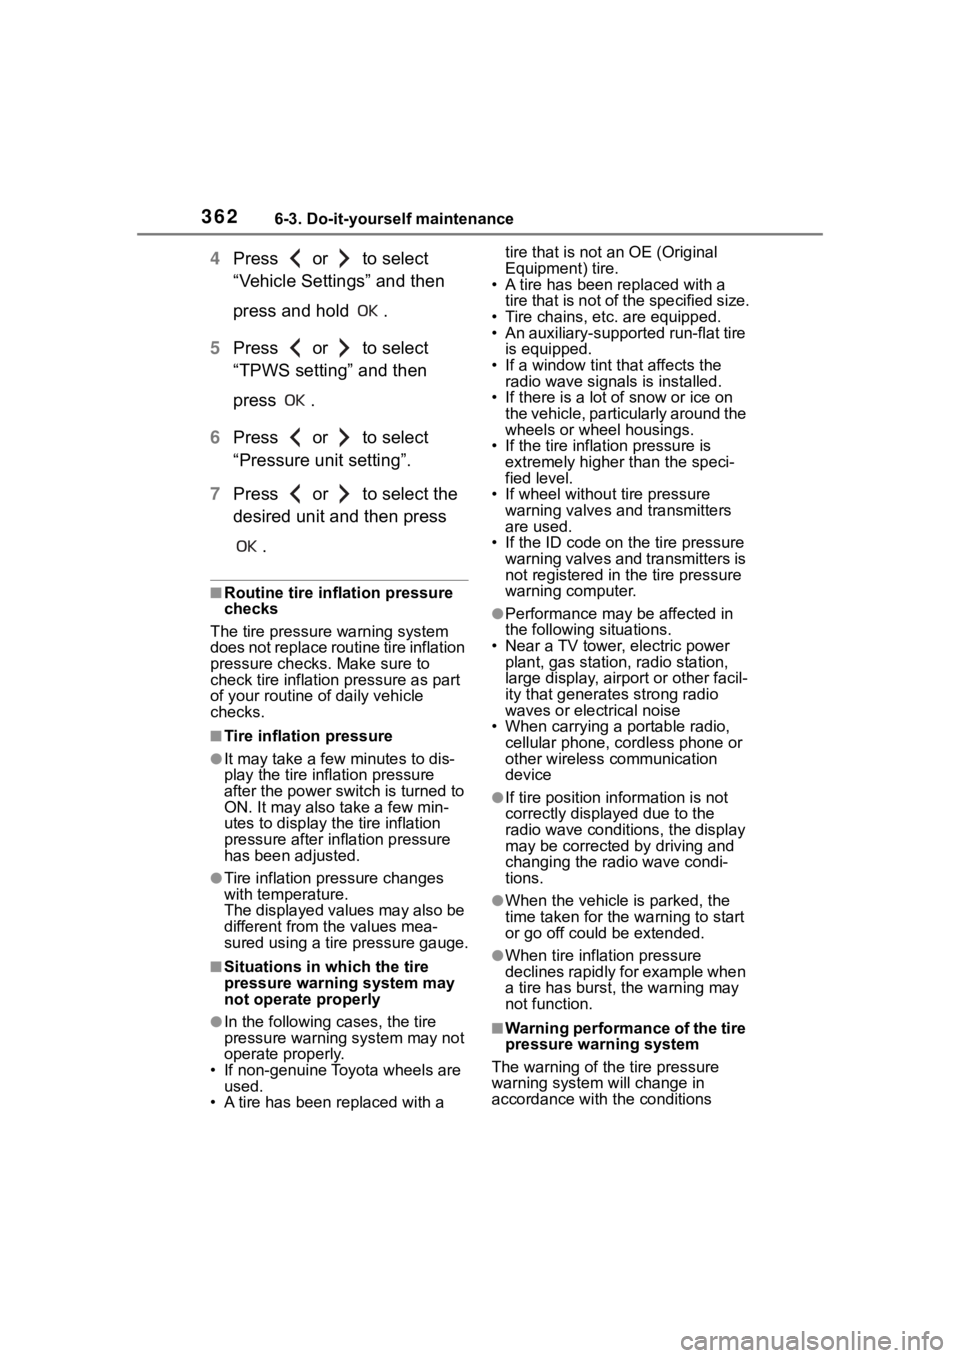
4Press or to select
“Vehicle Settings” and then
press and hold .
5 Press or to select
“TPWS setting” and then
press .
6 Press or to select
“Pressure unit setting”.
7 Press or to select the
desired unit and then press
.
■Routine tire inflation pressure
checks
The tire pressure warning system
does not replace routine tire inflation
pressure checks. Make sure to
check tire inflation pressure as part
of your routine of daily vehicle
checks.
■Tire inflation pressure
●It may take a few minutes to dis-
play the tire inflation pressure
after the power switch is turned to
ON. It may also take a few min-
utes to display the tire inflation
pressure after inflation pressure
has been adjusted.
●Tire inflation pressure changes
with temperature.
The displayed values may also be
different from th e values mea-
sured using a tire pressure gauge.
■Situations in which the tire
pressure warning system may
not operate properly
●In the following cases, the tire
pressure warning system may not
operate properly.
• If non-genuine Toyota wheels are
used.
• A tire has been replaced with a tire that is not an OE (Original
Equipment) tire.
• A tire has been replaced with a
tire that is not of the specified size.
• Tire chains, etc. are equipped.
• An auxiliary-support ed run-flat tire
is equipped.
• If a window tint that affects the radio wave signals is installed.
• If there is a lot of snow or ice on the vehicle, particularly around the
wheels or wheel housings.
• If the tire inflation pressure is extremely higher than the speci-
fied level.
• If wheel withou t tire pressure
warning valves and transmitters
are used.
• If the ID code on the tire pressure warning valves and transmitters is
not registered in the tire pressure
warning computer.
●Performance may be affected in
the following situations.
• Near a TV tower, electric power plant, gas station, radio station,
large display, airpo rt or other facil-
ity that generates strong radio
waves or electrical noise
• When carrying a portable radio, cellular phone, cordless phone or
other wireless communication
device
●If tire position information is not
correctly displayed due to the
radio wave conditions, the display
may be corrected by driving and
changing the radio wave condi-
tions.
●When the vehicle is parked, the
time taken for the warning to start
or go off could be extended.
●When tire inflation pressure
declines rapidly for example when
a tire has burst, the warning may
not function.
■Warning performance of the tire
pressure warning system
The warning of the tire pressure
warning system w ill change in
accordance with the conditions
Page 380 of 516

3806-3. Do-it-yourself maintenance
1Turn the power switch off.
2 Remove the air intake vent
cover.
Pull the cover as shown in
the illustration to disengage
the 5 claws, starting from the
claw in the upper right corner.
Pull the cover toward the
front of the vehicle to remove
it.
3 Remove the filter from the air
intake vent cover.
If dust has accumula ted on the air
intake vent cover, remove the dust
with a vacuum cleaner, etc.
Disengage the claws as
shown in the illustration.
Remove the filter from the
cover.
4 Remove the dust and sand
from the filter.
Using a vacuum cleaner, etc.,
absorb dust and sand from the filter
by profiling the nozzle lightly along
fold.
5Hold the filter to the light and
check if it is not clogged.
If the dust or sand cannot be
removed completely, contact your
NOTICE
■If “Maintenance required for
Traction Battery cooling parts
See owner’s manual” is dis-
played on the multi-informa-
tion display
Clean the air intake vent immedi-
ately.
If the vehicle is continuously
driven with the warning message
displayed, it may cause a mal-
function or output restriction of the
hybrid battery (tr action battery).
Cleaning procedure
Page 383 of 516
3836-3. Do-it-yourself maintenance
6
Maintenance and care
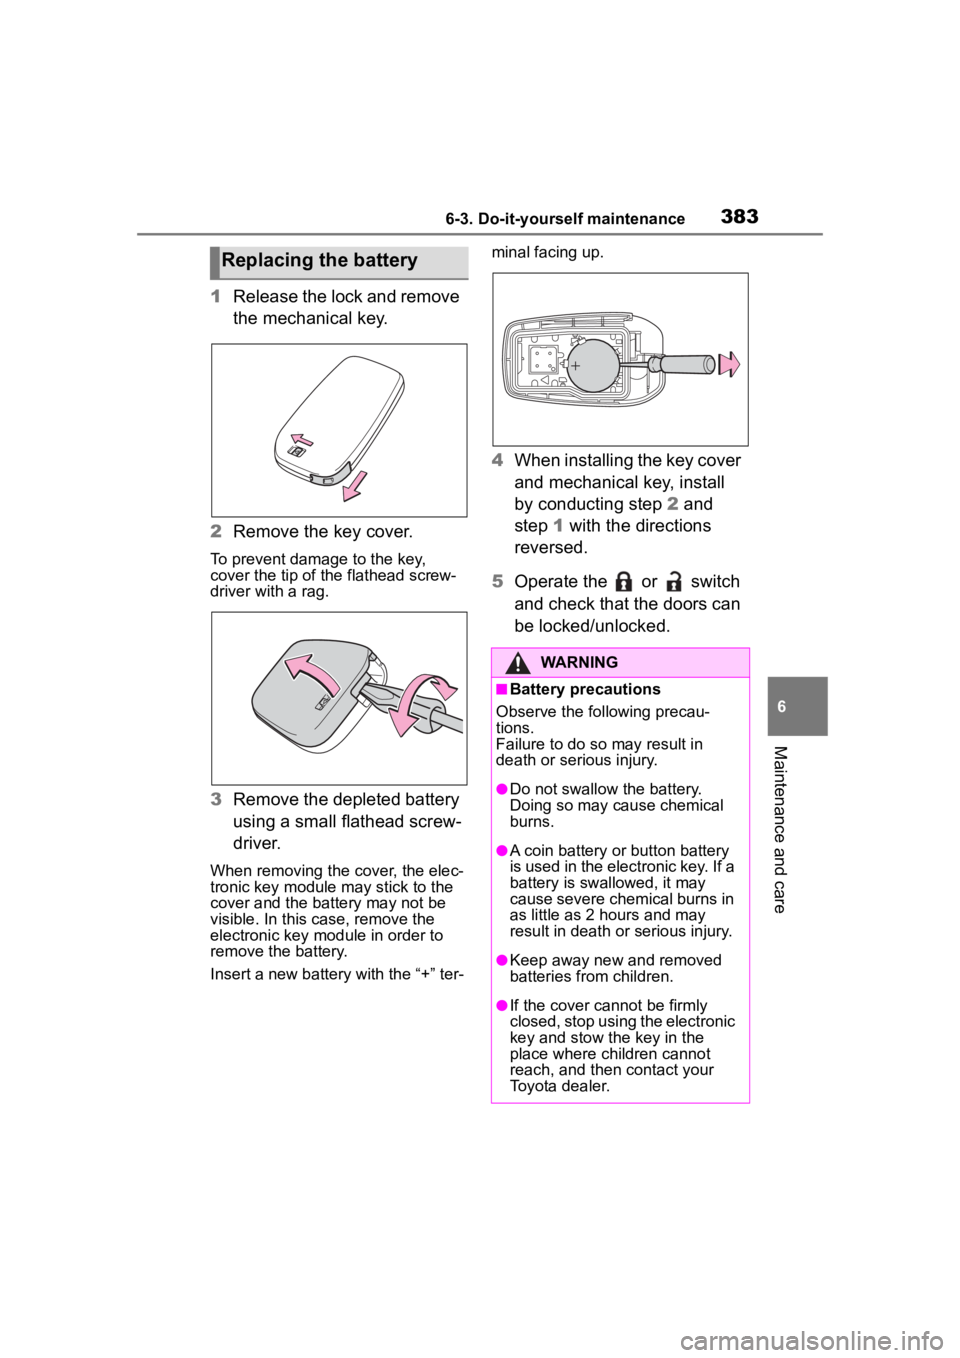
1Release the lock and remove
the mechanical key.
2 Remove the key cover.
To prevent damage to the key,
cover the tip of the flathead screw-
driver with a rag.
3Remove the depleted battery
using a small flathead screw-
driver.
When removing the cover, the elec-
tronic key module may stick to the
cover and the battery may not be
visible. In this case, remove the
electronic key module in order to
remove the battery.
Insert a new battery with the “+” ter- minal facing up.
4
When installing the key cover
and mechanical key, install
by conducting step 2 and
step 1 with the directions
reversed.
5 Operate the or switch
and check that the doors can
be locked/unlocked.
Replacing the battery
WARNING
■Battery precautions
Observe the following precau-
tions.
Failure to do so may result in
death or serious injury.
●Do not swallow the battery.
Doing so may cause chemical
burns.
●A coin battery or button battery
is used in the electronic key. If a
battery is swa llowed, it may
cause severe chemical burns in
as little as 2 hours and may
result in death or serious injury.
●Keep away new and removed
batteries from children.
●If the cover cannot be firmly
closed, stop using the electronic
key and stow the key in the
place where children cannot
reach, and then contact your
Toyota dealer.
Page 390 of 516
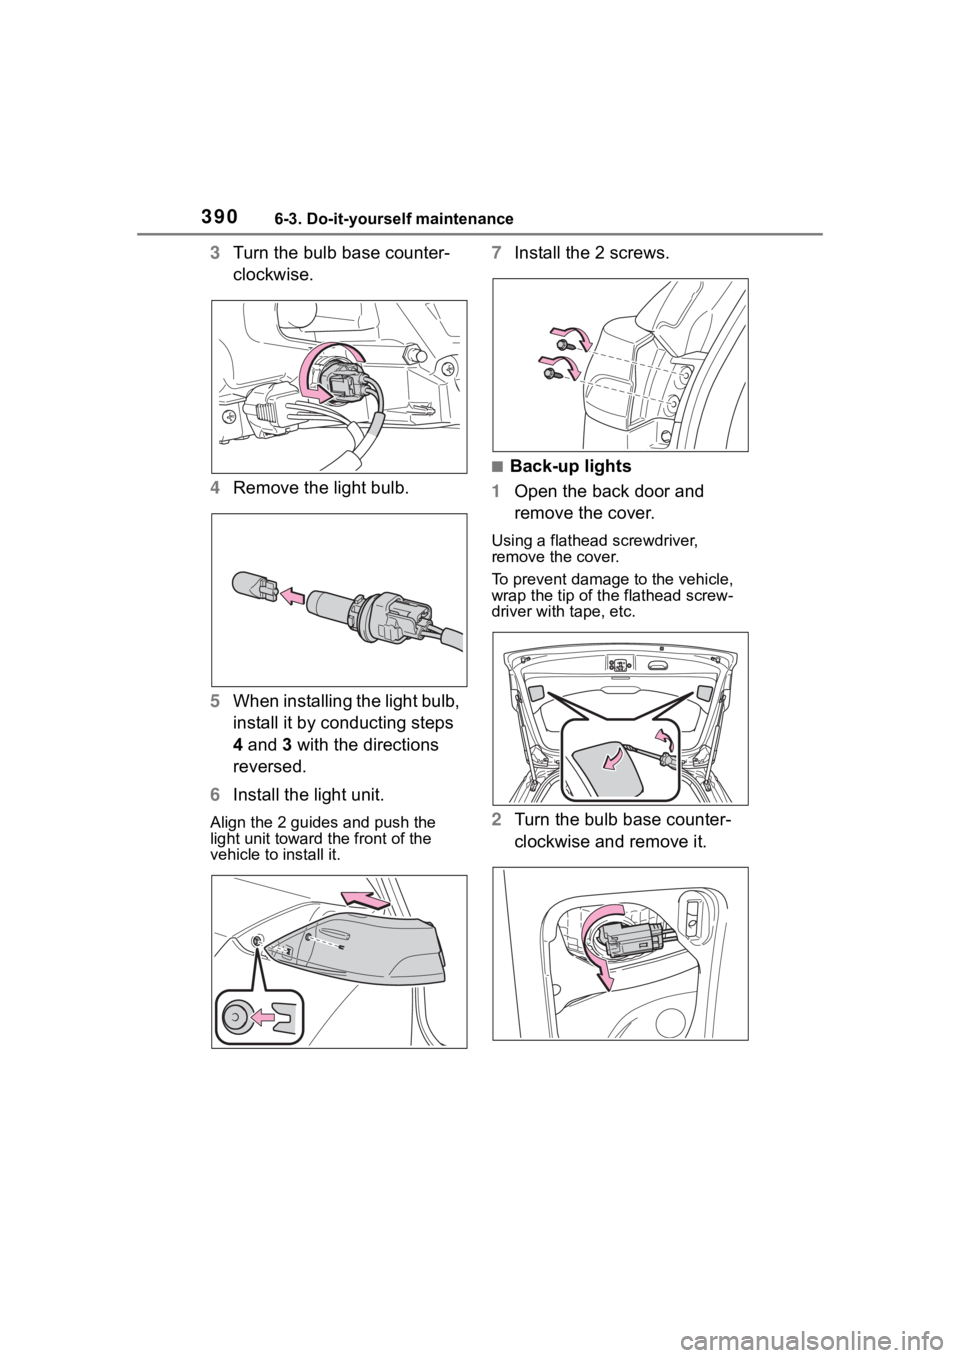
3906-3. Do-it-yourself maintenance
3Turn the bulb base counter-
clockwise.
4 Remove the light bulb.
5 When installing the light bulb,
install it by conducting steps
4 and 3 with the directions
reversed.
6 Install the light unit.
Align the 2 guides and push the
light unit toward the front of the
vehicle to install it.
7Install the 2 screws.
■Back-up lights
1 Open the back door and
remove the cover.
Using a flathead screwdriver,
remove the cover.
To prevent damage to the vehicle,
wrap the tip of th e flathead screw-
driver with tape, etc.
2 Turn the bulb base counter-
clockwise and remove it.