windshield wipers TOYOTA COROLLA CROSS HYBRID 2023 Owners Manual
[x] Cancel search | Manufacturer: TOYOTA, Model Year: 2023, Model line: COROLLA CROSS HYBRID, Model: TOYOTA COROLLA CROSS HYBRID 2023Pages: 516, PDF Size: 15.96 MB
Page 3 of 516
3TABLE OF CONTENTS
1
2
3
4
5
6
7
8
9
10
Turn signal lever.................185
Parking brake ..................... 186
Brake Hold ......................... 189
4-3. Operating the lights and wip- ers
Headlight switch ................. 192
AHB (Automatic High Beam) ......................................... 195
Fog light switch .................. 198
Windshield wipers and washer ......................................... 198
Rear windshield wiper and washer ............................. 200
4-4. Refueling Opening the fuel tank cap .. 202
4-5. Using the driving support sys- tems
Toyota Safety Sense 3 software update .............................. 205
Toyota Safety Sense 3.0 .... 207
PCS (Pre-Collision System) ......................................... 213
LTA (Lane Tracing Assist)... 223
LDA (Lane Departure Alert) ......................................... 228
RSA (Road Sign Assist) ..... 233
Dynamic radar cruise control ......................................... 235
Cruise control ..................... 246
Emergency Driving Stop System ......................................... 250
BSM (Blind Spot Monitor)... 252
RCTA (Rear Cross Traffic Alert) ......................................... 257
Safe Exit Assist .................. 263
Intuitive parking assist ........ 268
PKSB (Parking Support Brake) ......................................... 274
Driving mode select switch ......................................... 283
Driving assist systems........ 2844-6. Driving tips
Hybrid vehicle driving tips .. 289
Winter driving tips .............. 291
Utility vehicle precautions .. 293
5-1. Using the air conditioning system and defogger
Automatic air conditioning sys-tem ................................... 298
Heated steering wheel/seat heaters ............................. 306
5-2. Using the interior lights Interior lights list ................. 308
5-3. Using the storage features List of storage features ...... 310
Luggage compartment features ......................................... 313
5-4. Other interior features Other interior features ........ 315
Garage door opener........... 326
6-1. Maintenance and care Cleaning and protecting the vehicle exterior................. 334
Cleaning and protecting the vehicle interior.................. 337
6-2. Maintenance
Maintenance requirements ........ ................................. 34
0
General maintenance......... 342
Emission inspection and mainte- nance (I/M) programs ...... 344
6-3. Do-it-yourself maintenance Do-it-yourself service precau-tions ................................. 346
Hood .................................. 348
Positioning a floor jack ....... 349
5Interior features
6Maintenance and care
Page 13 of 516
13Pictorial index
Pictorial index
■Exterior
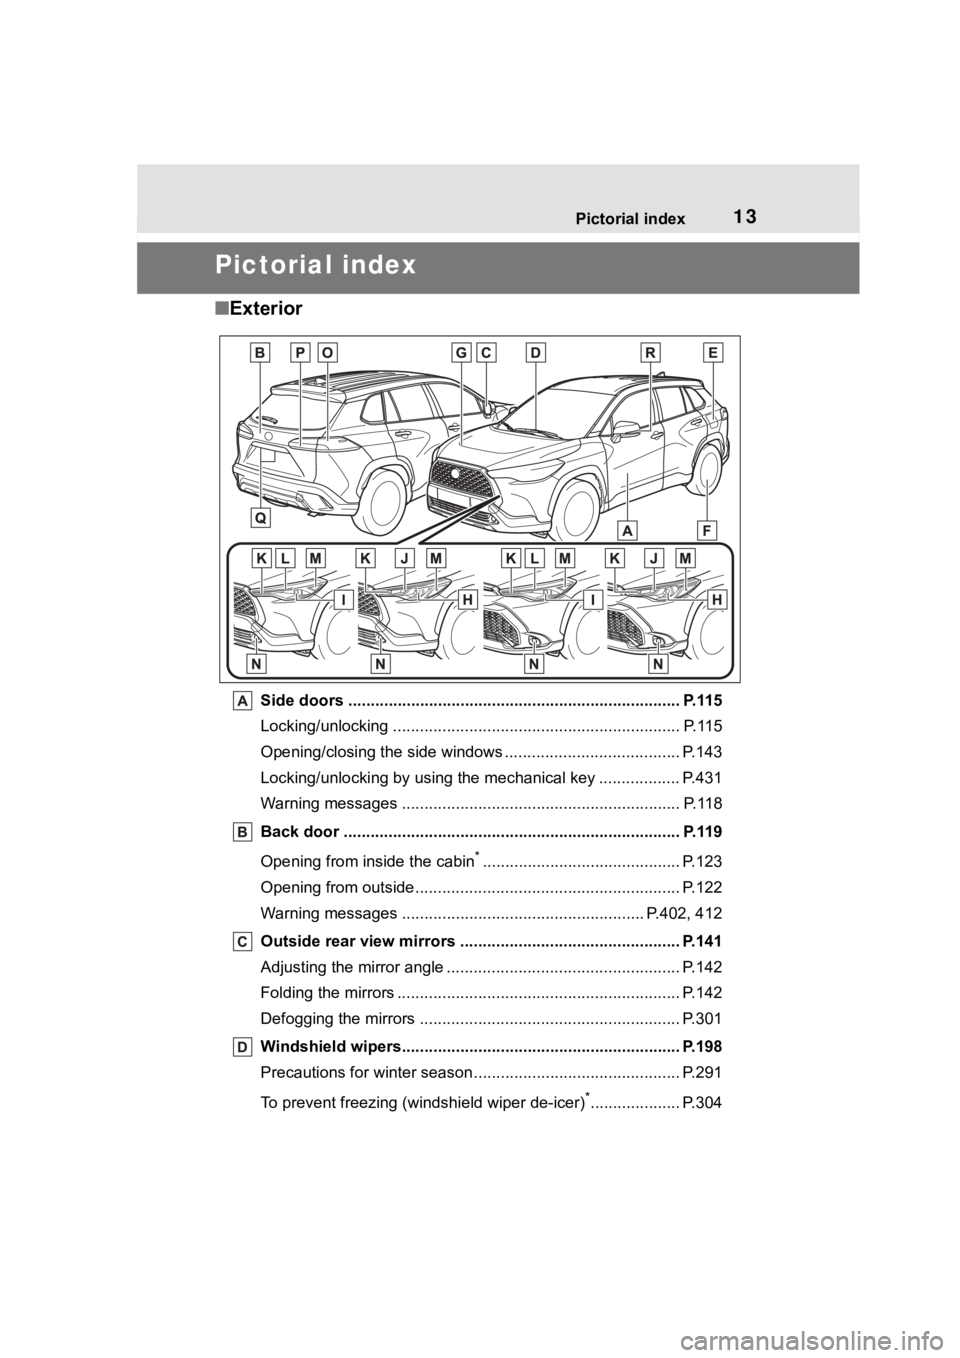
Side doors ......... ................................. ................................ P.115
Locking/unlocking .............................................. .................. P.115
Opening/closing the side windows ............................... ........ P.143
Locking/unlocking by using the mechanical key .................. P. 4 3 1
Warning messages ............................................... ............... P.118
Back door ...................................................... ..................... P.119
Opening from inside the cabin
*............................................ P.123
Opening from outside........................................... ................ P.122
Warning messages ............................................... ....... P.402, 412
Outside rear view mirrors ................................................. P.141
Adjusting the mirror angle ..................................... ............... P.142
Folding the mirrors ............................................ ................... P.142
Defogging the mirrors .......................................... ................ P.301
Windshield wipers.............................................. ................ P.198
Precautions for winter seas on.............................................. P.291
To prevent freezing (windshield wiper de-icer)
*.................... P.304
Page 151 of 516
151
4
4
Driving
Driving
.4-1. Before drivingDriving the vehicle....... 153
Cargo and luggage ..... 160
Vehicle load limits ....... 163
Trailer towing............... 164
Dinghy towing ............. 173
4-2. Driving procedures Power (ignition) switch.................................. 174
EV drive mode ............ 179
Hybrid transmission .... 181
Turn signal lever.......... 185
Parking brake .............. 186
Brake Hold .................. 189
4-3. Operating the lights and wipers
Headlight switch .......... 192
AHB (Automatic High Beam)........................ 195
Fog light switch ........... 198
Windshield wipers and washer....................... 198
Rear windshield wiper and washer....................... 200
4-4. Refueling Opening the fuel tank cap.................................. 202
4-5. Using the driving support
systems
Toyota Safety Sense 3 soft- ware update .............. 205Toyota Safety Sense 3.0
.................................. 207
PCS (Pre-Collision System) .................................. 213
LTA (Lane Tracing Assist) .................................. 223
LDA (Lane Departure Alert) .................................. 228
RSA (Road Sign Assist) .................................. 233
Dynamic radar cruise con- trol ............................. 235
Cruise control .............. 246
Emergency Driving Stop System ...................... 250
BSM (Blind Spot Monitor) .................................. 252
RCTA (Rear Cross Traffic Alert) .......................... 257
Safe Exit Assist ........... 263
Intuitive parking assist . 268
PKSB (Parking Support Brake) ........................ 274
Driving mode select switch .................................. 283
Driving assist systems .................................. 284
4-6. Driving tips Hybrid vehicle driving tips.................................. 289
Winter driving tips........ 291
Page 193 of 516
1934-3. Operating the lights and wipers
4
Driving
nate using the same lights as the
headlights and illuminate darker
than the headlights.
●To make your vehicle more visible
to other drivers during daytime
driving, the daytime running lights
turn on automatically when all of
the following condi tions are met.
(The daytime running lights are
not designed for use at night.)
• The hybrid system is operating.
• The parking brake is released
• The headlight switch is in the
or
* position
*: When the surroundings are bright
The daytime running lights remain
on after they illumi nate, even if the
parking brake is set again.
●Daytime running lights can be
turned off by operating the switch.
●Compared to turning on the head-
lights, the daytime running light
system offers gr eater durability
and consumes less electricity, so
it can help improve fuel economy.
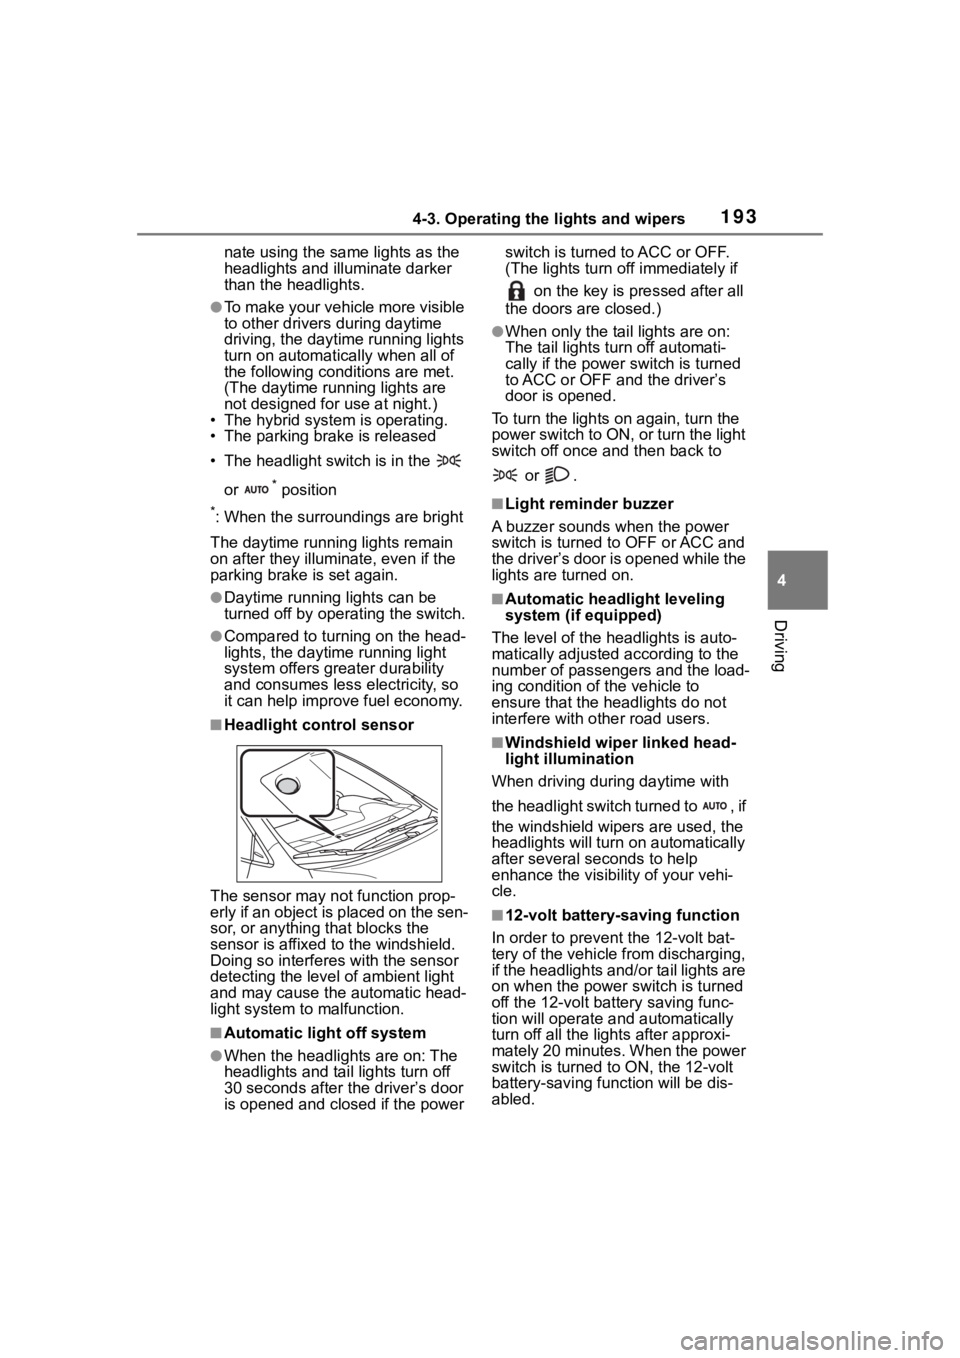
■Headlight control sensor
The sensor may not function prop-
erly if an object is placed on the sen-
sor, or anything that blocks the
sensor is affixed to the windshield.
Doing so interfere s with the sensor
detecting the level of ambient light
and may cause the automatic head-
light system to malfunction.
■Automatic light off system
●When the headlights are on: The
headlights and tail lights turn off
30 seconds after the driver’s door
is opened and clos ed if the power switch is turned to ACC or OFF.
(The lights turn off immediately if
on the key is pressed after all
the doors are closed.)
●When only the tail lights are on:
The tail lights turn off automati-
cally if the power switch is turned
to ACC or OFF and the driver’s
door is opened.
To turn the lights on again, turn the
power switch to ON, or turn the light
switch off once and then back to
or .
■Light reminder buzzer
A buzzer sounds when the power
switch is turned t o OFF or ACC and
the driver’s door is opened while the
lights are turned on.
■Automatic headlight leveling
system (if equipped)
The level of the headlights is auto-
matically adjusted according to the
number of passengers and the load-
ing condition of the vehicle to
ensure that the headlights do not
interfere with o ther road users.
■Windshield wiper linked head-
light illumination
When driving during daytime with
the headlight switch turned to , if
the windshield wipers are used, the
headlights will turn o n automatically
after several se conds to help
enhance the visibility of your vehi-
cle.
■12-volt battery-saving function
In order to prevent the 12-volt bat-
tery of the vehicle from discharging,
if the headlights and/or tail lights are
on when the power switch is turned
off the 12-volt battery saving func-
tion will operate and automatically
turn off all the lig hts after approxi-
mately 20 minutes. When the power
switch is turned to ON, the 12-volt
battery-saving function will be dis-
abled.
Page 195 of 516
1954-3. Operating the lights and wipers
4
Driving
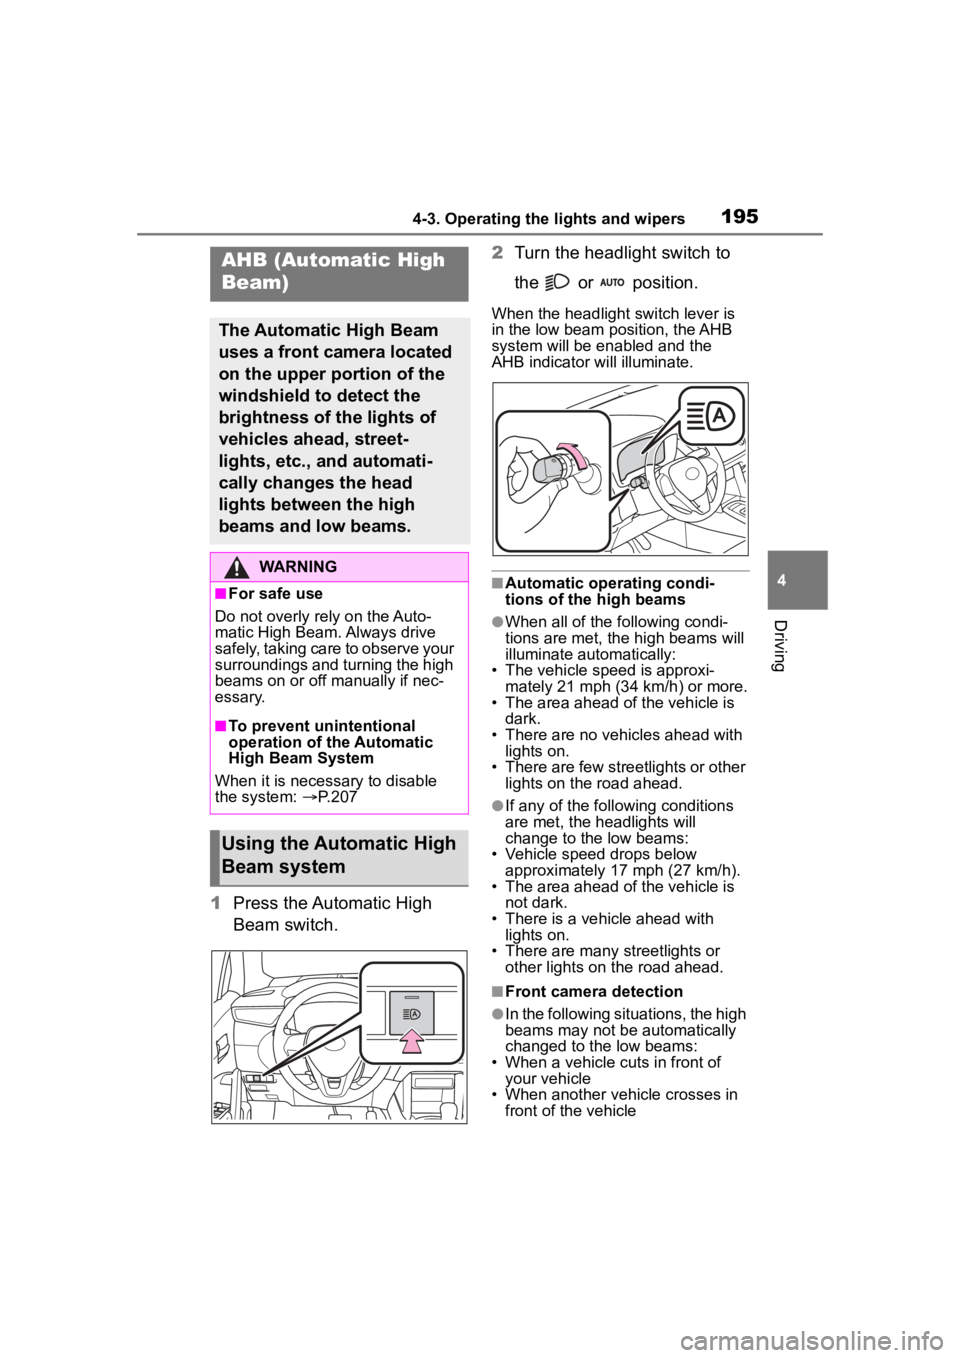
1Press the Automatic High
Beam switch. 2
Turn the headlight switch to
the or position.
When the headlight switch lever is
in the low beam position, the AHB
system will be en abled and the
AHB indicator will illuminate.
■Automatic operating condi-
tions of the high beams
●When all of the following condi-
tions are met, the high beams will
illuminate automatically:
• The vehicle speed is approxi-
mately 21 mph (34 km/h) or more.
• The area ahead of the vehicle is dark.
• There are no vehicles ahead with lights on.
• There are few streetlights or other
lights on the road ahead.
●If any of the following conditions
are met, the headlights will
change to the low beams:
• Vehicle speed drops below
approximately 17 mph (27 km/h).
• The area ahead of the vehicle is not dark.
• There is a vehicle ahead with lights on.
• There are many streetlights or
other lights on the road ahead.
■Front camera detection
●In the following situations, the high
beams may not be automatically
changed to the low beams:
• When a vehicle cuts in front of your vehicle
• When another vehicle crosses in front of the vehicle
AHB (Automatic High
Beam)
The Automatic High Beam
uses a front camera located
on the upper portion of the
windshield to detect the
brightness of the lights of
vehicles ahead, street-
lights, etc., and automati-
cally changes the head
lights between the high
beams and low beams.
WARNING
■For safe use
Do not overly rely on the Auto-
matic High Beam. Always drive
safely, taking care to observe your
surroundings and turning the high
beams on or off manually if nec-
essary.
■To prevent unintentional
operation of the Automatic
High Beam System
When it is necessary to disable
the system: P. 2 0 7
Using the Automatic High
Beam system
Page 198 of 516
1984-3. Operating the lights and wipers
*: If equipped
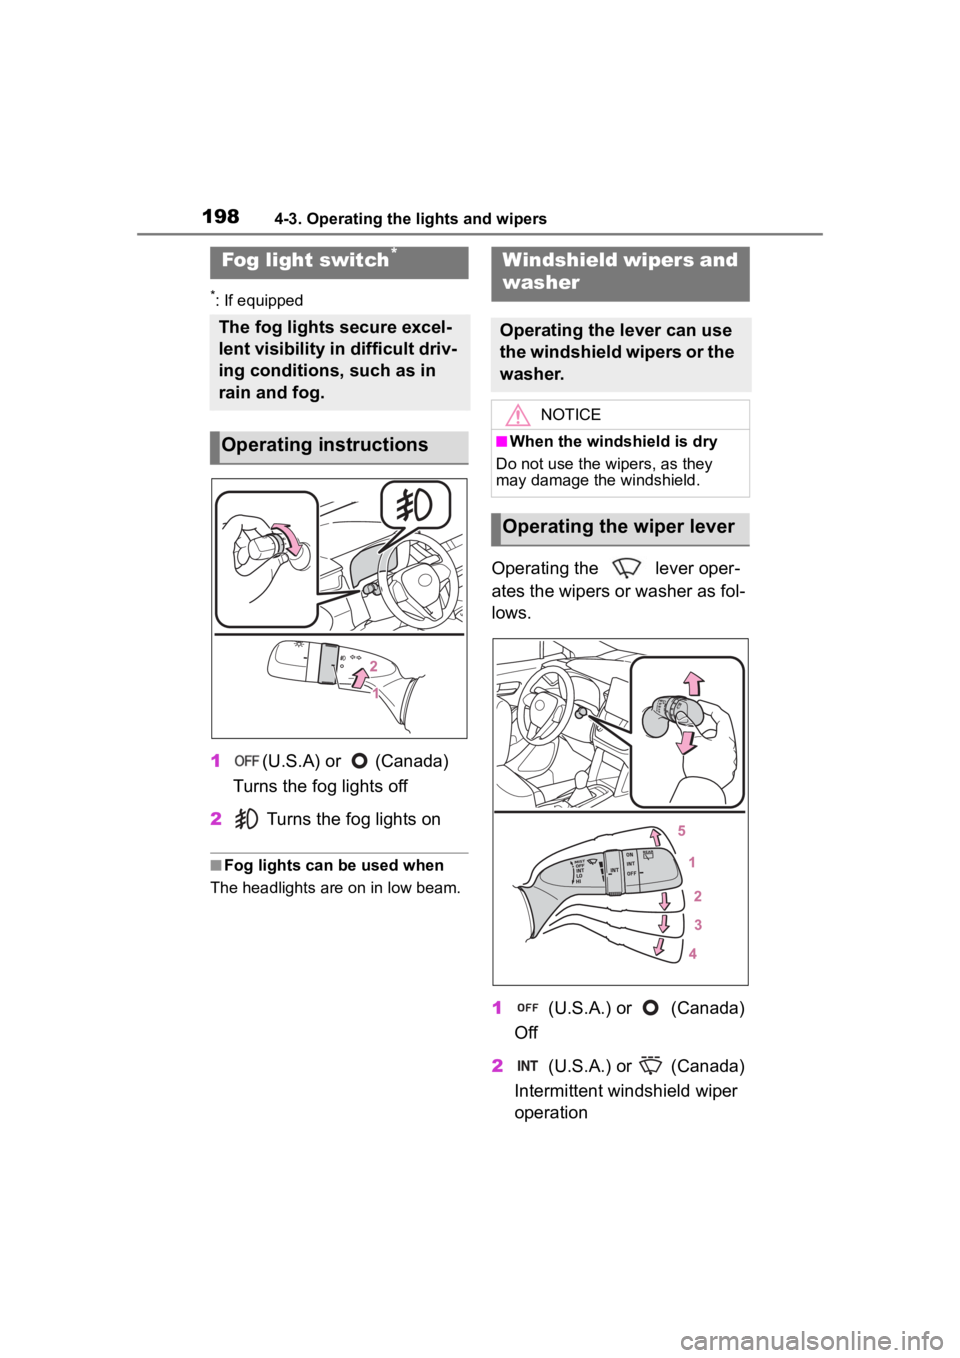
1(U.S.A) or (Canada)
Turns the fog lights off
2 Turns the fog lights on
■Fog lights can be used when
The headlights are on in low beam.
Operating the lever oper-
ates the wipers or washer as fol-
lows.
1 (U.S.A.) or (Canada)
Off
2 (U.S.A.) or (Canada)
Intermittent windshield wiper
operation
Fog light switch*
The fog lights secure excel-
lent visibility in difficult driv-
ing conditions, such as in
rain and fog.
Operating instructions
Windshield wipers and
washer
Operating the lever can use
the windshield wipers or the
washer.
NOTICE
■When the windshield is dry
Do not use the wipers, as they
may damage the windshield.
Operating the wiper lever
Page 199 of 516
1994-3. Operating the lights and wipers
4
Driving
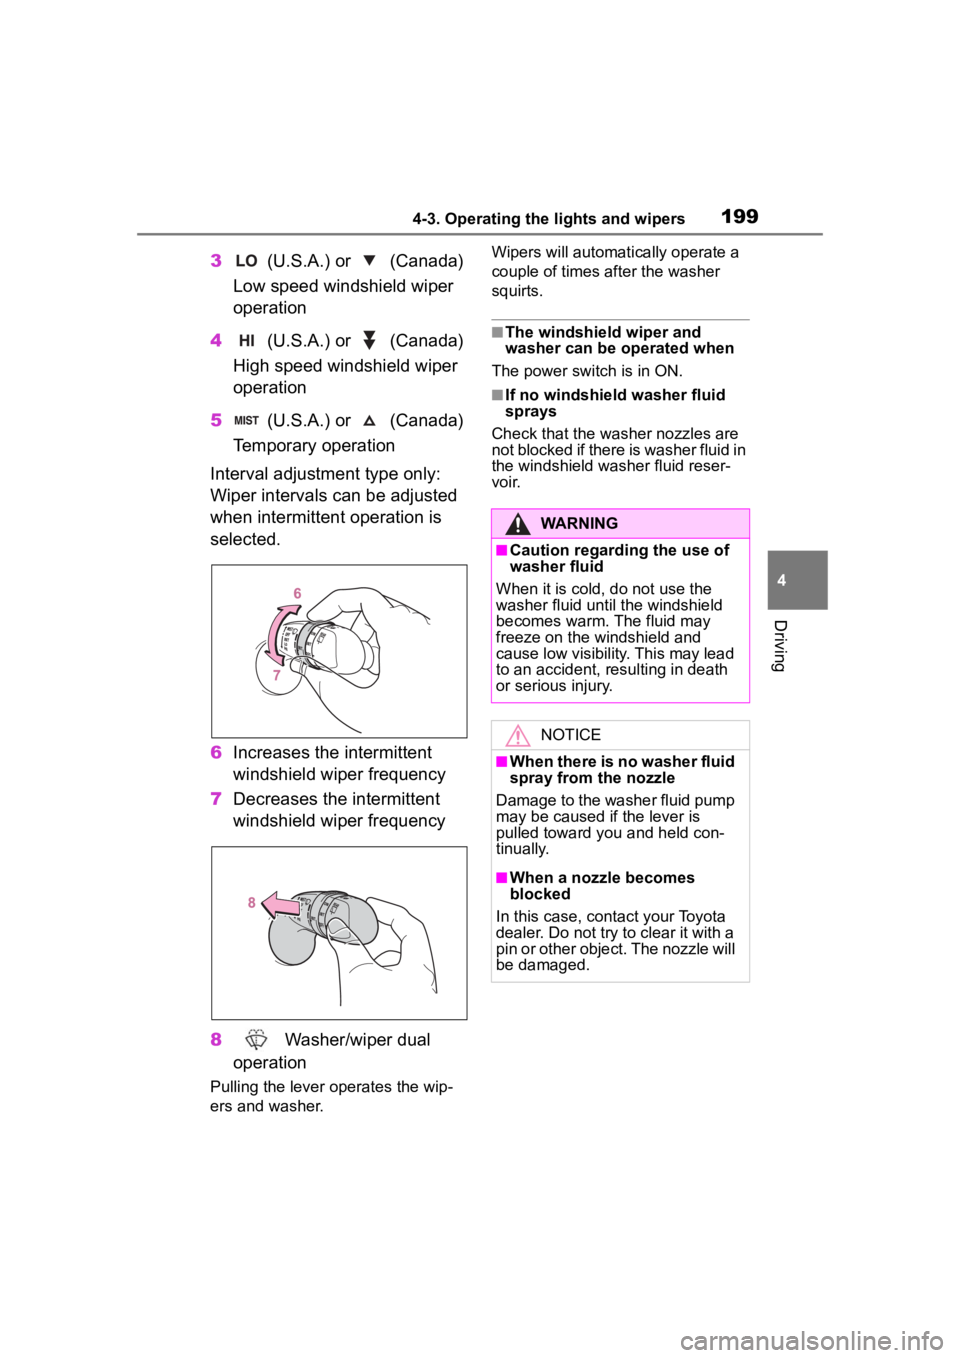
3 (U.S.A.) or (Canada)
Low speed windshield wiper
operation
4 (U.S.A.) or (Canada)
High speed windshield wiper
operation
5 (U.S.A.) or (Canada)
Temporary operation
Interval adjustment type only:
Wiper intervals can be adjusted
when intermittent operation is
selected.
6 Increases the intermittent
windshield wiper frequency
7 Decreases the intermittent
windshield wiper frequency
8 Washer/wiper dual
operation
Pulling the lever o perates the wip-
ers and washer. Wipers will automatically operate a
couple of times after the washer
squirts.
■The windshield wiper and
washer can be operated when
The power switch is in ON.
■If no windshield washer fluid
sprays
Check that the washer nozzles are
not blocked if there is washer fluid in
the windshield washer fluid reser-
voir.
WARNING
■Caution regarding the use of
washer fluid
When it is cold, do not use the
washer fluid unt il the windshield
becomes warm. The fluid may
freeze on the windshield and
cause low visibility. This may lead
to an accident, resulting in death
or serious injury.
NOTICE
■When there is no washer fluid
spray from the nozzle
Damage to the washer fluid pump
may be caused if the lever is
pulled toward you and held con-
tinually.
■When a nozzle becomes
blocked
In this case, contact your Toyota
dealer. Do not try to clear it with a
pin or other object. The nozzle will
be damaged.
Page 200 of 516
2004-3. Operating the lights and wipers
*: If equipped
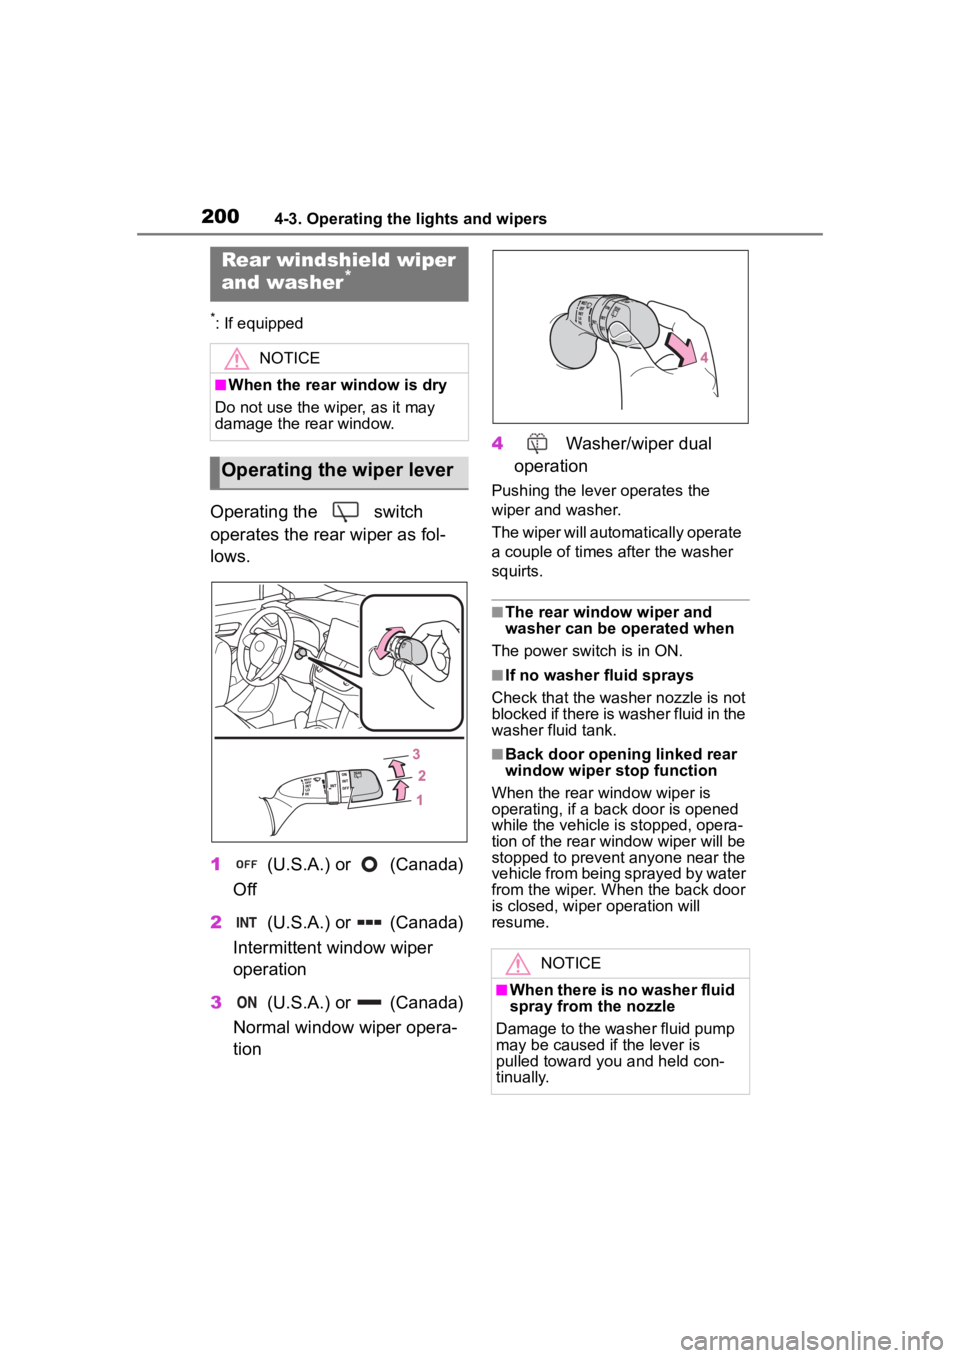
Operating the switch
operates the rear wiper as fol-
lows.
1 (U.S.A.) or (Canada)
Off
2 (U.S.A.) or (Canada)
Intermittent window wiper
operation
3 (U.S.A.) or (Canada)
Normal window wiper opera-
tion 4
Washer/wiper dual
operation
Pushing the lever operates the
wiper and washer.
The wiper will automatically operate
a couple of times after the washer
squirts.
■The rear window wiper and
washer can be operated when
The power switch is in ON.
■If no washer fluid sprays
Check that the wash er nozzle is not
blocked if there is washer fluid in the
washer fluid tank.
■Back door opening linked rear
window wiper stop function
When the rear window wiper is
operating, if a back door is opened
while the vehicle is stopped, opera-
tion of the rear window wiper will be
stopped to prevent anyone near the
vehicle from being sprayed by water
from the wiper. When the back door
is closed, wiper operation will
resume.
Rear windshield wiper
and washer*
NOTICE
■When the rear window is dry
Do not use the wiper, as it may
damage the rear window.
Operating the wiper lever
NOTICE
■When there is no washer fluid
spray from the nozzle
Damage to the washer fluid pump
may be caused if the lever is
pulled toward you and held con-
tinually.
Page 209 of 516
2094-5. Using the driving support systems
4
Driving
WARNING
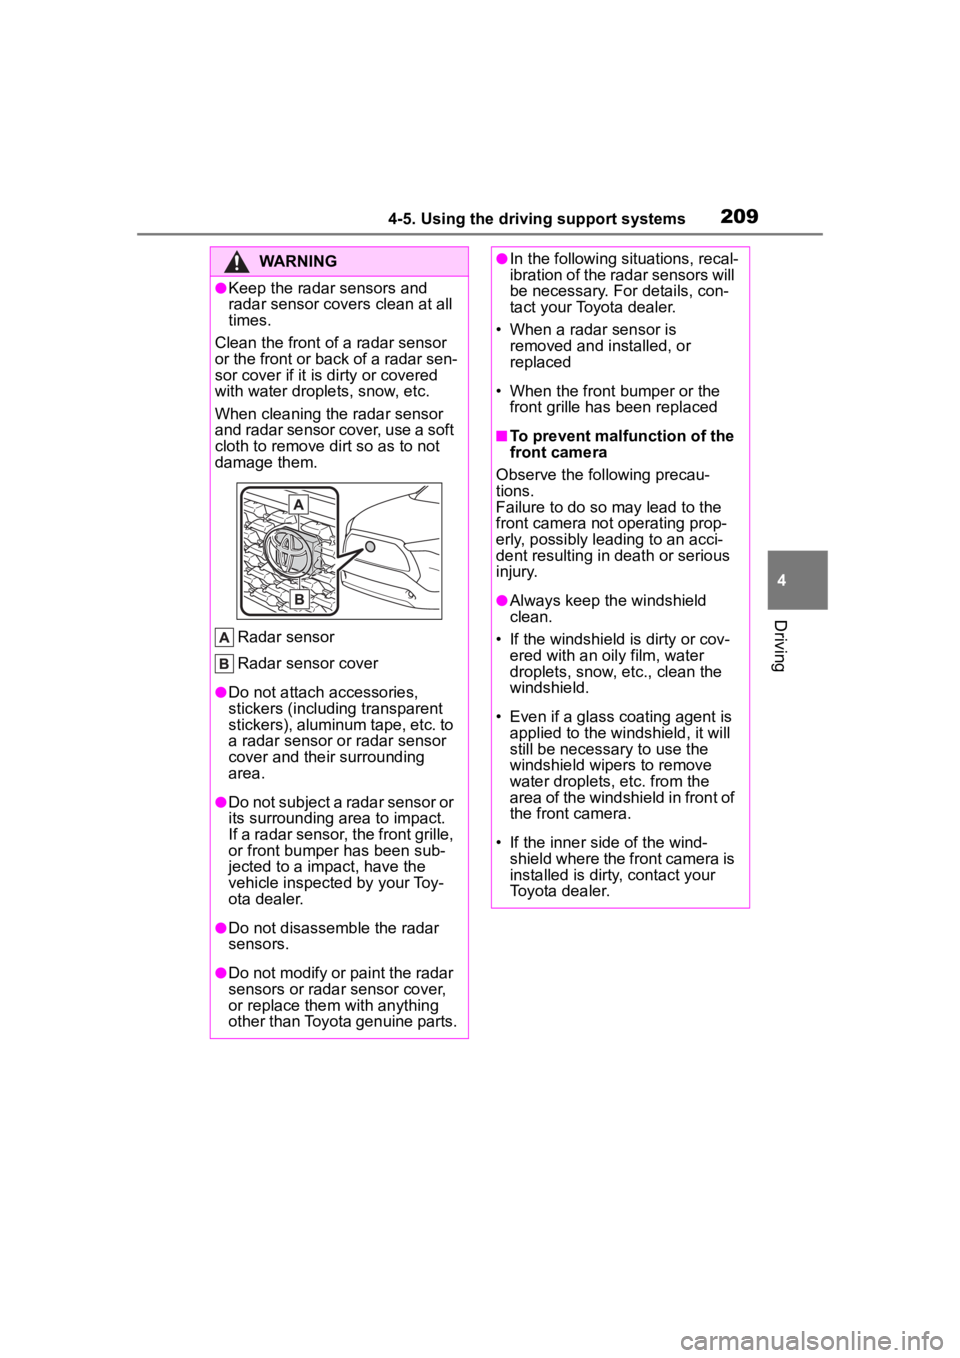
●Keep the radar sensors and
radar sensor covers clean at all
times.
Clean the front of a radar sensor
or the front or back of a radar sen-
sor cover if it is dirty or covered
with water drople ts, snow, etc.
When cleaning the radar sensor
and radar sensor cover, use a soft
cloth to remove di rt so as to not
damage them.
Radar sensor
Radar sensor cover
●Do not attach accessories,
stickers (including transparent
stickers), aluminum tape, etc. to
a radar sensor or radar sensor
cover and their surrounding
area.
●Do not subject a radar sensor or
its surrounding area to impact.
If a radar sensor, the front grille,
or front bumper has been sub-
jected to a impact, have the
vehicle inspected by your Toy-
ota dealer.
●Do not disassemble the radar
sensors.
●Do not modify or paint the radar
sensors or radar sensor cover,
or replace them with anything
other than Toyota genuine parts.
●In the following situations, recal-
ibration of the radar sensors will
be necessary. For details, con-
tact your Toyota dealer.
• When a radar sensor is removed and installed, or
replaced
• When the front bumper or the front grille has been replaced
■To prevent malfunction of the
front camera
Observe the following precau-
tions.
Failure to do so may lead to the
front camera not operating prop-
erly, possibly leading to an acci-
dent resulting in death or serious
injury.
●Always keep the windshield
clean.
• If the windshield is dirty or cov-
ered with an o ily film, water
droplets, snow, etc., clean the
windshield.
• Even if a glass coating agent is applied to the windshield, it will
still be necessary to use the
windshield wipers to remove
water droplets, etc. from the
area of the windshield in front of
the front camera.
• If the inner side of the wind- shield where the front camera is
installed is dirty, contact your
Toyota dealer.
Page 210 of 516
2104-5. Using the driving support systems
WARNING
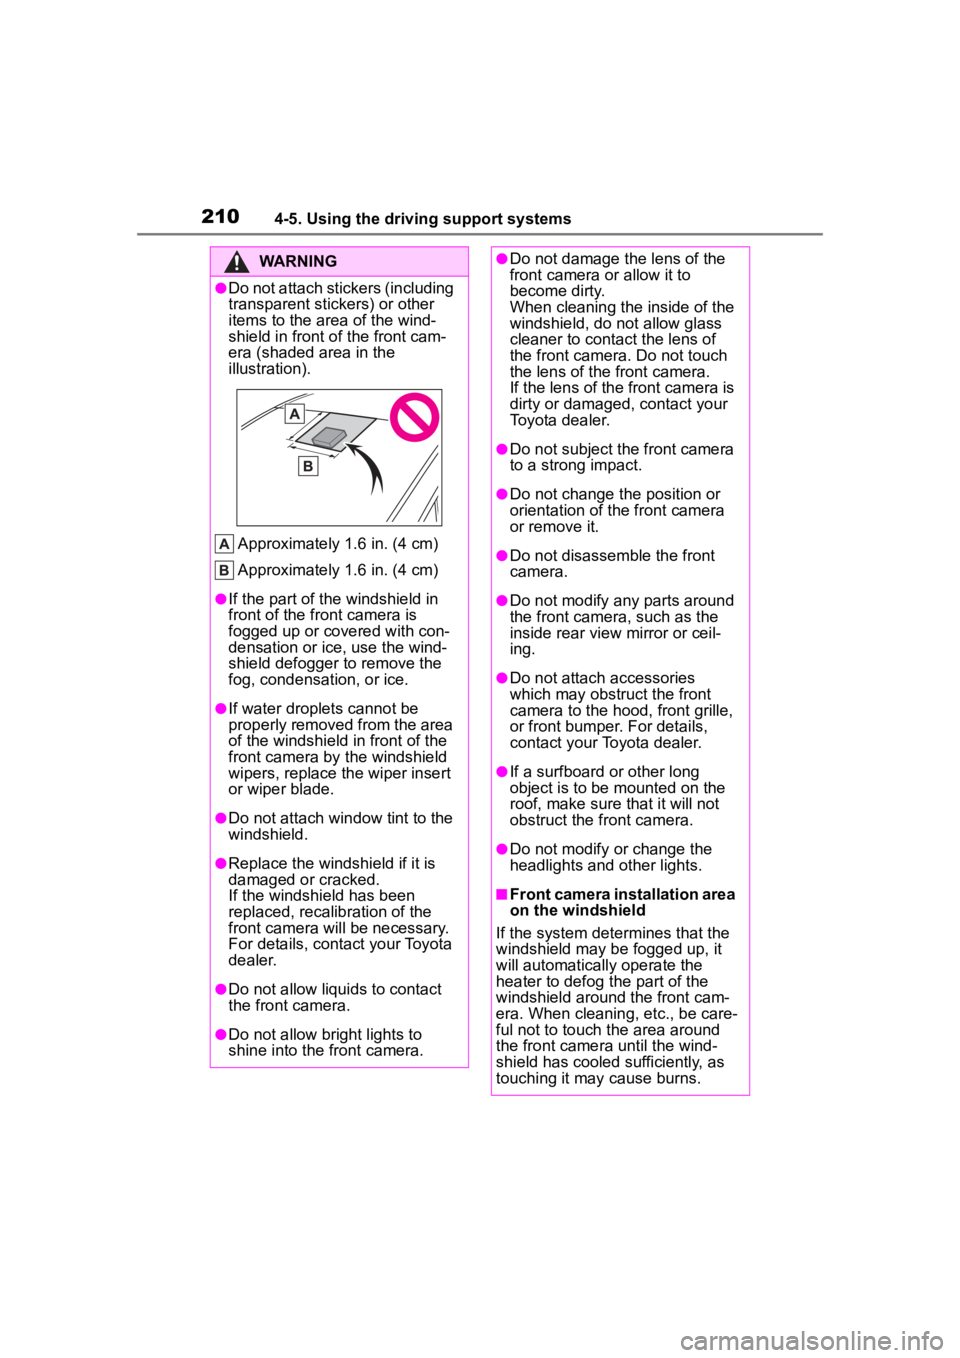
●Do not attach stickers (including
transparent stickers) or other
items to the area of the wind-
shield in front of the front cam-
era (shaded area in the
illustration).
Approximately 1.6 in. (4 cm)
Approximately 1.6 in. (4 cm)
●If the part of the windshield in
front of the front camera is
fogged up or covered with con-
densation or ice, use the wind-
shield defogger to remove the
fog, condensation, or ice.
●If water droplets cannot be
properly removed from the area
of the windshield in front of the
front camera by the windshield
wipers, replace the wiper insert
or wiper blade.
●Do not attach win dow tint to the
windshield.
●Replace the windshield if it is
damaged or cracked.
If the windshield has been
replaced, recalib ration of the
front camera will be necessary.
For details, contact your Toyota
dealer.
●Do not allow liquids to contact
the front camera.
●Do not allow bright lights to
shine into the front camera.
●Do not damage th e lens of the
front camera o r allow it to
become dirty.
When cleaning the inside of the
windshield, do not allow glass
cleaner to contact the lens of
the front camera. Do not touch
the lens of the front camera.
If the lens of the front camera is
dirty or damaged, contact your
Toyota dealer.
●Do not subject the front camera
to a strong impact.
●Do not change the position or
orientation of the front camera
or remove it.
●Do not disassemble the front
camera.
●Do not modify any parts around
the front camera , such as the
inside rear view mirror or ceil-
ing.
●Do not attach accessories
which may obstruct the front
camera to the hood, front grille,
or front bumper. For details,
contact your Toyota dealer.
●If a surfboard or other long
object is to be mounted on the
roof, make sure that it will not
obstruct the front camera.
●Do not modify or change the
headlights and other lights.
■Front camera installation area
on the windshield
If the system determines that the
windshield may be fogged up, it
will automatically operate the
heater to defog t he part of the
windshield aroun d the front cam-
era. When cleaning, etc., be care-
ful not to touch the area around
the front camera until the wind-
shield has cooled sufficiently, as
touching it may cause burns.