reset TOYOTA COROLLA HATCHBACK 2020 (in English) User Guide
[x] Cancel search | Manufacturer: TOYOTA, Model Year: 2020, Model line: COROLLA HATCHBACK, Model: TOYOTA COROLLA HATCHBACK 2020Pages: 572, PDF Size: 13.8 MB
Page 277 of 572
2775-3. Connectivity settings
COROLLA H/B_U
5
Audio
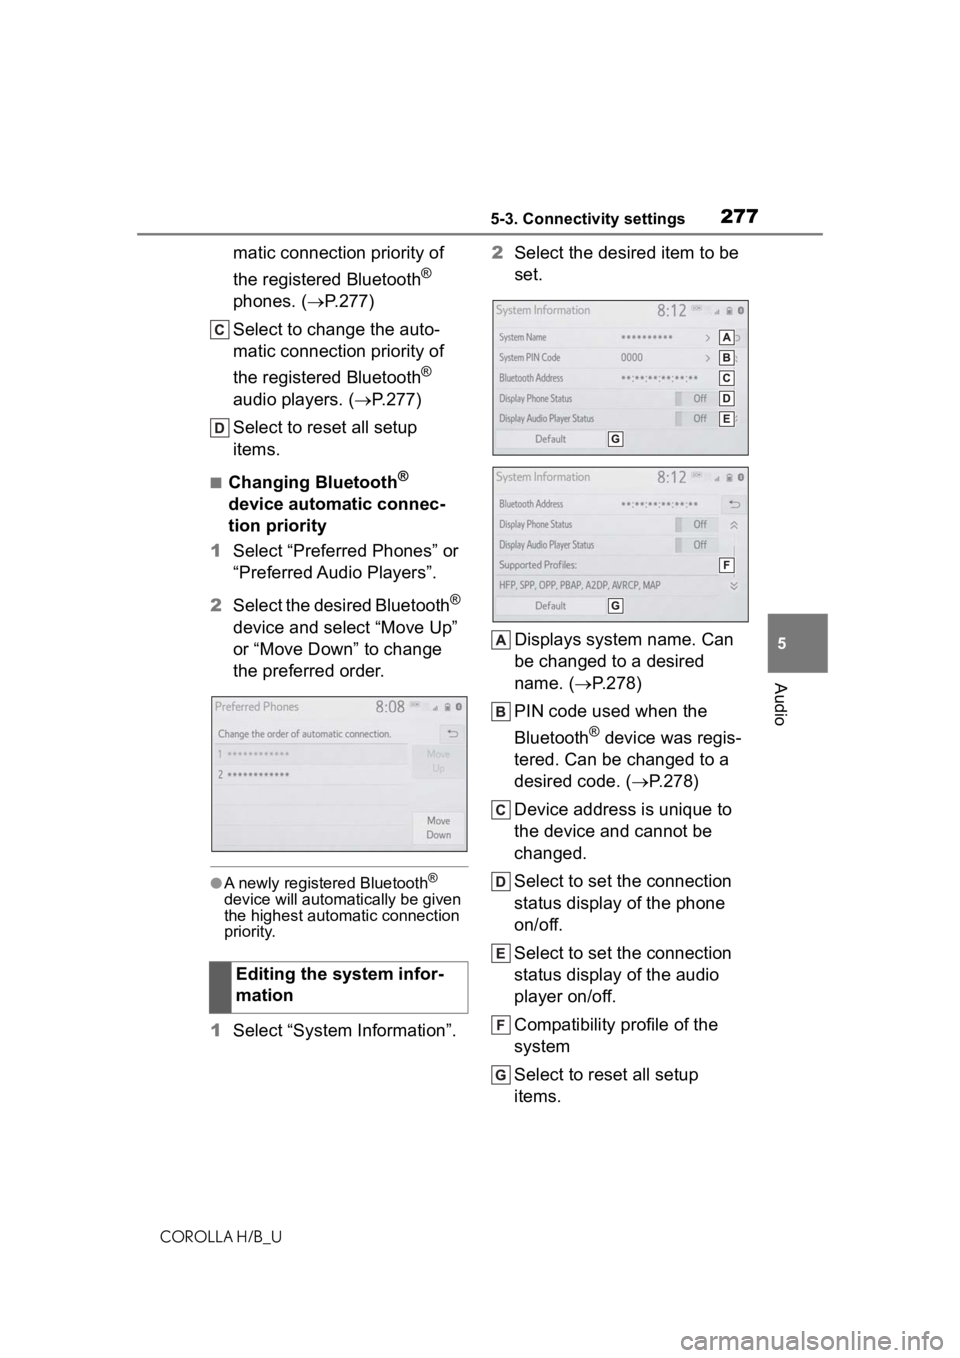
matic connection priority of
the registered Bluetooth
®
phones. ( P.277)
Select to change the auto-
matic connection priority of
the registered Bluetooth
®
audio players. ( P.277)
Select to reset all setup
items.
■Changing Bluetooth®
device automatic connec-
tion priority
1 Select “Preferred Phones” or
“Preferred Audio Players”.
2 Select the desired Bluetooth
®
device and select “Move Up”
or “Move Down” to change
the preferred order.
●A newly registered Bluetooth®
device will automat ically be given
the highest autom atic connection
priority.
1 Select “System Information”. 2
Select the desired item to be
set.
Displays system name. Can
be changed to a desired
name. ( P.278)
PIN code used when the
Bluetooth
® device was regis-
tered. Can be changed to a
desired code. ( P.278)
Device address is unique to
the device and cannot be
changed.
Select to set the connection
status display of the phone
on/off.
Select to set the connection
status display of the audio
player on/off.
Compatibility profile of the
system
Select to reset all setup
items.
Editing the system infor-
mation
Page 280 of 572
2805-3. Connectivity settings
COROLLA H/B_U
Select to check/change the
access point password.
(P.280)
Select to display hints for
connecting to the vehicle via
Wi-Fi
®.
Select to make the access
point searchable/unsearch-
able.
Select to check/change the
security protocol of the
access point (for authentica-
tion and encryption).
( P.281)
Select to change the access
point name (SSID). ( P.281)
Select to change the Wi-Fi
®
connection channel (within
the 2.4GHz frequency band).
( P.281)
●If any settings have been
changed, it will be necessary to
reset the Wi-Fi
® system to com-
plete the changes. To reset the
Wi-Fi
® system, select “Yes” on the
pop-up displayed after changing
the settings.
When the Wi-Fi® Hotspot func-
tion is enabled, the system
checks for a valid Hotspot ser-
vice subscription.
If a hotspot service subscription
has not been started, connect
your device to the in-vehicle access point to start your sub-
scription. A trial subscription
may be available.
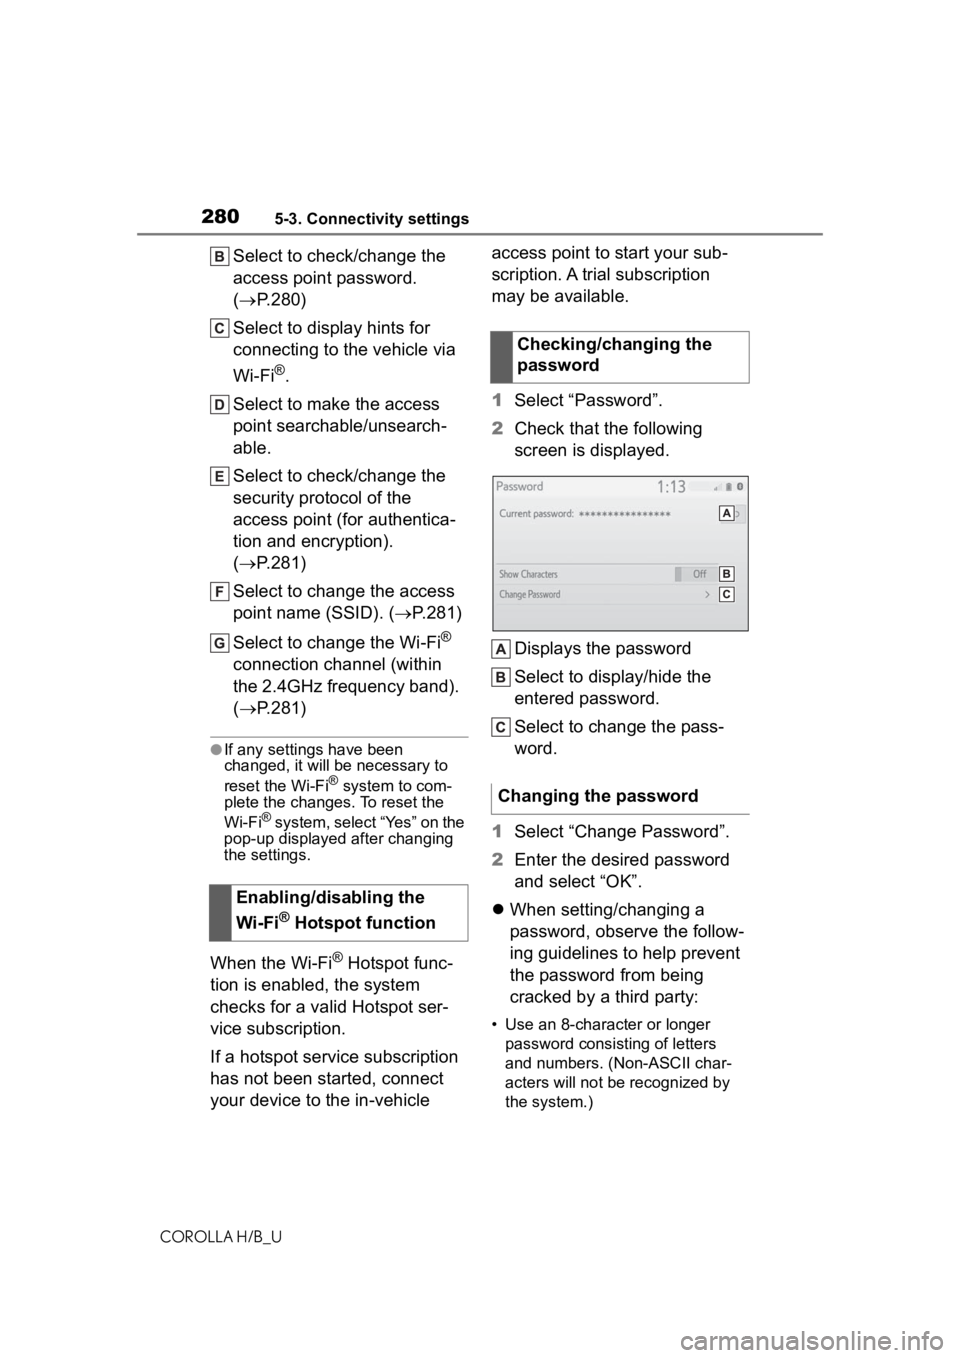
1
Select “Password”.
2 Check that the following
screen is displayed.
Displays the password
Select to display/hide the
entered password.
Select to change the pass-
word.
1 Select “Change Password”.
2 Enter the desired password
and select “OK”.
When setting/changing a
password, observe the follow-
ing guidelines to help prevent
the password from being
cracked by a third party:
• Use an 8-character or longer
password consisting of letters
and numbers. (Non-ASCII char-
acters will not be recognized by
the system.)
Enabling/disabling the
Wi-Fi
® Hotspot function
Checking/changing the
password
Changing the password
Page 294 of 572
2945-4. Other settings
COROLLA H/B_U
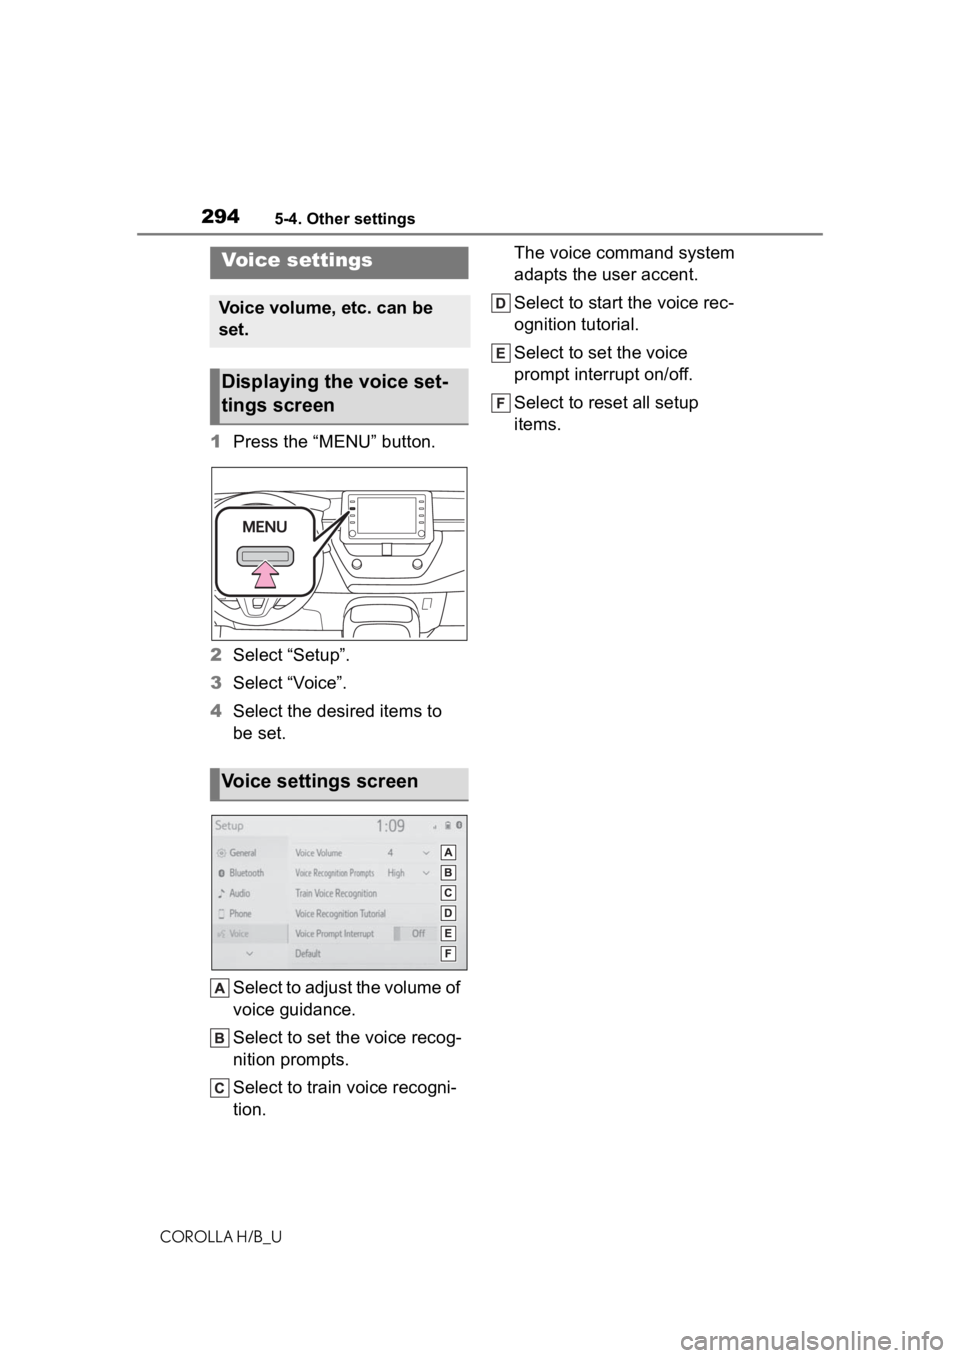
1Press the “MENU” button.
2 Select “Setup”.
3 Select “Voice”.
4 Select the desired items to
be set.
Select to adjust the volume of
voice guidance.
Select to set the voice recog-
nition prompts.
Select to train voice recogni-
tion. The voice command system
adapts the user accent.
Select to start the voice rec-
ognition tutorial.
Select to set the voice
prompt interrupt on/off.
Select to reset all setup
items.
Voice settings
Voice volume, etc. can be
set.
Displaying the voice set-
tings screen
Voice settings screen
Page 302 of 572
3025-6. Radio operation
COROLLA H/B_U
5-6.Radio operation
*: If equipped
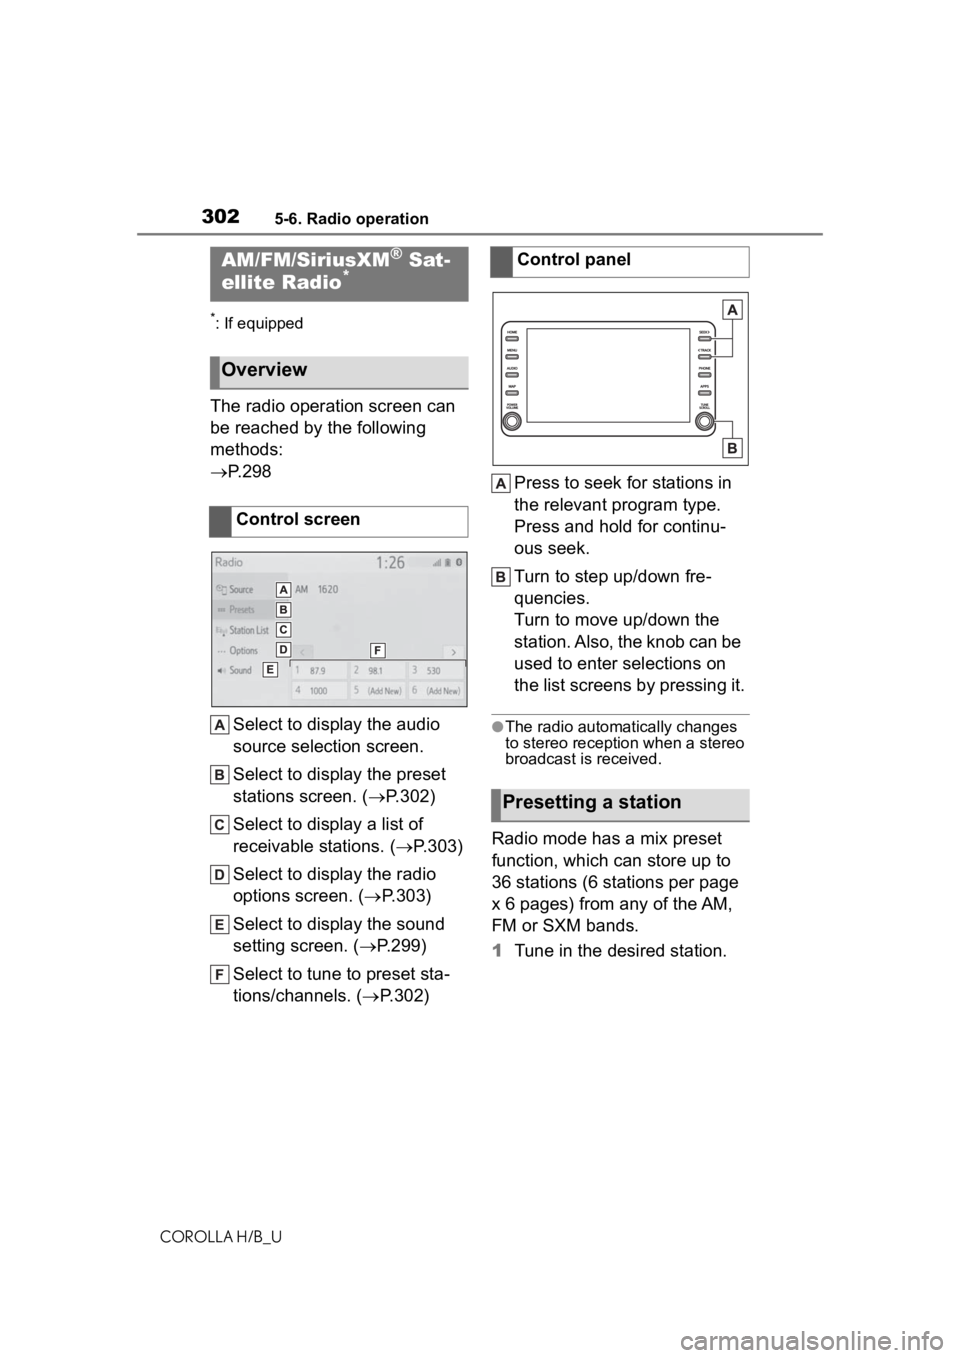
The radio operation screen can
be reached by the following
methods:
P. 2 9 8
Select to display the audio
source selection screen.
Select to display the preset
stations screen. ( P.302)
Select to display a list of
receivable stations. ( P.303)
Select to display the radio
options screen. ( P.303)
Select to display the sound
setting screen. ( P.299)
Select to tune to preset sta-
tions/channels. ( P.302) Press to seek for stations in
the relevant program type.
Press and hold for continu-
ous seek.
Turn to step up/down fre-
quencies.
Turn to move up/down the
station. Also, the knob can be
used to enter selections on
the list screens by pressing it.
●The radio automatically changes
to stereo reception when a stereo
broadcast is received.
Radio mode has a mix preset
function, which can store up to
36 stations (6 stations per page
x 6 pages) from any of the AM,
FM or SXM bands.
1
Tune in the desired station.
AM/FM/SiriusXM® Sat-
ellite Radio*
Overview
Control screen
Control panel
Presetting a station
Page 303 of 572
3035-6. Radio operation
COROLLA H/B_U
5
Audio
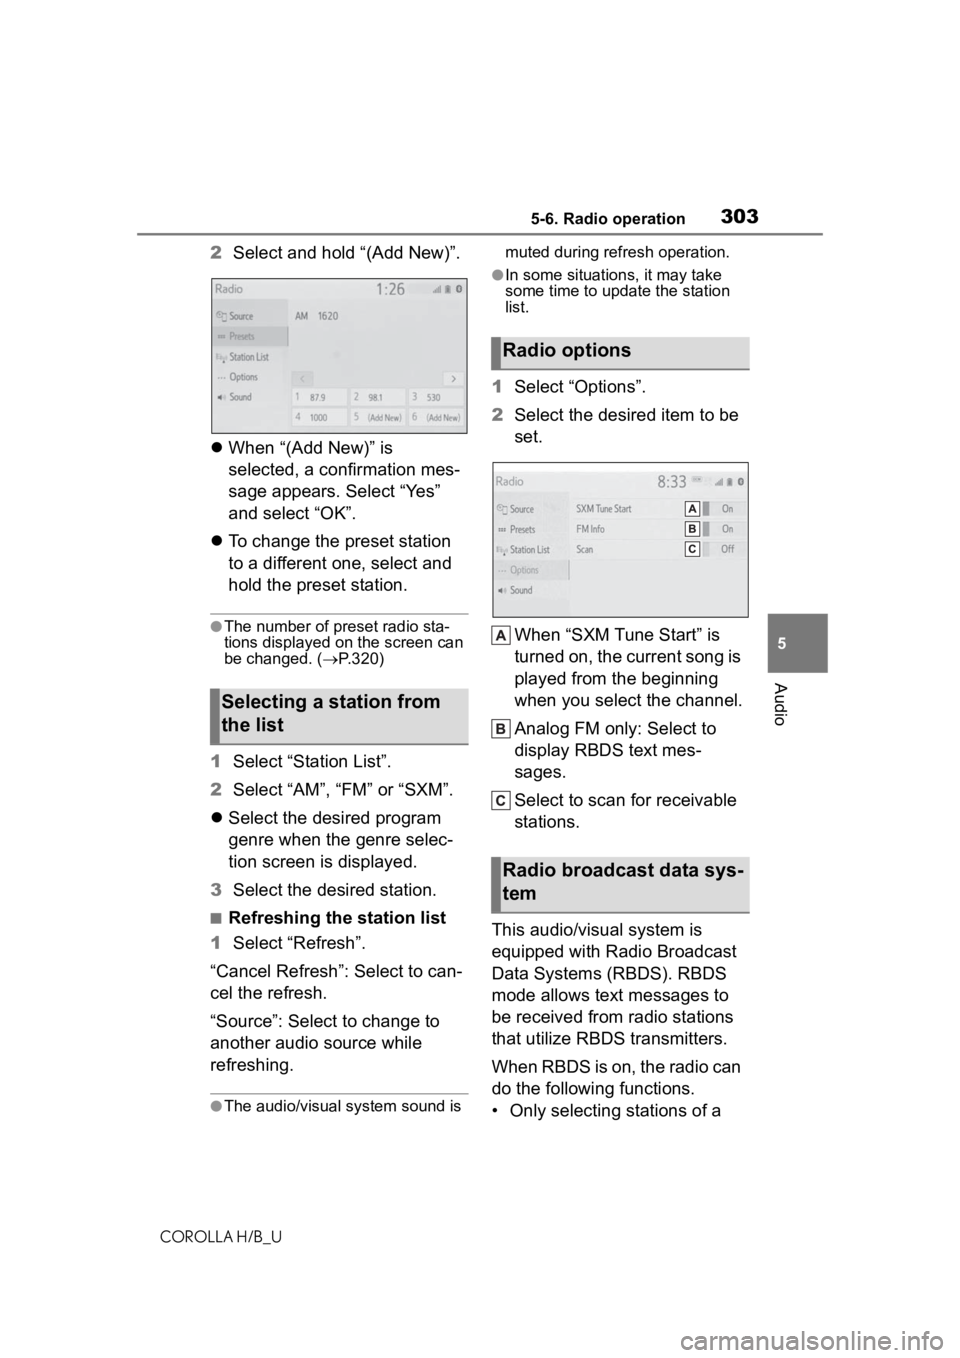
2 Select and hold “(Add New)”.
When “(Add New)” is
selected, a confirmation mes-
sage appears. Select “Yes”
and select “OK”.
To change the preset station
to a different one, select and
hold the preset station.
●The number of preset radio sta-
tions displayed on the screen can
be changed. ( P.320)
1 Select “Station List”.
2 Select “AM”, “FM” or “SXM”.
Select the desired program
genre when the genre selec-
tion screen is displayed.
3 Select the desired station.
■Refreshing the station list
1 Select “Refresh”.
“Cancel Refresh”: Select to can-
cel the refresh.
“Source”: Select to change to
another audio source while
refreshing.
●The audio/visual system sound is muted during refresh operation.
●In some situations, it may take
some time to update the station
list.
1
Select “Options”.
2 Select the desired item to be
set.
When “SXM Tune Start” is
turned on, the current song is
played from the beginning
when you select the channel.
Analog FM only: Select to
display RBDS text mes-
sages.
Select to scan for receivable
stations.
This audio/visual system is
equipped with Radio Broadcast
Data Systems (RBDS). RBDS
mode allows text messages to
be received from radio stations
that utilize RBDS transmitters.
When RBDS is on, the radio can
do the following functions.
• Only selecting stations of a
Selecting a station from
the list
Radio options
Radio broadcast data sys-
tem
Page 318 of 572
3185-8. Audio/visual remote controls
COROLLA H/B_U
5-8.Audio/visual remote controls
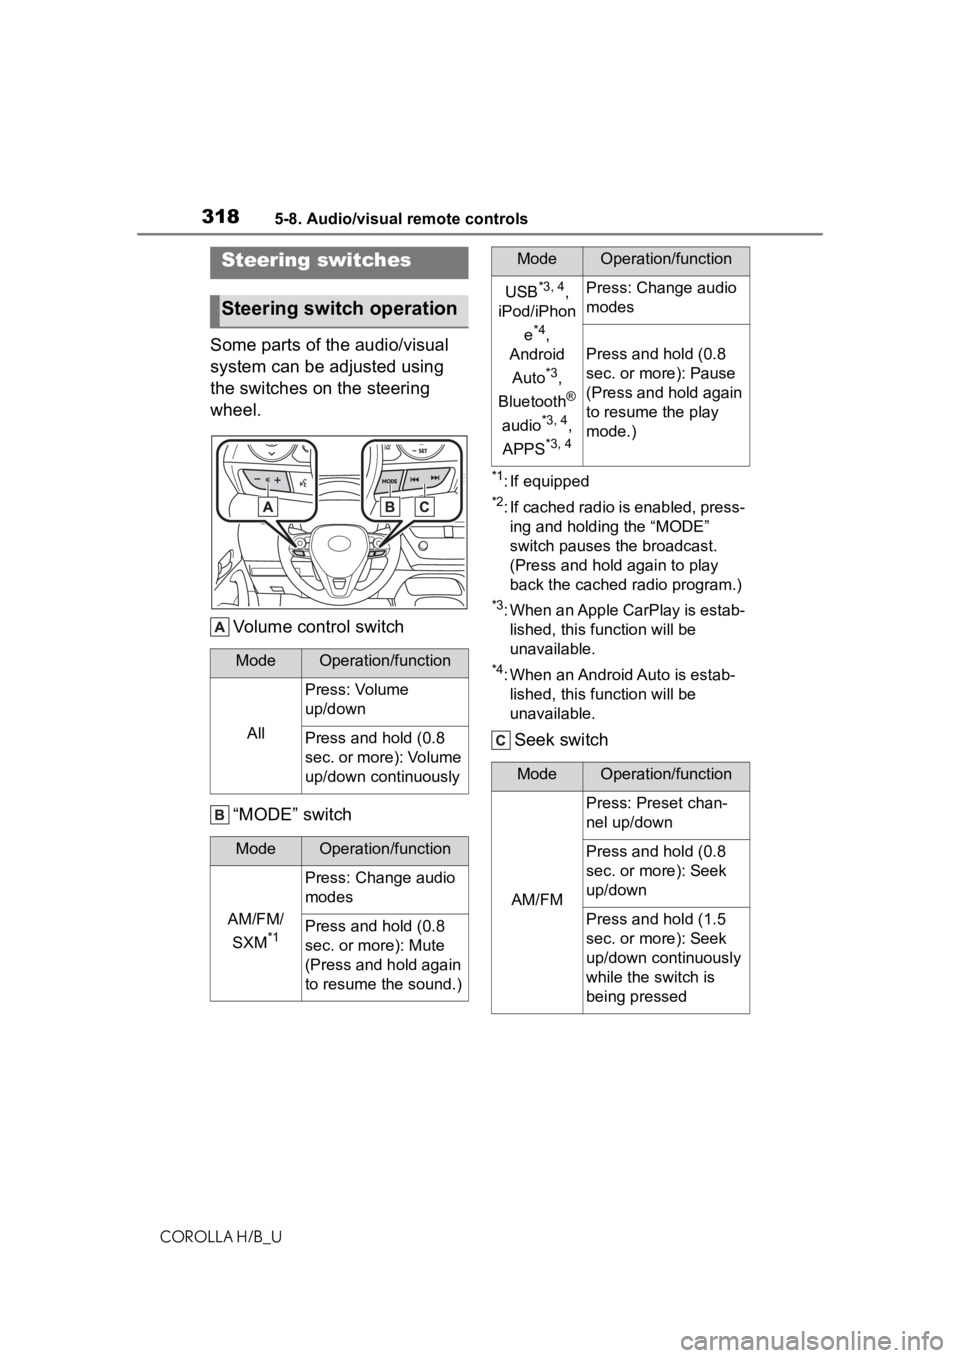
Some parts of the audio/visual
system can be adjusted using
the switches on the steering
wheel.Volume control switch
“MODE” switch
*1: If equipped
*2: If cached radio is enabled, press-ing and holding the “MODE”
switch pauses the broadcast.
(Press and hold again to play
back the cached radio program.)
*3: When an Apple CarPlay is estab-lished, this function will be
unavailable.
*4: When an Android Auto is estab-lished, this function will be
unavailable.
Seek switch
Steering switches
Steering switch operation
ModeOperation/function
All
Press: Volume
up/down
Press and hold (0.8
sec. or more): Volume
up/down continuously
ModeOperation/function
AM/FM/
SXM
*1
Press: Change audio
modes
Press and hold (0.8
sec. or more): Mute
(Press and hold again
to resume the sound.)
USB*3, 4,
iPod/iPhon
e
*4,
Android
Auto
*3,
Bluetooth
®
audio
*3, 4,
APPS
*3, 4
Press: Change audio
modes
Press and hold (0.8
sec. or more): Pause
(Press and hold again
to resume the play
mode.)
ModeOperation/function
AM/FM
Press: Preset chan-
nel up/down
Press and hold (0.8
sec. or more): Seek
up/down
Press and hold (1.5
sec. or more): Seek
up/down continuously
while the switch is
being pressed
ModeOperation/function
Page 319 of 572
3195-8. Audio/visual remote controls
COROLLA H/B_U
5
Audio*1: If equipped
*2: When an Apple CarPlay is estab- lished, this function will be
unavailable.
*3: When an Android Auto is estab-lished, this function will be
unavailable.
●In the APPS mode, some opera-
tion may be done on the screen
depend on t he selected APPS.
SXM*1
Press: Preset chan-
nel up/down
Press and hold (0.8
sec. or more): Seek
for stations in the rele-
vant program
type/channel category
Press and hold (1.5
sec. or more): Fast
channel up/down
USB*2, 3,
iPod/iPhon
e
*3, Blue-
tooth
®
audio
*2, 3
Press: Track/file
up/down
Press and hold (0.8
sec. or more): Fast
forward/rewind
Android
Auto
*2Press: Track up/down
ModeOperation/function
Page 320 of 572
3205-9. Audio settings
COROLLA H/B_U
5-9.Audio settings
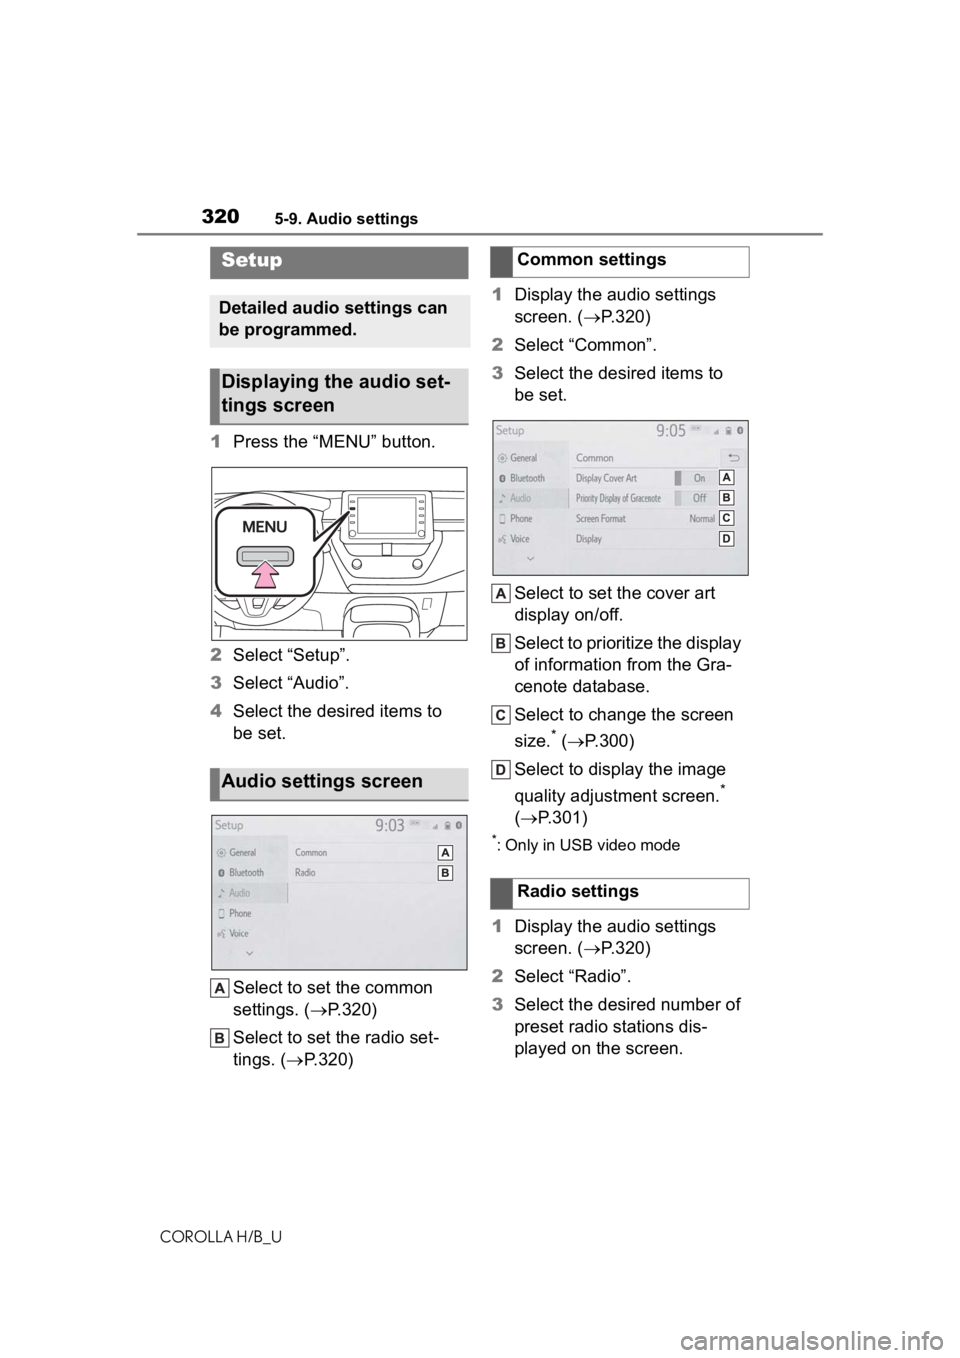
1Press the “MENU” button.
2 Select “Setup”.
3 Select “Audio”.
4 Select the desired items to
be set.
Select to set the common
settings. ( P.320)
Select to set the radio set-
tings. ( P.320) 1
Display the audio settings
screen. ( P.320)
2 Select “Common”.
3 Select the desired items to
be set.
Select to set the cover art
display on/off.
Select to prioritize the display
of information from the Gra-
cenote database.
Select to change the screen
size.
* ( P.300)
Select to display the image
quality adjustment screen.
*
( P.301)
*: Only in USB video mode
1Display the audio settings
screen. ( P.320)
2 Select “Radio”.
3 Select the desired number of
preset radio stations dis-
played on the screen.
Setup
Detailed audio settings can
be programmed.
Displaying the audio set-
tings screen
Audio settings screen
Common settings
Radio settings
Page 339 of 572
3395-11. Voice command system operation
COROLLA H/B_U
5
Audio
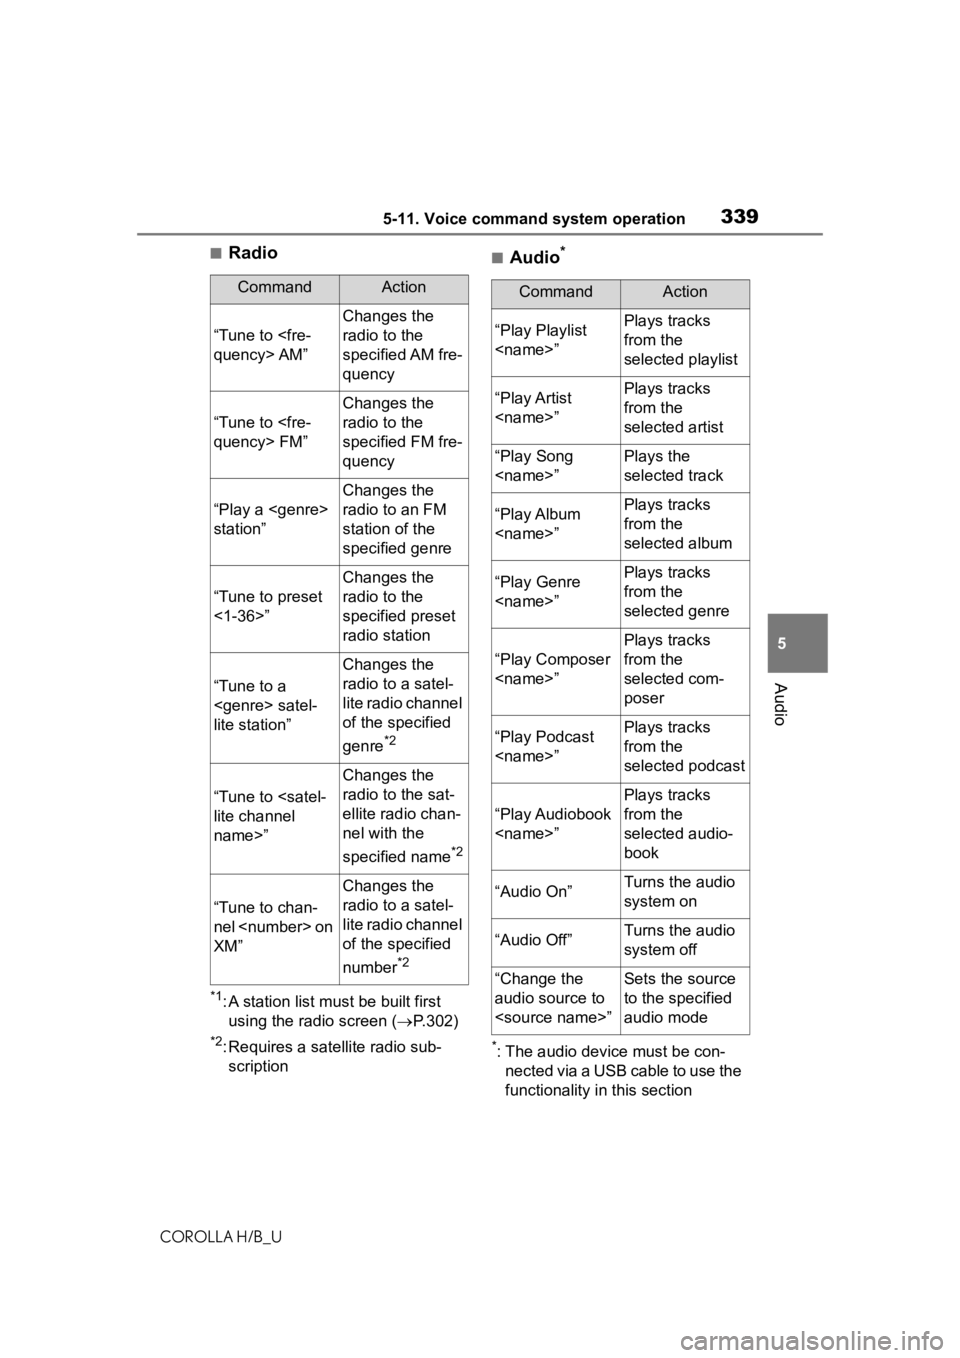
■Radio
*1: A station list must be built first using the radio screen ( P.302)
*2: Requires a satellite radio sub-
scription
■Audio*
*: The audio device must be con- nected via a USB cable to use the
functionality in this section
CommandAction
“Tune to
Changes the
radio to the
specified AM fre-
quency
“Tune to
Changes the
radio to the
specified FM fre-
quency
“Play a
station”
Changes the
radio to an FM
station of the
specified genre
“Tune to preset
<1-36>”
Changes the
radio to the
specified preset
radio station
“Tune to a
lite station”
Changes the
radio to a satel-
lite radio channel
of the specified
genre
*2
“Tune to
name>”
Changes the
radio to the sat-
ellite radio chan-
nel with the
specified name
*2
“Tune to chan-
nel
XM”
Changes the
radio to a satel-
lite radio channel
of the specified
number
*2
CommandAction
“Play Playlist
from the
selected playlist
“Play Artist
from the
selected artist
“Play Song
selected track
“Play Album
from the
selected album
“Play Genre
from the
selected genre
“Play Composer
Plays tracks
from the
selected com-
poser
“Play Podcast
from the
selected podcast
“Play Audiobook
Plays tracks
from the
selected audio-
book
“Audio On”Turns the audio
system on
“Audio Off”Turns the audio
system off
“Change the
audio source to
to the specified
audio mode
Page 357 of 572
3575-13. Phone operation (Hands-free system for cellular phones)
COROLLA H/B_U
5
Audio
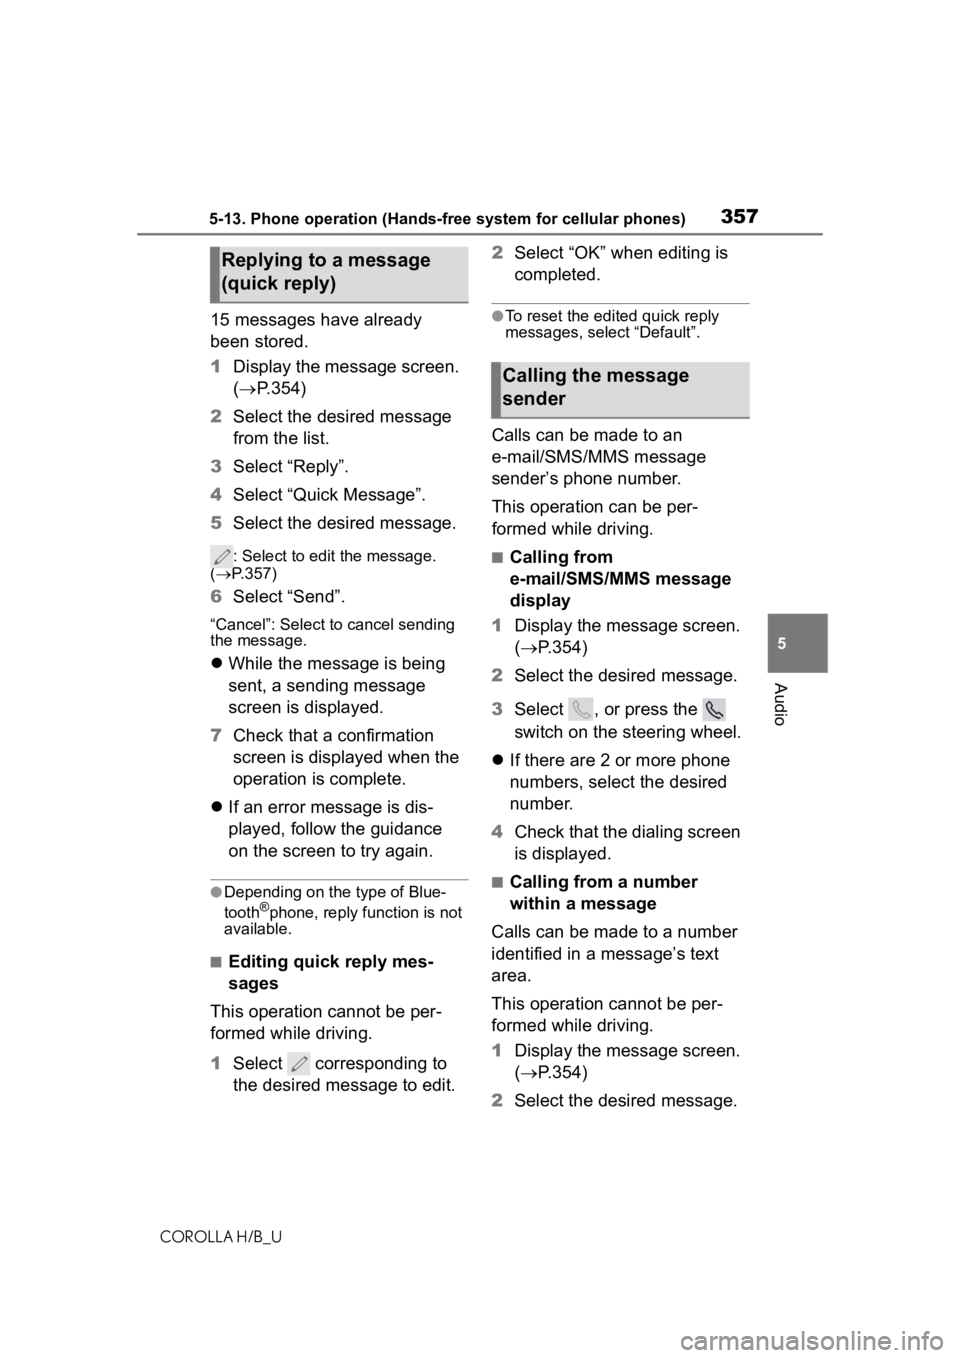
15 messages have already
been stored.
1 Display the message screen.
( P.354)
2 Select the desired message
from the list.
3 Select “Reply”.
4 Select “Quick Message”.
5 Select the desired message.
: Select to edit the message.
( P.357)
6 Select “Send”.
“Cancel”: Select to cancel sending
the message.
While the message is being
sent, a sending message
screen is displayed.
7 Check that a confirmation
screen is displayed when the
operation is complete.
If an error message is dis-
played, follow the guidance
on the screen to try again.
●Depending on the type of Blue-
tooth®phone, reply function is not
available.
■Editing quick reply mes-
sages
This operation cannot be per-
formed while driving.
1 Select corresponding to
the desired message to edit. 2
Select “OK” when editing is
completed.
●To reset the edited quick reply
messages, select “Default”.
Calls can be made to an
e-mail/SMS/MMS message
sender’s phone number.
This operation can be per-
formed while driving.
■Calling from
e-mail/SMS/MMS message
display
1 Display the message screen.
( P.354)
2 Select the desired message.
3 Select , or press the
switch on the steering wheel.
If there are 2 or more phone
numbers, select the desired
number.
4 Check that the dialing screen
is displayed.
■Calling from a number
within a message
Calls can be made to a number
identified in a message’s text
area.
This operation cannot be per-
formed while driving.
1 Display the message screen.
( P.354)
2 Select the desired message.
Replying to a message
(quick reply)
Calling the message
sender