tow TOYOTA COROLLA HATCHBACK 2023 Owner's Guide
[x] Cancel search | Manufacturer: TOYOTA, Model Year: 2023, Model line: COROLLA HATCHBACK, Model: TOYOTA COROLLA HATCHBACK 2023Pages: 436, PDF Size: 8.72 MB
Page 287 of 436
2876-3. Do-it-yourself maintenance
6
Maintenance and care
• If tires not equipped with tire pres-sure warning valves and transmit-
ters are used.
• If the ID code on the tire pressure warning valves and transmitters is
not registered in the tire pressure
warning computer.
●Performance may be affected in
the following situations.
• Near a TV tower, electric power plant, gas station, radio station,
large display, airpo rt or other facil-
ity that generates strong radio
waves or electrical noise.
• When carrying a portable radio, cellular phone, cordless phone or
other wireless communication
device.
●When the vehicle is parked, the
time taken for the warning to start
or go off could be extended.
●When tire inflation pressure
declines rapidly for example when
a tire has burst, the warning may
not function.
■Warning performance of the tire
pressure warning system
The warning of the tire pressure
warning system will change in
accordance with driving conditions.
For this reason, the system may
give a warning even if the tire pres-
sure does not reach a low enough
level, or if the p ressure is higher
than the pressure that was adjusted
to when the system was initialized.
When replacing tires or wheels,
tire pressure warning valves and
transmitters must also be
installed.
When new tire pressure warning
valves and transmitters are installed, new ID codes must be
registered in the tire pressure
warning computer and the tire
pressure warning system must
be initialized. Have tire pressure
warning valves and transmitter
ID codes registered by your Toy-
ota dealer. (
P.293)
■Replacing tires and wheels
If the ID code of the tire pressure
warning valve and tr ansmitter is not
registered, the tire pressure warning
system will not work properly. After
driving for about 20 minutes, the tire
pressure warning light blinks for 1
minute and stays on to indicate a
system malfunction.
Installing tire pressure
warning valves and trans-
mitters
NOTICE
■Repairing or replacing tires,
wheels, tire pressure warn-
ing valves, transmitters and
tire valve caps
●When removing or fitting the
wheels, tires or the tire pressure
warning valves and transmit-
ters, contact your Toyota dealer
as the tire pressure warning
valves and transmitters may be
damaged if not handled cor-
rectly.
●Make sure to install the tire
valve caps. If the tire valve caps
are not installed, water could
enter the tire pressure warning
valves and the tire pressure
warning valves could be bound.
●When replacing tire valve caps,
do not use tire valve caps other
than those specified. The cap
may become stuck.
Page 305 of 436
3056-3. Do-it-yourself maintenance
6
Maintenance and care
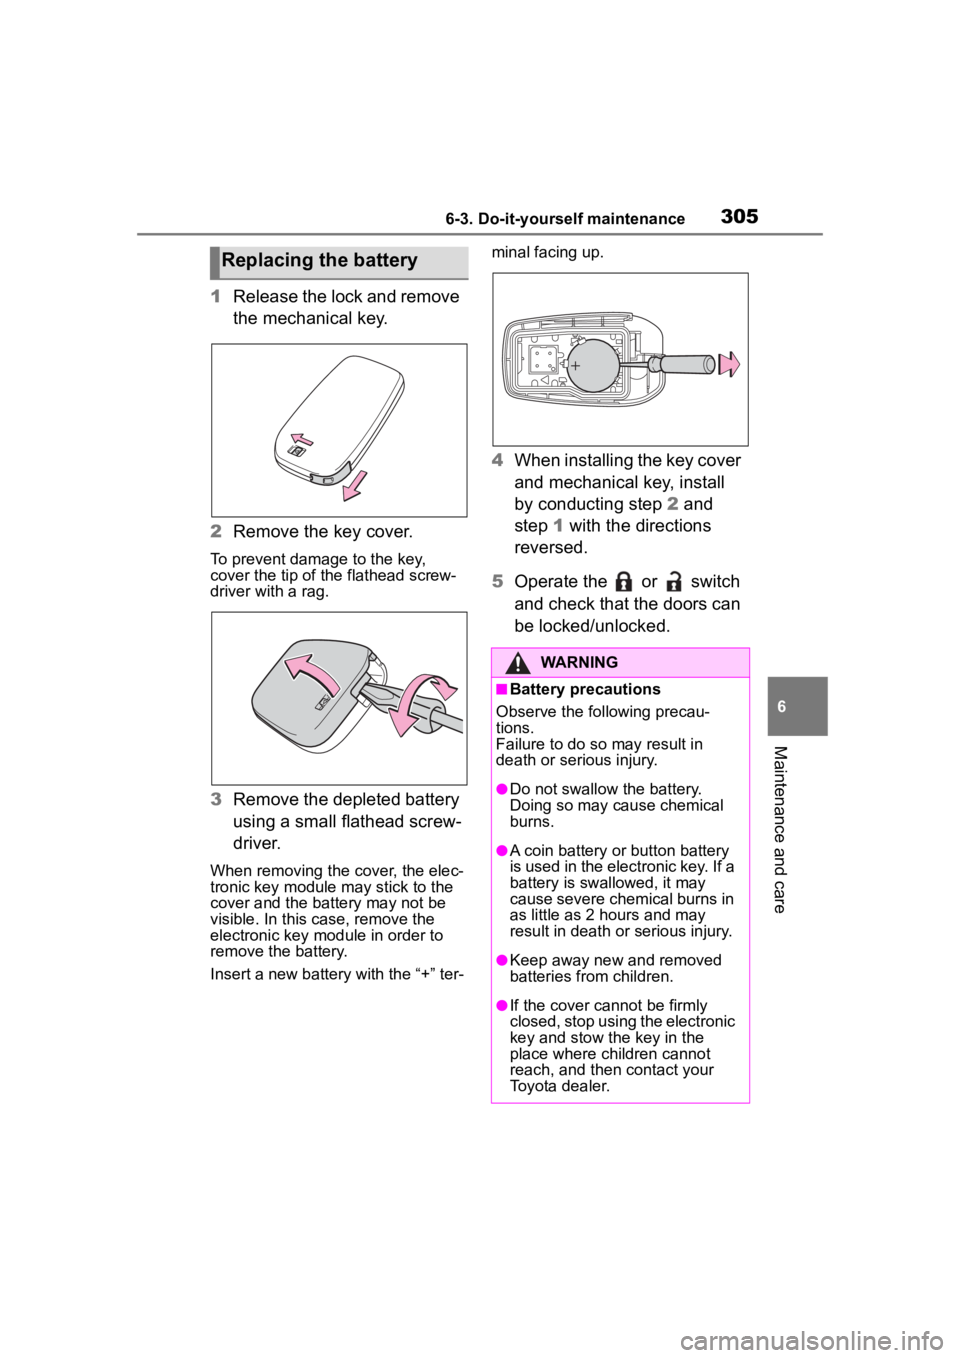
1Release the lock and remove
the mechanical key.
2 Remove the key cover.
To prevent damage to the key,
cover the tip of the flathead screw-
driver with a rag.
3Remove the depleted battery
using a small flathead screw-
driver.
When removing the cover, the elec-
tronic key module may stick to the
cover and the battery may not be
visible. In this case, remove the
electronic key module in order to
remove the battery.
Insert a new battery with the “+” ter- minal facing up.
4
When installing the key cover
and mechanical key, install
by conducting step 2 and
step 1 with the directions
reversed.
5 Operate the or switch
and check that the doors can
be locked/unlocked.
Replacing the battery
WARNING
■Battery precautions
Observe the following precau-
tions.
Failure to do so may result in
death or serious injury.
●Do not swallow the battery.
Doing so may cause chemical
burns.
●A coin battery or button battery
is used in the electronic key. If a
battery is swa llowed, it may
cause severe chemical burns in
as little as 2 hours and may
result in death or serious injury.
●Keep away new and removed
batteries from children.
●If the cover cannot be firmly
closed, stop using the electronic
key and stow the key in the
place where children cannot
reach, and then contact your
Toyota dealer.
Page 311 of 436

311
7
7
When trouble arises
When trouble arises
.7-1. Essential informationEmergency flashers .... 312
If your vehicle has to be stopped in an emergency.................................. 312
If the vehicle is submerged or water on the road is ris-
ing ............................. 313
7-2. Steps to take in an emer- gency
If your vehicle needs to be towed......................... 315
If you think something is wrong ........................ 318
Fuel pump shut off system .................................. 319
If a warning light turns on or a warning buzzer sounds.................................. 320
If a warning message is dis- played........................ 330
If you have a flat tire (vehi- cles without spare tire).................................. 334
If you have a flat tire (vehi- cles with a spare tire).................................. 346
If the engine will not start .................................. 354
If you lose your keys ... 356
If the electronic key does not operate properly .. 356If the vehicle
battery is dis-
charged ..................... 358
If your vehicle overheats .................................. 362
If the vehicle becomes stuck .................................. 364
Page 315 of 436
3157-2. Steps to take in an emergency
7
When trouble arises
7-2.Steps to take in an emergency
If your vehicle needs
to be towed
If towing is necessary, we
recommend having your
vehicle towed by your Toy-
ota dealer or commercial
towing service, using a
wheel-lift type truck or flat-
bed truck.
Use a safety chain system
for all towing, and abide by
all state/provincial and local
laws.
WARNING
Observe the following precau-
tions.
Failure to do so may result in
death or serious injury.
■When towing the vehicle
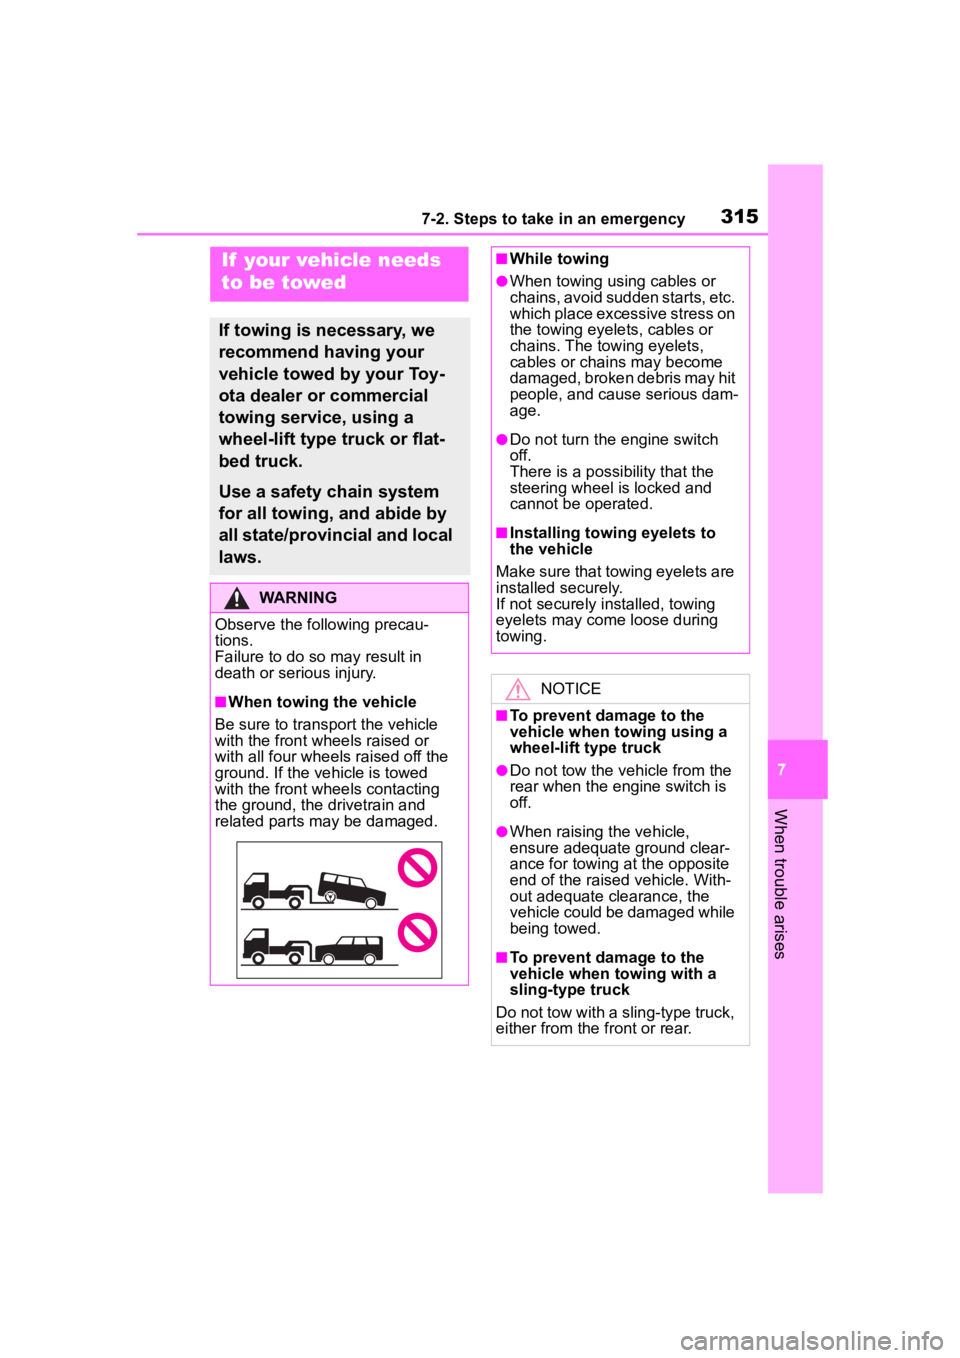
Be sure to transport the vehicle
with the front wh eels raised or
with all four wheels raised off the
ground. If the vehicle is towed
with the front wh eels contacting
the ground, the drivetrain and
related parts may be damaged.
■While towing
●When towing using cables or
chains, avoid sudden starts, etc.
which place excessive stress on
the towing eyelets, cables or
chains. The towing eyelets,
cables or chains may become
damaged, broken debris may hit
people, and cause serious dam-
age.
●Do not turn the engine switch
off.
There is a possibility that the
steering wheel is locked and
cannot be operated.
■Installing towing eyelets to
the vehicle
Make sure that towing eyelets are
installed securely.
If not securely installed, towing
eyelets may come loose during
towing.
NOTICE
■To prevent damage to the
vehicle when t owing using a
wheel-lift type truck
●Do not tow the vehicle from the
rear when the engine switch is
off.
●When raising the vehicle,
ensure adequate ground clear-
ance for towing at the opposite
end of the raised vehicle. With-
out adequate clearance, the
vehicle could be damaged while
being towed.
■To prevent damage to the
vehicle when towing with a
sling-type truck
Do not tow with a sling-type truck,
either from the front or rear.
Page 316 of 436
3167-2. Steps to take in an emergency
The following may indicate a
problem with your transmission.
Contact your Toyota dealer or
commercial towing service
before towing.
The engine is running but the
vehicle does not move.
The vehicle makes an abnor-
mal sound.
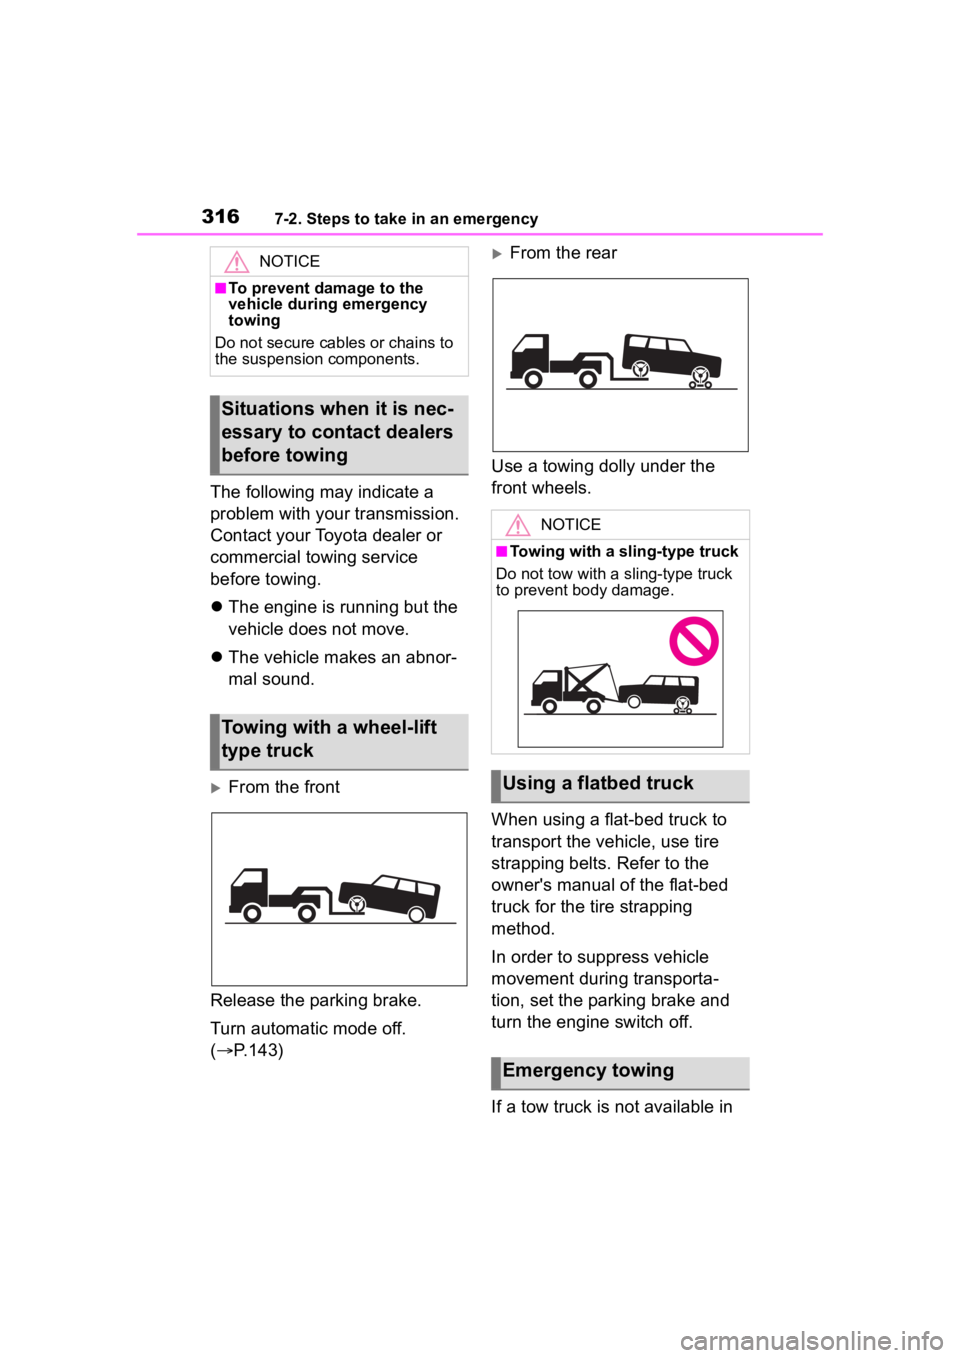
From the front
Release the parking brake.
Turn automatic mode off.
( P.143)
From the rear
Use a towing dolly under the
front wheels.
When using a flat-bed truck to
transport the vehicle, use tire
strapping belts. Refer to the
owner's manual of the flat-bed
truck for the tire strapping
method.
In order to suppress vehicle
movement during transporta-
tion, set the parking brake and
turn the engine switch off.
If a tow truck is not available in NOTICE
■To prevent damage to the
vehicle during emergency
towing
Do not secure cables or chains to
the suspension components.
Situations when it is nec-
essary to contact dealers
before towing
Towing with a wheel-lift
type truck
NOTICE
■Towing with a sling-type truck
Do not tow with a sling-type truck
to prevent body damage.
Using a flatbed truck
Emergency towing
Page 317 of 436

3177-2. Steps to take in an emergency
7
When trouble arises
an emergency, your vehicle may
be temporarily towed using
cables or chains secured to the
emergency towing eyelets. This
should only be attempted on
hard surfaced roads for at most
50 miles (80 km) at under 18
mph (30 km/h).
A driver must be in the vehicle to
steer and operate the brakes.
The vehicle’s wheels, drive train,
axles, steering and brakes must
be in good condition.
Only the front towing eyelets
may be used.
To have your vehicle towed by
another vehicle, the towing eye-
let must be installed to your
vehicle. Install the towing eyelet
using the following procedure.
1Take out the wheel nut
wrench, flathead screwdriver
and towing eyelet. ( P.336,
347)
2 Remove the eyelet cover
using a flathead screwdriver.
To protect the bod ywork, place a
rag between the screwdriver and
the vehicle body as shown in the illustration.
3
Insert the towing eyelet into
the hole and tighten partially
by hand.
4 Tighten down the towing eye-
let securely using a wheel nut
wrench or hard metal bar.
5 Securely attach cables or
chains to the towing eyelet.
Take care not to damage the vehi-
Emergency towing proce-
dure
Page 318 of 436
3187-2. Steps to take in an emergency
cle body.
6Enter the vehicle being towed
and start the engine.
If the engine does not start, turn the
engine switch to ON.
7Shift the shift lever to N and
release the parking brake.
Turn automatic mode off.
( P.143)
When the shift lever cannot
be shifted: P. 1 3 9
■While towing
If the engine is not running, the
power assist for the brakes and
steering will not function, making
steering and braking more difficult.
■Wheel nut wrench
Wheel nut wrench is installed in lug-
gage compartment. ( P.336, 347)
Fluid leaks under the vehicle.
(Water dripping from the air
conditioning after use is nor-
mal.)
Flat-looking tires or uneven
tire wear
Engine coolant temperature
gauge needle continually
points higher than normal.
Changes in exhaust sound
Excessive tire squeal when
cornering
Strange noises related to the
suspension system
Pinging or other noises
related to the engine
Engine missing, stumbling or
running roughly
Appreciable loss of power
Vehicle pulls heavily to one
If you think something
is wrong
If you notice any of the fol-
lowing symptoms, your
vehicle probably needs
adjustment or repair. Con-
tact your Toyota dealer as
soon as possible.
Visible symptoms
Audible symptoms
Operational symptoms
Page 336 of 436
3367-2. Steps to take in an emergency
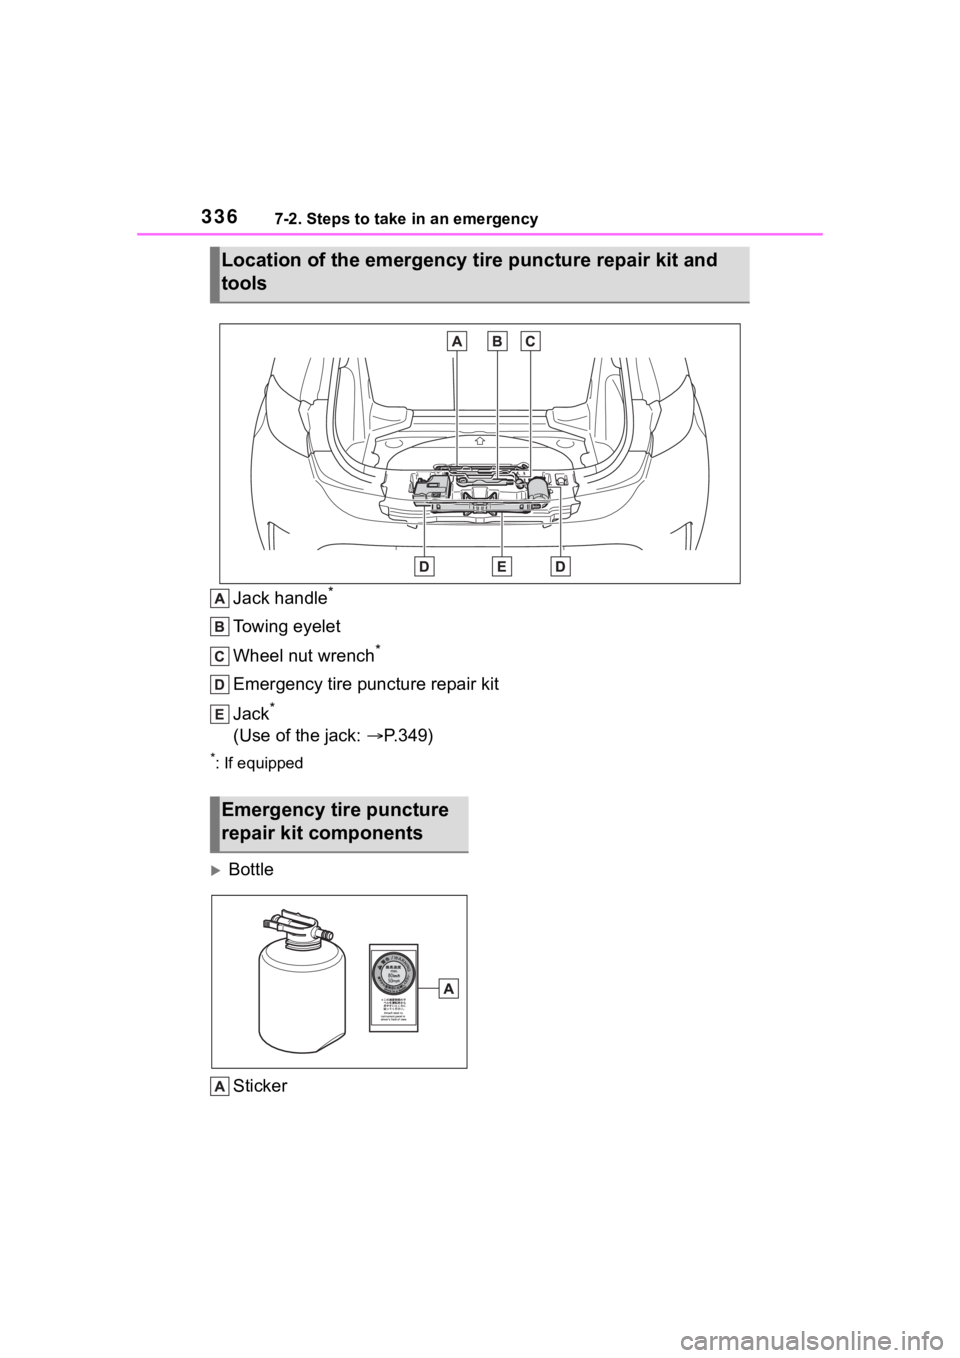
Jack handle*
Towing eyelet
Wheel nut wrench
*
Emergency tire puncture repair kit
Jack
*
(Use of the jack: P.349)
*: If equipped
Bottle
Sticker
Location of the emergency ti re puncture repair kit and
tools
Emergency tire puncture
repair kit components
Page 347 of 436
3477-2. Steps to take in an emergency
7
When trouble arises
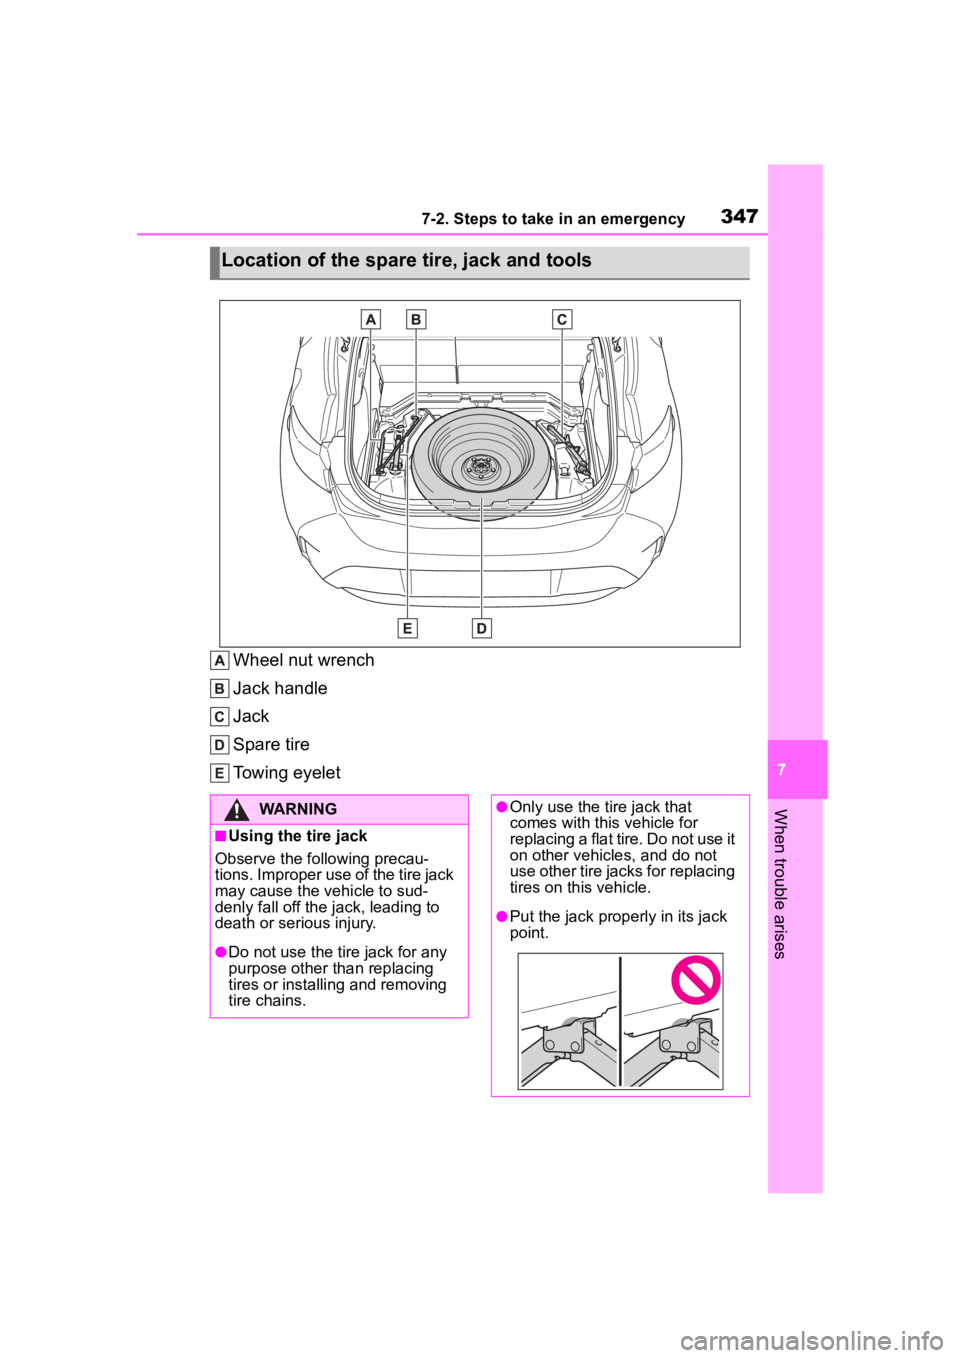
Wheel nut wrench
Jack handle
Jack
Spare tire
Towing eyelet
Location of the spare tire, jack and tools
WARNING
■Using the tire jack
Observe the following precau-
tions. Improper use of the tire jack
may cause the vehicle to sud-
denly fall off the jack, leading to
death or serious injury.
●Do not use the tire jack for any
purpose other than replacing
tires or installing and removing
tire chains.
●Only use the tire jack that
comes with this vehicle for
replacing a flat tire. Do not use it
on other vehicles, and do not
use other tire jacks for replacing
tires on this vehicle.
●Put the jack properly in its jack
point.
Page 352 of 436
3527-2. Steps to take in an emergency
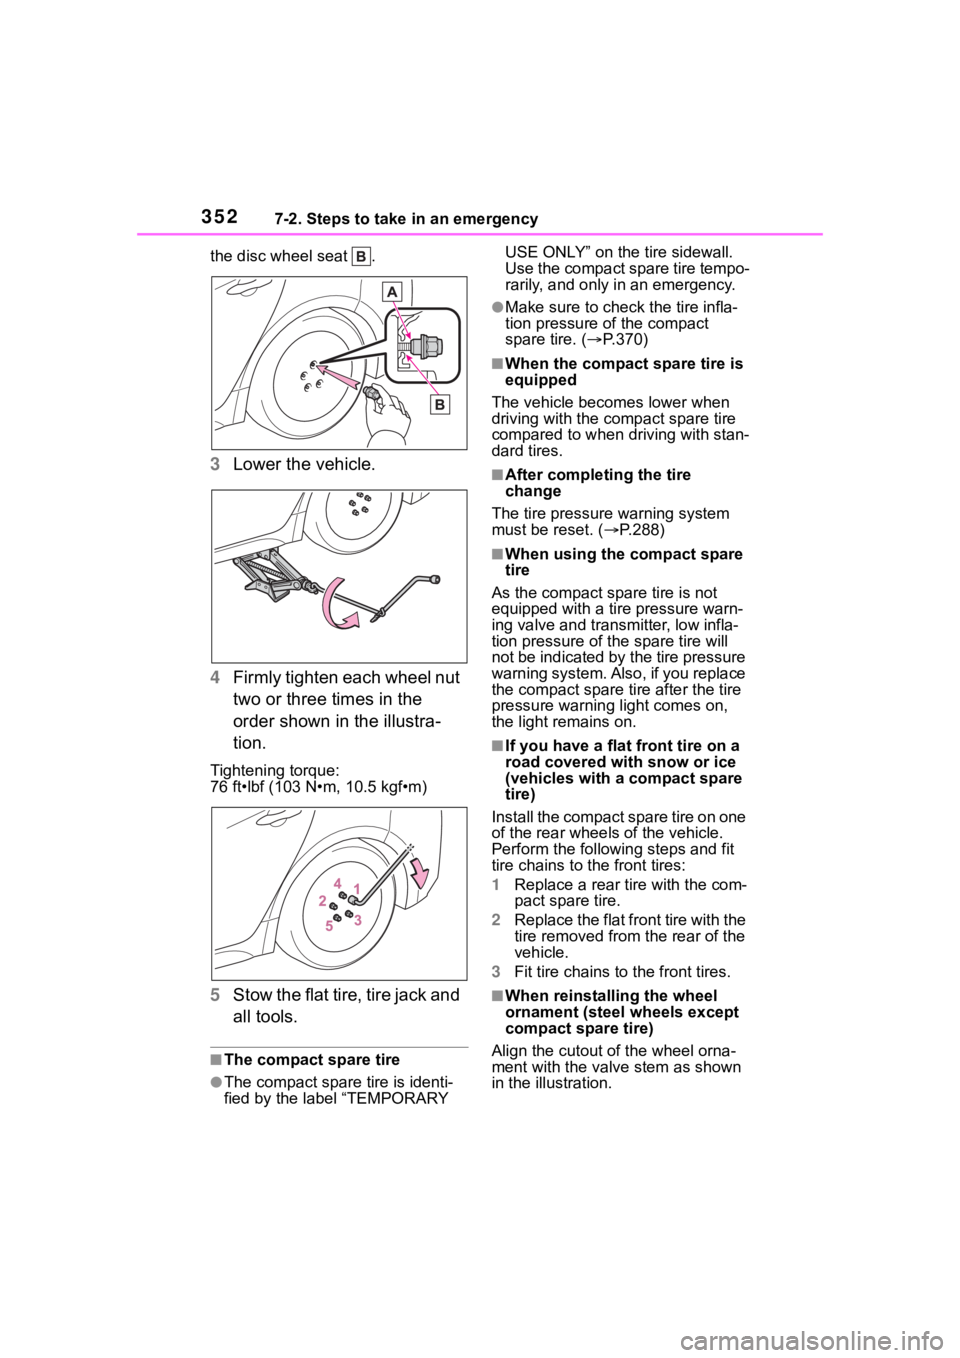
the disc wheel seat .
3Lower the vehicle.
4 Firmly tighten each wheel nut
two or three times in the
order shown in the illustra-
tion.
Tightening torque:
76 ft•lbf (103 N•m, 10.5 kgf•m)
5Stow the flat tire, tire jack and
all tools.
■The compact spare tire
●The compact spare tire is identi-
fied by the label “TEMPORARY USE ONLY” on the tire sidewall.
Use the compact spare tire tempo-
rarily, and only in an emergency.
●Make sure to check the tire infla-
tion pressure of the compact
spare tire. (
P.370)
■When the compact spare tire is
equipped
The vehicle becomes lower when
driving with the compact spare tire
compared to when driving with stan-
dard tires.
■After completing the tire
change
The tire pressure warning system
must be reset. ( P.288)
■When using the compact spare
tire
As the compact spare tire is not
equipped with a tire pressure warn-
ing valve and transm itter, low infla-
tion pressure of t he spare tire will
not be indicated by the tire pressure
warning system. Also , if you replace
the compact spare ti re after the tire
pressure warning light comes on,
the light remains on.
■If you have a flat front tire on a
road covered wit h snow or ice
(vehicles with a compact spare
tire)
Install the compact spare tire on one
of the rear wheels of the vehicle.
Perform the following steps and fit
tire chains to the front tires:
1 Replace a rear tire with the com-
pact spare tire.
2 Replace the flat front tire with the
tire removed from the rear of the
vehicle.
3 Fit tire chains to the front tires.
■When reinstalling the wheel
ornament (steel wheels except
compact spare tire)
Align the cutout of the wheel orna-
ment with the valve stem as shown
in the illustration.