engine TOYOTA COROLLA HATCHBACK 2023 Repair Manual
[x] Cancel search | Manufacturer: TOYOTA, Model Year: 2023, Model line: COROLLA HATCHBACK, Model: TOYOTA COROLLA HATCHBACK 2023Pages: 436, PDF Size: 8.72 MB
Page 140 of 436
1404-2. Driving procedures
operated, the shift range
switches to a range that is one
range higher than the current
range.
Changing the shift range allows
restriction of the highest gear,
preventing unnecessary upshift-
ing and enabling the level of
engine braking force to be
selected.
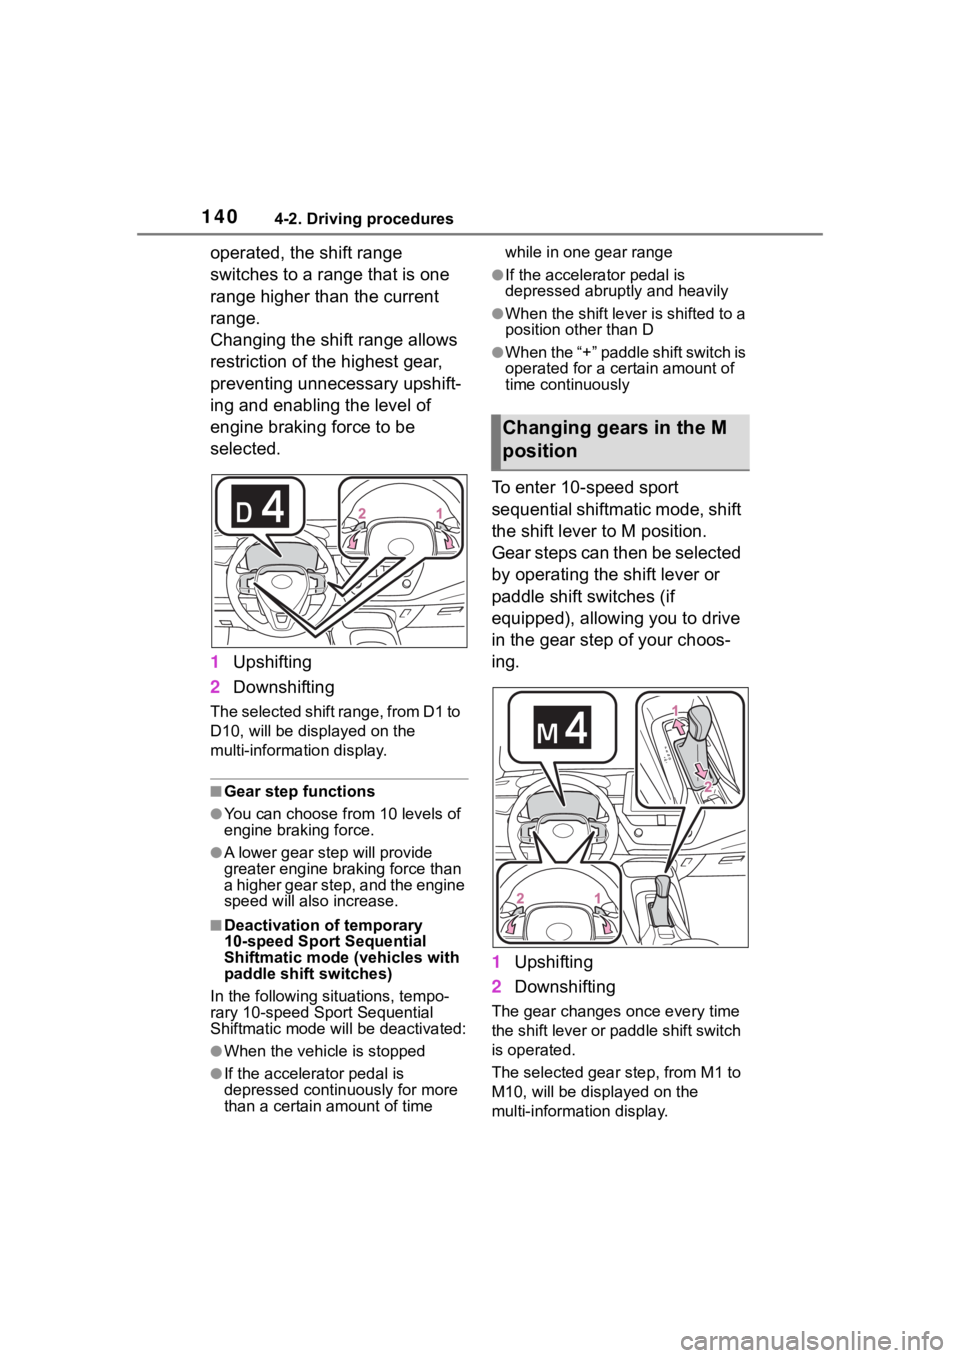
1Upshifting
2 Downshifting
The selected shift range, from D1 to
D10, will be dis played on the
multi-information display.
■Gear step functions
●You can choose from 10 levels of
engine braking force.
●A lower gear s tep will provide
greater engine braking force than
a higher gear step, and the engine
speed will also increase.
■Deactivation of temporary
10-speed Sport Sequential
Shiftmatic mode (vehicles with
paddle shift switches)
In the following situations, tempo-
rary 10-speed Sport Sequential
Shiftmatic mode will be deactivated:
●When the vehicle is stopped
●If the accelerator pedal is
depressed continuously for more
than a certain amount of time while in one gear range
●If the accelerator pedal is
depressed abruptly and heavily
●When the shift lever is shifted to a
position other than D
●W h en th e “+ ” p ad dle sh ift sw itch is
operated for a certain amount of
time continuously
To enter 10-speed sport
sequential shiftmatic mode, shift
the shift lever to M position.
Gear steps can then be selected
by operating the shift lever or
paddle shift switches (if
equipped), allowing you to drive
in the gear step of your choos-
ing.
1
Upshifting
2 Downshifting
The gear changes once every time
the shift lever or paddle shift switch
is operated.
The selected gear step, from M1 to
M10, will be dis played on the
multi-information display.
Changing gears in the M
position
Page 141 of 436
1414-2. Driving procedures
4
Driving
However, even when in the M
position, the gear steps will be
automatically changed if the
engine speed is too high, or too
low.
■Gear step functions
●You can choose from 10 levels of
engine braking force.
●A lower gear step will provide
greater engine braking force than
a higher gear step, and the engine
speed will also increase.
■When the vehic le comes to a
stop with the shift lever in the M
position
●The transmission will automati-
cally downshift to M1 once the
vehicle is stopped.
●After a stop, the vehicle will start
off in M1.
●When the vehicle is stopped, the
transmission is set at M1.
■Downshifting restriction warn-
ing buzzer
To help ensure safety and driving
performance, downshifting opera-
tion may sometimes b e restricted. In
some circumstances, downshifting
may not be possible even when the
shift lever or paddle shift switch (if
equipped) is operated. (A buzzer
will sound twice.)
■If the 10-speed sport sequential
shiftmatic mode indicator does
not come on even after shifting
the shift lever to M
This may indicate a malfunction in
the continuously variable transmis-
sion system. Have the vehicle
inspected by your Toyota dealer
immediately.
(In this situation, the transmission
will operate in t he same manner as
when the shift lever is in D.)
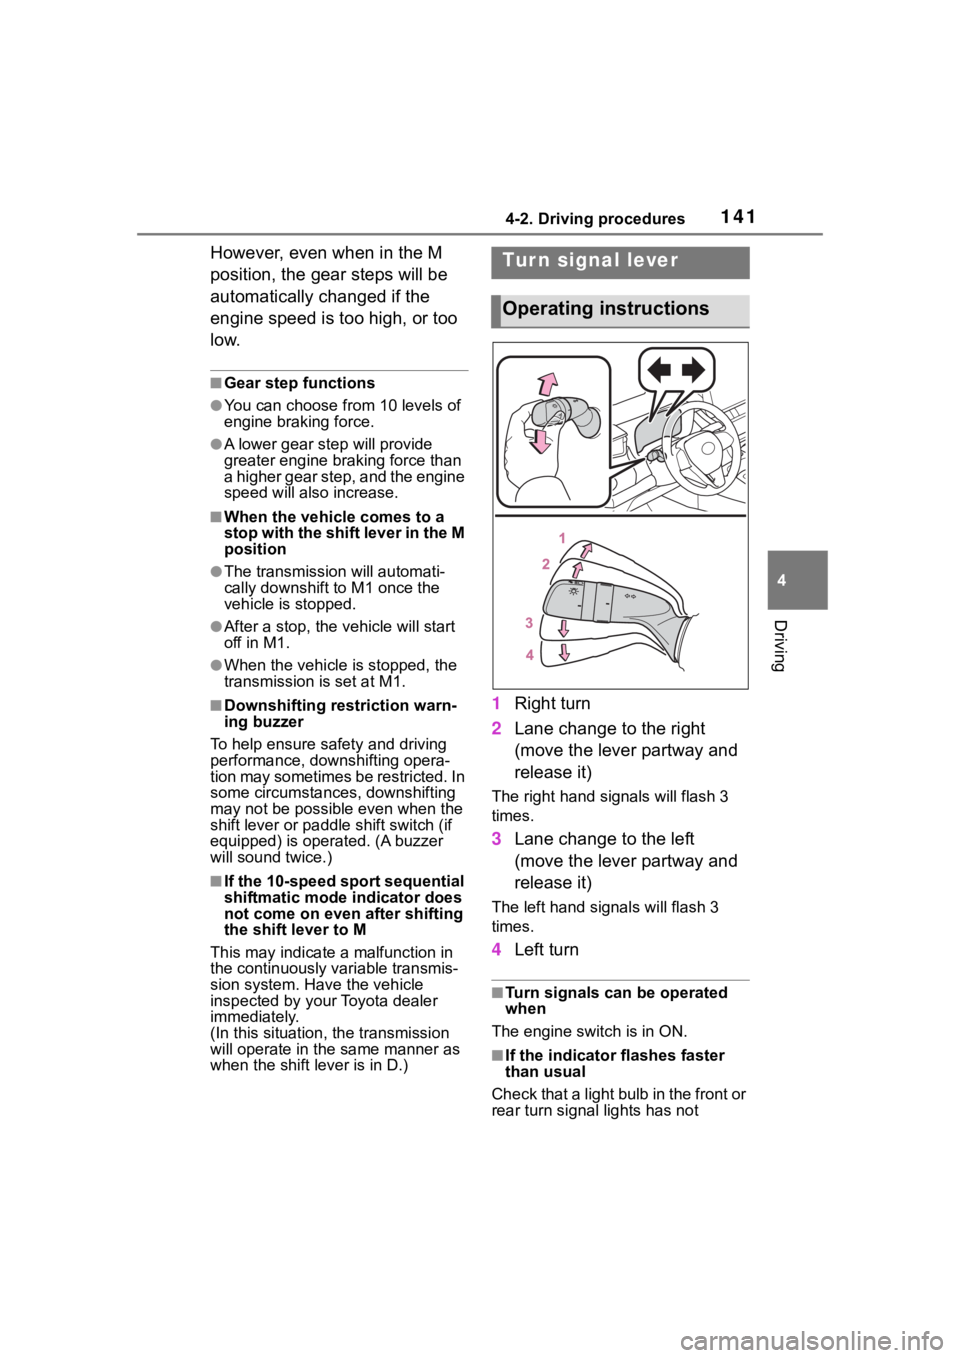
1 Right turn
2 Lane change to the right
(move the lever partway and
release it)
The right hand s ignals will flash 3
times.
3 Lane change to the left
(move the lever partway and
release it)
The left hand signals will flash 3
times.
4Left turn
■Turn signals can be operated
when
The engine switch is in ON.
■If the indicator flashes faster
than usual
Check that a light bulb in the front or
rear turn signal lights has not
Tur n signal lever
Operating instructions
Page 143 of 436

1434-2. Driving procedures
4
Driving
Pull and hold the parking brake
switch if an emergency occurs and
it is necessary to operate the park-
ing brake while driving.
2Press the switch to release
the parking brake.
• Operate the parking brake switch
while depressing the brake pedal.
• Using the parking brake auto- matic release function, the park-
ing brake can be released by
depressing the accelerator pedal.
When using this function, slowly
depress the accelerator pedal.
( P.144)
Make sure that t he parking brake
indicator light turn off.
If the parking brake indicator
light flash, operate the switch
again. ( P.326)
■Turning the automatic
mode on
While the vehicle is stopped,
pull and hold the parking brake
switch until a buzzer sounds and
a message is shown on the
multi-information display.
When the automatic mode is
turned on, the parking brake
operates as follows.
When the shift lever is shifted
from P, the parking brake will
be released, and the parking
brake indicator light will turn
off.
When the shift lever is shifted
to P, the parking brake will be
set, and the parking brake
indicator light will turn on. Operate the shift lever with the
vehicle stopped and the brake
pedal depressed.
The auto function may not operate
if the shift lever is moved extremely
quickly. In this situation, apply the
parking brake manually. (
P.142)
■Turning the automatic
mode off
While the vehicle is stopped and
depressing the brake pedal,
press and hold the parking
brake switch until a buzzer
sounds and a message is
shown on the multi-information
display.
■Parking brake operation
●When the engine switch is not in
ON, the parking brake cannot be
released using the parking brake
switch.
●When the engine switch is not in
ON, automatic mode (automatic
brake setting and releasing) is not
available.
■Parking brake automatic
release function
When all of the fo llowing conditions
are met, the parking brake can be
released by depressing the acceler-
ator pedal.
●The driver’s door is closed
●The driver is wearing the seat belt
●The shift lever is in a forward driv-
ing position or reverse driving
position
●The malfunction in dicator lamp or
brake system warning light is not
illuminated.
When depressing the accelerator
pedal, depress it slowly.
If the parking brak e is not released
Page 144 of 436
1444-2. Driving procedures
when the accelerator pedal is
depressed, release the parking
brake manually.
When the shift lever is shifted from
P, the parking brake will be released
automatically.
■Parking brake automatic lock
function
The parking brake will be set auto-
matically under the following condi-
tions:
●The brake pedal is not depressed
●The driver’s door is open
●The driver’s seat belt is not fas-
tened
●The shift lever is in a position
other than P or N
●The malfunction indicator lamp
and brake system warning light
are not illuminated
■If “Parking Brake Temporarily
Unavailable” i s displayed on
the multi-information display
If the parking brake is operated
repeatedly over a short period of
time, the system may restrict opera-
tion to prevent overheating. If this
happens, refrain from operating the
parking brake. Nor mal operation will
return after about 1 minute.
■If “Parking Brake Unavailable”
is displayed on the multi-infor-
mation display
Operate the parking brake switch. If
the message does not disappear
after operating the switch several
times, the system may be malfunc-
tioning. Have the vehicle inspected
by your Toyota dealer.
■Parking brake operation sound
When the parking brake operates, a
motor sound (whirring sound) may
be heard. This does not indicate a
malfunction.
■Parking brake indicator light
●Depending on the engine switch
position/mode, the parking brake indicator light will turn on and stay
on as described below:
ON: Comes on until the parking
brake is released.
Not in ON: Stays
on for approxi-
mately 15 seconds.
●When the engine switch is turned
off with the parking brake set, the
parking brake i ndicator light will
stay on for about 15 seconds. This
does not indicate a malfunction.
■When the parking brake switch
malfunctions
Automatic mode (automatic brake
setting and releas ing) will be turned
on automatically.
■Parking the vehicle
P.122
■Parking brake engaged warning
buzzer
A buzzer will sound if the vehicle is
driven with the parking brake
engaged. “Parking Brake ON” is dis-
played on the multi-information dis-
play (with the vehicle reaching a
speed of 3 mph [5 km/h]).
■If the brake system warning
light comes on
P.320
■Usage in winter time
P.230
WARNING
■When parking the vehicle
Do not leave a child in the vehicle
alone. The parking brake may be
released unintentionally by a child
and there is the danger of the
vehicle moving that may lead to
an accident resulting in death or
serious injury.
Page 146 of 436
1464-2. Driving procedures
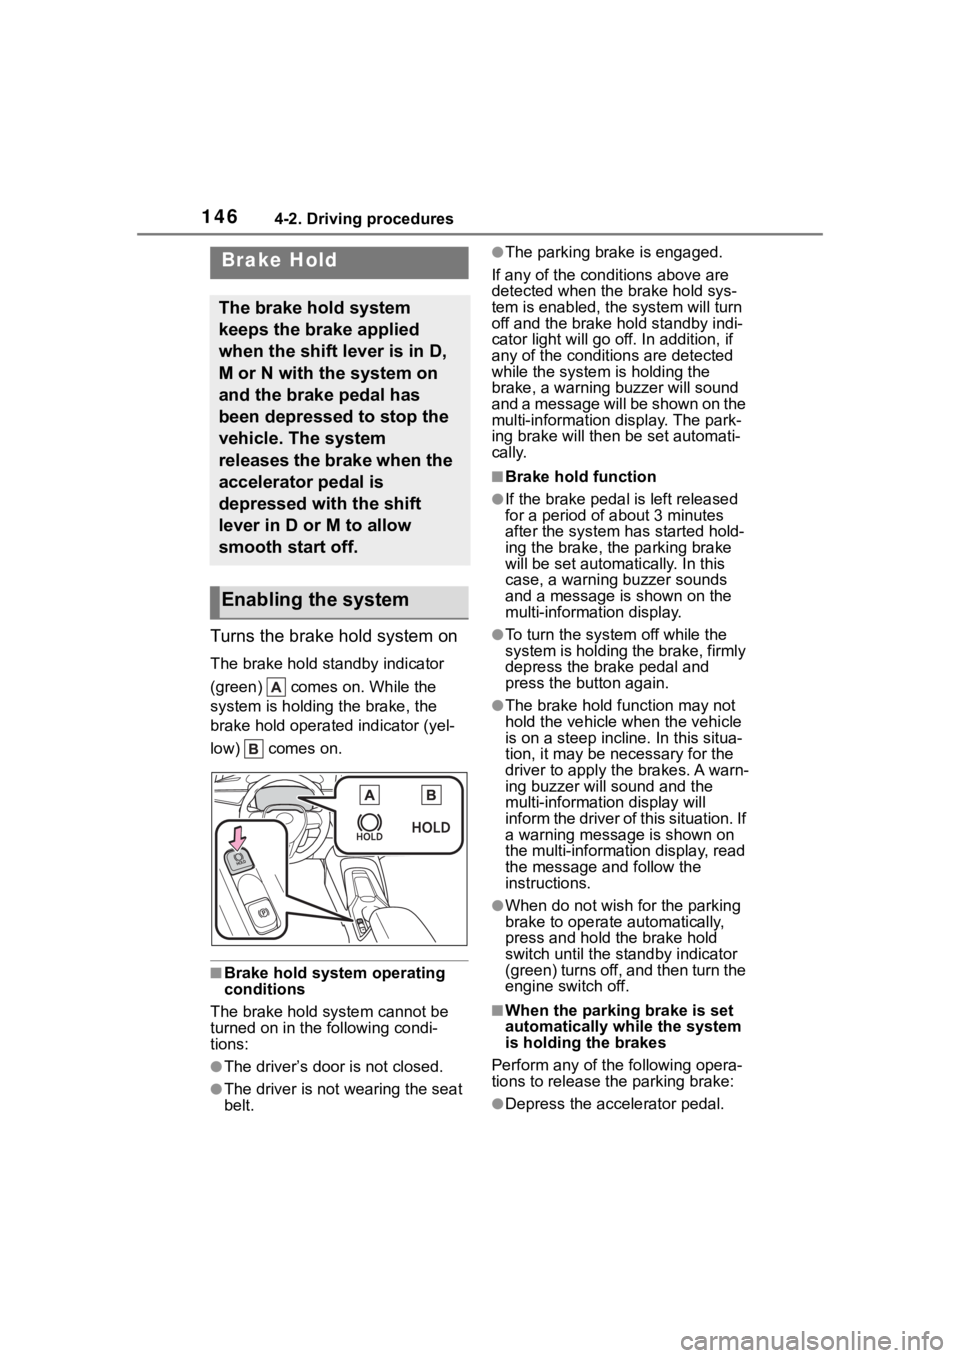
Turns the brake hold system on
The brake hold standby indicator
(green) comes on. While the
system is holding the brake, the
brake hold operated indicator (yel-
low) comes on.
■Brake hold system operating
conditions
The brake hold system cannot be
turned on in the following condi-
tions:
●The driver’s doo r is not closed.
●The driver is not wearing the seat
belt.
●The parking brake is engaged.
If any of the cond itions above are
detected when the brake hold sys-
tem is enabled, the system will turn
off and the brake hold standby indi-
cator light will go off. In addition, if
any of the conditions are detected
while the system is holding the
brake, a warning buzzer will sound
and a message will be shown on the
multi-information display. The park-
ing brake will then be set automati-
cally.
■Brake hold function
●If the brake pedal is left released
for a period of about 3 minutes
after the system has started hold-
ing the brake, the parking brake
will be set automatically. In this
case, a warning buzzer sounds
and a message is shown on the
multi-information display.
●To turn the system off while the
system is holding the brake, firmly
depress the brake pedal and
press the button again.
●The brake hold function may not
hold the vehicle when the vehicle
is on a steep incline. In this situa-
tion, it may be ne cessary for the
driver to apply the brakes. A warn-
ing buzzer will sound and the
multi-information display will
inform the driver of this situation. If
a warning message is shown on
the multi-information display, read
the message and follow the
instructions.
●When do not wish for the parking
brake to operate automatically,
press and hold the brake hold
switch until the standby indicator
(green) turns off, and then turn the
engine switch off.
■When the parking brake is set
automatically while the system
is holding the brakes
Perform any of the following opera-
tions to release the parking brake:
●Depress the accelerator pedal.
Brake Hold
The brake hold system
keeps the brake applied
when the shift lever is in D,
M or N with the system on
and the brake pedal has
been depressed to stop the
vehicle. The system
releases the brake when the
accelerator pedal is
depressed with the shift
lever in D or M to allow
smooth start off.
Enabling the system
Page 147 of 436
1474-2. Driving procedures
4
Driving
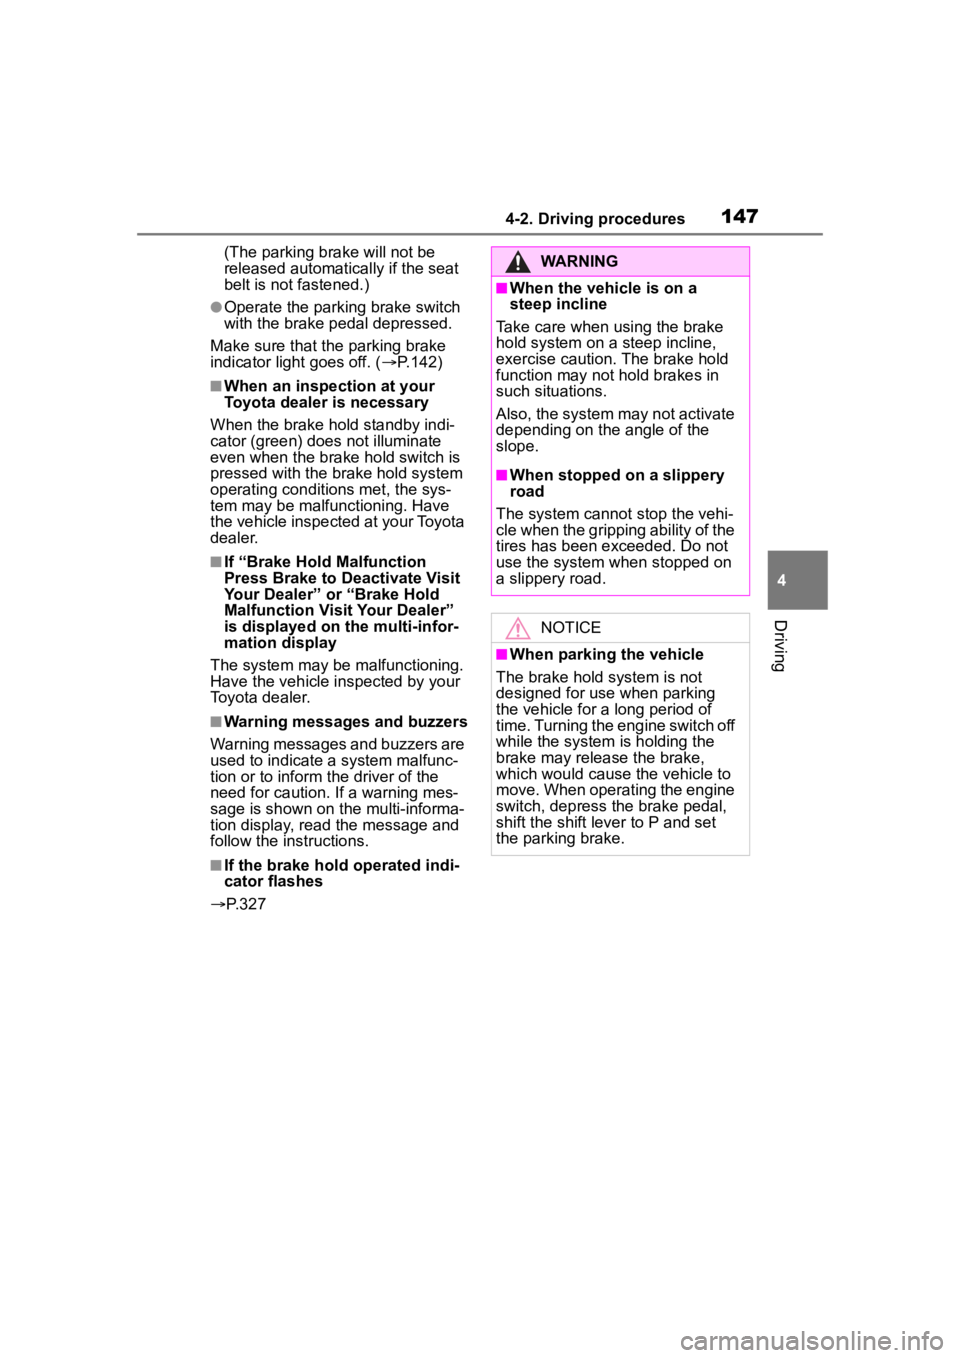
(The parking brake will not be
released automatically if the seat
belt is not fastened.)
●Operate the parking brake switch
with the brake pedal depressed.
Make sure that the parking brake
indicator light goes off. ( P.142)
■When an inspection at your
Toyota dealer is necessary
When the brake hold standby indi-
cator (green) does not illuminate
even when the brake hold switch is
pressed with the brake hold system
operating conditions met, the sys-
tem may be malfunctioning. Have
the vehicle inspected at your Toyota
dealer.
■If “Brake Hold Malfunction
Press Brake to Deactivate Visit
Your Dealer” or “Brake Hold
Malfunction Visit Your Dealer”
is displayed on the multi-infor-
mation display
The system may be malfunctioning.
Have the vehicle inspected by your
Toyota dealer.
■Warning messages and buzzers
Warning messages and buzzers are
used to indicate a system malfunc-
tion or to inform the driver of the
need for caution. If a warning mes-
sage is shown on the multi-informa-
tion display, read the message and
follow the instructions.
■If the brake hold operated indi-
cator flashes
P. 3 2 7
WARNING
■When the vehicle is on a
steep incline
Take care when using the brake
hold system on a steep incline,
exercise caution. The brake hold
function may not hold brakes in
such situations.
Also, the system may not activate
depending on the angle of the
slope.
■When stopped on a slippery
road
The system cannot stop the vehi-
cle when the gripping ability of the
tires has been exceeded. Do not
use the system w hen stopped on
a slippery road.
NOTICE
■When parking the vehicle
The brake hold system is not
designed for use when parking
the vehicle for a long period of
time. Turning the engine switch off
while the system is holding the
brake may release the brake,
which would cause the vehicle to
move. When operating the engine
switch, depress the brake pedal,
shift the shift lever to P and set
the parking brake.
Page 148 of 436
1484-3. Operating the lights and wipers
4-3.Operating the lights and wipers
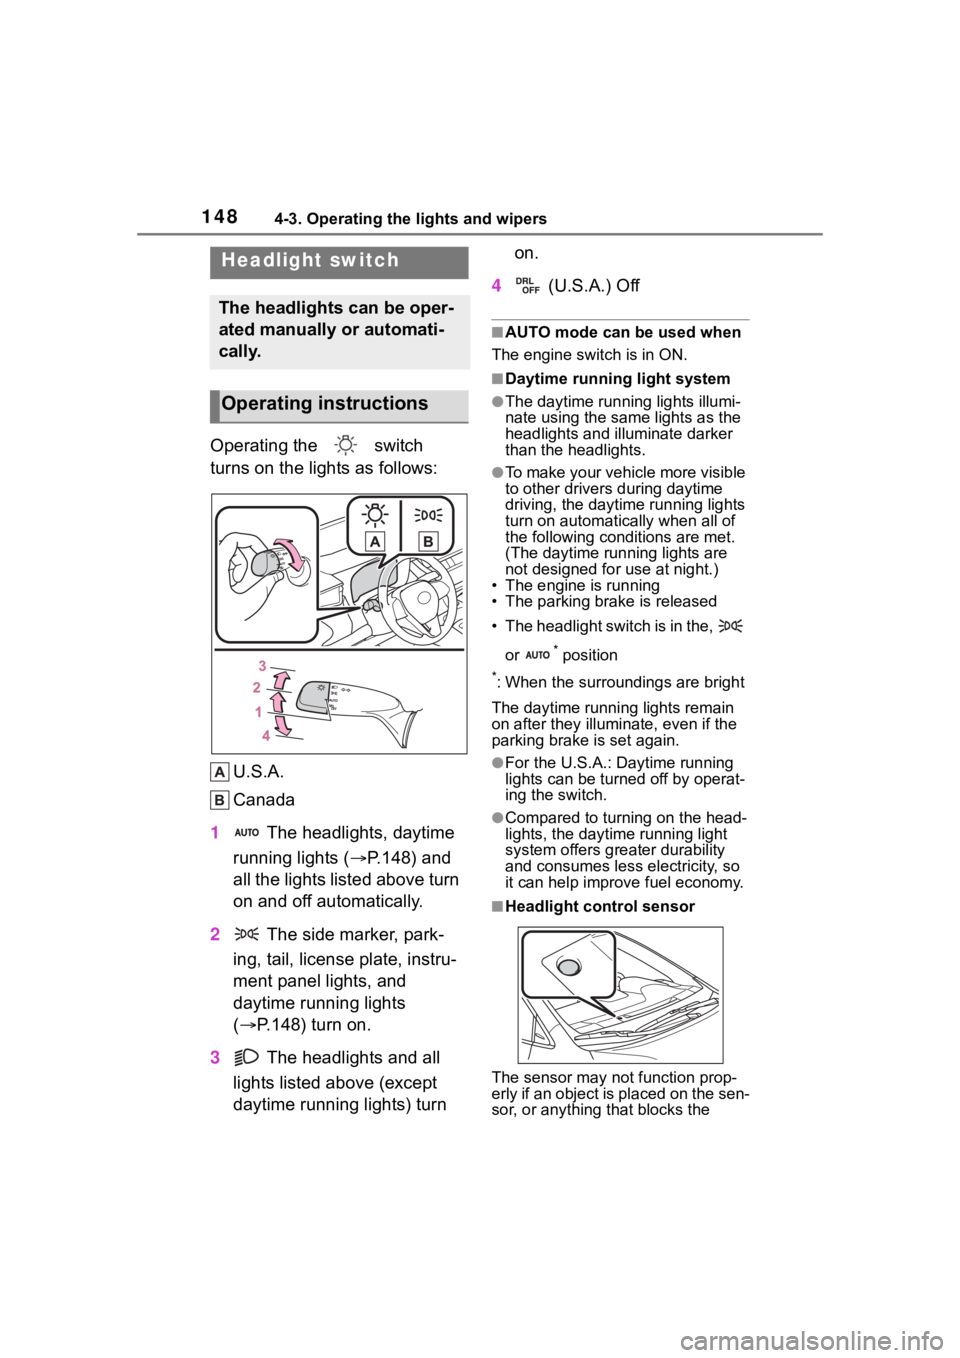
Operating the switch
turns on the lights as follows:U.S.A.
Canada
1 The headlights, daytime
running lights ( P.148) and
all the lights listed above turn
on and off automatically.
2 The side marker, park-
ing, tail, license plate, instru-
ment panel lights, and
daytime running lights
( P.148) turn on.
3 The headlights and all
lights listed above (except
daytime running lights) turn on.
4 (U.S.A.) Off
■AUTO mode can be used when
The engine switch is in ON.
■Daytime running light system
●The daytime runn ing lights illumi-
nate using the same lights as the
headlights and illu minate darker
than the headlights.
●To make your vehicle more visible
to other drivers during daytime
driving, the daytime running lights
turn on automatically when all of
the following conditions are met.
(The daytime running lights are
not designed for use at night.)
• The engine is running
• The parking brake is released
• The headlight switch is in the,
or
* position
*: When the surroundings are bright
The daytime running lights remain
on after they illumi nate, even if the
parking brake is set again.
●For the U.S.A.: Daytime running
lights can be turned off by operat-
ing the switch.
●Compared to turning on the head-
lights, the daytime running light
system offers greater durability
and consumes less electricity, so
it can help improve fuel economy.
■Headlight control sensor
The sensor may not function prop-
erly if an object is placed on the sen-
sor, or anything that blocks the
Headlight switch
The headlights can be oper-
ated manually or automati-
cally.
Operating instructions
Page 149 of 436
1494-3. Operating the lights and wipers
4
Driving
sensor is affixed to the windshield.
Doing so interferes with the sensor
detecting the level of ambient light
and may cause the automatic head-
light system to malfunction.
■Automatic light off system
●When the headlights are on: The
headlights and tail lights turn off
30 seconds after the driver’s door
is opened and closed if the engine
switch is turned to ACC or OFF.
(The lights turn off immediately if
on the key is pressed after all
the doors are closed.)
●When only the tail lights are on:
The tail lights tu rn off automati-
cally if the engine switch is turned
to ACC or OFF and the driver’s
door is opened.
To turn the lights on again, turn the
engine switch to ON, or turn the light
switch off once and then back to
or .
■Light reminder buzzer
A buzzer sounds when the engine
switch is turned to OFF or ACC and
the driver’s door is opened while the
lights are turned on.
■Automatic headlight leveling
system (if equipped)
The level of the headlights is auto-
matically adjusted according to the
number of passengers and the load-
ing condition of the vehicle to
ensure that the headlights do not
interfere with other road users.
■Windshield wiper linked head-
light illumination
When driving during daytime with
the headlight switch turned to , if
the windshield wipers are used, the
headlights will turn on automatically
after several seconds to help
enhance the visibility of your vehi-
cle.
■Battery-saving function
In order to prevent the battery of the vehicle from discharging, if the
headlights and/or tail lights are on
when the engine switch is turned off
the battery saving function will oper-
ate and automatically turn off all the
lights after approximately 20 min-
utes. When the engine switch is
turned to ON, the
battery-saving
function will be disabled.
When any of the following are per-
formed, the battery-saving function
is canceled once and then reacti-
vated. All the lights will turn off auto-
matically 20 minutes after the
Battery- saving function has been
reactivated:
●When the headlight switch is oper-
ated
●When a door is opened or closed
■Customization
Some functions can be customized.
( P.386)
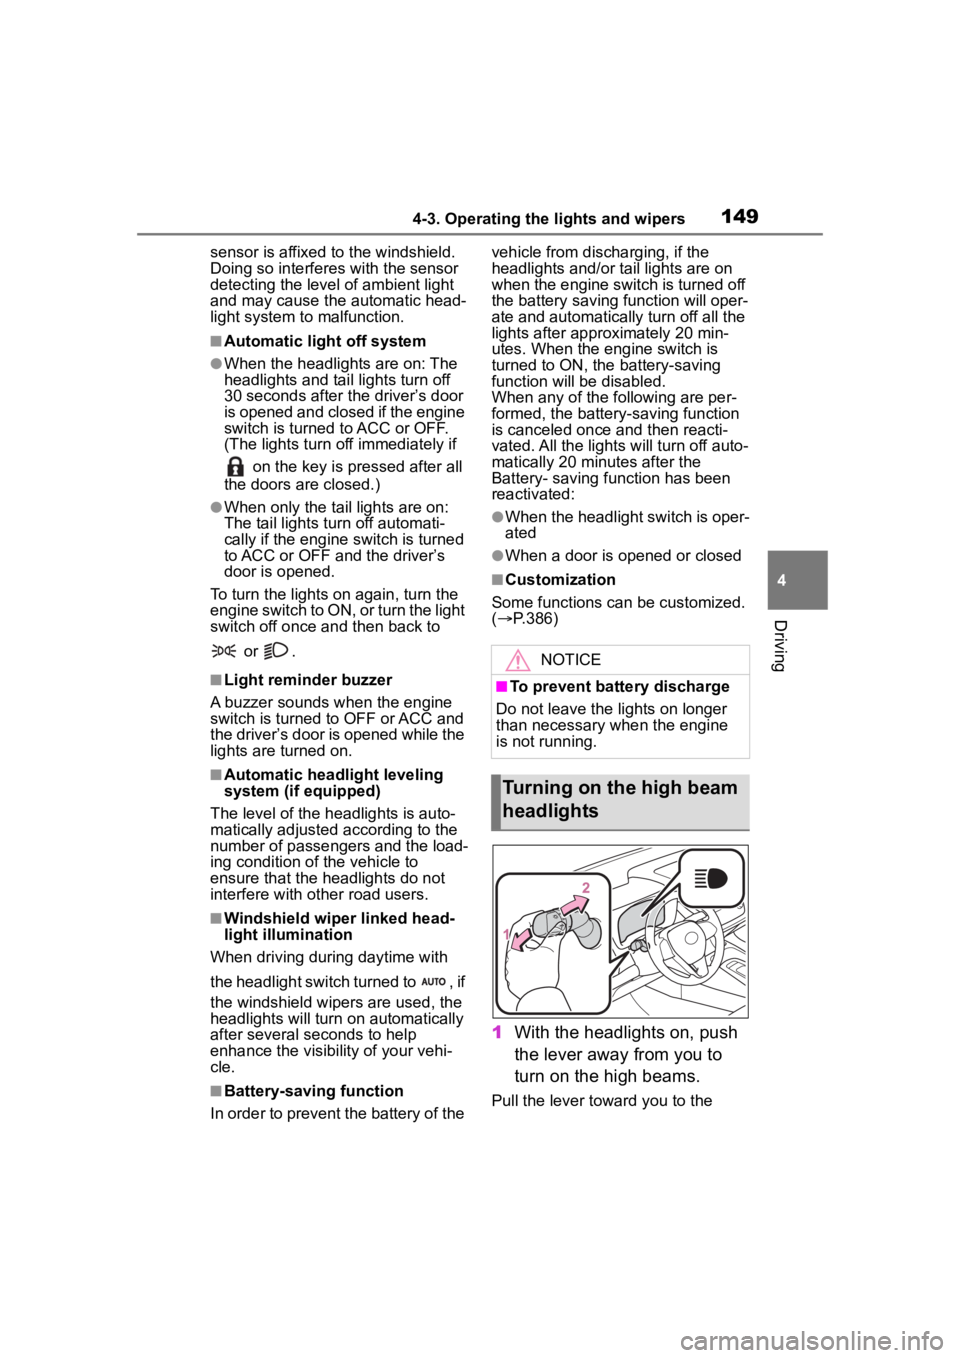
1 With the headlights on, push
the lever away from you to
turn on the high beams.
Pull the lever toward you to the
NOTICE
■To prevent battery discharge
Do not leave the lights on longer
than necessary w hen the engine
is not running.
Turning on the high beam
headlights
Page 152 of 436
1524-3. Operating the lights and wipers
roundings. This may cause the
low beams to remain on or the
high beams to flash or dazzle
pedestrians or vehicles ahead. In
such a case, it is necessary to
manually change between the
high beams and low beams.
• When there are lights similar to headlights or tail li ghts in the sur-
rounding area
• When headlights or tail lights of vehicles ahead are turned off,
dirty, changing color, or not aimed
properly
• When the headlights are repeat-
edly changing between the high
beams and low beams.
• When use of the high beams is
inappropriate or when the high
beams may be flashing or daz-
zling pedestrians or other drivers.
• When the vehicle is used in an area in which vehicles travel on
the opposite side of the road of
the country for wh ich the vehicle
was designed, for example using
a vehicle designed for right-hand
traffic in a left-hand traffic area, or
vice versa
• When it is necessary to disable
the system: P. 1 6 1
• Situations in which the sensors may not operate properly: P. 1 6 5
■Temporarily reducing front
camera sensitivity (for the
U.S.A.)
The sensitivity o f the front camera
can be temporarily reduced.
1 Turn the engine switch off with
the following conditions met.
• The headlight switch is in the
or position.
• The headlight switch lever is in the low beam position.
• The automatic High Beam switch is on.
2 Press the engine switch to ON.
3 Within 60 seconds after perform-
ing step 2, push the headlight
switch lever to the high beam
position then pull it to the original position quickly 10 times, then
leave the lever in its original posi-
tion.
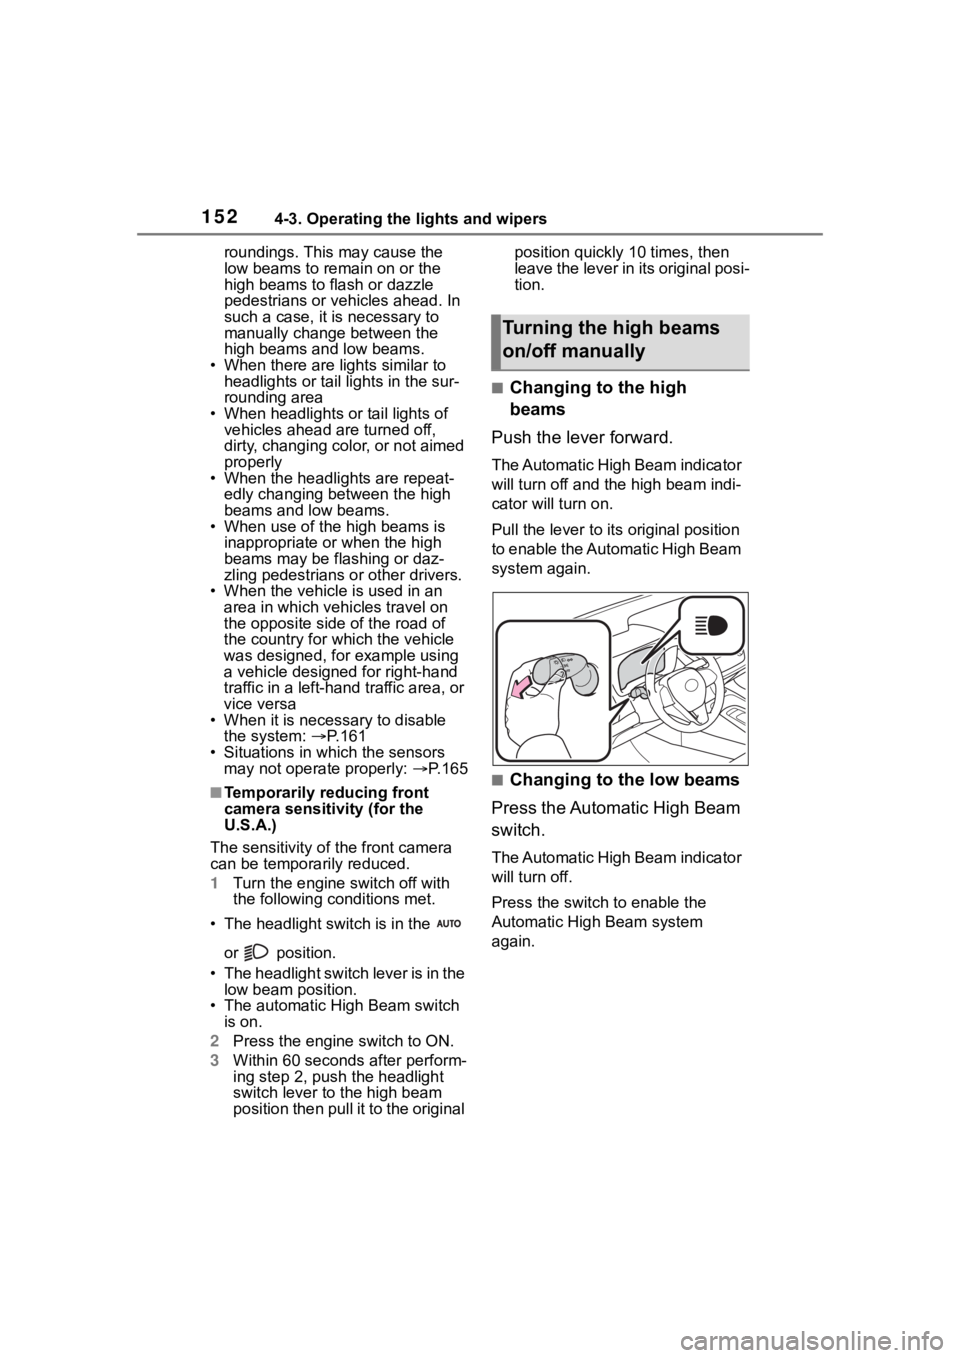
■Changing to the high
beams
Push the lever forward.
The Automatic High Beam indicator
will turn off and the high beam indi-
cator will turn on.
Pull the lever to its original position
to enable the Automatic High Beam
system again.
■Changing to the low beams
Press the Automatic High Beam
switch.
The Automatic High Beam indicator
will turn off.
Press the switch to enable the
Automatic High Beam system
again.
Turning the high beams
on/off manually
Page 155 of 436

1554-3. Operating the lights and wipers
4
Driving
■The windshield wiper and
washer can be operated when
The engine switch is in ON.
■If no windshield washer fluid
sprays
Check that the wash er nozzles are
not blocked if there is washer fluid in
the windshield washer fluid reser-
v oi r.
■When stopping the engine in an
emergency while driving
If the windshield wipers are operat-
ing when the engine is stopped, the
windshield wipers will operate in
high speed operation. After the vehi-
cle is stopped, operation will return
to normal when the engine switch is
turned to ON, or op eration will stop
when the driver’s door is opened.
Operating the switch
operates the rear wiper as fol-
lows:
1 (U.S.A.) or (Canada)
Intermittent window wiper
operation
2 (U.S.A.) or (Canada)
Normal window wiper opera-
tion
WARNING
■Caution regarding the use of
washer fluid
When it is cold, do not use the
washer fluid until the windshield
becomes warm. The fluid may
freeze on the windshield and
cause low visibility. This may lead
to an accident, resulting in death
or serious injury.
NOTICE
■When the washer fluid tank is
empty
Do not operate the switch continu-
ally as the washer fluid pump may
overheat.
■When a nozzle becomes
blocked
In this case, contact your Toyota
dealer. Do not try to clear it with a
pin or other object. The nozzle will
be damaged.
Rear window wiper
and washer
Operating the lever can use
the rear window wiper or the
washer.
NOTICE
■When the rear window is dry
Do not use the wiper, as it may
damage the rear window.
Operating instructions