inflation pressure TOYOTA COROLLA HATCHBACK 2023 Owners Manual
[x] Cancel search | Manufacturer: TOYOTA, Model Year: 2023, Model line: COROLLA HATCHBACK, Model: TOYOTA COROLLA HATCHBACK 2023Pages: 436, PDF Size: 8.72 MB
Page 1 of 436

COROLLA H/B_U
1
2
3
4
5
6
7
8
9
9
Pictorial indexSearch by illustration
For safety
and securityMake sure to read through them
(Main topics: Child seat, theft deterrent system)
Vehicle status
information and
indicatorsReading driving-related information
(Main topics: Meters, multi-information display)
Before driving
Opening and closing the doors and windows,
adjustment before driving
(Main topics: Keys, doors, seats)
Driving
Operations and advice which are necessary for
driving
(Main topics: Starting engine, refueling)
Interior featuresUsage of the interior features
(Main topics: Air conditioner, storage features)
Maintenance
and careCaring for your vehicle and maintenance
procedures
(Main topics: Interior and exterior, light bulbs)
When trouble
arisesWhat to do in case of malfunction and emergency
(Main topics: Battery discharge, flat tire)
Vehicle
specificationsVehicle specifications, customizable features
(Main topics: Fuel, oil, tire inflation pressure)
For ownersReporting safety defects for U.S. owners, and seat
belt and SRS airbag instructions for Canadian
owners
IndexSearch by symptom
Search alphabetically
Page 3 of 436

3TABLE OF CONTENTS
1
2
3
4
5
6
7
8
9
10
4-3. Operating the lights and wip-ers
Headlight switch ................. 148
AHB (Automatic High Beam) ......................................... 150
Fog light switch .................. 153
Windshield wipers and washer ......................................... 154
Rear window wiper and washer ......................................... 155
4-4. Refueling Opening the fuel tank cap .. 157
4-5. Using the driving support sys- tems
Toyota Safety Sense 3.0 soft-ware update ..................... 159
Toyota Safety Sense 3.0 .... 161
PCS (Pre-Collision System) ......................................... 167
LTA (Lane Tracing Assist)... 177
LDA (Lane Departure Alert) ......................................... 182
PDA (Proactive driving assist) ......................................... 187
Dynamic radar cruise control ......................................... 193
Cruise control ..................... 201
Emergency Driving Stop System ......................................... 204
RSA (Road Sign Assist) ..... 206
BSM (Blind Spot Monitor)... 209
RCTA (Rear Cross Traffic Alert) function ............................ 214
Safe Exit Assist .................. 219
Driving mode select switch ......................................... 224
Driving assist systems........ 225
4-6. Driving tips Winter driving tips............... 2305-1. Using the air conditioning
system and defogger
Automatic air conditioning sys-tem ................................... 234
Heated steering wheel/seat heaters ............................. 241
5-2. Using the interior lights Interior lights list ................. 243
5-3. Using the storage features List of storage features ...... 245
Luggage compartment features ......................................... 248
5-4. Other interior features Other interior features ........ 250
6-1. Maintenance and care Cleaning and protecting the vehicle exterior................. 260
Cleaning and protecting the vehicle interior.................. 262
6-2. Maintenance Maintenance requirements......................................... 265
General maintenance......... 267
Emission inspection and mainte- nance (I/M) programs ...... 270
6-3. Do-it-yourself maintenance Do-it-yourself service precau-tions ................................. 271
Hood .................................. 27
3
Positioning a floor jack .......27
4
Engine compartment .......... 275
Tires ................................... 282
Tire inflation pressure......... 299
Wheels ............................... 301
Air conditioning filter........... 303
5Interior features
6Maintenance and care
Page 14 of 436
14Pictorial index
Refueling method ................................................................. P.158
Fuel type/fuel tan k capacity ................................... .............. P.367
Tires.......................................................... ........................... P.282
Tire size/inflation pressure ................................... ................ P.370
Winter tires/tire chains ....................................... .................. P.230
Checking/rotation/tire pressur e warning system ..................P.282
Coping with flat tires......................................... ............ P.334, 346
Hood ........................................................... ......................... P.273
Opening ............................................................................... P.273
Engine oil ..................................................... ........................ P.368
Coping with overheating ...................................................... P.362
Headlights/daytime running lights .............................. ..... P.148
Turn signal lights/parking lights .............................. ......... P.148
Front side marker lights ....................................... ............. P.148
Fog lights
*............................................................... ............ P.153
Stop lights/tail lights/ rear side marker lights/
turn signal lights ............................................. ................... P.148
License plate lights........................................... ................. P.148
Tail lights.................................................... ......................... P.148
Back-up lights
Shifting the shift position to R ............................... ............... P.137
*: If equipped
Light bulbs of the exterior lights for driving
(Replacing method: P.309, Watts: P.372)
Page 162 of 436
1624-5. Using the driving support systems
■PCS (Pre-Collision System)
P.167
■LTA (Lane Tracing Assist)
P.177
■LDA (Lane Departure Alert)
P.182
■PDA (Proactive driving
assist)
P.187
■Emergency Driving Stop
System
P.204
■AHB (Automatic High
Beam)
P.150
■RSA (Road Sign Assist)
P.206
■Dynamic radar cruise con-
trol
P.193
■Cruise control
P.201
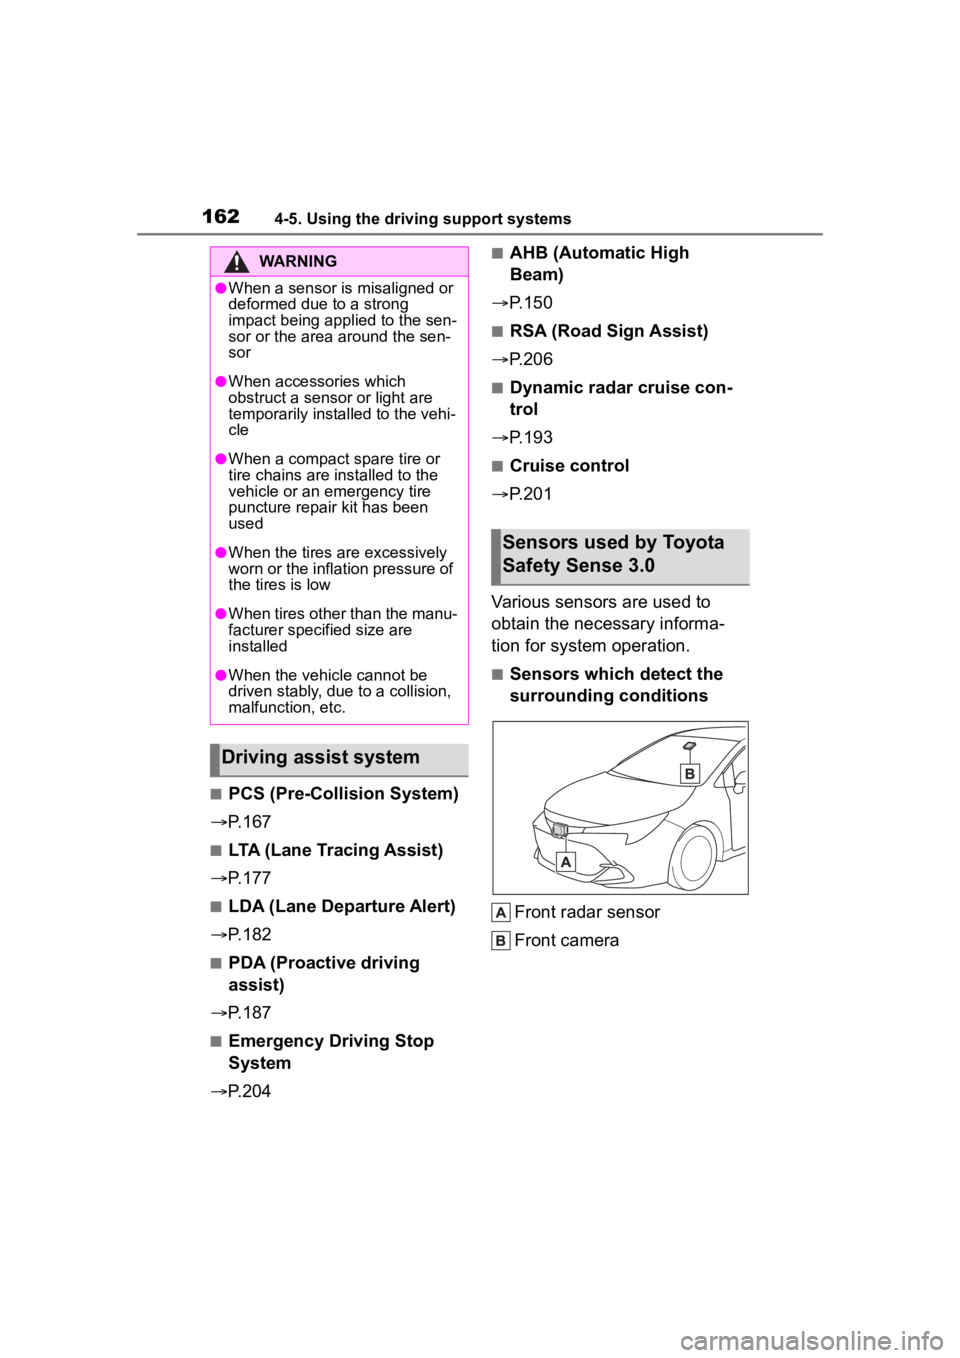
Various sensors are used to
obtain the necessary informa-
tion for system operation.
■Sensors which detect the
surrounding conditions
Front radar sensor
Front camera
WARNING
●When a sensor is misaligned or
deformed due to a strong
impact being applied to the sen-
sor or the area around the sen-
sor
●When accessories which
obstruct a sensor or light are
temporarily installed to the vehi-
cle
●When a compact spare tire or
tire chains are installed to the
vehicle or an emergency tire
puncture repair kit has been
used
●When the tires are excessively
worn or the inflation pressure of
the tires is low
●When tires other than the manu-
facturer specified size are
installed
●When the vehicle cannot be
driven stably, due to a collision,
malfunction, etc.
Driving assist system
Sensors used by Toyota
Safety Sense 3.0
Page 259 of 436

259
6
6
Maintenance and care
Maintenance and care
.6-1. Maintenance and careCleaning and protecting the vehicle exterior .......... 260
Cleaning and protecting the vehicle interior ........... 262
6-2. Maintenance Maintenance requirements.................................. 265
General maintenance.. 267
Emission inspection and maintenance (I/M) pro-
grams ........................ 270
6-3. Do-it-yourself mainte- nance
Do-it-yourself service pre- cautions ..................... 271
Hood ........................... 273
Positioning a floor jack .................................. 274
Engine compartment ... 275
Tires ............................ 282
Tire inflation pressure.. 299
Wheels ......... ...............301
Air conditioning filter .... 303
Electronic key battery.. 304
Checking and replacing fuses.......................... 306
Light bulbs................... 309
Page 284 of 436
2846-3. Do-it-yourself maintenance
tires also have radial construction.
Do not install stud ded tires without
first checking local regulations for
possible restrictions. Snow tires
should be installed on all wheels.
( P.230)
■If the tread on snow tires wears
down below 0.16 in. (4 mm)
The effectiveness of the tires as
snow tires is lost.
■Checking the tire valves
When replacing the tires, check the
tire valves for deformation, cracks,
and other damage.
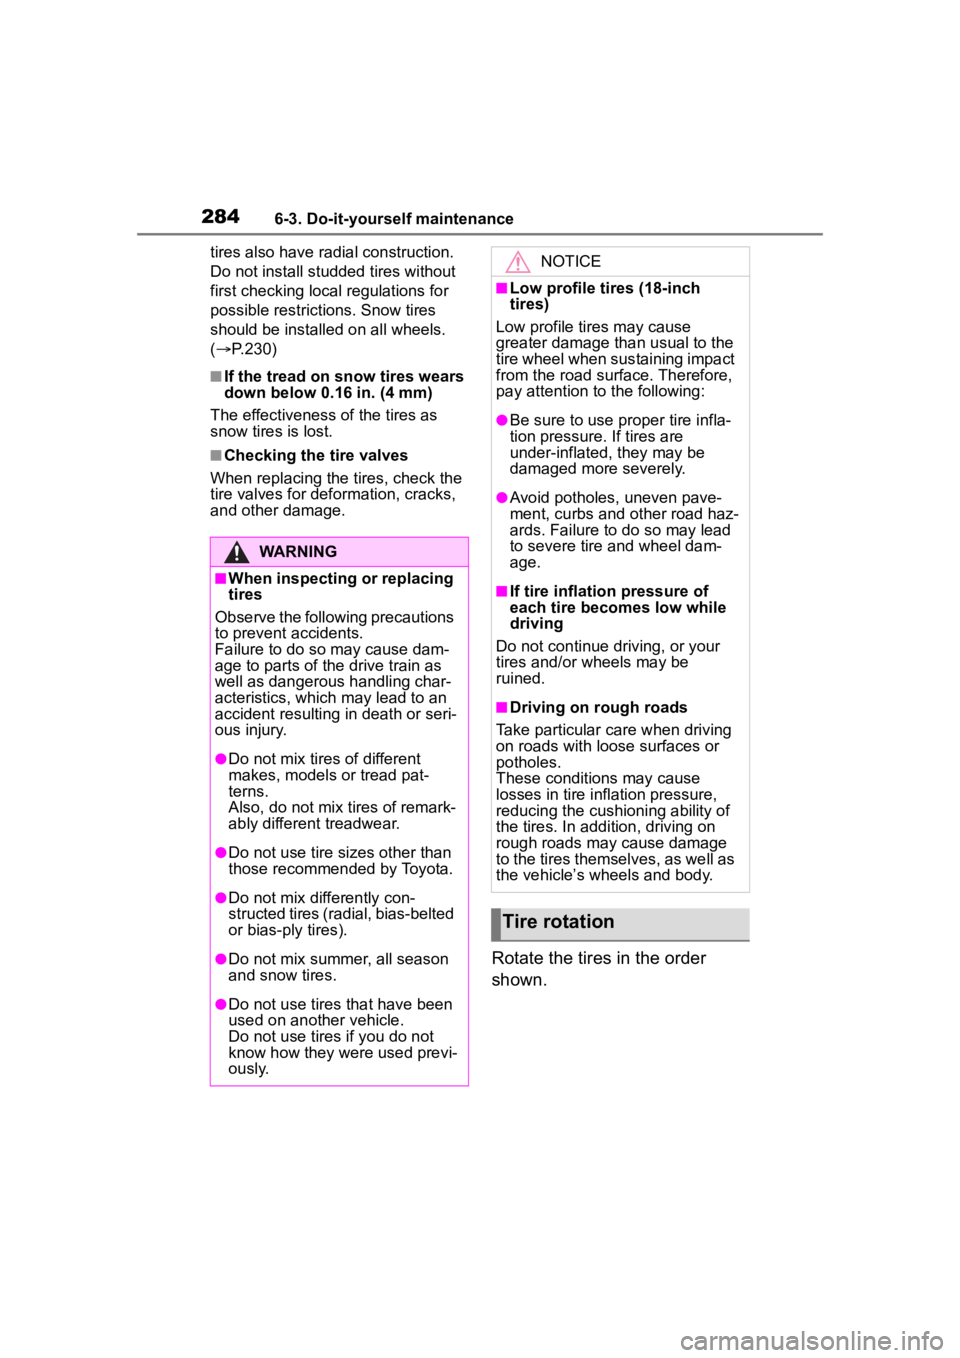
Rotate the tires in the order
shown.
WARNING
■When inspecting or replacing
tires
Observe the following precautions
to prevent accidents.
Failure to do so may cause dam-
age to parts of t he drive train as
well as dangerous handling char-
acteristics, which may lead to an
accident resulting in death or seri-
ous injury.
●Do not mix tires of different
makes, models or tread pat-
terns.
Also, do not mix tires of remark-
ably different treadwear.
●Do not use tire sizes other than
those recommended by Toyota.
●Do not mix differently con-
structed tires (radial, bias-belted
or bias-ply tires).
●Do not mix summer, all season
and snow tires.
●Do not use tires that have been
used on another vehicle.
Do not use tires if you do not
know how they were used previ-
ously.
NOTICE
■Low profile tires (18-inch
tires)
Low profile tires may cause
greater damage than usual to the
tire wheel when sustaining impact
from the road surface. Therefore,
pay attention to the following:
●Be sure to use proper tire infla-
tion pressure. If tires are
under-inflated, they may be
damaged more severely.
●Avoid potholes, uneven pave-
ment, curbs and other road haz-
ards. Failure to do so may lead
to severe tire a nd wheel dam-
age.
■If tire inflation pressure of
each tire becomes low while
driving
Do not continue driving, or your
tires and/or wheels may be
ruined.
■Driving on rough roads
Take particular care when driving
on roads with loose surfaces or
potholes.
These conditions may cause
losses in tire inflation pressure,
reducing the cushioning ability of
the tires. In addition, driving on
rough roads may cause damage
to the tires themselves, as well as
the vehicle’s wheels and body.
Tire rotation
Page 285 of 436

2856-3. Do-it-yourself maintenance
6
Maintenance and care
Front
To equalize tire wear and extend
tire life, Toyota recommends that
tire rotation is carried out at the
same interval as tire inspection.
Do not fail to initialize the tire pres-
sure warning system after tire rota-
tion.
Your vehicle is equipped with a
tire pressure warning system
that uses tire pressure warning
valves and transmitters to detect
low tire inflation pressure before
serious problems arise.
The tire pressure warning sys-
tem of this vehicle adopts a
2-type warning system.
When “Adjust Pressure” is
displayed (Normal Warning)
A warning with the tire pressure
warning light and warning buzzer
when there is an unknown level of
low tire pressure with the appear-
ance of the tire due to natural air
leakage as well as the pressure
lowering due to changes in the
pressure according to the outside
temperature. (Ways of coping:
P.324, 370)
When “Immediately Check
Tire when Safe” is displayed
(Emergency Warning)
A warning with the tire pressure
warning light and warning buzzer
when there is a k nown level of low
tire pressure with the appearance
of the tire due to pressure suddenly
lowering. (Ways of coping: P.324,
346)
However, the system may not be
able to detect sudden tire ruptures
(bursting, etc.).
The tire pressure detected by the
tire pressure warning system can
be displayed on the multi-informa-
tion display.
■How to change the unit
4.2-inch display
1 Park the vehicle in a safe
place and turn the engine
switch off.
Changing the unit cannot be per-
formed while the vehicle is moving.
2Turn the engine switch to
ON.
3 Select of the multi-infor-
mation display and then
press .
Tire pressure warning
system
Page 286 of 436

2866-3. Do-it-yourself maintenance
4Press or to select
“Vehicle Settings” and then
press and hold .
5 Press or to select
“TPWS setting” and then
press .
6 Press or to select
“Pressure unit setting”.
7 Press or to select the
desired unit and then press
.
7-inch display
1 Park the vehicle in a safe
place and turn the engine
switch off.
Changing the unit cannot be per-
formed while the vehicle is moving.
2Turn the engine switch to
ON.
3 Select of the multi-infor-
mation display and then
press .
4 Press or to select
“Vehicle Settings” and then
press and hold .
5 Press or to select
“TPWS setting” and then
press .
6 Press or to select
“Pressure unit setting”. 7
Press or to select the
desired unit and then press
.
■Routine tire inflation pressure
checks
The tire pressure warning system
does not replace routine tire inflation
pressure checks . Make sure to
check tire inflation pressure as part
of your routine o f daily vehicle
checks.
■Tire inflation pressure
●It may take a few minutes to dis-
play the tire inflation pressure
after the engine switch is turned to
ON. It may also take a few min-
utes to display the tire inflation
pressure after infl ation pressure
has been adjusted.
●Tire inflation pressure changes
with temperature.
The displayed values may also be
different from the values mea-
sured using a tire pressure gauge.
■Situations in which the tire
pressure warning system may
not operate properly
●In the following cases, the tire
pressure warning system may not
operate properly.
• If non-genuine Toyota wheels are used.
• A tire has been replaced with a
tire that is not an OE (Original
Equipment) tire.
• A tire has been replaced with a
tire that is not of the specified size.
• Tire chains, etc. are equipped.
• An auxiliary-support ed run-flat tire
is equipped.
• If a window tint that affects the radio wave signals is installed.
• If there is a lot of snow or ice on the vehicle, particularly around the
wheels or wheel housings.
• If the tire inflation pressure is extremely higher than the speci-
fied level.
Page 287 of 436
2876-3. Do-it-yourself maintenance
6
Maintenance and care
• If tires not equipped with tire pres-sure warning valves and transmit-
ters are used.
• If the ID code on the tire pressure warning valves and transmitters is
not registered in the tire pressure
warning computer.
●Performance may be affected in
the following situations.
• Near a TV tower, electric power plant, gas station, radio station,
large display, airpo rt or other facil-
ity that generates strong radio
waves or electrical noise.
• When carrying a portable radio, cellular phone, cordless phone or
other wireless communication
device.
●When the vehicle is parked, the
time taken for the warning to start
or go off could be extended.
●When tire inflation pressure
declines rapidly for example when
a tire has burst, the warning may
not function.
■Warning performance of the tire
pressure warning system
The warning of the tire pressure
warning system will change in
accordance with driving conditions.
For this reason, the system may
give a warning even if the tire pres-
sure does not reach a low enough
level, or if the p ressure is higher
than the pressure that was adjusted
to when the system was initialized.
When replacing tires or wheels,
tire pressure warning valves and
transmitters must also be
installed.
When new tire pressure warning
valves and transmitters are installed, new ID codes must be
registered in the tire pressure
warning computer and the tire
pressure warning system must
be initialized. Have tire pressure
warning valves and transmitter
ID codes registered by your Toy-
ota dealer. (
P.293)
■Replacing tires and wheels
If the ID code of the tire pressure
warning valve and tr ansmitter is not
registered, the tire pressure warning
system will not work properly. After
driving for about 20 minutes, the tire
pressure warning light blinks for 1
minute and stays on to indicate a
system malfunction.
Installing tire pressure
warning valves and trans-
mitters
NOTICE
■Repairing or replacing tires,
wheels, tire pressure warn-
ing valves, transmitters and
tire valve caps
●When removing or fitting the
wheels, tires or the tire pressure
warning valves and transmit-
ters, contact your Toyota dealer
as the tire pressure warning
valves and transmitters may be
damaged if not handled cor-
rectly.
●Make sure to install the tire
valve caps. If the tire valve caps
are not installed, water could
enter the tire pressure warning
valves and the tire pressure
warning valves could be bound.
●When replacing tire valve caps,
do not use tire valve caps other
than those specified. The cap
may become stuck.
Page 288 of 436
2886-3. Do-it-yourself maintenance
It is necessary to register the
position of each wheel after per-
forming a tire rotation.
Wheel position registration can
be performed by oneself. Wheel
position registration is per-
formed by driving forward with
moderate left and right turns.
However, depending on the driv-
ing conditions and driving envi-
ronment, registration may take
some time to complete.
4.2-inch display
1 Park the vehicle in a safe
place and turn the engine
switch off, wait for approxi-
mately 20 minutes or more,
and then start the engine.
The wheel position registration pro-
cedure cannot be performed while
the vehicle is moving.
2Select of the multi-infor-
mation display and then
press .
3 Press or to select
“Vehicle Settings” and then
press and hold .
4 Press or to select
“TPWS setting” and then
press .
5 Press or to select
“Tire Rotation” and then
press .
6 Select “OK” and then press
.
A message indicating that wheel
position registration is being per-
formed will be disp layed on the
multi-information display. “---” will
be displayed for the tire inflation
pressure of each tire and wheel
position registr ation will begin.
7Drive straight (with occa-
sional left and right turns) at
approximately 25 mph (40
km/h) or more for approxi-
mately 10 to 30 minutes.
When wheel position registration is
complete, a mess age indicating
that registration has been com-
pleted and the inflation pressure of
each tire will be displayed on the
multi-information display.
Even if it is not possible to drive
continuously at approximately 25
mph (40 km/h) or more, registration
can be completed by driving for a
long time. However, if registration
does not complete after driving for
1 hour or more, par k the vehicle in
NOTICE
■To avoid damage to the tire
pressure warning valves and
transmitters
When a tire is repaired with liquid
sealants, the tire pressure warn-
ing valve and transmitter may not
operate properly. If a liquid seal-
ant is used, contact your Toyota
dealer or other qualified service
shop as soon as possible. Make
sure to replace the tire pressure
warning valve and transmitter
when replaci ng the tire. (P.287)
Registration of the posi-
tion of each wheel after
performing a tire rotation