rear light TOYOTA COROLLA HYBRID 2023 Owner's Manual
[x] Cancel search | Manufacturer: TOYOTA, Model Year: 2023, Model line: COROLLA HYBRID, Model: TOYOTA COROLLA HYBRID 2023Pages: 496, PDF Size: 10.13 MB
Page 94 of 496
942-1. Instrument cluster
*1: These lights come on when the power switch is turned to ON to
indicate that a system check is
being performed. They will turn
off after the hybrid system is on,
or after a few seconds. There
may be a malfunction in a sys-
tem if the lights do not come on,
or turn off. Have the vehicle
inspected by your Toyota dealer.
*2: This light illuminates on the multi-information display.
*3: 4.2-inch display.
*4: 7-inch display.
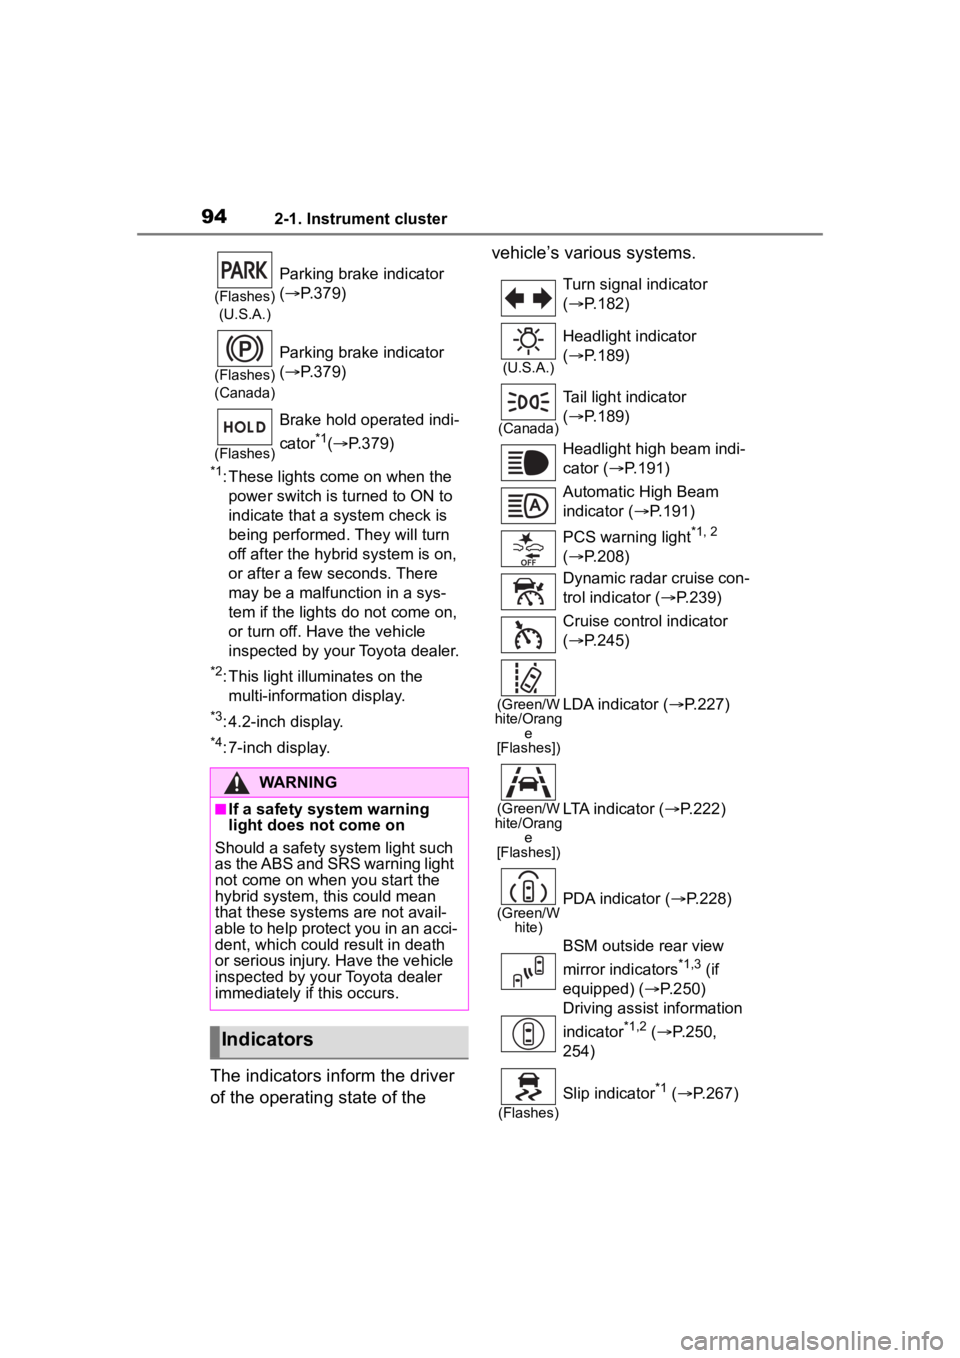
The indicators inform the driver
of the operating state of the vehicle’s various systems.
(Flashes)
(U.S.A.)
Parking brake indicator
( P.379)
(Flashes)
(Canada)
Parking brake indicator
( P.379)
(Flashes)
Brake hold operated indi-
cator
*1( P.379)
WARNING
■If a safety system warning
light does not come on
Should a safety system light such
as the ABS and SRS warning light
not come on when you start the
hybrid system, this could mean
that these systems are not avail-
able to help protect you in an acci-
dent, which could result in death
or serious injury. Have the vehicle
inspected by your Toyota dealer
immediately if this occurs.
Indicators
Turn signal indicator
( P.182)
(U.S.A.)
Headlight indicator
( P.189)
(Canada)
Tail light indicator
( P.189)
Headlight high beam indi-
cator ( P.191)
Automatic High Beam
indicator ( P.191)
PCS warning light
*1, 2
( P.208)
Dynamic radar cruise con-
trol indicator ( P.239)
Cruise control indicator
( P.245)
(Green/W
hite/Orang e
[Flashes])LDA indicator ( P.227)
(Green/W
hite/Orang e
[Flashes])LTA indicator ( P.222)
(Green/W
hite)PDA indicator ( P.228)
BSM outside rear view
mirror indicators
*1,3 (if
equipped) ( P.250)
Driving assist information
indicator
*1,2 ( P.250,
254)
(Flashes)
Slip indicator*1 ( P.267)
Page 95 of 496
952-1. Instrument cluster
2
Vehicle status information and indicators
*1: These lights come on when the power switch is turned to ON to
indicate that a system check is
being performed. They will turn
off after the hybrid system is on,
or after a few seconds. There
may be a malfunction in a sys-
tem if the lights do not come on,
or turn off. Have the vehicle inspected by your Toyota dealer.
*2: This light comes on when the
system is turned off.
*3: This light illuminates on the out-side rear view mirrors.
*4: This light illuminates on the multi-information display.
*5: When the outside temperature is approximately 37°F (3°C) or
lower, this indicator will flash for
approximately 10 seconds, then
stay on.
*6: This light illuminates on the cen-ter panel.
*7: This light illuminates on the over-head console.
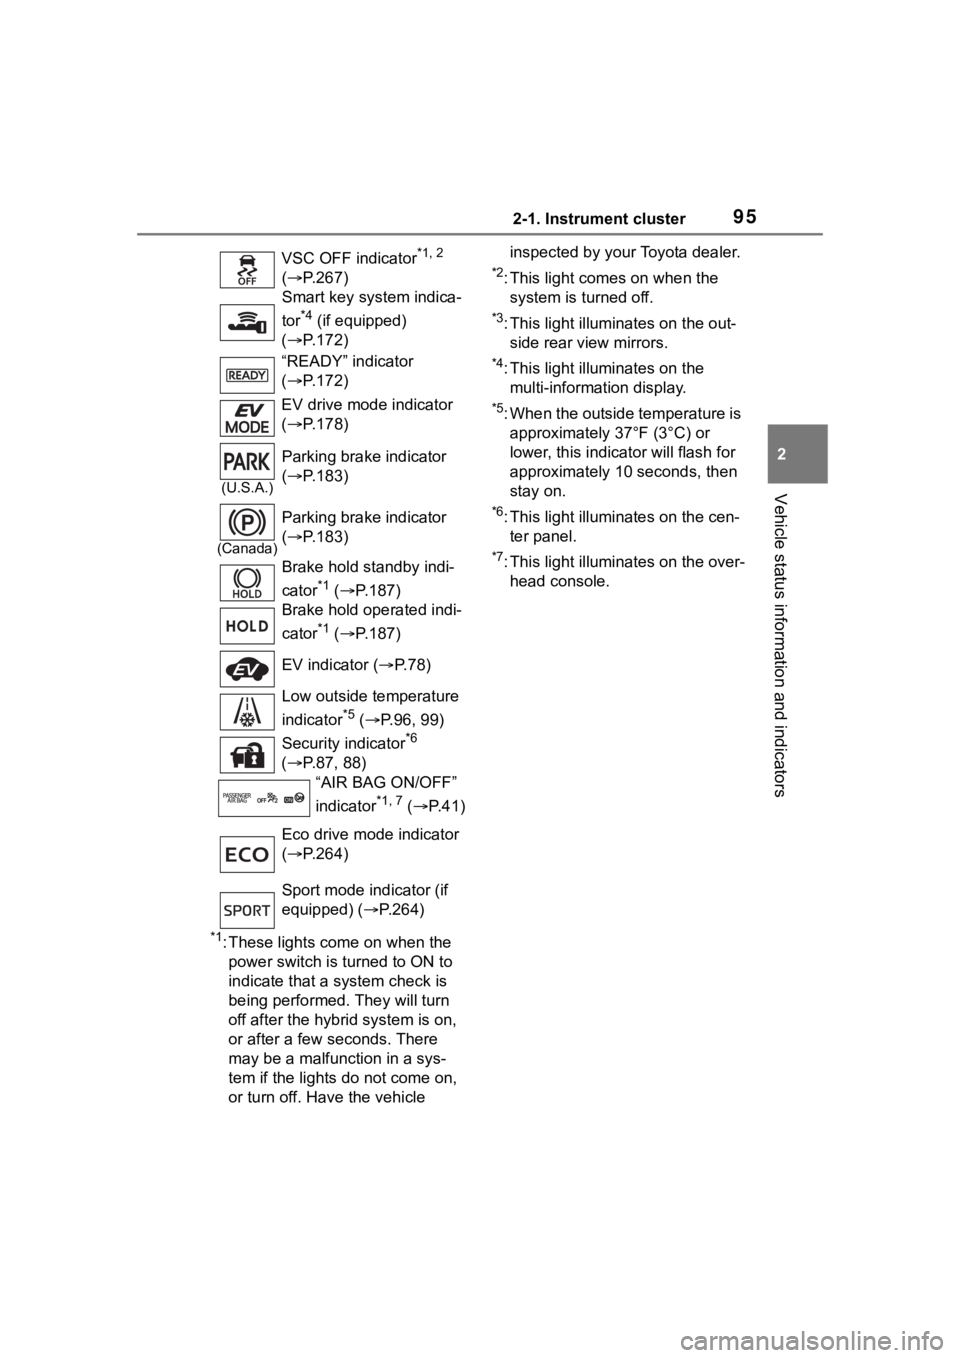
VSC OFF indicator
*1, 2
( P.267)
Smart key system indica-
tor
*4 (if equipped)
( P.172)
“READY” indicator
( P.172)
EV drive mode indicator
( P.178)
(U.S.A.)
Parking brake indicator
( P.183)
(Canada)
Parking brake indicator
( P.183)
Brake hold standby indi-
cator
*1 ( P.187)
Brake hold operated indi-
cator
*1 ( P.187)
EV indicator ( P. 7 8 )
Low outside temperature
indicator
*5 ( P.96, 99)
Security indicator
*6
( P.87, 88)
“AIR BAG ON/OFF”
indicator
*1, 7 ( P. 4 1 )
Eco drive mode indicator
( P.264)
Sport mode indicator (if
equipped) ( P.264)
Page 125 of 496
1253-1. Key information
3
Before driving
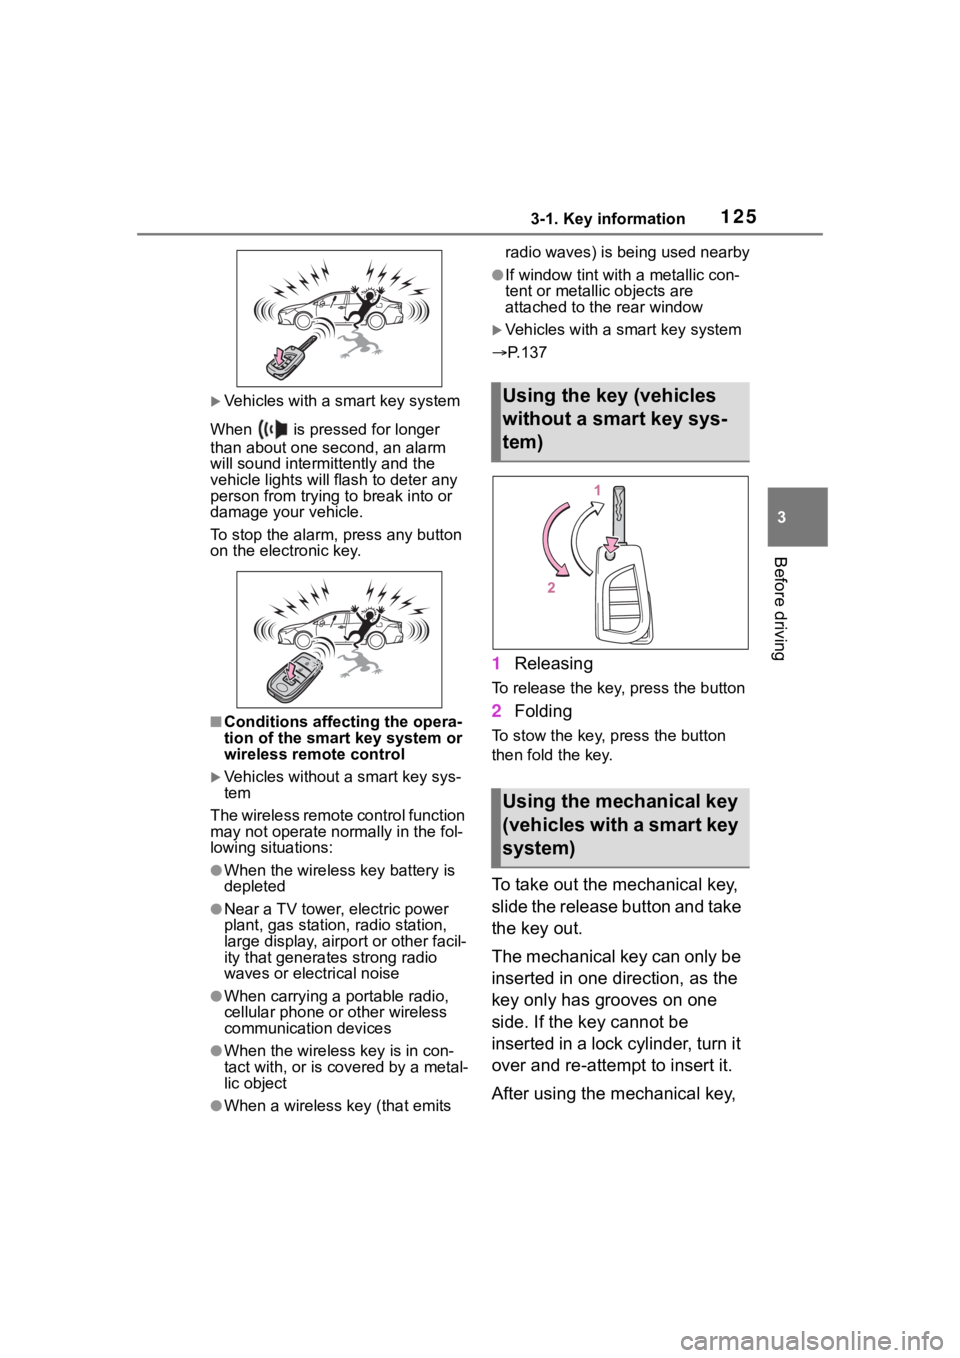
Vehicles with a smart key system
When is pressed for longer
than about one second, an alarm
will sound intermittently and the
vehicle lights will f lash to deter any
person from trying to break into or
damage your vehicle.
To stop the alarm, press any button
on the electronic key.
■Conditions affect ing the opera-
tion of the smart key system or
wireless remo te control
Vehicles without a smart key sys-
tem
The wireless remote control function
may not operate normally in the fol-
lowing situations:
●When the wireless key battery is
depleted
●Near a TV tower, electric power
plant, gas station , radio station,
large display, airpo rt or other facil-
ity that generates strong radio
waves or electrical noise
●When carrying a portable radio,
cellular phone or other wireless
communication devices
●When the wireles s key is in con-
tact with, or is covered by a metal-
lic object
●When a wireless key (that emits radio waves) is being used nearby
●If window tint wit
h a metallic con-
tent or metallic objects are
attached to the rear window
Vehicles with a smart key system
P.137
1 Releasing
To release the key, press the button
2Folding
To stow the key, press the button
then fold the key.
To take out the mechanical key,
slide the release button and take
the key out.
The mechanical key can only be
inserted in one direction, as the
key only has grooves on one
side. If the key cannot be
inserted in a lock cylinder, turn it
over and re-attempt to insert it.
After using the mechanical key,
Using the key (vehicles
without a smart key sys-
tem)
Using the mechanical key
(vehicles with a smart key
system)
Page 143 of 496
1433-3. Adjusting the seats
3
Before driving
WARNING
●Do not allow anyone to sit on a
folded seatback or in the trunk
while driving.
●Do not allow child ren to enter
the trunk.
●Be careful not to get your hand
caught when folding the rear
seatbacks.
●Adjust the position of the front
seats before folding down the
rear seatbacks so that the front
seats do not interfere with the
rear seatbacks when folding
down the rear seatbacks.
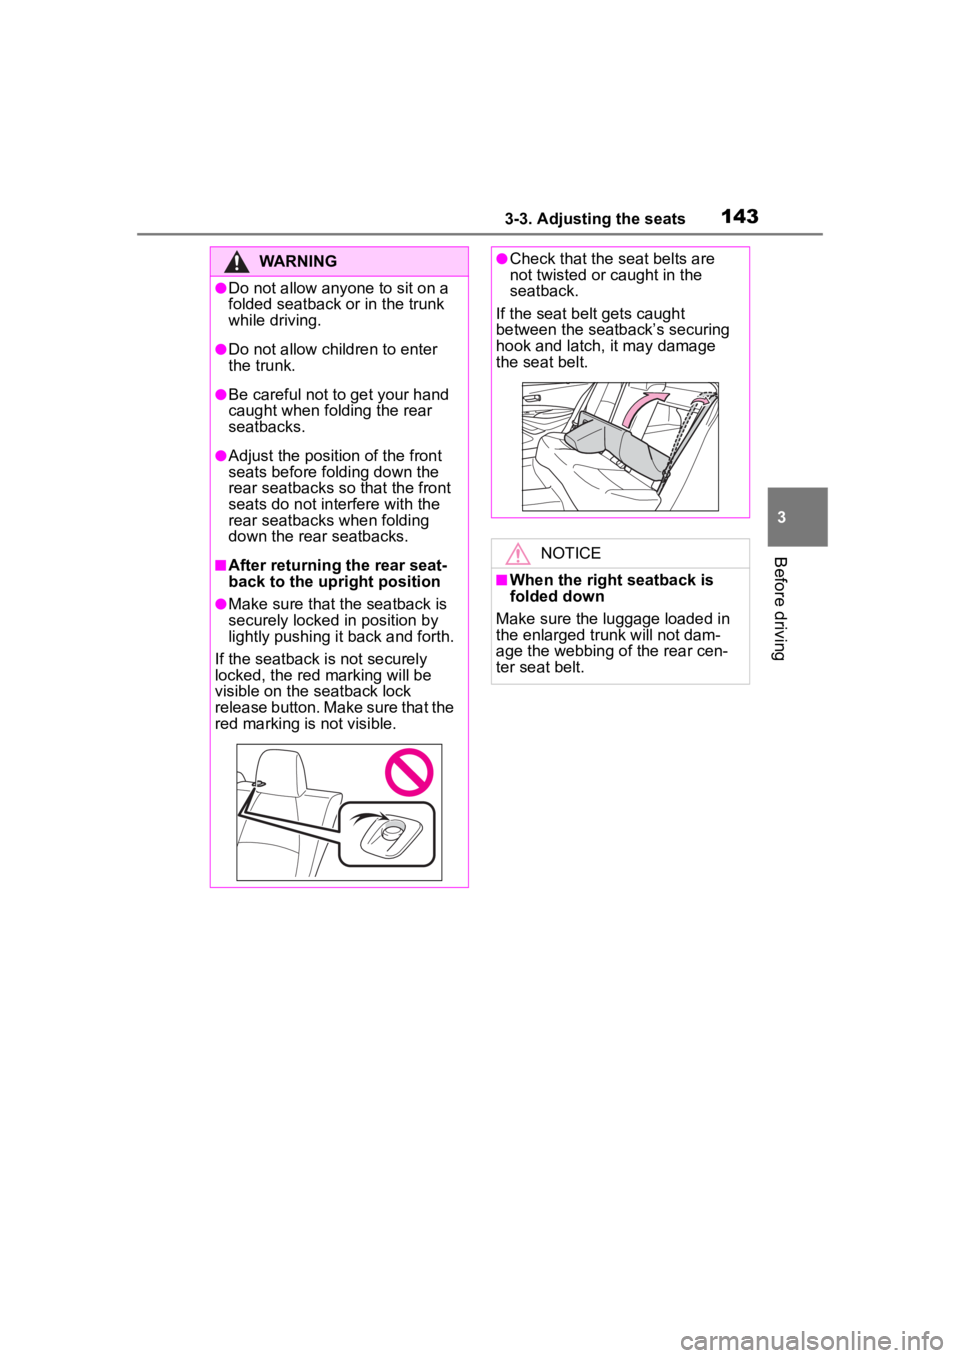
■After returning the rear seat-
back to the upright position
●Make sure that the seatback is
securely locked in position by
lightly pushing it back and forth.
If the seatback is not securely
locked, the red marking will be
visible on the seatback lock
release button. Make sure that the
red marking is not visible.
●Check that the seat belts are
not twisted or caught in the
seatback.
If the seat belt gets caught
between the seatback’s securing
hook and latch, it may damage
the seat belt.
NOTICE
■When the right seatback is
folded down
Make sure the luggage loaded in
the enlarged trunk will not dam-
age the webbing of the rear cen-
ter seat belt.
Page 147 of 496
1473-4. Adjusting the steering wheel and mirrors
3
Before driving
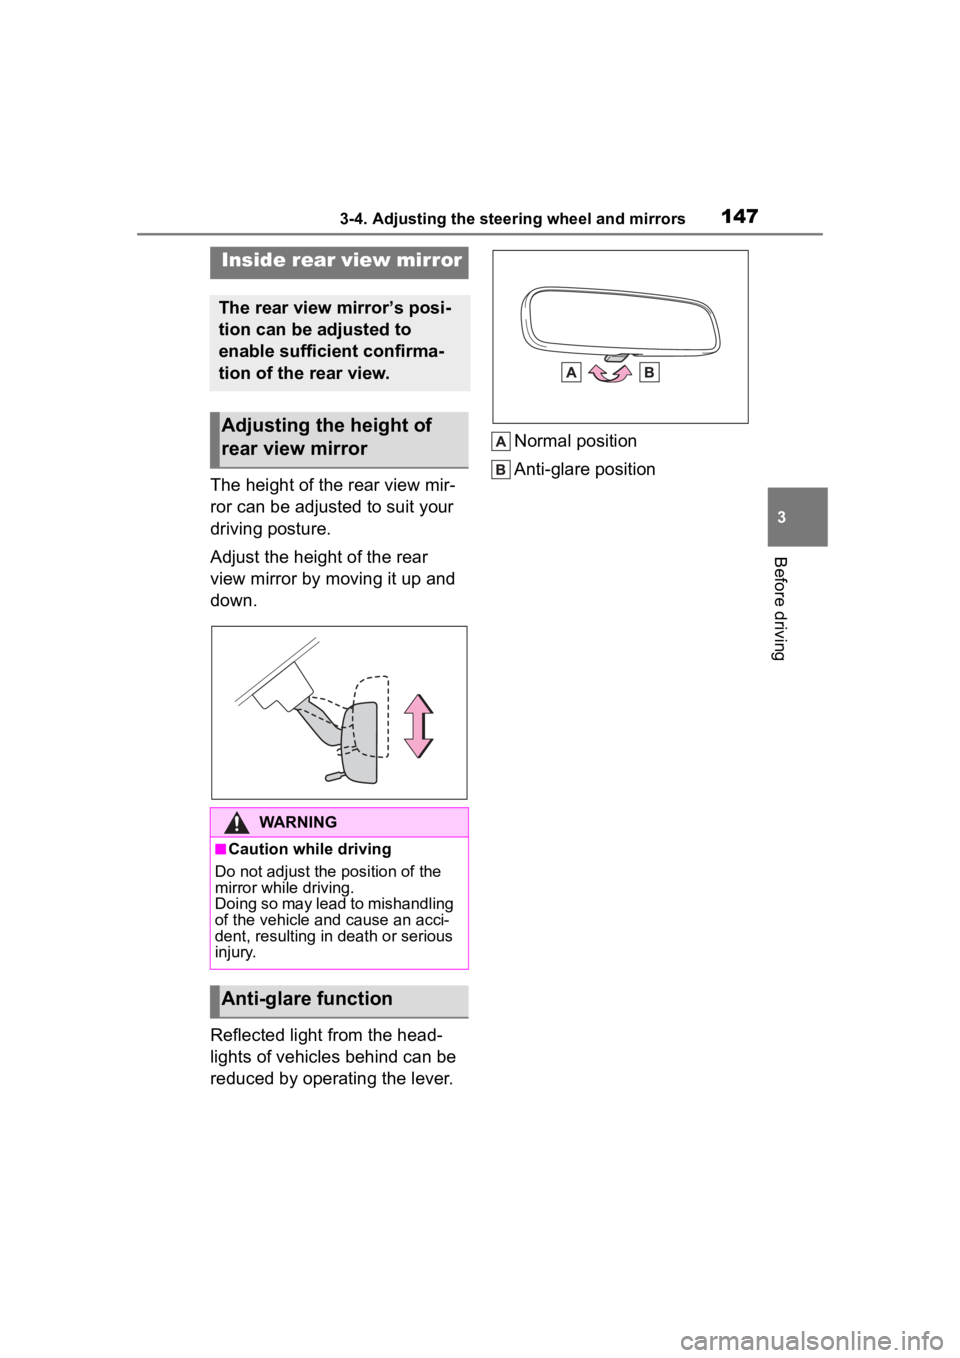
The height of the rear view mir-
ror can be adjusted to suit your
driving posture.
Adjust the height of the rear
view mirror by moving it up and
down.
Reflected light from the head-
lights of vehicles behind can be
reduced by operating the lever.Normal position
Anti-glare position
Inside rear view mirror
The rear view mirror’s posi-
tion can be adjusted to
enable sufficient confirma-
tion of the rear view.
Adjusting the height of
rear view mirror
WARNING
■Caution while driving
Do not adjust the position of the
mirror while driving.
Doing so may lead to mishandling
of the vehicle and cause an acci-
dent, resulting in death or serious
injury.
Anti-glare function
Page 157 of 496
157
4
4
Driving
Driving
.4-1. Before drivingDriving the vehicle....... 159
Cargo and luggage ..... 166
Vehicle load limits ....... 168
Trailer towing............... 169
Dinghy towing ............. 169
4-2. Driving procedures Power (ignition) switch (vehicles without a smart
key system) ............... 170
Power (ignition) switch (vehicles with a smart key
system)...................... 172
EV drive mode ............ 178
Hybrid transmission .... 180
Turn signal lever.......... 182
Parking brake .............. 183
Brake Hold .................. 187
4-3. Operating the lights and wipers
Headlight switch .......... 189
AHB (Automatic High Beam)........................ 191
Windshield wipers and washer....................... 194
4-4. Refueling Opening the fuel tank cap.................................. 1964-5. Using the dr
iving support
systems
Toyota Safety Sense 3.0 software update ......... 199
Toyota Safety Sense 3.0 .................................. 201
PCS (Pre-Collision System) .................................. 207
LTA (Lane Tracing Assist) .................................. 218
LDA (Lane Departure Alert) .................................. 223
PDA (Proactive driving assist) ........................ 228
RSA (Road Sign Assist) .................................. 234
Dynamic radar cruise con- trol ............................. 236
Cruise control .............. 244
Emergency Driving Stop System ...................... 247
BSM (Blind Spot Monitor) .................................. 249
RCTA (Rear Cross Traffic Alert) function ............ 254
Safe Exit Assist ........... 260
Driving mode select switch .................................. 264
Driving assist systems .................................. 266
4-6. Driving tips Hybrid vehicle driving tips.................................. 271
Page 182 of 496
1824-2. Driving procedures
P.264
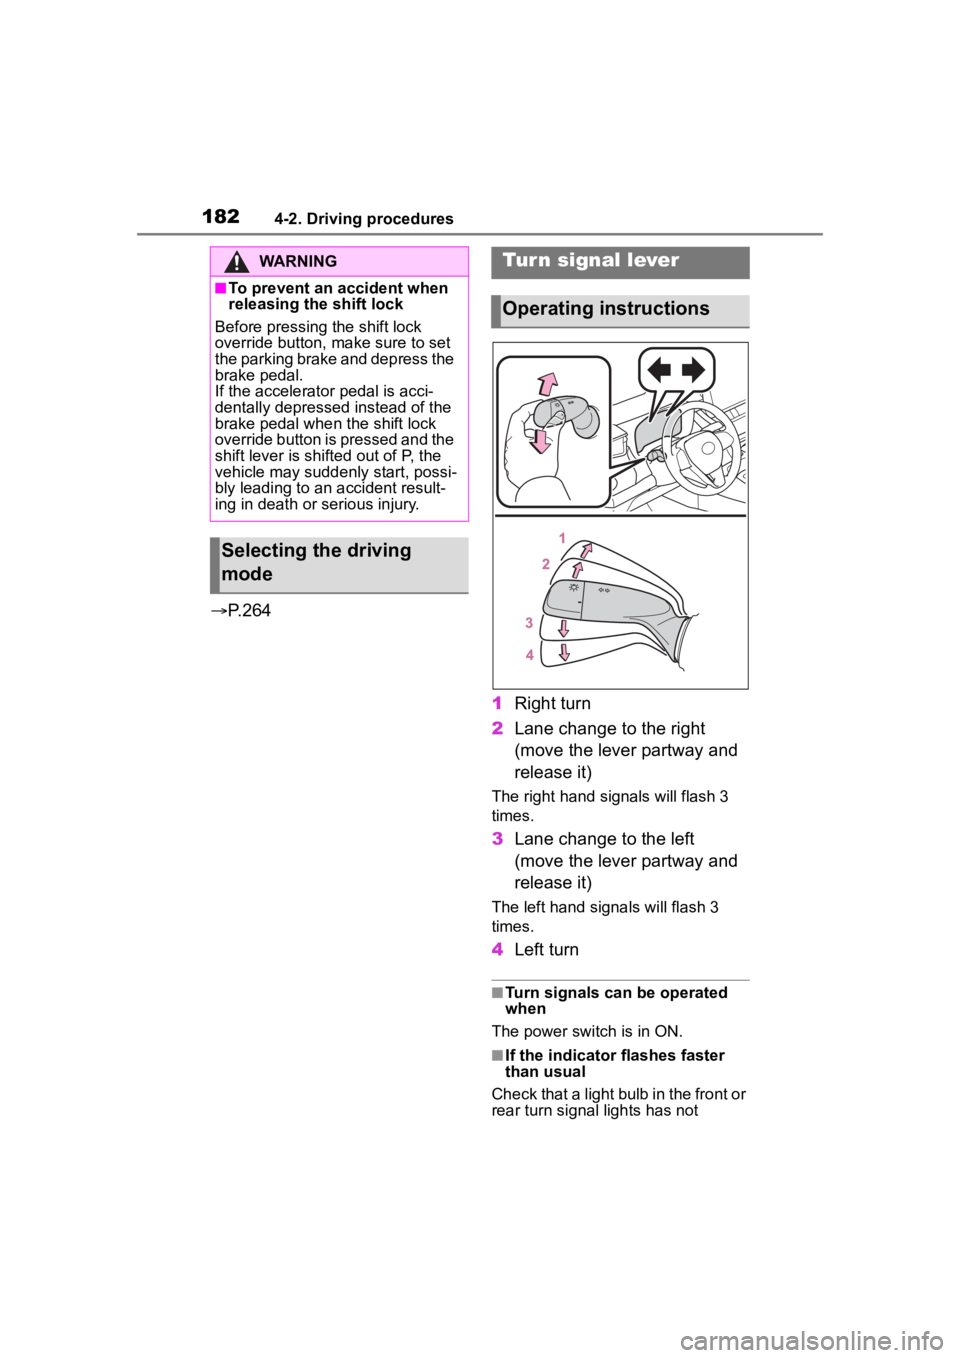
1Right turn
2 Lane change to the right
(move the lever partway and
release it)
The right hand s ignals will flash 3
times.
3 Lane change to the left
(move the lever partway and
release it)
The left hand signals will flash 3
times.
4Left turn
■Turn signals can be operated
when
The power switch is in ON.
■If the indicator flashes faster
than usual
Check that a light bulb in the front or
rear turn signal lights has not
WARNING
■To prevent an accident when
releasing the shift lock
Before pressing the shift lock
override button, make sure to set
the parking brake and depress the
brake pedal.
If the accelerator pedal is acci-
dentally depressed instead of the
brake pedal when the shift lock
override button is pressed and the
shift lever is shifted out of P, the
vehicle may suddenly start, possi-
bly leading to an accident result-
ing in death or serious injury.
Selecting the driving
mode
Tur n signal lever
Operating instructions
Page 194 of 496
1944-3. Operating the lights and wipers
■Temporarily changing to
the low beams
It is recommended to switch to
the low beams when use of the
high beams is inappropriate or
when the high beams may
cause problems or distress to
other drivers or pedestrians
nearby.
Pull the lever rearward and then
return it to its original position.
The high beams will illuminate
while the lever is pulled, however,
after the lever is returned to its orig-
inal position, t he low beams will
remain on for a certain amount of
time. After this, the Automatic High
Beam system will operate.
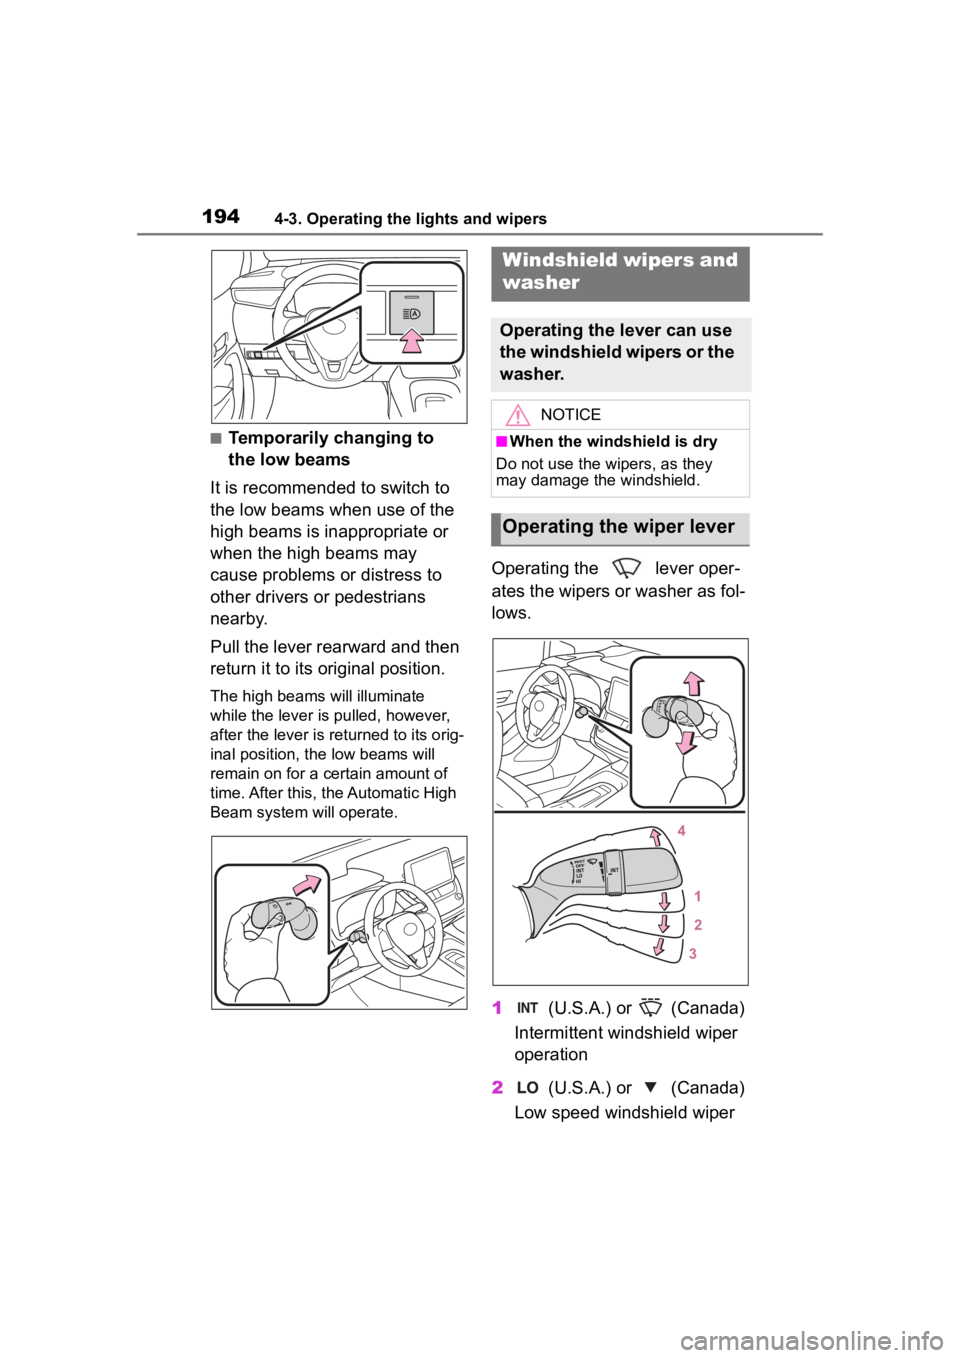
Operating the lever oper-
ates the wipers or washer as fol-
lows.
1 (U.S.A.) or (Canada)
Intermittent windshield wiper
operation
2 (U.S.A.) or (Canada)
Low speed windshield wiper
Windshield wipers and
washer
Operating the lever can use
the windshield wipers or the
washer.
NOTICE
■When the windshield is dry
Do not use the wipers, as they
may damage the windshield.
Operating the wiper lever
Page 204 of 496
2044-5. Using the driving support systems
WARNING
• Even if a glass coating agent is applied to the windshield, it will
still be necessary to use the
windshield wipers to remove
water droplets, etc. from the
area of the windshield in front of
the front camera.
• If the inner side of the wind- shield where the front camera is
installed is dirty, contact your
Toyota dealer.
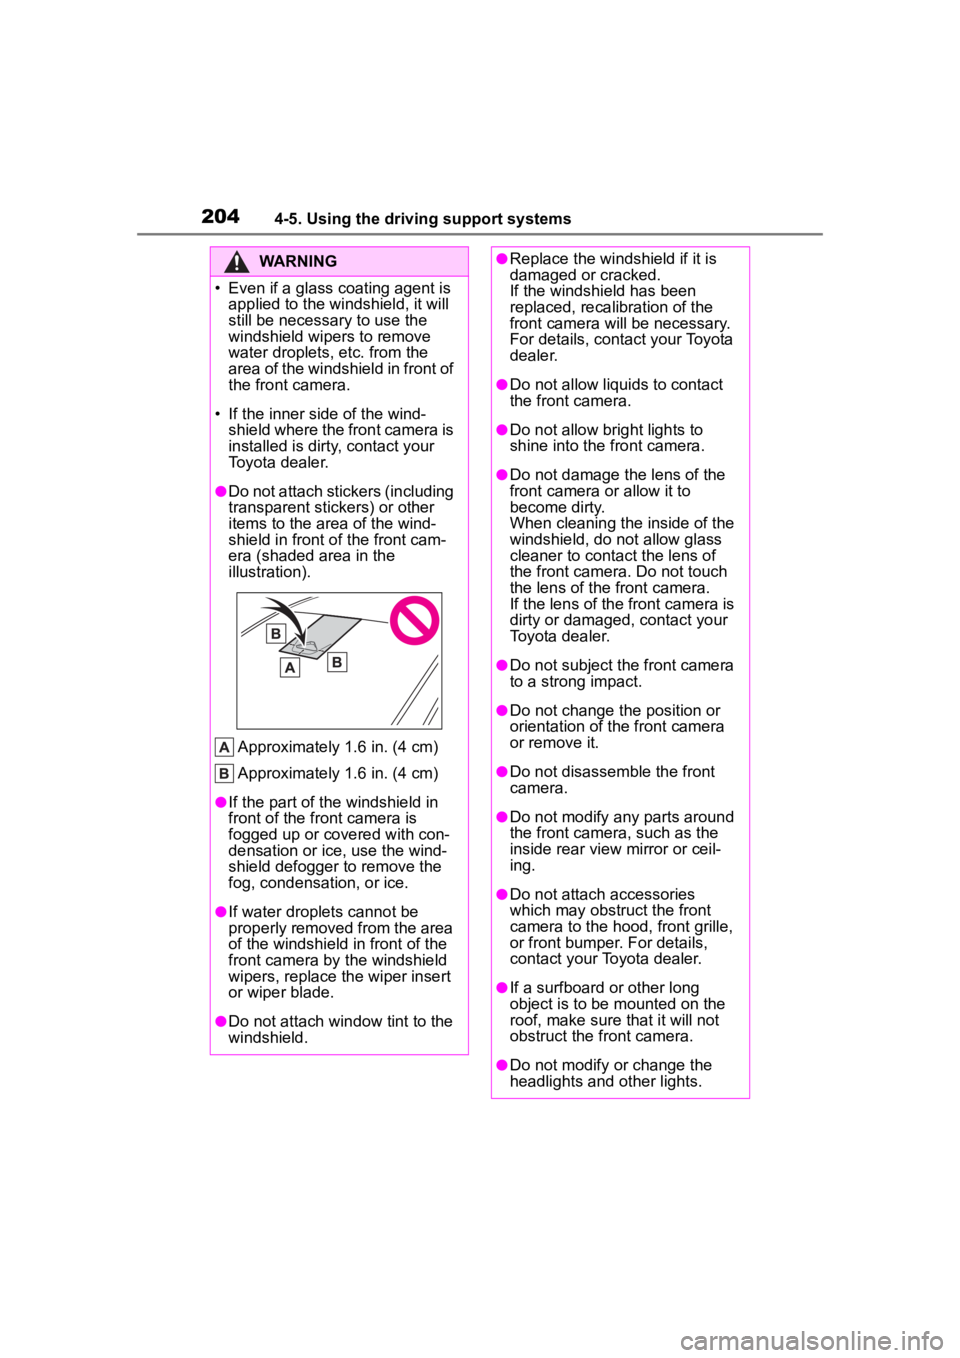
●Do not attach stickers (including
transparent stickers) or other
items to the area of the wind-
shield in front o f the front cam-
era (shaded area in the
illustration).
Approximately 1.6 in. (4 cm)
Approximately 1.6 in. (4 cm)
●If the part of the windshield in
front of the front camera is
fogged up or covered with con-
densation or ice, use the wind-
shield defogger to remove the
fog, condensation, or ice.
●If water droplets cannot be
properly removed from the area
of the windshield in front of the
front camera by the windshield
wipers, replace the wiper insert
or wiper blade.
●Do not attach win dow tint to the
windshield.
●Replace the windshield if it is
damaged or cracked.
If the windshield has been
replaced, recalibration of the
front camera will be necessary.
For details, contact your Toyota
dealer.
●Do not allow liquids to contact
the front camera.
●Do not allow bright lights to
shine into the front camera.
●Do not damage th e lens of the
front camera o r allow it to
become dirty.
When cleaning the inside of the
windshield, do not allow glass
cleaner to contact the lens of
the front camera. Do not touch
the lens of the front camera.
If the lens of the front camera is
dirty or damaged, contact your
Toyota dealer.
●Do not subject the front camera
to a strong impact.
●Do not change the position or
orientation of the front camera
or remove it.
●Do not disassemble the front
camera.
●Do not modify any parts around
the front camera , such as the
inside rear view mirror or ceil-
ing.
●Do not attach accessories
which may obstruct the front
camera to the hood, front grille,
or front bumper. For details,
contact your Toyota dealer.
●If a surfboard or other long
object is to be mounted on the
roof, make sure that it will not
obstruct the front camera.
●Do not modify or change the
headlights and other lights.
Page 205 of 496
2054-5. Using the driving support systems
4
Driving
■Situations in which the sensors
may not operate properly
●When the height or inclination of
the vehicle has been changed due
to modifications
●When the windshield is dirty,
fogged up, cracked or damaged
●When the ambient temperature is
high or low
●When mud, water, snow, dead
insects, foreign matter, etc., is
attached to the front of the sensor
●When in inclement weather such
as heavy rain, fog, snow, or a
sandstorm
●When water, snow, dust, etc. is
thrown up in front of the vehicle, or
when driving through mist or
smoke
●When the headlig hts are not illu-
minated while driving in the dark,
such as at night o r when in a tun-
nel
●When the lens of a headlight is
dirty and illumination is weak
●When the headlights are mis-
aligned
●When a headlight is malfunction-
ing
●When the headlights of another
vehicle, sunlight, or reflected light
shines directly into the front cam-
era
●When the brightness of the sur-
rounding area changes suddenly
●When driving near a TV tower,
broadcasting station, electric
power plant, radar equipped vehi-
cles, etc., or other location where
strong radio waves or electrical
noise may be present
●When a wiper blade is blocking
the front camera
●When in a location or near objects
which strongly reflect radio waves,
such as the following:
• Tunnels
• Truss bridges
• Gravel roads
• Rutted, snow-covered roads
• Walls
• Large trucks
• Manhole covers
• Guardrail
• Metal plates
●When near a step or protrusion
●When a detectable vehicle is nar-
row, such as a small mobility vehi-
cle
●When a detectable vehicle has a
small front or rear end, such as an
unloaded truck
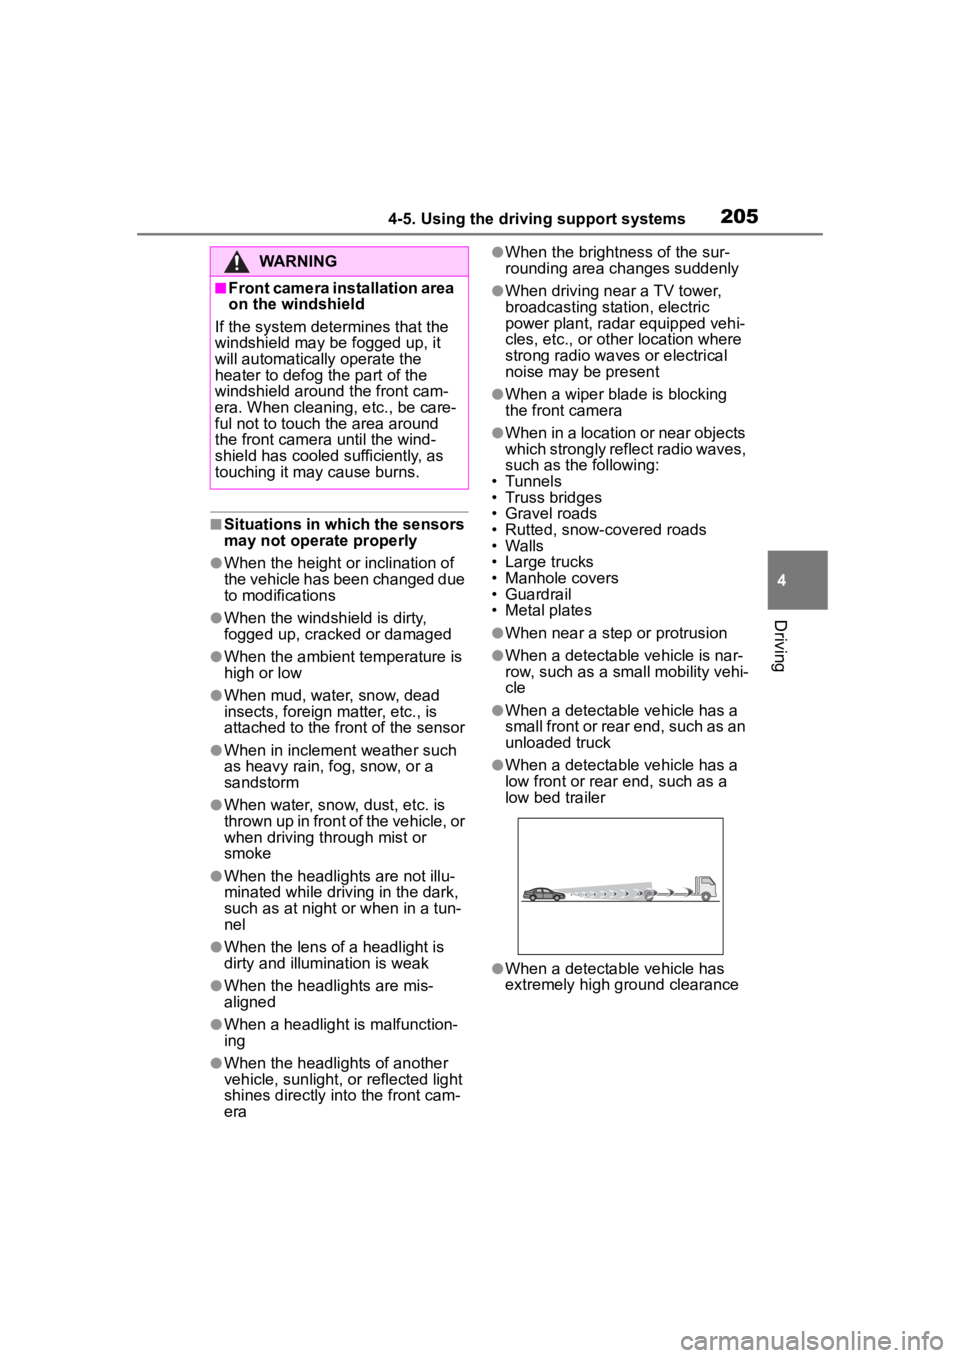
●When a detectable vehicle has a
low front or rear end, such as a
low bed trailer
●When a detectable vehicle has
extremely high ground clearance
WARNING
■Front camera installation area
on the windshield
If the system determines that the
windshield may be fogged up, it
will automatically operate the
heater to defog the part of the
windshield around the front cam-
era. When cleaning, etc., be care-
ful not to touch the area around
the front camera until the wind-
shield has cooled sufficiently, as
touching it may cause burns.