check oil TOYOTA COROLLA HYBRID 2023 Owners Manual
[x] Cancel search | Manufacturer: TOYOTA, Model Year: 2023, Model line: COROLLA HYBRID, Model: TOYOTA COROLLA HYBRID 2023Pages: 496, PDF Size: 10.13 MB
Page 4 of 496
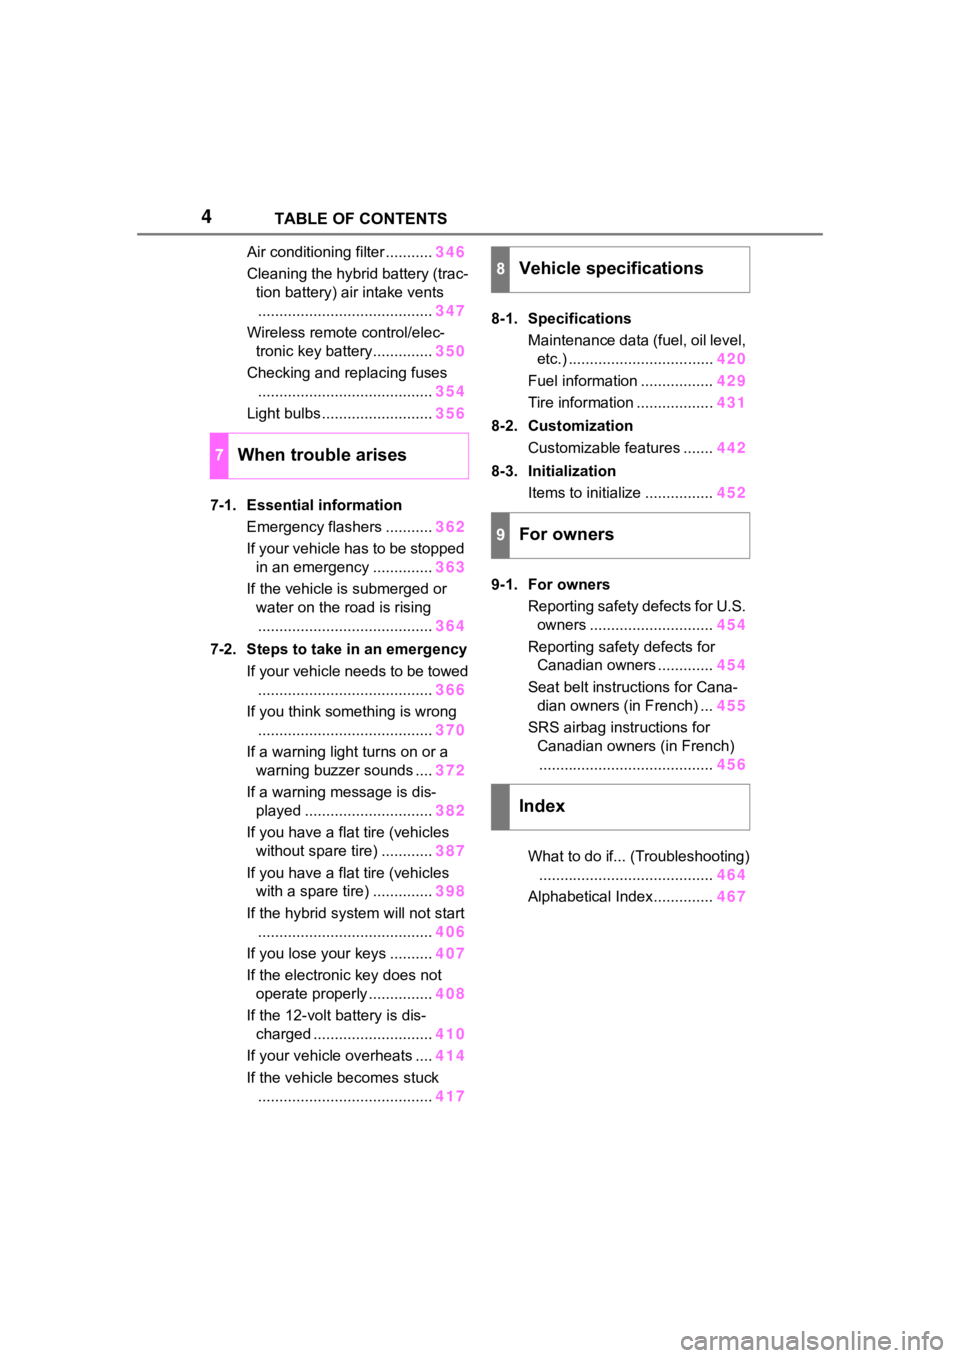
4TABLE OF CONTENTS
Air conditioning filter ...........346
Cleaning the hybrid battery (trac- tion battery) air intake vents......................................... 347
Wireless remote control/elec- tronic key battery.............. 350
Checking and replacing fuses ......................................... 354
Light bulbs .......................... 356
7-1. Essential information Emergency flashers ........... 362
If your vehicle has to be stopped in an emergency .............. 363
If the vehicle is submerged or water on the road is rising......................................... 364
7-2. Steps to take in an emergency If your vehicle needs to be towed......................................... 366
If you think something is wrong ......................................... 370
If a warning light turns on or a warning buzzer sounds .... 372
If a warning message is dis- played .............................. 382
If you have a flat tire (vehicles without spare tire) ............ 387
If you have a flat tire (vehicles with a spare tire) .............. 398
If the hybrid system will not start ......................................... 406
If you lose your keys .......... 407
If the electronic key does not operate properly ............... 408
If the 12-volt battery is dis- charged ............................ 410
If your vehicle overheats .... 414
If the vehicle becomes stuck ......................................... 4178-1. Specifications
Maintenance data (fuel, oil level, etc.) .................................. 420
Fuel information ................. 429
Tire information .................. 431
8-2. Customization Customizable features ....... 442
8-3. Initialization Items to initialize ................ 452
9-1. For owners Reporting safety defects for U.S. owners ............................. 454
Reporting safety defects for Canadian owners ............. 454
Seat belt instructions for Cana- dian owners (in French) ... 455
SRS airbag instructions for Canadian owners (in French)......................................... 456
What to do if... (Troubleshooting) ......................................... 464
Alphabetical Index.............. 467
7When trouble arises
8Vehicle specifications
9For owners
Index
Page 14 of 496
14Pictorial index
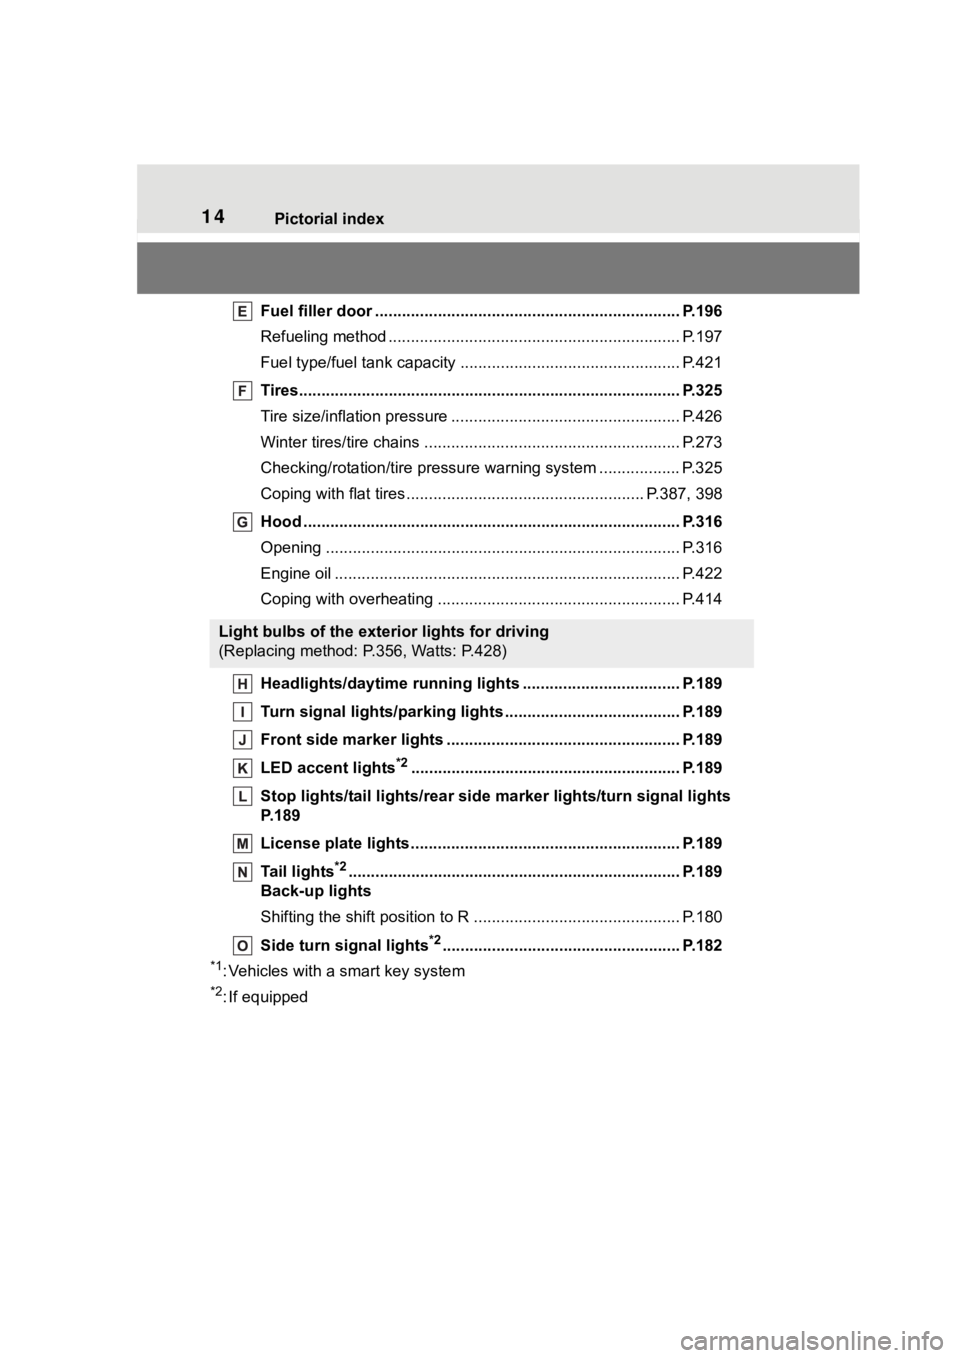
Fuel filler door .................................................................... P.196
Refueling method ............................................... .................. P.197
Fuel type/fuel tan k capacity ................................... .............. P.421
Tires.......................................................... ........................... P.325
Tire size/inflation pressure ................................... ................ P.426
Winter tires/tire chains ....................................... .................. P.273
Checking/rotation/tire pressur e warning system ..................P.325
Coping with flat tires......................................... ............ P.387, 398
Hood ........................................................... ......................... P.316
Opening ............................................................................... P.316
Engine oil ..................................................... ........................ P.422
Coping with overheating ...................................................... P.414
Headlights/daytime running lights .............................. ..... P.189
Turn signal lights/parking lights .............................. ......... P.189
Front side marker lights ....................................... ............. P.189
LED accent lights
*2............................................................ P.1 89
Stop lights/tail lights/rear side marker lights/turn signal lig hts
P. 1 8 9
License plate lights........................................... ................. P.189
Tail lights
*2............................................................... ........... P.189
Back-up lights
Shifting the shift position to R ............................... ............... P.180
Side turn signal lights
*2..................................................... P.182
*1: Vehicles with a smart key system
*2: If equipped
Light bulbs of the exterior lights for driving
(Replacing method: P.356, Watts: P.428)
Page 165 of 496
1654-1. Before driving
4
Driving
When the following unusual
operation is performed with the
accelerator pedal depressed,
the hybrid system output may be
restrained.
When the shift lever is shifted
to R
*.
When the shift lever is shifted
from P or R to forward drive
shift position such as D
*.
When the system op erates, a mes-
sage appears on the multi-informa-
tion display. Read the message and
follow the instruction.
*: Depending on the situation, the shift position may not be
changed.
■Drive-Start Control (DSC)
When the TRAC is turned off
( P.267), sudden start restraint
control also does not operate. If
your vehicle have trouble escaping
from the mud or fr esh snow due to
sudden start restraint control opera-
tion, deactivate TRAC ( P.267) so
that the vehicle may become able to
escape from the mud or fresh snow.NOTICE
●Engine damage caused by
water immersion
In the event that you drive on a
flooded road an d the vehicle
becomes flooded or stuck in mud
or sand, be sure to have your Toy-
ota dealer check the following:
●Brake function
●Changes in quantity and quality
of oil and fluid used for the
engine, hybrid transmission,
etc.
●Lubricant condition for the bear-
ings and suspension joints
(where possible), and the func-
tion of all joints , bearings, etc.
Sudden start restraint
control (Drive-Start Con-
trol [DSC])
Page 223 of 496
2234-5. Using the driving support systems
4
Driving
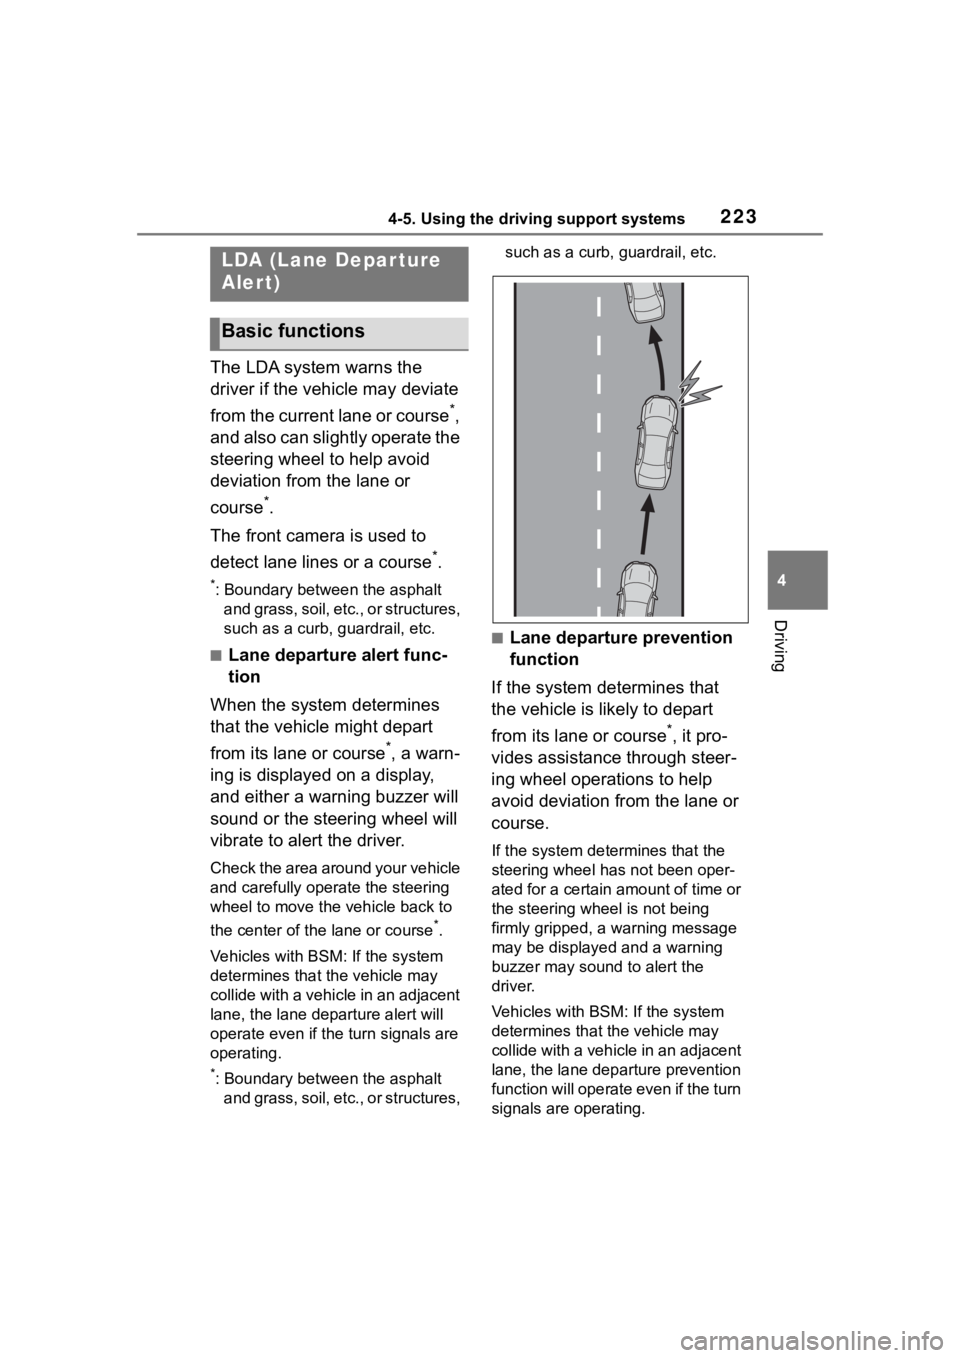
The LDA system warns the
driver if the vehicle may deviate
from the current lane or course
*,
and also can slightly operate the
steering wheel to help avoid
deviation from the lane or
course
*.
The front camera is used to
detect lane lines or a course
*.
*: Boundary between the asphalt and grass, soil, etc., or structures,
such as a curb, guardrail, etc.
■Lane departure alert func-
tion
When the system determines
that the vehicle might depart
from its lane or course
*, a warn-
ing is displayed on a display,
and either a warning buzzer will
sound or the steering wheel will
vibrate to alert the driver.
Check the area around your vehicle
and carefully operate the steering
wheel to move the vehicle back to
the center of the lane or course
*.
Vehicles with BSM: If the system
determines that the vehicle may
collide with a vehicle in an adjacent
lane, the lane de parture alert will
operate even if the turn signals are
operating.
*: Boundary between the asphalt and grass, soil, etc., or structures, such as a curb,
guardrail, etc.
■Lane departure prevention
function
If the system determines that
the vehicle is likely to depart
from its lane or course
*, it pro-
vides assistance through steer-
ing wheel operations to help
avoid deviation from the lane or
course.
If the system determines that the
steering wheel has not been oper-
ated for a certain amount of time or
the steering wheel is not being
firmly gripped, a warning message
may be displayed and a warning
buzzer may sound to alert the
driver.
Vehicles with BSM: If the system
determines that the vehicle may
collide with a vehicl e in an adjacent
lane, the lane departure prevention
function will operate even if the turn
signals are operating.
LDA (Lane Depar ture
Alert)
Basic functions
Page 308 of 496
3086-2. Maintenance
6-2.Maintenance
■Repair and replacement
It is recommended that genuine
Toyota parts be used for repairs to
ensure performanc e of each sys-
tem. If non-Toyota parts are used in
replacement or if a repair shop other
than a Toyota dealer performs
repairs, confirm the warranty cover-
age.
■Allow inspection and repairs to
be performed by a Toyota
dealer
●Toyota technicians are
well-trained specialists and are
kept up to date with the latest ser-
vice information. They are well
informed about the operation of all
systems on your vehicle.
●Keep a copy of the repair order. It
proves that the maintenance that
has been performed is under war-
ranty coverage. If any problem
should arise while your vehicle is
under warranty, your Toyota
dealer will promptly take care of it.
General maintenance should be
performed on a daily basis. This
can be done by yourself or by a
Toyota dealer.
Scheduled maintenance should
be performed at specified inter-
vals according to the mainte-
nance schedule.
For details about maintenance
items and schedules, refer to the
“Scheduled Maintenance Guide” or
“Owner’s Manual Supplement”.
Maintenance require-
ments
To ensure safe and econom-
ical driving, day-to-day care
and regular maintenance
are essential. It is the
owner’s responsibility to
perform regular checks.
Toyota recommends the
maintenance below.
WARNING
■If your vehicle is not properly
maintained
Improper maintenance could
result in serious damage to the
vehicle and possible death or seri-
ous injury.
■Handling of the 12-volt bat-
tery
●Engine exhaust, some of its
constituents, and a wide variety
of automobile components con-
tain or emit chemicals known to
the State of California to cause
cancer and birth defects and
other reproductive harm. Work
in a well ventilated area.
●Oils, fuels and fluids contained
in vehicles as well as waste pro-
duced by component wear con-
tain or emit chemicals known to
the State of California to cause
cancer and birth defects or
other reproductive harm. Avoid
exposure and wash any
affected area immediately.
●12-volt battery posts, terminals
and related accessories con-
tain lead and lead compounds
which are known to cause brain
damage. Wash your hands after
handling. ( P.323)
General maintenance
Scheduled maintenance
Page 310 of 496
3106-2. Maintenance
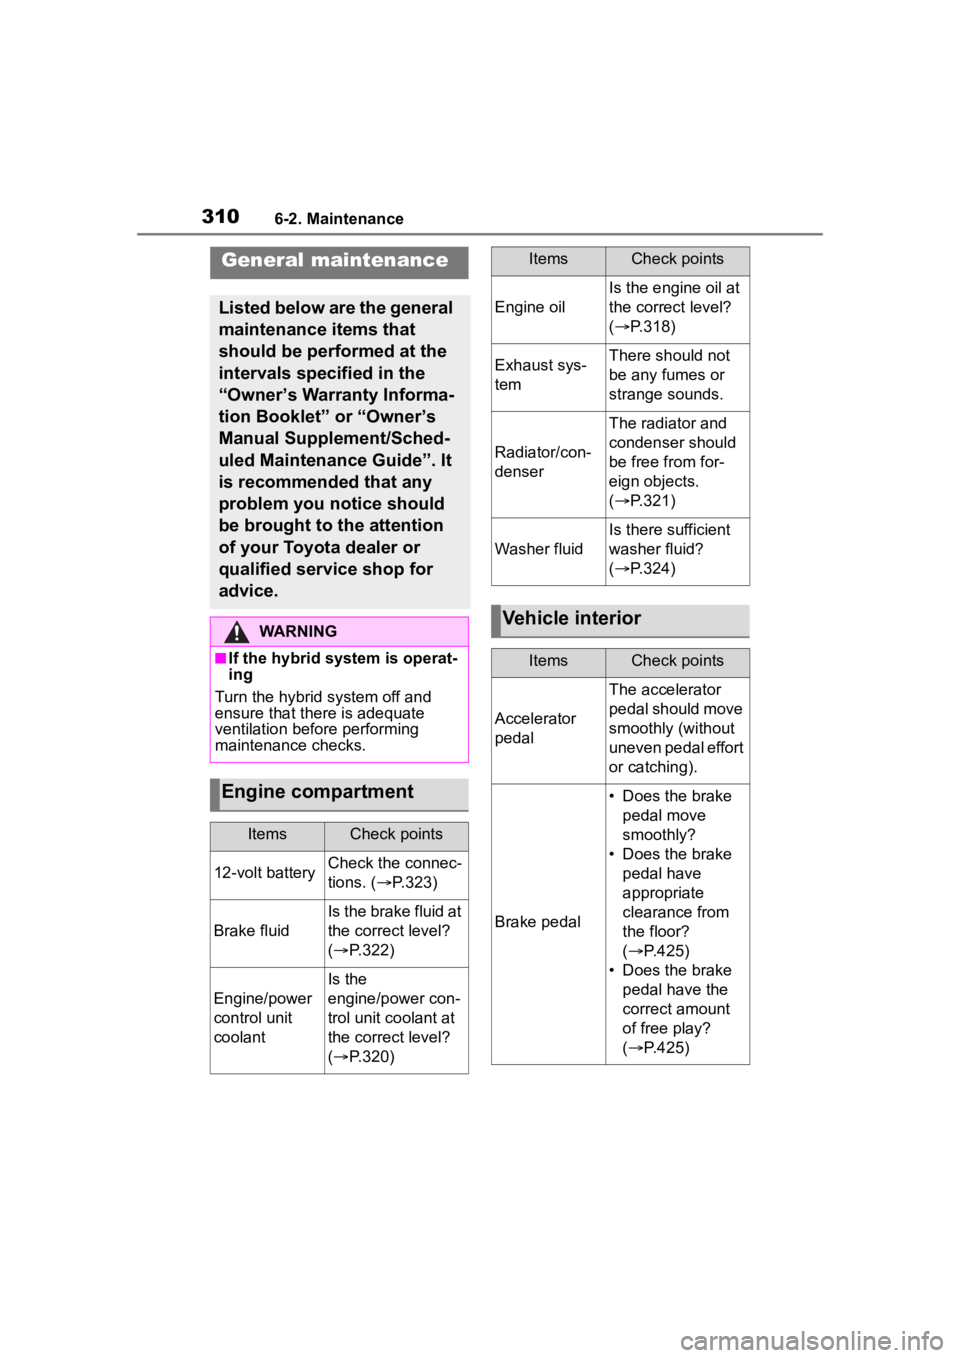
General maintenance
Listed below are the general
maintenance items that
should be performed at the
intervals specified in the
“Owner’s Warranty Informa-
tion Booklet” or “Owner’s
Manual Supplement/Sched-
uled Maintenance Guide”. It
is recommended that any
problem you notice should
be brought to the attention
of your Toyota dealer or
qualified service shop for
advice.
WARNING
■If the hybrid system is operat-
ing
Turn the hybrid system off and
ensure that there is adequate
ventilation before performing
maintenance checks.
Engine compartment
ItemsCheck points
12-volt batteryCheck the connec-
tions. ( P.323)
Brake fluid
Is the brake fluid at
the correct level?
( P.322)
Engine/power
control unit
coolant
Is the
engine/power con-
trol unit coolant at
the correct level?
( P.320)
Engine oil
Is the engine oil at
the correct level?
( P.318)
Exhaust sys-
temThere should not
be any fumes or
strange sounds.
Radiator/con-
denser
The radiator and
condenser should
be free from for-
eign objects.
( P.321)
Washer fluid
Is there sufficient
washer fluid?
( P.324)
Vehicle interior
ItemsCheck points
Accelerator
pedal
The accelerator
pedal should move
smoothly (without
uneven pedal effort
or catching).
Brake pedal
• Does the brake
pedal move
smoothly?
• Does the brake pedal have
appropriate
clearance from
the floor?
( P.425)
• Does the brake pedal have the
correct amount
of free play?
( P.425)
ItemsCheck points
Page 318 of 496
3186-3. Do-it-yourself maintenance
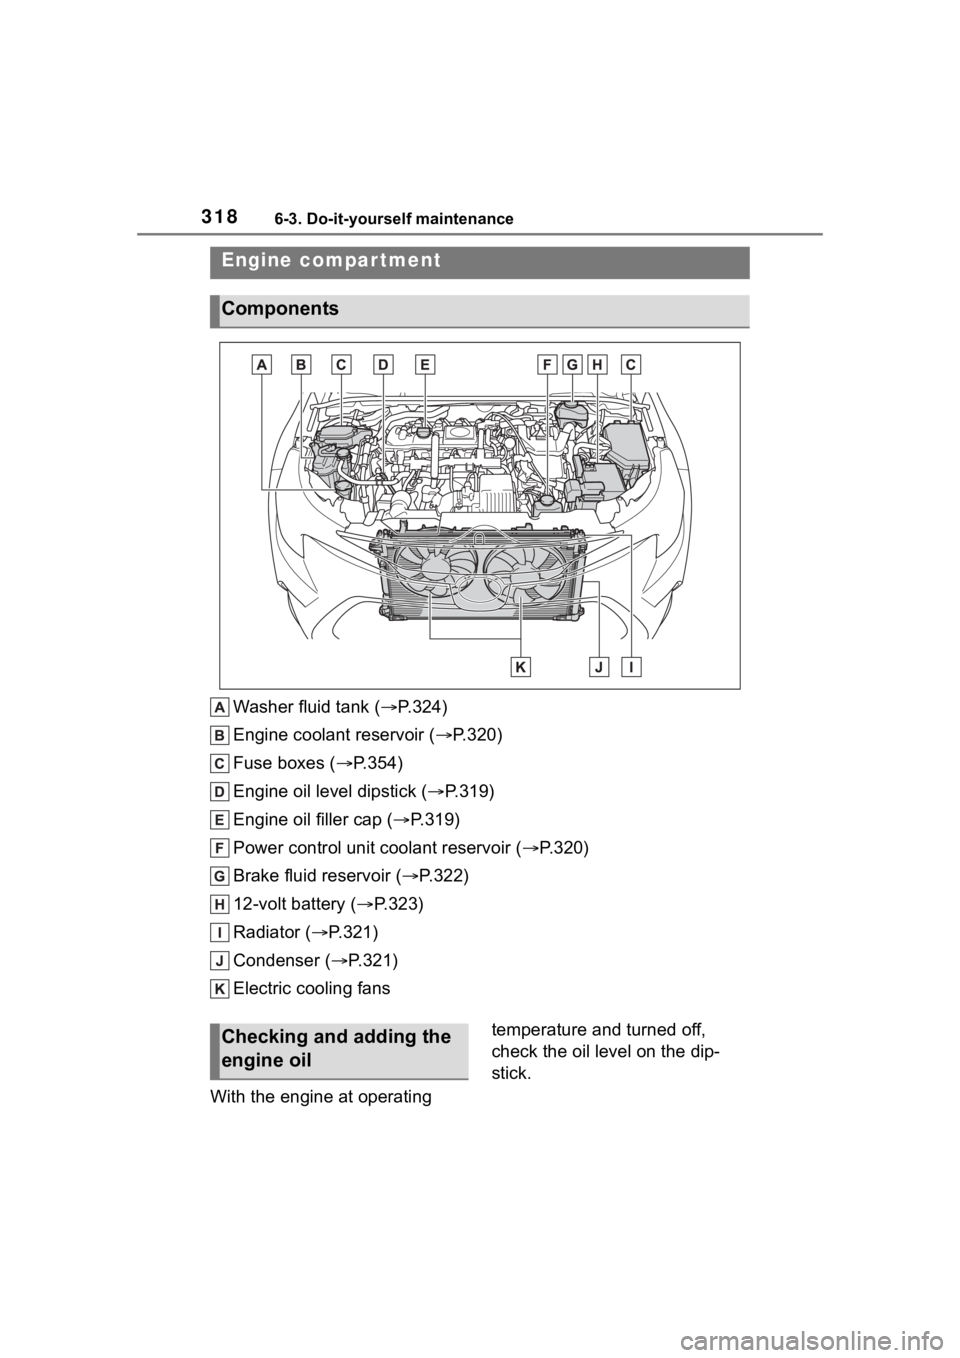
Washer fluid tank ( P.324)
Engine coolant reservoir ( P.320)
Fuse boxes ( P.354)
Engine oil level dipstick ( P.319)
Engine oil filler cap ( P.319)
Power control unit coolant reservoir ( P.320)
Brake fluid reservoir ( P.322)
12-volt battery ( P.323)
Radiator ( P.321)
Condenser ( P.321)
Electric cooling fans
With the engine at operating temperature and turned off,
check the oil level on the dip-
stick.
Engine compar tment
Components
Checking and adding the
engine oil
Page 319 of 496
3196-3. Do-it-yourself maintenance
6
Maintenance and care
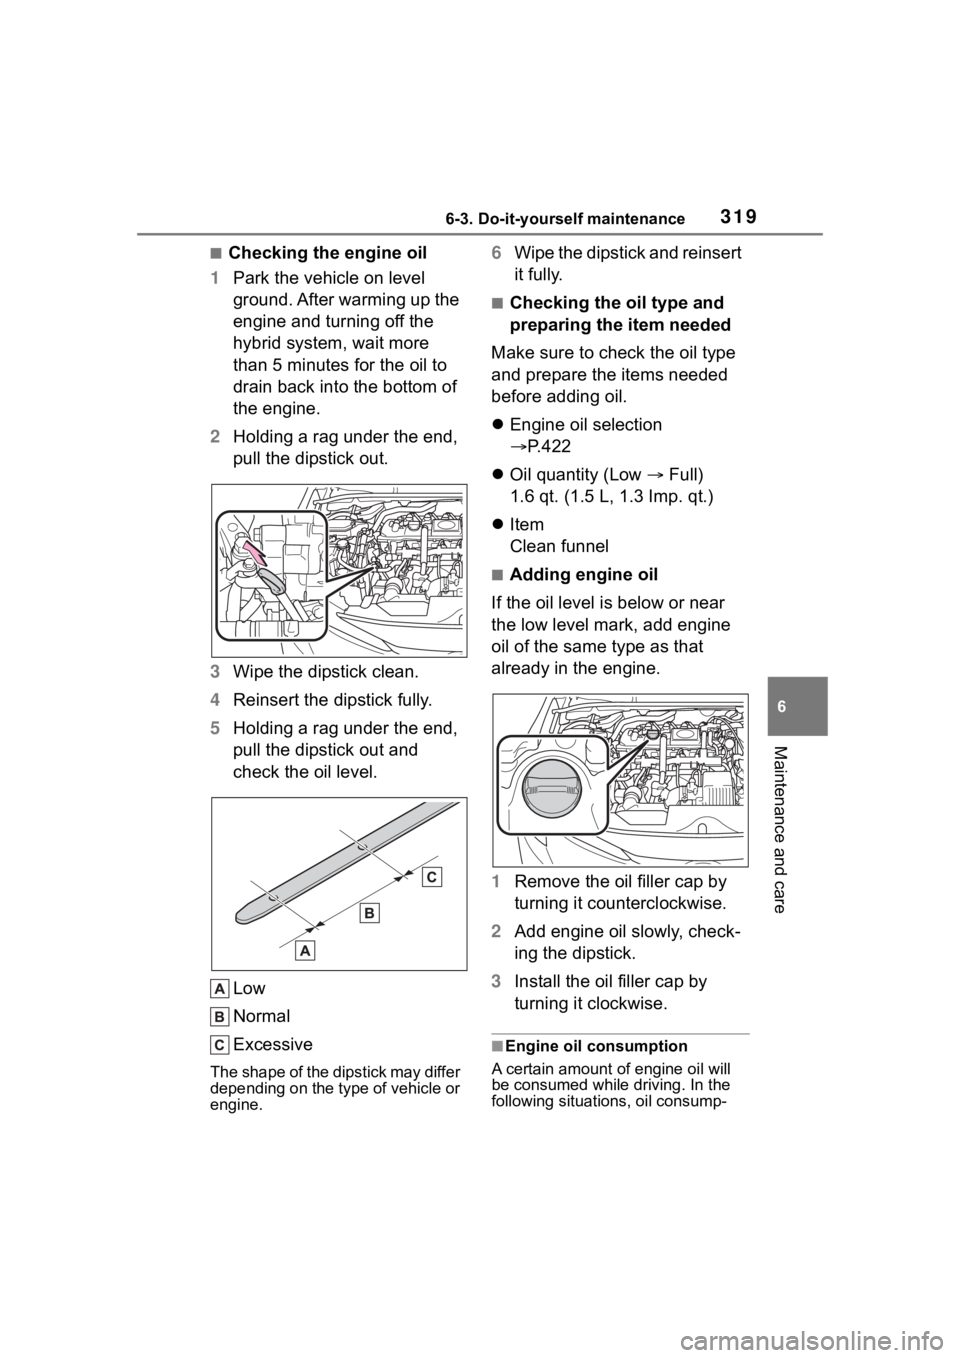
■Checking the engine oil
1 Park the vehicle on level
ground. After warming up the
engine and turning off the
hybrid system, wait more
than 5 minutes for the oil to
drain back into the bottom of
the engine.
2 Holding a rag under the end,
pull the dipstick out.
3 Wipe the dipstick clean.
4 Reinsert the dipstick fully.
5 Holding a rag under the end,
pull the dipstick out and
check the oil level.
Low
Normal
Excessive
The shape of the dipstick may differ
depending on the type of vehicle or
engine.
6Wipe the dipstick and reinsert
it fully.
■Checking the oil type and
preparing the item needed
Make sure to check the oil type
and prepare the items needed
before adding oil.
Engine oil selection
P.422
Oil quantity (Low Full)
1.6 qt. (1.5 L, 1.3 Imp. qt.)
Item
Clean funnel
■Adding engine oil
If the oil level is below or near
the low level mark, add engine
oil of the same type as that
already in the engine.
1 Remove the oil filler cap by
turning it counterclockwise.
2 Add engine oil slowly, check-
ing the dipstick.
3 Install the oil filler cap by
turning it clockwise.
■Engine oil consumption
A certain amount of engine oil will
be consumed while driving. In the
following situatio ns, oil consump-
Page 320 of 496
3206-3. Do-it-yourself maintenance
tion may increase, and engine oil
may need to be ref illed in between
oil maintenance intervals.
●When the engine is new, for
example directly after purchasing
the vehicle or after replacing the
engine
●If low quality oil or oil of an inap-
propriate viscosity is used
●When driving at high engine
speeds or with a heavy load, or
when driving while accelerating or
decelerating frequently
●When leaving the engine idling for
a long time, or wh en driving fre-
quently through heavy traffic
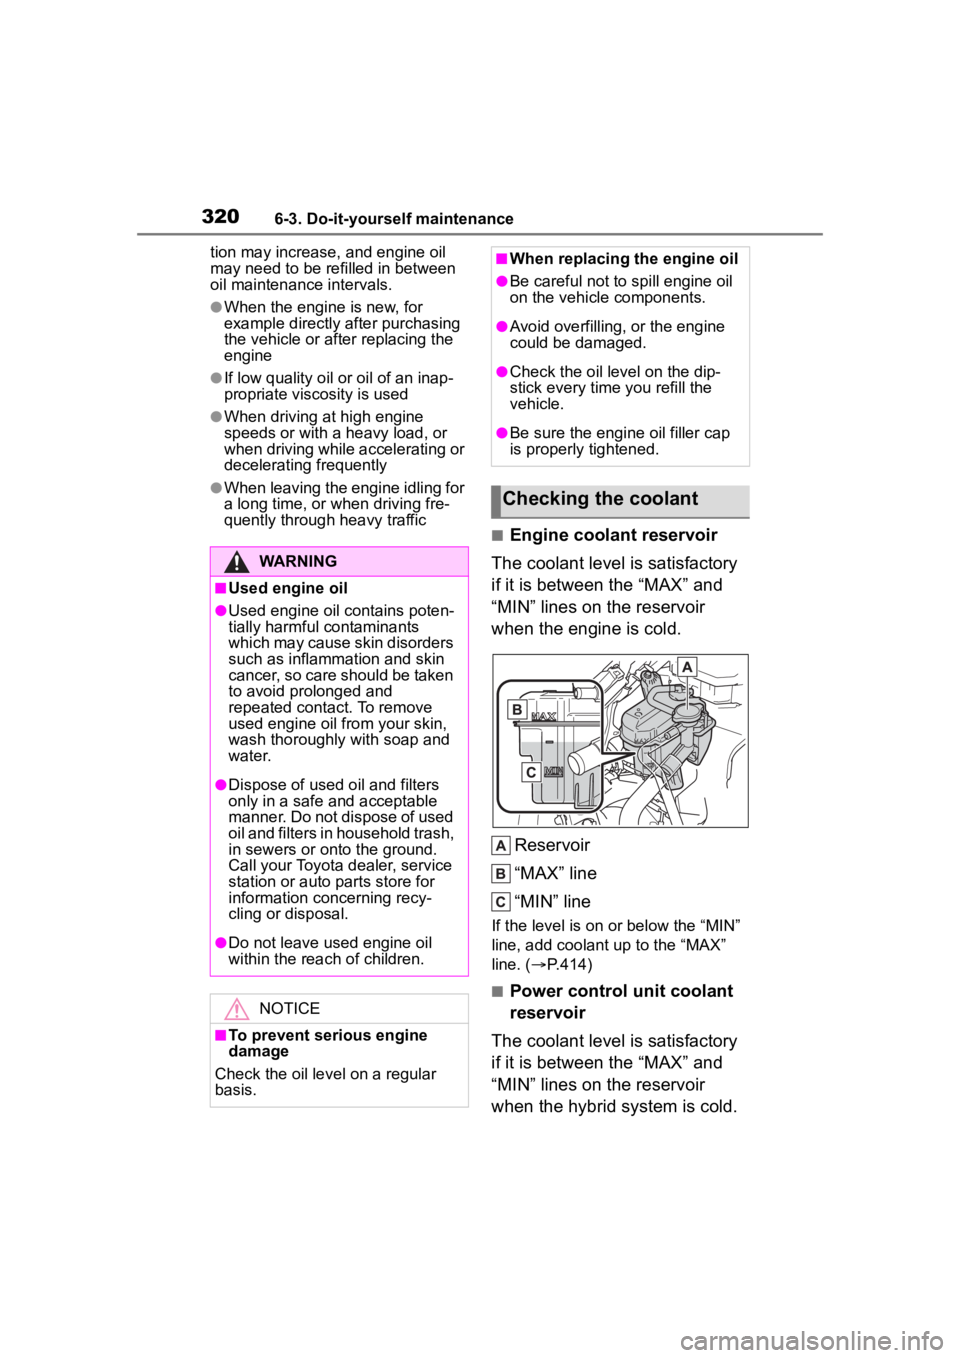
■Engine coolant reservoir
The coolant level is satisfactory
if it is between the “MAX” and
“MIN” lines on the reservoir
when the engine is cold.
Reservoir
“MAX” line
“MIN” line
If the level is on or below the “MIN”
line, add coolant up to the “MAX”
line. ( P.414)
■Power control unit coolant
reservoir
The coolant level is satisfactory
if it is between the “MAX” and
“MIN” lines on the reservoir
when the hybrid system is cold.
WARNING
■Used engine oil
●Used engine oil contains poten-
tially harmful contaminants
which may cause skin disorders
such as inflammation and skin
cancer, so care should be taken
to avoid prolonged and
repeated contact. To remove
used engine oil from your skin,
wash thoroughly with soap and
water.
●Dispose of used oil and filters
only in a safe an d acceptable
manner. Do not dispose of used
oil and filters in household trash,
in sewers or onto the ground.
Call your Toyota dealer, service
station or auto parts store for
information concerning recy-
cling or disposal.
●Do not leave used engine oil
within the rea ch of children.
NOTICE
■To prevent serious engine
damage
Check the oil level on a regular
basis.
■When replacing the engine oil
●Be careful not to spill engine oil
on the vehicle components.
●Avoid overfilling, or the engine
could be damaged.
●Check the oil level on the dip-
stick every time you refill the
vehicle.
●Be sure the engine oil filler cap
is properly tightened.
Checking the coolant
Page 345 of 496
3456-3. Do-it-yourself maintenance
6
Maintenance and care
Use only Toyota wheel nuts
and wheel nut wrenches
designed for use with your
aluminum wheels.
When rotating, repairing or
changing your tires, check
that the wheel nuts are still
tight after driving 1000 miles
(1600 km).
Be careful not to damage the
aluminum wheels when using
tire chains.
Use only Toyota genuine bal-
ance weights or equivalent
and a plastic or rubber ham-
mer when balancing your
wheels.
WARNING
■When replacing wheels
●Do not use wheels that are a dif-
ferent size from those recom-
mended in the Owner’s Manual,
as this may result in a loss of
handling control.
●Never use an inner tube in a
leaking wheel which is designed
for a tubeless tire.
Doing so may result in an acci-
dent, causing death or serious
injury.
■When installing the wheel
nuts
Never use oil or grease on the
wheel bolts or wheel nuts.
Oil and grease may cause the
wheel nuts to be excessively tight-
ened, leading to bolt or disc wheel
damage. In addition, the oil or
grease can cause the wheel nuts
to loosen and the wheel may fall
off, causing an accident and
resulting in death or serious injury.
Remove any oil or grease from
the wheel bolts or wheel nuts.
■Use of defective wheels pro-
hibited
Do not use cracked or deformed
wheels. Doing so could cause the
tire to leak air during driving, pos-
sibly causing an accident.
NOTICE
■Replacing tire pressure warn-
ing valves and transmitters
●Because tire repair or replace-
ment may affect the tire pres-
sure warning valves and
transmitters, make sure to have
tires serviced by your Toyota
dealer or other qualified service
shop. In addition, make sure to
purchase your tire pressure
warning valves and transmit-
ters at your Toyota dealer.
●Ensure that only genuine Toyota
wheels are used on your vehi-
cle.
Tire pressure warning valves
and transmitters may not work
properly with non-genuine
wheels.
Aluminum wheel precau-
tions (if equipped)