4WD TOYOTA FJ CRUISER 2010 1.G Owners Manual
[x] Cancel search | Manufacturer: TOYOTA, Model Year: 2010, Model line: FJ CRUISER, Model: TOYOTA FJ CRUISER 2010 1.GPages: 439, PDF Size: 11.02 MB
Page 3 of 439

1
2
3
4
5
6
7
3
2-3. Operating the lights and
wipers
Headlight switch .................. 145
Windshield wipers and
washer .............................. 147
Rear window wiper and
washer .............................. 149
2-4. Using other driving systems
Cruise control ...................... 150
Intuitive parking assist......... 153
Rear view monitor system
(vehicles with auto anti-glare
inside rear view mirror) ..... 158
Four-wheel drive system
(4WD models with a
manual transmission)........ 162
Four-wheel drive system
(4WD models with an
automatic transmission) .... 164
Active traction control
system .............................. 166
AUTO LSD system
(2WD models) ................... 168
Rear differential lock
system .............................. 170
Clutch start cancel switch
(vehicles with a manual
transmission) .................... 173
Driving assist systems ........ 174
2-5. Driving information
Off-road precautions ........... 179
Cargo and luggage ............. 184
Vehicle load limits ............... 187
Winter driving tips ............... 188
Trailer towing ...................... 191
Dinghy towing ..................... 2013-1. Using the air conditioning
system and defogger
Air conditioning system ...... 204
Rear window defogger ....... 210
3-2. Using the audio system
Audio system types ............ 211
Using the radio ................... 214
Using the CD player ........... 220
Playing back MP3 and
WMA discs ....................... 227
Optimal use of the audio
system .............................. 235
Operating the sub woofer ... 238
Changing display color
(type B only) ..................... 239
Using the AUX adapter....... 240
Using the steering wheel
audio switches.................. 242
3-3. Using the interior lights
Interior lights list ................. 244
• Interior lights..................... 245
• Personal lights.................. 246
3-4. Using the storage features
List of storage features ....... 247
• Glove box ......................... 247
• Cup holders (front) ........... 248
• Cup holders (rear) ............ 251
• Bottle holders ................... 252
• Auxiliary box ..................... 253
3Interior features
Page 115 of 439
When driving2
115
2-1. Driving procedures
Driving the vehicle............ 116
Engine (ignition) switch .... 126
Automatic
Transmission.... 129
Manual Transmission ....... 131
Turn signal lever .............. 133
Parking brake ................... 134
Horn ................................. 136
2-2. Instrument cluster
Gauges and meters ......... 137
Indicators and warning
lights .............................. 140
Accessory meter .............. 143
2-3. Operating the lights and
wipers
Headlight switch ............... 145
Windshield wipers and
washer ........................... 147
Rear window wiper and
washer ........................... 1492-4. Using other driving systems
Cruise control ................... 150
Intuitive parking assist...... 153
Rear view monitor system
(vehicles with auto
anti-glare inside rear
view mirror) .................... 158
Four-wheel drive system
(4WD models with a
manual transmission) ..... 162
Four-wheel drive system
(4WD models with
an automatic
transmission) ................. 164
Active traction control
system ........................... 166
AUTO LSD system
(2WD models) ................ 168
Rear differential lock
system ........................... 170
Clutch start cancel switch
(vehicles with a manual
transmission) ................. 173
Driving assist systems ..... 174
2-5. Driving information
Off-road precautions ........ 179
Cargo and luggage .......... 184
Vehicle load limits ............ 187
Winter driving tips ............ 188
Trailer towing ................... 191
Dinghy towing .................. 201
Page 125 of 439

125 2-1. Driving procedures
2
When driving
NOTICE
■If you get a flat tire while driving
A flat or damaged tire may cause the following situations. Hold the steering
wheel firmly and gradually press the brake pedal to slow down the vehicle.
●It may be difficult to control your vehicle.
●The vehicle will make abnormal sounds.
●The vehicle will behave abnormally.
Replace a flat tire with a new one. (P. 368)
■When encountering flooded roads
Do not drive on a road that has flooded after heavy rain etc. Doing so may
cause the following serious damage to the vehicle.
●Engine stalling
●Short in electrical components
●Engine damage caused by water immersion
In the event that you drive on a flooded road and the vehicle is flooded, be
sure to have your Toyota dealer check the following.
●Brake function
●Changes in quantity and quality of oil and fluid used for the engine, trans-
mission, transfer (4WD models), differentials, etc.
●Lubricant condition for the propeller shaft, bearings and suspension joints
(where possible) and the function of all joints, bearings, etc.
Page 130 of 439
130 2-1. Driving procedures
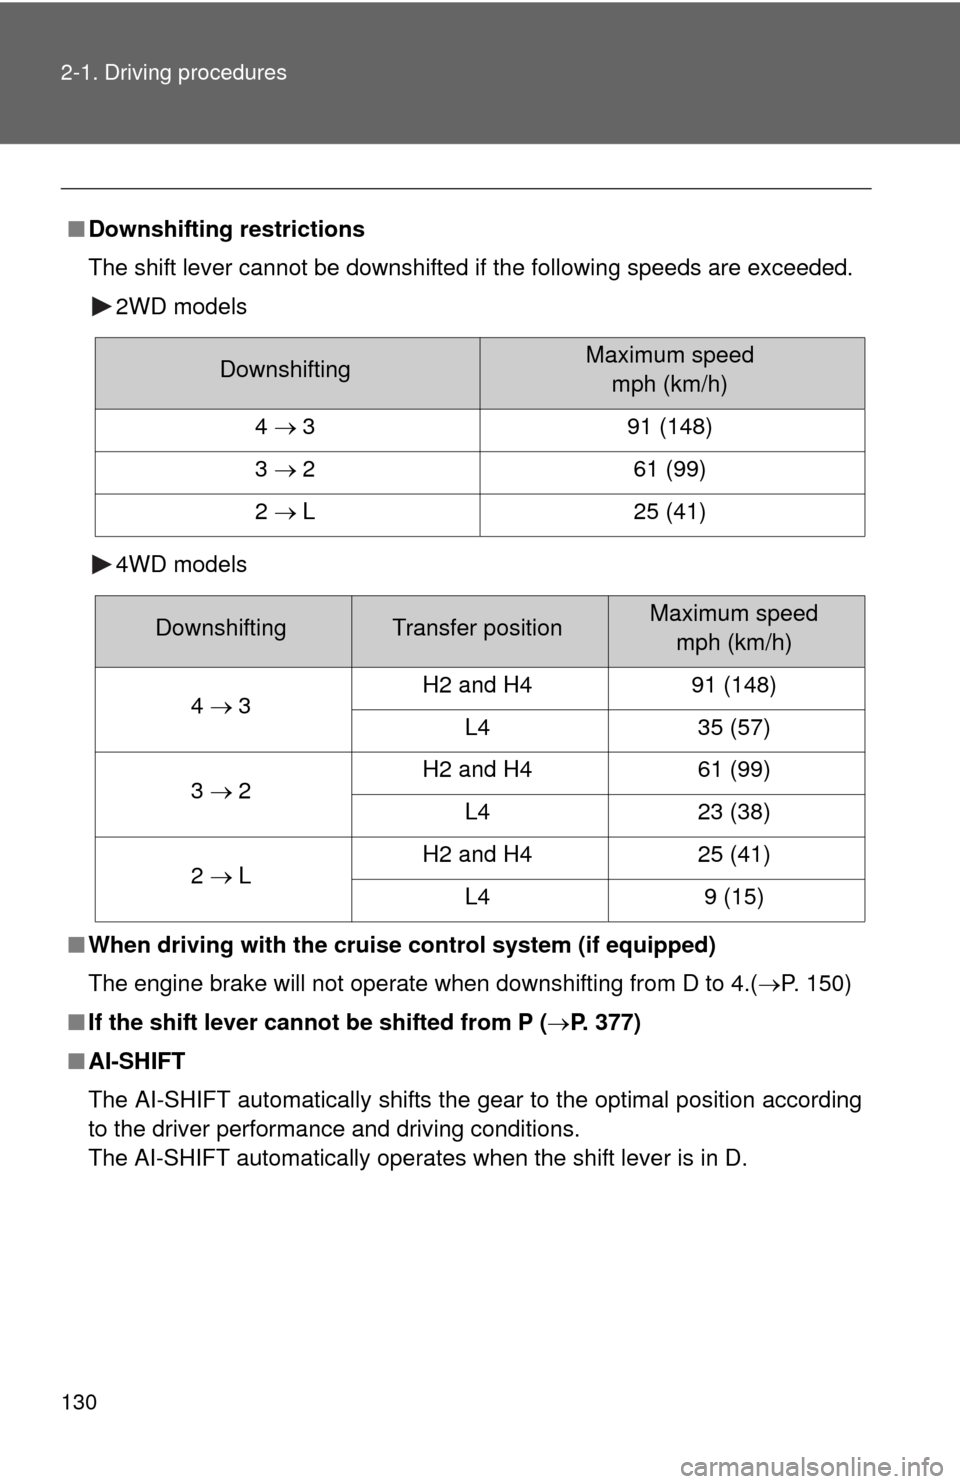
■Downshifting restrictions
The shift lever cannot be downshifted if the following speeds are exceeded.
2WD models
4WD models
■When driving with the cruise control system (if equipped)
The engine brake will not operate when downshifting from D to 4.(P. 150)
■If the shift lever cannot be shifted from P (P. 377)
■AI-SHIFT
The AI-SHIFT automatically shifts the gear to the optimal position according
to the driver performance and driving conditions.
The AI-SHIFT automatically operates when the shift lever is in D.
DownshiftingMaximum speed
mph (km/h)
4 3 91 (148)
3 2 61 (99)
2 L 25 (41)
DownshiftingTransfer positionMaximum speed
mph (km/h)
4 3H2 and H4 91 (148)
L4 35 (57)
3 2H2 and H4 61 (99)
L4 23 (38)
2 LH2 and H4 25 (41)
L4 9 (15)
Page 162 of 439
162
2-4. Using other driving systems
Four-wheel drive system (4WD models with a manual transmission)
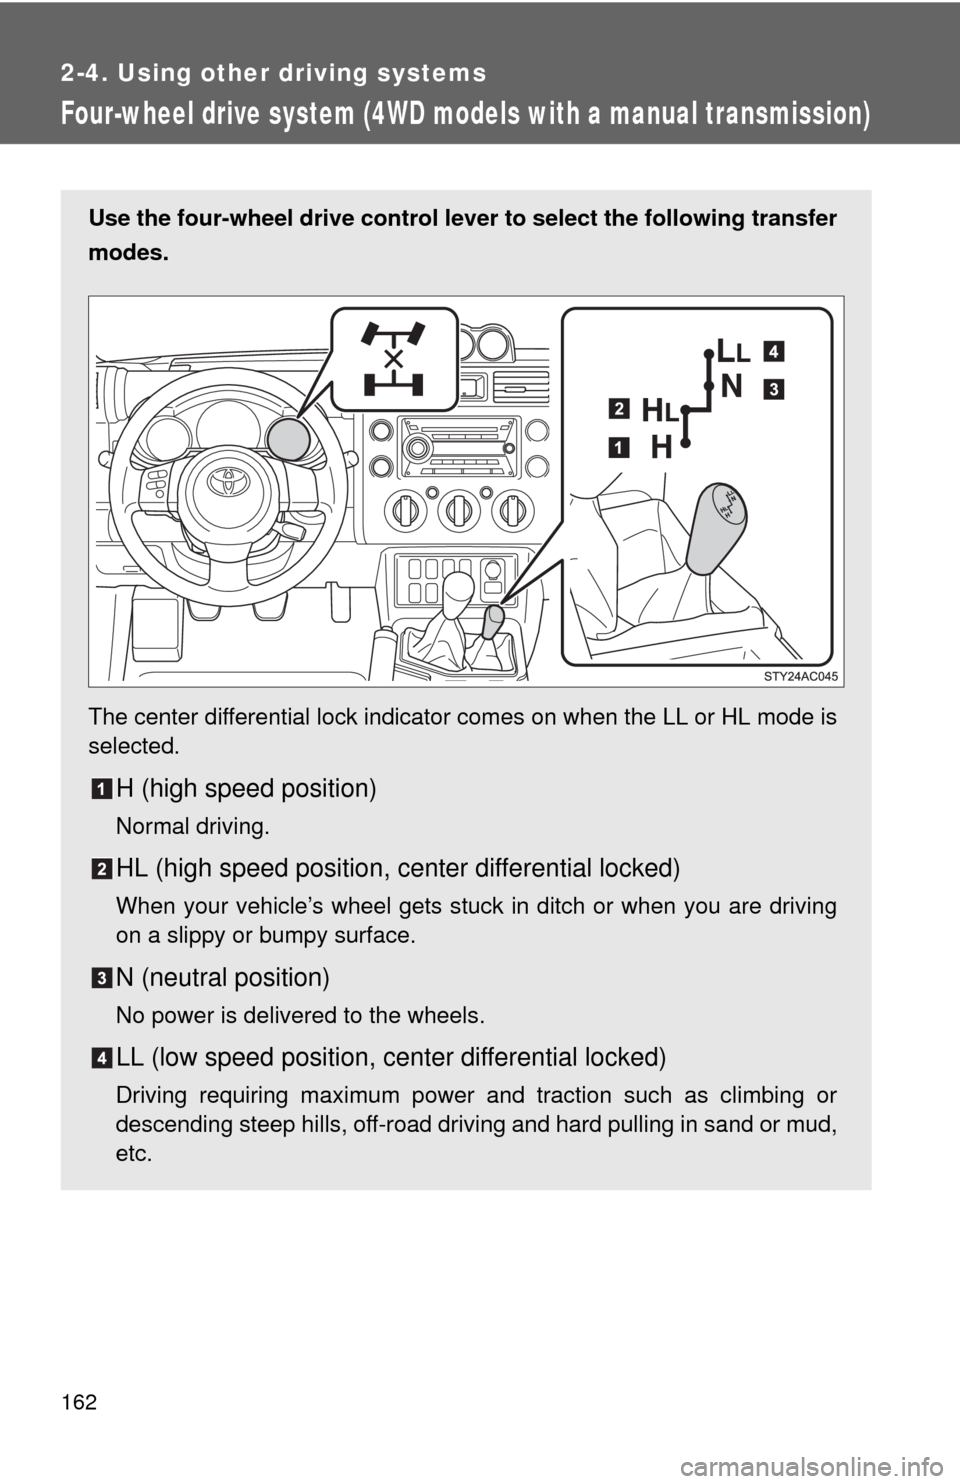
Use the four-wheel drive control lever to select the following transfer
modes.
The center differential lock indicator comes on when the LL or HL mode is
selected.
H (high speed position)
Normal driving.
HL (high speed position, center differential locked)
When your vehicle’s wheel gets stuck in ditch or when you are driving
on a slippy or bumpy surface.
N (neutral position)
No power is delivered to the wheels.
LL (low speed position, center differential locked)
Driving requiring maximum power and traction such as climbing or
descending steep hills, off-road driving and hard pulling in sand or mud,
etc.
Page 164 of 439
164
2-4. Using other driving systems
Four-wheel drive system (4WD models with an automatic transmission)
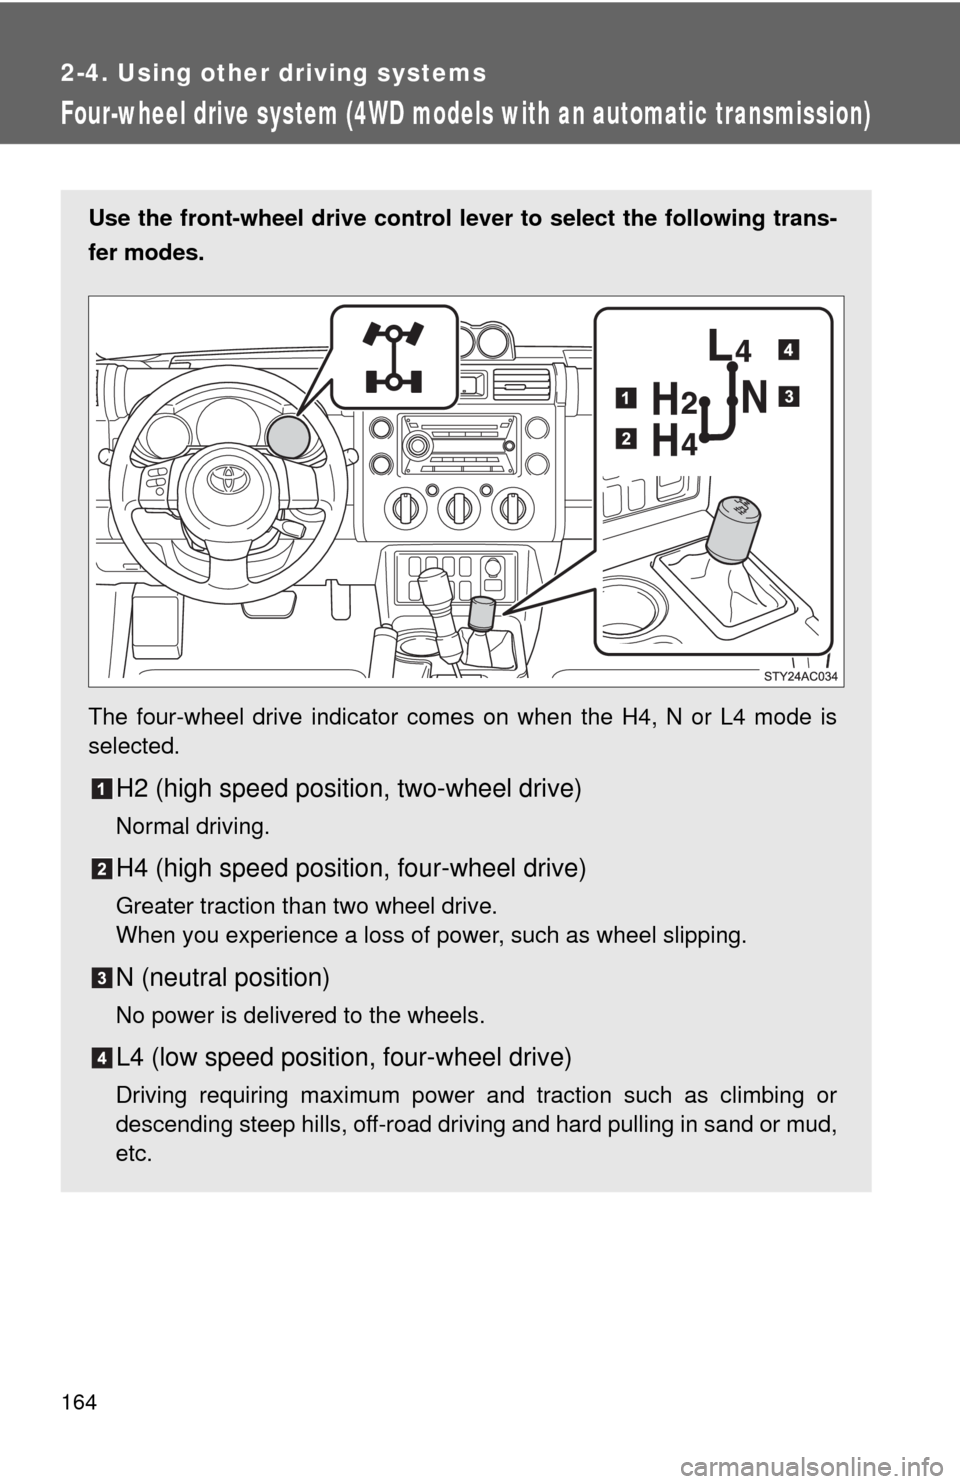
Use the front-wheel drive control lever to select the following trans-
fer modes.
The four-wheel drive indicator comes on when the H4, N or L4 mode is
selected.
H2 (high speed position, two-wheel drive)
Normal driving.
H4 (high speed position, four-wheel drive)
Greater traction than two wheel drive.
When you experience a loss of power, such as wheel slipping.
N (neutral position)
No power is delivered to the wheels.
L4 (low speed position, four-wheel drive)
Driving requiring maximum power and traction such as climbing or
descending steep hills, off-road driving and hard pulling in sand or mud,
etc.
Page 170 of 439
170
2-4. Using other driving systems
Rear differential lock system
Using the rear differential lock system
Automatic transmission
4WD models: Before using the rear differential lock system.
Stop the vehicle, shift the shift lever to N and shift the front-
wheel drive control lever into L4 to see if this is sufficient. If
this has no effect, additionally use the rear differential lock
system.
Be sure to stop the wheels.
Press the RR DIFF LOCK switch.
Gently depress the accelerator pedal.
After the rear differential is locked, the indicator will come on.
Unlock the rear differential as soon as the vehicle moves.
To unlock the rear differential, push the switch again.
: If equipped
The rear differential lock system is provided for use only when wheel
spinning occurs in a ditch or on a slippery or rugged surface.
The rear differential lock system is effective in case one of the rear
wheels is spinning.
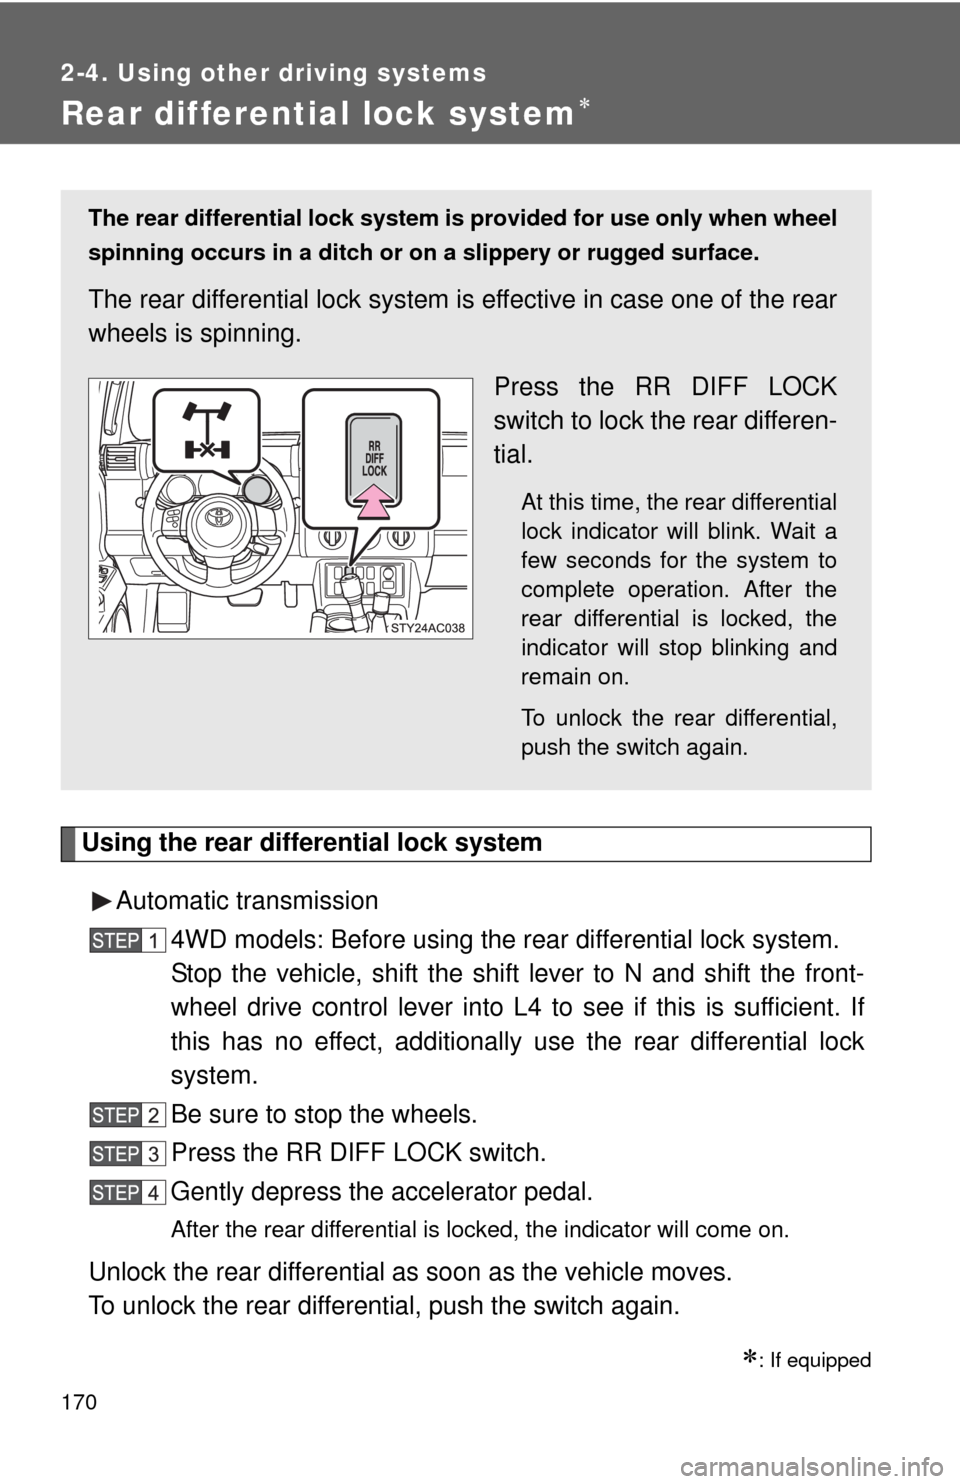
Press the RR DIFF LOCK
switch to lock the rear differen-
tial.
At this time, the rear differential
lock indicator will blink. Wait a
few seconds for the system to
complete operation. After the
rear differential is locked, the
indicator will stop blinking and
remain on.
To unlock the rear differential,
push the switch again.
Page 171 of 439
171 2-4. Using other driving systems
2
When driving
Manual transmission
Before using the rear differential lock system.
Stop the vehicle or reduce your speed to less than 5 mph (8
km/h). Depress the clutch pedal and shift the four-wheel drive
control lever into LL to see if this is sufficient. If this has no
effect, additionally use the rear differential lock system.
Be sure to stop the wheels.
Depress the clutch pedal.
Press the RR DIFF LOCK switch.
Slowly release the clutch pedal.
After the rear differential is locked, the indicator will come on.
Unlock the rear differential as soon as the vehicle moves.
To unlock the rear differential, push the switch again.
■Locking the rear differential
●When the rear differential is locked, VSC is automatically turned off.
(The rear differential lock and VSC OFF indicators will come on.)
●The following systems do not operate when the rear differential is locked.
It is normal operation for the ABS warning light, VSC OFF indicator and
slip indicator to be on at this time.
•ABS
• Brake assist system
•VSC
•TRAC
■The rear differential lock is disengaged when
●Shift the four-wheel drive control lever to H or HL. (4WD models with a
manual transmission)
●Shift the front-wheel drive control lever to H2 or H4. (4WD models with
an automatic transmission)
Never forget to turn off the switch after using this feature.
■After unlocking the rear differential
Check that the indicator goes off.
Page 174 of 439
174
2-4. Using other driving systems
Driving assist systems
When VSC/TRAC are operating
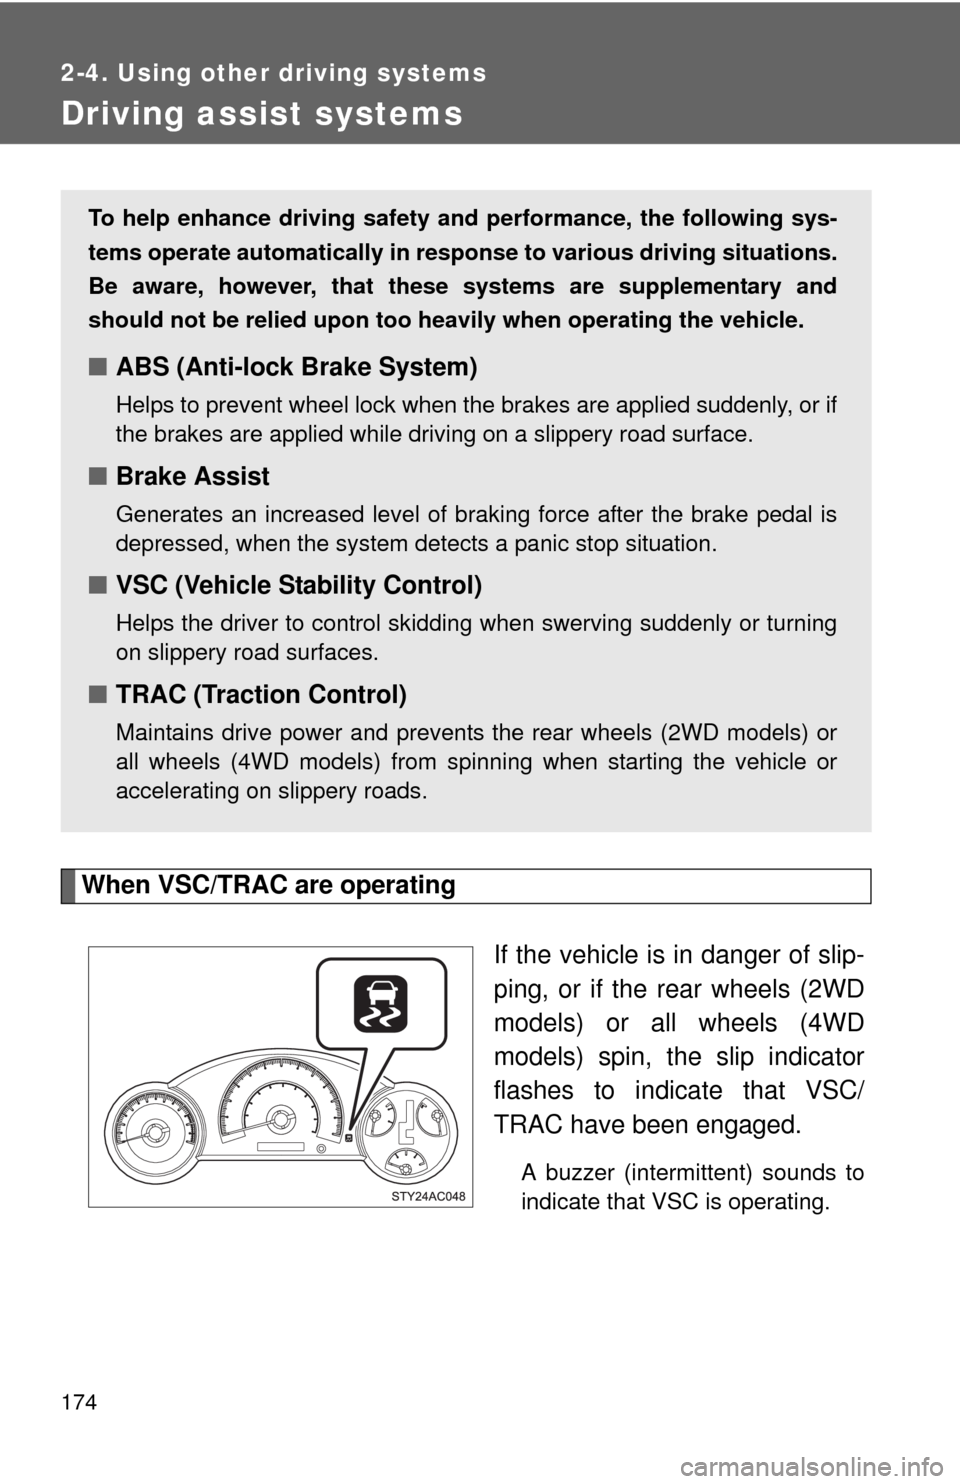
If the vehicle is in danger of slip-
ping, or if the rear wheels (2WD
models) or all wheels (4WD
models) spin, the slip indicator
flashes to indicate that VSC/
TRAC have been engaged.
A buzzer (intermittent) sounds to
indicate that VSC is operating.
To help enhance driving safety and performance, the following sys-
tems operate automatically in response to various driving situations.
Be aware, however, that these systems are supplementary and
should not be relied upon too heavily when operating the vehicle.
■ABS (Anti-lock Brake System)
Helps to prevent wheel lock when the brakes are applied suddenly, or if
the brakes are applied while driving on a slippery road surface.
■Brake Assist
Generates an increased level of braking force after the brake pedal is
depressed, when the system detects a panic stop situation.
■VSC (Vehicle Stability Control)
Helps the driver to control skidding when swerving suddenly or turning
on slippery road surfaces.
■TRAC (Traction Control)
Maintains drive power and prevents the rear wheels (2WD models) or
all wheels (4WD models) from spinning when starting the vehicle or
accelerating on slippery roads.
Page 176 of 439
![TOYOTA FJ CRUISER 2010 1.G Owners Manual 176 2-4. Using other driving systems
To disable TRAC and/or VSC (H2 and H4 mode [automatic transmission]
or H and HL mode [manual transmission] on 4WD models)
If the vehicle gets stuck in fresh snow o TOYOTA FJ CRUISER 2010 1.G Owners Manual 176 2-4. Using other driving systems
To disable TRAC and/or VSC (H2 and H4 mode [automatic transmission]
or H and HL mode [manual transmission] on 4WD models)
If the vehicle gets stuck in fresh snow o](/img/14/6367/w960_6367-175.png)
176 2-4. Using other driving systems
To disable TRAC and/or VSC (H2 and H4 mode [automatic transmission]
or H and HL mode [manual transmission] on 4WD models)
If the vehicle gets stuck in fresh snow or mud, TRAC and VSC may
reduce power from the engine to the wheels. You may need to turn
the system off to enable you to rock the vehicle in order to free it.
■Turning off TRAC
Press the VSC OFF switch to
turn off TRAC.
The TRAC OFF indicator will
come on.
Push the switch again to turn the
system back on.
■Turning off TRAC and VSC
Press and hold the VSC OFF
switch for more than 3 seconds
while the vehicle is stopped to
turn off both TRAC and VSC.
The VSC OFF and TRAC OFF
indicators will come on.
Push the switch again to turn both
systems back on.
■Automatic reactivation of TRAC and VSC
Turning the engine switch off after turning off the TRAC and VSC systems
will automatically re-enable them.
■Automatic VSC reactivation (2WD models)
If only the TRAC system is turned off, VSC OFF and AUTO LSD indicators
turn on. The VSC system will turn on when the vehicle speed increases.