TOYOTA FJ CRUISER 2013 1.G Owners Manual
Manufacturer: TOYOTA, Model Year: 2013, Model line: FJ CRUISER, Model: TOYOTA FJ CRUISER 2013 1.GPages: 568, PDF Size: 9.49 MB
Page 171 of 568
171
2-4. Using other
driving systems
2
When driving
Things you should know
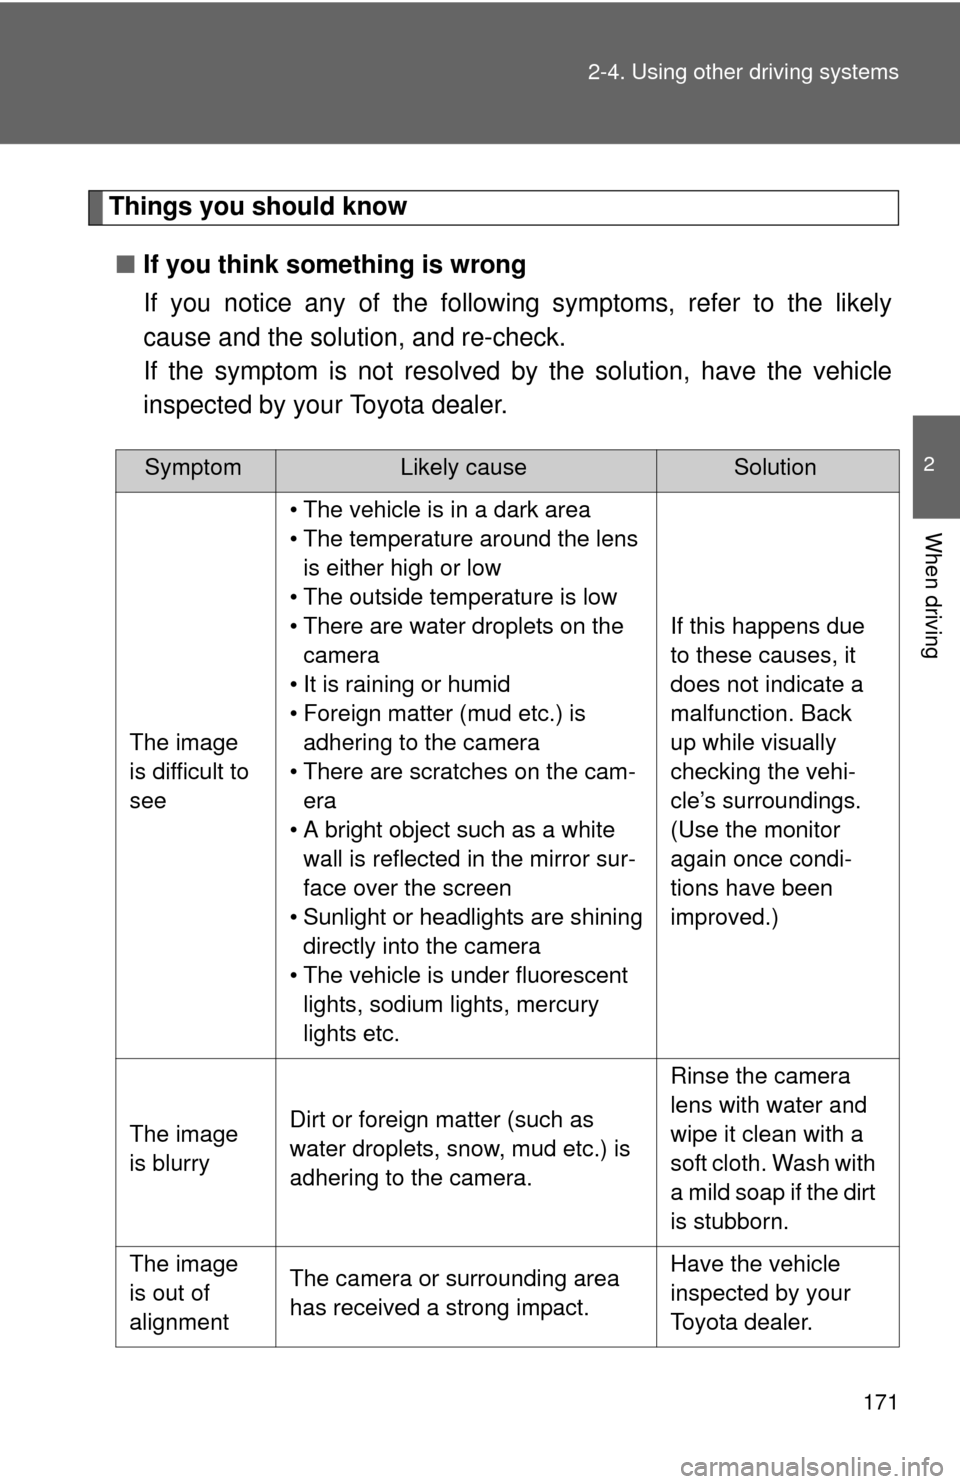
■ If you think something is wrong
If you notice any of the following symptoms, refer to the likely
cause and the solution, and re-check.
If the symptom is not resolved by the solution, have the vehicle
inspected by your Toyota dealer.
SymptomLikely causeSolution
The image
is difficult to
see • The vehicle is in a dark area
• The temperature around the lens
is either high or low
• The outside temperature is low
• There are water droplets on the camera
• It is raining or humid
• Foreign matter (mud etc.) is adhering to the camera
• There are scratches on the cam- era
• A bright object such as a white wall is reflected in the mirror sur-
face over the screen
• Sunlight or headlights are shining directly into the camera
• The vehicle is under fluorescent lights, sodium lights, mercury
lights etc. If this happens due
to these causes, it
does not indicate a
malfunction. Back
up while visually
checking the vehi-
cle’s surroundings.
(Use the monitor
again once condi-
tions have been
improved.)
The image
is blurry Dirt or foreign matter (such as
water droplets, snow, mud etc.) is
adhering to the camera. Rinse the camera
lens with water and
wipe it clean with a
soft cloth. Wash with
a mild soap if the dirt
is stubborn.
The image
is out of
alignment The camera or surrounding area
has received a strong impact. Have the vehicle
inspected by your
Toyota dealer.
Page 172 of 568
172 2-4. Using other driving systems
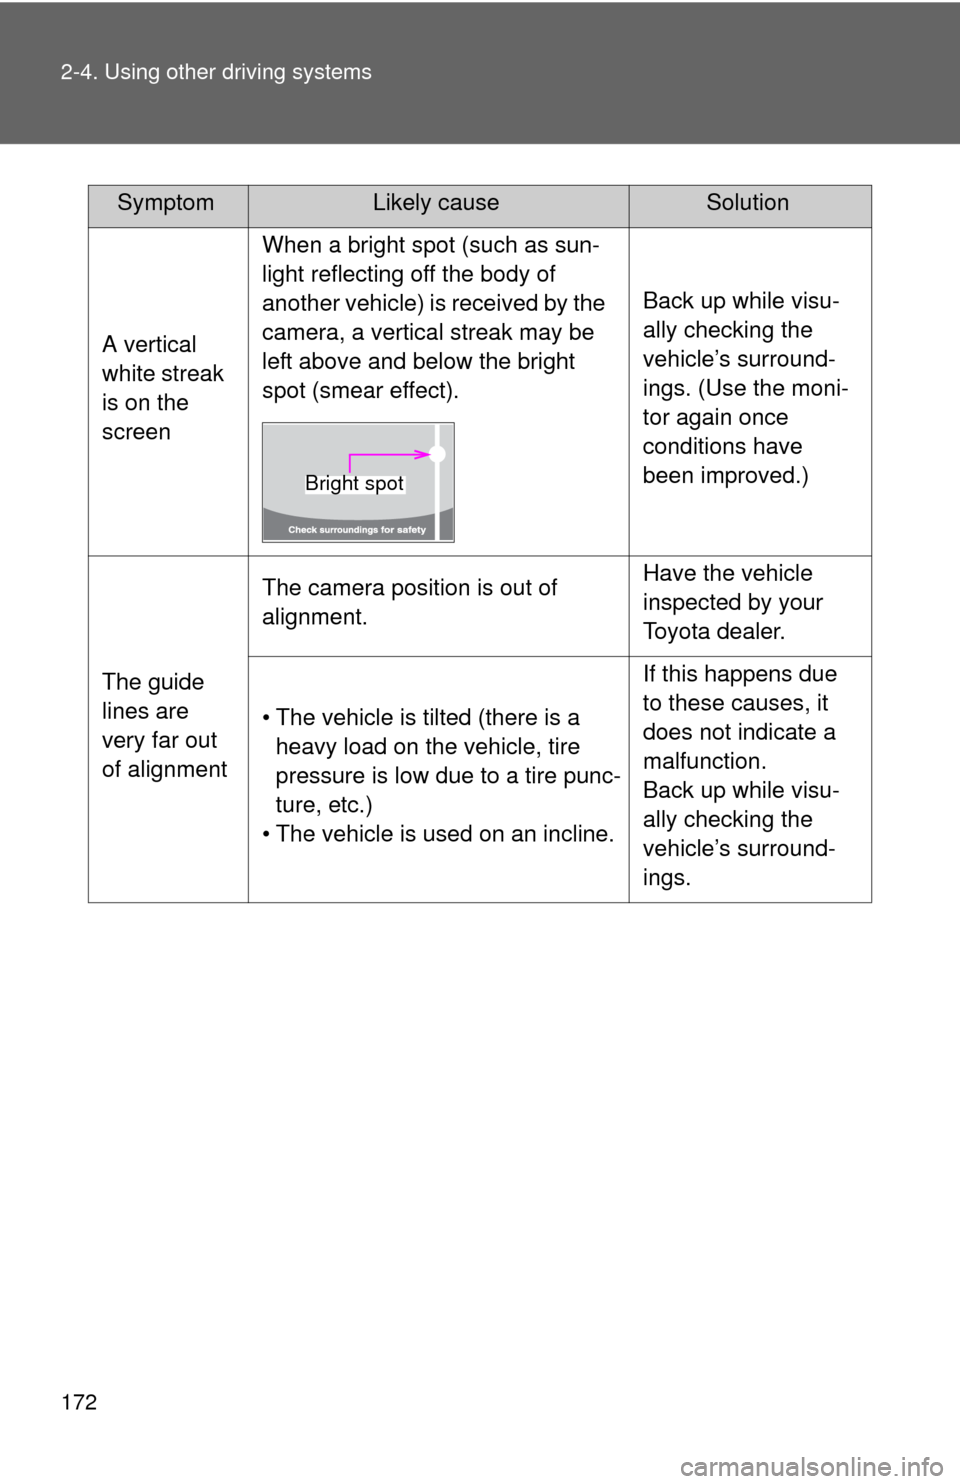
A vertical
white streak
is on the
screenWhen a bright spot (such as sun-
light reflecting off the body of
another vehicle) is received by the
camera, a vertical streak may be
left above and below the bright
spot (smear effect).
Back up while visu-
ally checking the
vehicle’s surround-
ings. (Use the moni-
tor again once
conditions have
been improved.)
The guide
lines are
very far out
of alignment The camera position is out of
alignment.
Have the vehicle
inspected by your
Toyota dealer.
• The vehicle is tilted (there is a heavy load on the vehicle, tire
pressure is low due to a tire punc-
ture, etc.)
• The vehicle is used on an incline. If this happens due
to these causes, it
does not indicate a
malfunction.
Back up while visu-
ally checking the
vehicle’s surround-
ings.
SymptomLikely causeSolution
Bright spot
Page 173 of 568
173
2-4. Using other
driving systems
2
When driving
■When using the rear view monitor system
The anti-glare function of the inside rear view mirror will be canceled.
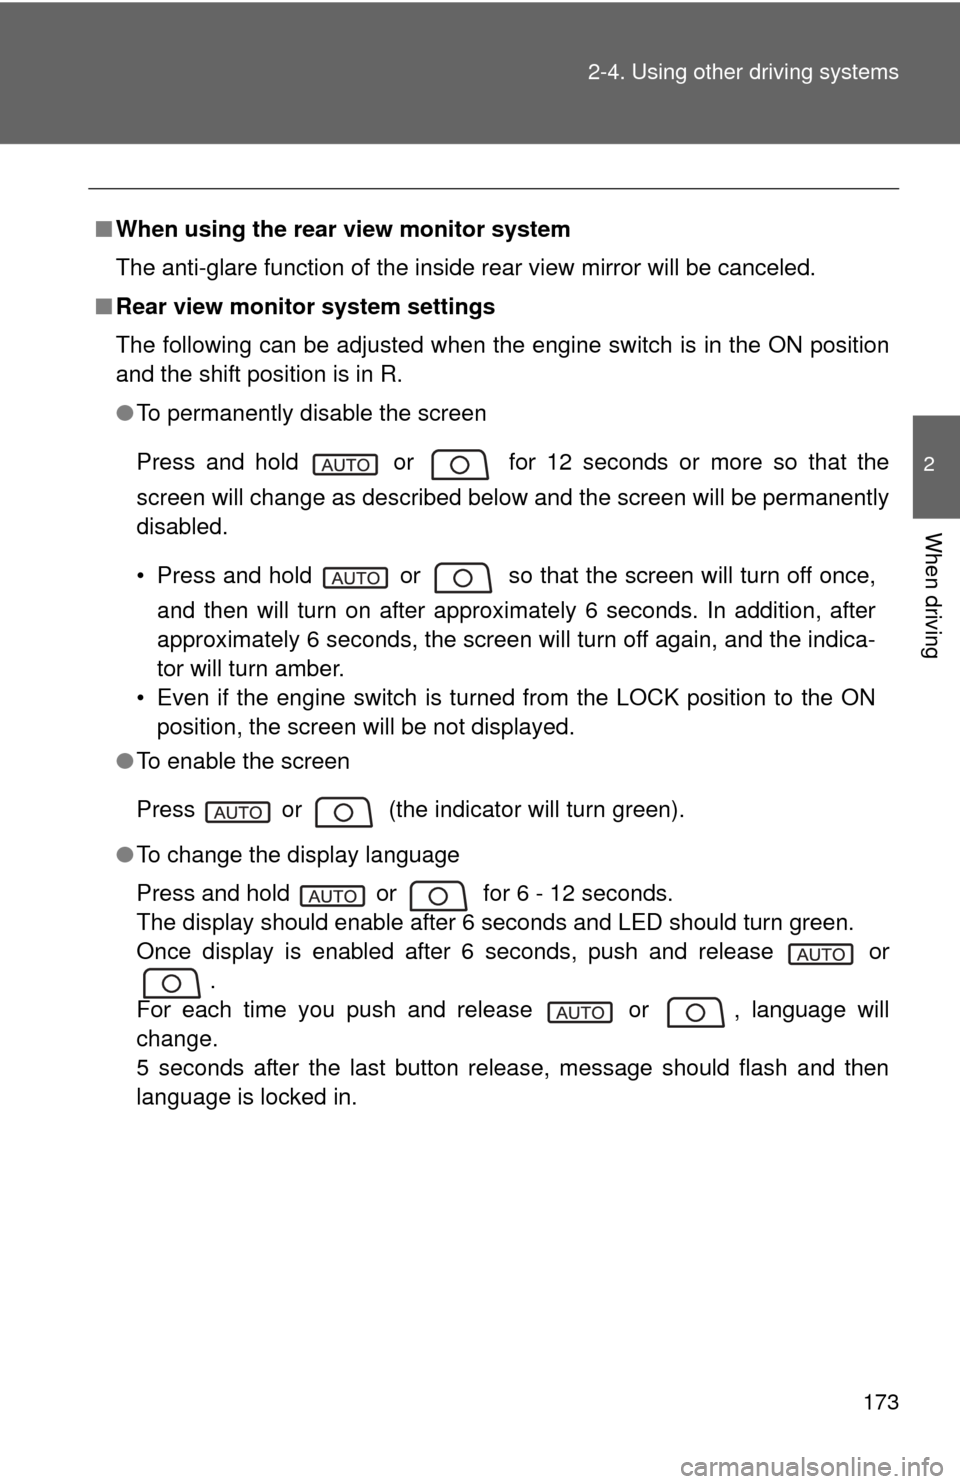
■ Rear view monitor system settings
The following can be adjusted when the engine switch is in the ON position
and the shift position is in R.
●To permanently disable the screen
Press and hold or for 12 seconds or more so that the
screen will change as described below and the screen will be permanently
disabled.
• Press and hold or so that the screen will turn off once,
and then will turn on after approximately 6 seconds. In addition, after
approximately 6 seconds, the screen will turn off again, and the indica-
tor will turn amber.
• Even if the engine switch is turned from the LOCK position to the ON position, the screen will be not displayed.
● To enable the screen
Press or (the indicator will turn green).
● To change the display language
Press and hold or for 6 - 12 seconds.
The display should enable after 6 seconds and LED should turn green.
Once display is enabled after 6 seconds, push and release or
.
For each time you push and release or , language will
change.
5 seconds after the last button release, message should flash and then
language is locked in.
Page 174 of 568
174 2-4. Using other driving systems
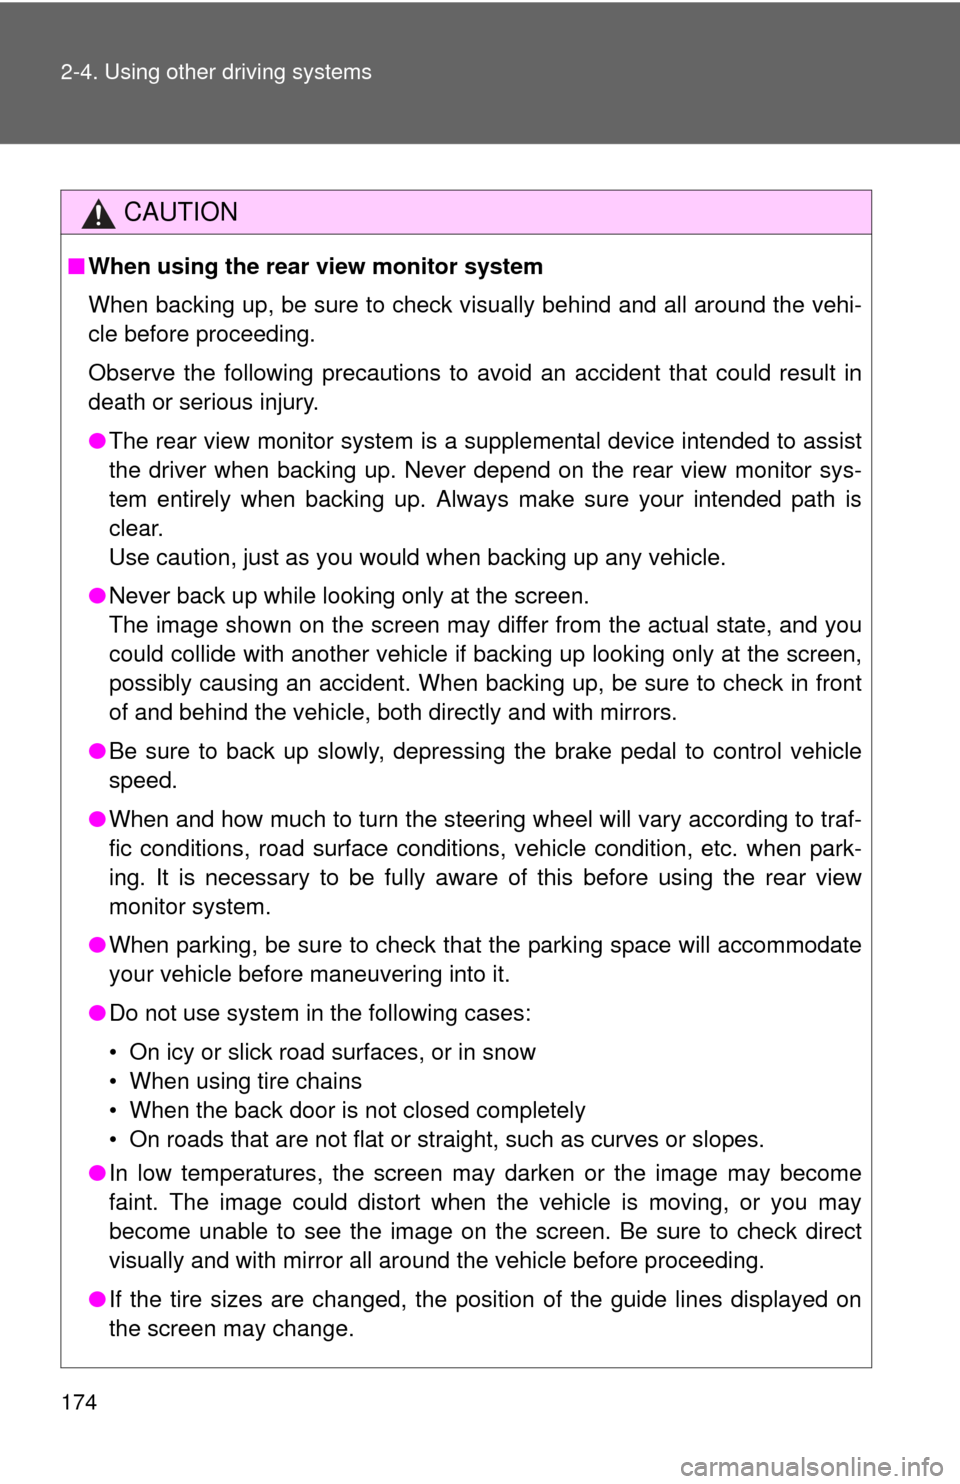
CAUTION
■When using the rear view monitor system
When backing up, be sure to check visually behind and all around the vehi-
cle before proceeding.
Observe the following precautions to avoid an accident that could result in
death or serious injury.
● The rear view monitor system is a supplemental device intended to assist
the driver when backing up. Never depend on the rear view monitor sys-
tem entirely when backing up. Always make sure your intended path is
clear.
Use caution, just as you would when backing up any vehicle.
● Never back up while looking only at the screen.
The image shown on the screen may differ from the actual state, and you
could collide with another vehicle if backing up looking only at the screen,
possibly causing an accident. When backing up, be sure to check in front
of and behind the vehicle, both directly and with mirrors.
● Be sure to back up slowly, depressing the brake pedal to control vehicle
speed.
● When and how much to turn the steering wheel will vary according to traf-
fic conditions, road surface conditions, vehicle condition, etc. when park-
ing. It is necessary to be fully aware of this before using the rear view
monitor system.
● When parking, be sure to check that the parking space will accommodate
your vehicle before maneuvering into it.
● Do not use system in the following cases:
• On icy or slick road surfaces, or in snow
• When using tire chains
• When the back door is not closed completely
• On roads that are not flat or straight, such as curves or slopes.
● In low temperatures, the screen may darken or the image may become
faint. The image could distort when the vehicle is moving, or you may
become unable to see the image on the screen. Be sure to check direct
visually and with mirror all around the vehicle before proceeding.
● If the tire sizes are changed, the position of the guide lines displayed on
the screen may change.
Page 175 of 568
175
2-4. Using other
driving systems
2
When driving
CAUTION
●The camera uses a special lens. The distances between objects and
pedestrians that appear in the image displayed on the screen will differ
from the actual distances. ( P. 167)
■ When using the rear view monitor system
●The position of the guide lines displayed on the screen may change in
accordance with the number of passenger s, the amount of cargo etc. Be
sure to check behind and all around the vehicle direct visually and with
mirror before proceeding.
● The vehicle width extension guide lines are wider than the actual width of
the vehicle. When backing up, be sure to check behind and all around the
vehicle direct visually and with mirror before proceeding.
NOTICE
■How to use the camera
●The rear view monitor system may not operate properly in the following
cases, or if the precautions described below are not followed.
• If the back of the vehicle is hit, the position and mounting angle of the
camera may change.
• As the camera has a water proof construction, do not detach, disas- semble or modify it. This may cause incorrect operation.
• Do not strongly rub the camera lens. If the camera lens is scratched, it cannot transmit a clear image.
• Do not allow organic solvent, car wax, window cleaner or glass coat to adhere to the camera. If this happens, wipe it off as soon as possible.
• If the temperature changes rapidly, such as when hot water is poured on the vehicle in cold weather, the system may not operate normally.
• When washing the vehicle, do not apply intensive bursts of water to the camera or camera area. Doing so may result in the camera malfunc-
tioning.
● Do not expose the camera to strong impact as this could cause a malfunc-
tion. If this happens, have the vehicle inspected by your Toyota dealer as
soon as possible.
Page 176 of 568
176
2-4. Using other driving systems
Four-wheel drive system (4WD models with a manual transmission)
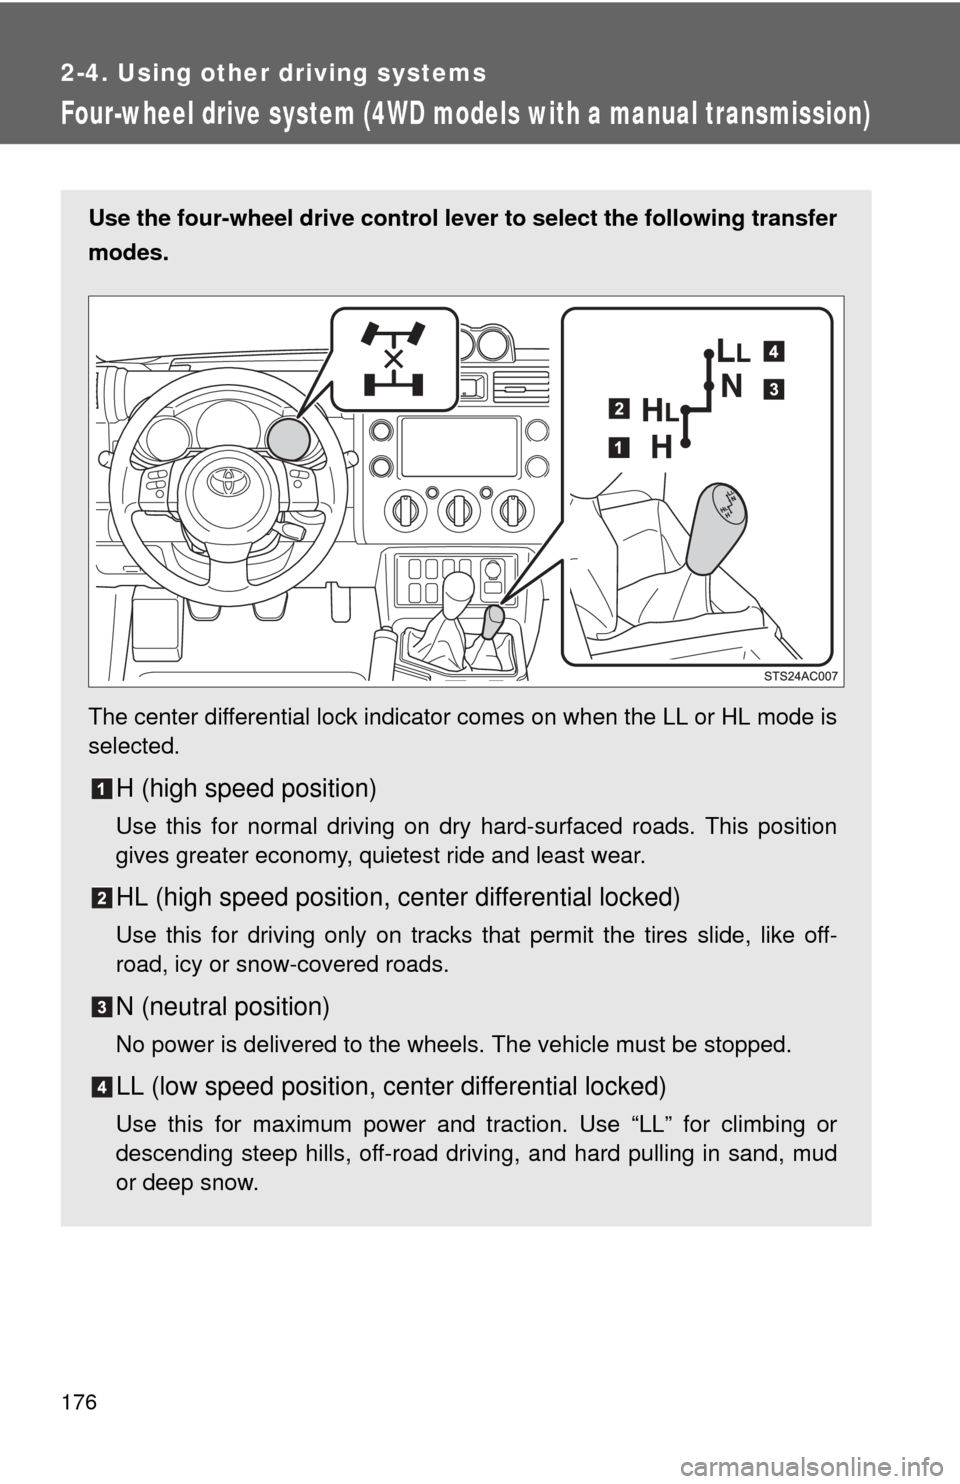
Use the four-wheel drive control lever to select the following transfer
modes.
The center differential lock indicator comes on when the LL or HL mode is
selected.
H (high speed position)
Use this for normal driving on dry hard-surfaced roads. This position
gives greater economy, quietest ride and least wear.
HL (high speed position, center differential locked)
Use this for driving only on tracks that permit the tires slide, like off-
road, icy or snow-covered roads.
N (neutral position)
No power is delivered to the wheels. The vehicle must be stopped.
LL (low speed position, ce nter differential locked)
Use this for maximum power and traction. Use “LL” for climbing or
descending steep hills, off-road driving, and hard pulling in sand, mud
or deep snow.
Page 177 of 568
177
2-4. Using other
driving systems
2
When driving
■Shifting between H and HL
●You need not to depress the clutch pedal.
● If the center differential lock indicator does not come on when you shift
from H to HL, drive straight ahead while accelerating or decelerating.
● If the center differential lock indicator does not go off when you shift from
HL to H, drive straight ahead while accelerating or decelerating, or drive
in reverse.
■ Shifting from HL to LL
Stop the vehicle or reduce your speed to less than 5 mph (8 km/h).
Depress the clutch pedal and move the four-wheel drive control lever.
■ Shifting from LL to HL
Depress the clutch pedal and move the four-wheel drive control lever.
■ Shifting to LL
VSC is automatically turned off.
CAUTION
■Caution while driving
Avoid turning suddenly while the center differential is locked. If you do turn
suddenly, the difference in turning speeds between the front and rear wheels
may have a similar effect to braking, thus making driving difficult.
Page 178 of 568
178 2-4. Using other driving systems
NOTICE
■To prevent damage to the center differential
●For normal driving on dry and hard surface roads, unlock the center differ-
ential.
● Shift to H after the wheels are out of the ditch or off the slippery or bumpy
surface.
● Do not shift to any position when the vehicle is cornering or when its
wheels spinning freely off the ground.
■ Shifting from H to HL while driving
Never operate the four-wheel drive control lever if the wheels are slipping.
Stop the slipping or spinning before shifting.
Page 179 of 568
179
2-4. Using other driving systems
2
When driving
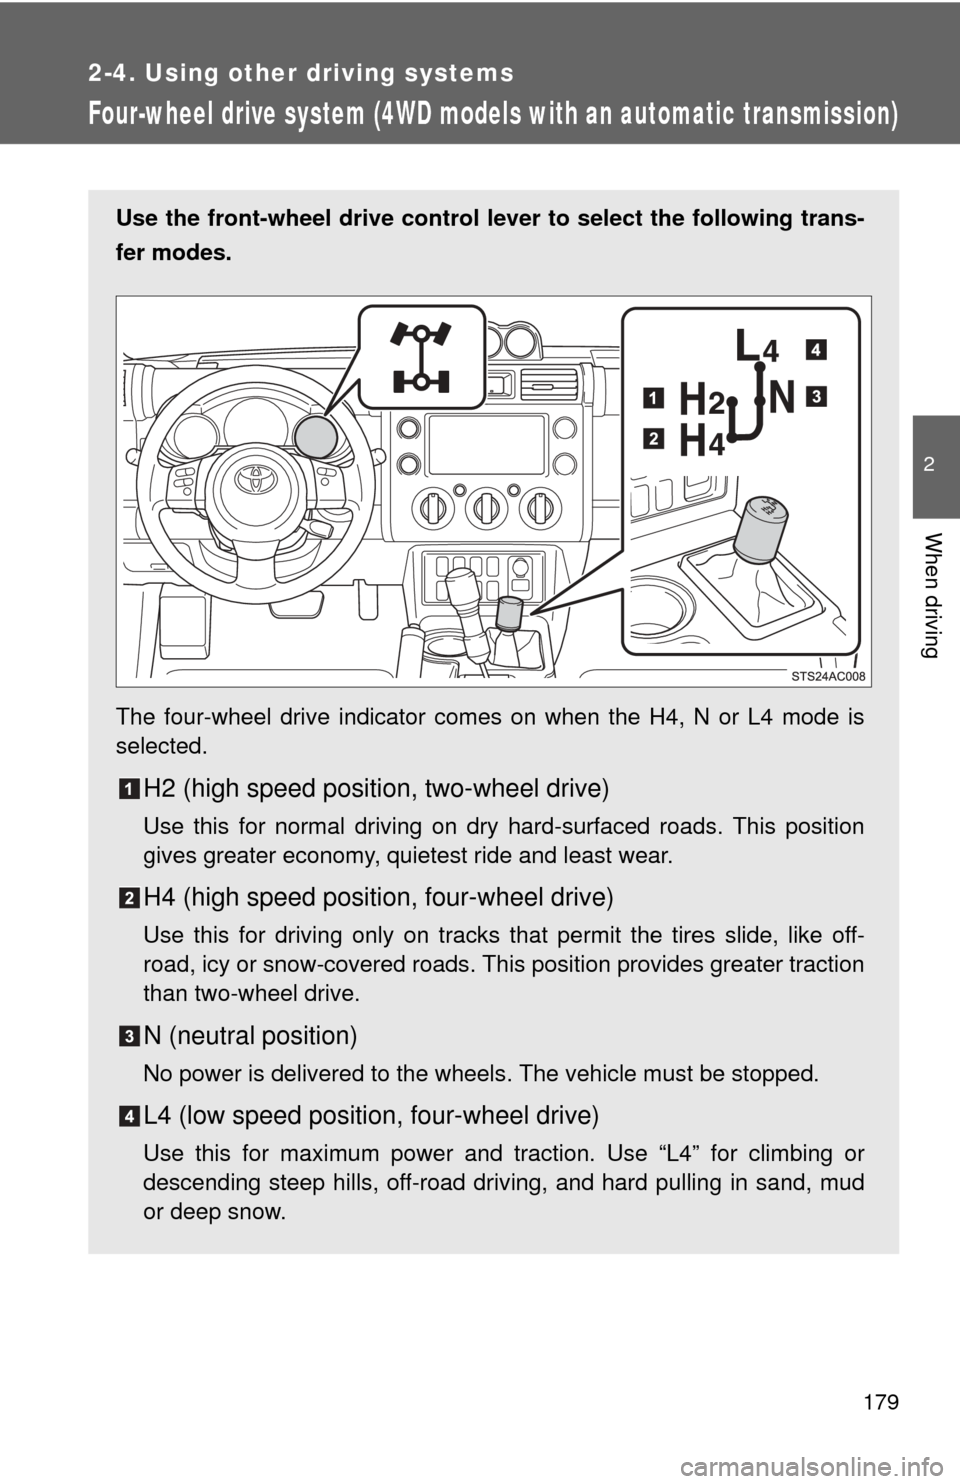
Four-wheel drive system (4WD models with an automatic transmission)
Use the front-wheel drive control lever to select the following trans-
fer modes.
The four-wheel drive indicator comes on when the H4, N or L4 mode is
selected.
H2 (high speed position, two-wheel drive)
Use this for normal driving on dry hard-surfaced roads. This position
gives greater economy, quietest ride and least wear.
H4 (high speed position, four-wheel drive)
Use this for driving only on tracks that permit the tires slide, like off-
road, icy or snow-covered roads. This position provides greater traction
than two-wheel drive.
N (neutral position)
No power is delivered to the wheels. The vehicle must be stopped.
L4 (low speed position, four-wheel drive)
Use this for maximum power and traction. Use “L4” for climbing or
descending steep hills, off-road driving, and hard pulling in sand, mud
or deep snow.
Page 180 of 568

180 2-4. Using other driving systems
■Shifting between H2 and H4
●Reduce your speed to less than 50 mph (80 km/h) and shift the front-
wheel drive control lever from H2 to H4.
If you have trouble shifting in cold weather, reduce your speed or stop the
vehicle.
● If the four-wheel drive indicator does not go off when you shift from H4 to
H2, drive straight ahead while accelerating or decelerating, or drive in\
reverse.
■ Shifting between H4 and L4
Stop the vehicle, shift the shift lever to N and shift the front-wheel drive con-
trol lever.
■ Shifting to L4
VSC is automatically turned off.
■ Four-wheel drive usage frequency
You should drive in four-wheel drive for at least 10 miles (16 km) each
month.
This will assure that the front drive components are lubricated.