TOYOTA FR-S 2016 Accessories, Audio & Navigation (in English)
Manufacturer: TOYOTA, Model Year: 2016, Model line: FR-S, Model: TOYOTA FR-S 2016Pages: 164, PDF Size: 6.21 MB
Page 61 of 164
1. BASIC INFORMATION BEFORE OPERATION
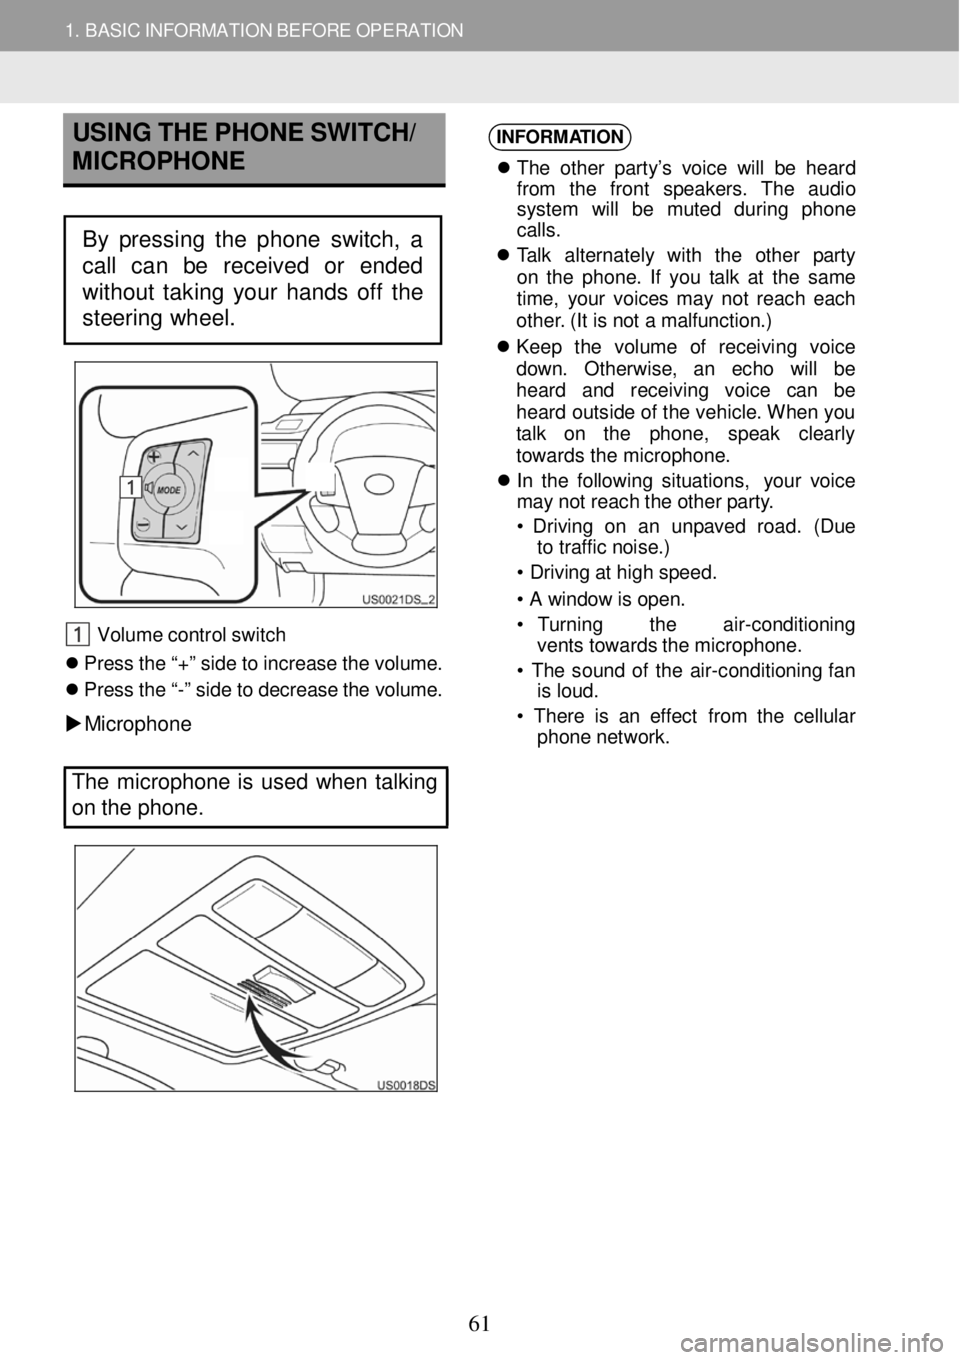
USING THE PHONE SWITCH/
MICROPHO NE
Steeri ng sw it ch (IF EQUIPPED)
Volum e co ntr o l s w itch
Pr ess th e “+ ” s id e t o increas e th e v o lum e.
P ress th e “ -” side to decrease th e volume.
Microp hone
INFORM
ATION
Th e othe r par ty ’s voi ce will be heard
fro m th e fron t speak ers. Th e au dio
sys te m w ill be mut ed duri ng phone
c al ls.
T a lk alternat ely w it h th e other par ty
on th e p h one . If yo u tal k a t th e sam e
t im e, you r vo ice s ma y no t re ac h eac h
o the r. ( It is n ot a ma lf u nc tio n.)
Kee p the volum e of rec eiv in g voice
d ow n. Oth erw ise , an echo wi ll be
h eard an d rec eiv in g voic e ca n be
h e ar d o uts id e o f th e veh ic le . W he n yo u
t a lk on the ph one, spe ak clearl y
towards the micro ph one.
In the f ollow in g situ ations , you r voi ce
ma y n ot reac h t h e o the r p ar ty .
• Dr ivi ng on an un pa ve d road. (Du e
to tra ffic n oi se.)
• Dr ivi ng a t hig h sp eed.
• A windo w is o pen.
• Turn in g th e air -con dit io ni ng
vent s towards t h e m icropho ne.
• Th e sou nd o f th e a ir -co ndi tio ni ng fa n
is loud.
• Ther e is a n eff e ct fr om th e cellu lar
phon e n etwork.
The micropho ne is used when talking
on the phone.
By pressing the phone switch, a
call can be received or ended
without taking your hands off the
steering wheel.
61
Page 62 of 164
1. BA SIC INFORMATION BE FORE O PERATION
ABOUT
THE PHONE BOOK IN
THIS S YSTEM
T he fo llo w in g data is stored fo r ever y
regi stered phone. W hen ano ther p hone is
conn ectin g, you can not rea d th e
re gis te re d dat a.
• P hon e b oo k da ta
• C all his tor y d ata
INFORM ATION
When yo u d el ete th e pho ne, th e abo ve
listed details are a ls o del eted.
WHE N Y OU SELL YOUR C AR
A lot of personal data is registered
when you use the Hands -free system.
W hen you sell your car, erase your
data. ( →P.90)
Y ou can erase th e fo llo w in g da ta from th e 3 sy
stem.
• Ph one book d at a
• C all h is tor y da ta
• V olum e se ttin g
• B lue too th
® se ttin g • A ll te le phon e s e ttin gs
• Sh ort messa ge tem pla te
INFORMATION
When utilizing the “ Delete all personal
data” function, a ll personal dat a wi ll be
erased.
62
Page 63 of 164
1. BASIC INFORMATION BEFORE OPERATION
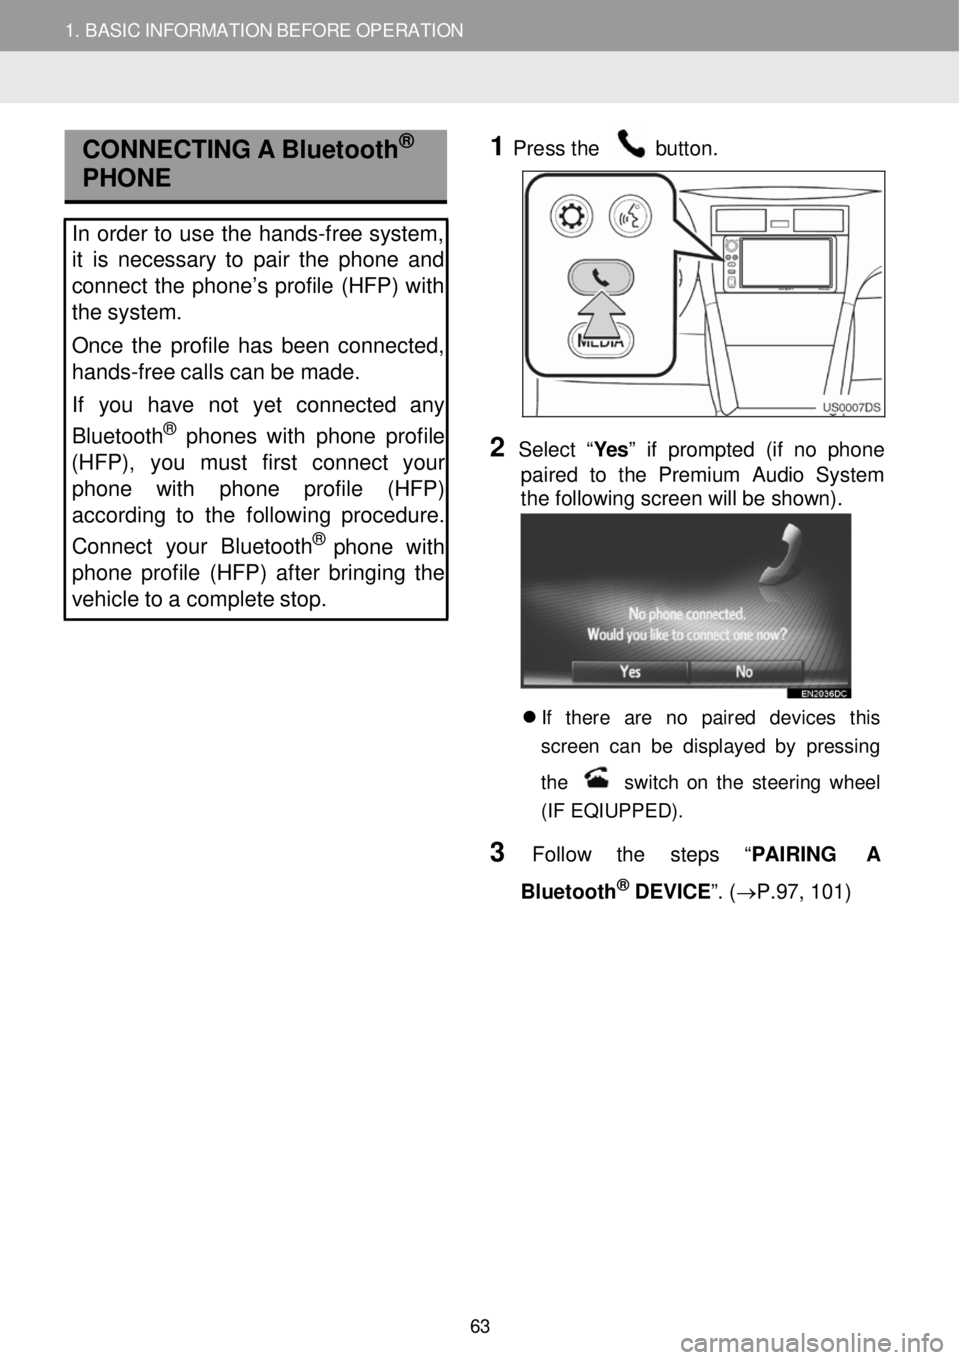
CONNECTI NG A Bluetoot h®
PHONE
In order to u se the hands -free system,
it is necessary to pair the phone and
connect the phone’s profile (HFP) with
the system.
Once the profile has been connected,
hands -free calls can be made.
If you have not yet connected any
Bluetooth
® phone s with phone profile
(HFP), yo u must first conn ect yo ur
phone with phone profile (HFP)
according to the following procedure.
Connect your Bluet ooth
® pho ne with
phone profile (HFP) after bringing the
vehicle to a complete stop.
1
Pre
ss the button.
2 Select “Yes ” if prompted (if no phone
p aired to the Premium Audio System
the following screen will be shown) .
If there are no paired devices t his
s creen ca n b e d is pla ye d b y pres sing
t h e
s w it c h o n th e s te erin g whe el
(IF EQIUPPED) .
3 Follow th e steps “ PAIRING A
Bl uetooth
® DEVICE ”. (→P. 97, 101)
63
Page 64 of 164
1. BASIC INFORMATION BEFORE OPER ATION
3. REGISTERING AN ENTRY
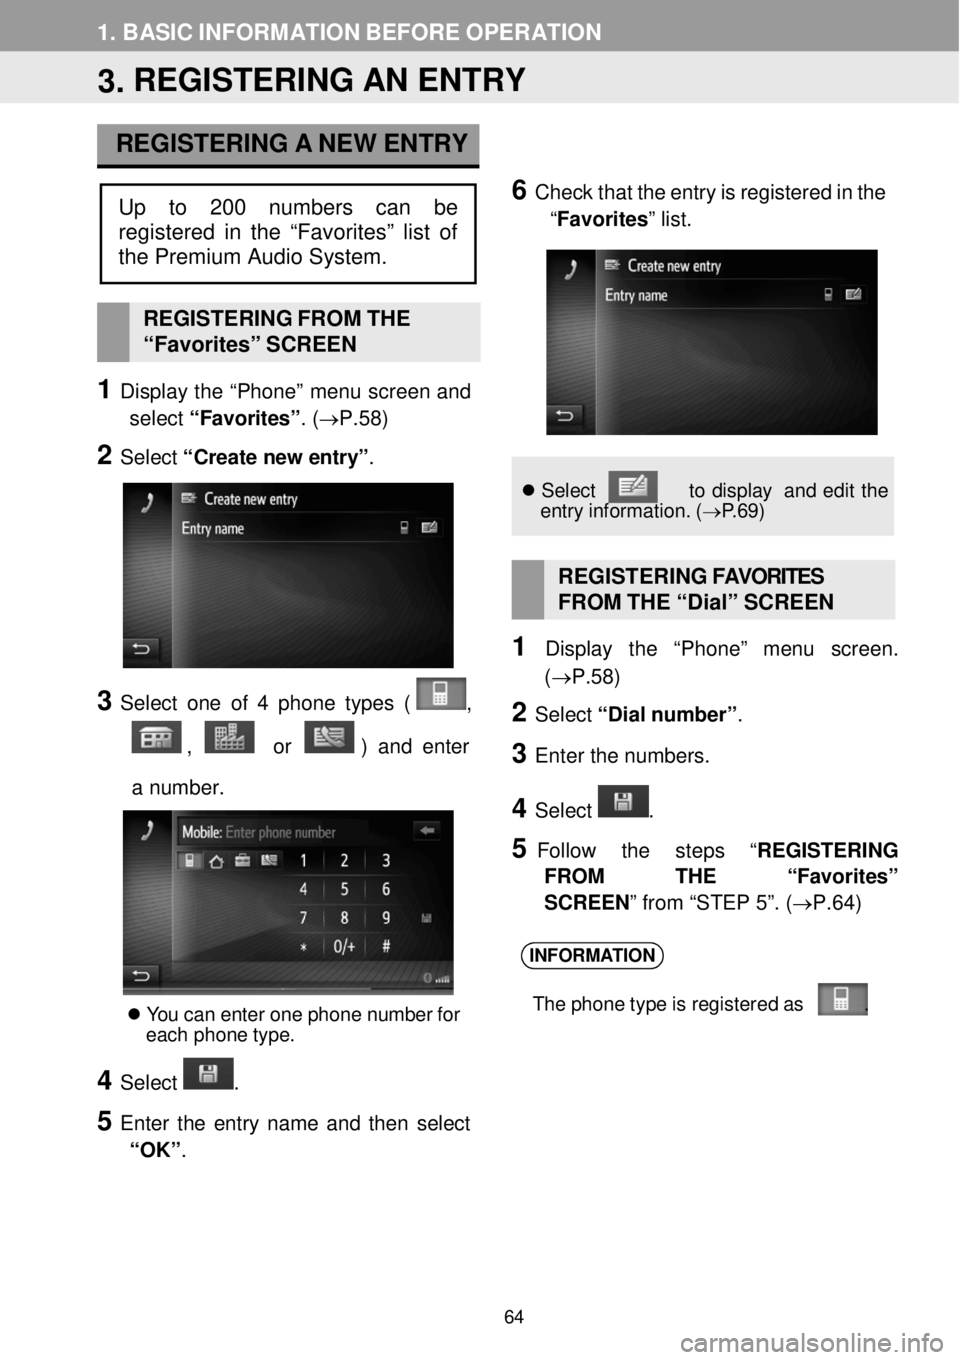
REGISTERING A NEW E NTRY
6 C heck t h at the e n try is re gistered in the
“Favorites ” list.
REGISTERI NG FR OM THE
“Favor ites” SCREEN
1 Display th e “Pho ne” menu scre en a nd
select “F avorites ”. ( →P. 58)
2 Select “C rea te n ew e ntr y” .
3 Select o ne of 4 p hone ty pe s ( ,
, or ) an d e nte r
a numb er.
Y ou ca n en te r one p hon e numbe r f o r
e ach ph one ty pe.
4 Select .
5 Enter the entry n ame a nd th en select
“OK” .
Se lec t to dis pla y an d edi t the
e ntr y in format ion . ( → P.6 9)
R EGISTERING FAVOR ITES
FROM THE “ Dial” SC REEN
1 Displ ay th e “Ph one” m enu screen.
(→P. 58)
2 Select “Dial number ”.
3 En te r the num bers.
4 Select .
5 Fol low the st ep s “REGIS TERING
FROM THE “Favorite s”
SCREEN ” from “STEP 5”. (→ P.64)
INFORM ATION
The p hon e t yp e is re gis tere d a s .
Up to 200 numbers can be
registered in the “Favorites” list of
the Premium Audio System .
64
Page 65 of 164
1. BASIC INFORMATION BEFORE OPERATION
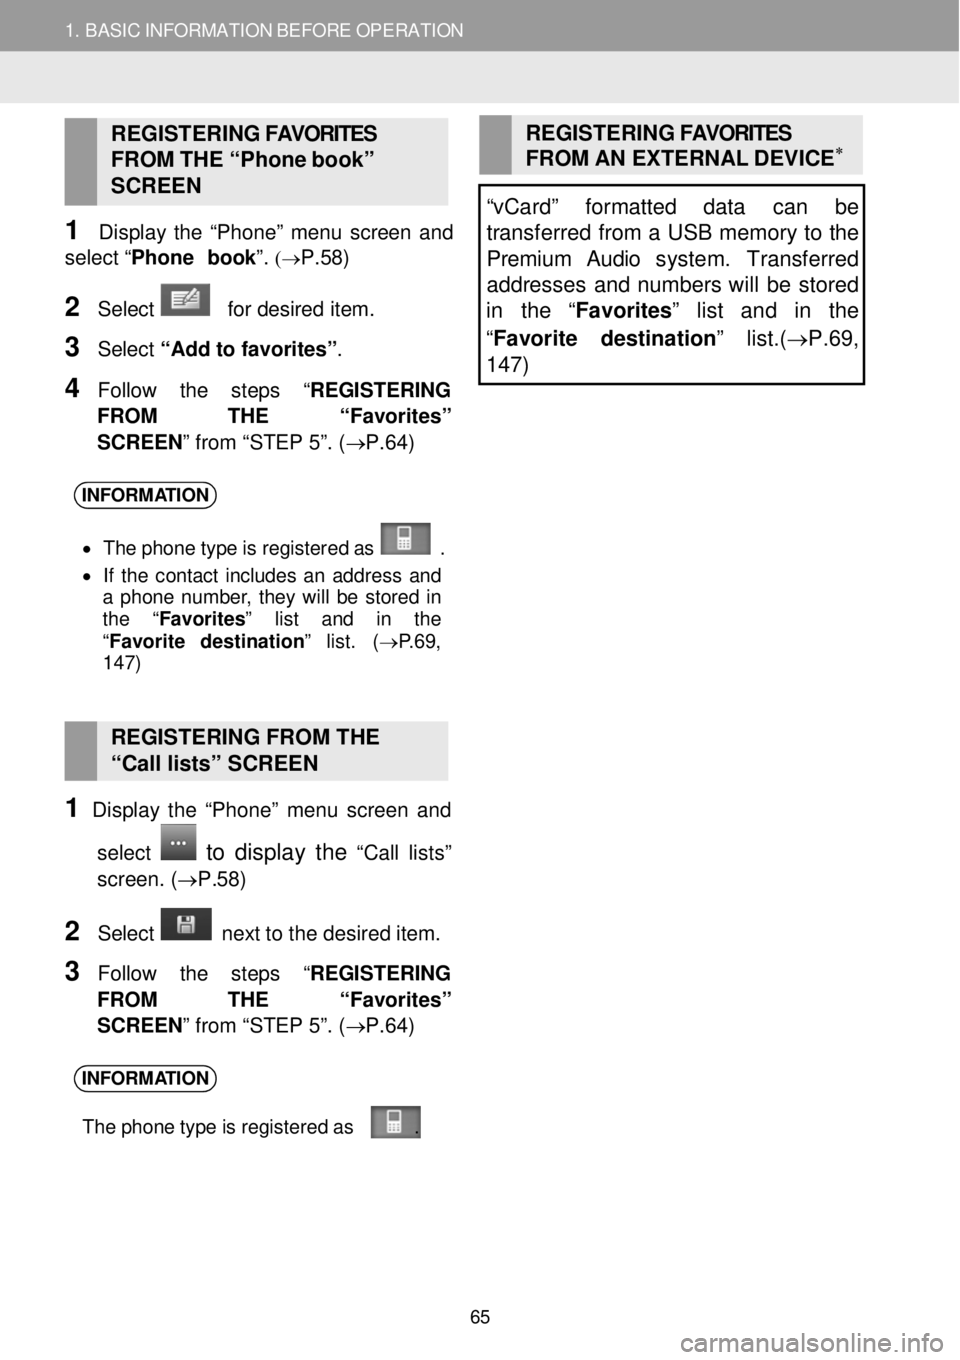
REGISTERING FAVORITES
FROM THE “Ph one b ook”
S C REEN
1 Disp lay th e “Pho ne” menu screen a nd
select “Phone b ook ”.
(→P. 58)
2 Sel ect for desired item.
3 Select “Add to favorites ”.
4 F ollow the st ep s “REGISTERING
FROM THE “Favorite s”
SCREEN ” from “STEP 5”. (→ P.64)
REGISTERING FAVORITES
FROM AN EXTERNAL DEVIC E∗
“vCard” formatted data can be
transferred from a U SB memory to the
Premium Audio s ystem. Tr ansfe rred
addresses and numbers will be stored
in the “Favorites” list and in the
“ Favorite destination ” list.(→P.69,
1 47)
INFORM ATION
• Th e p hon e t yp e is re gis tere d a s .
• If th e co ntact inc lu d es an a d dres s and
a ph on e numbe r, th ey w ill b e s tor ed in
t h e “Favorites” list and in the
“ Favo rite des tin ation ” lis t. (→ P.69 ,
1 47)
REGISTERING FROM THE
“Call lists” SCREEN
1 Disp lay th e “Pho ne” menu screen a nd
select
to display the “C all lists”
screen . (→P. 58)
2 Select n ext to the d esired item.
3 Follow the st ep s “REGISTERING
FROM THE “Favorite s”
SCREEN ” from “STEP 5”. (→ P.64)
INFORM ATION
The p hon e t yp e is re gis tere d a s .
65
Page 66 of 164
1. BA SIC INFORMATION BE FORE O PERATION
D
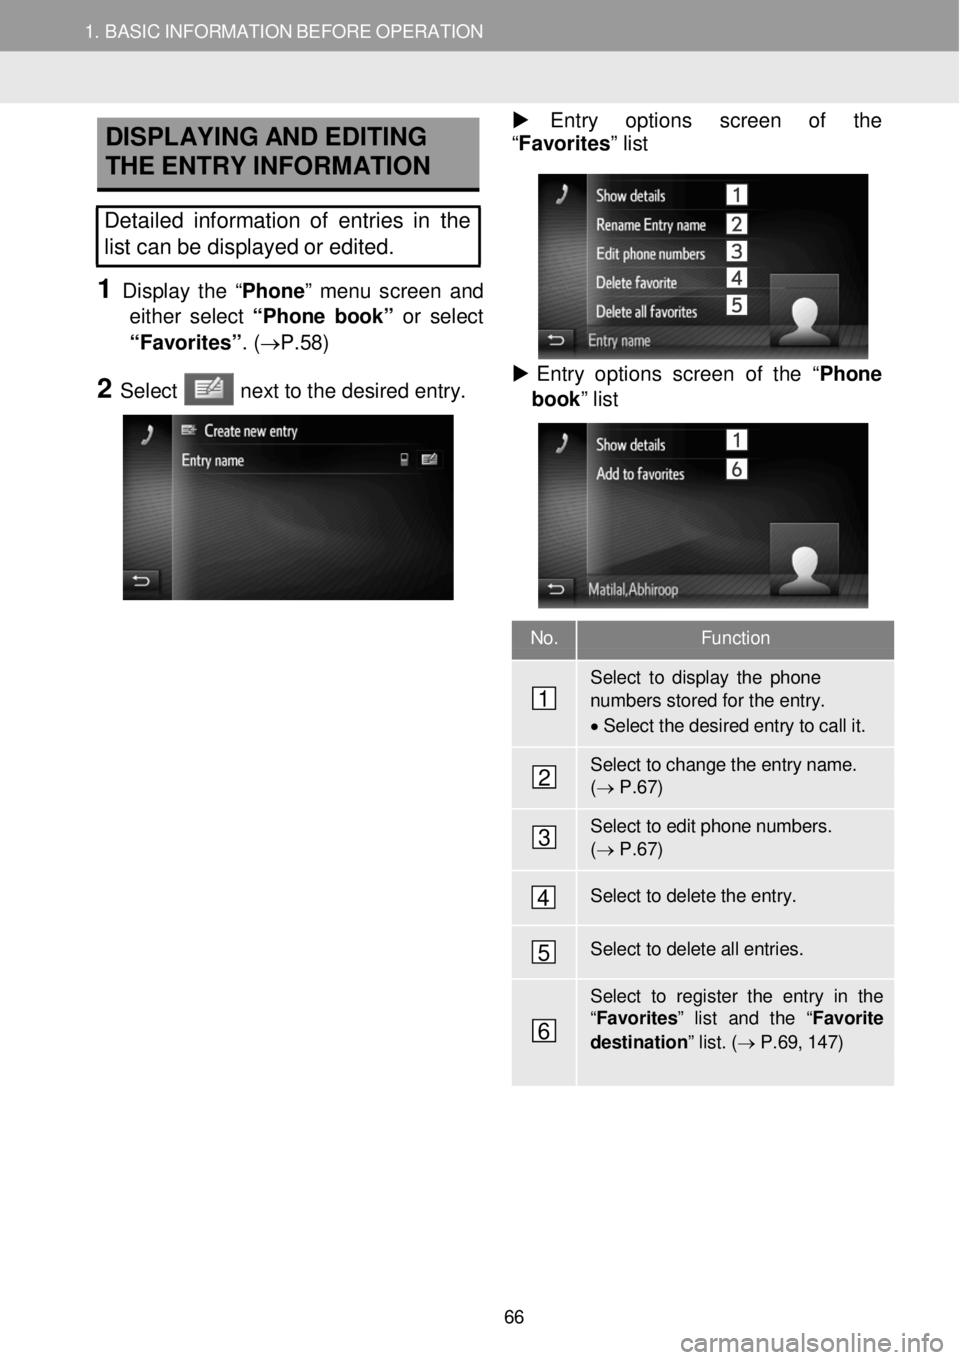
ISPLAYING AND EDITING
THE ENTRY INFORMATION Entry optio ns scre en of th e
“F avorites ” list
Detailed information of entries in the
list can be displayed or edited.
1 Display th e “Pho ne” menu scre en an d
either s elect “Phone b ook ” or select
“Fa vorite s”. (→P. 58)
2 Select n ext to t he d e sir ed e ntry.
Entry o ptions scre en of the “ Phone
book ” list
No. Function
Select to d ispl ay the phone numbers stored for the entry.
• Select the desi red entry to call it.
Select to change th e entry name. ( → P .6 7)
Select to edit phone numbers. ( → P .6 7)
Select to delete the entry.
Select to delete all entries.
Select to register the entry in th e “F avo rites ” list and the “ Favorite
destination ” list. ( → P.6 9, 1 47)
1
2
3
4
5
6
66
Page 67 of 164
1. BASIC INFORMATION BEFORE OPERATION
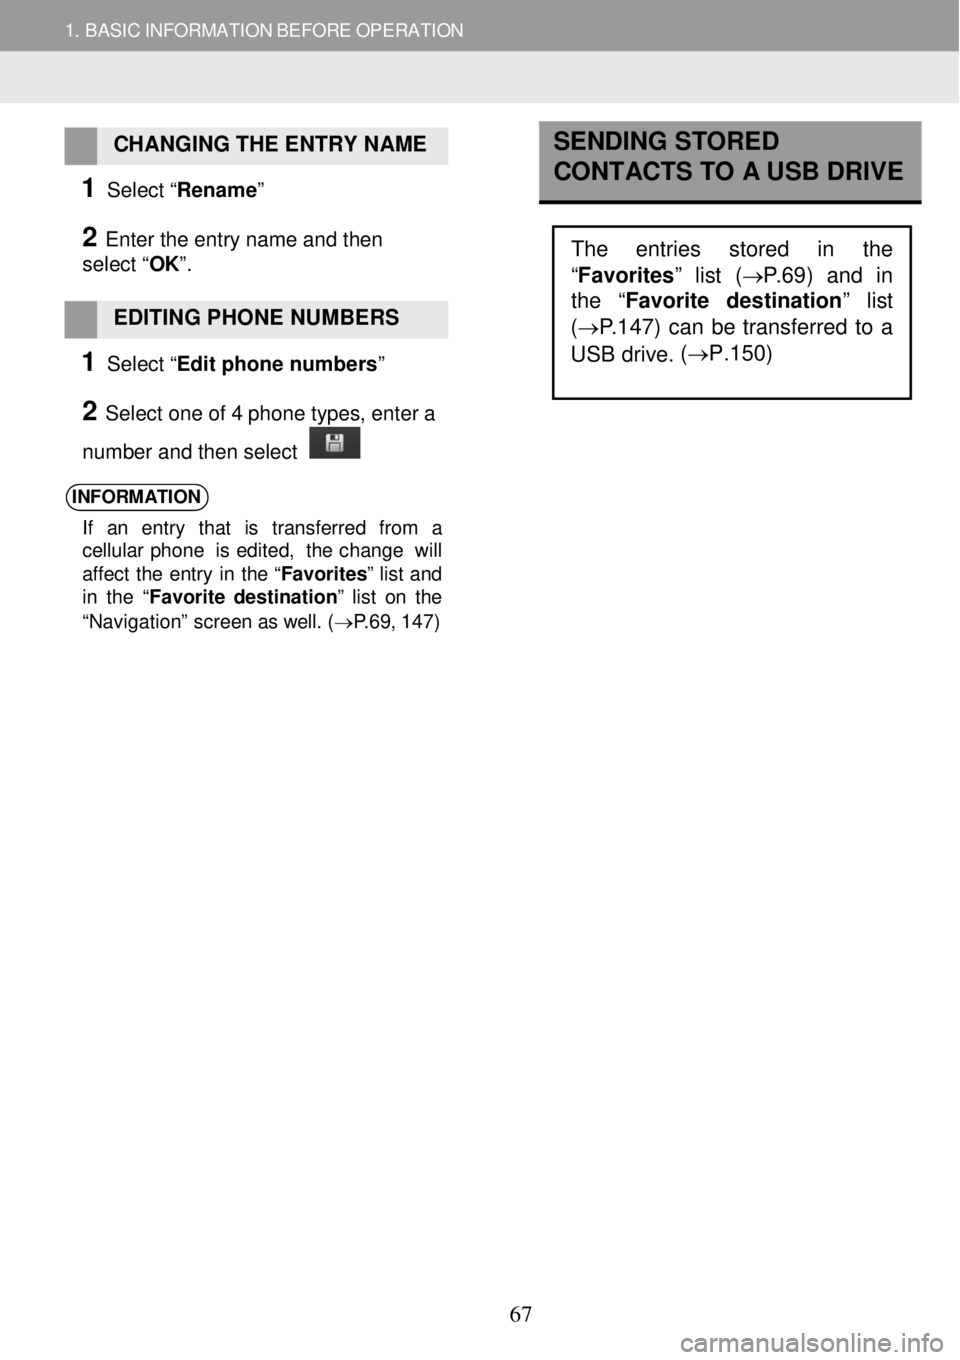
CHANGING THE ENTRY NAME
1 Se lect “Rename”
2 Enter the entry name and then
select “ OK”.
EDITING PHONE NUMBERS
1 Se lect “Edit phone numbers ”
2 Select one of 4 phone types, enter a
number and then select
INFORMATION
If an en tr y that is tra nsf erre d f ro m a
c e llu lar phon e is edi te d, th e ch ang e w ill
a ff ec t th e ent ry in th e “ Favorites” list and
in the “ Favorite d es tin ation” lis t o n th e
“Nav igat ion ” scre en as well . (→ P.69 , 147 )
SENDING STORED
CONTACTS TO A USB DRIVE
The entries stored in the
“Favorites ” list (→P.69) and in
the “ Favorite destination
” list
( →P .147 ) can be transferred to a
USB drive. (
→P.150)
67
Page 68 of 164
How to make a call list Page
By dial 68
By “ Favorites” list 69
By phone book 69
By ca ll li sts 70
By using a sh ort messa ge 71
By POI c all 71
2. PHONE OPERATION
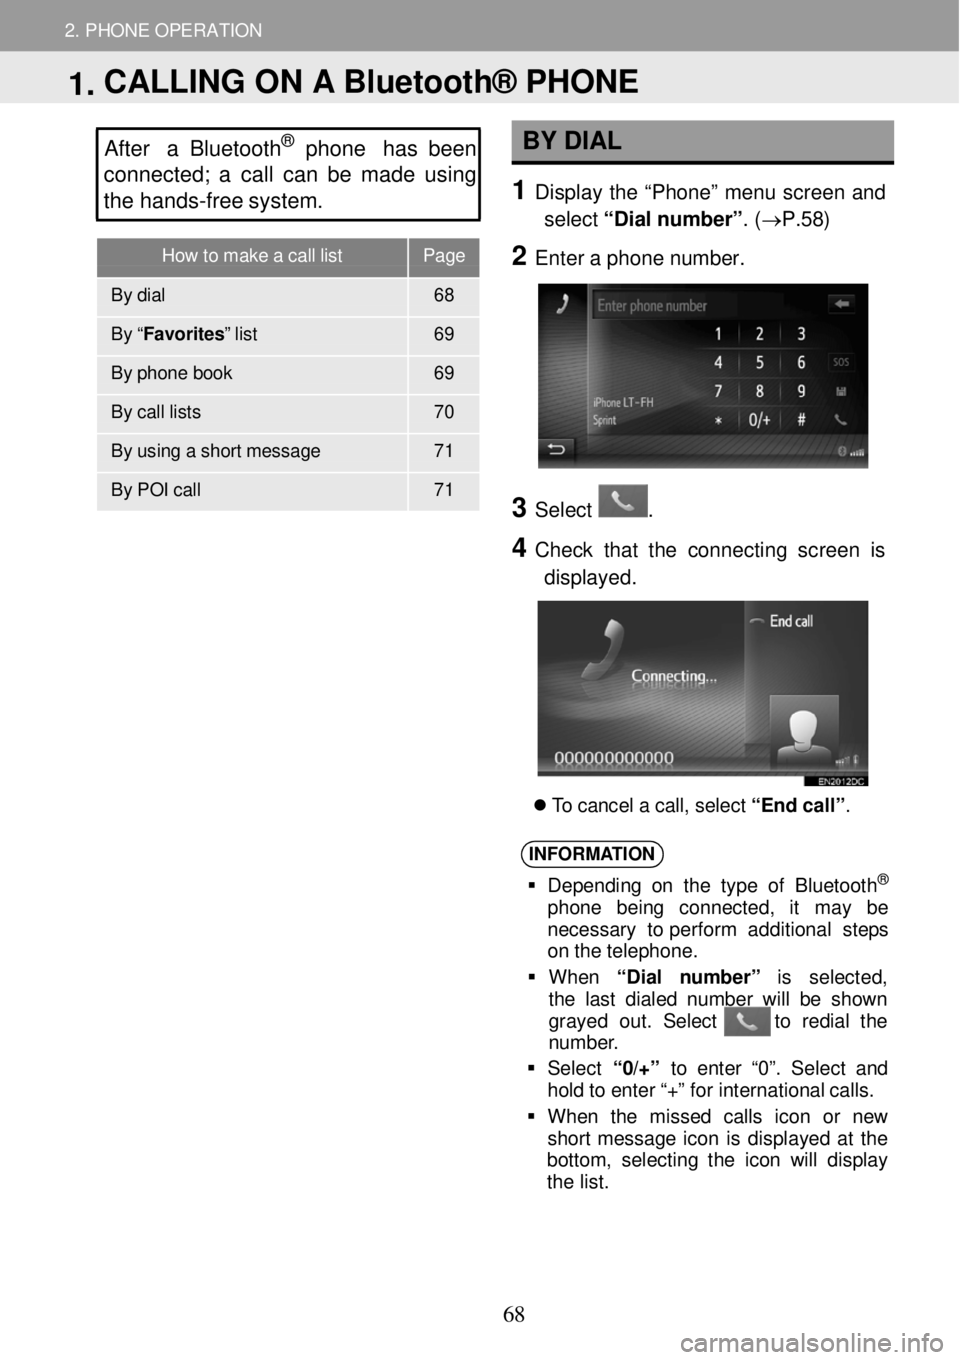
After a Bluetooth® phone has been
c o nnected; a call c a n be made using
the hands -fr ee s ystem. BY D IAL
1 Displ ay the “Phon e” m enu scre en and
select “Dial n um ber” . (→P. 58)
2 Ente r a p hon e num ber.
3
3 Select .
4 C heck that the con necting screen is
displayed.
T o c a ncel a c a ll, se lec t “End ca ll” .
INFORM ATION
Depe ndi ng o n th e ty pe o f B lue to oth®
ph on e be in g conn ect ed, it ma y be
necessa ry to perfor m add itio nal st eps
on t he te leph one.
Wh en “Di al num ber ” is se lec ted ,
t he l ast di ale d num ber wi ll be sh ow n
gray ed ou t. Sel ect to re dia l th e
n umbe r.
Se lec t “0/+” to ent er “0 ”. Se lec t an d
ho ld t o e nte r “+ ” for i nter nat ion al ca lls .
Wh en th e m isse d cal ls ico n or new
sh ort mess age i con is d isp lay ed at th e
b otto m , se lec tin g t he ico n w ill dis pla y
t he l is t.
1. CALLING ON A Bluetooth® PHONE
68
Page 69 of 164
2. PHONE OPERATION 2. PHONE OPERATION
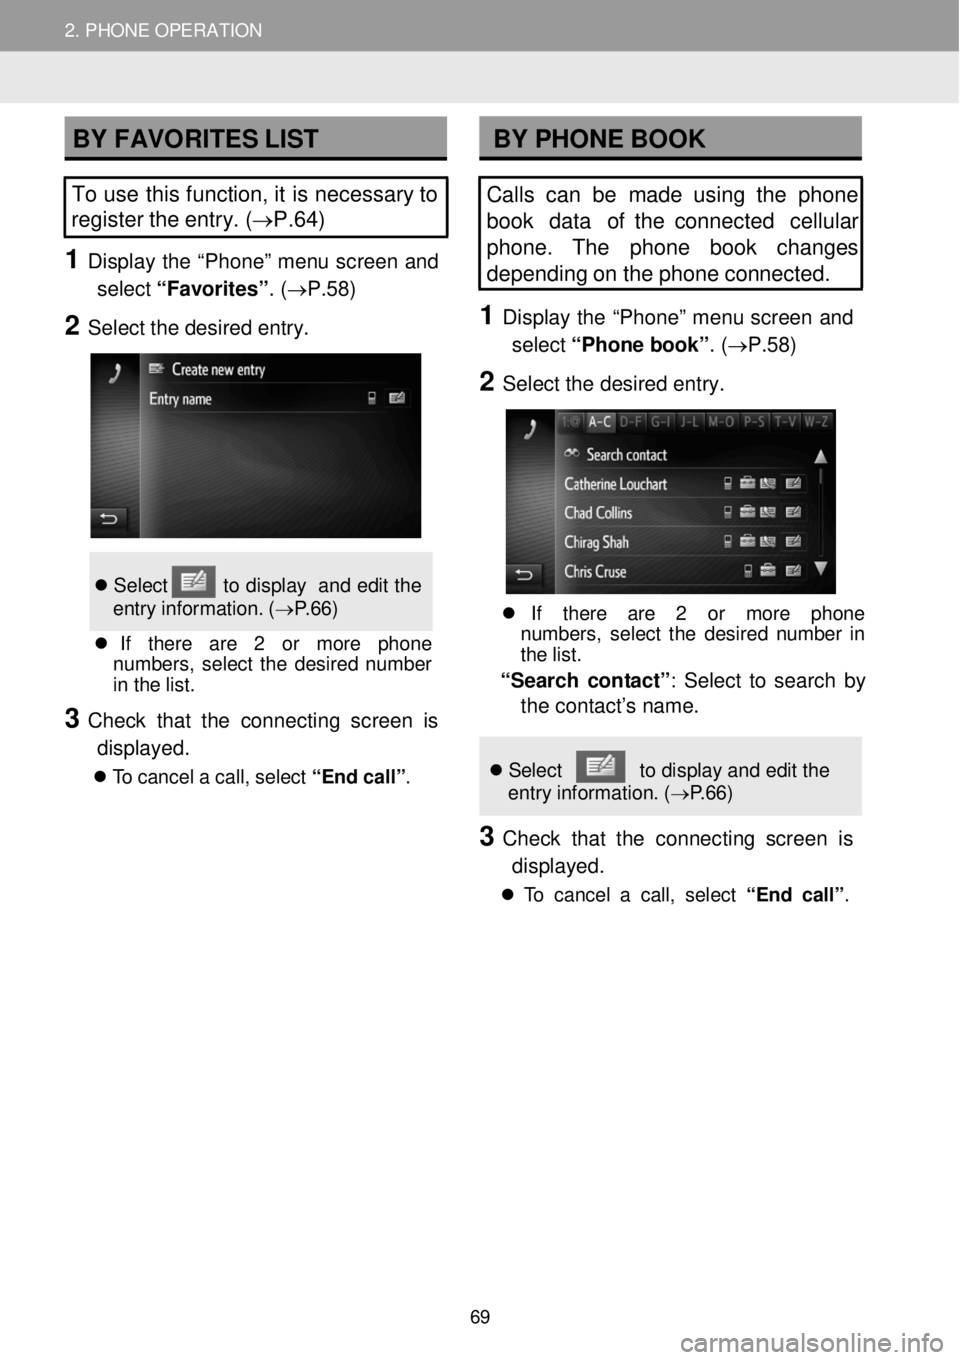
BY FAVORITES LIST BY PHONE BOOK
To use this function, it is necessary to
register the entry. ( →P.64 )
1 D ispl ay the “Phon e” m enu scre en and
select “Favorites” . (→P. 58)
2 Select the desired entry.
Se lec t to dis pla y an d edit th e
e ntr y in format ion . ( → P.6 6)
If ther e ar e 2 or mor e pho ne
numbe rs , se lec t th e des ir e d n umbe r
i n th e lis t.
3 Check that the con necting screen is
displayed.
T o ca nce l a c a ll, se lec t “End ca ll” .
Calls can be made us ing the phone
book data of the connected cellular
phone. The phone book chan ges
depending on the phone connected.
1 Dis p lay the “Ph one” me nu scre en and
select “Phone b ook”. ( →P. 58)
2 Se le ct the de sired entry.
If ther e are 2 or more ph on e
num bers, s ele ct th e des ired numbe r in
th e lis t.
“Sea rch con tact” : Select to sear ch by
the contact’s name.
Se lec t to displ ay an d ed it the
en tr y in format ion. ( → P.6 6)
3 C heck that the conn ect ing scre en is
displayed.
T o c ance l a cal l, s e le ct “ E nd call”.
69
Page 70 of 164
2. PHONE OPERATION 2. PHONE OPERATION
INFORMATION
• When a pho ne is conn ecte d f or th e
f irst t ime , it s pho ne bo ok mus t be
d ownlo aded . If th e pho ne b oo k ca nno t
be downl oaded, a pop- up wi ndo w w ill
be di spl ayed.
• If th e con tac t do es no t hav e phon e
n umber st ore d, t h e en tr y w ill b e grayed
out .
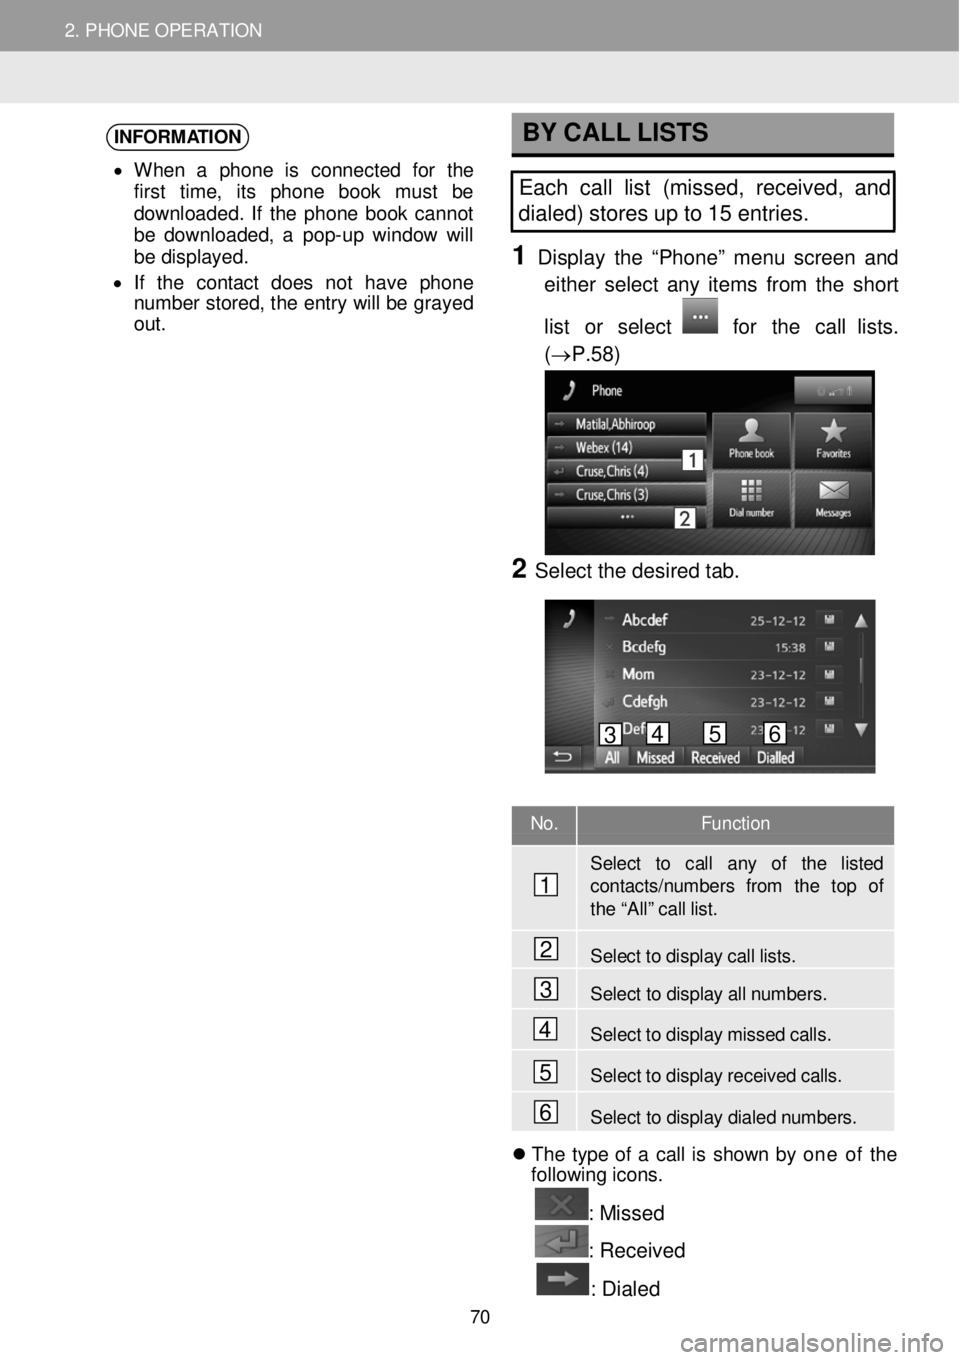
BY CALL L ISTS
Each call list (missed, re ceived, and
dialed) stor es u p to 15 entries.
1 D ispl ay the “Phone ” m enu scre en and
e ither s e lect an y it e m s fr om the short
list or select
for the call lists.
(→P. 58)
2 Se lect the de sired tab.
No. Function
Select to call any of the listed contacts/numbe rs from the top of th e “A ll” c all lis t.
Select to display call lists.
Select to display all n umbers.
Select to disp lay mi ssed calls.
Se lect to disp lay recei ved call s.
Select to display dialed numbers. Th e type of a c al l is s how n b y one of th e
fo llow in g ic ons.
: Missed
: R eceived
: Dialed
1
2
3
4
5
6
3 4 5 6
70