brake TOYOTA GR YARIS 2022 Repair Manual
[x] Cancel search | Manufacturer: TOYOTA, Model Year: 2022, Model line: GR YARIS, Model: TOYOTA GR YARIS 2022Pages: 470, PDF Size: 113.17 MB
Page 317 of 470
315
7
Owner's Manual_Europe_M52P63_en
7-2. Steps to take in an emergency
When trouble arises
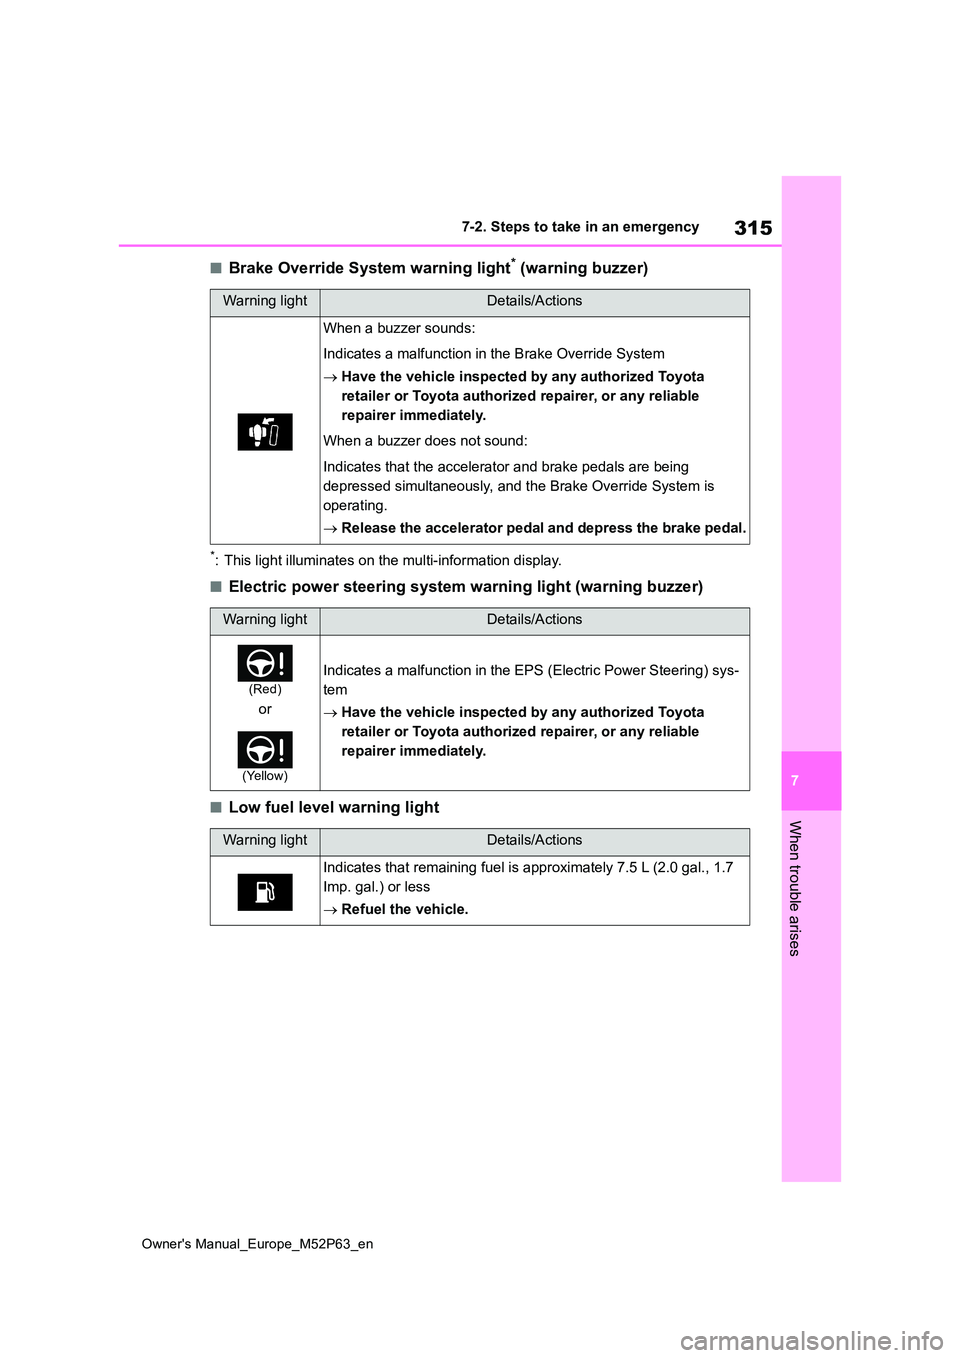
■Brake Override System warning light* (warning buzzer)
*: This light illuminates on the multi-information display.
■Electric power steering system warning light (warning buzzer)
■Low fuel level warning light
Warning lightDetails/Actions
When a buzzer sounds:
Indicates a malfunction in the Brake Override System
Have the vehicle inspected by any authorized Toyota
retailer or Toyota authorized repairer, or any reliable
repairer immediately.
When a buzzer does not sound:
Indicates that the accelerator and brake pedals are being
depressed simultaneously, and the Brake Override System is
operating.
Release the accelerator pedal and depress the brake pedal.
Warning lightDetails/Actions
(Red)
or
(Yellow)
Indicates a malfunction in the EPS (Electric Power Steering) sys-
tem
Have the vehicle inspected by any authorized Toyota
retailer or Toyota authorized repairer, or any reliable
repairer immediately.
Warning lightDetails/Actions
Indicates that remaining fuel is approximately 7.5 L (2.0 gal., 1.7
Imp. gal.) or less
Refuel the vehicle.
Page 322 of 470

320
Owner's Manual_Europe_M52P63_en
7-2. Steps to take in an emergency
ble.
■Electric power steering system
warning light (warning buzzer)
When the battery charge becomes insufficient or the voltage temporarily
drops, the electric power steering sys- tem warning light may come on and the warning buzzer may sound.
■When the tire pressure warning
light comes on
Inspect the tires to check if a tire is punctured.
If a tire is punctured: P. 3 2 3
If none of the tires are punctured: Turn the engine switch off then turn it to
ON. Check if the tire pressure warning light comes on or blinks.
If the tire pressure warning light blinks
for approximately 1 minute then stays on
There may be a malfunction in the tire
pressure warning system. Have the vehicle inspected by any authorized Toyota retailer or Toyota authorized
repairer, or any reliable repairer immedi- ately.
If the tire pressure warning light
comes on
1 After the temperature of the tires has lowered sufficiently, check the infla-tion pressure of each tire and adjust
them to the specified level.
2 If the warning light does not turn off even after several minutes have elapsed, check that the inflation
pressure of each tire is at the speci- fied level and perform initialization. ( P.280)
■The tire pressure warning light may
come on due to natural causes
The tire pressure warning light may come on due to natural causes such as
natural air leaks and tire inflation pres- sure changes caused by temperature. In this case, adjusting the tire inflation
pressure will turn off the warning light (after a few minutes).
■Conditions that the tire pressure
warning system may not function properly
P. 2 7 8
WARNING
■If both the ABS and the brake system warning lights remain on
Stop your vehicle in a safe place
immediately and contact any autho- rized Toyota retailer or Toyota autho-rized repairer, or any reliable repairer.
The vehicle will become extremely unstable during braking, and the ABS system may fail, which could cause
an accident resulting in death or seri- ous injury.
■When the electric power steer-ing system warning light comes on
When the light comes on yellow, the assist to the power steering is restricted. When the light comes on
red, the assist to the power steering is lost and handling operations of the steering wheel become extremely
heavy. When steering wheel operations are heavier than usual, grip the steering
wheel firmly and operate it using more force than usual.
■If the tire pressure warning light comes on
Be sure to observe the following pre-
cautions. Failure to do so could cause a loss of vehicle control and result in death or
serious injury.
●Stop your vehicle in a safe place as
soon as possible. Adjust the tire inflation pressure immediately.
●Avoid abrupt maneuvering and braking.If the vehicle tires deteriorate, you
could lose control of the steering wheel or the brakes.
Page 326 of 470
324
Owner's Manual_Europe_M52P63_en
7-2. Steps to take in an emergency
Stop the vehicle in a safe place
on a hard, flat surface.
Set the parking brake.
Shift the shift lever to N.
Stop the engine.
Turn on the emergency flashers.
( P.304)
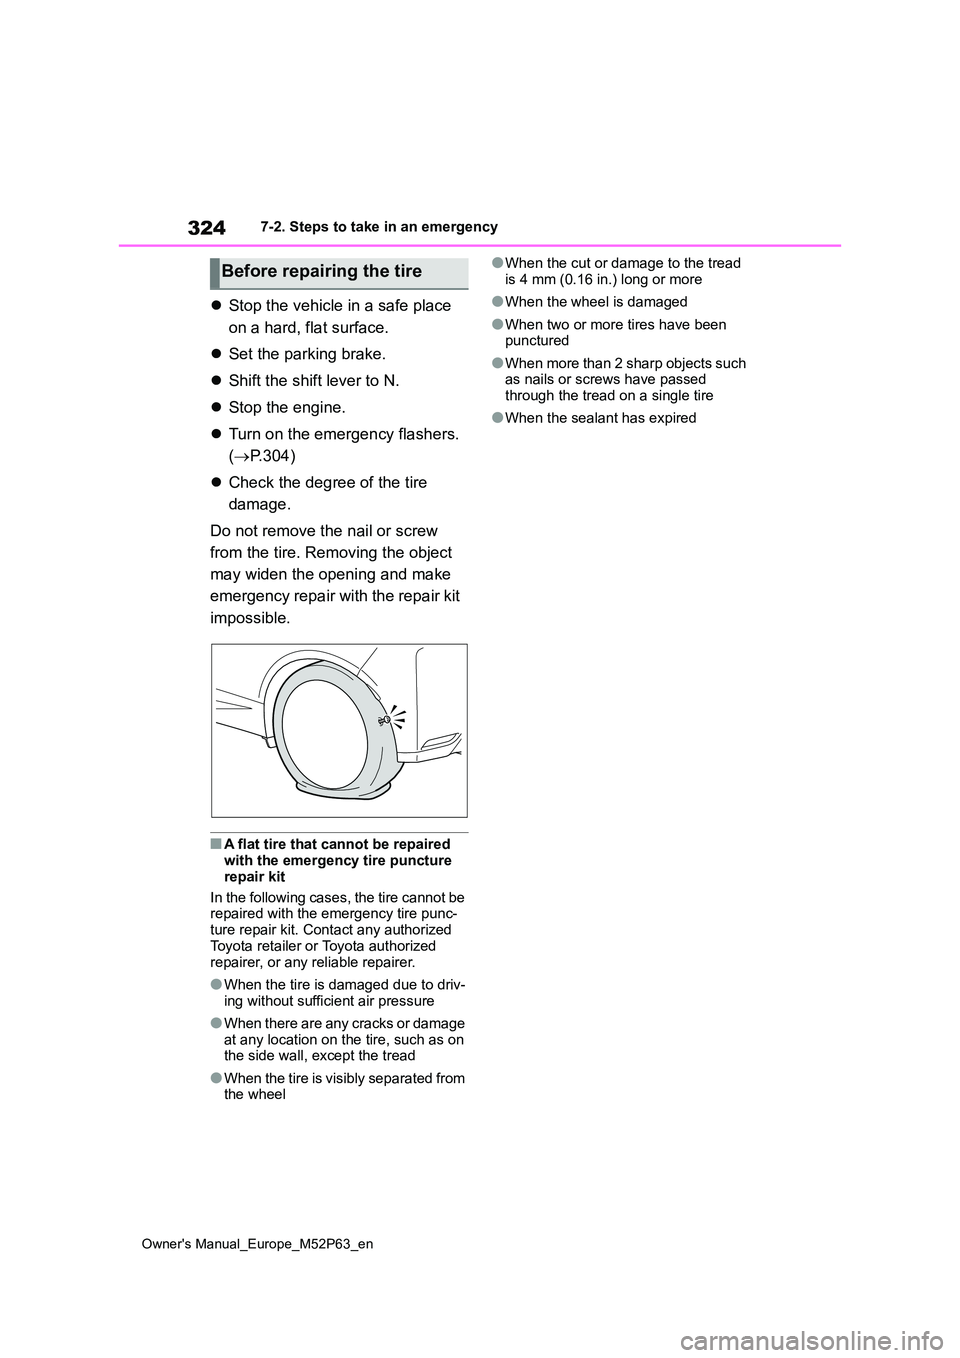
Check the degree of the tire
damage.
Do not remove the nail or screw
from the tire. Removing the object
may widen the opening and make
emergency repair with the repair kit
impossible.
■A flat tire that cannot be repaired with the emergency tire puncture
repair kit
In the following cases, the tire cannot be repaired with the emergency tire punc-
ture repair kit. Contact any authorized Toyota retailer or Toyota authorized
repairer, or any reliable repairer.
●When the tire is damaged due to driv-
ing without sufficient air pressure
●When there are any cracks or damage
at any location on the tire, such as on the side wall, except the tread
●When the tire is visibly separated from the wheel
●When the cut or damage to the tread
is 4 mm (0.16 in.) long or more
●When the wheel is damaged
●When two or more tires have been punctured
●When more than 2 sharp objects such as nails or screws have passed
through the tread on a single tire
●When the sealant has expired
Before repairing the tire
Page 335 of 470

333
7
Owner's Manual_Europe_M52P63_en
7-2. Steps to take in an emergency
When trouble arises
WARNING
●Do not touch the wheels or the area around the brakes immediately
after the vehicle has been driven. After the vehicle has been driven, the wheels and the area around the
brakes may be extremely hot. Touching these areas with hands, feet or other body parts may result
in burns.
●Connect the valve and hose
securely with the tire installed on the vehicle. If the hose is not prop-erly connected to the valve, air
leakage may occur as sealant may be sprayed out.
●If the hose comes off the valve while inflating the tire, there is a risk that the hose will move abruptly due
to air pressure.
●After inflation of the tire has com-
pleted, the sealant may splatter when the hose is disconnected or some air is let out of the tire.
●Follow the operation procedure to repair the tire. If the procedures not
followed, the sealant may spray out.
●Keep back from the tire while it is being repaired, as there is a chance of it bursting while the repair opera-
tion is being performed. If you notice any cracks or deformation of the tire, turn off the compressor
switch and stop the repair operation immediately.
●The repair kit may overheat if oper-ated for a long period of time. Do not operate the repair kit continu-
ously for more than 40 minutes.
●Parts of the repair kit become hot during operation. Be careful when handling the repair kit during and
after operation. Do not touch the metal part around the connecting area between the bottle and com-
pressor. It will be extremely hot.
●Do not attach the vehicle speed
warning sticker to an area other than the one indicated. If the sticker is attached to an area where an
SRS airbag is located, such as the pad of the steering wheel, it may prevent the SRS airbag from oper-
ating properly.
●To avoid risk of burst or severe
leakage, do not drop or damage the bottle. Visually inspect the bottle before use. Do not use a bottle with
shock, crack, scratch, leakage or any other damage. In such case, immediately replace.
■Driving to spread the liquid seal-ant evenly
Observe the following precautions to reduce the risk of accidents.Failing to do so may result in a loss of
vehicle control and cause death or serious injury.
●Drive the vehicle carefully at a low speed. Be especially careful when turning and cornering.
●If the vehicle does not drive straight or you feel a pull through the steer-
ing wheel, stop the vehicle and check the following.
• Tire condition. The tire may have separated from the wheel.
• Tire inflation pressure. If the tire inflation pressure is 130 kPa (1.3
kgf/cm2 or bar, 19 psi) or less, the
tire may be severely damaged.
Page 338 of 470
336
Owner's Manual_Europe_M52P63_en
7-2. Steps to take in an emergency
interim measure to start the engine
if the engine switch is functioning
normally.
Do not use this starting procedure
except in case of emergency.
1 Set the parking brake.
2 Check that the shift lever is in N.
3 Turn the engine switch to ACC.
4 Press and hold the engine
switch for about 15 seconds
while depressing the clutch
pedal firmly.
Even if the engine can be started using
the above steps, the system may be
malfunctioning. Have the vehicle
inspected by any authorized Toyota
retailer or Toyota authorized repairer, or
any reliable repairer.
If you lose your keys
New genuine keys can be
made by any authorized Toyota
retailer or Toyota authorized
repairer, or any reliable
repairer using the other
mechanical key and the key
number stamped on your key
number plate.
Keep the plate in a safe place
such as your wallet, not in the
vehicle.
NOTICE
■When an electronic key is lost
If the electronic key remains lost, the
risk of vehicle theft increases signifi- cantly. Visit any authorized Toyota retailer or Toyota authorized repairer,
or any reliable repairer immediately with all remaining electronic keys that were provided with your vehicle.
Page 348 of 470
346
Owner's Manual_Europe_M52P63_en
7-2. Steps to take in an emergency
1Stop the engine. Set the parking
brake and shift the shift lever to
N.
2 Remove the mud, snow or sand
from around the front wheels.
3 Place wood, stones or some
other material under the front
wheels to help provide traction.
4 Restart the engine.
5 Shift the shift lever to 1 or R and
release the parking brake. Then,
while exercising caution,
depress the accelerator pedal.
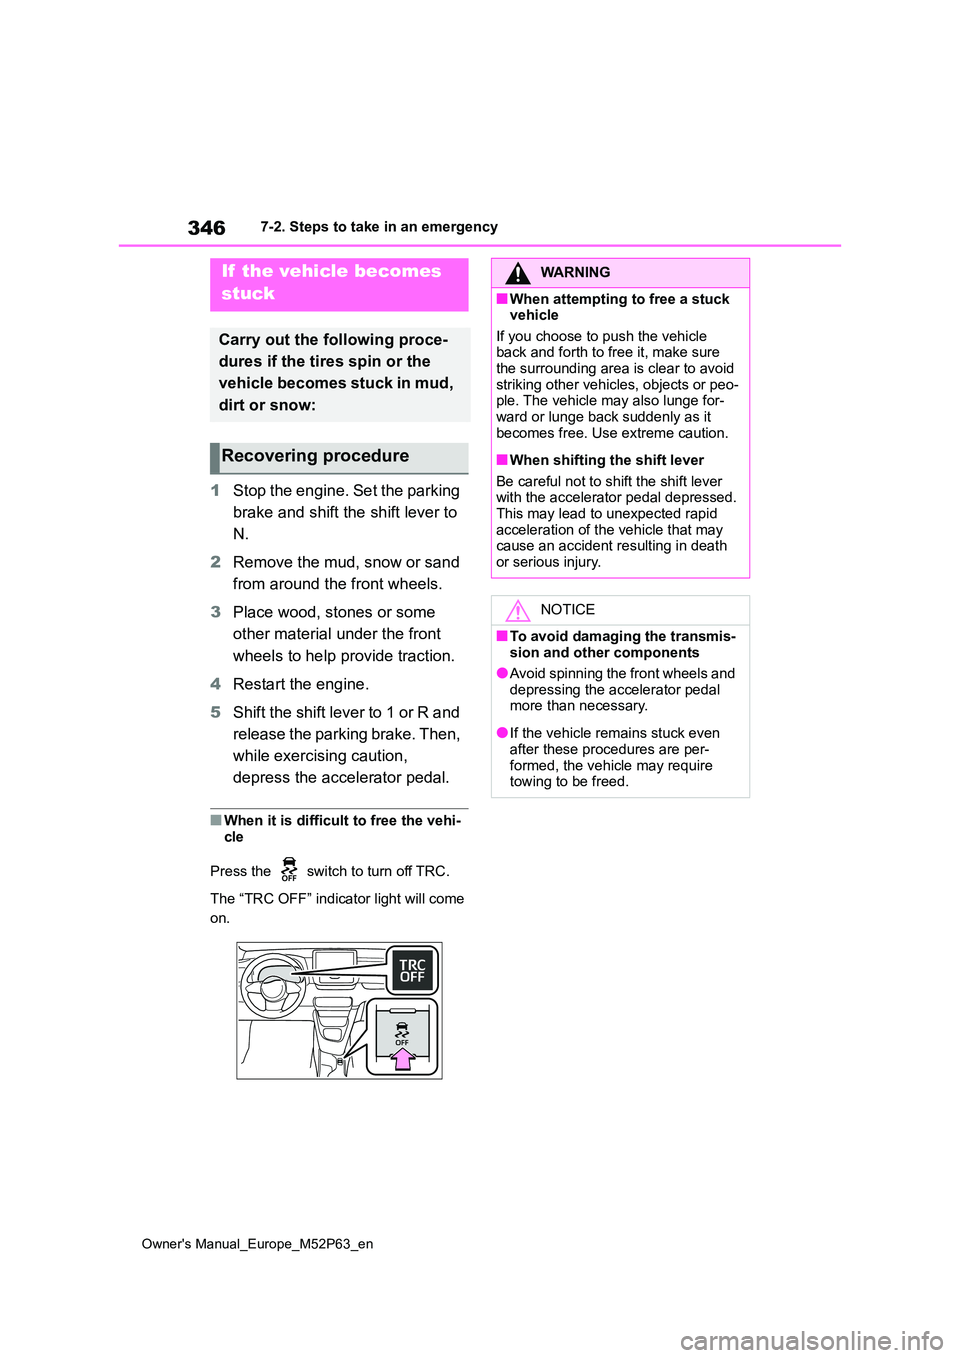
■When it is difficult to free the vehi-
cle
Press the switch to turn off TRC.
The “TRC OFF” indicator light will come
on.
If the vehicle becomes
stuck
Carry out the following proce-
dures if the tires spin or the
vehicle becomes stuck in mud,
dirt or snow:
Recovering procedure
WARNING
■When attempting to free a stuck vehicle
If you choose to push the vehicle back and forth to free it, make sure the surrounding area is clear to avoid
striking other vehicles, objects or peo- ple. The vehicle may also lunge for-ward or lunge back suddenly as it
becomes free. Use extreme caution.
■When shifting the shift lever
Be careful not to shift the shift lever with the accelerator pedal depressed.This may lead to unexpected rapid
acceleration of the vehicle that may cause an accident resulting in death or serious injury.
NOTICE
■To avoid damaging the transmis-sion and other components
●Avoid spinning the front wheels and depressing the accelerator pedal more than necessary.
●If the vehicle remains stuck even
after these procedures are per- formed, the vehicle may require towing to be freed.
Page 355 of 470

353
8
Owner's Manual_Europe_M52P63_en
8-1. Specifications
Vehicle specifications
*: If a fluid type with “TOYOTA GENUINE BRAKE FLUID DOT4, CLASS6”, FMVSS
No.116 DOT4 or SAE J1704LV is not available, fluid type with TO YOTA GENU-
INE BRAKE FLUID DOT3, FMVSS No.116 DOT3 or SAE J1703 may be used
with no detriment to brake durability.
Your Toyota vehicle is filled with “Toyota Genuine Differential Gear Oil” at
the factory.
Use Toyota approved “Toyota Genuine Differential Gear Oil” or a n equiva-
lent of matching quality to satisfy the above specification. Pl ease contact
any authorized Toyota retailer or Toyota authorized repairer, o r any reliable
repairer for further details.
NOTICE
●Your Toyota vehicle is filled with “TOYOTA Genuine Manual Trans mission Gear Oil LV GL-4 75W” at the factory.
Use Toyota approved “TOYOTA Genuine Manual Transmission Gear Oi l LV GL- 4 75W” or an equivalent oil of matching quality that satisfies the above specifica- tions.
Please contact any authorized Toyota retailer or Toyota authori zed repairer, or any reliable repairer for further details.
Clutch (Manual transmission)
Pedal free play3 15 mm (0.1 0.6 in.)
Fluid type
“TOYOTA GENUINE BRAKE FLUID DOT4,
CLASS6”*, FMVSS No.116 DOT4 or SAE
J1704LV*
Transfer
Oil capacity0.45 L (0.48 qt., 0.40 Imp.qt.)
Oil type and viscosityToyota Genuine Differential gear oil LT 75W-85
GL-5 or equivalent
NOTICE
■Transfer oil type precaution
Using transfer oil other than the specified oil may cause abnor mal noise or vibra- tion, or damage the transfer of your vehicle.
Page 356 of 470
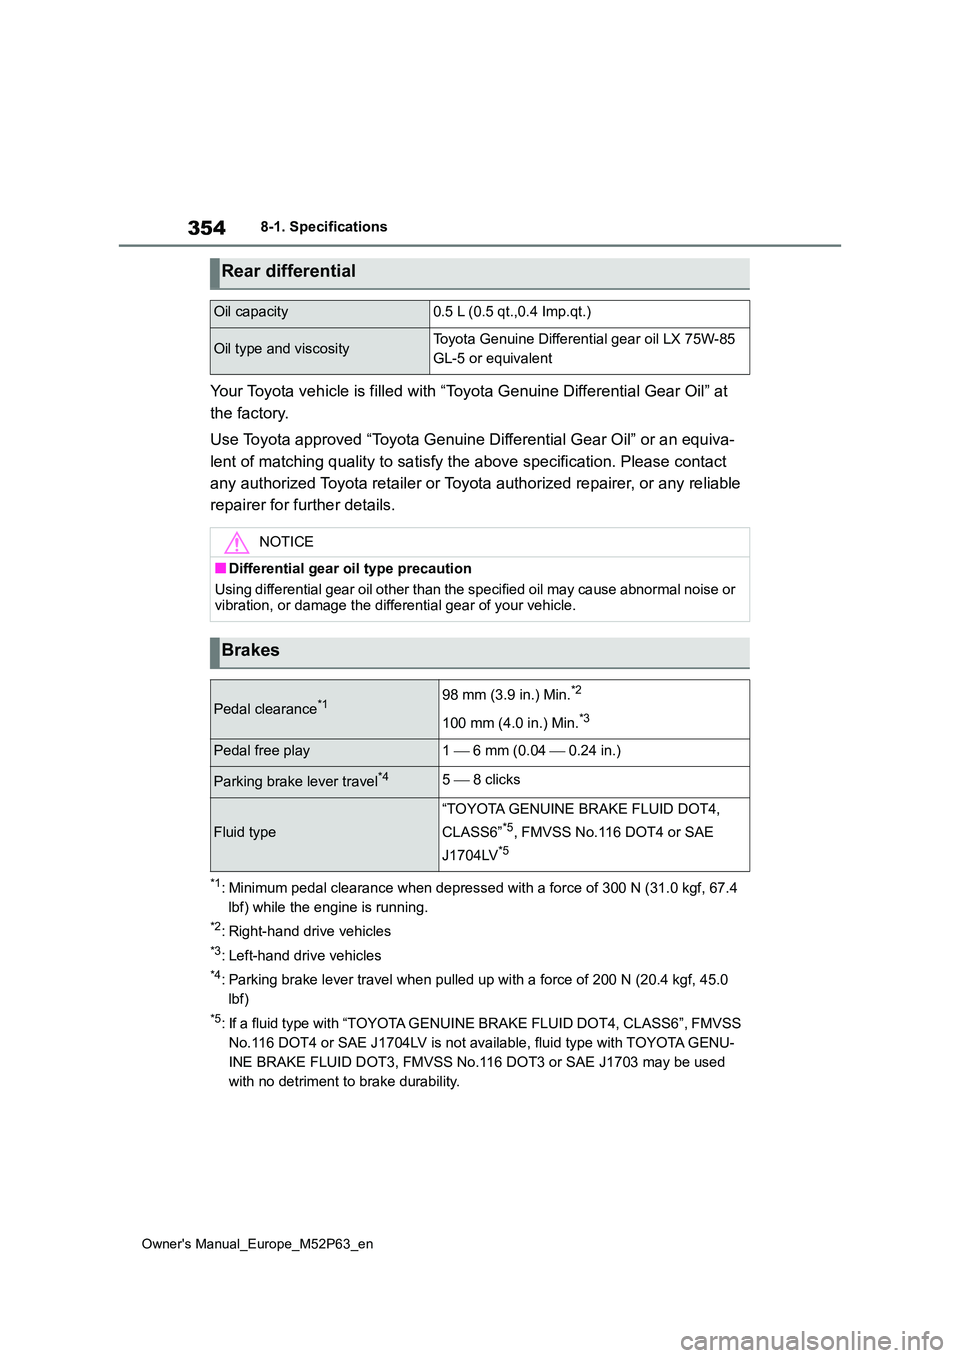
354
Owner's Manual_Europe_M52P63_en
8-1. Specifications
Your Toyota vehicle is filled with “Toyota Genuine Differential Gear Oil” at
the factory.
Use Toyota approved “Toyota Genuine Differential Gear Oil” or a n equiva-
lent of matching quality to satisfy the above specification. Pl ease contact
any authorized Toyota retailer or Toyota authorized repairer, o r any reliable
repairer for further details.
*1: Minimum pedal clearance when depressed with a force of 300 N ( 31.0 kgf, 67.4
lbf) while the engine is running.
*2: Right-hand drive vehicles
*3: Left-hand drive vehicles
*4: Parking brake lever travel when pulled up with a force of 200 N (20.4 kgf, 45.0
lbf)
*5: If a fluid type with “TOYOTA GENUINE BRAKE FLUID DOT4, CLASS6” , FMVSS
No.116 DOT4 or SAE J1704LV is not available, fluid type with TO YOTA GENU-
INE BRAKE FLUID DOT3, FMVSS No.116 DOT3 or SAE J1703 may be use d
with no detriment to brake durability.
Rear differential
Oil capacity0.5 L (0.5 qt.,0.4 Imp.qt.)
Oil type and viscosityToyota Genuine Differential gear oil LX 75W-85
GL-5 or equivalent
NOTICE
■Differential gear oil type precaution
Using differential gear oil other than the specified oil may ca use abnormal noise or vibration, or damage the differential gear of your vehicle.
Brakes
Pedal clearance*198 mm (3.9 in.) Min.*2
100 mm (4.0 in.) Min.*3
Pedal free play1 6 mm (0.04 0.24 in.)
Parking brake lever travel*45 8 clicks
Fluid type
“TOYOTA GENUINE BRAKE FLUID DOT4,
CLASS6”*5, FMVSS No.116 DOT4 or SAE
J1704LV*5
Page 455 of 470

453
Owner's Manual_Europe_M52P63_en
What to do if... (Troubleshooting)
Is the window lock switch
pressed?
The power window except for the one
at the driver’s seat cannot be operated
if the window lock switch is pressed.
( P. 1 2 4)
The auto power off function will
be operated if the vehicle is left
in ACC or ON (the engine is not
running) for a period of time.
( P.136)
The seat belt reminder light is
flashing
Are the driver and the passenger wear-
ing the seat belts? ( P.316)
The parking brake indicator is on
Is the parking brake released?
( P. 1 4 1)
Depending on the situation, other
types of warning buzzer may also
sound. ( P.313, 321)
Did anyone inside the vehicle
open a door or anything move
inside the vehicle during setting
the alarm?
The sensor detects it and the alarm
sounds. ( P. 7 2)
Do one of the following to deacti-
vate or stop the alarms:
Unlock the doors using the entry
function or wireless remote con-
trol.
Starting the engine. (The alarm
will be deactivated or stopped
after a few seconds.)
Is the electronic key left inside
the vehicle?
Check the message on the multi-infor-
mation display. ( P.321)
When a warning light turns on or
a warning message is displayed,
refer to P.313, 321.
Stop the vehicle in a safe place
and repair the flat tire temporarily
with the emergency tire puncture
The windows do not open or
close by operating the
power window switches
The engine switch is turned
off automatically
A warning buzzer sounds
during driving
An alarm is activated and the
horn sounds (vehicles with
an alarm)
A warning buzzer sounds
when leaving the vehicle
A warning light turns on or a
warning message is dis-
played
When a problem has
occurred
If you have a flat tire
Page 457 of 470

455
Owner's Manual_Europe_M52P63_en
Alphabetical Index
Alphabetical Index
A
A/C
Air conditioning filter................... 291
Automatic air conditioning system
................................................. 228
ABS (Anti-lock Brake System) .... 217
Warning light .............................. 314
Active Torque Split AWD system 218
Air conditioning filter ................... 291
Air conditioning system
Air conditioning filter................... 291
Automatic air conditioning system
................................................. 228
Airbag manual on-off system ........ 43
Airbags ............................................ 34
Airbag manual on-off system ....... 43
Airbag operating conditions ......... 36
Airbag precautions for your child . 38
Correct driving posture................. 29
Curtain shield airbag operating con-
ditions ........................................ 36
Curtain shield airbag precautions 38
General airbag precautions.......... 38
Locations of airbags ..................... 34
Modification and disposal of airbags
................................................... 41
Side airbag operating conditions.. 36
Side airbag precautions ............... 38
Side and curtain shield airbags oper-
ating conditions.......................... 36
Side and curtain shield airbags pre-
cautions ..................................... 38
SRS airbags ................................. 34
SRS warning light ...................... 314
Alarm ............................................... 72
Alarm............................................ 72
Warning buzzer .......................... 313
Antennas (smart entry & start sys-
tem).............................................. 107
Anti-lock Brake System (ABS) .... 217
Warning light .............................. 314
Approach warning ........................ 185
Assist grips ...................................243
Audio remote control switches ... 243
Audio system-linked display ......... 87
Automatic air conditioning system
..................................................... 228
Automatic High Beam ..................145
Automatic light control system ... 142
Average fuel economy ................... 86
Average vehicle speed ................... 87
B
Back door ...................................... 104
Back-up light
Replacing light bulbs ..................299
Battery
Battery checking......................... 273
If the battery is discharged ......... 339
Preparing and checking before win-
ter ............................................. 224
Warning light .............................. 313
Blind Spot Monitor (BSM) ............199
Enabling/disabling the Blind Spot
Monitor ..................................... 201
Boost Meter .....................................88
Bottle holders................................ 238
Brake
Emergency brake signal............. 218
Fluid ........................................... 354
Parking brake .............................141
Warning light .............................. 313
Brake assist...................................217
Break-in tips .................................. 127
Brightness control
Instrument panel light control ....... 84
BSM (Blind Spot Monitor) ............199
Enabling/disabling the Blind Spot
Monitor ..................................... 201