charging TOYOTA GR86 2022 Owners Manual (in English)
[x] Cancel search | Manufacturer: TOYOTA, Model Year: 2022, Model line: GR86, Model: TOYOTA GR86 2022Pages: 582, PDF Size: 86.38 MB
Page 86 of 582
842-1. Instrument cluster
2-1.Instrument cluster
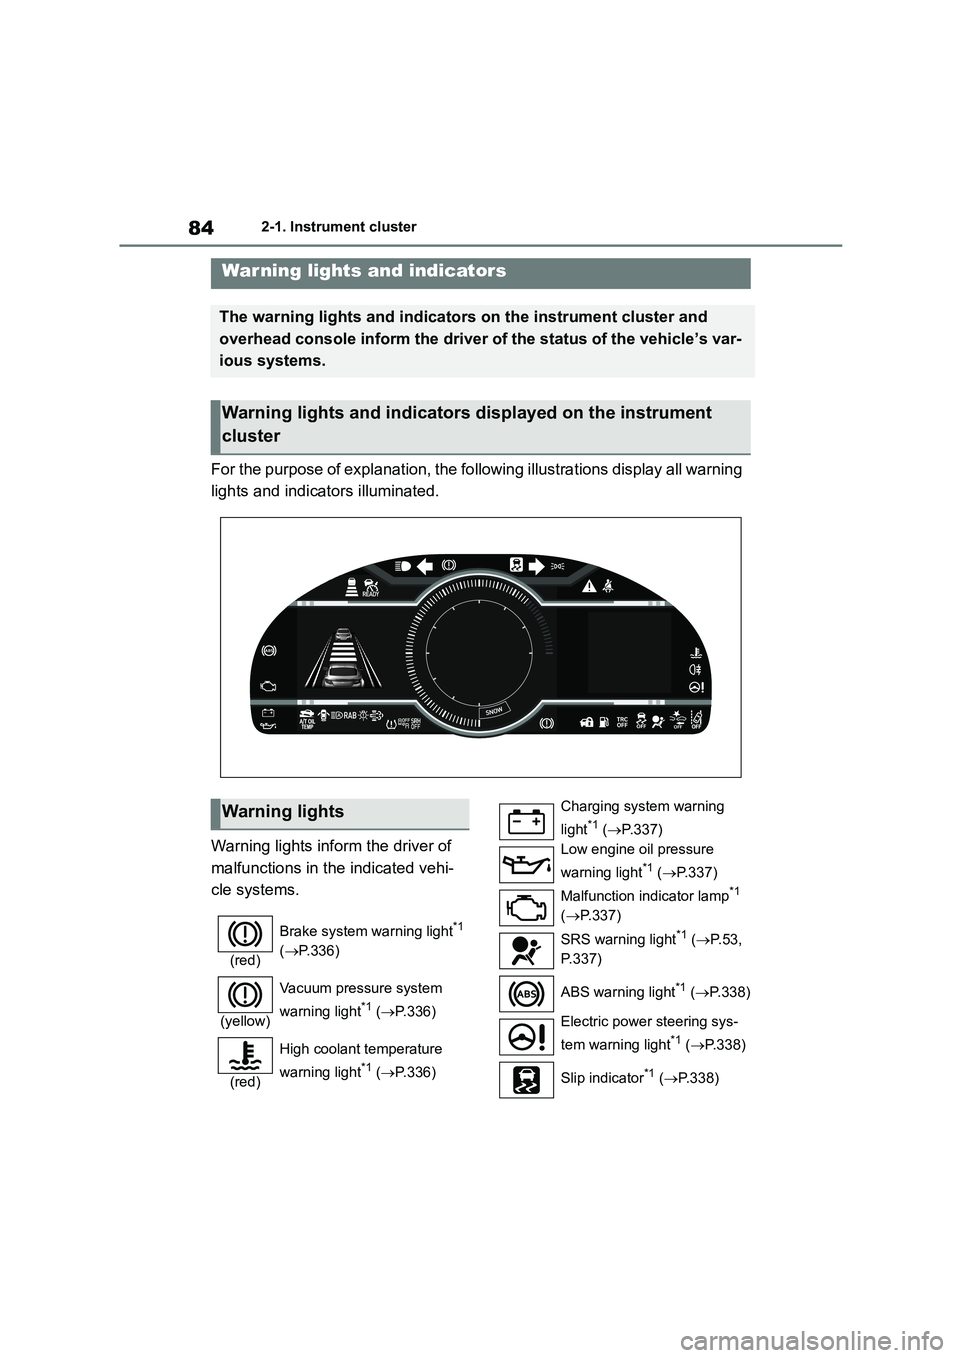
For the purpose of explanation, the following illustrations display all warning
lights and indicators illuminated.
Warning lights inform the driver of
malfunctions in the indicated vehi-
cle systems.
War ning lights and indicators
The warning lights and indicators on the instrument cluster and
overhead console inform the driver of the status of the vehicle’s var-
ious systems.
Warning lights and indicators displayed on the instrument
cluster
Warning lights
(red)
Brake system warning light*1
( P.336)
(yellow)
Vacuum pressure system
warning light*1 ( P.336)
(red)
High coolant temperature
warning light*1 ( P.336)
Charging system warning
light*1 ( P.337)
Low engine oil pressure
warning light*1 ( P.337)
Malfunction indicator lamp*1
( P.337)
SRS warning light*1 ( P. 5 3 ,
P.337)
ABS warning light*1 ( P.338)
Electric power steering sys-
tem warning light*1 ( P.338)
Slip indicator*1 ( P.338)
Page 102 of 582
1003-1. Key information
3-1.Key information
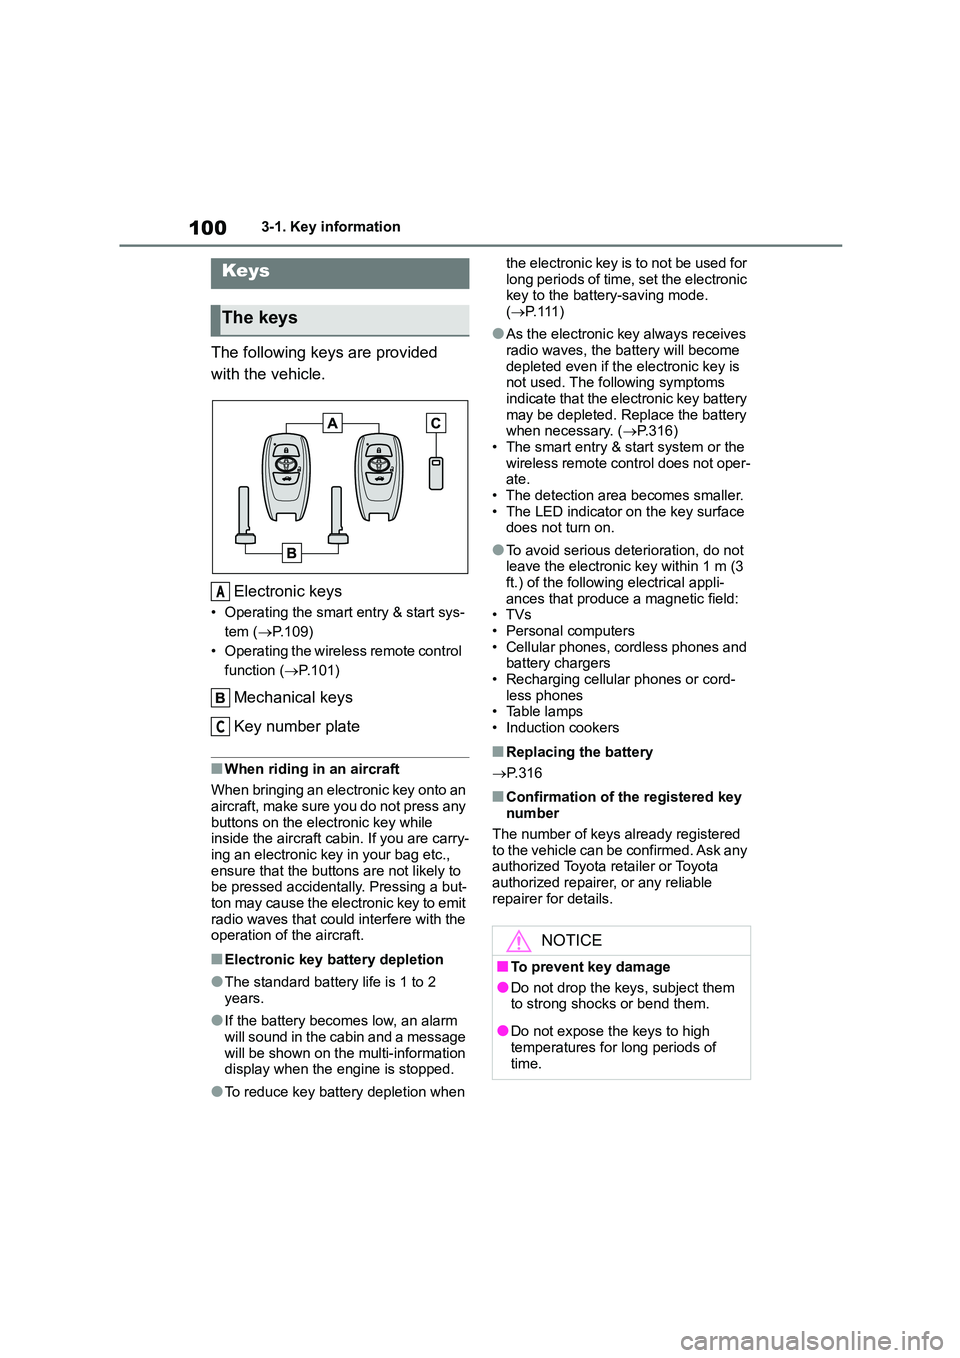
The following keys are provided
with the vehicle.
Electronic keys
• Operating the smart entry & start sys-
tem ( P.109)
• Operating the wireless remote control
function ( P.101)
Mechanical keys
Key number plate
■When riding in an aircraft
When bringing an electronic key onto an
aircraft, make sure you do not press any
buttons on the electronic key while inside the aircraft cabin. If you are carry-
ing an electronic key in your bag etc.,
ensure that the buttons are not likely to be pressed accidentally. Pressing a but-
ton may cause the electronic key to emit
radio waves that could interfere with the operation of the aircraft.
■Electronic key battery depletion
●The standard battery life is 1 to 2 years.
●If the battery becomes low, an alarm
will sound in the cabin and a message will be shown on the multi-information
display when the engine is stopped.
●To reduce key battery depletion when
the electronic key is to not be used for
long periods of time, set the electronic key to the battery-saving mode.
( P. 111 )
●As the electronic key always receives
radio waves, the battery will become
depleted even if the electronic key is not used. The following symptoms
indicate that the electronic key battery
may be depleted. Replace the battery when necessary. ( P.316)
• The smart entry & start system or the
wireless remote control does not oper- ate.
• The detection area becomes smaller.
• The LED indicator on the key surface does not turn on.
●To avoid serious deterioration, do not leave the electronic key within 1 m (3
ft.) of the following electrical appli-
ances that produce a magnetic field: •TVs
• Personal computers
• Cellular phones, cordless phones and battery chargers
• Recharging cellular phones or cord-
less phones • Table lamps
• Induction cookers
■Replacing the battery
P. 3 1 6
■Confirmation of the registered key number
The number of keys already registered
to the vehicle can be confirmed. Ask any authorized Toyota retailer or Toyota
authorized repairer, or any reliable
repairer for details.
Keys
The keys
A
C
NOTICE
■To prevent key damage
●Do not drop the keys, subject them
to strong shocks or bend them.
●Do not expose the keys to high
temperatures for long periods of
time.
Page 146 of 582
1444-2. Driving procedures
authorized repairer, or any reliable
repairer.
■When driving with Adaptive Cruise Control or Conventional Cruise
Control activated
Downshifting can be performed even when using Adaptive Cruise Control or
Conventional Cruise Control. After
downshifting, the set speed continues. ( P.145, 146)
■Automatic gear selection when the
vehicle is stopped
When the vehicle is idling at high rpm in order to warm up, and the vehicle is on a
slippery road, the transmission may
automatically shift to 2nd gear for stop- ping and starting off.
■AI-SHIFT
●The AI-SHIFT automatically selects the suitable gear according to driver
performance and driving conditions.
The AI-SHIFT automatically operates when the shift lever is in D. (Shifting
the shift lever to the M position can-
cels the function.)
●G AI-SHIFT automatically selects a
suitable gear for sporty driving accord- ing to driver’s input and driving condi-
tions. G AI-SHIFT operates
automatically when the shift lever is in D and sport mode is selected for the
driving mode. (Selecting normal mode
with the driving mode select switch or shifting the shift lever to the M position
cancels this function.)
■After recharging/reconnecting the
battery
P.361
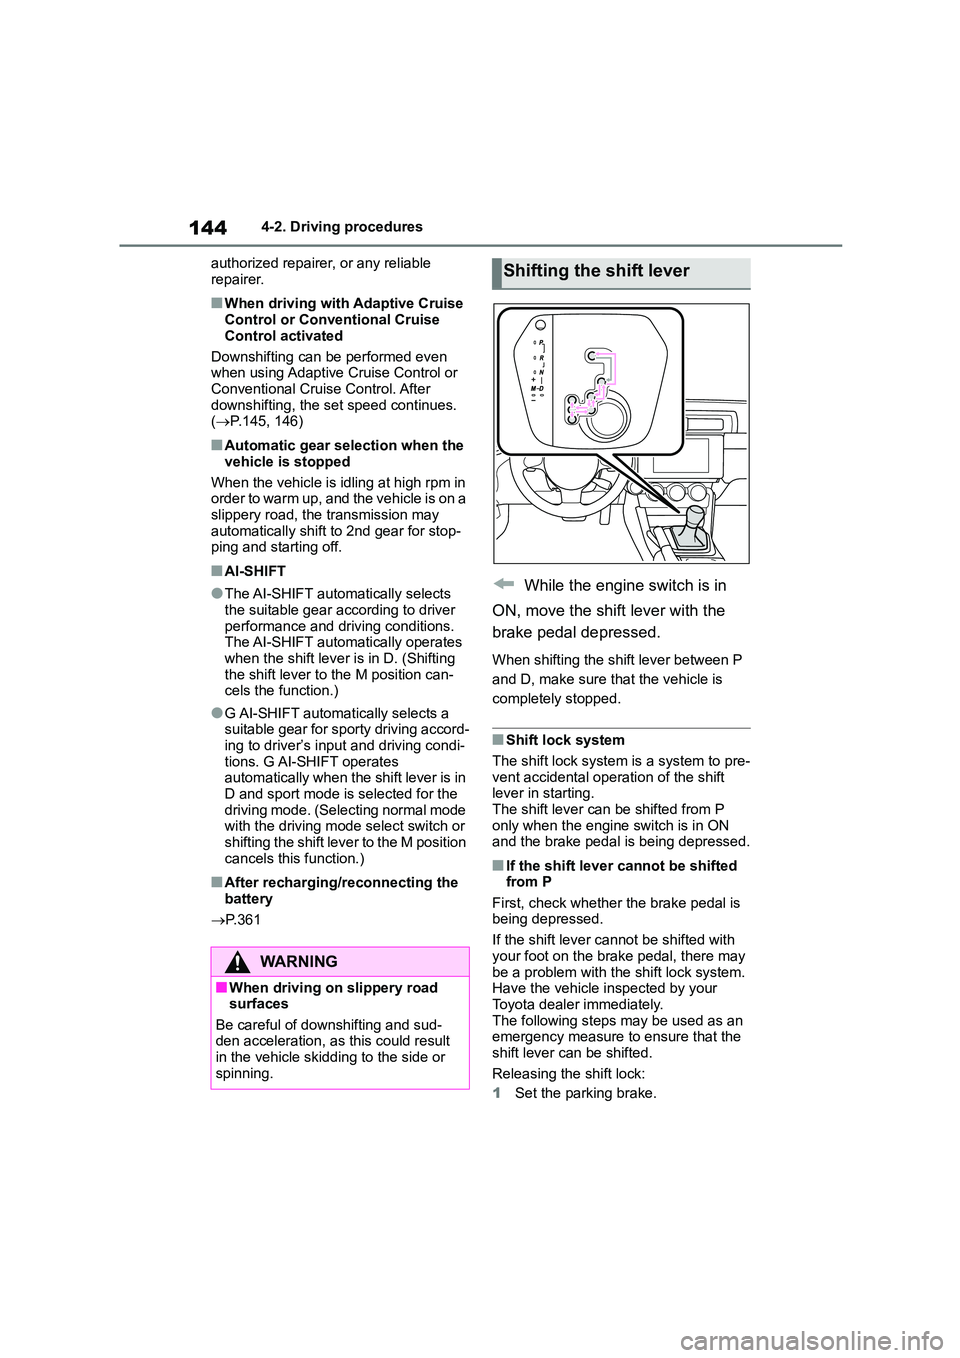
While the engine switch is in
ON, move the shift lever with the
brake pedal depressed.
When shifting the shift lever between P
and D, make sure that the vehicle is
completely stopped.
■Shift lock system
The shift lock system is a system to pre-
vent accidental operation of the shift
lever in starting. The shift lever can be shifted from P
only when the engine switch is in ON
and the brake pedal is being depressed.
■If the shift lever cannot be shifted from P
First, check whether the brake pedal is
being depressed.
If the shift lever cannot be shifted with
your foot on the brake pedal, there may
be a problem with the shift lock system. Have the vehicle inspected by your
Toyota dealer immediately.
The following steps may be used as an emergency measure to ensure that the
shift lever can be shifted.
Releasing the shift lock:
1 Set the parking brake.
WA R N I N G
■When driving on slippery road
surfaces
Be careful of downshifting and sud- den acceleration, as this could result
in the vehicle skidding to the side or
spinning.
Shifting the shift lever
Page 156 of 582
1544-3. Operating the lights and wipers
To turn the lights on again, turn the
engine switch to ON, or turn the light
switch off once and then back to or
.
■Light reminder buzzer
A buzzer sounds when the engine switch is turned off and the driver’s door
is opened while the lights are turned on.
■Automatic headlight leveling sys-
tem
The level of the headlights is automati-
cally adjusted according to the number
of passengers and the loading condition of the vehicle to ensure that the head-
lights do not interfere with other road
users.
■Windshield wiper linked headlight illumination
When driving during daytime with the
headlight switch turned to , if the
windshield wipers are used, the head-
lights will turn on automatically after sev-
eral seconds to help enhance the visibility of your vehicle.
■Battery-saving function
In order to prevent the battery of the
vehicle from discharging, if the light
switch is in the or position when
the engine switch is turned off the bat-
tery saving function will operate and
automatically turn off all the lights after approximately 20 minutes.
When any of the following are per-
formed, the battery-saving function will be disabled.
●When the engine switch is turned to ACC or ON
●When the headlight switch is in the
position
●When a door is opened or closed
■Welcome light illumination control
The headlights and tail lights automati- cally turn on at night when the doors are
unlocked using the wireless remote con-
trol if the light switch is in the posi-
tion. The headlights and tail lights will turn off automatically after approxi-
mately 30 seconds.
■Customization
Some functions can be customized. ( P.377)
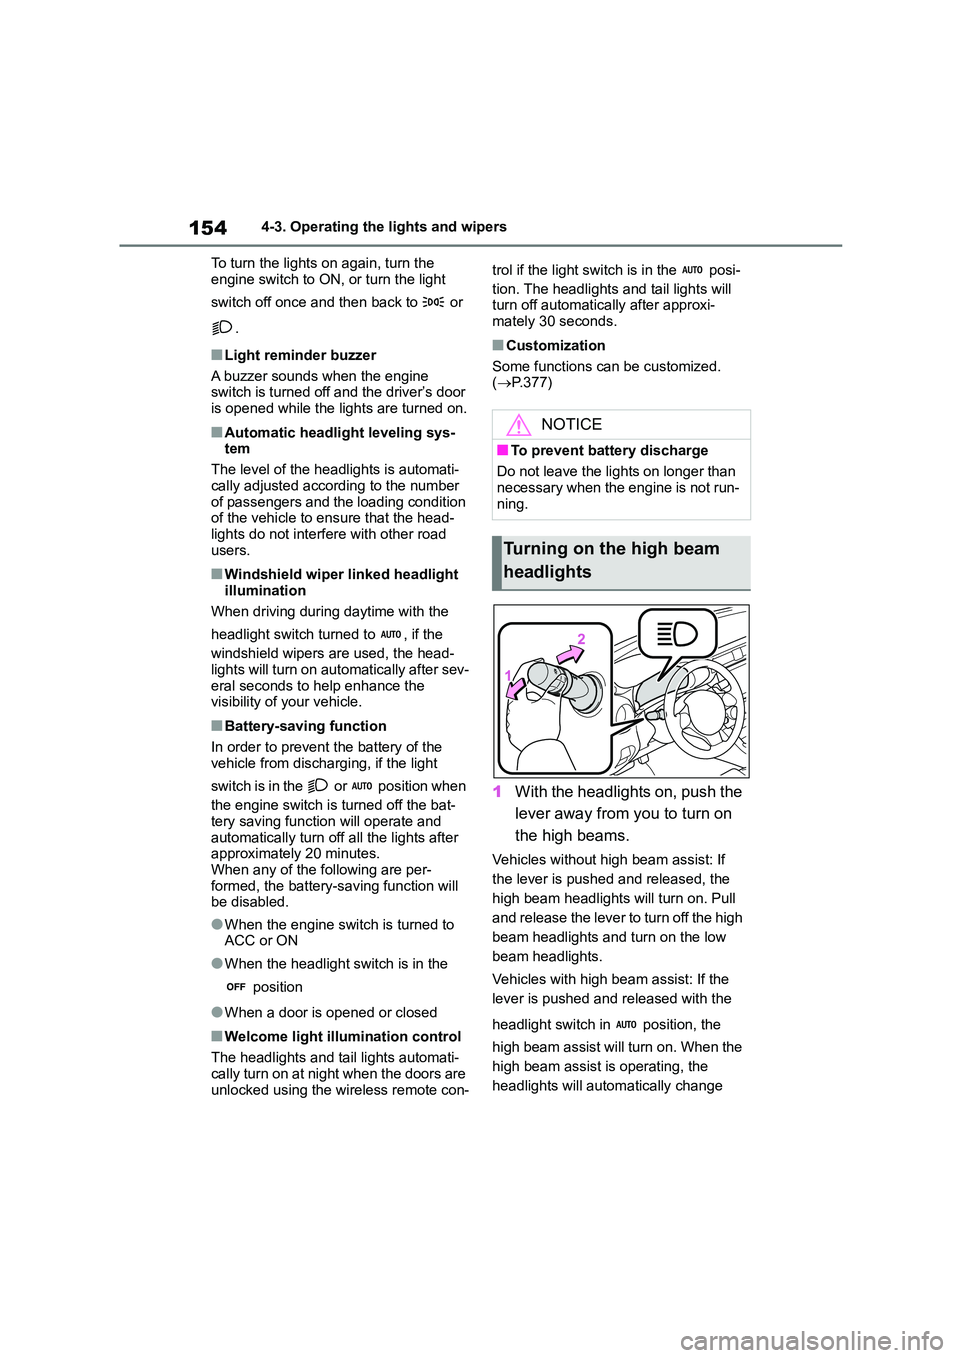
1With the headlights on, push the
lever away from you to turn on
the high beams.
Vehicles without high beam assist: If
the lever is pushed and released, the
high beam headlights will turn on. Pull
and release the lever to turn off the high
beam headlights and turn on the low
beam headlights.
Vehicles with high beam assist: If the
lever is pushed and released with the
headlight switch in position, the
high beam assist will turn on. When the
high beam assist is operating, the
headlights will automatically change
NOTICE
■To prevent battery discharge
Do not leave the lights on longer than
necessary when the engine is not run- ning.
Turning on the high beam
headlights
Page 279 of 582
277
5
5-4. Using the other interior features
Interior features
5-4.Using the other interior features
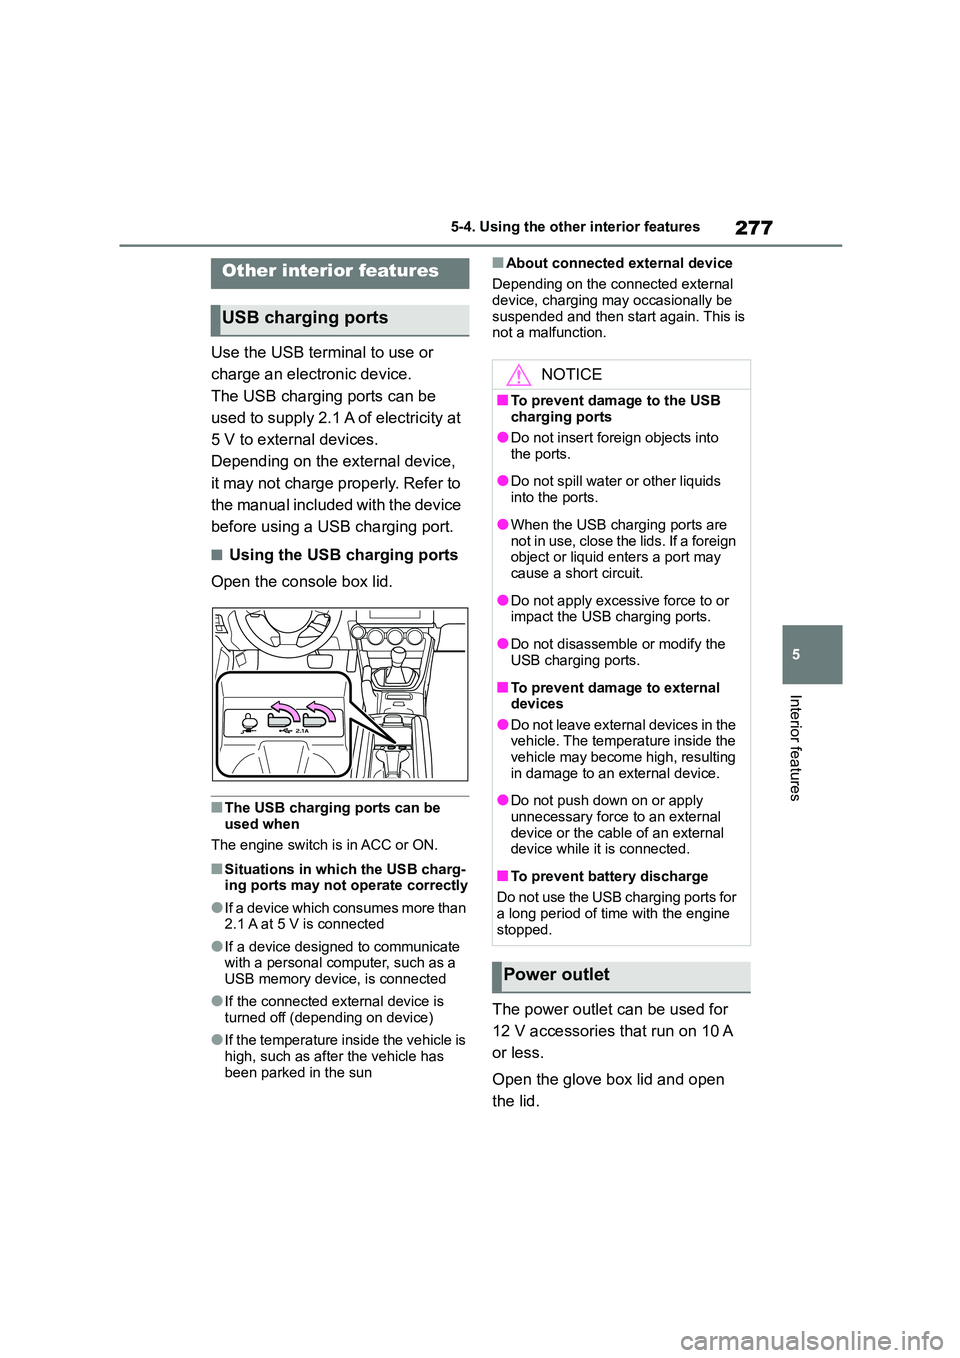
Use the USB terminal to use or
charge an electronic device.
The USB charging ports can be
used to supply 2.1 A of electricity at
5 V to external devices.
Depending on the external device,
it may not charge properly. Refer to
the manual included with the device
before using a USB charging port.
■Using the USB charging ports
Open the console box lid.
■The USB charging ports can be used when
The engine switch is in ACC or ON.
■Situations in which the USB charg-
ing ports may not operate correctly
●If a device which consumes more than
2.1 A at 5 V is connected
●If a device designed to communicate
with a personal computer, such as a
USB memory device, is connected
●If the connected external device is
turned off (depending on device)
●If the temperature inside the vehicle is
high, such as after the vehicle has been parked in the sun
■About connected external device
Depending on the connected external device, charging may occasionally be
suspended and then start again. This is
not a malfunction.
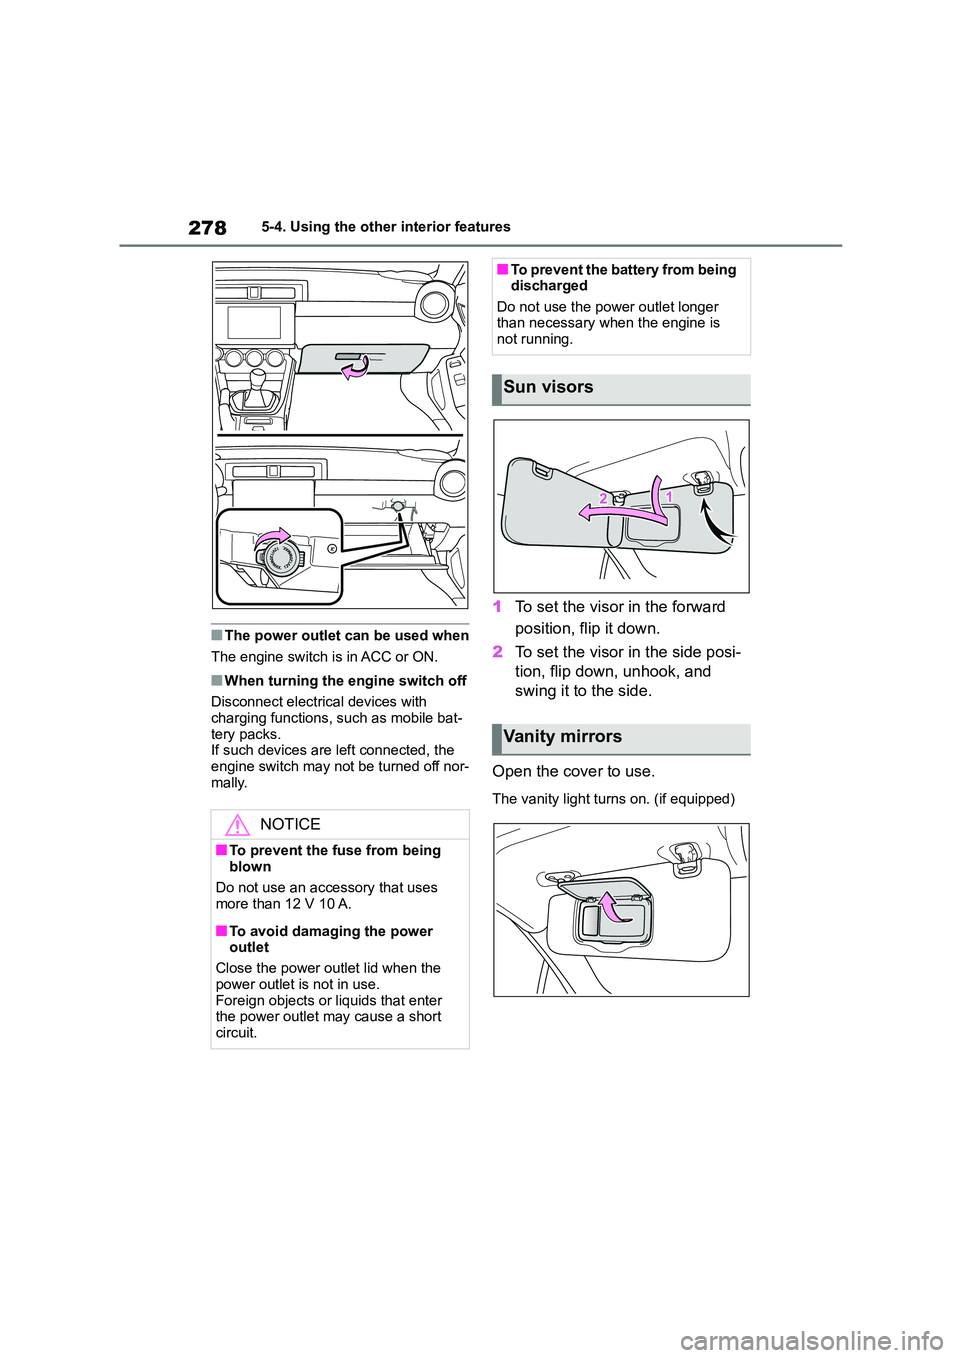
The power outlet can be used for
12 V accessories that run on 10 A
or less.
Open the glove box lid and open
the lid.
Other interior features
USB charging ports
NOTICE
■To prevent damage to the USB
charging ports
●Do not insert foreign objects into
the ports.
●Do not spill water or other liquids
into the ports.
●When the USB charging ports are
not in use, close the lids. If a foreign object or liquid enters a port may
cause a short circuit.
●Do not apply excessive force to or
impact the USB charging ports.
●Do not disassemble or modify the
USB charging ports.
■To prevent damage to external
devices
●Do not leave external devices in the vehicle. The temperature inside the
vehicle may become high, resulting
in damage to an external device.
●Do not push down on or apply
unnecessary force to an external device or the cable of an external
device while it is connected.
■To prevent battery discharge
Do not use the USB charging ports for
a long period of time with the engine stopped.
Power outlet
Page 280 of 582
2785-4. Using the other interior features
■The power outlet can be used when
The engine switch is in ACC or ON.
■When turning the engine switch off
Disconnect electrical devices with
charging functions, such as mobile bat-
tery packs. If such devices are left connected, the
engine switch may not be turned off nor-
mally.
1 To set the visor in the forward
position, flip it down.
2 To set the visor in the side posi-
tion, flip down, unhook, and
swing it to the side.
Open the cover to use.
The vanity light turns on. (if equipped)
NOTICE
■To prevent the fuse from being blown
Do not use an accessory that uses
more than 12 V 10 A.
■To avoid damaging the power
outlet
Close the power outlet lid when the
power outlet is not in use.
Foreign objects or liquids that enter the power outlet may cause a short
circuit.
■To prevent the battery from being discharged
Do not use the power outlet longer
than necessary when the engine is not running.
Sun visors
Vanity mirrors
Page 301 of 582
299
6
6-3. Do-it-yourself maintenance
Maintenance and care
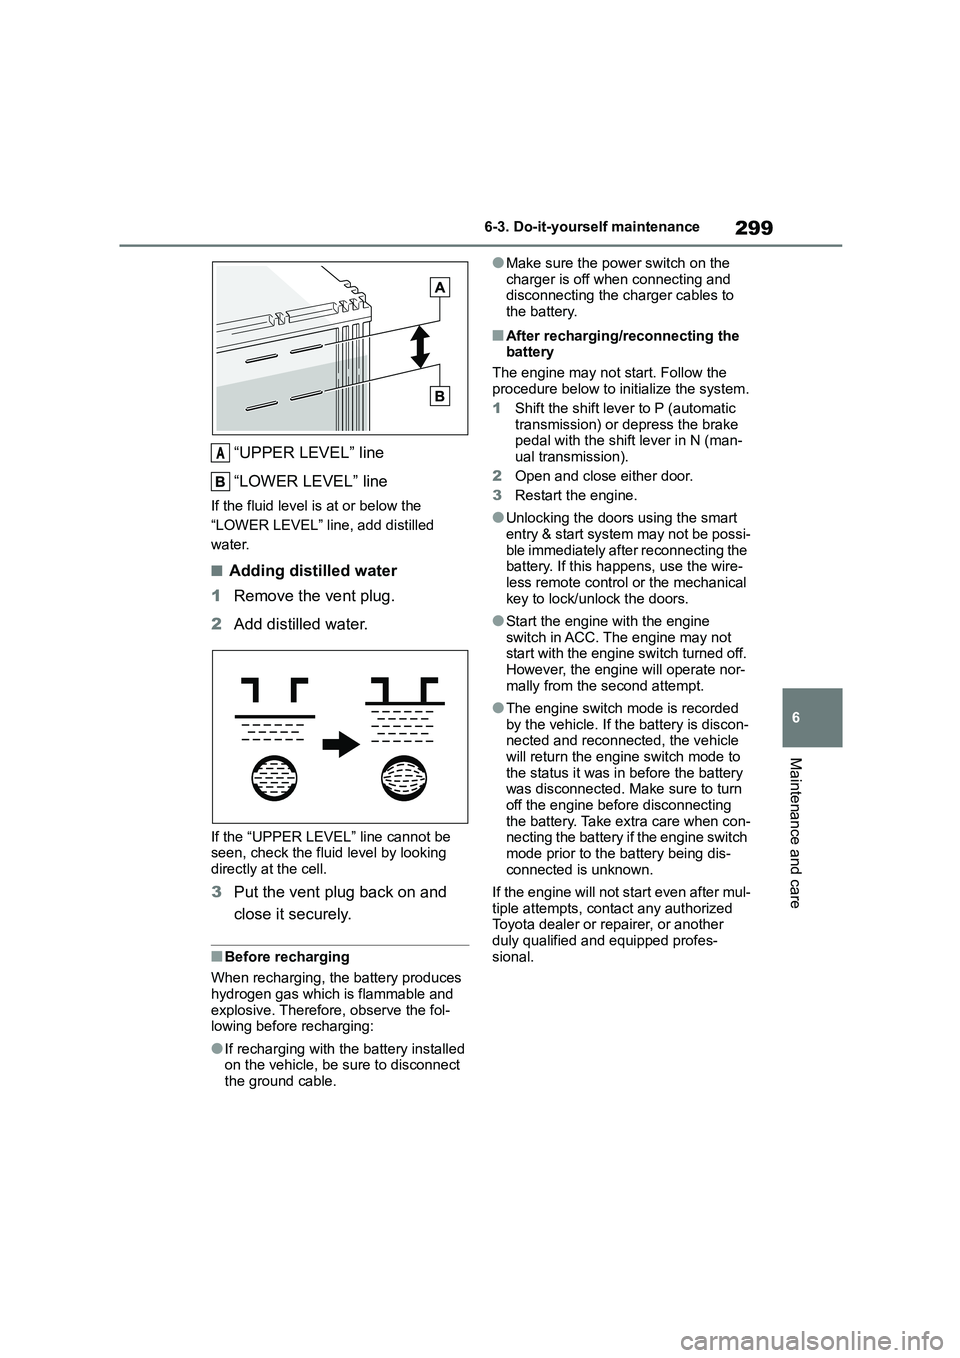
“UPPER LEVEL” line
“LOWER LEVEL” line
If the fluid level is at or below the
“LOWER LEVEL” line, add distilled
water.
■Adding distilled water
1 Remove the vent plug.
2 Add distilled water.
If the “UPPER LEVEL” line cannot be seen, check the fluid level by looking
directly at the cell.
3 Put the vent plug back on and
close it securely.
■Before recharging
When recharging, the battery produces
hydrogen gas which is flammable and
explosive. Therefore, observe the fol- lowing before recharging:
●If recharging with the battery installed on the vehicle, be sure to disconnect
the ground cable.
●Make sure the power switch on the
charger is off when connecting and disconnecting the charger cables to
the battery.
■After recharging/reconnecting the
battery
The engine may not start. Follow the
procedure below to initialize the system.
1 Shift the shift lever to P (automatic
transmission) or depress the brake pedal with the shift lever in N (man-
ual transmission).
2 Open and close either door.
3 Restart the engine.
●Unlocking the doors using the smart
entry & start system may not be possi-
ble immediately after reconnecting the battery. If this happens, use the wire-
less remote control or the mechanical
key to lock/unlock the doors.
●Start the engine with the engine
switch in ACC. The engine may not start with the engine switch turned off.
However, the engine will operate nor-
mally from the second attempt.
●The engine switch mode is recorded
by the vehicle. If the battery is discon- nected and reconnected, the vehicle
will return the engine switch mode to
the status it was in before the battery was disconnected. Make sure to turn
off the engine before disconnecting
the battery. Take extra care when con- necting the battery if the engine switch
mode prior to the battery being dis-
connected is unknown.
If the engine will not start even after mul-
tiple attempts, contact any authorized Toyota dealer or repairer, or another
duly qualified and equipped profes-
sional.
A
Page 302 of 582
3006-3. Do-it-yourself maintenance
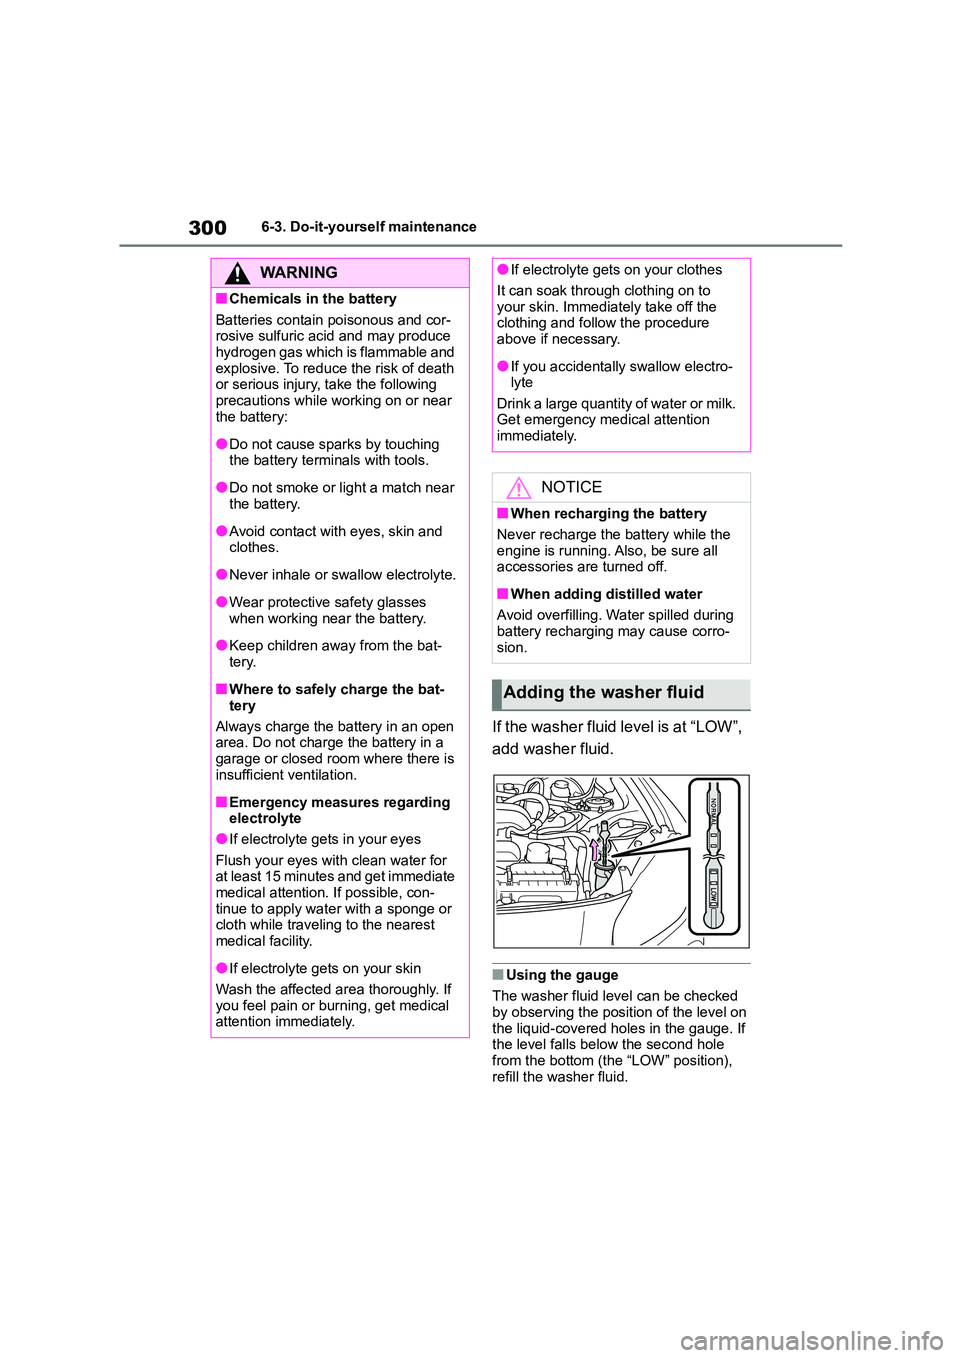
If the washer fluid level is at “LOW”,
add washer fluid.
■Using the gauge
The washer fluid level can be checked
by observing the position of the level on
the liquid-covered holes in the gauge. If the level falls below the second hole
from the bottom (the “LOW” position),
refill the washer fluid.
WA R N I N G
■Chemicals in the battery
Batteries contain poisonous and cor-
rosive sulfuric acid and may produce hydrogen gas which is flammable and
explosive. To reduce the risk of death
or serious injury, take the following precautions while working on or near
the battery:
●Do not cause sparks by touching the battery terminals with tools.
●Do not smoke or light a match near the battery.
●Avoid contact with eyes, skin and clothes.
●Never inhale or swallow electrolyte.
●Wear protective safety glasses
when working near the battery.
●Keep children away from the bat-
tery.
■Where to safely charge the bat-
tery
Always charge the battery in an open
area. Do not charge the battery in a
garage or closed room where there is insufficient ventilation.
■Emergency measures regarding electrolyte
●If electrolyte gets in your eyes
Flush your eyes with clean water for at least 15 minutes and get immediate
medical attention. If possible, con-
tinue to apply water with a sponge or cloth while traveling to the nearest
medical facility.
●If electrolyte gets on your skin
Wash the affected area thoroughly. If
you feel pain or burning, get medical attention immediately.
●If electrolyte gets on your clothes
It can soak through clothing on to
your skin. Immediately take off the
clothing and follow the procedure above if necessary.
●If you accidentally swallow electro-lyte
Drink a large quantity of water or milk.
Get emergency medical attention immediately.
NOTICE
■When recharging the battery
Never recharge the battery while the
engine is running. Also, be sure all accessories are turned off.
■When adding distilled water
Avoid overfilling. Water spilled during
battery recharging may cause corro-
sion.
Adding the washer fluid
Page 339 of 582
337
7
7-2. Steps to take in an emergency
When trouble arises
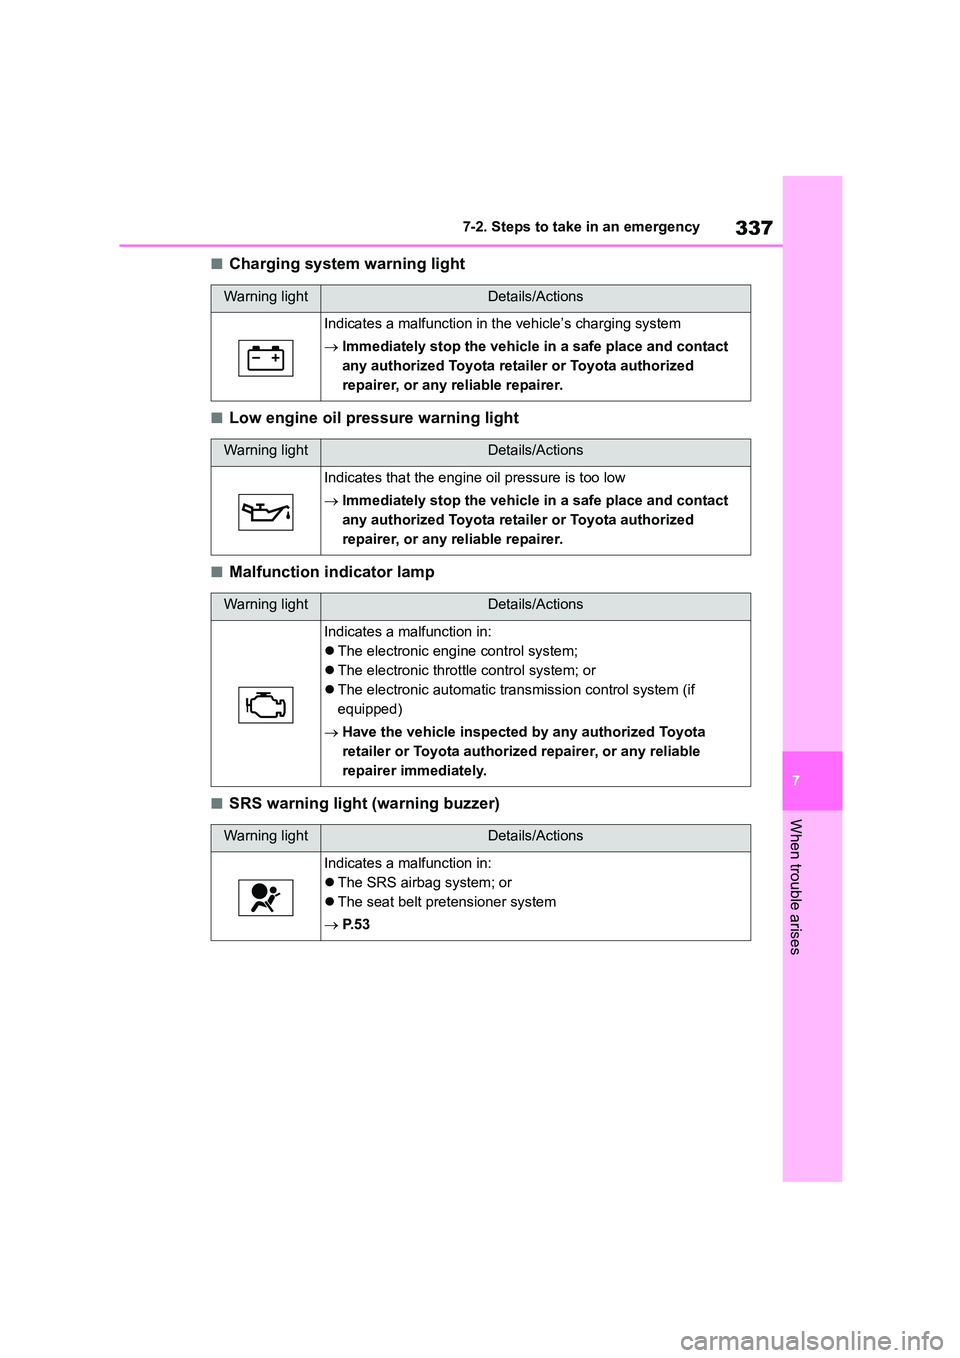
■Charging system warning light
■Low engine oil pressure warning light
■Malfunction indicator lamp
■SRS warning light (warning buzzer)
Warning lightDetails/Actions
Indicates a malfunction in the vehicle’s charging system
Immediately stop the vehicle in a safe place and contact
any authorized Toyota retailer or Toyota authorized
repairer, or any reliable repairer.
Warning lightDetails/Actions
Indicates that the engine oil pressure is too low
Immediately stop the vehicle in a safe place and contact
any authorized Toyota retailer or Toyota authorized
repairer, or any reliable repairer.
Warning lightDetails/Actions
Indicates a malfunction in:
The electronic engine control system;
The electronic throttle control system; or
The electronic automatic transmission control system (if
equipped)
Have the vehicle inspected by any authorized Toyota
retailer or Toyota authorized repairer, or any reliable
repairer immediately.
Warning lightDetails/Actions
Indicates a malfunction in:
The SRS airbag system; or
The seat belt pretensioner system
P. 5 3
Page 363 of 582
361
7
7-2. Steps to take in an emergency
When trouble arises
■When the battery is removed or dis-
charged
Information stored in the ECU is
cleared. When the battery is depleted,
have the vehicle inspected at any authorized Toyota retailer or Toyota
authorized repairer, or any reliable
repairer.
■When removing the battery termi- nals
When the battery terminals are
removed, the information stored in the ECU is cleared. Before removing the
battery terminals, contact any author-
ized Toyota retailer or Toyota authorized repairer, or any reliable repairer.
■Charging the battery
The electricity stored in the battery will
discharge gradually even when the vehi- cle is not in use, due to natural dis-
charge and the draining effects of
certain electrical appliances. If the vehi- cle is left for a long time, the battery may
discharge, and the engine may be una-
ble to start. (The battery recharges auto- matically during driving.)
■When recharging or replacing the
battery
●In some cases, it may not be possible
to unlock the doors using the smart
entry & start system when the battery is discharged. Use the wireless
remote control or the mechanical key
to lock or unlock the doors.
●The engine may not start on the first
attempt after the battery has recharged but will start normally after
the second attempt. This is not a mal-
function.
●The engine switch mode is memo-
rized by the vehicle. When the battery
is reconnected, the system will return to the mode it was in before the bat-
tery was discharged. Before discon-
necting the battery, turn the engine switch off.
If you are unsure what mode the
engine switch was in before the bat- tery discharged, be especially careful
when reconnecting the battery.
WA R N I N G
■When removing the battery ter- minals
Always remove the negative (-) termi-
nal first. If the positive (+) terminal contacts any metal in the surrounding
area when the positive (+) terminal is
removed, a spark may occur, leading
to a fire in addition to electrical shocks and death or serious injury.
■Avoiding battery fires or explo-sions
Observe the following precautions to
prevent accidentally igniting the flam- mable gas that may be emitted from
the battery:
●Make sure each jumper cable is
connected to the correct terminal
and that it is not unintentionally in contact with any other than the
intended terminal.
●Do not allow the + and - clamps of
the jumper cables to come into con-
tact with each other.
●Do not smoke, use matches, ciga-
rette lighters or allow open flame near the battery.
■Battery precautions
The battery contains poisonous and
corrosive acidic electrolyte, while
related parts contain lead and lead compounds. Observe the following
precautions when handling the bat-
tery:
●When working with the battery,
always wear safety glasses and take care not to allow any battery
fluids (acid) to come into contact
with skin, clothing or the vehicle body.
●Do not lean over the battery.