weight TOYOTA GR86 2022 Owners Manual (in English)
[x] Cancel search | Manufacturer: TOYOTA, Model Year: 2022, Model line: GR86, Model: TOYOTA GR86 2022Pages: 582, PDF Size: 86.38 MB
Page 41 of 582
39
1
1-1. For safe use
For safety and security
WA R N I N G
■General Precautions regarding
SRS Airbag System and Children
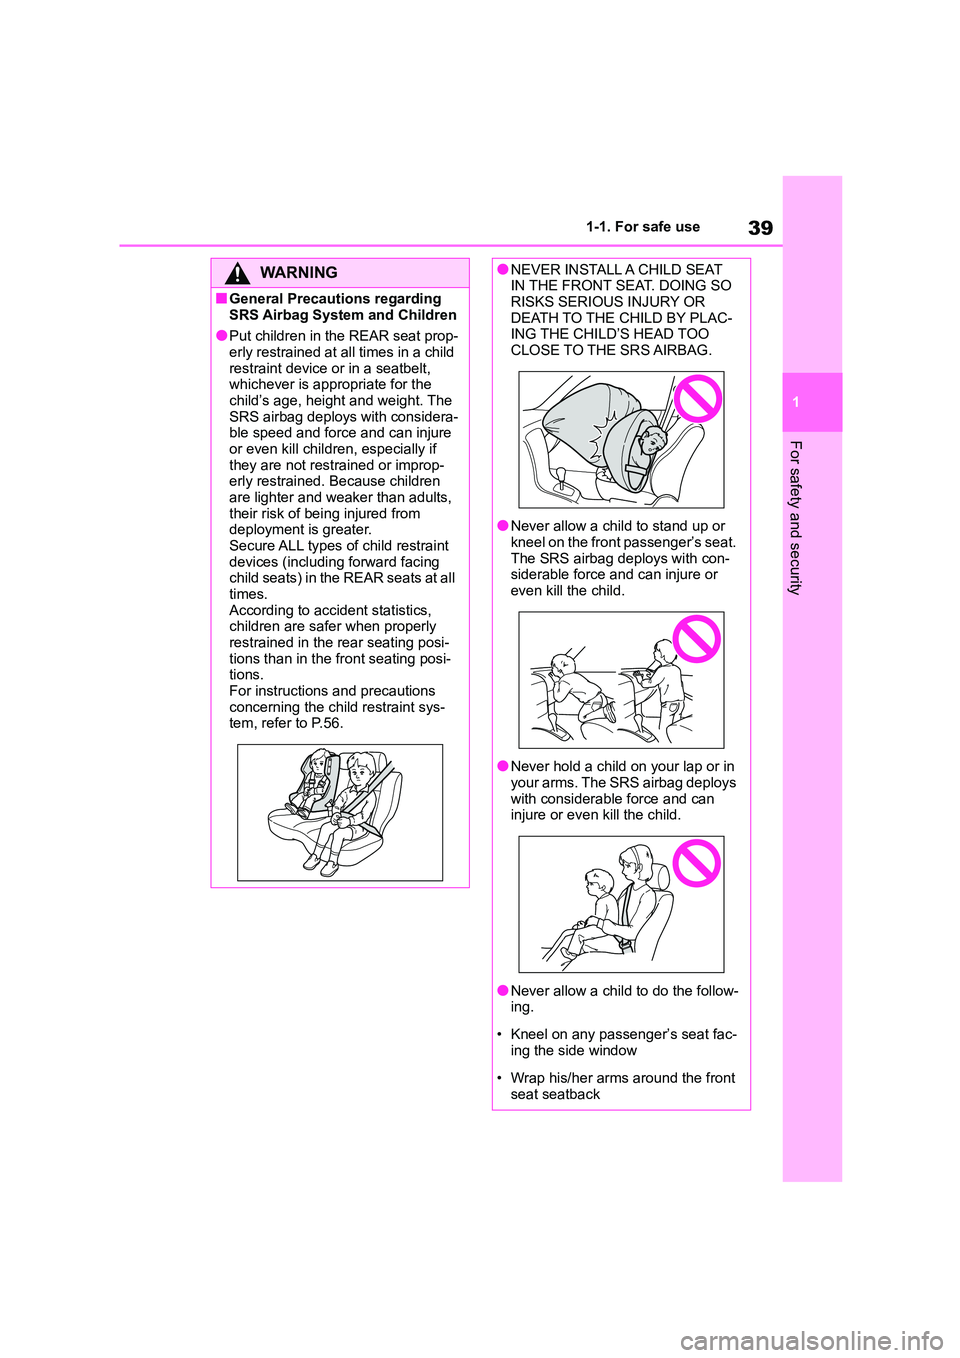
●Put children in the REAR seat prop- erly restrained at all times in a child
restraint device or in a seatbelt,
whichever is appropriate for the child’s age, height and weight. The
SRS airbag deploys with considera-
ble speed and force and can injure
or even kill children, especially if they are not restrained or improp-
erly restrained. Because children
are lighter and weaker than adults, their risk of being injured from
deployment is greater.
Secure ALL types of child restraint devices (including forward facing
child seats) in the REAR seats at all
times. According to accident statistics,
children are safer when properly
restrained in the rear seating posi- tions than in the front seating posi-
tions.
For instructions and precautions concerning the child restraint sys-
tem, refer to P.56.
●NEVER INSTALL A CHILD SEAT IN THE FRONT SEAT. DOING SO
RISKS SERIOUS INJURY OR
DEATH TO THE CHILD BY PLAC- ING THE CHILD’S HEAD TOO
CLOSE TO THE SRS AIRBAG.
●Never allow a child to stand up or
kneel on the front passenger’s seat.
The SRS airbag deploys with con- siderable force and can injure or
even kill the child.
●Never hold a child on your lap or in
your arms. The SRS airbag deploys
with considerable force and can injure or even kill the child.
●Never allow a child to do the follow-ing.
• Kneel on any passenger’s seat fac-
ing the side window
• Wrap his/her arms around the front
seat seatback
Page 59 of 582
57
1
1-2. Child safety
For safety and security
• Fixed with a seat belt: P. 6 5
• Fixed with an ISOFIX lower
anchorage: P. 6 7
• Using a top tether anchorage:
P. 6 8
Prioritize and observe the warn-
ings, as well as the laws and reg-
ulations for child restraint
systems.
Use a child restraint system until
the child becomes large enough
to properly wear the vehicle’s
seat belt.
Choose a child restraint system
appropriate to the age and size
of the child.
Note that not all child restraint
systems can fit in all vehicles.
Before using or purchasing a
child restraint system, check the
compatibility of th e child restraint
system with seat positions.
( P. 6 0 )
Points to remember
WA R N I N G
■When a child is riding
Observe the following precautions.
Failure to do so may result in death or
serious injury.
●For effective protection in automo- bile accidents and sudden stops, a
child must be properly restrained,
using a seat belt or child restraint system which is corr ectly installed.
For installation details, refer to the
operation manual enclosed with the child restraint system. General
installation instruction is provided in
this manual.
●Toyota strongly urges the use of a
proper child rest raint system that conforms to the weight and size of
the child, installed on the rear seat.
According to accident statistics, the child is safer when properly
restrained in the rear seat than in
the front seat.
●Holding a child in your or someone
else’s arms is not a substitute for a child restraint system. In an acci-
dent, the child can be crushed
against the windshield or between the holder and the interior of the
vehicle.
■Handling the child restraint sys-
tem
If the child restraint system is not properly fixed in place, the child or
other passengers may be seriously
injured or even killed in the event of sudden braking, sudden swerving, or
an accident.
●If the vehicle were to receive a
strong impact from an accident,
etc., it is possible that the child restraint system has damage that is
not readily visible. In such cases,
do not reuse the restraint system.
Page 62 of 582
601-2. Child safety
■Child restraint system compat-
ibility for each seating posi-
tion
Compatibility of eac h seating posi-
tion with child restraint systems
( P.61) displays the type of child
restraint systems that can be used
and possible seating positions for
installation using symbols. Also, the
recommended child restraint sys-
tem that is suitable for your child
can be selected.
Otherwise, check [Recommended
child restraint systems and Com-
patibility table] for recommended
child restraint systems. ( P. 6 3 )
Check the selected child restraint
system together with the following
[Before confirming the compatibility
of each seating position with child
restraint systems].
■Before confirming the compat-
ibility of each seating position
with child restraint systems
1 Checking the child restraint sys-
tem standards.
Use a child restraint system that
conforms to UN(ECE) R44*1.
The following approval mark is
displayed on child restraint sys-
tems which are conformed.
Check for an approval mark
attached to the child restraint
system.
Example of the displayed regulation
Number
UN(ECE) R44 approval mark*2
The weight range of the child
who is applicable for an
UN(ECE) R44 approval mark is
indicated.
2 Checking the category of the
child restraint system.
Check the approval mark of the
WA R N I N G
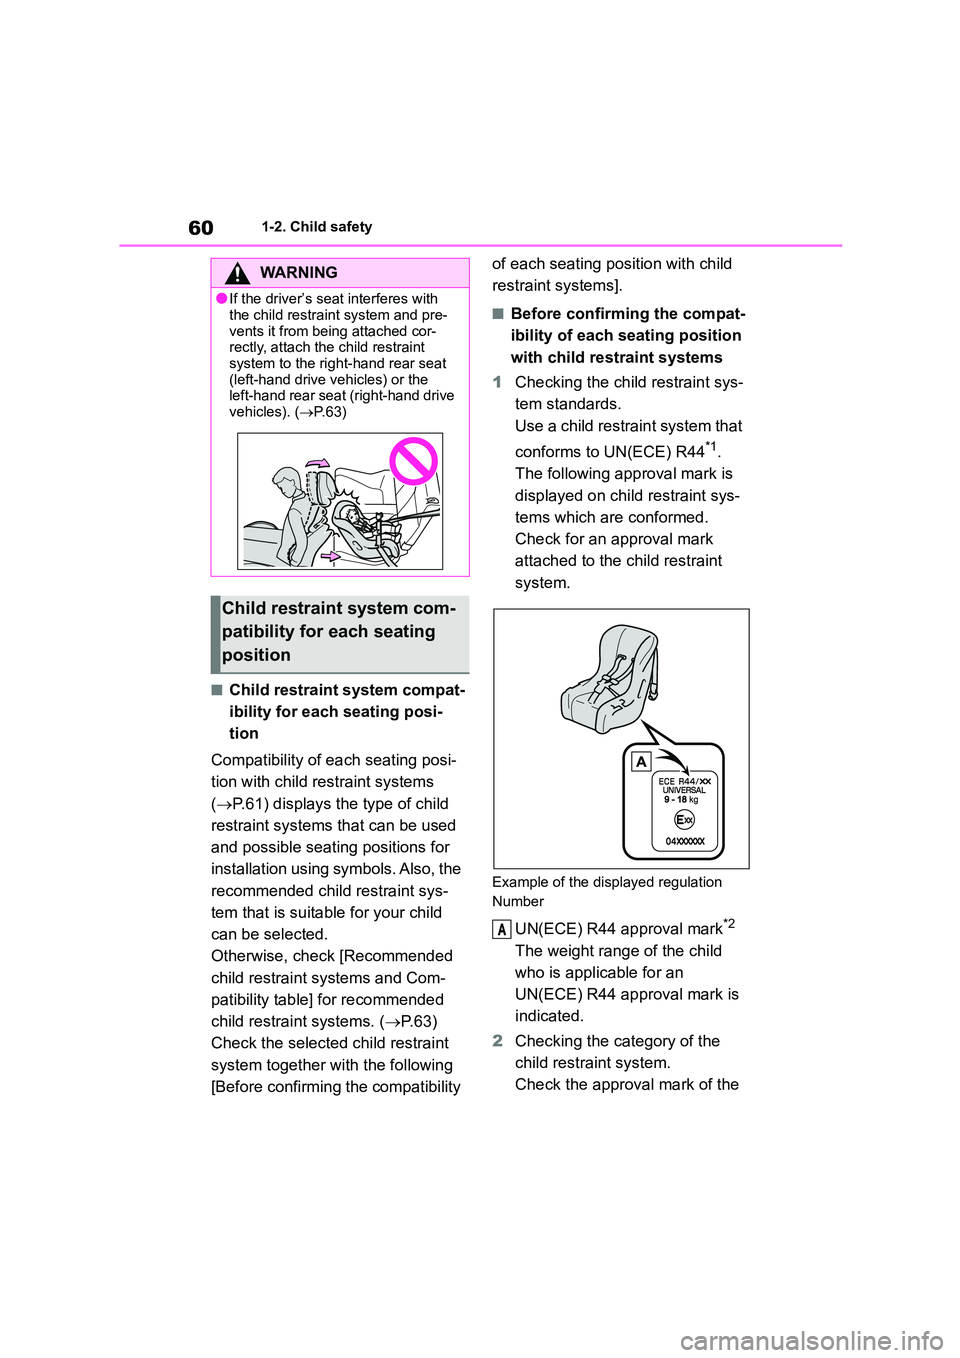
●If the driver’s seat interferes with
the child restraint system and pre-
vents it from being attached cor- rectly, attach the child restraint
system to the righ t-hand rear seat
(left-hand drive vehicles) or the left-hand rear seat (right-hand drive
vehicles). ( P.63)
Child restraint system com-
patibility for each seating
position
A
Page 109 of 582
107
3
3-2. Opening, closing and locking the doors and trunk
Before driving
■Trunk opener switch
Press and hold the trunk opener
switch.
WA R N I N G
●When closing the trunk lid, take
extra care to prevent your fingers
etc. from being caught.
●When closing the trunk lid, make
sure to press it lightly on its outer
surface.
●Do not attach any accessories
other than genuine Toyota parts to the trunk lid. Such additional weight
on the trunk lid may cause the lid to
suddenly shut again after it is opened.
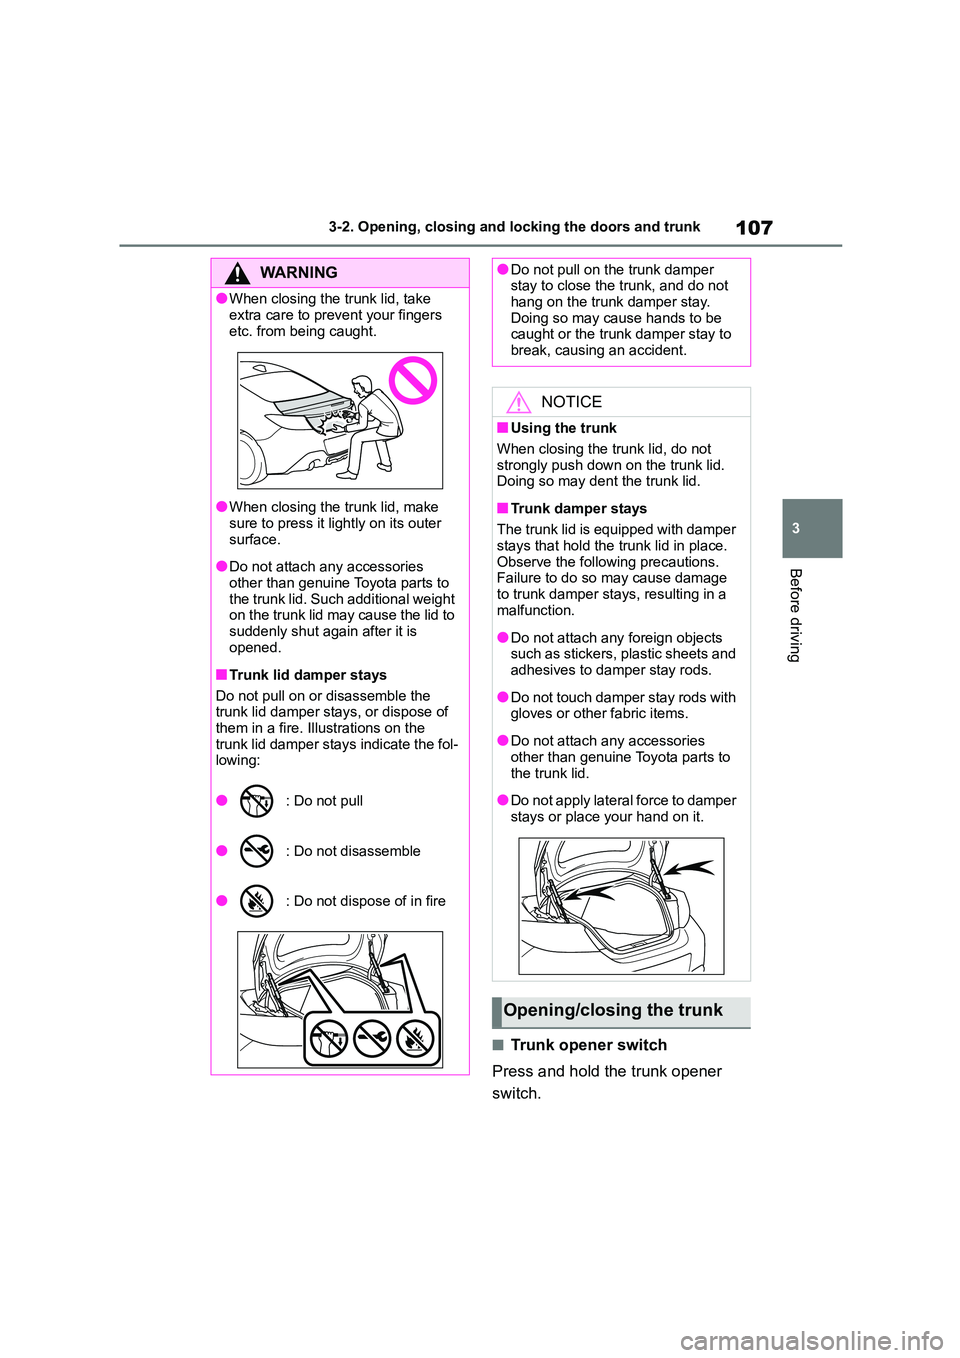
■Trunk lid damper stays
Do not pull on or disassemble the
trunk lid damper stays, or dispose of
them in a fire. Illustrations on the trunk lid damper stays indicate the fol-
lowing:
●: Do not pull
●: Do not disassemble
●: Do not dispose of in fire
●Do not pull on the trunk damper stay to close the trunk, and do not
hang on the trunk damper stay.
Doing so may cause hands to be caught or the trunk damper stay to
break, causing an accident.
NOTICE
■Using the trunk
When closing the trunk lid, do not strongly push down on the trunk lid.
Doing so may dent the trunk lid.
■Trunk damper stays
The trunk lid is equipped with damper
stays that hold the trunk lid in place. Observe the following precautions.
Failure to do so may cause damage
to trunk damper stays, resulting in a malfunction.
●Do not attach any foreign objects such as stickers, plastic sheets and
adhesives to damper stay rods.
●Do not touch damper stay rods with
gloves or other fabric items.
●Do not attach any accessories
other than genuine Toyota parts to
the trunk lid.
●Do not apply lateral force to damper
stays or place your hand on it.
Opening/closing the trunk
Page 169 of 582
167
4
4-5. EyeSight
Driving
WA R N I N G
• The brake system warning light is
illuminated in red.*2
• A heavy cargo is inside the vehicle.
• The maximum number of occu- pants is exceeded.
• The meter is not operating properly;
such as when the lights do not illu- minate, the beeps do not sound, the
display is different from when it is
normal, etc.*3
●The system will not operate cor-
rectly in the following conditions. Do not use Adaptive Cruise Control or
Conventional Cruise Control.
• The wheels are out of balance (e.g., the balance weight is removed or
misaligned).*1
• The wheels are out of alignment.*1
• A trailer or another vehicle, etc. is being towed.
*1: The wheels and tires have func-
tions that are critically important.
Be sure to use the correct ones.
(P.375)
*2: If the brake system warning light
(red) does not turn off, immediately
pull the vehicle over in a safe place
and contact any authorized Toyota
retailer or Toyota authorized
repairer, or any reliable repairer to
have the system inspected.
*3: For details about the meter, refer to
P. 8 8 .
NOTICE
●The characteristics of the stereo
camera are similar to those of
human eyes. For this reason, con- ditions that make it difficult for the
driver to see in the forward direction
have the same effect on the stereo camera. They also make it difficult
for the system to detect vehicles,
obstacles, and traffic lanes.
●Detection by the EyeSight system
is limited to objects that are within
the range of the stereo camera’s field of view. Also, after an object
enters the range of the camera’s
field of view, it may take some time for the system to detect it as a con-
trollable target and to warn the
driver.
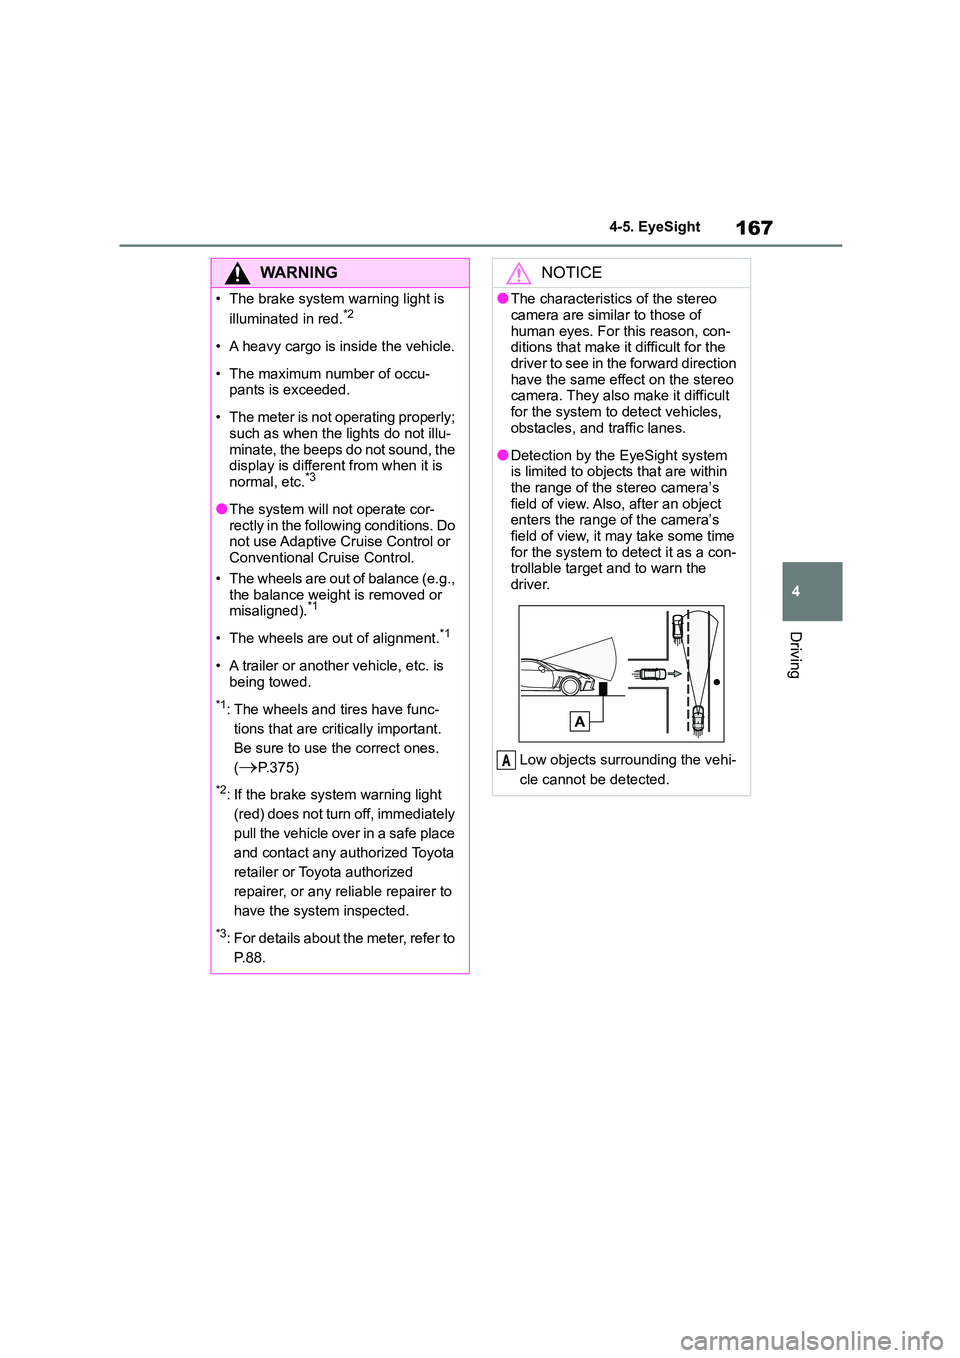
Low objects surrounding the vehi-
cle cannot be detected.
A
Page 295 of 582
293
6
6-3. Do-it-yourself maintenance
Maintenance and care
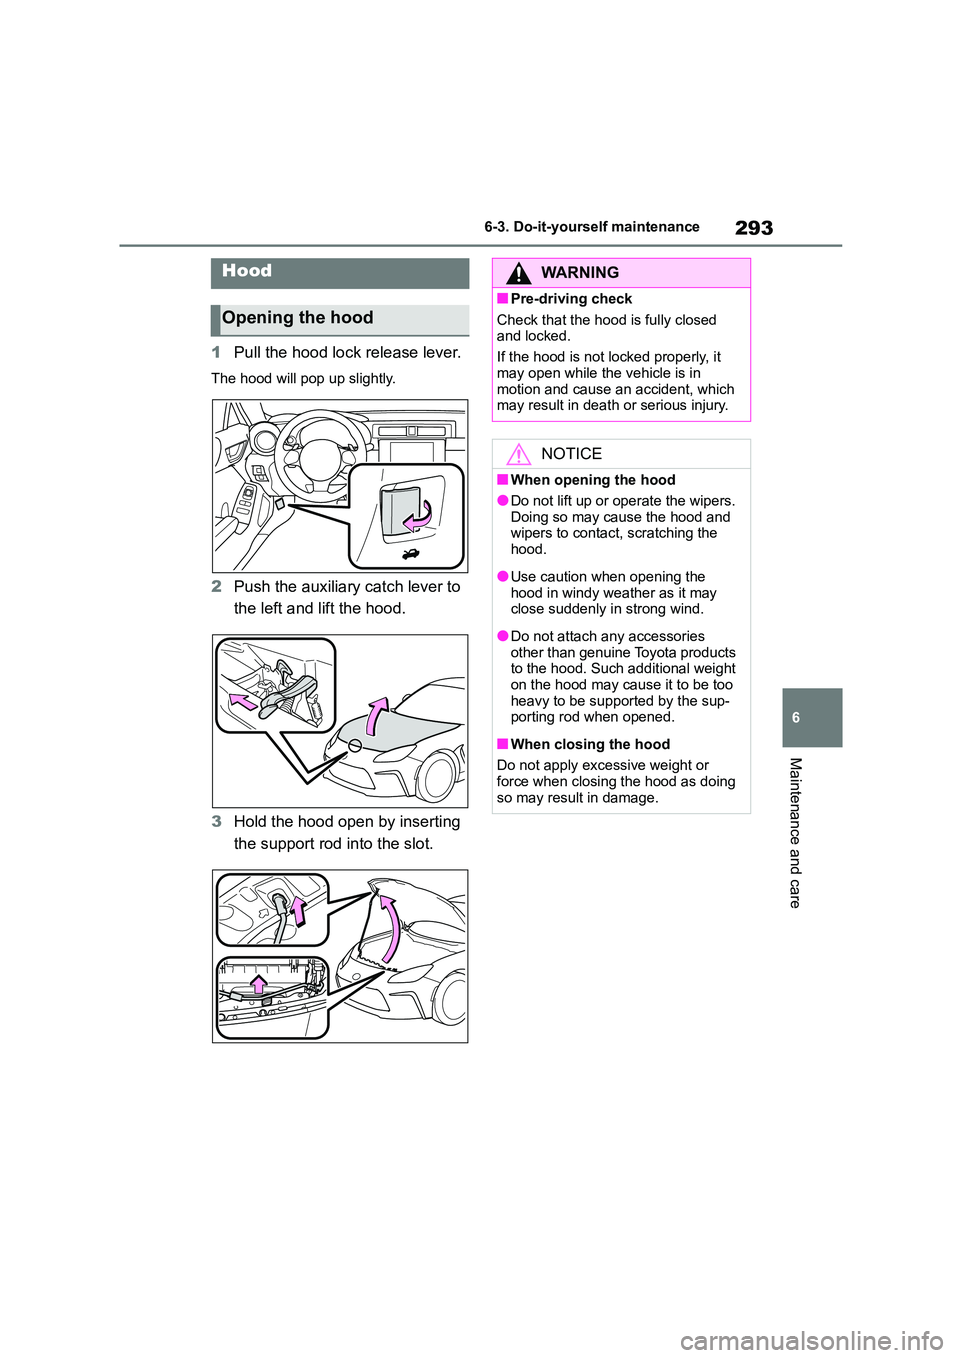
1 Pull the hood lock release lever.
The hood will pop up slightly.
2Push the auxiliary catch lever to
the left and lift the hood.
3 Hold the hood open by inserting
the support rod into the slot.
Hood
Opening the hood
WA R N I N G
■Pre-driving check
Check that the hood is fully closed
and locked.
If the hood is not locked properly, it
may open while the vehicle is in
motion and cause an accident, which may result in death or serious injury.
NOTICE
■When opening the hood
●Do not lift up or operate the wipers. Doing so may cause the hood and
wipers to contact, scratching the
hood.
●Use caution when opening the
hood in windy weather as it may close suddenly in strong wind.
●Do not attach any accessories other than genuine Toyota products
to the hood. Such additional weight
on the hood may cause it to be too heavy to be supported by the sup-
porting rod when opened.
■When closing the hood
Do not apply exce ssive weight or
force when closing the hood as doing
so may result in damage.
Page 314 of 582
3126-3. Do-it-yourself maintenance
■Effects of incorrect tire inflation
pressure
Driving with incorrect tire inflation pres-
sure may result in the following:
●Reduced fuel economy
●Reduced driving comfort and poor handling
●Reduced tire life due to wear
●Reduced safety
●Damage to the drivetrain
If a tire needs frequent inflating, have it
checked by any authorized Toyota retailer or Toyota authorized repairer, or
any reliable repairer.
■Instructions for checking tire infla-
tion pressure
When checking tire inflation pressure, observe the following:
●Check only when the tires are cold.If your vehicle has been parked for at
least 3 hours or has not been driven
for more than 1.5 km or 1 mile, you will get an accurate cold tire inflation
pressure reading.
●Always use a tire pressure gauge.
It is difficult to judge if a tire is properly
inflated based only on its appearance.
●It is normal for the tire inflation pres-
sure to be higher after driving as heat is generated in the tire. Do not reduce
tire inflation pressure after driving.
●Passengers and luggage weight
should be placed so that the vehicle is
balanced.Tire inflation pressure
Make sure to maintain proper
tire inflation pressure. Tire
inflation pressure should be
checked at least once per
month. However, Toyota rec-
ommends that tire inflation
pressure be checked once
every two weeks.
WA R N I N G
■Proper inflation is critical to save
tire performance
Keep your tires properly inflated. If the tires are not properly inflated,
the following conditions may occur
which could lead to an accident
resulting in death or serious injury:
●Excessive wear
●Uneven wear
●Poor handling
●Possibility of blowouts resulting
from overheated tires
●Air leaking from between tire and
wheel
●Wheel deformation and/or tire dam-
age
●Greater possibility of tire damage
while driving (due to road hazards, expansion joints, sharp edges in the
road, etc.)
NOTICE
■When inspecting and adjusting tire inflation pressure
Be sure to put the tire valve caps back
on. If a valve cap is not installed, dirt or
moisture may get into the valve and
cause an air leak, resulting in decreased tire inflation pressure.
Page 316 of 582
3146-3. Do-it-yourself maintenance
Use only Toyota wheel nuts and
wrenches designed for use with
your aluminum wheels.
When rotating, repairing or
changing your tires, check that
the wheel nuts ar e still tight after
driving 1600 km (1000 miles).
Be careful not to damage the
aluminum wheels when using
tire chains.
Use only Toyota genuine balance
weights or equivalent and a plas-
tic or rubber hammer when bal-
ancing your wheels.
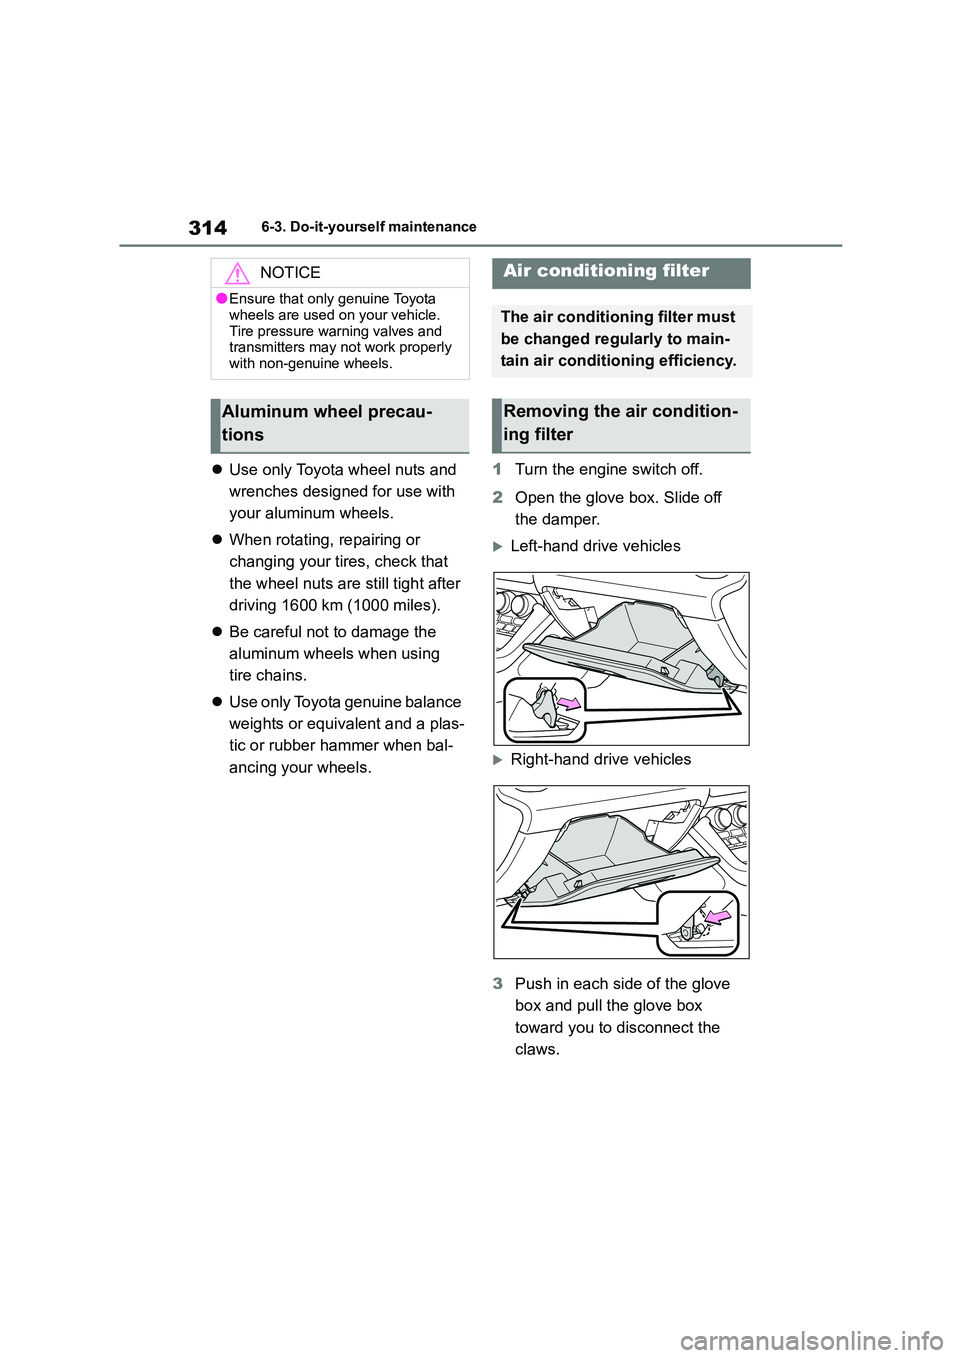
1 Turn the engine switch off.
2 Open the glove box. Slide off
the damper.
Left-hand drive vehicles
Right-hand drive vehicles
3 Push in each side of the glove
box and pull the glove box
toward you to disconnect the
claws.
NOTICE
●Ensure that only genuine Toyota
wheels are used on your vehicle.
Tire pressure warning valves and transmitters may not work properly
with non-genuine wheels.
Aluminum wheel precau-
tions
Air conditioning filter
The air conditioning filter must
be changed regularly to main-
tain air conditioning efficiency.
Removing the air condition-
ing filter
Page 370 of 582
3688-1. Specifications
8-1.Specifications
*: Unladen vehicle
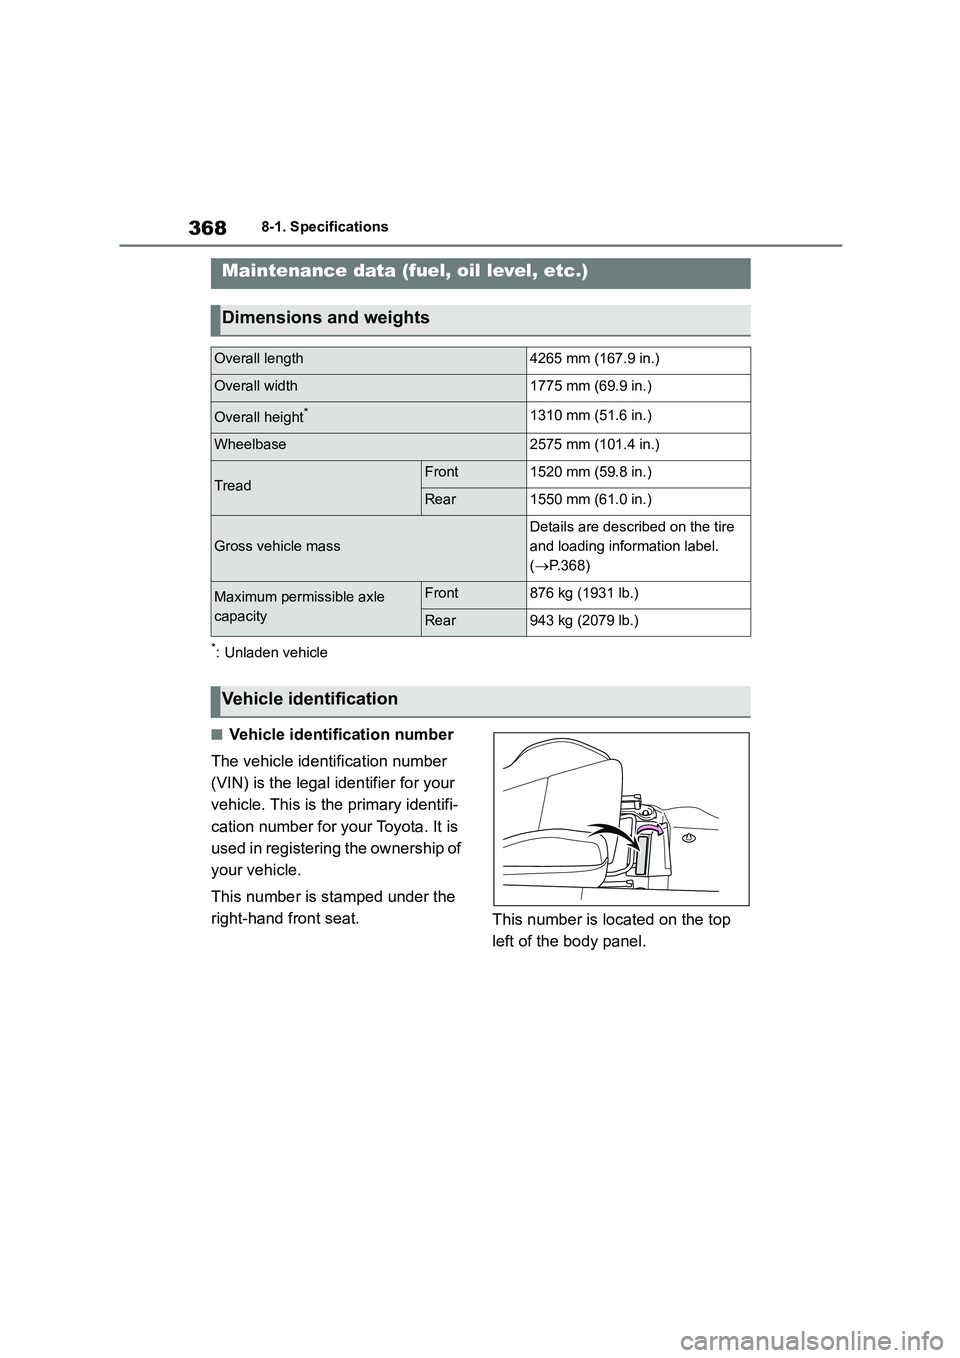
■Vehicle identification number
The vehicle identification number
(VIN) is the legal identifier for your
vehicle. This is the primary identifi-
cation number for your Toyota. It is
used in registering the ownership of
your vehicle.
This number is stamped under the
right-hand front seat. This number is located on the top
left of the body panel.
Maintenance data (fuel, oil level, etc.)
Dimensions and weights
Overall length4265 mm (167.9 in.)
Overall width1775 mm (69.9 in.)
Overall height*1310 mm (51.6 in.)
Wheelbase2575 mm (101.4 in.)
TreadFront1520 mm (59.8 in.)
Rear1550 mm (61.0 in.)
Gross vehicle mass
Details are described on the tire
and loading information label.
( P.368)
Maximum permissible axle
capacity
Front876 kg (1931 lb.)
Rear943 kg (2079 lb.)
Vehicle identification
Page 399 of 582
397Alphabetical Index
Open door .................................. 104
Seat belt ............................. 339, 340
Warning lights............................... 336 ABS ............................................ 338
Automatic he adlight leveling system
warning light ............................ 341
Automatic transmission fluid temper- ature ........................................ 339
Brake system .......... ................... 336
BSD/RCTA warning light ............ 340
Charging system ........................ 337
Conventional cruise control indicator ................................................. 340
Electric power steering............... 338
EyeSight warning light ............... 341
GPF system warning light .......... 342
High coolant temperature........... 336
LED headlight warning light ....... 341
Low engine oil pressure ............. 337
Low fuel level ............................. 339
Malfunction indicator lamp ......... 337
Master warning light ................... 341
Open door warning .................... 339
RAB warning light ...................... 341
Seat belt reminder light ...... 339, 340
Slip indicator .............................. 338
SRH warning light ...................... 340
SRS............................................ 337
Tire pressure .............................. 342
Warning messages ....................... 344
Warning reflector storage box .... 276
Washer Checking .................................... 300
Preparing and checking before win-ter ............................................ 260
Switch ........................................ 160
Washing and waxing .................... 282
Weight
Weight ........................................ 368
Wheels Replacing wheels ....................... 308
Size ............................................ 375
Window lock switch ..................... 127
Windows
Power windows .......................... 126 Rear window defogger ............... 266
Washer ....................................... 160
Windshield wipers ........................160
Winter driving tips ........................260
Wireless remote control Battery-Saving Function ............. 110
Locking/Unlocking ...................... 101
Replacing the battery ................. 316