lights TOYOTA GT86 2014 (in English) Owner's Guide
[x] Cancel search | Manufacturer: TOYOTA, Model Year: 2014, Model line: GT86, Model: TOYOTA GT86 2014Pages: 452, PDF Size: 14.38 MB
Page 334 of 452
334 4-3. Do-it-yourself maintenance
FT86_EE
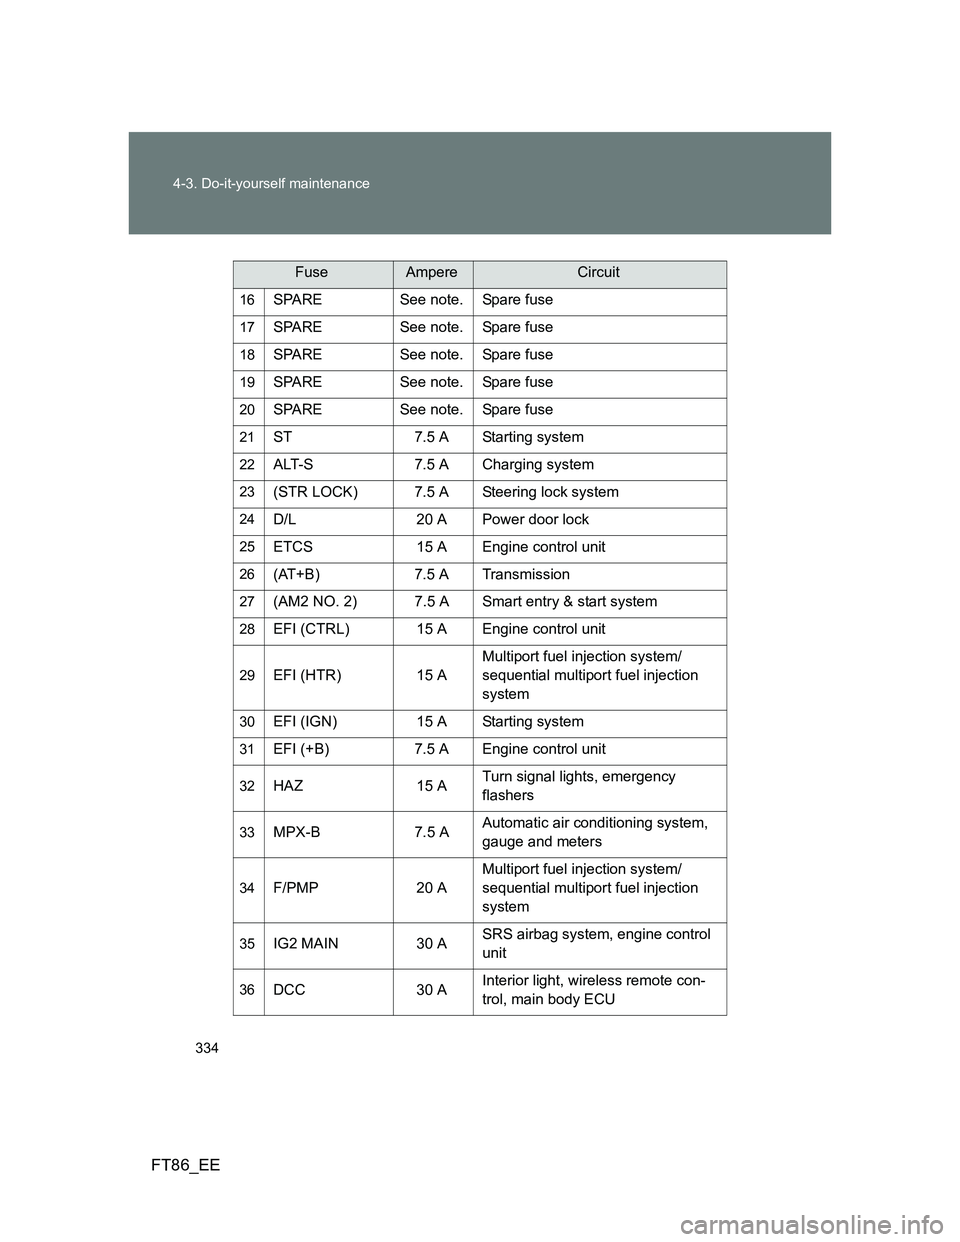
16SPARE See note. Spare fuse
17SPARE See note. Spare fuse
18SPARE See note. Spare fuse
19SPARE See note. Spare fuse
20SPARE See note. Spare fuse
21ST 7.5 A Starting system
22ALT-S 7.5 A Charging system
23(STR LOCK) 7.5 A Steering lock system
24D/L 20 A Power door lock
25ETCS 15 A Engine control unit
26(AT+B) 7.5 A Transmission
27(AM2 NO. 2) 7.5 A Smart entry & start system
28EFI (CTRL) 15 A Engine control unit
29EFI (HTR) 15 AMultiport fuel injection system/
sequential multiport fuel injection
system
30EFI (IGN) 15 A Starting system
31EFI (+B) 7.5 A Engine control unit
32HAZ 15 ATurn signal lights, emergency
flashers
33MPX-B 7.5 AAutomatic air conditioning system,
gauge and meters
34F/PMP 20 AMultiport fuel injection system/
sequential multiport fuel injection
system
35IG2 MAIN 30 ASRS airbag system, engine control
unit
36DCC 30 AInterior light, wireless remote con-
trol, main body ECU
FuseAmpereCircuit
Page 336 of 452
336 4-3. Do-it-yourself maintenance
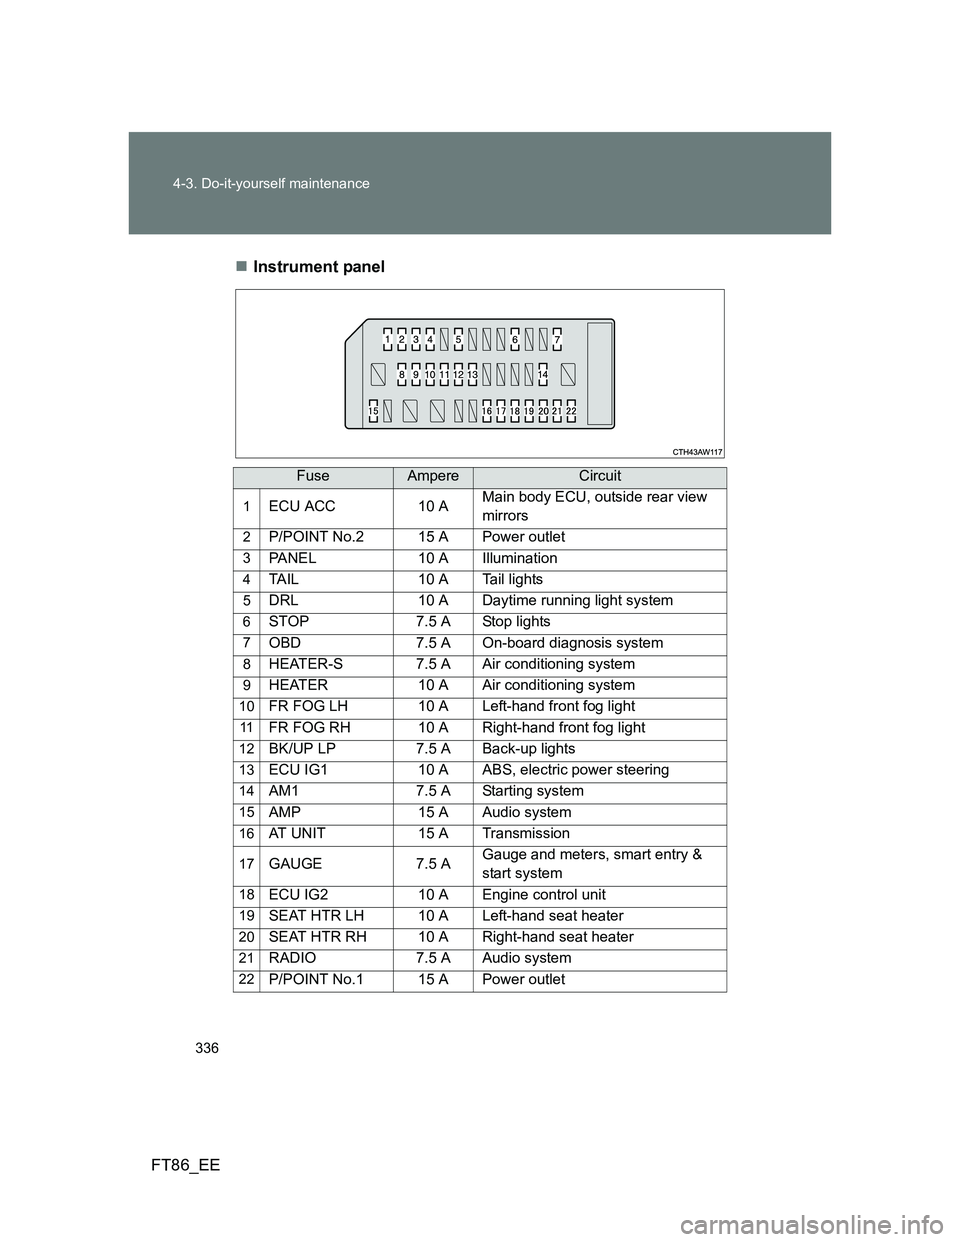
FT86_EEInstrument panel
FuseAmpereCircuit
1ECU ACC 10 AMain body ECU, outside rear view
mirrors
2P/POINT No.2 15 A Power outlet
3PANEL 10 A Illumination
4TAIL 10 A Tail lights
5DRL 10 A Daytime running light system
6STOP 7.5 A Stop lights
7OBD 7.5 A On-board diagnosis system
8HEATER-S 7.5 A Air conditioning system
9HEATER 10 A Air conditioning system
10FR FOG LH 10 A Left-hand front fog light
11FR FOG RH 10 A Right-hand front fog light
12BK/UP LP 7.5 A Back-up lights
13ECU IG1 10 A ABS, electric power steering
14AM1 7.5 A Starting system
15AMP 15 A Audio system
16AT UNIT 15 A Transmission
17GAUGE 7.5 AGauge and meters, smart entry &
start system
18ECU IG2 10 A Engine control unit
19SEAT HTR LH 10 A Left-hand seat heater
20SEAT HTR RH 10 A Right-hand seat heater
21RADIO 7.5 A Audio system
22P/POINT No.1 15 A Power outlet
Page 337 of 452
337 4-3. Do-it-yourself maintenance
4
Maintenance and care
FT86_EE
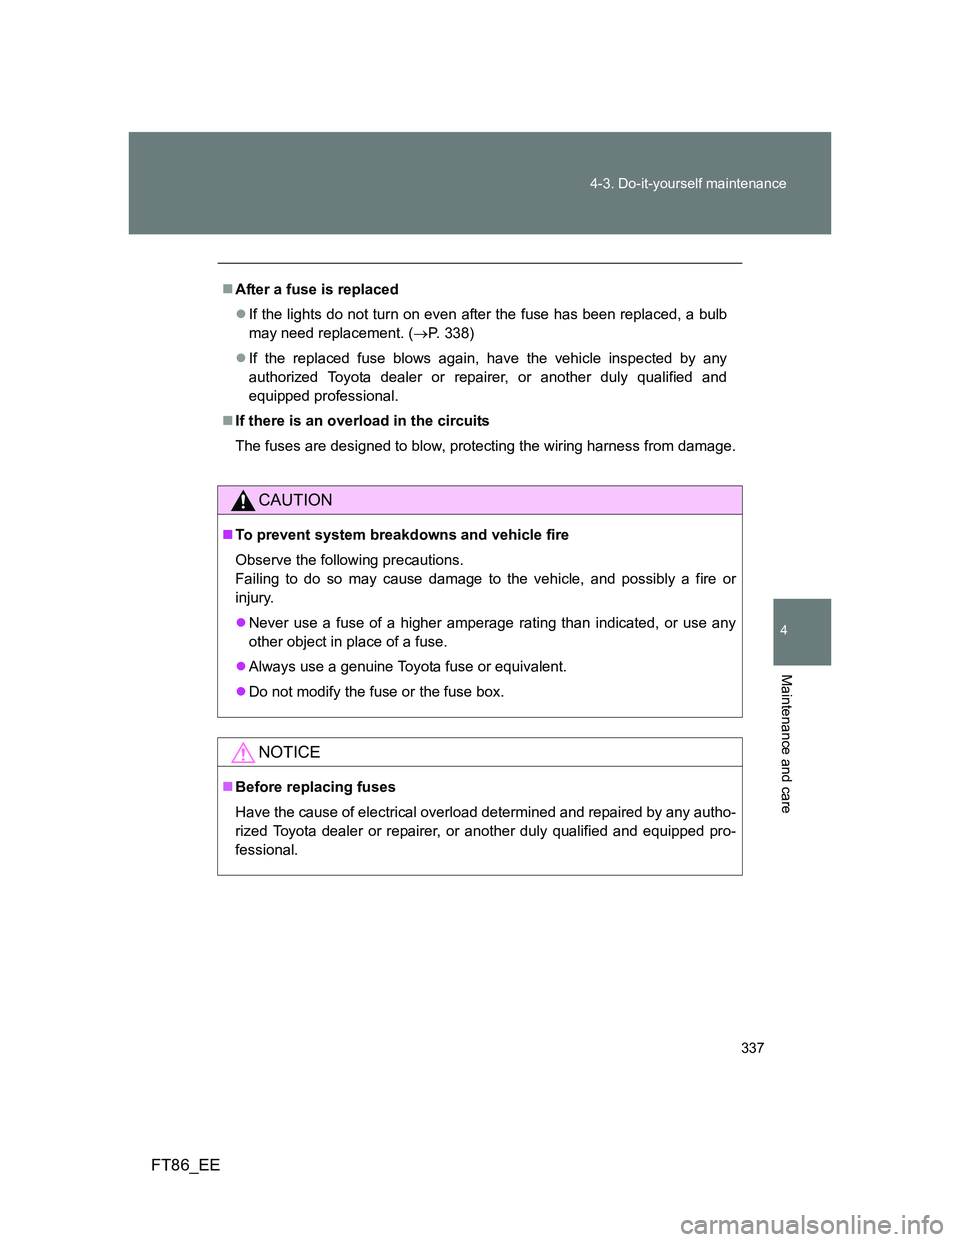
After a fuse is replaced
If the lights do not turn on even after the fuse has been replaced, a bulb
may need replacement. (P. 338)
If the replaced fuse blows again, have the vehicle inspected by any
authorized Toyota dealer or repairer, or another duly qualified and
equipped professional.
If there is an overload in the circuits
The fuses are designed to blow, protecting the wiring harness from damage.
CAUTION
To prevent system breakdowns and vehicle fire
Observe the following precautions.
Failing to do so may cause damage to the vehicle, and possibly a fire or
injury.
Never use a fuse of a higher amperage rating than indicated, or use any
other object in place of a fuse.
Always use a genuine Toyota fuse or equivalent.
Do not modify the fuse or the fuse box.
NOTICE
Before replacing fuses
Have the cause of electrical overload determined and repaired by any autho-
rized Toyota dealer or repairer, or another duly qualified and equipped pro-
fessional.
Page 338 of 452
338
4-3. Do-it-yourself maintenance
FT86_EE
Light bulbs
You may replace the following bulbs by yourself. The difficulty level
of replacement varies depending on the bulb. As there is a danger
that components may be damaged, we recommend that replacement
is carried out by any authorized Toyota dealer or repairer, or another
duly qualified and equipped professional.
Preparing a replacement light bulb
Check the wattage of the light bulb being replaced. (P. 434)
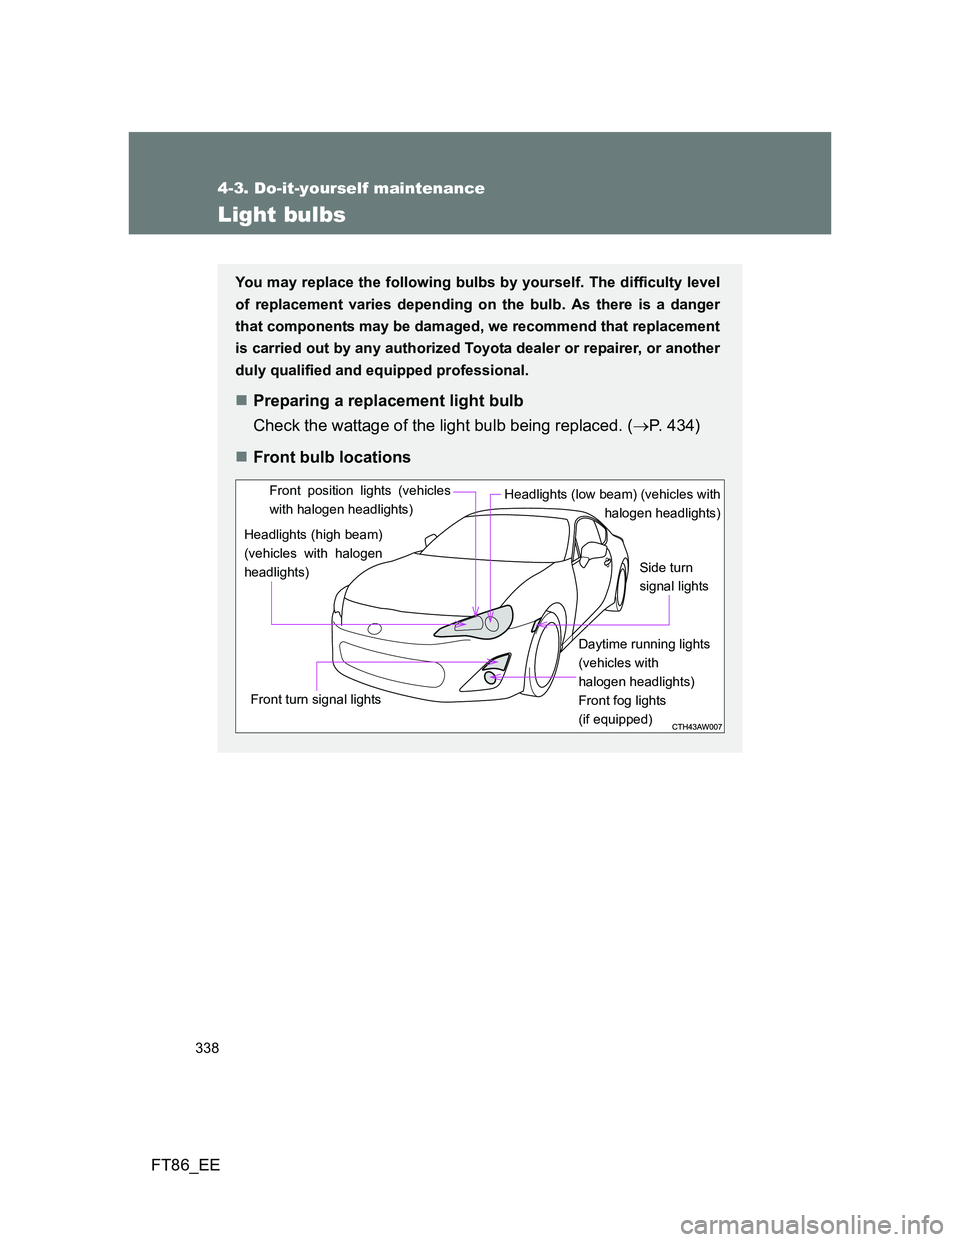
Front bulb locations
Headlights (high beam)
(vehicles with halogen
headlights)
Headlights (low beam) (vehicles with
halogen headlights)
Side turn
signal lights
Front turn signal lightsFront position lights (vehicles
with halogen headlights)
Daytime running lights
(vehicles with
halogen headlights)
Front fog lights
(if equipped)
Page 339 of 452
339 4-3. Do-it-yourself maintenance
4
Maintenance and care
FT86_EE
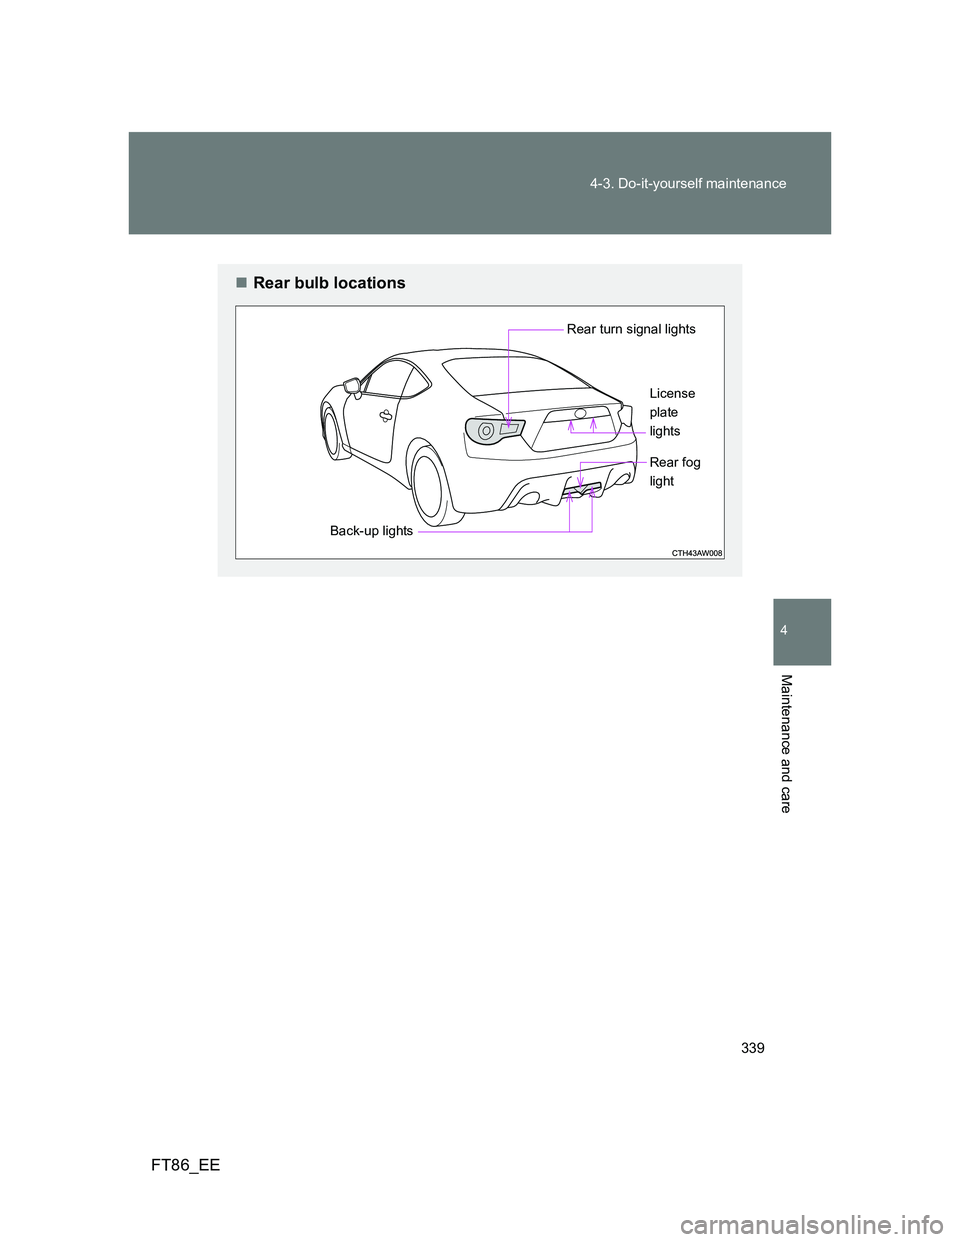
Rear bulb locations
Rear turn signal lights
Back-up lightsLicense
plate
lights
Rear fog
light
Page 342 of 452
342 4-3. Do-it-yourself maintenance
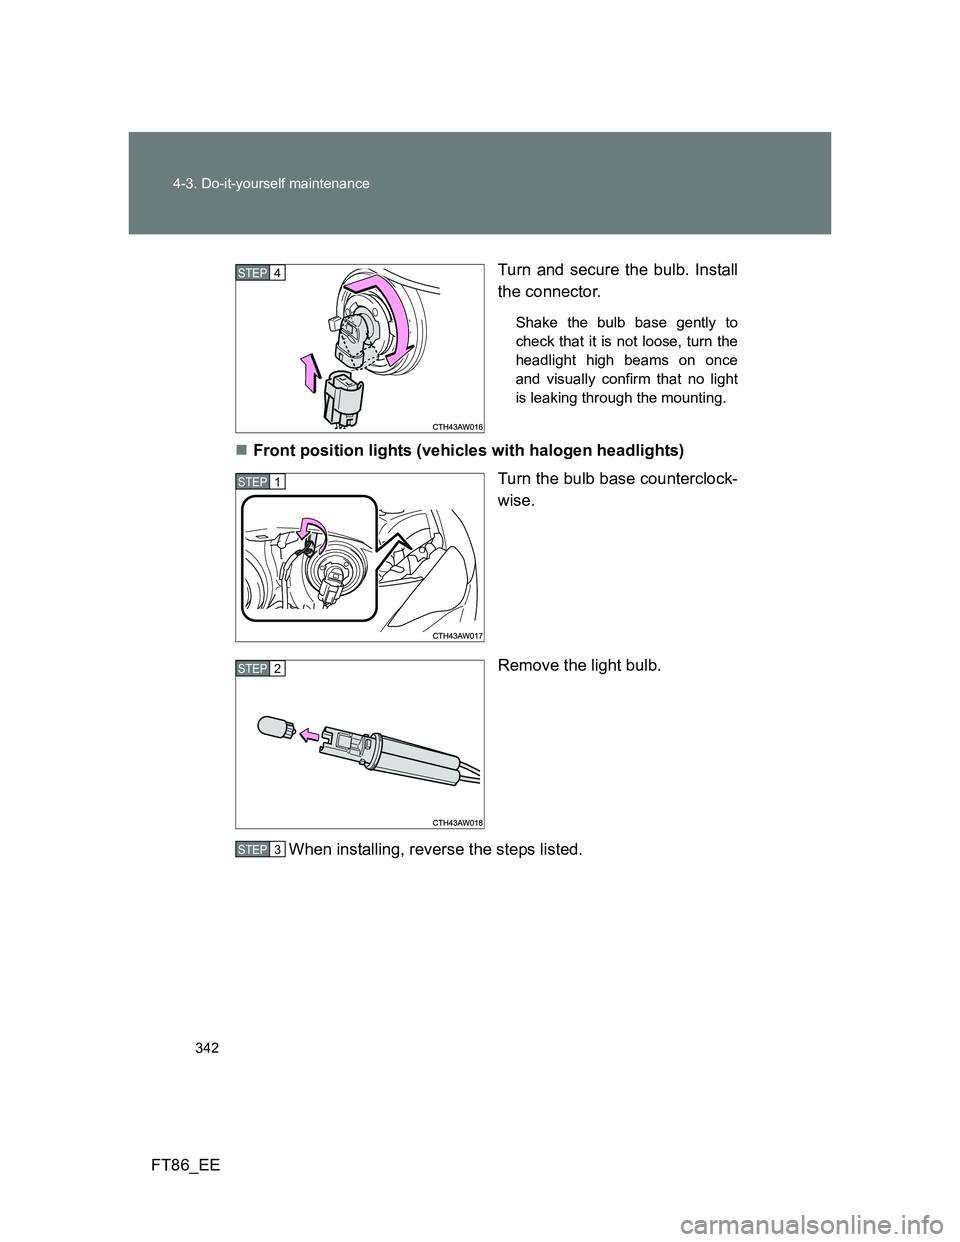
FT86_EETurn and secure the bulb. Install
the connector.
Shake the bulb base gently to
check that it is not loose, turn the
headlight high beams on once
and visually confirm that no light
is leaking through the mounting.
Front position lights (vehicles with halogen headlights)
Turn the bulb base counterclock-
wise.
Remove the light bulb.
When installing, reverse the steps listed.
STEP 4
STEP 1
STEP 2
STEP 3
Page 343 of 452
343 4-3. Do-it-yourself maintenance
4
Maintenance and care
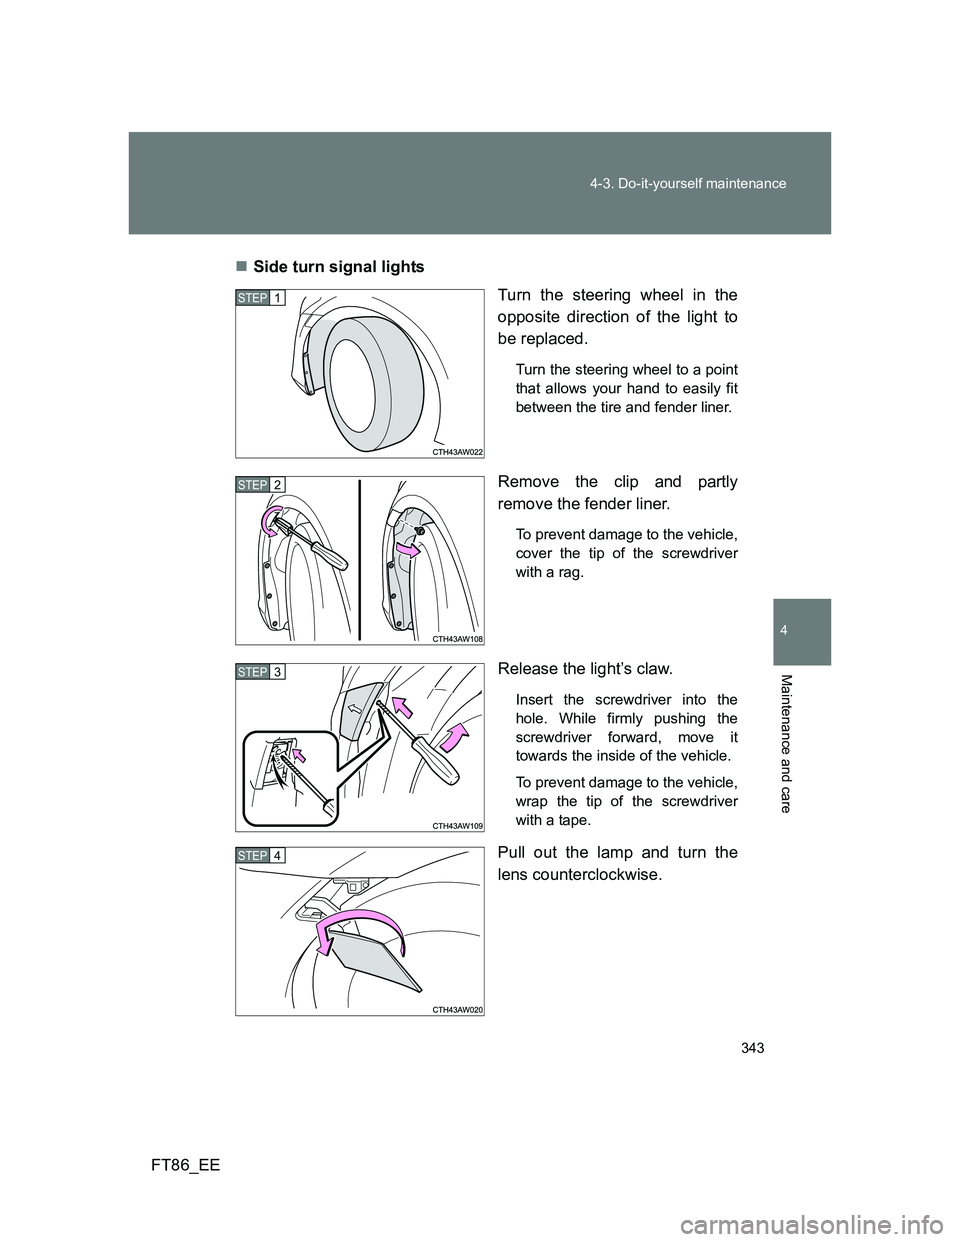
FT86_EESide turn signal lights
Turn the steering wheel in the
opposite direction of the light to
be replaced.
Turn the steering wheel to a point
that allows your hand to easily fit
between the tire and fender liner.
Remove the clip and partly
remove the fender liner.
To prevent damage to the vehicle,
cover the tip of the screwdriver
with a rag.
Release the light’s claw.
Insert the screwdriver into the
hole. While firmly pushing the
screwdriver forward, move it
towards the inside of the vehicle.
To prevent damage to the vehicle,
wrap the tip of the screwdriver
with a tape.
Pull out the lamp and turn the
lens counterclockwise.
STEP 1
STEP 2
STEP 3
STEP 4
Page 344 of 452
344 4-3. Do-it-yourself maintenance
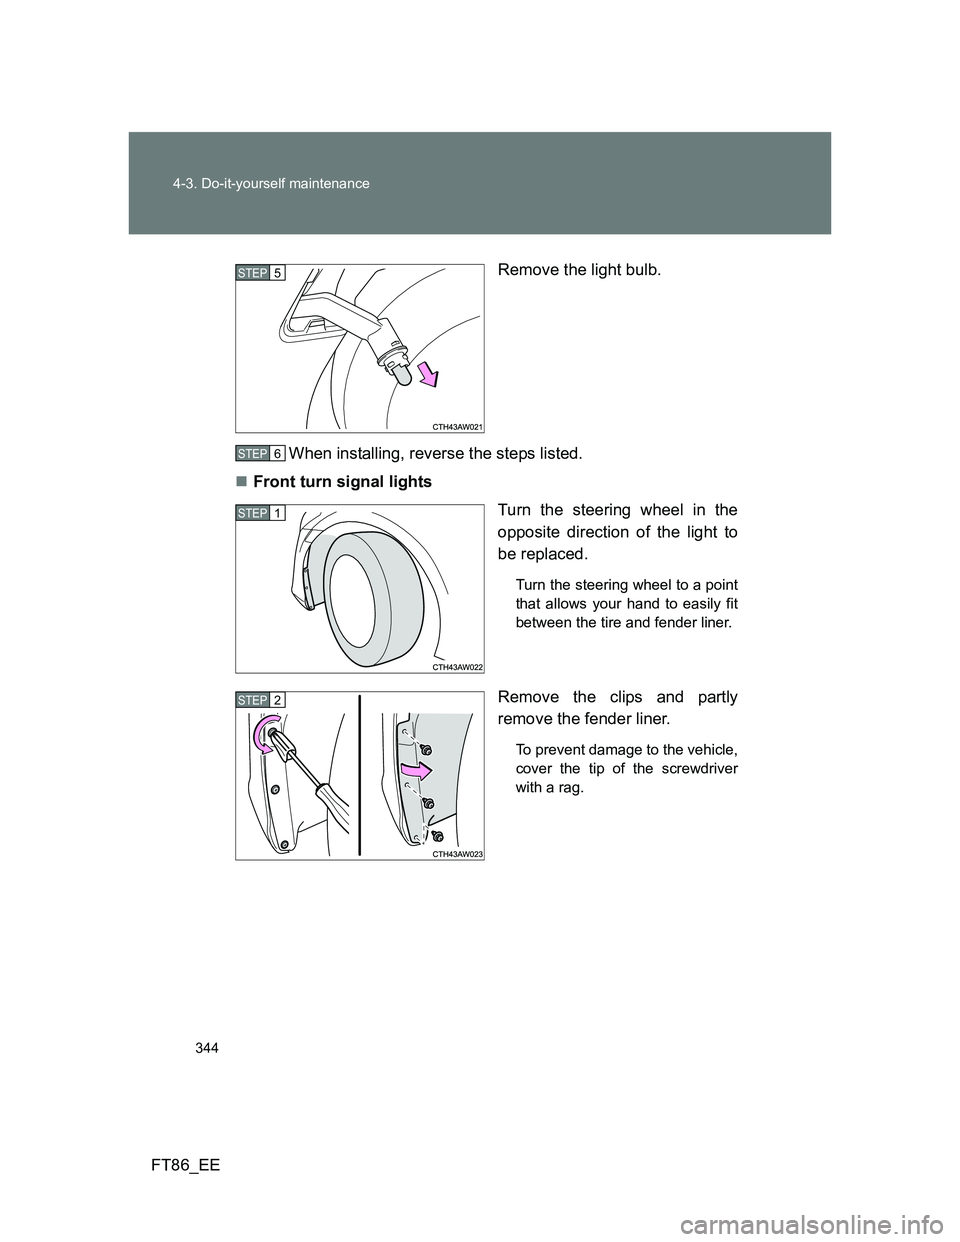
FT86_EERemove the light bulb.
When installing, reverse the steps listed.
Front turn signal lights
Turn the steering wheel in the
opposite direction of the light to
be replaced.
Turn the steering wheel to a point
that allows your hand to easily fit
between the tire and fender liner.
Remove the clips and partly
remove the fender liner.
To prevent damage to the vehicle,
cover the tip of the screwdriver
with a rag.
STEP 5
STEP 6
STEP 1
STEP 2
Page 346 of 452
346 4-3. Do-it-yourself maintenance
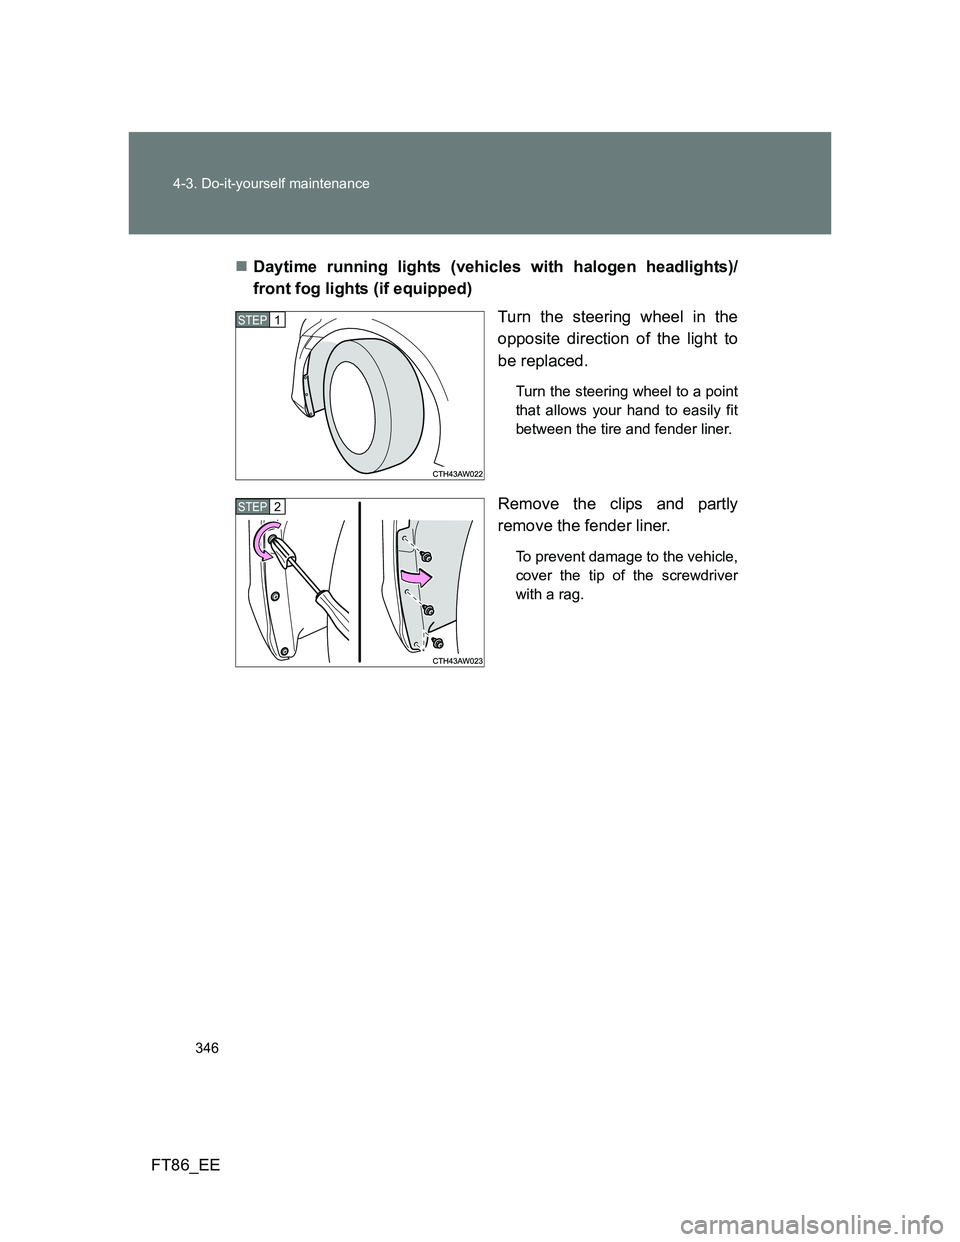
FT86_EEDaytime running lights (vehicles with halogen headlights)/
front fog lights (if equipped)
Turn the steering wheel in the
opposite direction of the light to
be replaced.
Turn the steering wheel to a point
that allows your hand to easily fit
between the tire and fender liner.
Remove the clips and partly
remove the fender liner.
To prevent damage to the vehicle,
cover the tip of the screwdriver
with a rag.
STEP 1
STEP 2
Page 347 of 452
347 4-3. Do-it-yourself maintenance
4
Maintenance and care
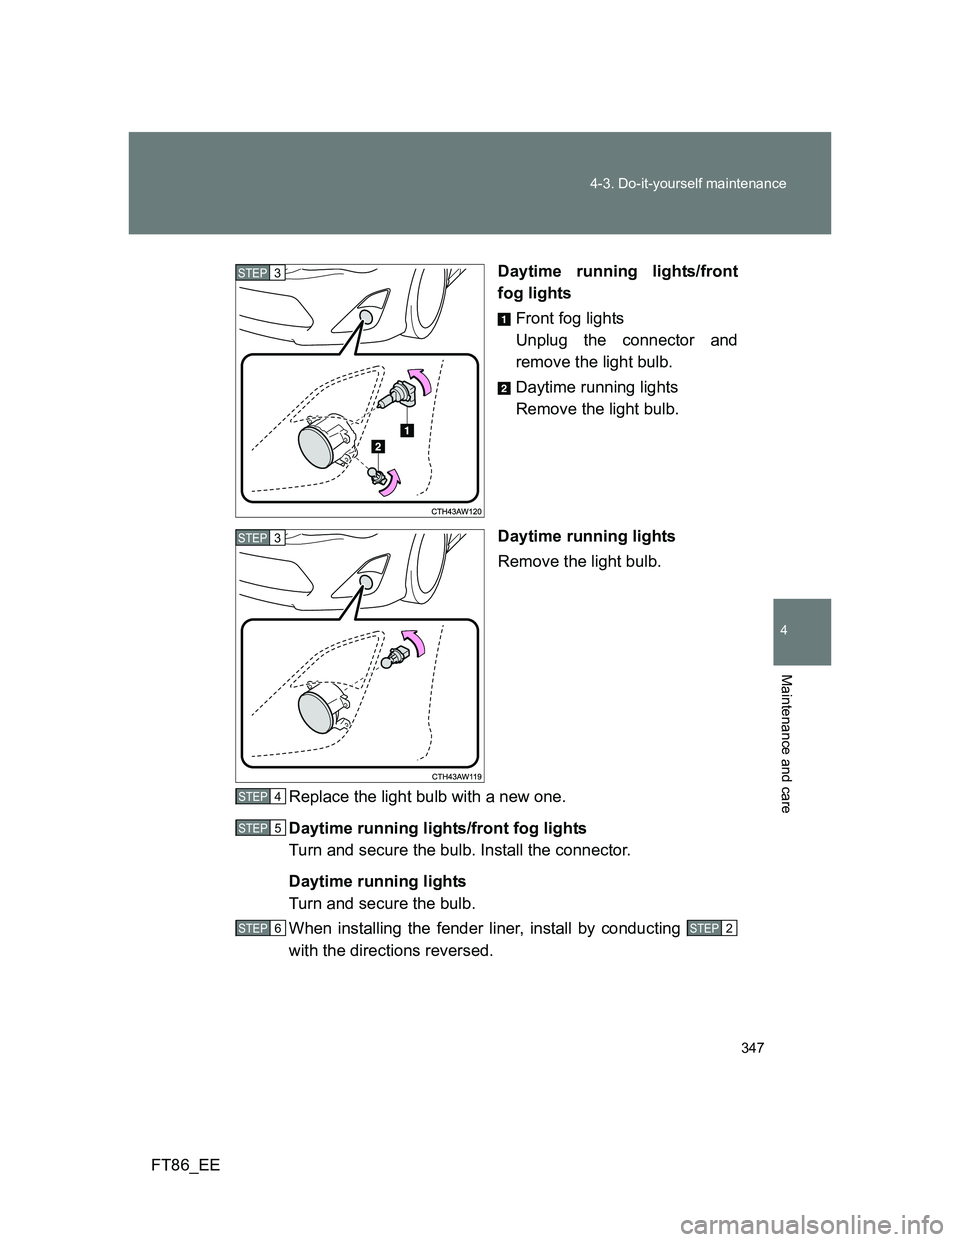
FT86_EEDaytime running lights/front
fog lights
Front fog lights
Unplug the connector and
remove the light bulb.
Daytime running lights
Remove the light bulb.
Daytime running lights
Remove the light bulb.
Replace the light bulb with a new one.
Daytime running lights/front fog lights
Turn and secure the bulb. Install the connector.
Daytime running lights
Turn and secure the bulb.
When installing the fender liner, install by conducting
with the directions reversed.
STEP 3
STEP 3
STEP 5 STEP 4
STEP 5 STEP 5
STEP 5 STEP 6 STEP 5 STEP 2