engine TOYOTA HIGHLANDER 2009 XU40 / 2.G Owners Manual
[x] Cancel search | Manufacturer: TOYOTA, Model Year: 2009, Model line: HIGHLANDER, Model: TOYOTA HIGHLANDER 2009 XU40 / 2.GPages: 608, PDF Size: 11.73 MB
Page 451 of 608
451
4-3. Do-it-yourself maintenance
4
Maintenance and care
CAUTION
■
How to recharge the battery
Only perform a slow charge (5 A or less). The battery may explode if
charged at a quicker rate.
■ Emergency measures regarding electrolyte
●If electrolyte gets in your eyes
Flush your eyes with clean water for at least 15 minutes and get immedi-
ate medical attention. If possible, continue to apply water with a sponge or
cloth while traveling to the nearest medical facility.
● If electrolyte gets on your skin
Wash the affected area thoroughly. If you feel pain or burning, get medical
attention immediately.
● If electrolyte gets on your clothes
It can soak through clothing on to your skin. Immediately take off the cloth-
ing and follow the procedure above if necessary.
● If you accidentally swallow electrolyte
Drink a large quantity of water or milk. Follow with milk of magnesia,
beaten raw egg or vegetable oil. Get emergency medical attention immedi-
ately.
NOTICE
■When recharging the battery
Never recharge the battery while the engine is running. Also, be sure all
accessories are turned off.
Page 452 of 608
452 4-3. Do-it-yourself maintenance
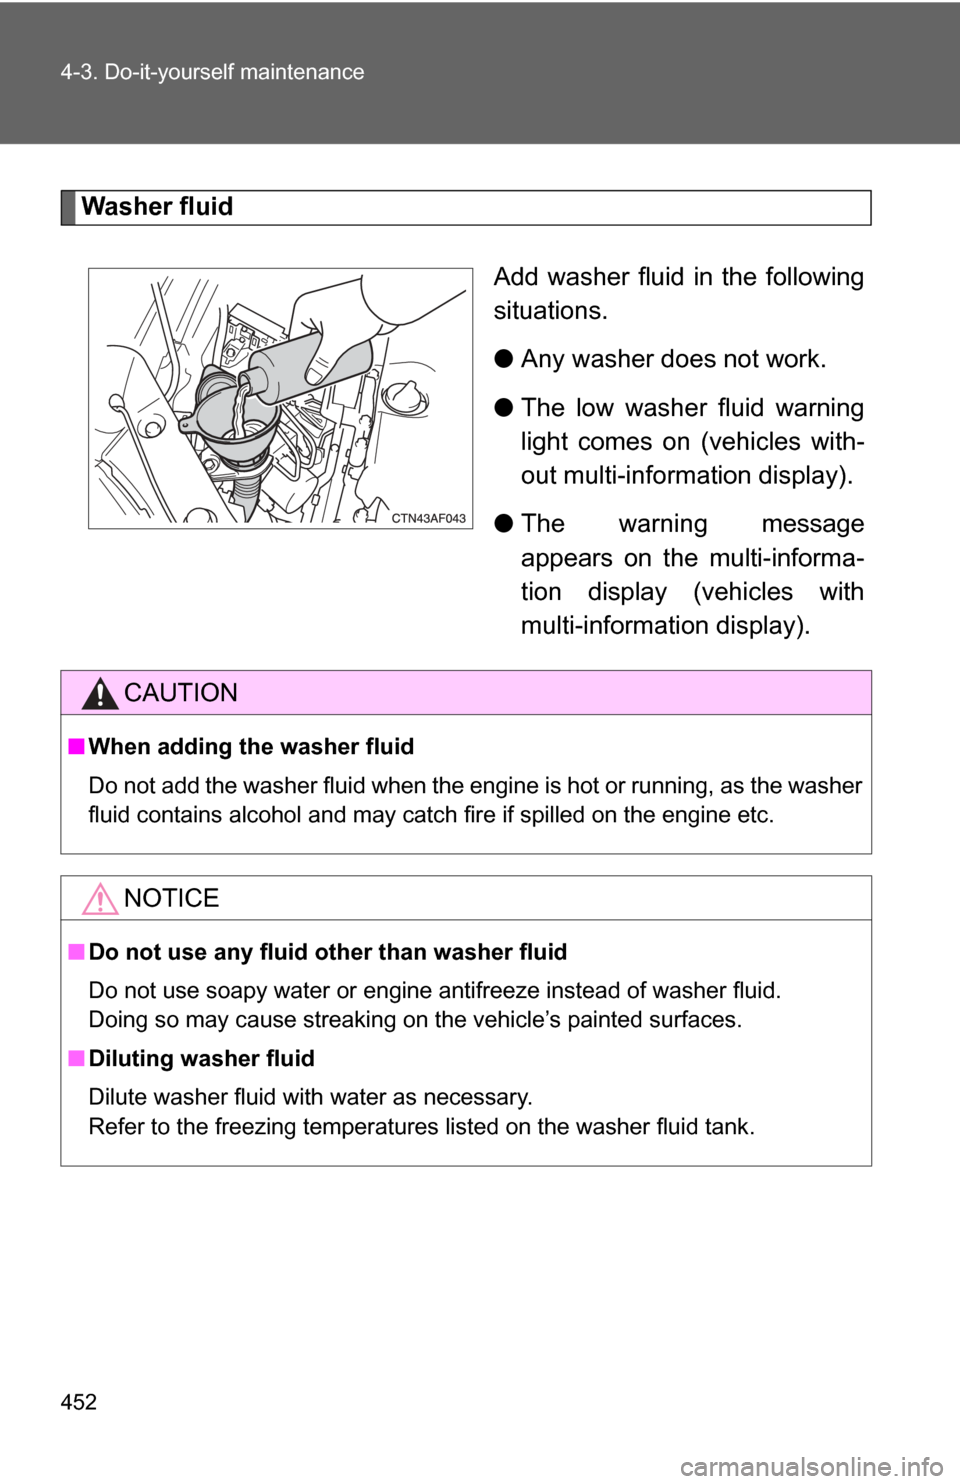
Washer fluidAdd washer fluid in the following
situations.
●Any washer does not work.
● The low washer fluid warning
light comes on (vehicles with-
out multi-information display).
● The warning message
appears on the multi-informa-
tion display (vehicles with
multi-information display).
CAUTION
■When adding the washer fluid
Do not add the washer fluid when the engine is hot or running, as the washer
fluid contains alcohol and may catch fire if spilled on the engine etc.
NOTICE
■Do not use any fluid other than washer fluid
Do not use soapy water or engine antifreeze instead of washer fluid.
Doing so may cause streaking on the vehicle’s painted surfaces.
■ Diluting washer fluid
Dilute washer fluid with water as necessary.
Refer to the freezing temperatures listed on the washer fluid tank.
Page 455 of 608
455
4-3. Do-it-yourself maintenance
4
Maintenance and care
Installing tire pressure warning valves and transmitters
When replacing tires or wheels, tire pressure warning valves and
transmitters must also be installed.
When new tire pressure warning valves and transmitters are
installed, new tire pressure warning valve and transmitter ID codes
must be registered in the tire pre ssure warning computer and the tire
pressure warning system must be initialized. Have tire pressure
warning valve and transmitter ID codes registered by your Toyota
dealer. ( →P. 457)
Initializing the tire pressure warning system
■ The tire pressure warning system must be initialized when the
tire inflation pressure is changed (such as when changing
traveling speed or towing a trailer.)
When the tire pressure warning syst em is initialized, the current tire
inflation pressure is set as the benchmark pressure.
■ How to initialize the tire pressure warning system
Park the vehicle in safe place and turn the “ENGINE START
STOP” switch or the engine switch OFF.
While the vehicle is moving, in itialization is not performed.
Adjust the tire inflation pressure to the specified cold tire infla-
tion pressure level. ( →P. 562)
Make sure to adjust the tire pressure to the specified cold tire
inflation pressure level. The tire pressure warning system will
operate based on this pressure level.
Turn the “ENGINE START STOP” switch to IGNITION ON
mode (vehicles with smart key sy stem) or the engine switch to
the “ON” position (vehicles without smart key system).
STEP1
STEP2
STEP3
Page 456 of 608
456 4-3. Do-it-yourself maintenance
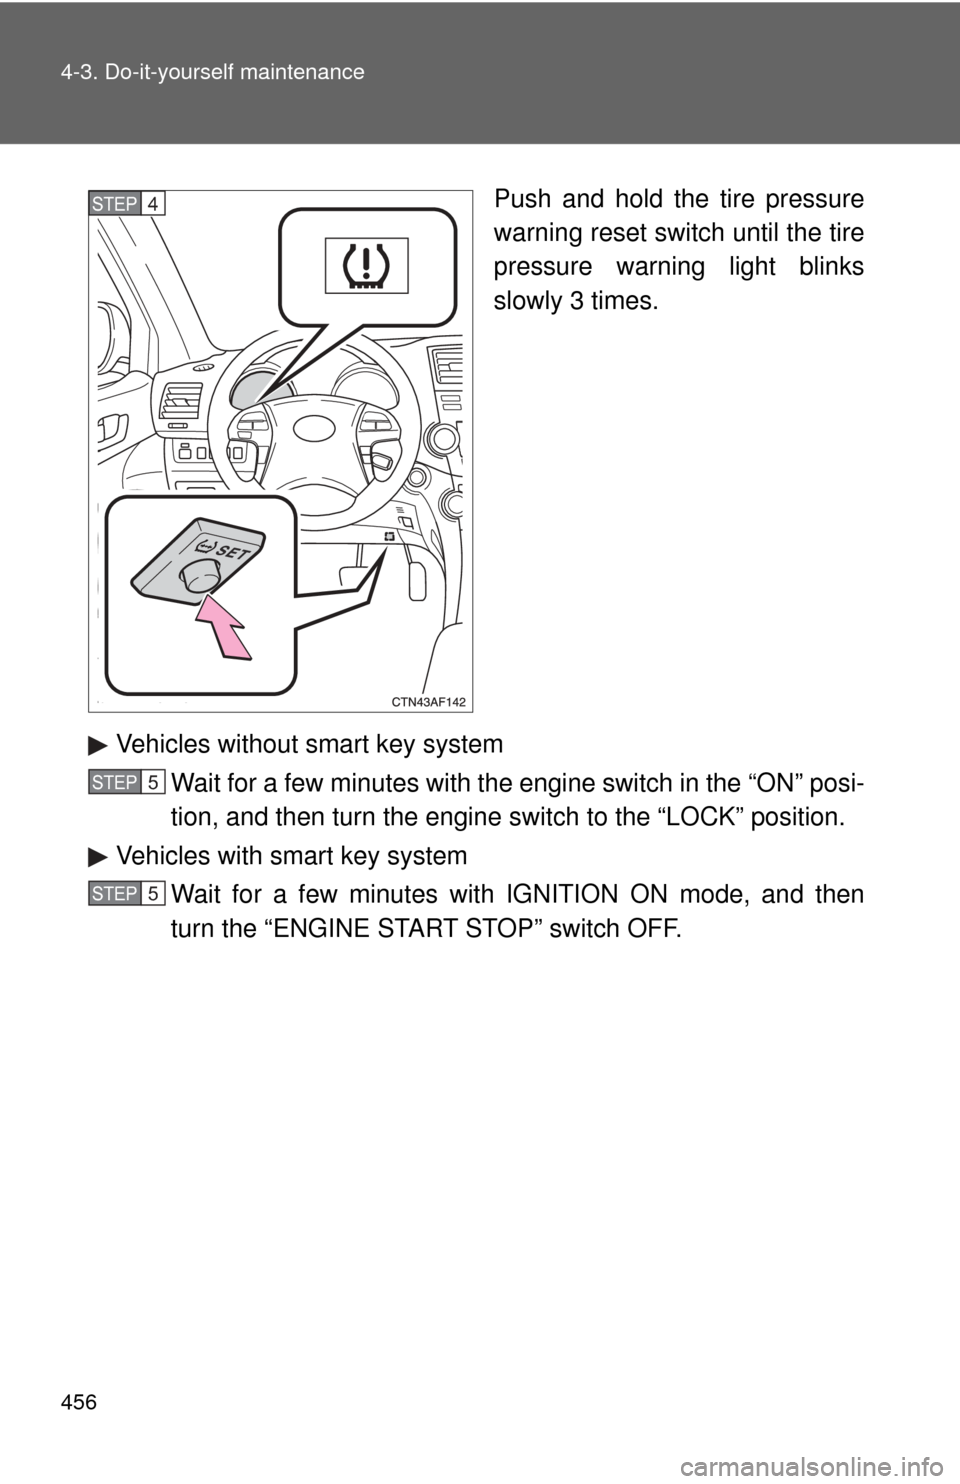
Push and hold the tire pressure
warning reset switch until the tire
pressure warning light blinks
slowly 3 times.
Vehicles without smart key system Wait for a few minutes with the engine switch in the “ON” posi-
tion, and then turn the engine switch to the “LOCK” position.
Vehicles with smart key system Wait for a few minutes with IGNITION ON mode, and then
turn the “ENGINE START STOP” switch OFF.STEP4
STEP5
STEP5
Page 469 of 608
469
4-3. Do-it-yourself maintenance
4
Maintenance and care
Air conditioning filter
The air conditioning filter must be changed regularly to maintain air
conditioning efficiency.
■ Removal method
Vehicles without smart key sy stem: Turn the engine switch
OFF.
Vehicles with smart key system: Turn the “ENGINE START
STOP” switch OFF.
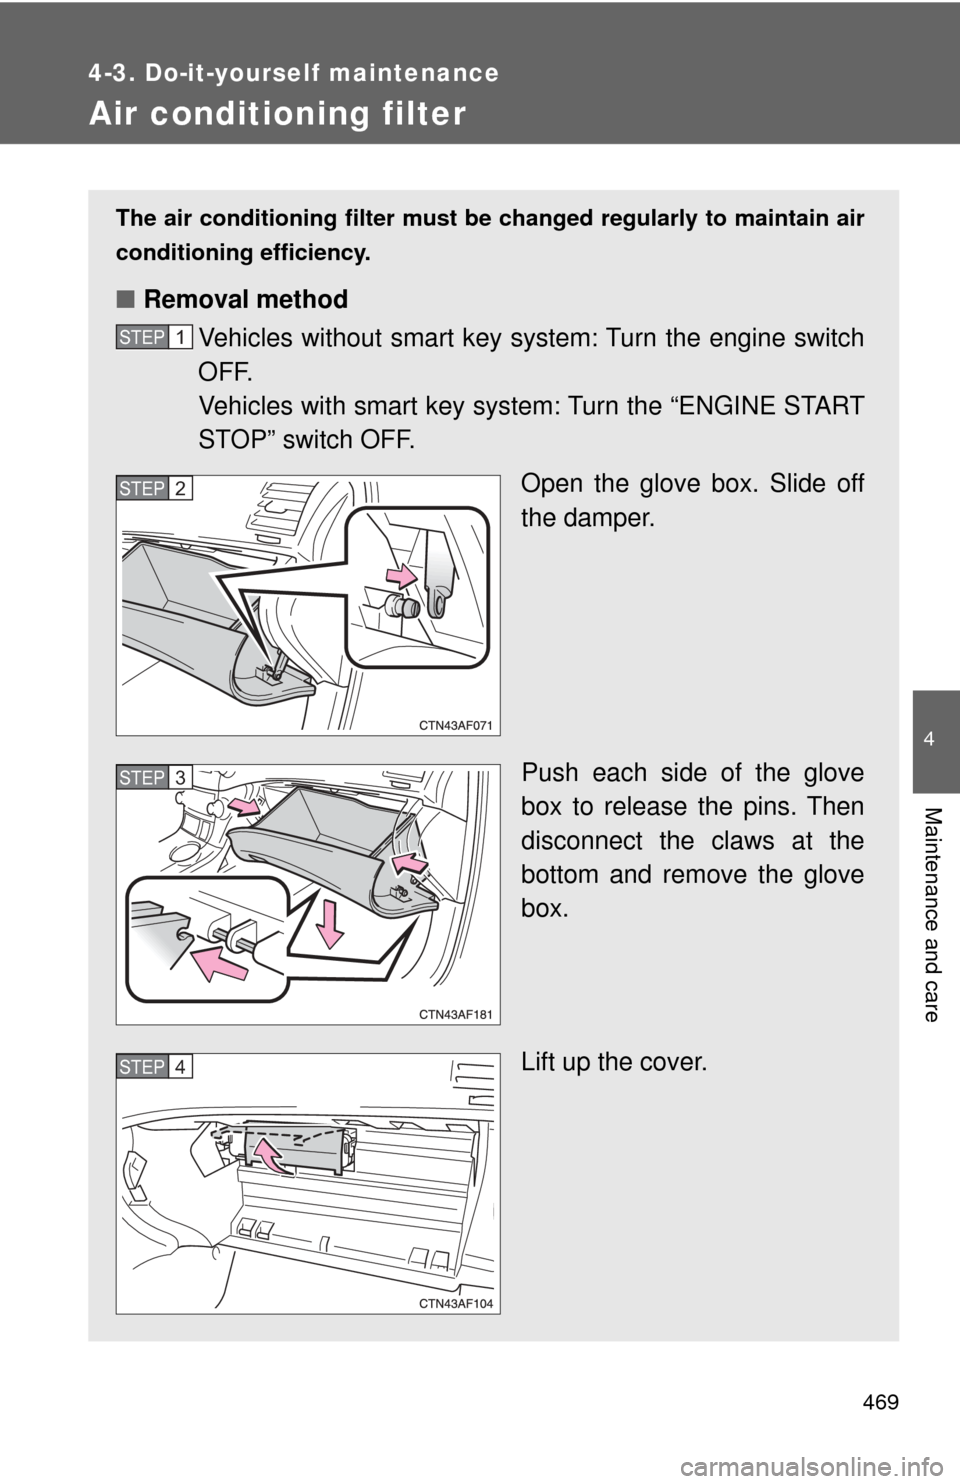
Open the glove box. Slide off
the damper.
Push each side of the glove
box to release the pins. Then
disconnect the claws at the
bottom and remove the glove
box.
Lift up the cover.
STEP1
STEP2
STEP3
STEP4
Page 475 of 608
475
4-3. Do-it-yourself maintenance
4
Maintenance and care
Checking and replacing fuses
If any of the electrical components do not operate, a fuse may have
blown. If this happens, check and replace the fuses as necessary.
Vehicles without smart key system: Turn the engine switch
OFF.
Vehicles with smart key system: Turn the “ENGINE START
STOP” switch OFF.
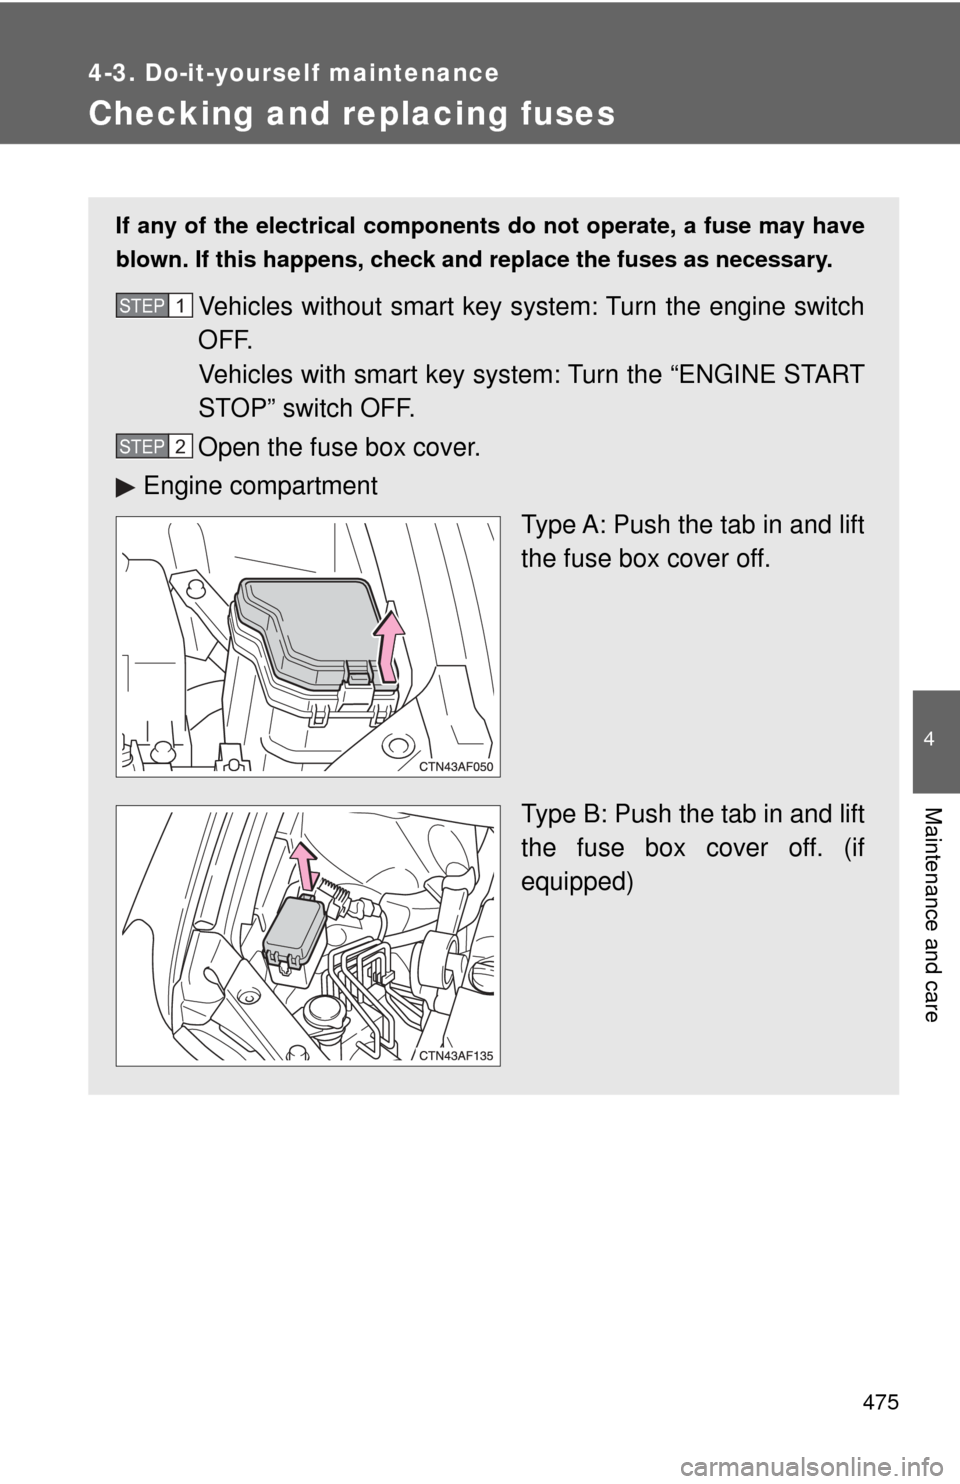
Open the fuse box cover.
Engine compartment Type A: Push the tab in and lift
the fuse box cover off.
Type B: Push the tab in and lift
the fuse box cover off. (if
equipped)STEP1
STEP2
Page 478 of 608
478 4-3. Do-it-yourself maintenance
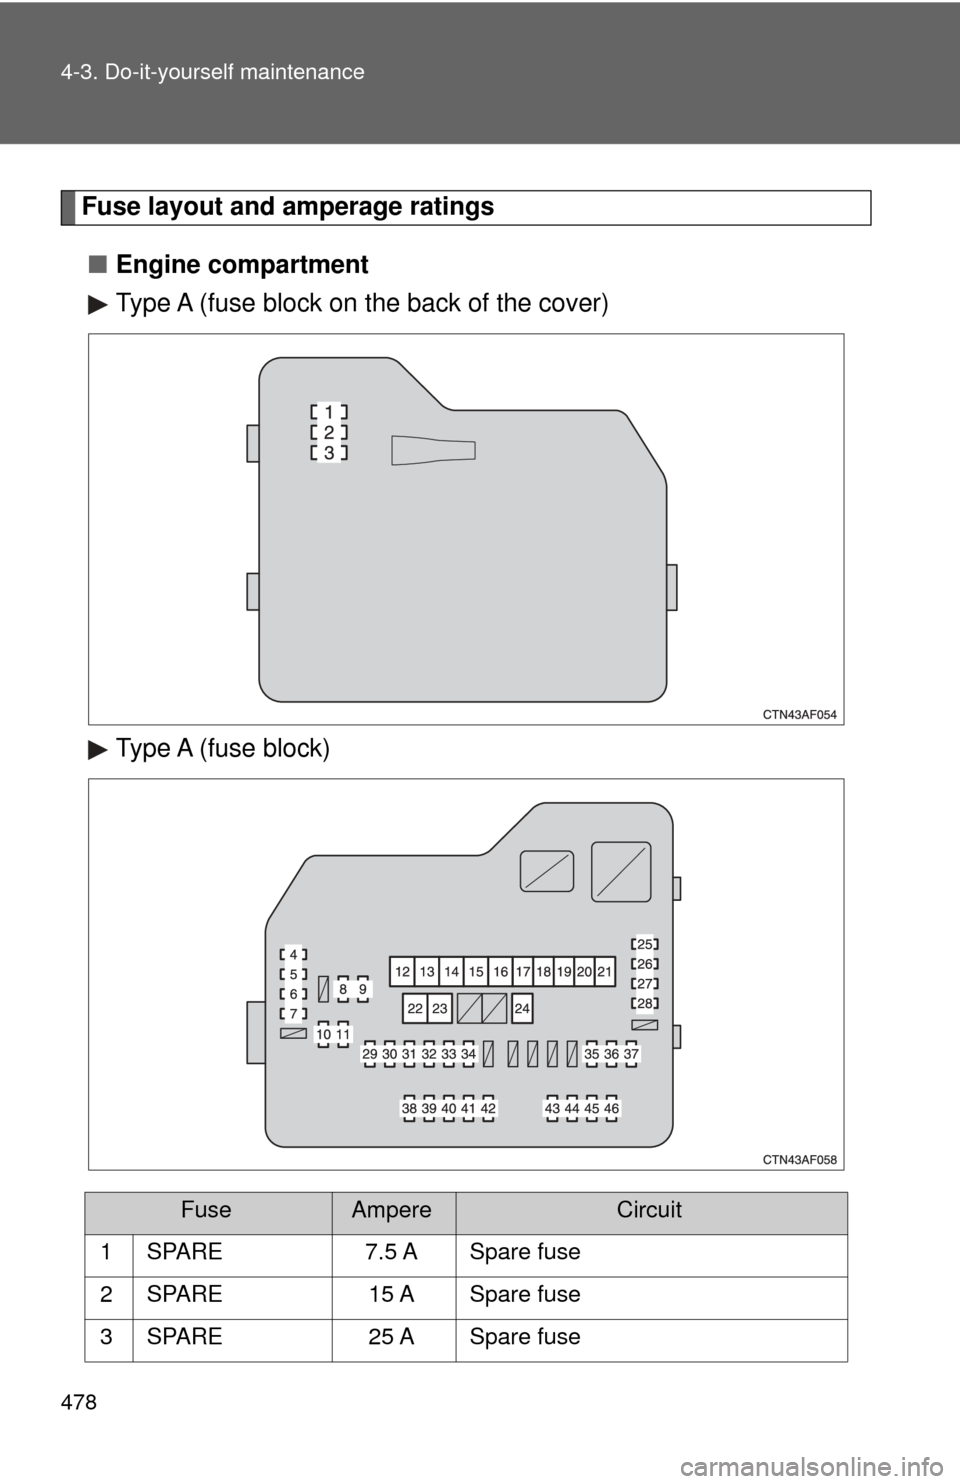
Fuse layout and amperage ratings■ Engine compartment
Type A (fuse block on the back of the cover)
Type A (fuse block)
FuseAmpereCircuit
1 SPARE 7.5 A Spare fuse
2 SPARE 15 A Spare fuse
3 SPARE 25 A Spare fuse
Page 480 of 608

480 4-3. Do-it-yourself maintenance
25 CRT10 A Rear seat entertainment system
26 RADIO1 15 A Audio system
27 ECU-B 10 ASteering sensor, gauges and
meters, clock, air conditioning sys-
tem, main body ECU, wireless
remote control, smart key system,
power back door, on-board diagno-
sis system
28 DOME 10 AVanity lights, personal lights, inte-
rior light, gauges and meters,
engine switch light, door courtesy
lights, power back door
29 AMP 15 A Audio system
30 TOWING 30 A Trailer lights
31 IG2 25 A INJ NO.1, INJ NO.2
32 STR LOCK 20 A Steering lock system
33 EFI MAIN 25 A EFI NO.2, EFI NO.3
34 HAZ 15 A Turn signal lights
35 G/H 10 APower door lock system, multiplex
communication system
36 ALT-S 7.5 A Charging system
37 AM2 7.5 A Multiplex communication system
38 H-LP LH 15 A Left-hand headlight (high beam)
39 H-LP RH 15 A Right-hand headlight (high beam)
40 H-LP LL 15 A Left-hand headlight (low beam)
41 H-LP RL 15 A Right-hand headlight (low beam)
42 HORN 10 A Horn
43 EFI NO.1 10 AMultiport fuel injection system/
sequential multiport fuel injection
system, smart key system
FuseAmpereCircuit
Page 486 of 608
486
4-3. Do-it-yourself maintenance
Light bulbs
You may replace the following bulbs yourself. The difficulty level of
replacement varies depending on the bulb. If necessary bulb
replacement seems difficult to perfor m, contact your Toyota dealer.
For more information about replacing other light bulbs, contact your
Toyota dealer.
■ Prepare a replacement light bulb.
Check the wattage of the li ght bulb being replaced. (→P. 566)
■ Remove the engine compartment cover.
→ P. 439
■ Turn the power back door main switch OFF. (vehicles with
power back door)
→ P. 7 3
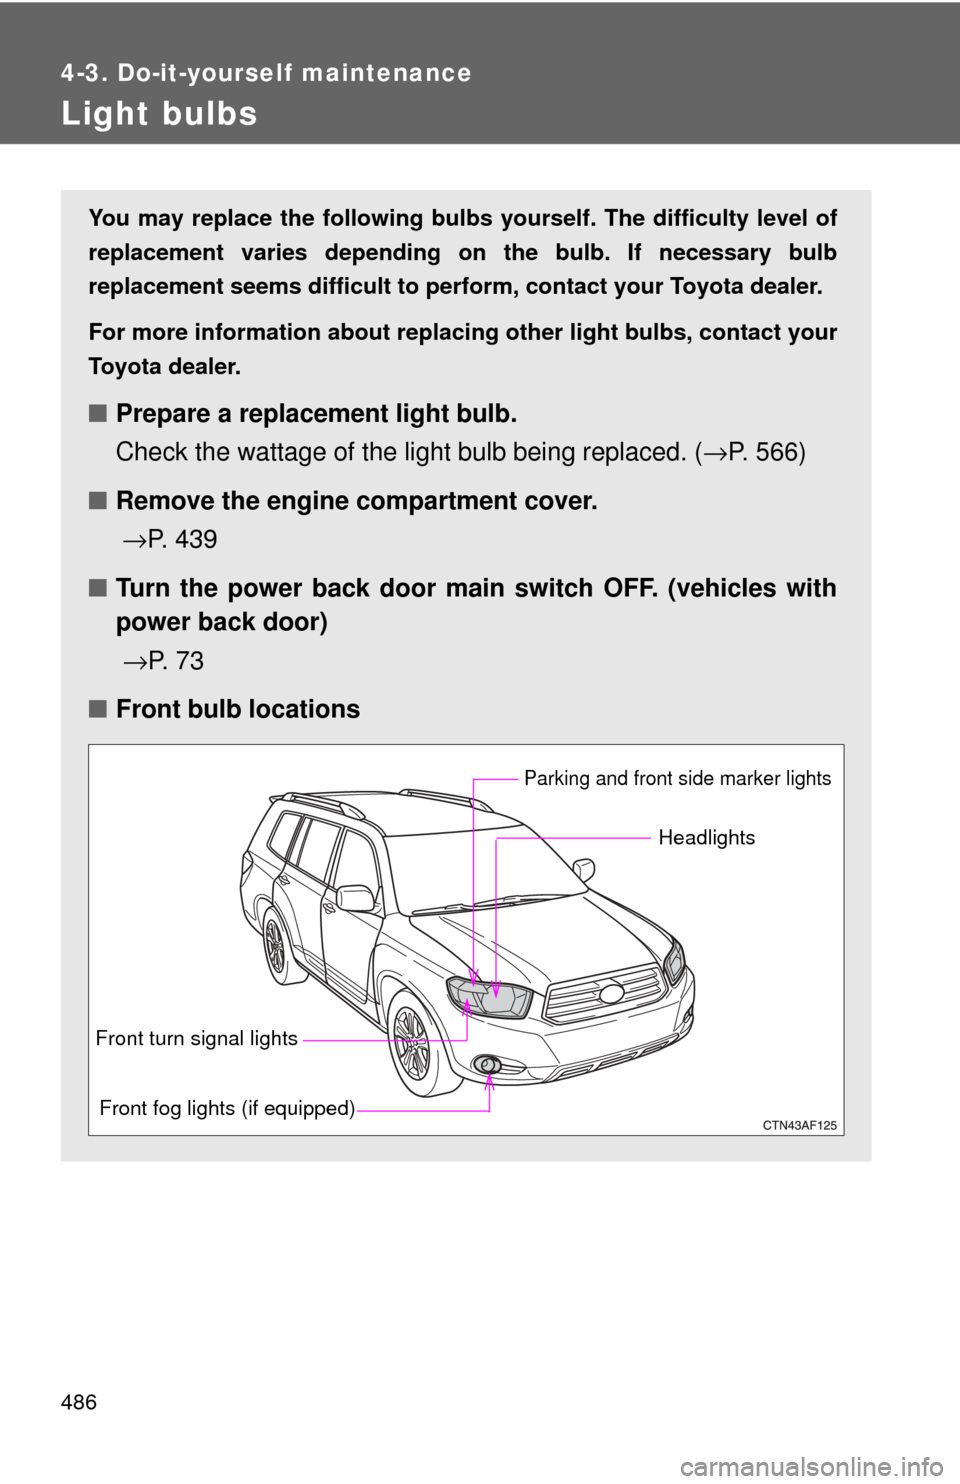
■ Front bulb locations
Headlights
Parking and front side marker lights
Front fog lights (if equipped)
Front turn signal lights
Page 497 of 608
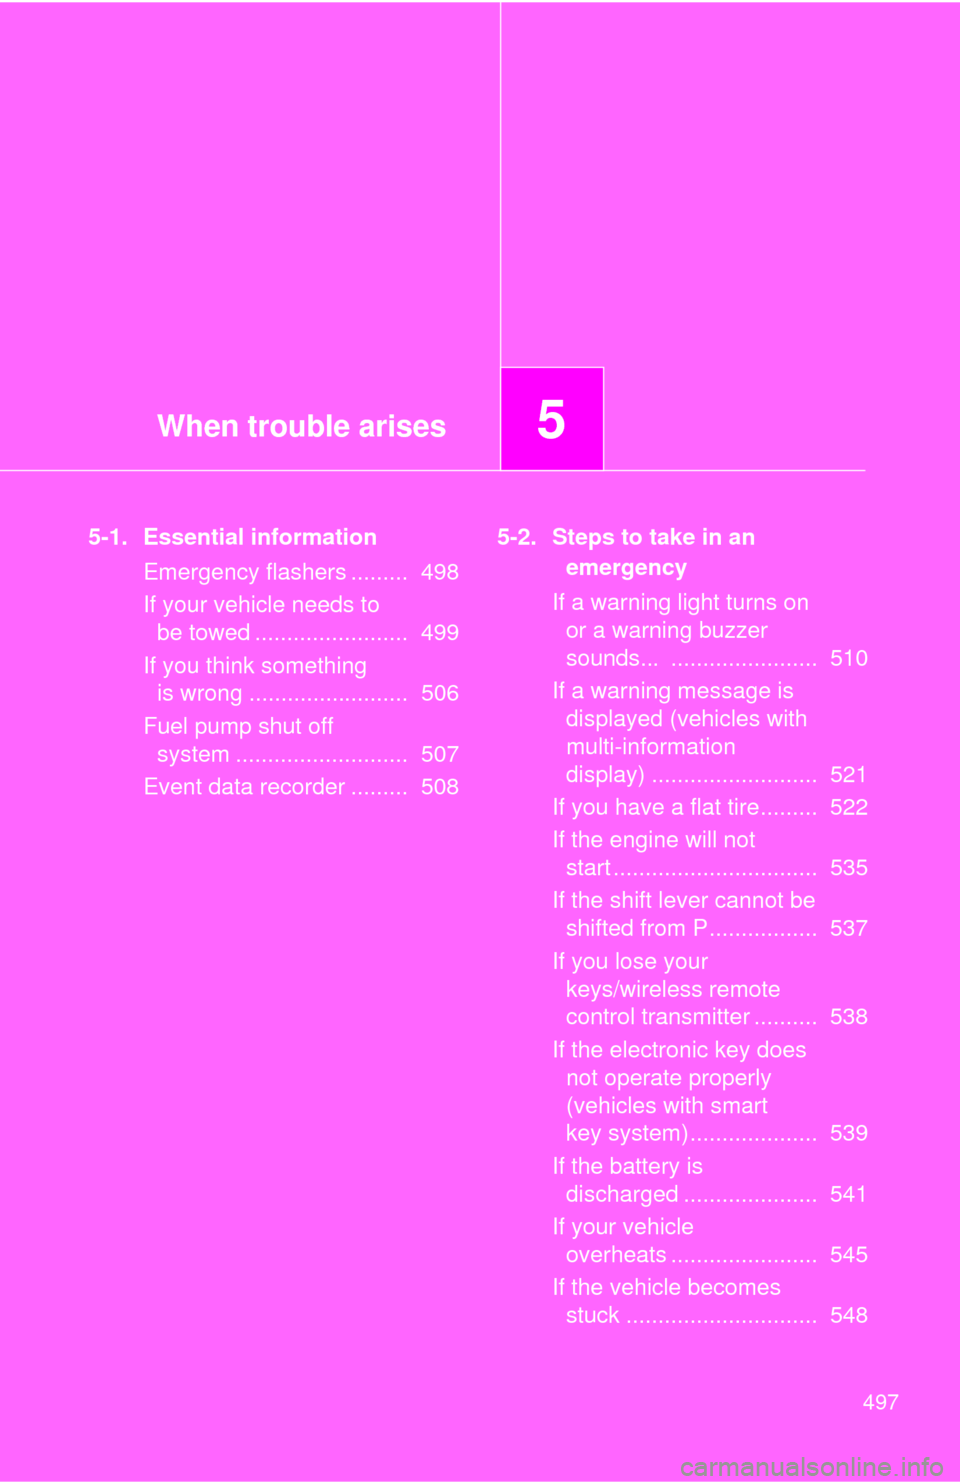
When trouble arises5
497
5-1. Essential informationEmergency flashers ......... 498
If your vehicle needs to be towed ........................ 499
If you think something is wrong ......................... 506
Fuel pump shut off system ........................... 507
Event data recorder ......... 508 5-2. Steps to take in an
emergency
If a warning light turns on or a warning buzzer
sounds... ....................... 510
If a warning message is displayed (vehicles with
multi-information
display) .......................... 521
If you have a flat tire......... 522
If the engine will not start ................................ 535
If the shift lever cannot be shifted from P................. 537
If you lose your keys/wireless remote
control transmitter .......... 538
If the electronic key does not operate properly
(vehicles with smart
key system).................... 539
If the battery is discharged ..................... 541
If your vehicle overheats ....................... 545
If the vehicle becomes stuck .............................. 548