turn signal TOYOTA HIGHLANDER 2016 XU50 / 3.G User Guide
[x] Cancel search | Manufacturer: TOYOTA, Model Year: 2016, Model line: HIGHLANDER, Model: TOYOTA HIGHLANDER 2016 XU50 / 3.GPages: 716, PDF Size: 11.4 MB
Page 357 of 716
3575-4. Using the radio
5
Audio system
HIGHLANDER_U (OM48F09U)
Search for desired stations by turning the “TUNE·SCROLL” knob or
pressing the “” or “ ” button on “SEEK/TRACK”.
Select “(add new)”.
To change the preset station to a different one, select and hold the preset
station.
Select “Yes”.
Select “OK” after setting the new preset station.
■Refreshing the station list Select “Refresh” on the “Station List” screen.
To cancel the refresh, select “Cancel Refresh”.
■Reception sensitivity
●Maintaining perfect radio reception at all times is difficult due to the continu-
ally changing position of the antenna, differences in signal strength and sur-
rounding objects, such as trains, transmitters, etc.
● The radio antenna is mounted inside the rear quarter window. To maintain
clear radio reception, do not attach metallic window tinting or other metallic
objects to the antenna wire mounted inside the rear window.
Setting station presets
1
2
3
4
1
Page 382 of 716
3825-7. Connecting Bluetooth®
HIGHLANDER_U (OM48F09U)
When auto connection has failed or “Bluetooth* Power” is turned off,
you must connect the Bluetooth® device manually.
Follow the steps in “Connecting a Bluetooth
® device” from step .
( P. 381)
*: Bluetooth is a registered trademark of Bluetooth SIG, Inc.
Registering an additional device
Select “Select Device” on the Bluetooth
® audio control screen.
For more information: P. 3 7 9
Selecting a registered device
Select “Select Device” on the Bluetooth
® audio control screen.
For more information: P. 3 8 1
■Reconnecting a Bluetooth® phone
If the system cannot connect due to poor signal strength, the system will
automatically attempt to reconnect.
If the system is attempting to connect to a Bluetooth
® phone and the
Bluetooth® phone is turned off and then back on, the system will attempt to
reconnect.
Manual connection
Connecting a Bluetooth® audio player
11
1
2
1
2
Page 474 of 716
4746-4. Using the other interior features
HIGHLANDER_U (OM48F09U)
Press the appropriate HomeLink® button. The HomeLink® indicator
light should turn on.
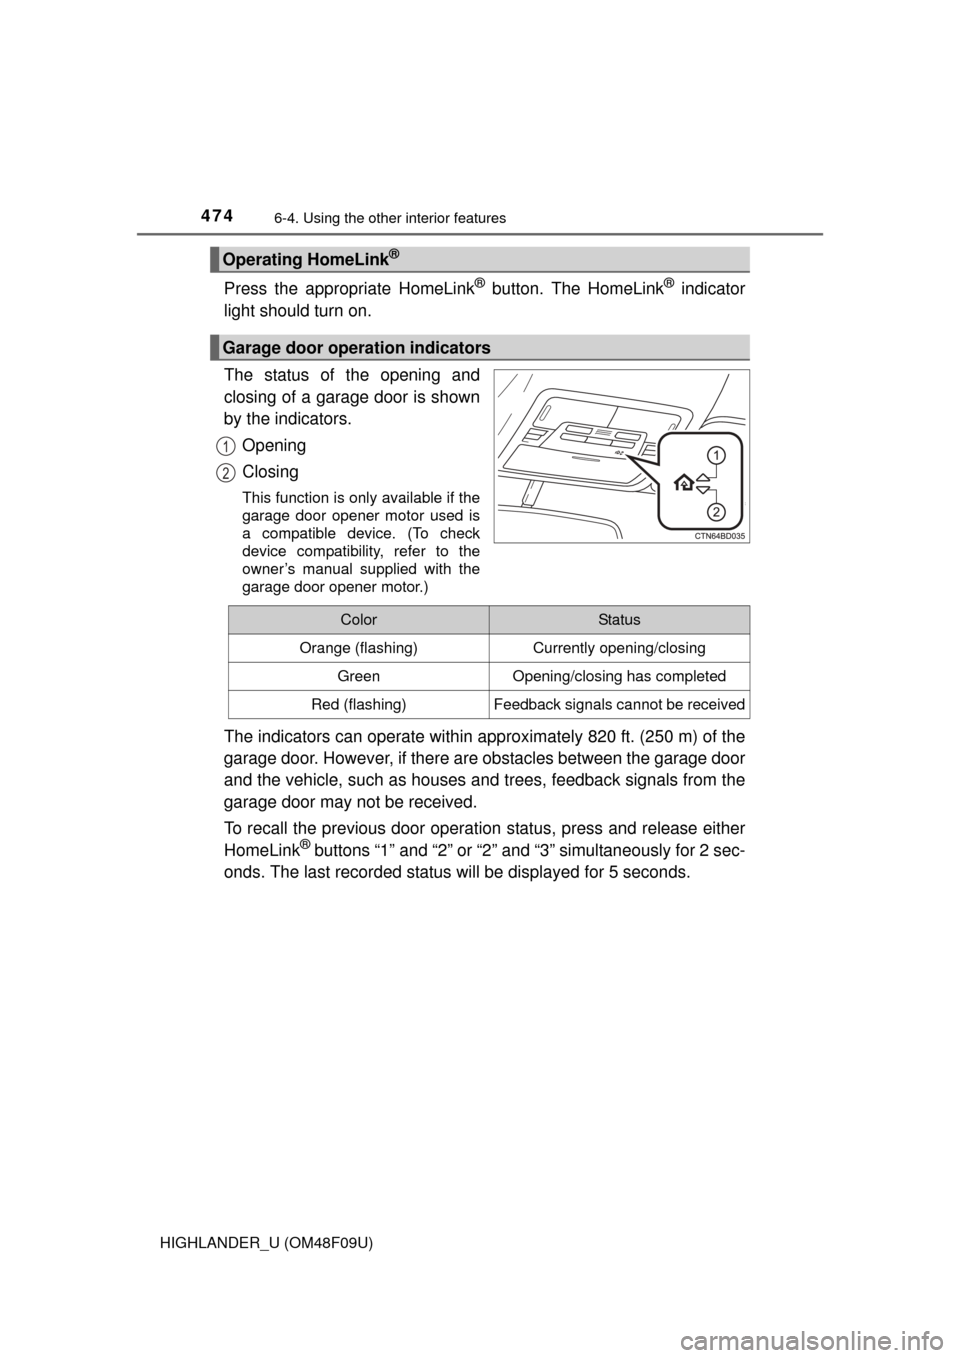
The status of the opening and
closing of a garage door is shown
by the indicators.
Opening
Closing
This function is only available if the
garage door opener motor used is
a compatible device. (To check
device compatibility, refer to the
owner’s manual supplied with the
garage door opener motor.)
The indicators can operate within approximately 820 ft. (250 m) of the
garage door. However, if there are obstacles between the garage door
and the vehicle, such as houses a nd trees, feedback signals from the
garage door may not be received.
To recall the previous door operat ion status, press and release either
HomeLink
® buttons “1” and “2” or “2” and “3” simultaneously for 2 sec-
onds. The last recorded status will be displayed for 5 seconds.
Operating HomeLink®
Garage door operation indicators
1
2
ColorStatus
Orange (flashing)Currently opening/closing
GreenOpening/closing has completed
Red (flashing)Feedback signals cannot be received
Page 546 of 716
5467-3. Do-it-yourself maintenance
HIGHLANDER_U (OM48F09U)■
Front
■Rear
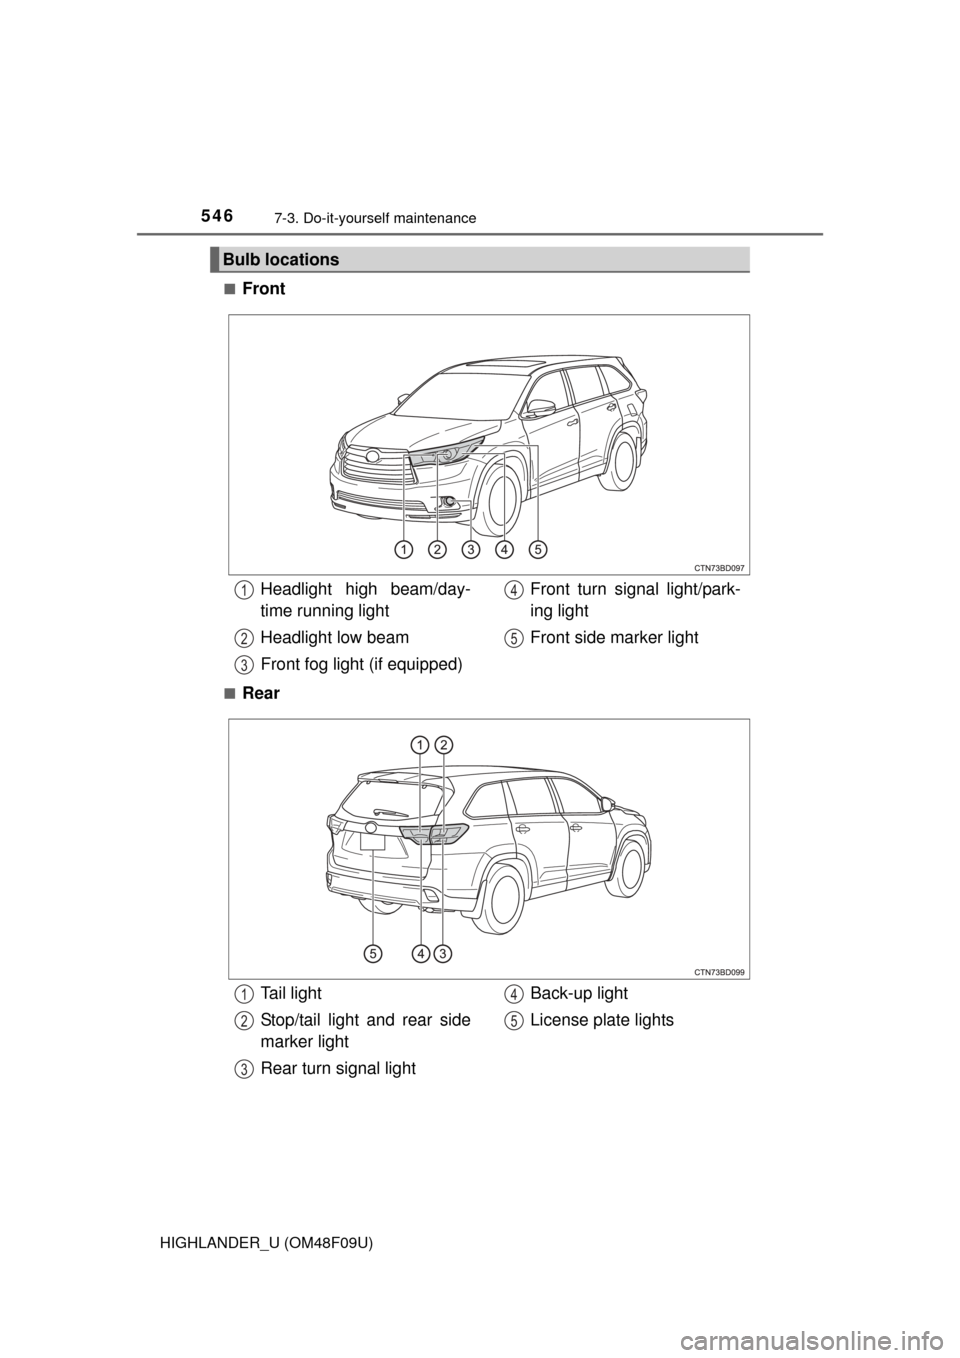
Bulb locations
Headlight high beam/day-
time running light
Headlight low beam
Front fog light (if equipped)
Front turn signal light/park-
ing light
Front side marker light1
2
3
4
5
Tail light
Stop/tail light and rear side
marker light
Rear turn signal lightBack-up light
License plate lights1
2
3
4
5
Page 550 of 716
5507-3. Do-it-yourself maintenance
HIGHLANDER_U (OM48F09U)■
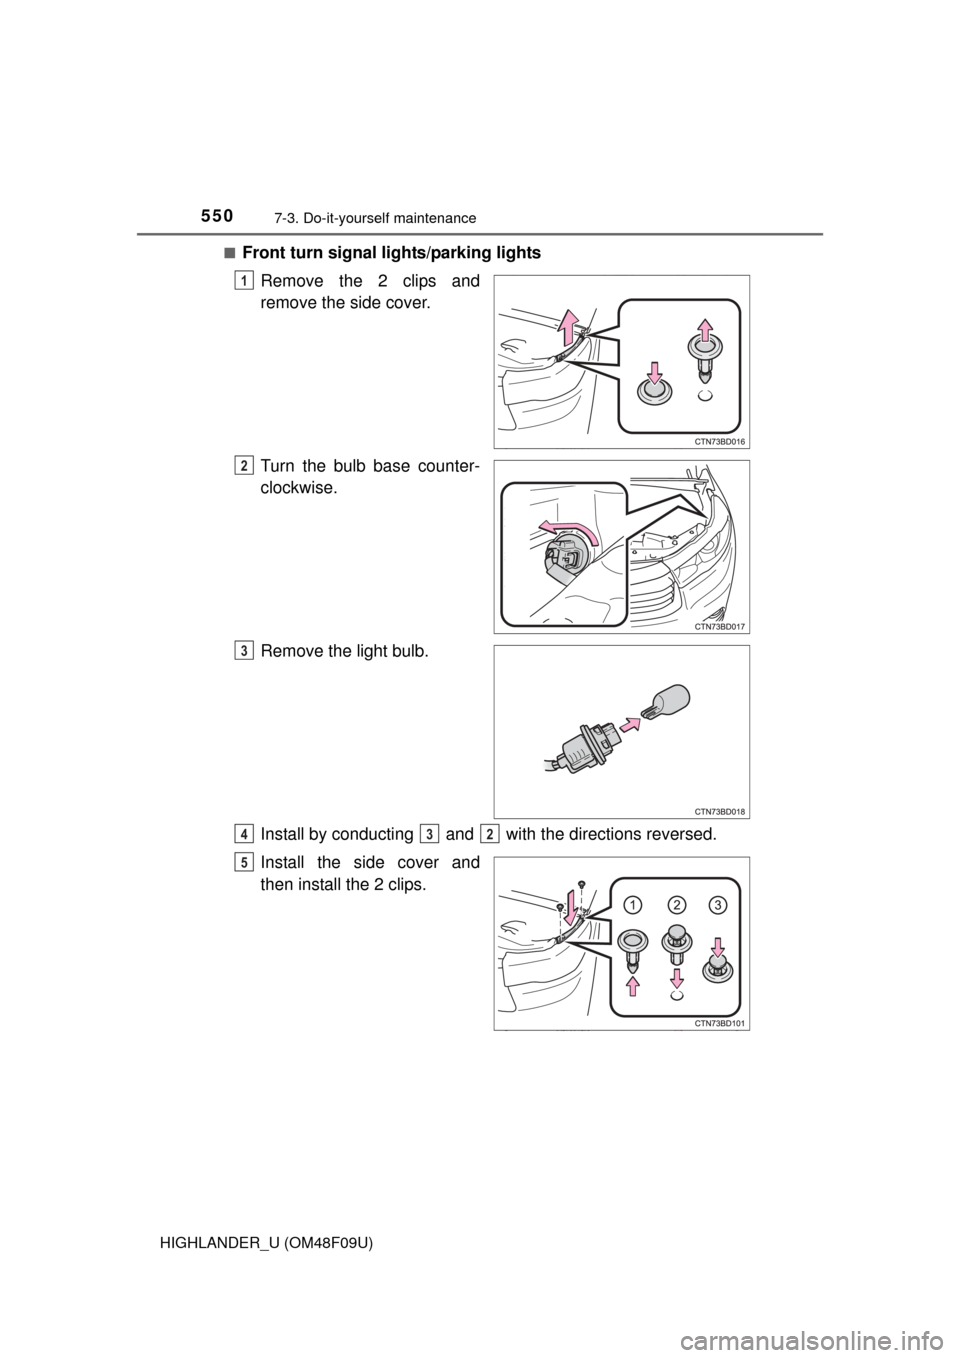
Front turn signal
lights/parking lights
Remove the 2 clips and
remove the side cover.
Turn the bulb base counter-
clockwise.
Remove the light bulb.
Install by conducting and with the directions reversed.
Install the side cover and
then install the 2 clips.
1
2
3
432
5
Page 554 of 716
5547-3. Do-it-yourself maintenance
HIGHLANDER_U (OM48F09U)■
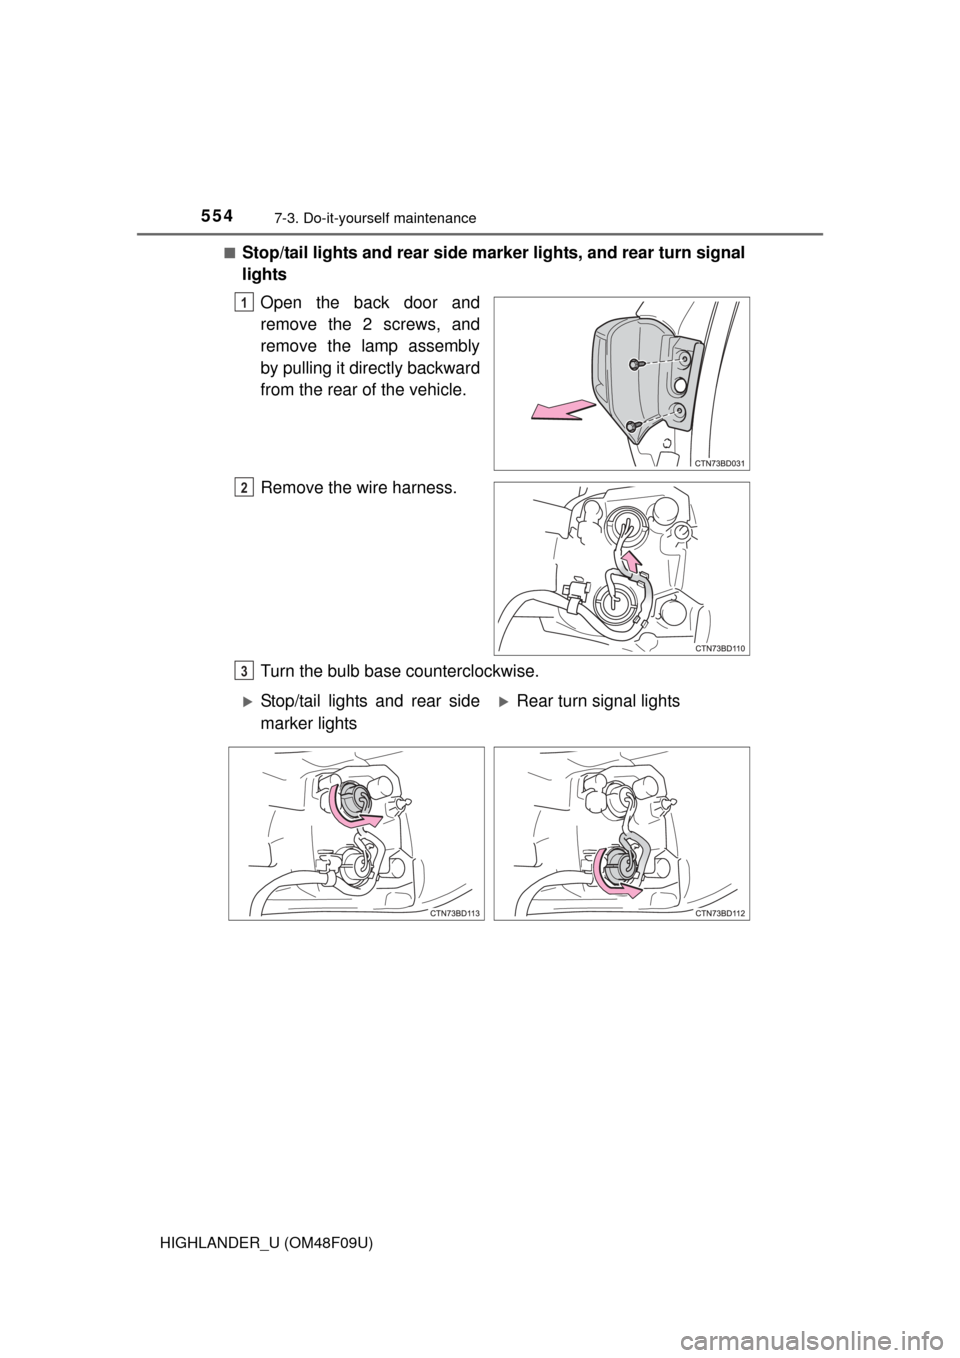
Stop/tail lights and rear side mar
ker lights, and rear turn signal
lights
Open the back door and
remove the 2 screws, and
remove the lamp assembly
by pulling it directly backward
from the rear of the vehicle.
Remove the wire harness.
Turn the bulb base counterclockwise.
1
2
3
Stop/tail lights and rear side
marker lightsRear turn signal lights
Page 555 of 716
5557-3. Do-it-yourself maintenance
7
Maintenance and care
HIGHLANDER_U (OM48F09U)
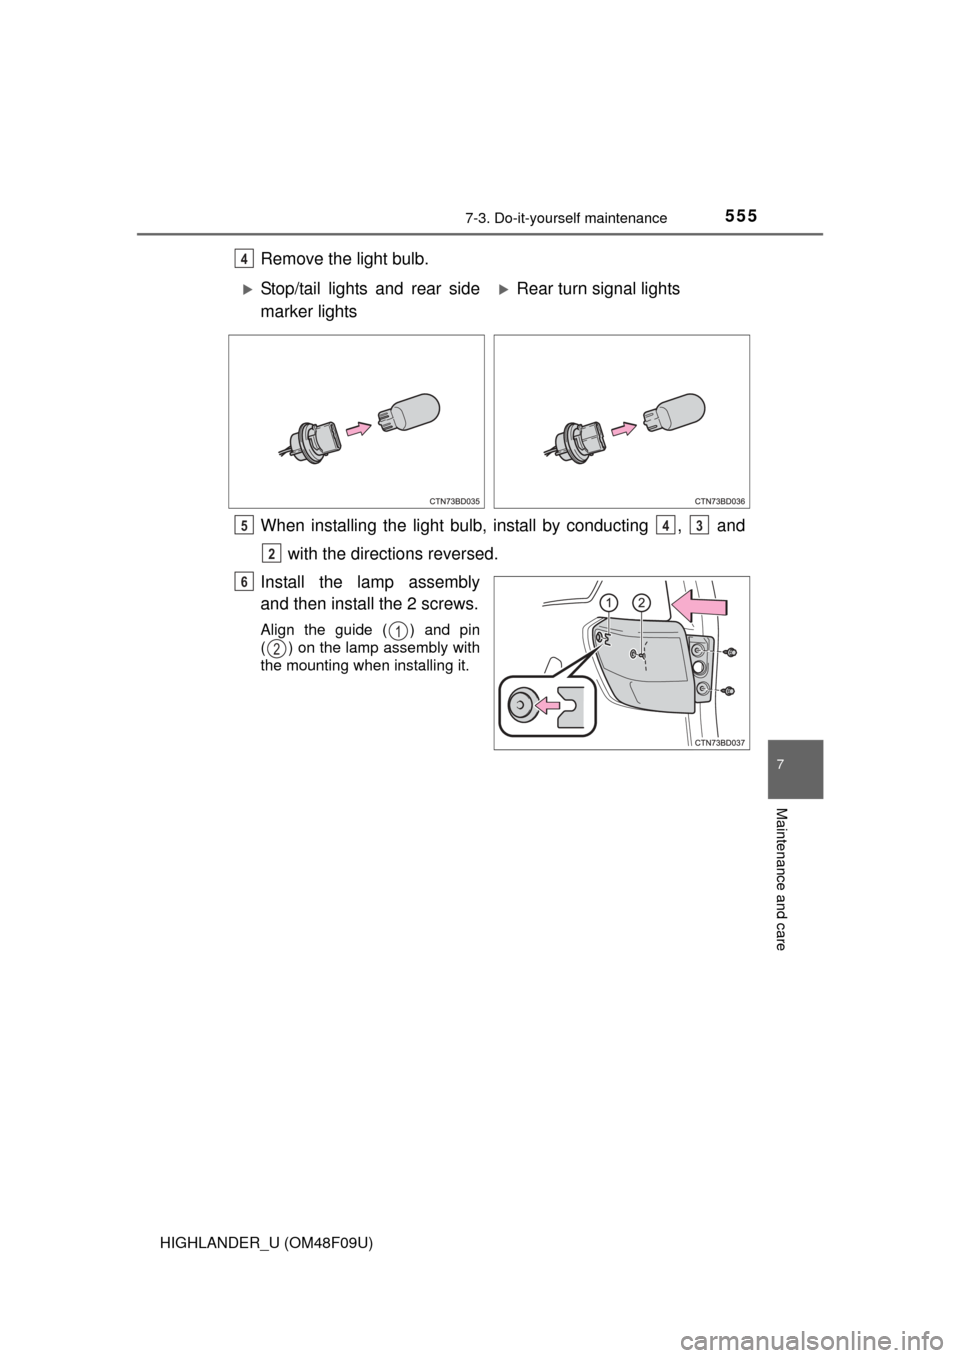
Remove the light bulb.
When installing the light bulb, install by conducting , and with the directions reversed.
Install the lamp assembly
and then install the 2 screws.
Align the guide ( ) and pin
( ) on the lamp assembly with
the mounting when installing it.
4
Stop/tail lights and rear side
marker lightsRear turn signal lights
543
2
6
1
2
Page 558 of 716
5587-3. Do-it-yourself maintenance
HIGHLANDER_U (OM48F09U)■
Replacing the following bulbs
If any of the lights listed below
has burnt out, have it replaced by
your Toyota dealer.
● Side turn signal lights
● Daytime running lights (LED type)
● High mounted stoplight
● Outer foot lights (if equipped)
■LED light bulbs
The side turn signal lights, daytime running lights (LED type), high mounted
stoplight and outer foot lights (if equipped) consist of a number of LEDs. If
any of the LEDs burns out, take your vehicle to your Toyota dealer to have the
light replaced.
■ Condensation build-up on the inside of the lens
Temporary condensation build-up on the inside of the headlight lens does not
indicate a malfunction.
Contact your Toyota dealer for more information in the following situations:
●Large drops of water have built up on the inside of the lens.
● Water has built up inside the headlight.
■ When replacing light bulbs
P. 544
WARNING
■Replacing light bulbs
●Turn off the lights. Do not attempt to replace the bulb immediately after
turning off the lights.
The bulbs become very hot and may cause burns.
● Do not touch the glass portion of the light bulb with bare hands. When it is
unavoidable to hold the glass portion, use and hold with a clean dry cloth
to avoid getting moisture and oils on the bulb.
Also, if the bulb is scratched or dropped, it may blow out or crack.
● Fully install light bulbs and any parts used to secure them. Failure to do so
may result in heat damage, fire, or water entering the headlight unit. This
may damage the headlights or cause condensation to build up on the lens.
■ To prevent damage or fire
Make sure bulbs are fully seated and locked.
Page 560 of 716
560
HIGHLANDER_U (OM48F09U)
8-1. Essential information
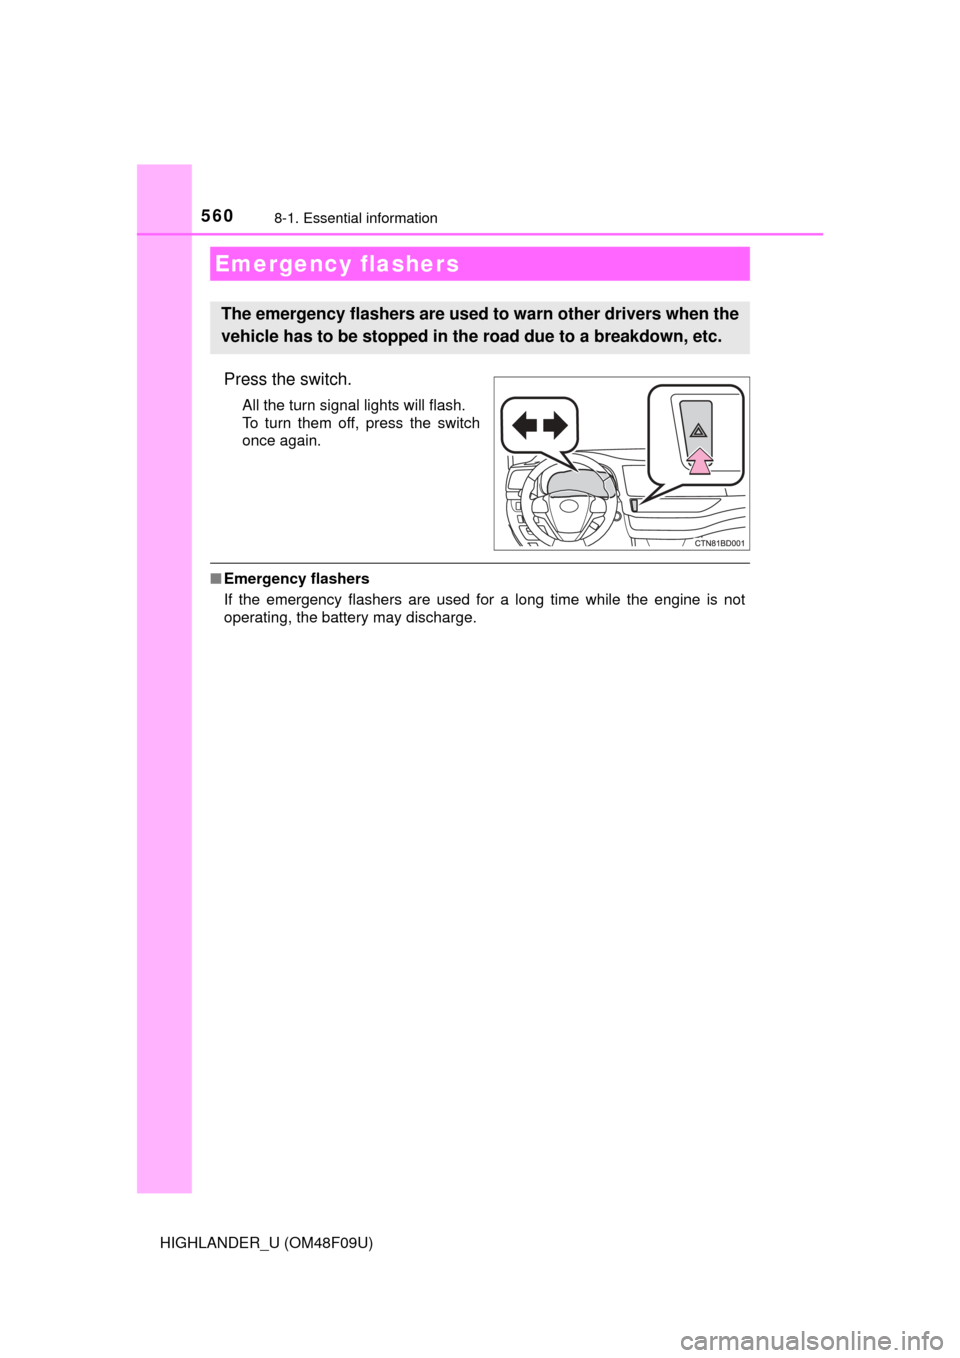
Press the switch.
All the turn signal lights will flash.
To turn them off, press the switch
once again.
■Emergency flashers
If the emergency flashers are used for a long time while the engine is not
operating, the battery may discharge.
Emergency flashers
The emergency flashers are used to warn other drivers when the
vehicle has to be stopped in th e road due to a breakdown, etc.
Page 651 of 716
6519-1. Specifications
9
Vehicle specifications
HIGHLANDER_U (OM48F09U)
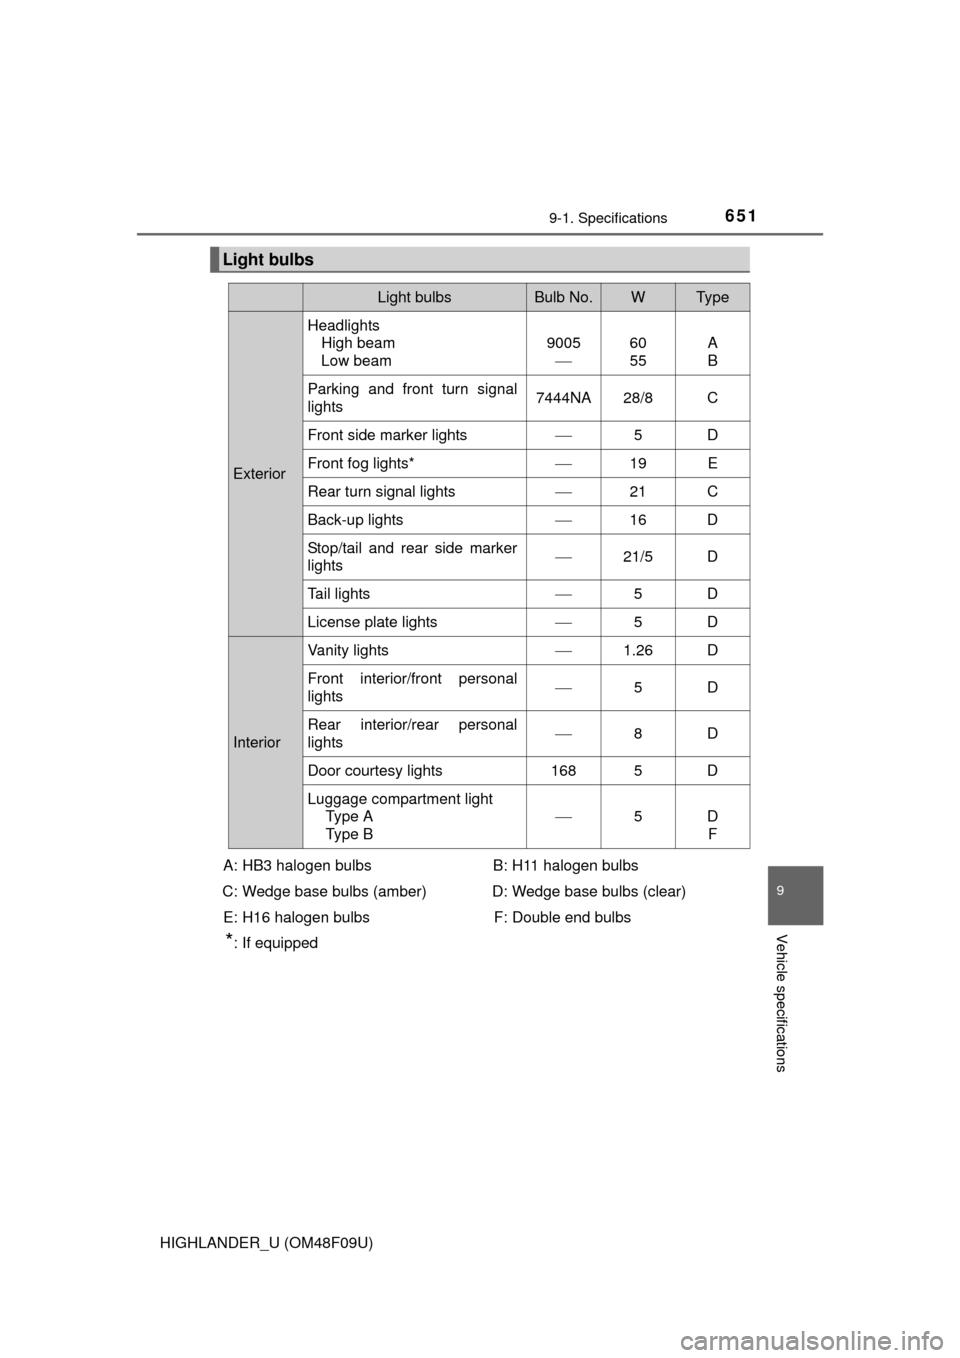
Light bulbs
Light bulbsBulb No.WTy p e
ExteriorHeadlights
High beam
Low beam 9005
60
55 A
B
Parking and front turn signal
lights 7444NA 28/8 C
Front side marker lights 5D
Front fog lights* 19 E
Rear turn signal lights 21 C
Back-up lights 16 D
Stop/tail and rear side marker
lights
21/5 D
Tail lights 5D
License plate lights 5D
InteriorVanity lights
1.26 D
Front interior/front personal
lights
5D
Rear interior/rear personal
lights
8D
Door courtesy lights 168 5 D
Luggage compartment light Type A
Type B
5D
F
A: HB3 halogen bulbs
C: Wedge base bulbs (amber) E: H16 halogen bulbs
*: If equipped B: H11 halogen bulbs
D: Wedge base bulbs (clear) F: Double end bulbs