TOYOTA HIGHLANDER 2017 XU50 / 3.G Navigation Manual
Manufacturer: TOYOTA, Model Year: 2017, Model line: HIGHLANDER, Model: TOYOTA HIGHLANDER 2017 XU50 / 3.GPages: 392, PDF Size: 7.18 MB
Page 351 of 392
351
4. MEMORY POINTS
HIGHLANDER_Navi_U
NAVIGATION SYSTEM
8
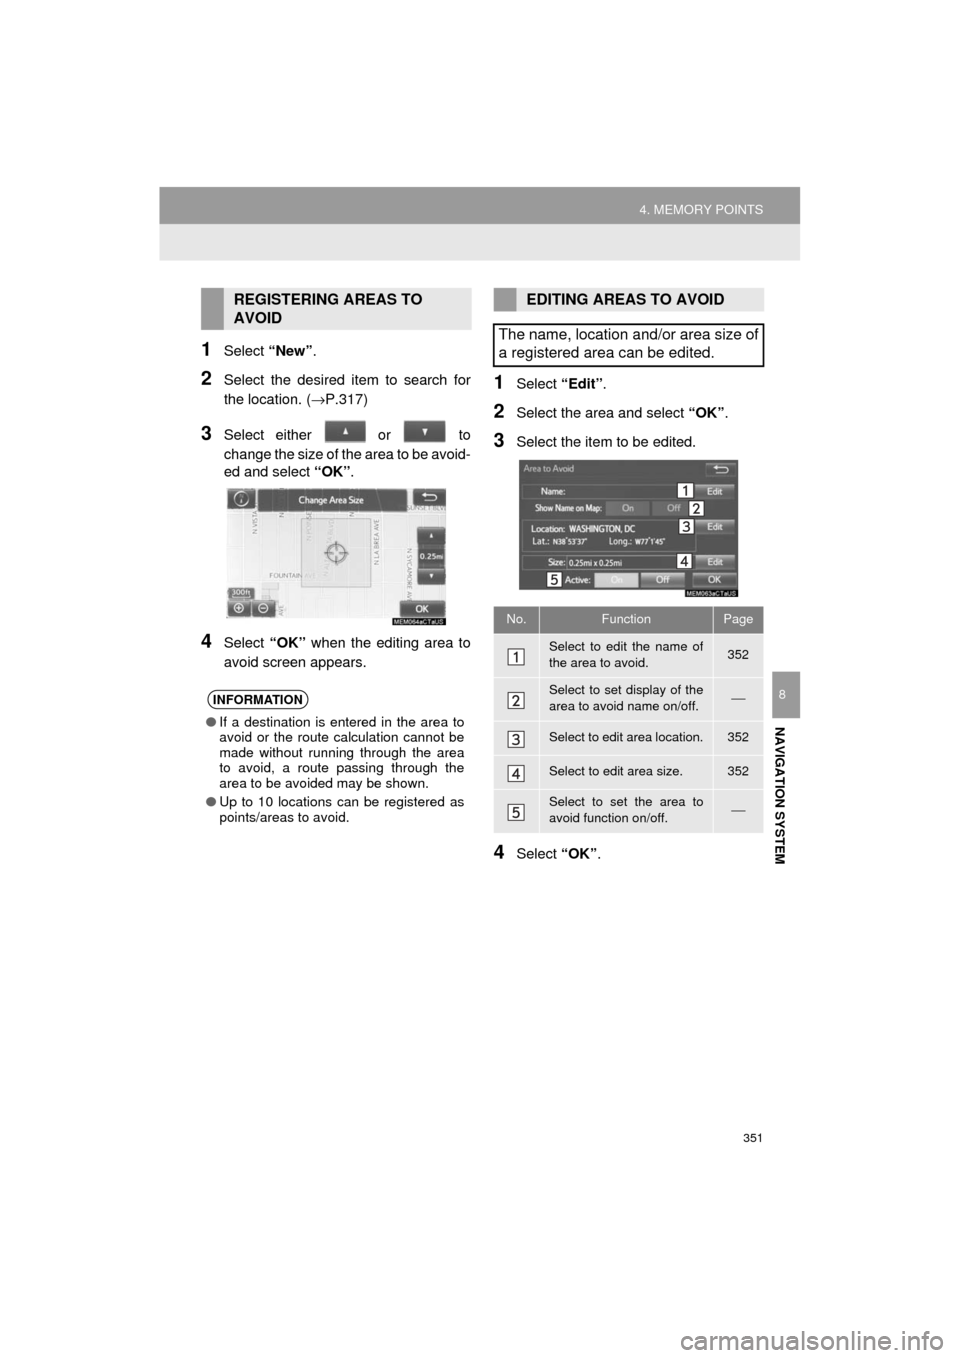
1Select “New”.
2Select the desired item to search for
the location. ( →P.317)
3Select either or to
change the size of the area to be avoid-
ed and select “OK”.
4Select “OK” when the editing area to
avoid screen appears.
1Select “Edit”.
2Select the area and select “OK”.
3Select the item to be edited.
4Select “OK”.
REGISTERING AREAS TO
AVOID
INFORMATION
●If a destination is entered in the area to
avoid or the route calculation cannot be
made without running through the area
to avoid, a route passing through the
area to be avoided may be shown.
● Up to 10 locations can be registered as
points/areas to avoid.
EDITING AREAS TO AVOID
The name, location and/or area size of
a registered area can be edited.
No.FunctionPage
Select to edit the name of
the area to avoid.352
Select to set display of the
area to avoid name on/off.⎯
Select to edit area location.352
Select to edit area size.352
Select to set the area to
avoid function on/off.⎯
Page 352 of 392
352
4. MEMORY POINTS
HIGHLANDER_Navi_U
■CHANGING THE NAME
1Select “Edit” next to “Name”.
2Enter a name and select “OK”.
■CHANGING THE LOCATION
1Select “Edit” next to “Location”.
2Scroll the map to the desired point
(→P.309) and select “OK”.
■CHANGING THE AREA SIZE
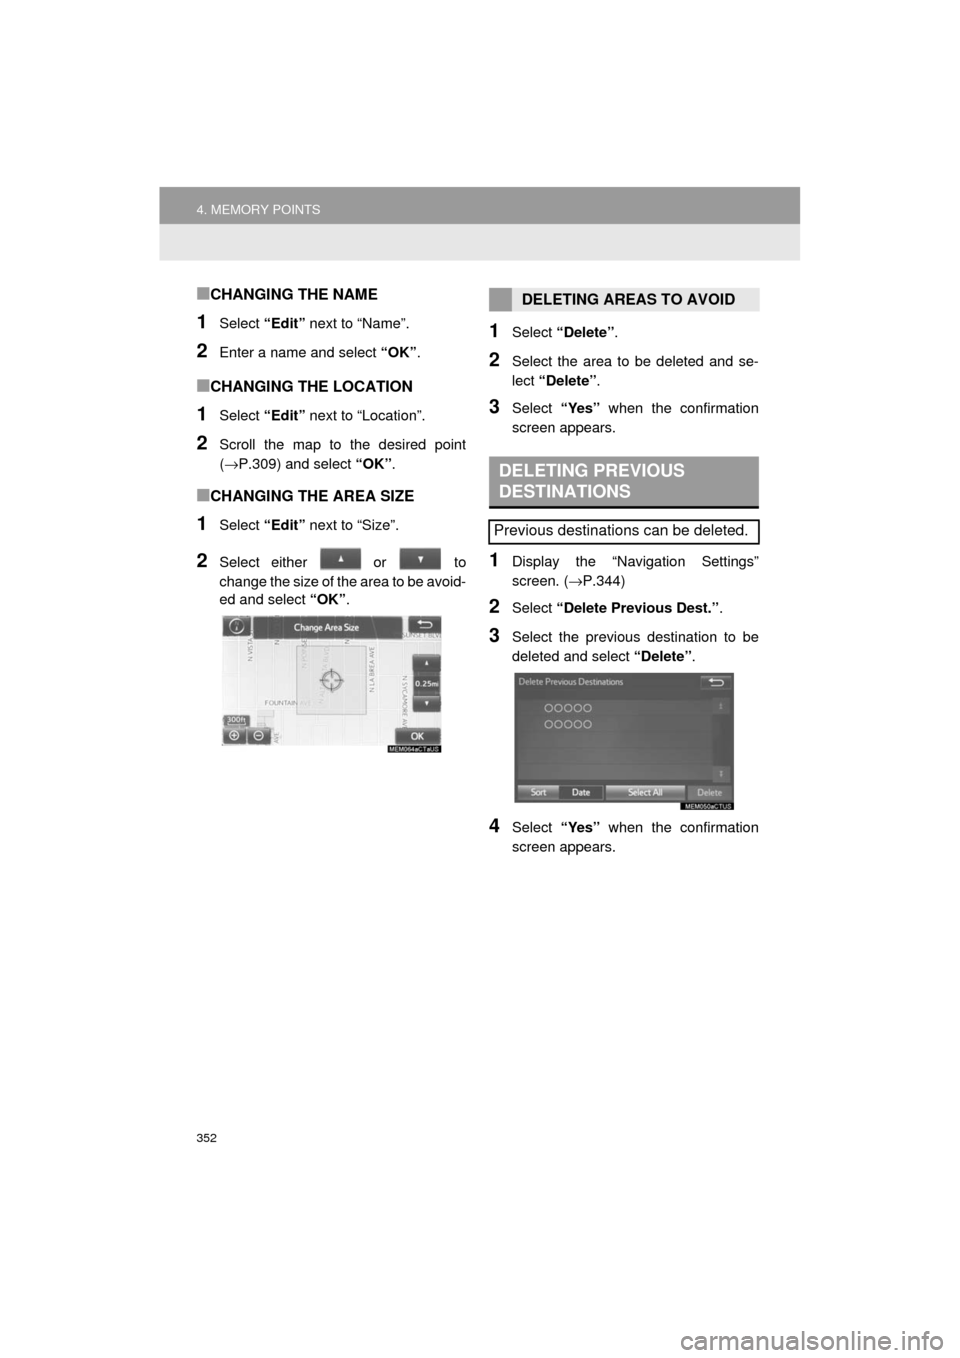
1Select “Edit” next to “Size”.
2Select either or to
change the size of the area to be avoid-
ed and select “OK”.
1Select “Delete” .
2Select the area to be deleted and se-
lect “Delete” .
3Select “Yes” when the confirmation
screen appears.
1Display the “Navigation Settings”
screen. ( →P.344)
2Select “Delete Previous Dest.” .
3Select the previous destination to be
deleted and select “Delete”.
4Select “Yes” when the confirmation
screen appears.
DELETING AREAS TO AVOID
DELETING PREVIOUS
DESTINATIONS
Previous destinations can be deleted.
Page 353 of 392
353
HIGHLANDER_Navi_U
NAVIGATION SYSTEM
8
5. SETUP
1. DETAILED NAVIGATION SETTINGS
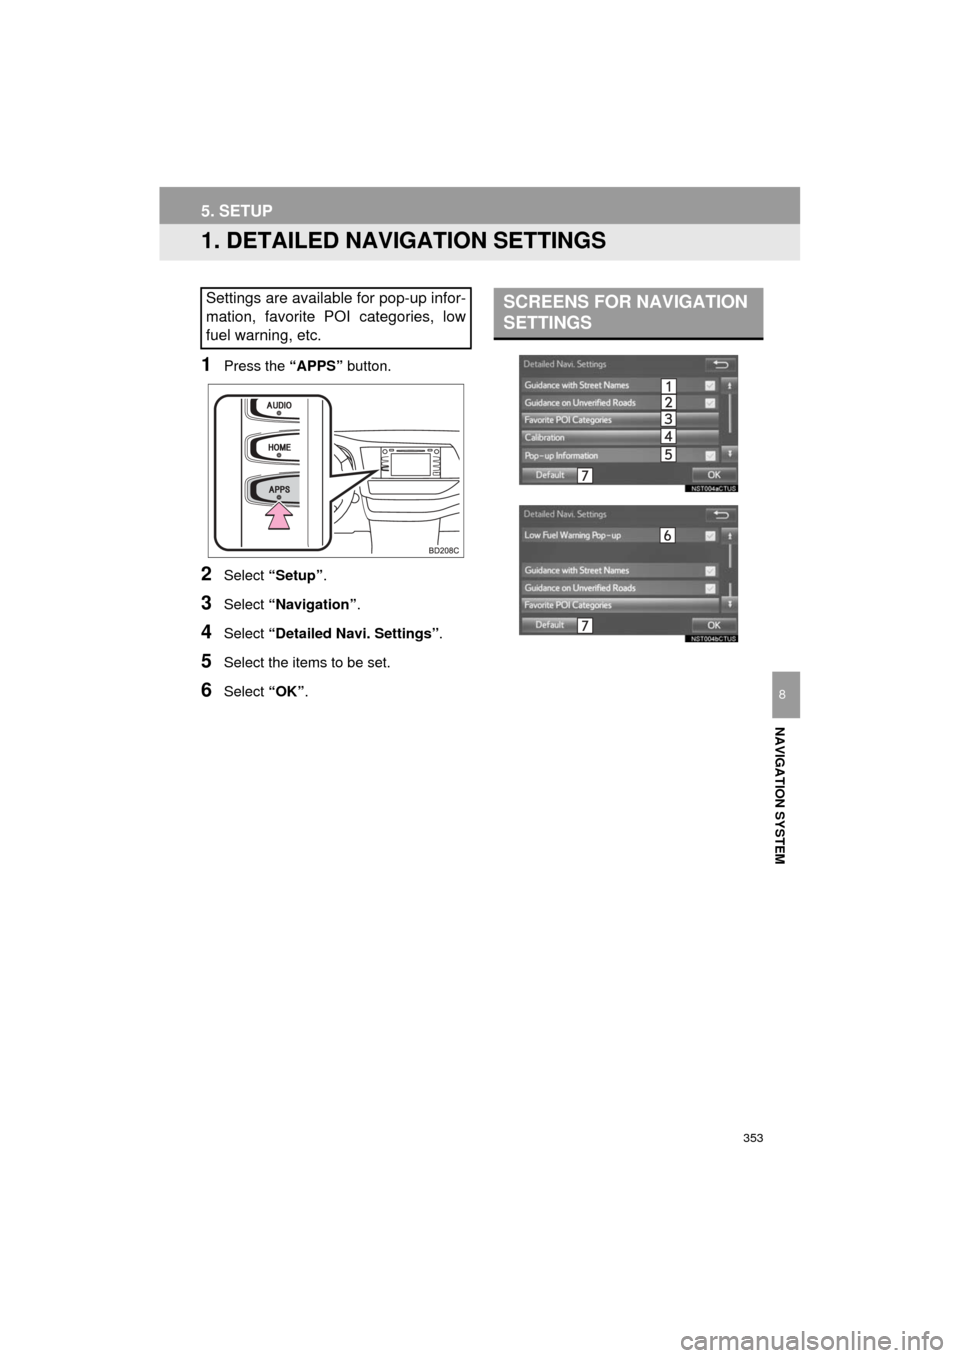
1Press the “APPS” button.
2Select “Setup” .
3Select “Navigation” .
4Select “Detailed Navi. Settings” .
5Select the items to be set.
6Select “OK”.
Settings are available for pop-up infor-
mation, favorite POI categories, low
fuel warning, etc.SCREENS FOR NAVIGATION
SETTINGS
Page 354 of 392
354
5. SETUP
HIGHLANDER_Navi_U
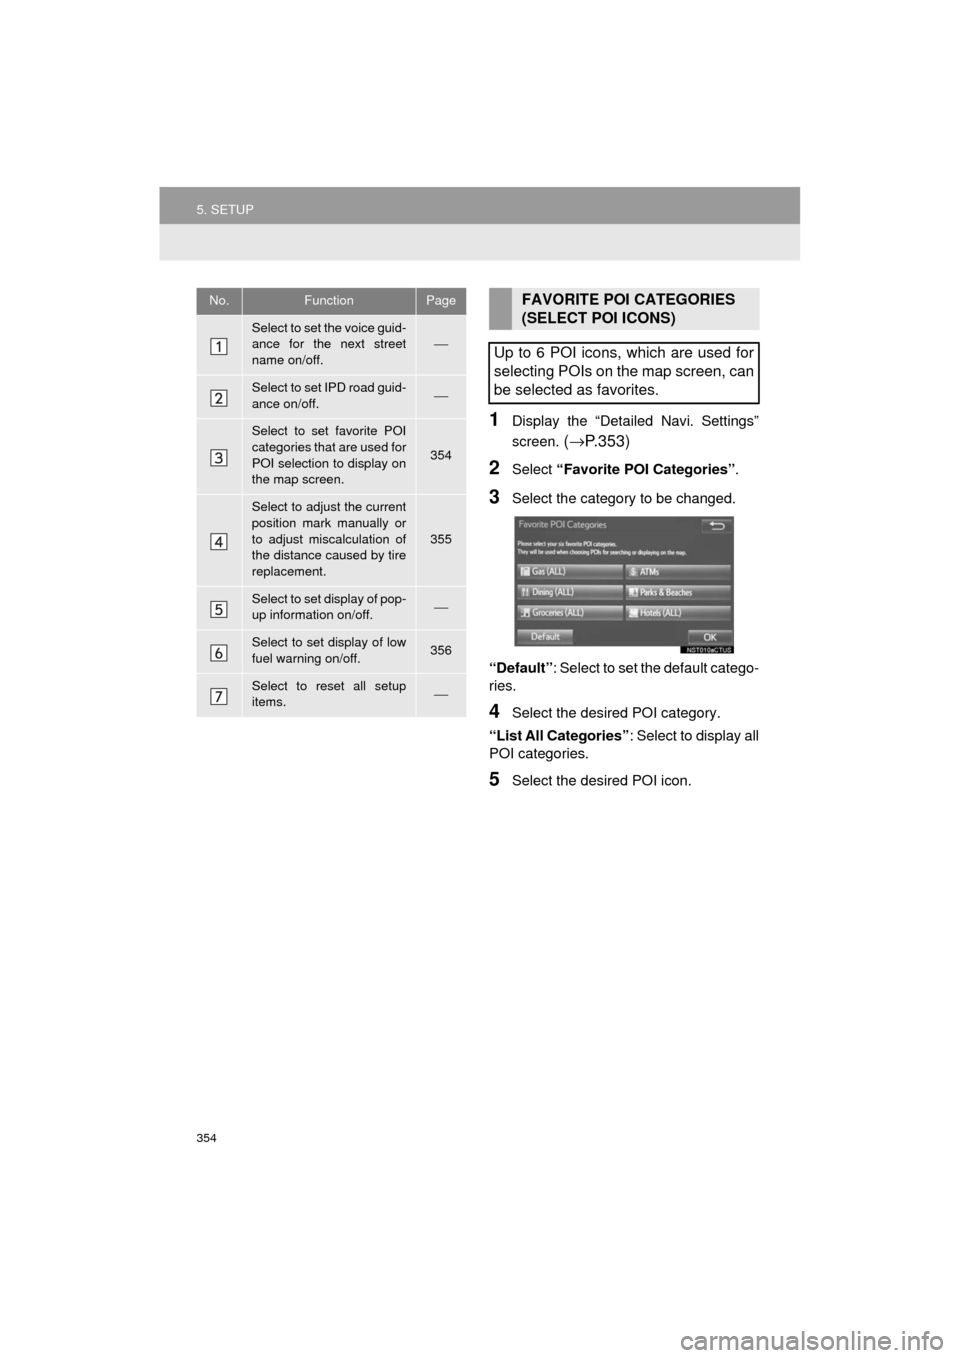
1Display the “Detailed Navi. Settings”
screen.
(→ P.353)
2Select “Favorite POI Categories” .
3Select the category to be changed.
“Default”: Select to set the default catego-
ries.
4Select the desired POI category.
“List All Categories” : Select to display all
POI categories.
5Select the desired POI icon.
No.FunctionPage
Select to set the voice guid-
ance for the next street
name on/off.⎯
Select to set IPD road guid-
ance on/off.⎯
Select to set favorite POI
categories that are used for
POI selection to display on
the map screen.
354
Select to adjust the current
position mark manually or
to adjust miscalculation of
the distance caused by tire
replacement.
355
Select to set display of pop-
up information on/off.⎯
Select to set display of low
fuel warning on/off.356
Select to reset all setup
items.⎯
FAVORITE POI CATEGORIES
(SELECT POI ICONS)
Up to 6 POI icons, which are used for
selecting POIs on the map screen, can
be selected as favorites.
Page 355 of 392
355
5. SETUP
HIGHLANDER_Navi_U
NAVIGATION SYSTEM
8
1Display the “Detailed Navi. Settings”
screen.
(→ P.353)
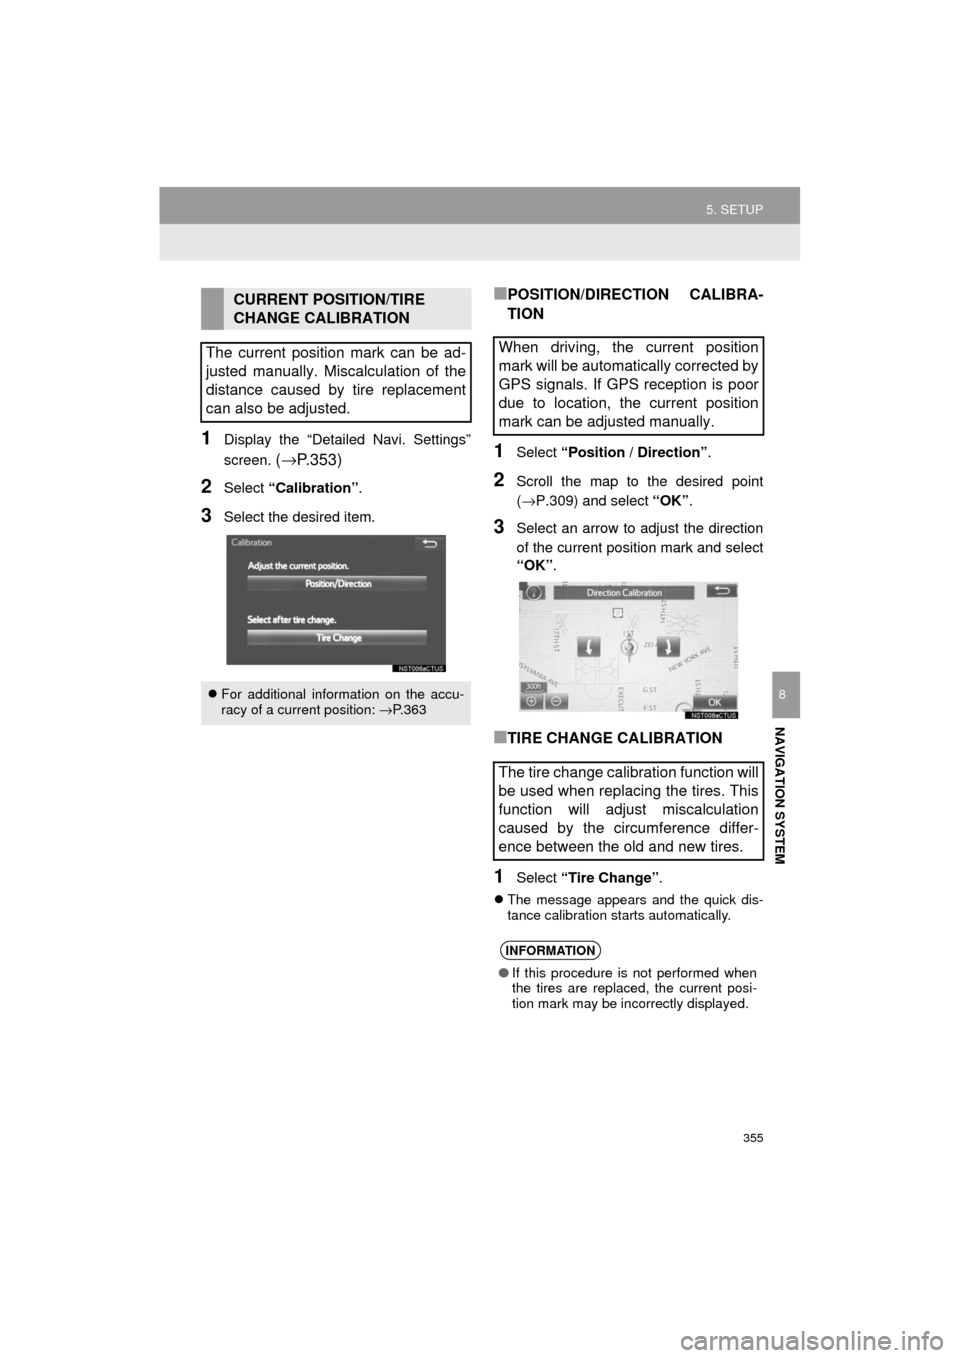
2Select “Calibration” .
3Select the desired item.
■POSITION/DIRECTION CALIBRA-
TION
1Select “Position / Direction” .
2Scroll the map to the desired point
(→P.309) and select “OK”.
3Select an arrow to adjust the direction
of the current position mark and select
“OK”.
■TIRE CHANGE CALIBRATION
1Select “Tire Change” .
The message appears and the quick dis-
tance calibration starts automatically.
CURRENT POSITION/TIRE
CHANGE CALIBRATION
The current position mark can be ad-
justed manually. Miscalculation of the
distance caused by tire replacement
can also be adjusted.
For additional information on the accu-
racy of a current position: →P. 3 6 3
When driving, the current position
mark will be automatically corrected by
GPS signals. If GPS reception is poor
due to location, the current position
mark can be adjusted manually.
The tire change calibration function will
be used when replacing the tires. This
function will adjust miscalculation
caused by the circumference differ-
ence between the old and new tires.
INFORMATION
● If this procedure is not performed when
the tires are replaced, the current posi-
tion mark may be incorrectly displayed.
Page 356 of 392
356
5. SETUP
HIGHLANDER_Navi_U
1Display the “Detailed Navi. Settings”
screen.
(→ P.353)
2Select “Low Fuel Warning Pop-up” .
■SEARCHING GAS STATION IN LOW
FUEL WARNING
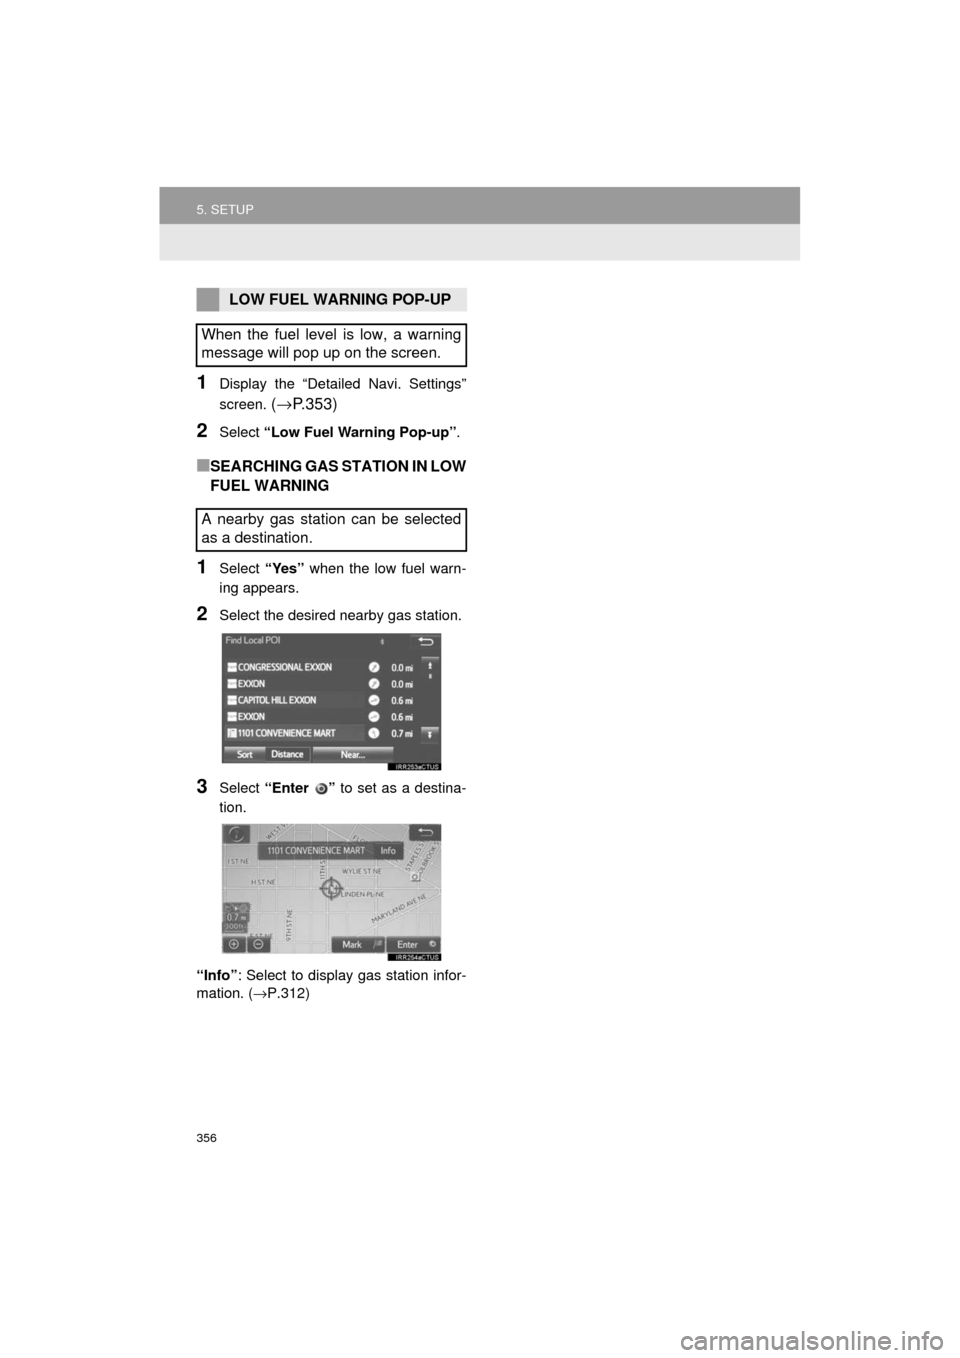
1Select “Yes” when the low fuel warn-
ing appears.
2Select the desired nearby gas station.
3Select “Enter ” to set as a destina-
tion.
“Info” : Select to display gas station infor-
mation. ( →P.312)
LOW FUEL WARNING POP-UP
When the fuel level is low, a warning
message will pop up on the screen.
A nearby gas station can be selected
as a destination.
Page 357 of 392
357
5. SETUP
HIGHLANDER_Navi_U
NAVIGATION SYSTEM
8
2. TRAFFIC SETTINGS
1Press the “APPS” button.
2Select “Setup” .
3Select “Traffic” .
4Select the items to be set.
5Select “OK”.
Traffic information such as traffic con-
gestion or traffic incident warnings can
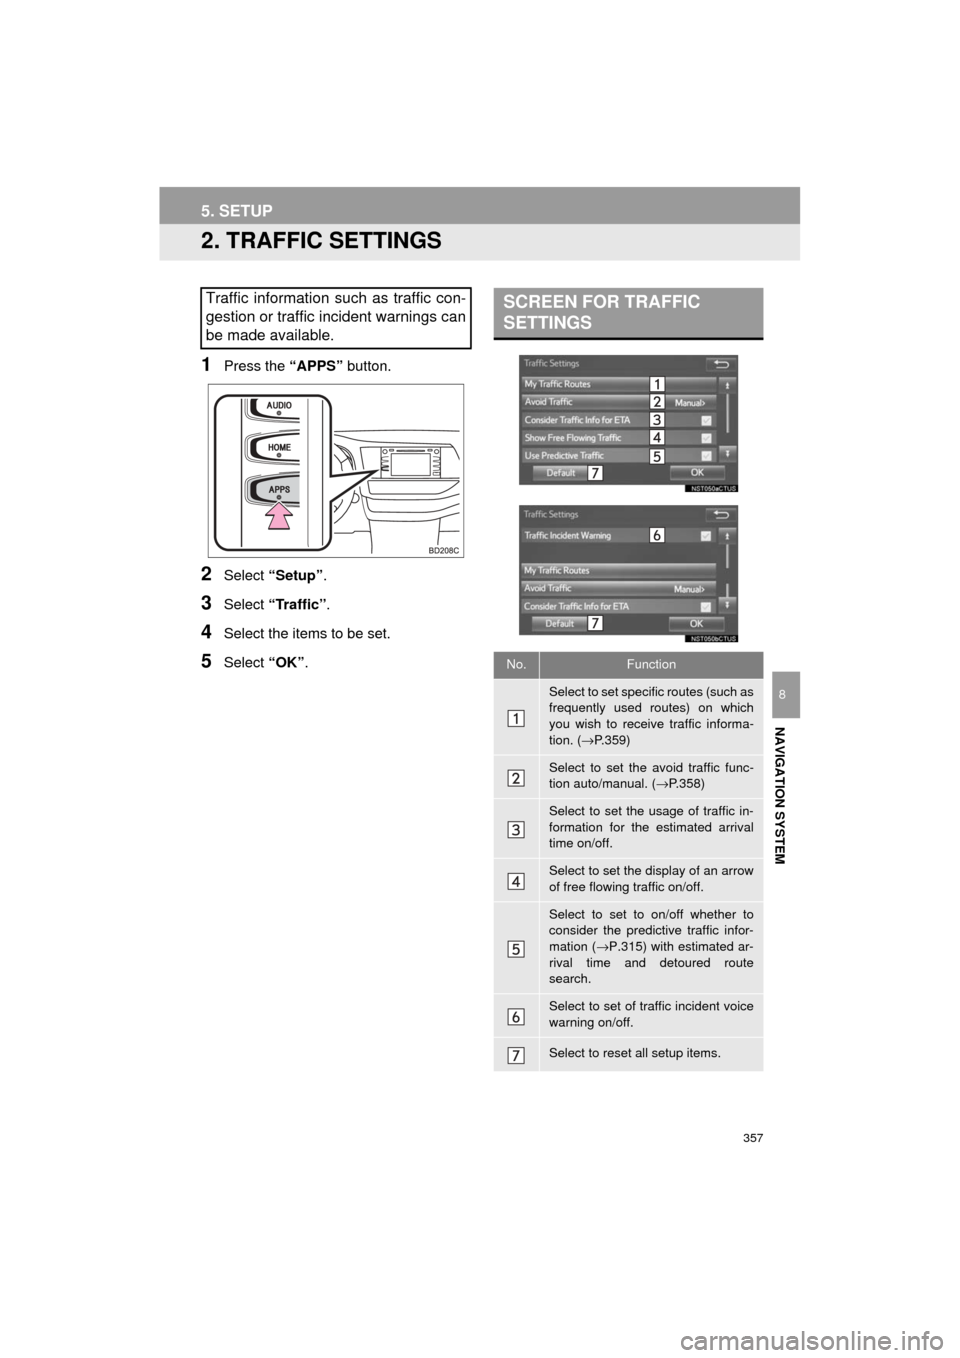
be made available. SCREEN FOR TRAFFIC
SETTINGS
No.Function
Select to set specific routes (such as
frequently used routes) on which
you wish to receive traffic informa-
tion. ( →P.359)
Select to set the avoid traffic func-
tion auto/manual. ( →P.358)
Select to set the usage of traffic in-
formation for the estimated arrival
time on/off.
Select to set the display of an arrow
of free flowing traffic on/off.
Select to set to on/off whether to
consider the predictive traffic infor-
mation ( →P.315) with estimated ar-
rival time and detoured route
search.
Select to set of traffic incident voice
warning on/off.
Select to reset all setup items.
Page 358 of 392
358
5. SETUP
HIGHLANDER_Navi_U
1Display the “Traffic Settings” screen.
(→P.357)
2Select “Avoid Traffic” .
3Select the desired item.
4Select “OK”.
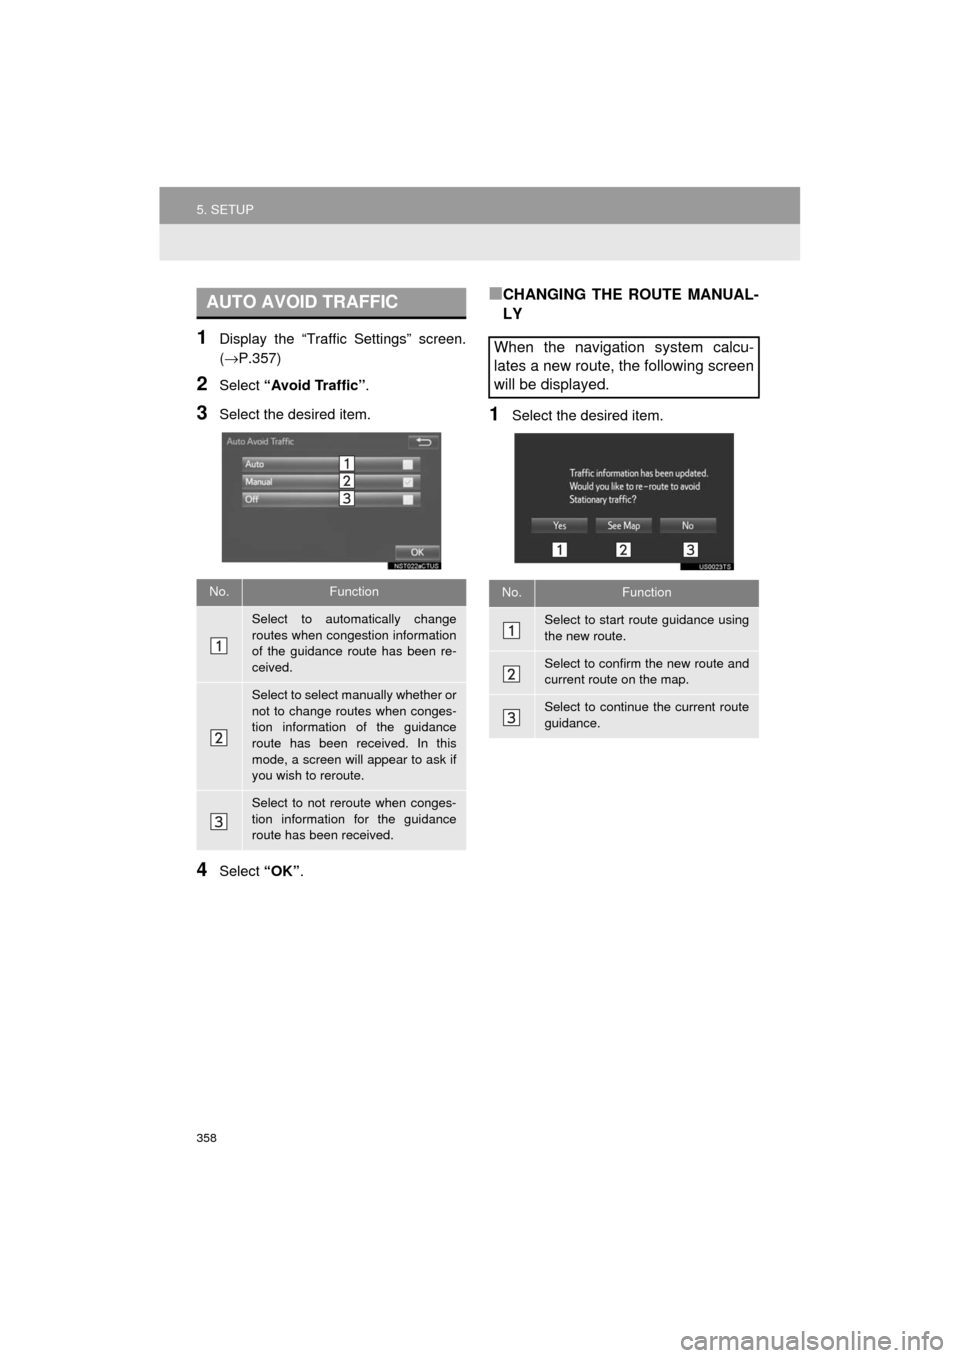
■CHANGING THE ROUTE MANUAL-
LY
1Select the desired item.
AUTO AVOID TRAFFIC
No.Function
Select to automatically change
routes when congestion information
of the guidance route has been re-
ceived.
Select to select manually whether or
not to change routes when conges-
tion information of the guidance
route has been received. In this
mode, a screen will appear to ask if
you wish to reroute.
Select to not reroute when conges-
tion information for the guidance
route has been received.
When the navigation system calcu-
lates a new route, the following screen
will be displayed.
No.Function
Select to start route guidance using
the new route.
Select to confirm the new route and
current route on the map.
Select to continue the current route
guidance.
Page 359 of 392
359
5. SETUP
HIGHLANDER_Navi_U
NAVIGATION SYSTEM
8
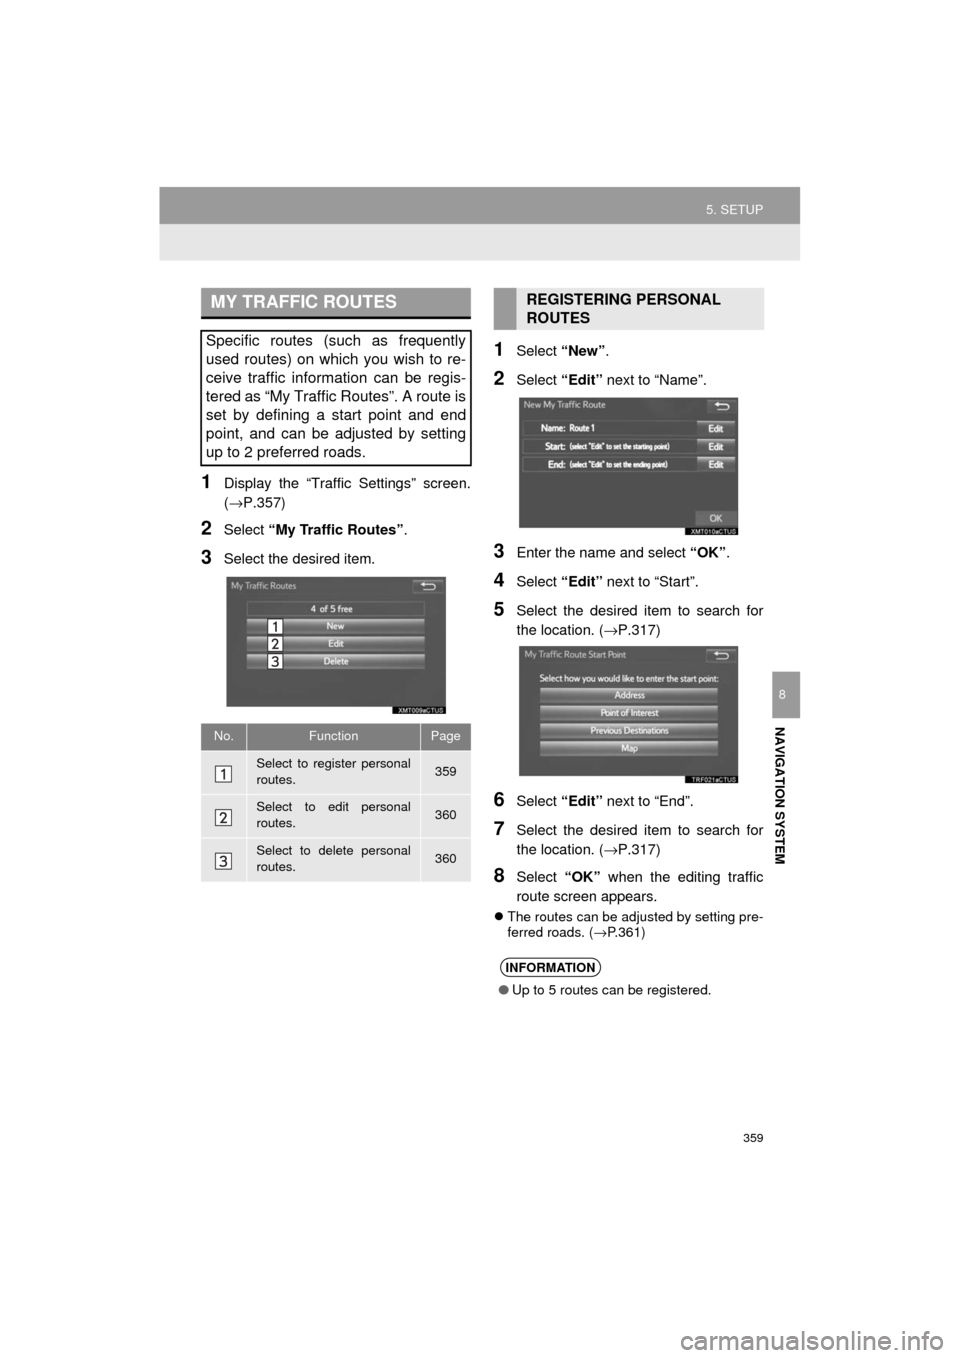
1Display the “Traffic Settings” screen.
(→P.357)
2Select “My Traffic Routes” .
3Select the desired item.
1Select “New”.
2Select “Edit” next to “Name”.
3Enter the name and select “OK”.
4Select “Edit” next to “Start”.
5Select the desired item to search for
the location. ( →P.317)
6Select “Edit” next to “End”.
7Select the desired item to search for
the location. ( →P.317)
8Select “OK” when the editing traffic
route screen appears.
The routes can be adjusted by setting pre-
ferred roads. ( →P.361)
MY TRAFFIC ROUTES
Specific routes (such as frequently
used routes) on which you wish to re-
ceive traffic information can be regis-
tered as “My Traffic Routes”. A route is
set by defining a start point and end
point, and can be adjusted by setting
up to 2 preferred roads.
No.FunctionPage
Select to register personal
routes.359
Select to edit personal
routes.360
Select to delete personal
routes.360
REGISTERING PERSONAL
ROUTES
INFORMATION
● Up to 5 routes can be registered.
Page 360 of 392
360
5. SETUP
HIGHLANDER_Navi_U
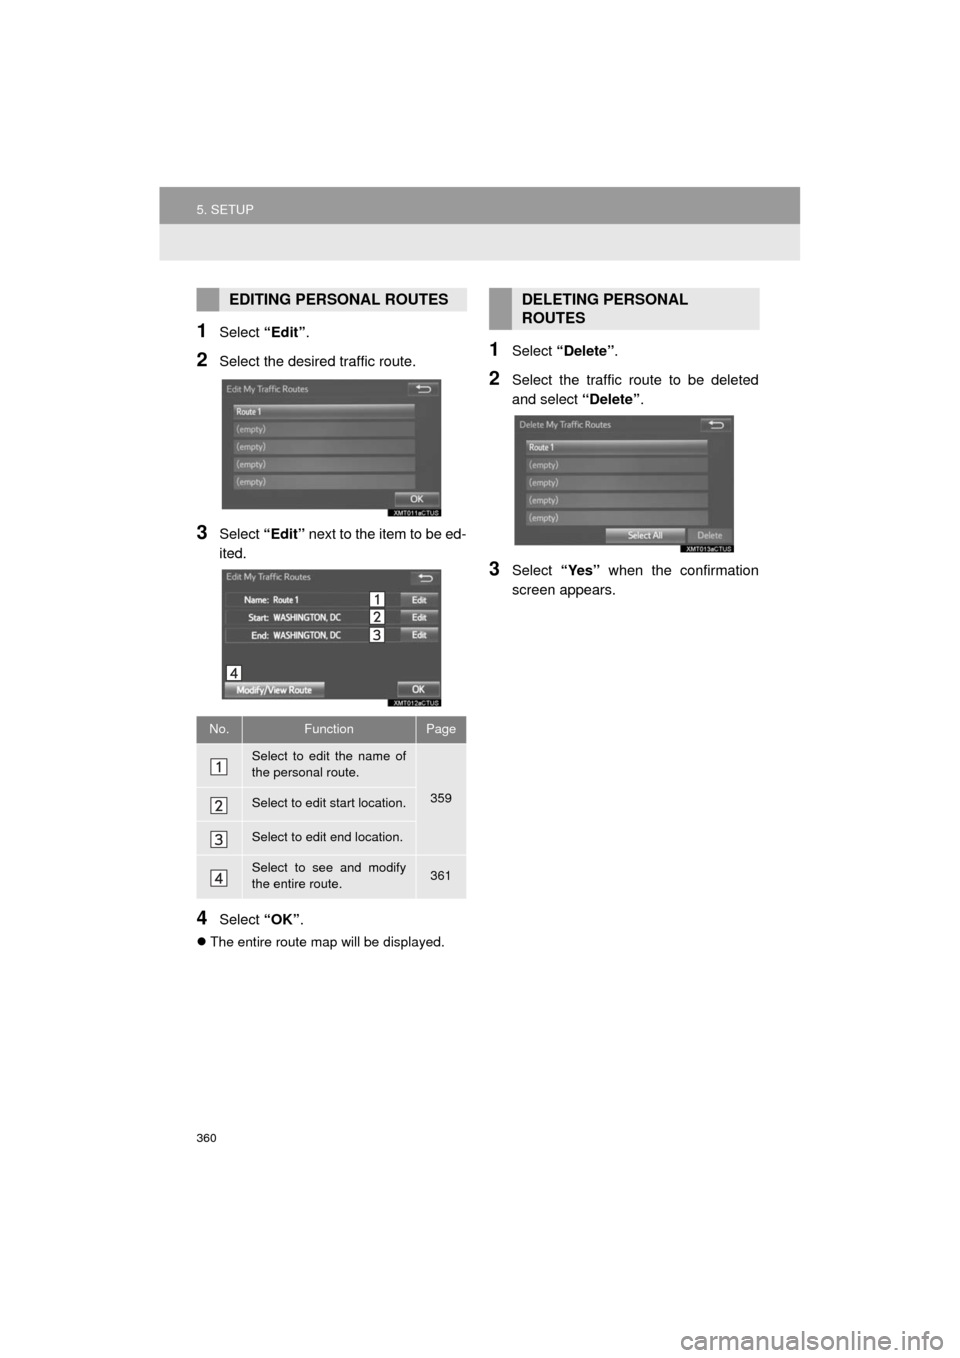
1Select “Edit”.
2Select the desired traffic route.
3Select “Edit” next to the item to be ed-
ited.
4Select “OK”.
The entire route map will be displayed.
1Select “Delete” .
2Select the traffic route to be deleted
and select “Delete”.
3Select “Yes” when the confirmation
screen appears.
EDITING PERSONAL ROUTES
No.FunctionPage
Select to edit the name of
the personal route.
359Select to edit start location.
Select to edit end location.
Select to see and modify
the entire route.361
DELETING PERSONAL
ROUTES