sensor TOYOTA HIGHLANDER 2017 XU50 / 3.G Navigation Manual
[x] Cancel search | Manufacturer: TOYOTA, Model Year: 2017, Model line: HIGHLANDER, Model: TOYOTA HIGHLANDER 2017 XU50 / 3.GPages: 392, PDF Size: 7.18 MB
Page 2 of 392

2
HIGHLANDER_Navi_U
This manual explains the operation of this system. Please read this manual
carefully to ensure proper use. Keep this manual in your vehicle at all times.
The screen shots in this document and the actual screens of this system differ
depending on whether the functions and/or a contract existed and the map data
available at the time of producing this document.
Please be aware that the content of this manual may be different from this sys-
tem in some cases, such as when the system’s software is updated.
The Navigation System is one of the most technologically advanced vehicle ac-
cessories ever developed. The system receives satellite signals from the Global
Positioning System (GPS) operated by the U.S. Department of Defense. Using
these signals and other vehicle sensors, the system indicates your present po-
sition and assists in locating a desired destination.
The navigation system is designed to select efficient routes from your present
starting location to your destination. The system is also designed to direct you
to a destination that is unfamiliar to you in an efficient manner. The system uses
AISIN AW maps. The calculated routes may not be the shortest nor the least
traffic congested. Your own personal local knowledge or “short cut” may at
times be faster than the calculated routes.
The navigation system’s database includes Point of Interest categories to allow
you to easily select destinations such as restaurants and hotels. If a d\
estination
is not in the database, you can enter the street address or a major intersection
close to it and the system will guide you there.
The system will provide both a visual map and audio instructions. The audio in-
structions will announce the distance remaining and the direction to tur\
n in when
approaching an intersection. These voice instructions will help you keep your
eyes on the road and are timed to provide enough time to allow you to maneu-
ver, change lanes or slow down.
Please be aware that all current vehicle navigation systems have certain limita-
tions that may affect their ability to perform properly. The accuracy of the vehi-
cle’s position depends on satellite conditions, road configuration, vehicle
condition or other circumstances. For more information on the limitations of the
system, refer to page 363.
NAVIGATION AND MULTIMEDIA SYSTEM OWNER’S MANUAL
NAVIGATION SYSTEM (ENTUNE PREMIUM AUDIO)
Introduction
Page 34 of 392
34
1. BASIC INFORMATION BEFORE OPERATION
HIGHLANDER_Navi_U
2. CAPACITIVE TOUCH SWITCHES
■HANDLING OF THE CONTROL
PANEL
If the surface of the touch switch is dirty or
has liquid attached to it, incorrect opera-
tion or non-response may occur.
If the surface of the touch switch receives
electromagnetic waves, incorrect opera-
tion or non-response may occur.
If wearing gloves during operation, non-
response may occur.
If fingernails are used to operate the sys-
tem, non-response may occur.
If a touch pen is used to operate the sys-
tem, non-response may occur.
If the palm of your hand touches the sur-
face of the touch switch during operation,
incorrect operation may occur.
If the palm of your hand touches the sur-
face of the touch switch, incorrect opera-
tion may occur.
If operations are performed quickly, non-
response may occur.
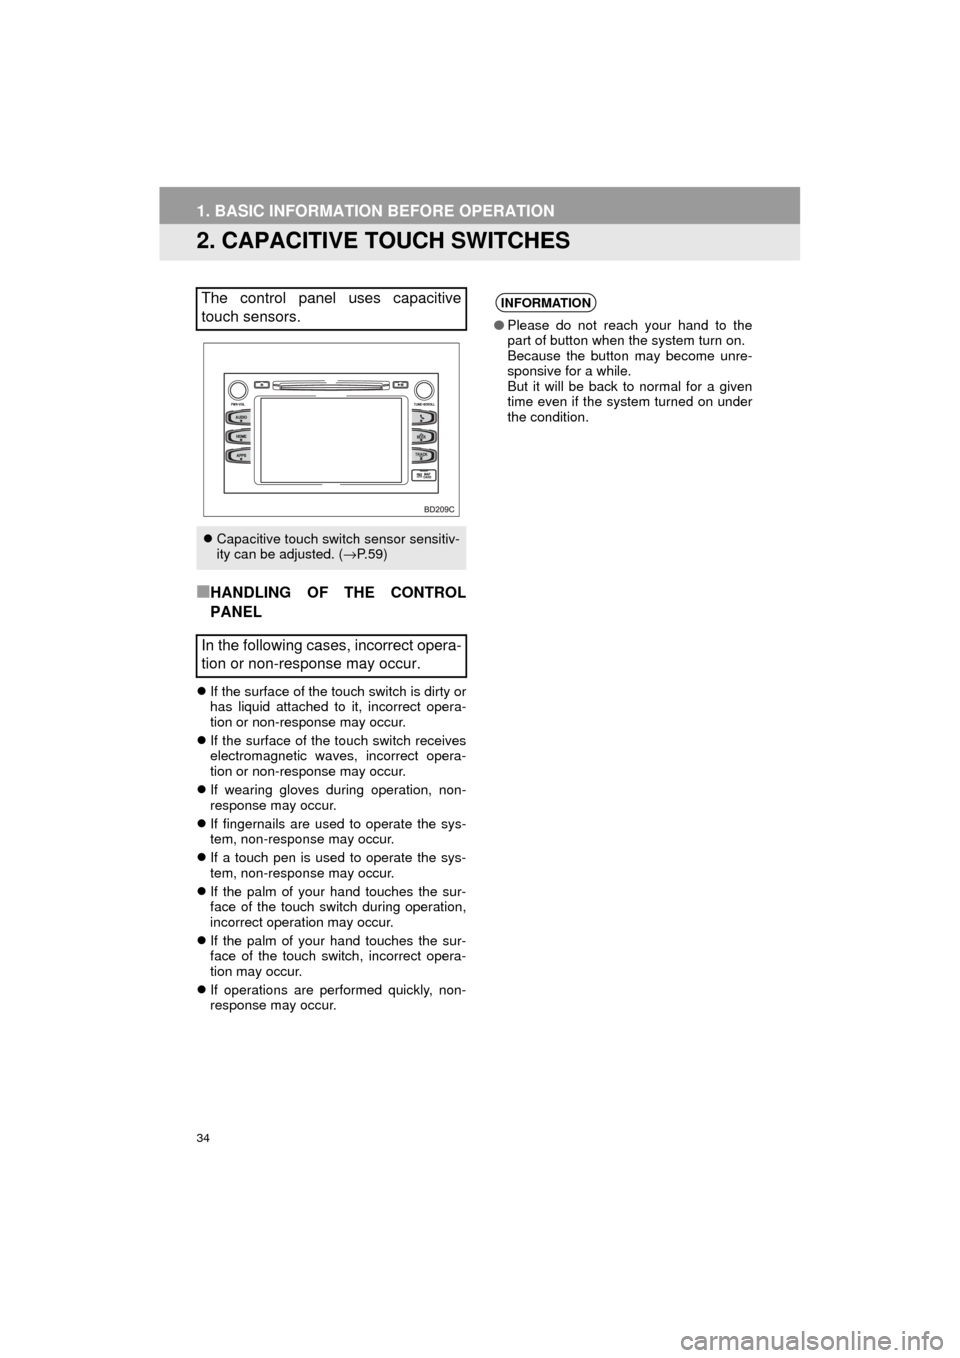
The control panel uses capacitive
touch sensors.
Capacitive touch switch sensor sensitiv-
ity can be adjusted. ( →P. 5 9 )
In the following cases, incorrect opera-
tion or non-response may occur.
INFORMATION
● Please do not reach your hand to the
part of button when the system turn on.
Because the button may become unre-
sponsive for a while.
But it will be back to normal for a given
time even if the system turned on under
the condition.
Page 60 of 392
60
3. OTHER SETTINGS
HIGHLANDER_Navi_U
No.Function
Select to change the time zone and
set the daylight saving time on/off.
(→ P.61)
Select to change the language.
*Select to change the unit of measure
for distance/fuel consumption.
Select to change the unit of tem-
perature.
Select to set the sound beeps on/off.
Select to change the screen button
color.
Select to change the keyboard lay-
out.
Select to set automatic screen
changes from the audio control
screen to the home screen to on/off.
When set to on, the screen will auto-
matically return to the home screen
from the audio control screen after
20 seconds.
Select to change the capacitive
touch button sensor sensitivity.
Select to set a pop-up message dis-
played on an iPhone connected via
Bluetooth
® on/off when an applica-
tion on the iPhone needs to be acti-
vated.
Select to set the animations on/off.
Select to customize the startup im-
age. ( →P.62)
Select to customize the screen off
image. ( →P.63)
Select to delete personal data.
(→ P.64)
Select to update software versions.
For details, contact your Toyota
dealer.
Select to update “Gracenote®” data-
base versions. For details, contact
your Toyota dealer.
Select to display the software infor-
mation. Notices related to third party
software used in this product are en-
listed. (This includes instructions for
obtaining such software, where ap-
plicable.)
Select to reset all setup items.
*: Entune Premium Audio only
No.Function
Page 67 of 392
67
3. OTHER SETTINGS
HIGHLANDER_Navi_U
BASIC FUNCTION
2
3. VEHICLE SETTINGS
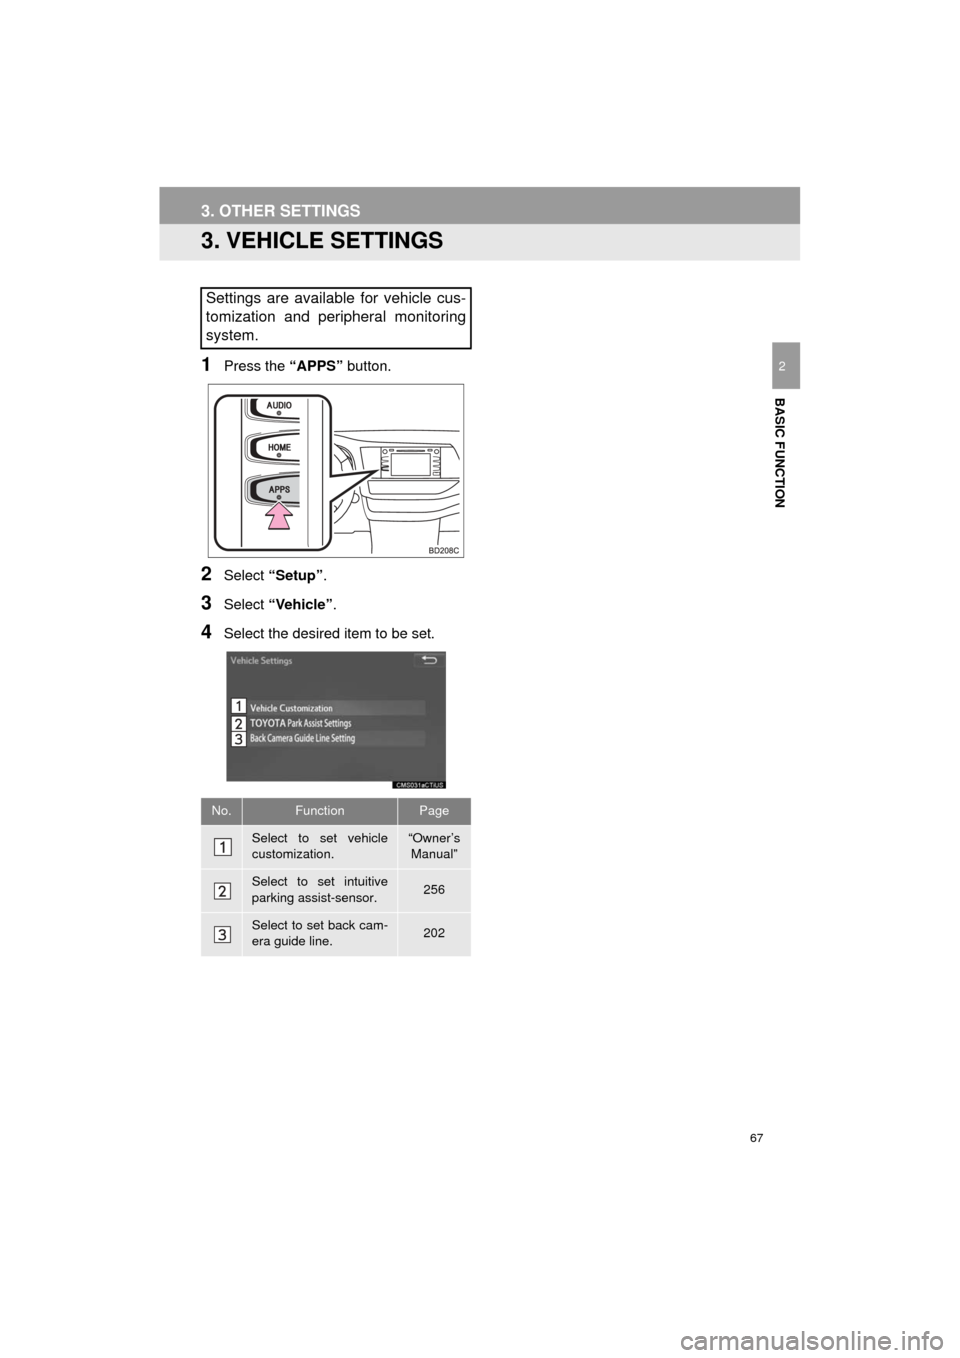
1Press the “APPS” button.
2Select “Setup” .
3Select “Vehicle”.
4Select the desired item to be set.
Settings are available for vehicle cus-
tomization and peripheral monitoring
system.
No.FunctionPage
Select to set vehicle
customization.“Owner’s
Manual”
Select to set intuitive
parking assist-sensor.256
Select to set back cam-
era guide line.202
Page 189 of 392
6
189
HIGHLANDER_Navi_U
4
5
7
8
9
1
2
3
6
2. CHECKING AROUND THEVEHICLE .................................... 221
SCREEN DISPLAY ............................. 221
3. CHECKING THE FRONT AND
AROUND THE VEHICLE ........... 222
SCREEN DISPLAY ............................. 222
4. CHECKING THE SIDES OFTHE VEHICLE............................ 225
SCREEN DISPLAY ............................. 225
5. CHECKING THE REAR AND
AROUND THE VEHICLE ........... 228
SCREEN DISPLAY ............................. 228
GUIDE LINES DISPLAYED ON
THE SCREEN ................................... 230
PARKING ............................................ 233
6. MAGNIFYING FUNCTION ........... 235
MAGNIFYING THE DISPLAY ............. 235
7. PANORAMIC VIEW MONITOR PRECAUTIONS ....... .................. 236
AREA DISPLAYED ON SCREEN ....... 236
THE CAMERA ..................................... 239
DIFFERENCES BETWEEN THE
SCREEN AND THE ACTUAL
ROAD ................................................ 241
DISTORTION OF THREE- DIMENSIONAL OBJECTS ON
THE SCREEN ................................... 243
WHEN APPROACHING THREE- DIMENSIONAL OBJECTS ................ 244
MAGNIFYING FUNCTION .................. 246
8. THINGS YOU SHOULD KNOW ....................................... 247
IF YOU NOTICE ANY
SYMPT OMS ...................................... 247
PRODUCT LICENSE ........................... 249
1. INTUITIVE PARKING ASSIST ...................................... 250
TYPES OF SENSORS......................... 250
INTUITIVE PARKING ASSIST
SWITCH ............................................ 250
DISPLAY .............................................. 250
THE DISTANCE DISPLAY AND BUZZER ............................................ 251
DETECTION RANGE OF THE SENSORS ......................................... 253
SENSOR DETECTION INFORMATION ................................. 253
INTUITIVE PARKING ASSIST- SENSOR FAILURE WARNING ......... 255
CERTIFICATION ................................. 255
2. INTUITIVE PARKING ASSIST SETTING ................................... 256
SETTING AN ALERT VOLUME........... 256
SETTING A PARKING SONAR
DISPLAY ........................................... 257
SETTING A DISPLAY AND TONE INDICATION ...................................... 257
4INTUITIVE PARKING ASSIST
PERIPHERAL MONITORING SYSTEM
Page 200 of 392
200
2. TOYOTA PARKING ASSIST MONITOR
HIGHLANDER_Navi_U
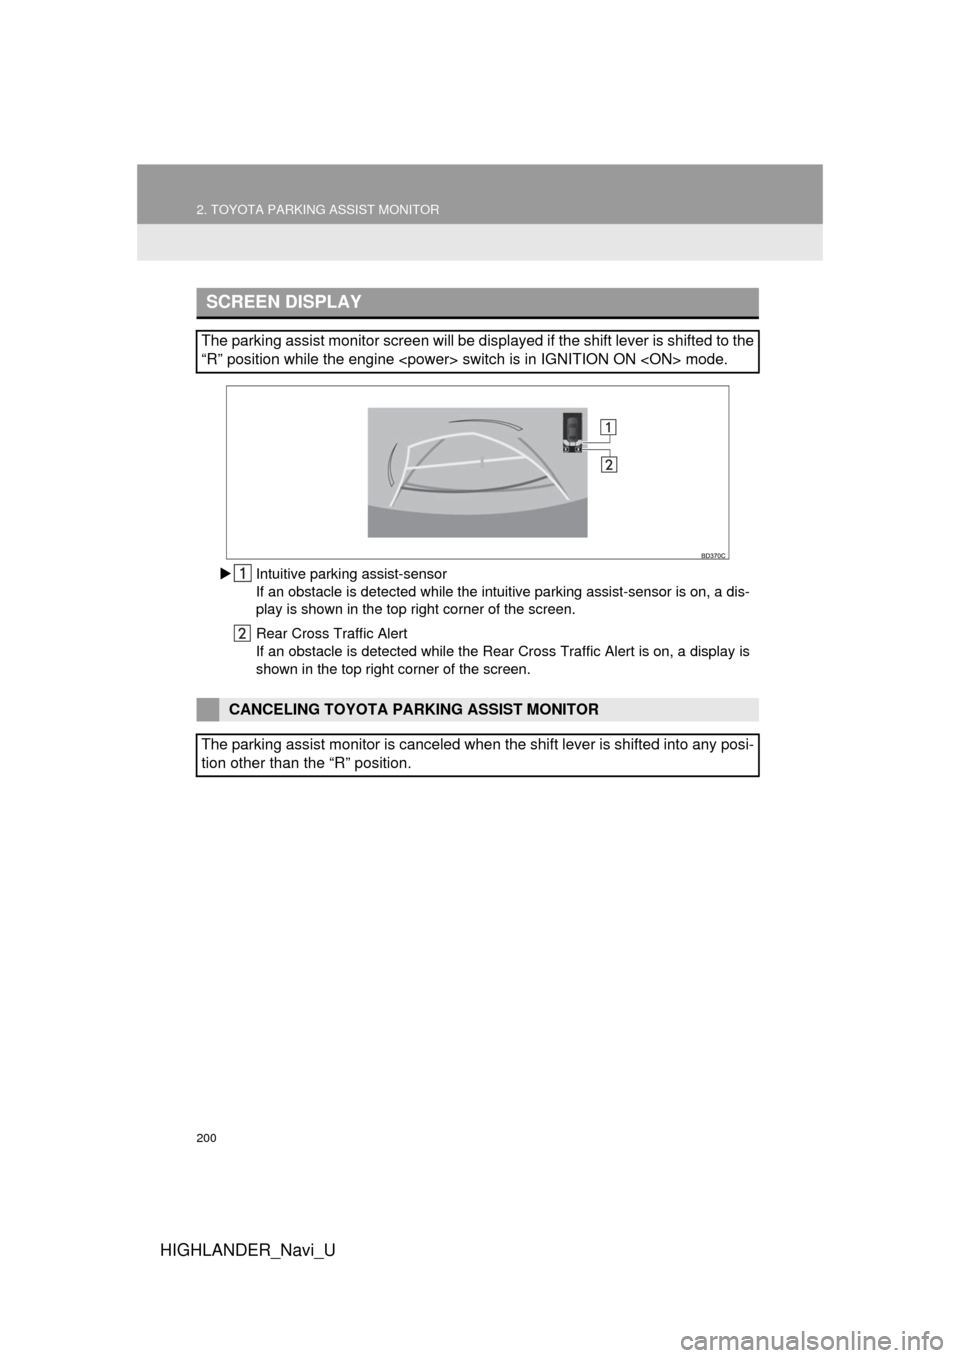
Intuitive parking assist-sensor
If an obstacle is detected while the intu itive parking assist-sensor is on, a dis-
play is shown in the top right corner of the screen.
Rear Cross Traffic Alert
If an obstacle is detected while the Rear Cross Traffic Alert is on, a display is
shown in the top right corner of the screen.
SCREEN DISPLAY
The parking assist monitor screen will be displayed if the shift lever is shifted to the
“R” position while the engine
CANCELING TOYOTA PARKING ASSIST MONITOR
The parking assist monitor is canceled when the shift lever is shifted into any posi-
tion other than the “R” position.
Page 212 of 392
212
2. TOYOTA PARKING ASSIST MONITOR
HIGHLANDER_Navi_U
5. THINGS YOU SHOULD KNOW
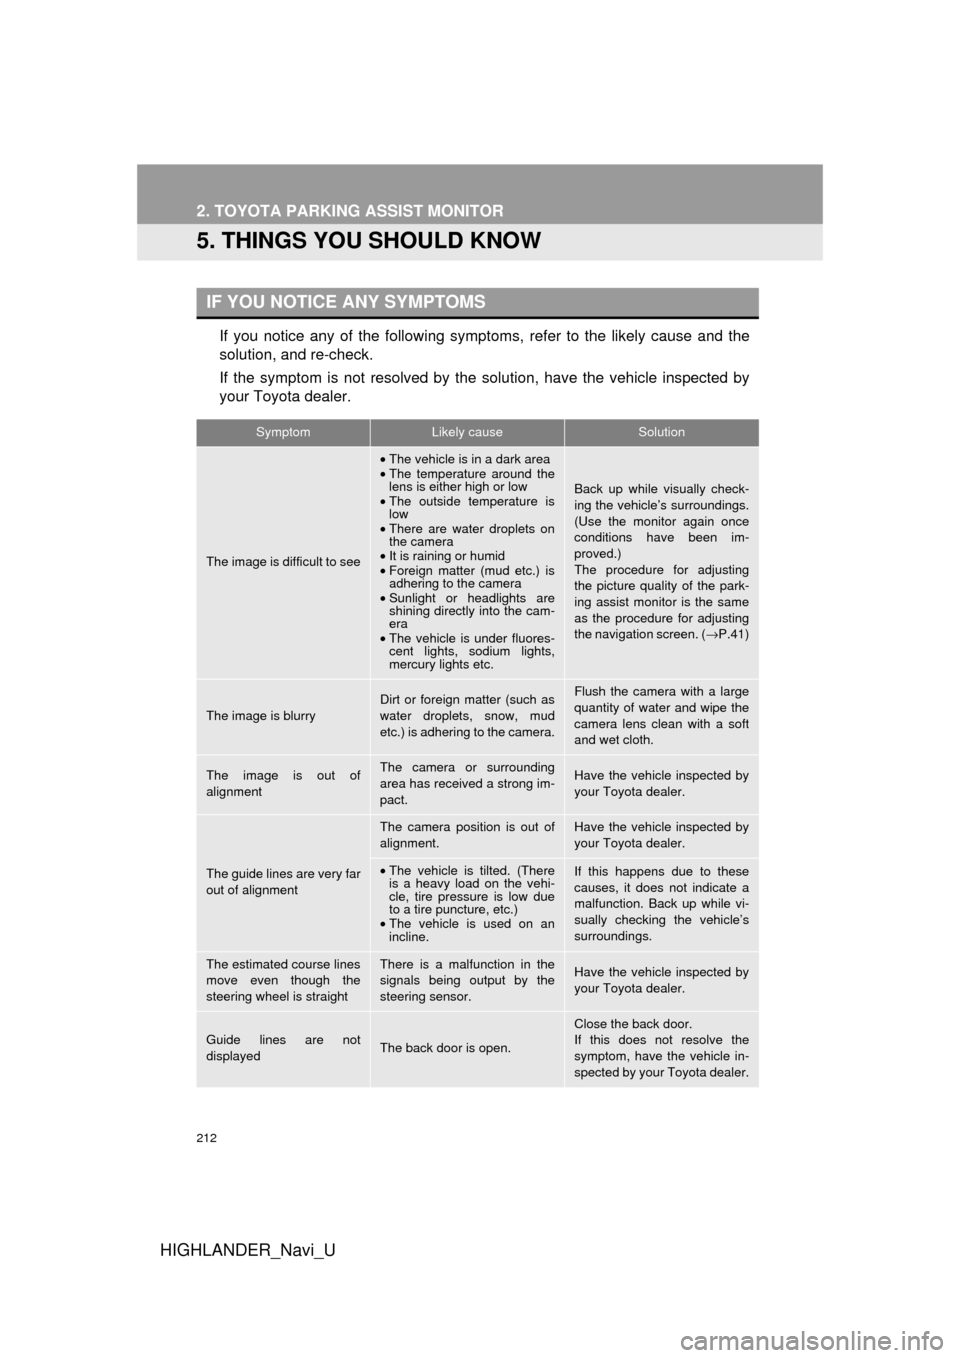
If you notice any of the following symptoms, refer to the likely cause and the
solution, and re-check.
If the symptom is not resolved by the solution, have the vehicle inspected by
your Toyota dealer.
IF YOU NOTICE ANY SYMPTOMS
SymptomLikely causeSolution
The image is difficult to see
•The vehicle is in a dark area
• The temperature around the
lens is either high or low
• The outside temperature is
low
• There are water droplets on
the camera
• It is raining or humid
• Foreign matter (mud etc.) is
adhering to the camera
• Sunlight or headlights are
shining directly into the cam-
era
• The vehicle is under fluores-
cent lights, sodium lights,
mercury lights etc.
Back up while visually check-
ing the vehicle’s surroundings.
(Use the monitor again once
conditions have been im-
proved.)
The procedure for adjusting
the picture quality of the park-
ing assist monitor is the same
as the procedure for adjusting
the navigation screen. ( →P.41)
The image is blurry
Dirt or foreign matter (such as
water droplets, snow, mud
etc.) is adhering to the camera.Flush the camera with a large
quantity of water and wipe the
camera lens clean with a soft
and wet cloth.
The image is out of
alignmentThe camera or surrounding
area has received a strong im-
pact.Have the vehicle inspected by
your Toyota dealer.
The guide lines are very far
out of alignment
The camera position is out of
alignment.Have the vehicle inspected by
your Toyota dealer.
•The vehicle is tilted. (There
is a heavy load on the vehi-
cle, tire pressure is low due
to a tire puncture, etc.)
• The vehicle is used on an
incline.If this happens due to these
causes, it does not indicate a
malfunction. Back up while vi-
sually checking the vehicle’s
surroundings.
The estimated course lines
move even though the
steering wheel is straightThere is a malfunction in the
signals being output by the
steering sensor.Have the vehicle inspected by
your Toyota dealer.
Guide lines are not
displayedThe back door is open.
Close the back door.
If this does not resolve the
symptom, have the vehicle in-
spected by your Toyota dealer.
Page 213 of 392
213
2. TOYOTA PARKING ASSIST MONITOR
HIGHLANDER_Navi_U
PERIPHERAL MONITORING SYSTEM
6
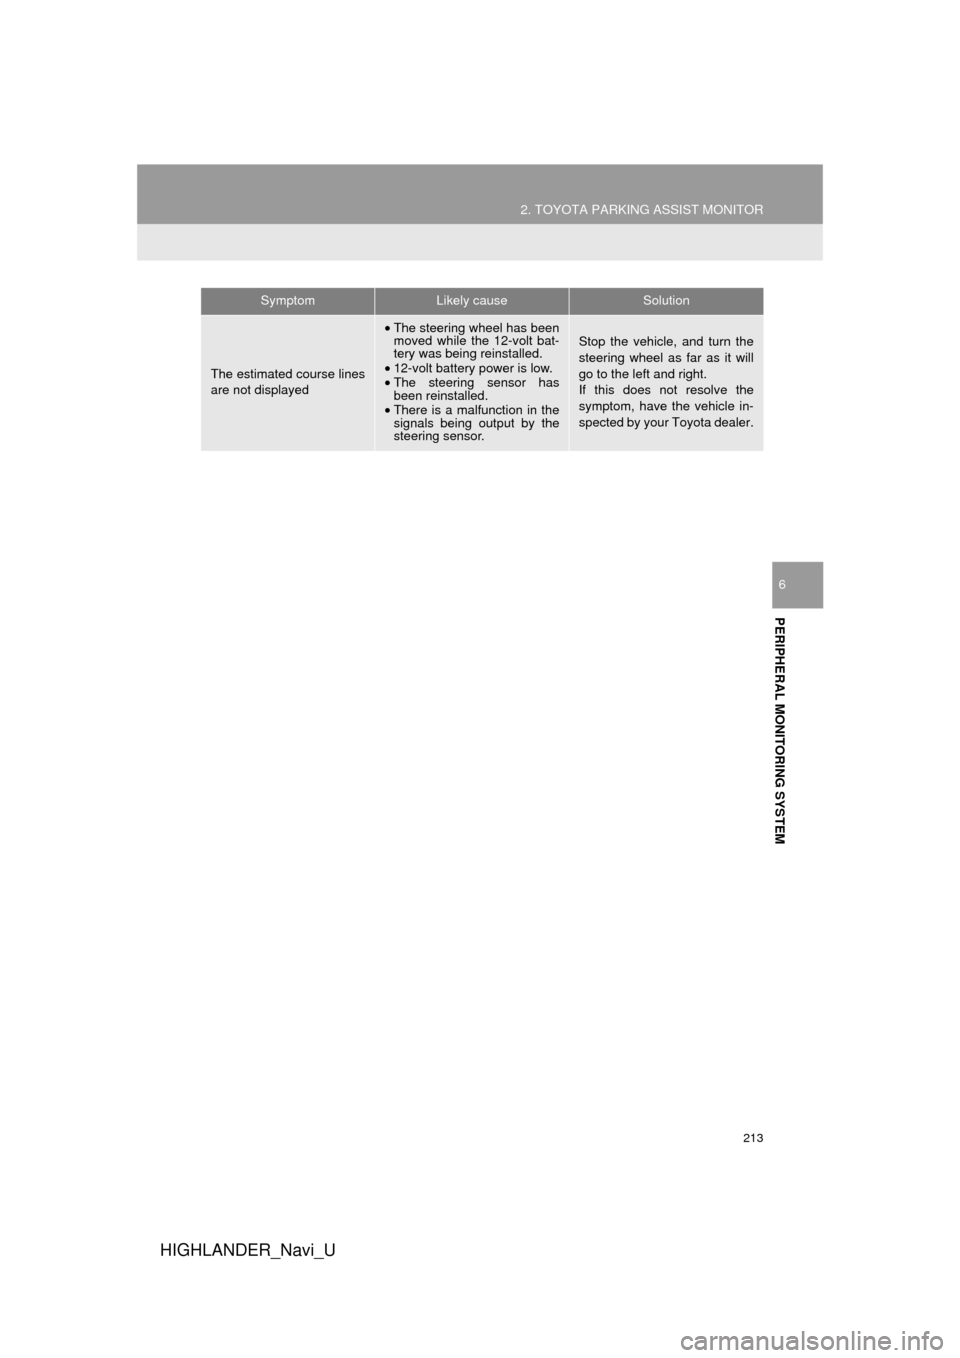
The estimated course lines
are not displayed
•The steering wheel has been
moved while the 12-volt bat-
tery was being reinstalled.
• 12-volt battery power is low.
• The steering sensor has
been reinstalled.
• There is a malfunction in the
signals being output by the
steering sensor.Stop the vehicle, and turn the
steering wheel as far as it will
go to the left and right.
If this does not resolve the
symptom, have the vehicle in-
spected by your Toyota dealer.
SymptomLikely causeSolution
Page 222 of 392
222
3. PANORAMIC VIEW MONITOR
HIGHLANDER_Navi_U
3. CHECKING THE FRONT AND AROUND THE VEHICLE
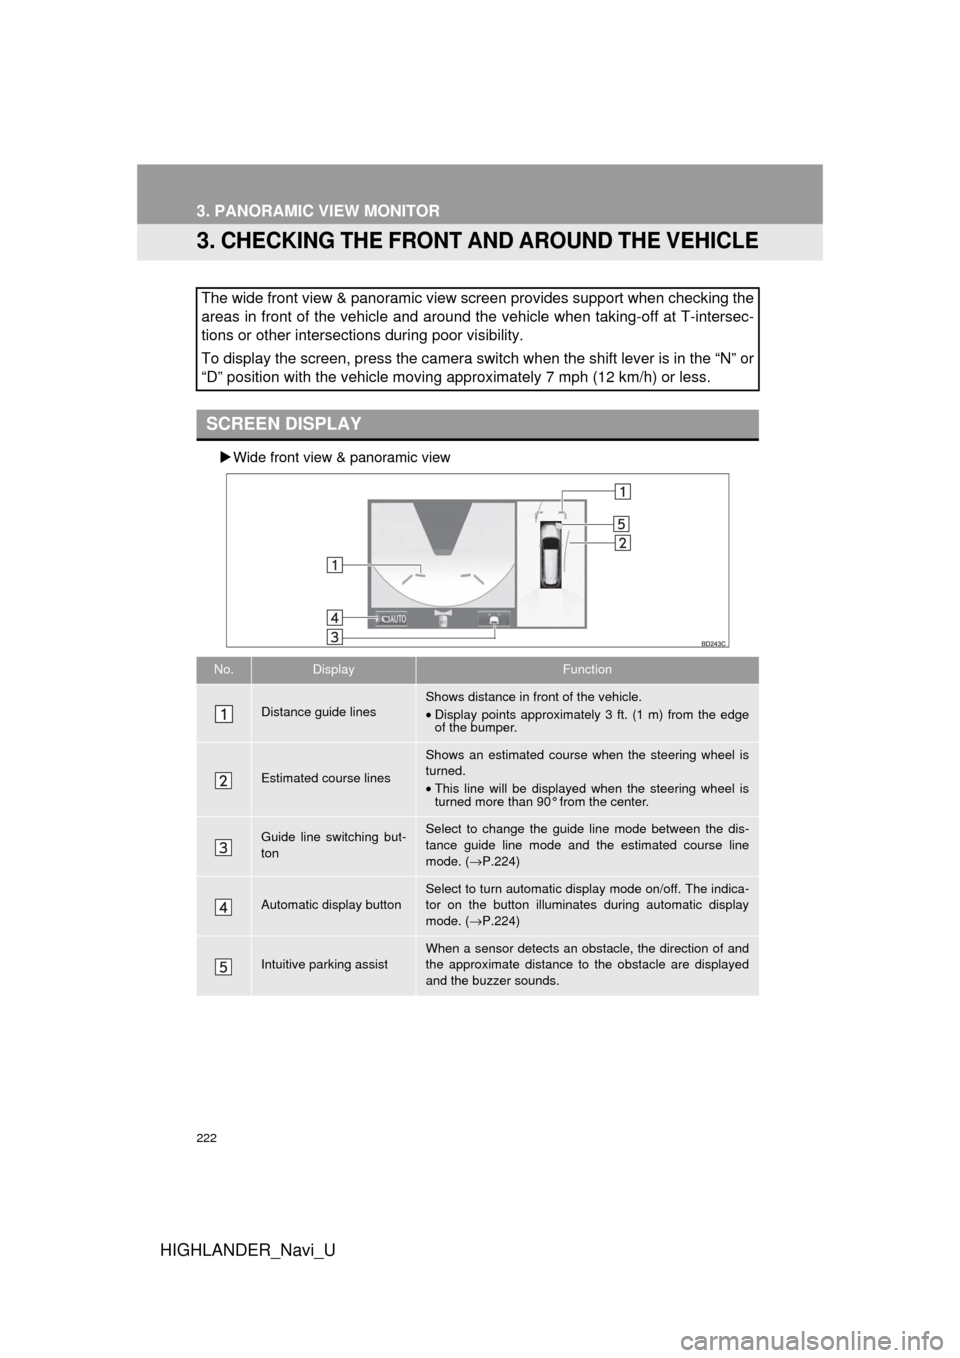
Wide front view & panoramic view
The wide front view & panoramic view screen provides support when checking the
areas in front of the vehicle and around the vehicle when taking-off at T-intersec-
tions or other intersections during poor visibility.
To display the screen, press the camera switch when the shift lever is in the “N” or
“D” position with the vehicle moving approximately 7 mph (12 km/h) or less.
SCREEN DISPLAY
No.DisplayFunction
Distance guide linesShows distance in front of the vehicle.
•Display points approximately 3 ft. (1 m) from the edge
of the bumper.
Estimated course lines
Shows an estimated course when the steering wheel is
turned.
•This line will be displayed when the steering wheel is
turned more than 90° from the center.
Guide line switching but-
tonSelect to change the guide line mode between the dis-
tance guide line mode and the estimated course line
mode. ( →P.224)
Automatic display button
Select to turn automatic display mode on/off. The indica-
tor on the button illuminates during automatic display
mode. ( →P.224)
Intuitive parking assistWhen a sensor detects an obstacle, the direction of and
the approximate distance to the obstacle are displayed
and the buzzer sounds.
Page 225 of 392
225
3. PANORAMIC VIEW MONITOR
HIGHLANDER_Navi_U
PERIPHERAL MONITORING SYSTEM
6
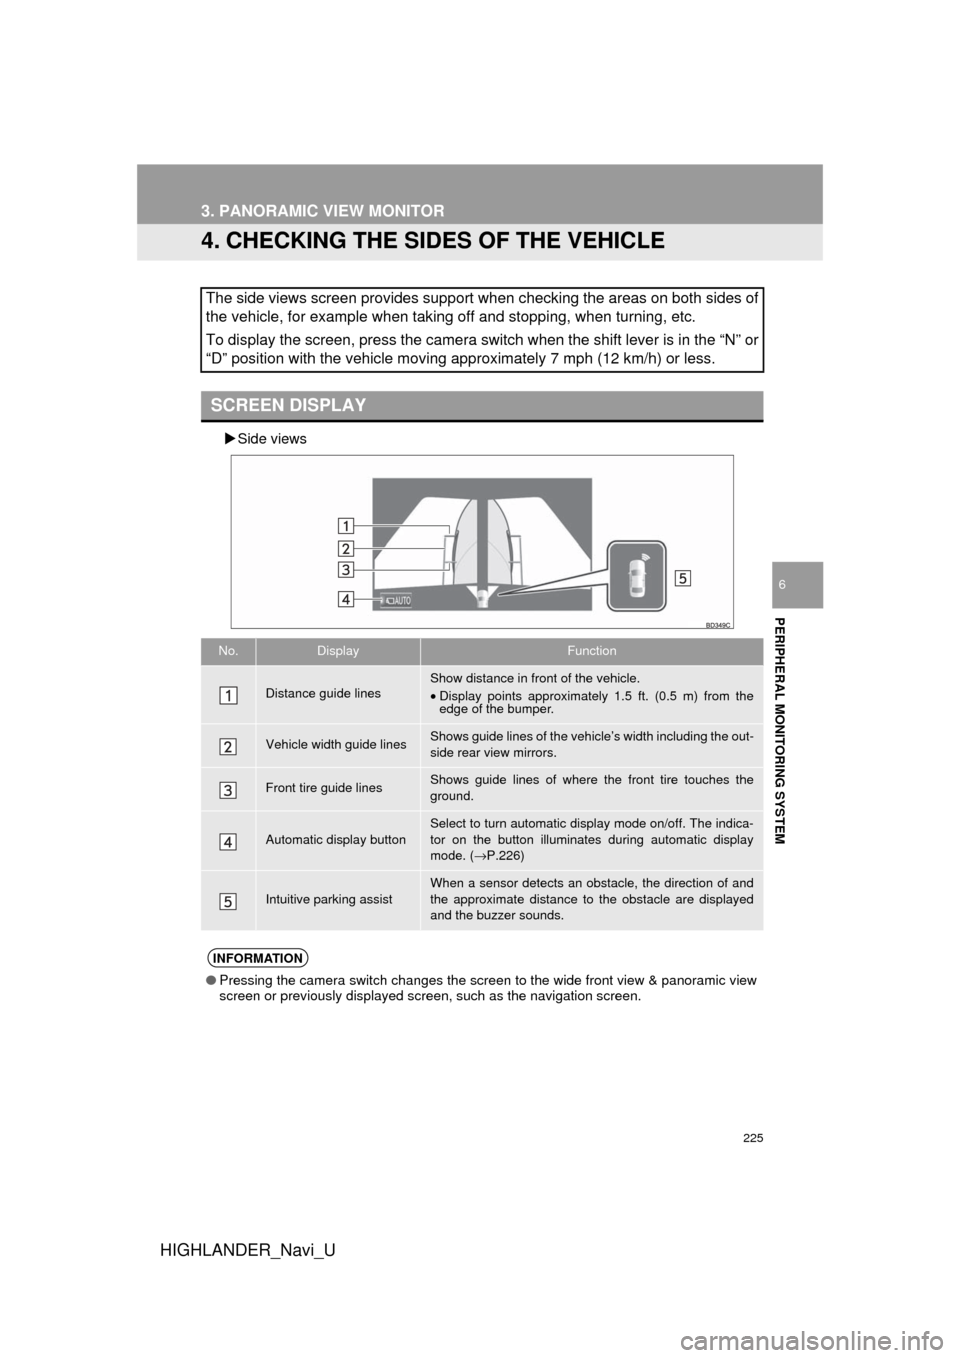
4. CHECKING THE SIDES OF THE VEHICLE
Side views
The side views screen provides support when checking the areas on both sides of
the vehicle, for example when taking off and stopping, when turning, etc.
To display the screen, press the camera switch when the shift lever is in the “N” or
“D” position with the vehicle moving approximately 7 mph (12 km/h) or less.
SCREEN DISPLAY
No.DisplayFunction
Distance guide linesShow distance in front of the vehicle.
•Display points approximately 1.5 ft. (0.5 m) from the
edge of the bumper.
Vehicle width guide linesShows guide lines of the vehi cle’s width including the out-
side rear view mirrors.
Front tire guide linesShows guide lines of where the front tire touches the
ground.
Automatic display button
Select to turn automatic display mode on/off. The indica-
tor on the button illuminates during automatic display
mode. ( →P.226)
Intuitive parking assistWhen a sensor detects an obstacle, the direction of and
the approximate distance to the obstacle are displayed
and the buzzer sounds.
INFORMATION
● Pressing the camera switch changes the screen to the wide front view & panoramic view
screen or previously displayed screen, such as the navigation screen.