reset TOYOTA HIGHLANDER 2017 XU50 / 3.G Quick Reference Guide
[x] Cancel search | Manufacturer: TOYOTA, Model Year: 2017, Model line: HIGHLANDER, Model: TOYOTA HIGHLANDER 2017 XU50 / 3.GPages: 56, PDF Size: 3.78 MB
Page 4 of 56
2
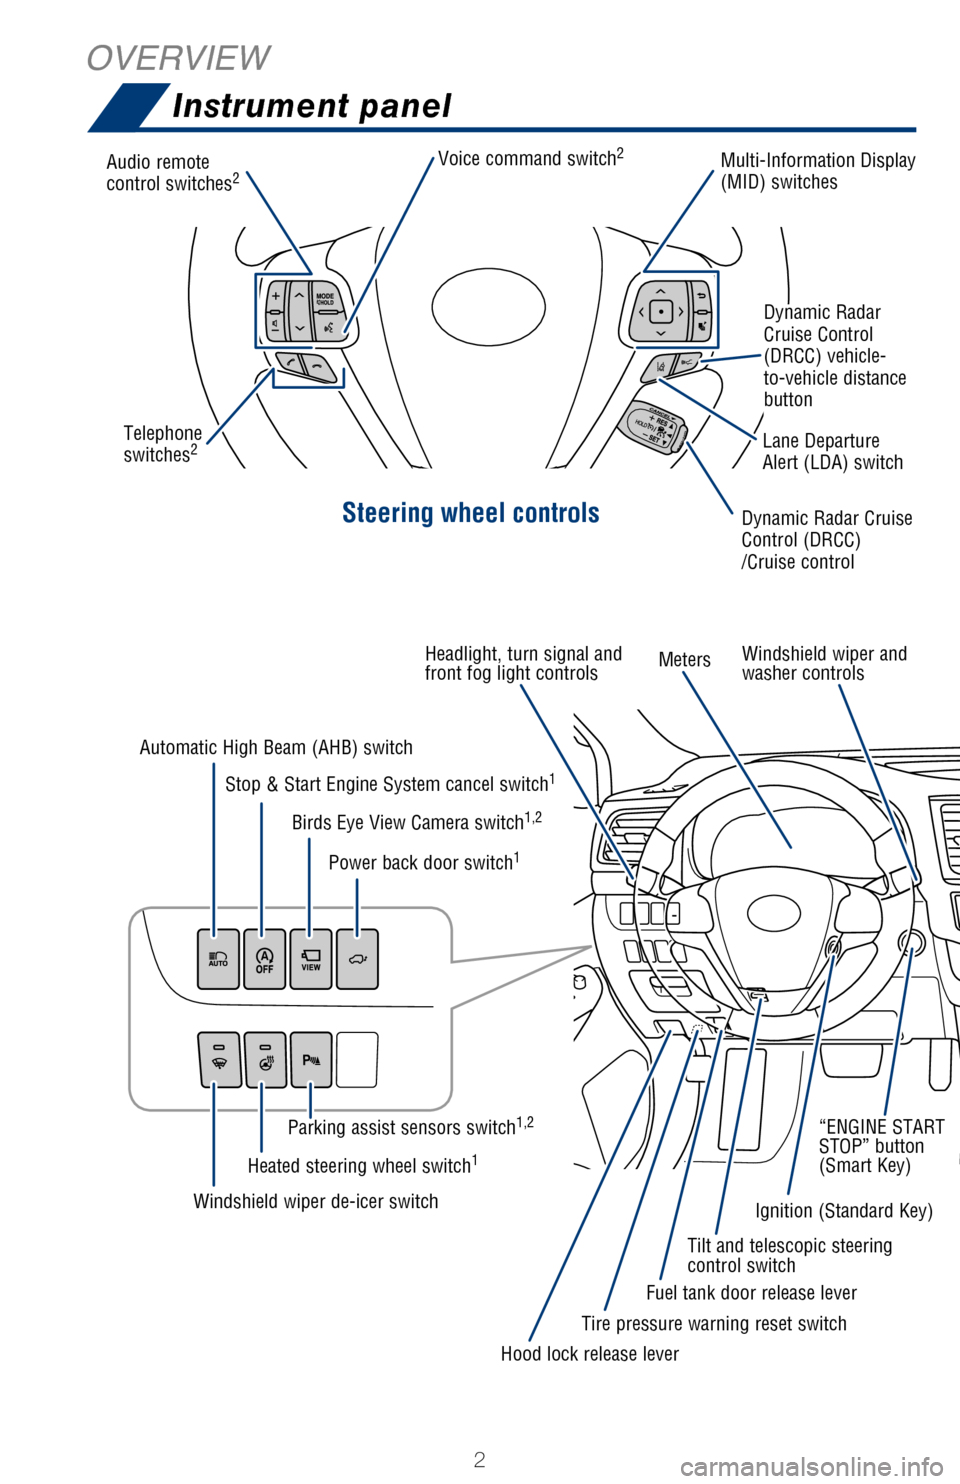
Steering wheel controls
Audio remote
control switches2Multi-Information Display
(MID) switchesDynamic Radar Cruise
Control
(DRCC)
/Cruise control
Dynamic Radar
Cruise Control
(DRCC) vehicle-
to-vehicle distance
button
Lane Departure
Alert (LDA) switch
Tilt and telescopic steering
control switch
Headlight, turn signal and
front fog light controls
Meters
Windshield wiper and
washer controls
Clock
“ENGINE START
STOP” button
(Smart Key)
Ignition (Standard Key)
Hood lock release lever Fuel tank door release lever
Tire pressure warning reset switch
Windshield wiper de-icer switch
Heated steering wheel switch
1
Parking assist sensors switch1,2
Automatic High Beam (AHB) switch
Stop & Start Engine System cancel switch
1
Birds Eye View Camera switch1,2
Power back door switch1
Voice command switch2
Telephone
switches2 1
If equipped2 For details, refer to the “Navigation System Owner’s Manual” and “2017 Entune™ Audio
Quick Reference Guide.”
OVERVIEW
Instrument panel
2017_Highlander_QRG_V1_1.indd 211/22/16 11:28 PM
Page 6 of 56
4
For details, refer to “Indicators and warning lights,” Section 2-2\
, 2017 Owner’s
Manual.
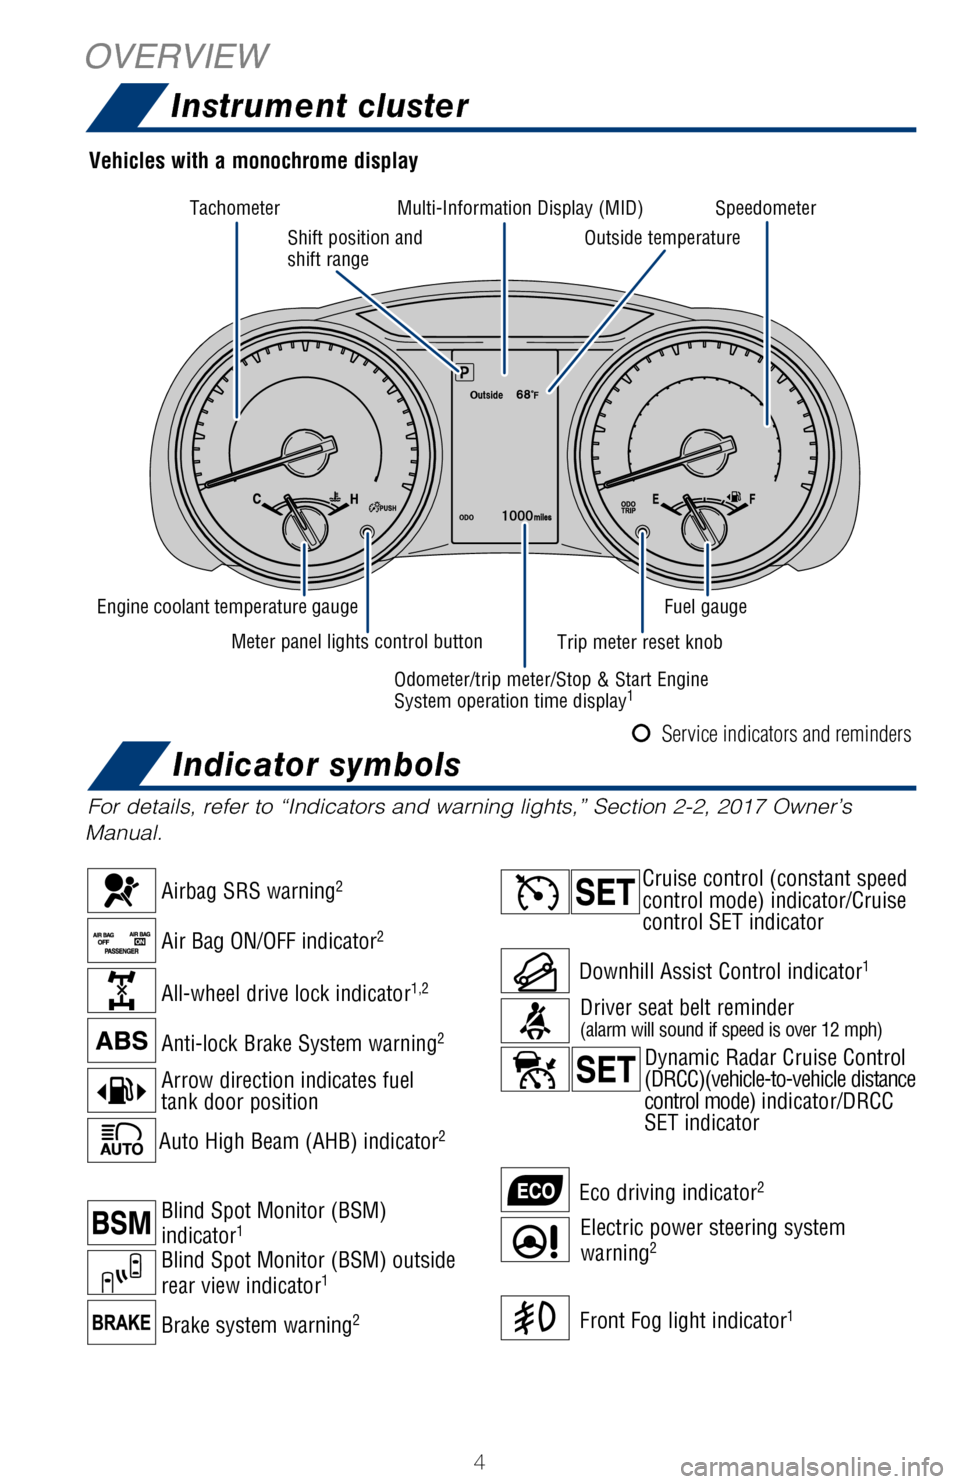
Vehicles with a monochrome display
1 If equipped.2 If indicator does not turn off within a few seconds of starting engine, \
there may be a malfunction.
Have vehicle inspected by your Toyota dealer.
Front Fog light indicator1
Cruise control (constant speed
control mode) indicator/Cruise
control SET indicator
Electric power steering system
warning2
Downhill Assist Control indicator1
Arrow direction indicates fuel
tank door position Anti-lock Brake System warning
2
Airbag SRS warning2
Air Bag ON/OFF indicator2
Auto High Beam (AHB) indicator2
All-wheel drive lock indicator1,2
Brake system warning2
Blind Spot Monitor (BSM) outside
rear view indicator1
Blind Spot Monitor (BSM)
indicator1
Eco driving indicator2
Driver seat belt reminder(alarm will sound if speed is over 12 mph)
Dynamic Radar Cruise Control
(DRCC)(vehicle-to-vehicle distance
control mode) indicator/DRCC
SET indicator
Engine coolant temperature gauge Shift position and
shift range
Tachometer
Multi-Information Display (MID) Speedometer
Fuel gauge
Outside temperature
Trip meter reset knob
Odometer/trip meter/Stop & Start Engine
System operation time display
1
Meter panel lights control button
Service indicators and reminders
OVERVIEW Instrument cluster
Indicator symbols
2017_Highlander_QRG_V1_1.indd 411/22/16 11:28 PM
Page 14 of 56
12
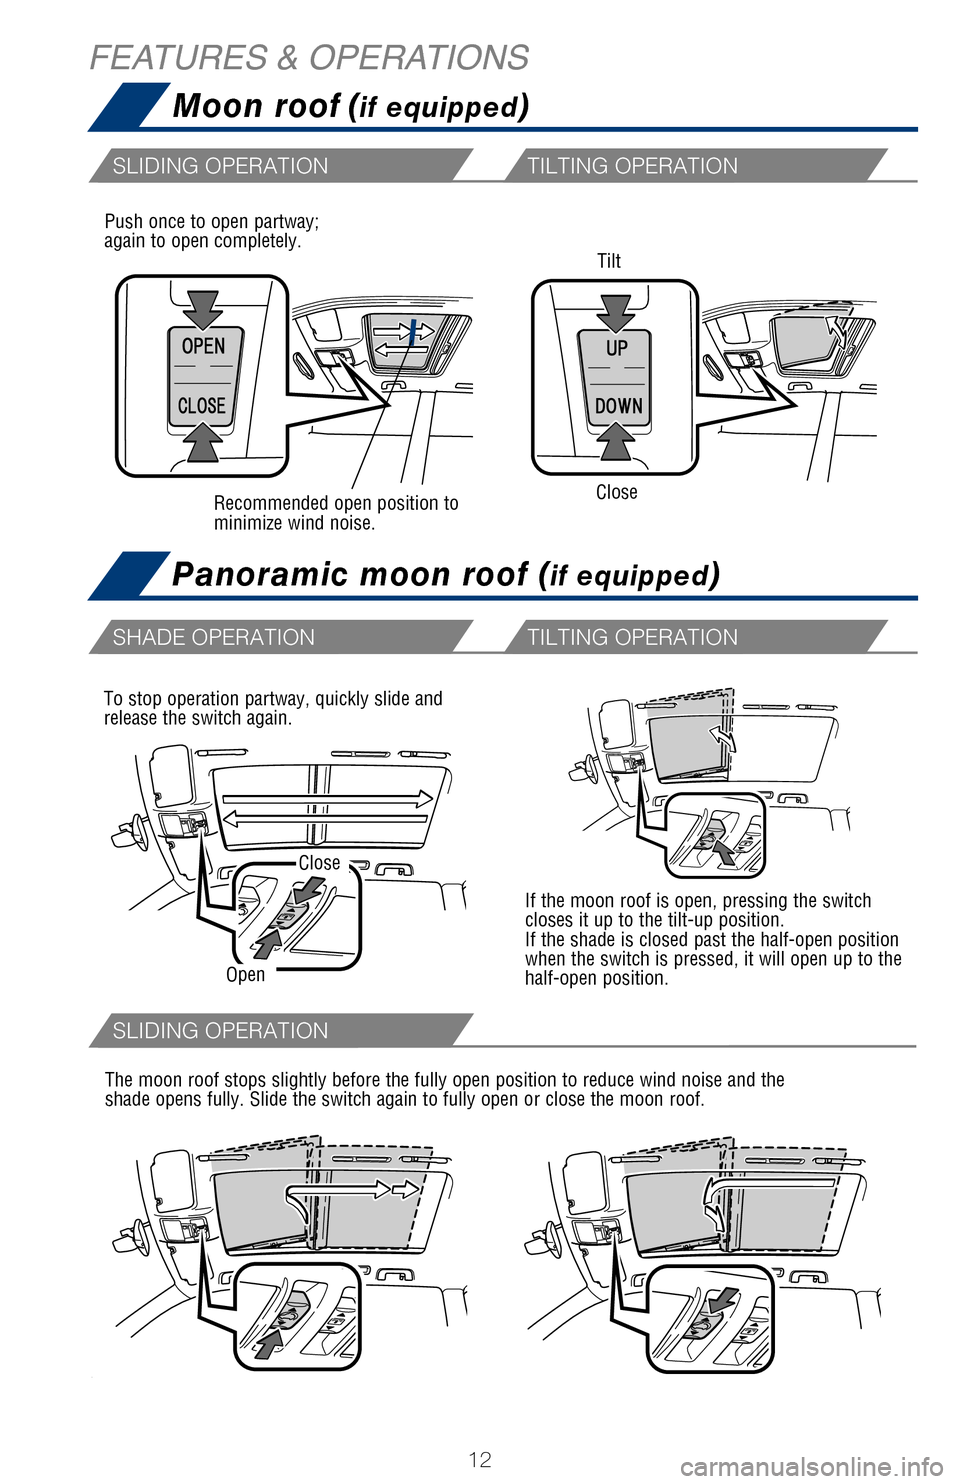
Moon roof (if equipped)
Panoramic moon roof (if equipped)
FEATURES & OPERATIONS
Tilt
Close
Recommended open position to
minimize wind noise.
Push once to open partway;
again to open completely.
If the moon roof is open, pressing the switch
closes it up to the tilt-up position.
If the shade is closed past the half-open position
when the switch is pressed, it will open up to the
half-open position.
To stop operation partway, quickly slide and
release the switch again.
Close
Open
The moon roof stops slightly before the fully open position to reduce wind \
noise and the
shade opens fully. Slide the switch again to fully open or close the moon roo\
f.
Instrument panel
NOTE: If battery is disconnected, the power back door needs to be reinitialized.\
Refer to the Owner’s Manual for more details.
Open only
1. When the liftgate reaches the desired height, push the rear liftgate cl\
ose-button (on the
door jam of the liftgate) once. Press and hold the button until the buzzer \
sounds.
2. To reset the height, with the liftgate open and not moving, press and h\
old the rear liftgate close-button until it buzzes, and continue to hold until it buzzes again -then let g\
o. Push
the same button to close the liftgate. When you next open the liftgate it w\
ill open to the
maximum height.
3. The height can also be set through the “Setup” screen on the audi\
o display. Setup >
Vehicle Customization > Other Vehicle Settings > Power Back Door Opening Adjust\
.
Through this screen, there are 5 height options to choose from.
NOTE: If the liftgate has stopped operating, check inside the glove box, on t\
he left side, to ensure the PWR DOOR OFF button has not been pushed.
For detailed instructions, see Owner’s Manual.
SLIDING OPERATION
SHADE OPERATION
SLIDING OPERATION
PROGRAMMABLE POWER LIFTGATE
TILTING OPERATION
TILTING OPERATION
2017_Highlander_QRG_V1_1.indd 1211/22/16 11:28 PM
Page 15 of 56
OVERVIEW
FEATURES & OPERATIONS
TOYOTA SAFETY SENSE
SAFETY & EMERGENCY FEATURES
13
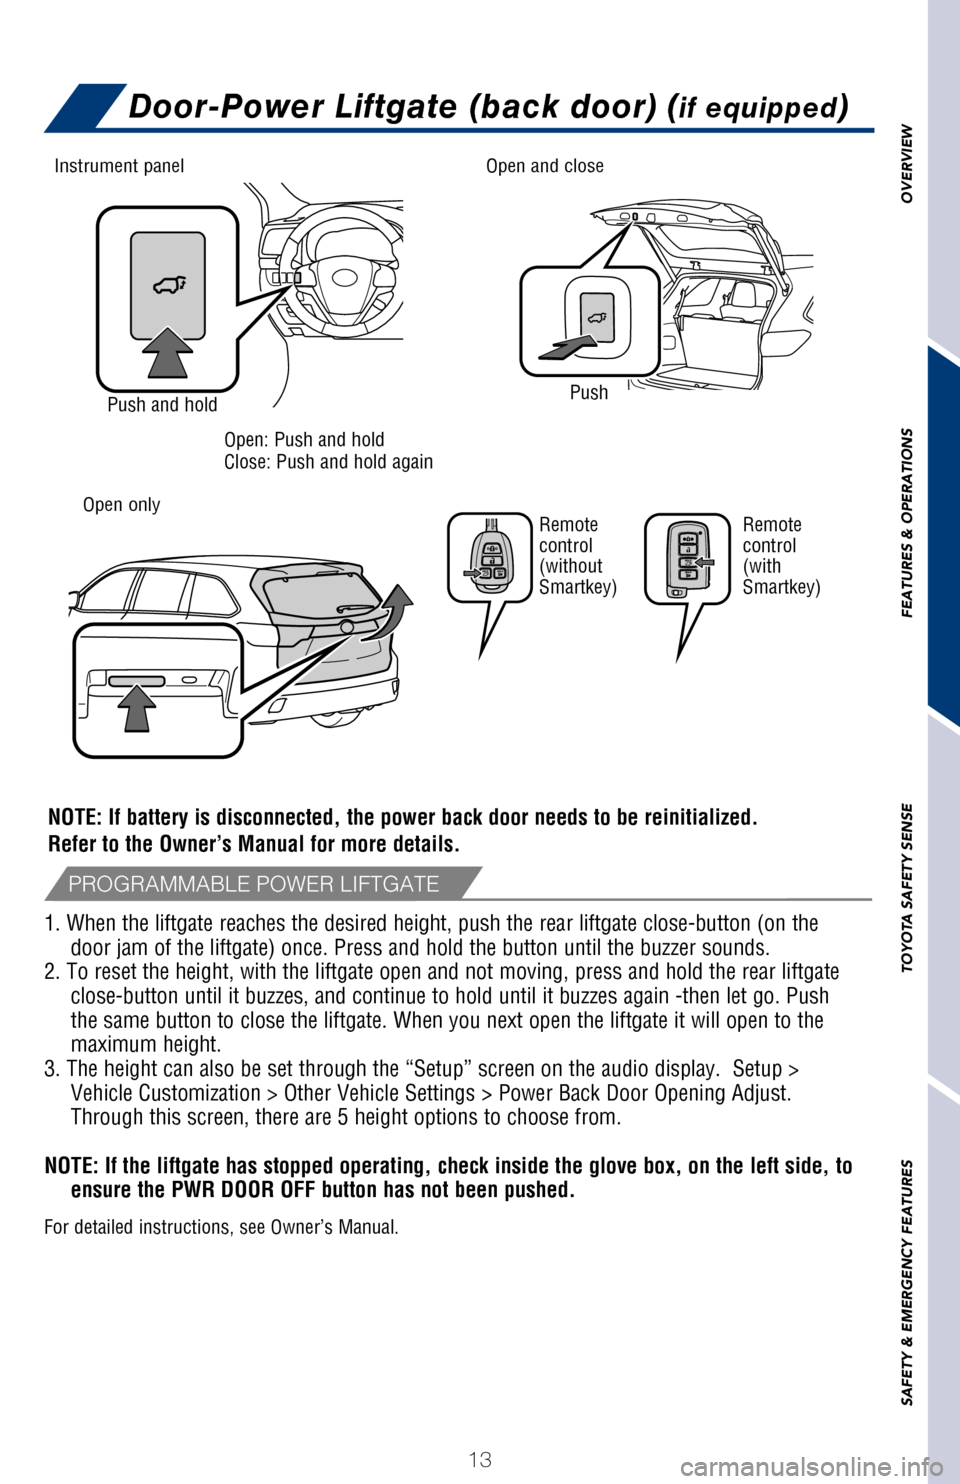
Door-Power Liftgate (back door) (if equipped)
If the moon roof is open, pressing the switch
closes it up to the tilt-up position.
If the shade is closed past the half-open position
when the switch is pressed, it will open up to the
half-open position.
The moon roof stops slightly before the fully open position to reduce wi\
nd noise and the
shade opens fully. Slide the switch again to fully open or close the moo\
n roof.
PushPush and hold
Instrument panel Open and close
Open: Push and hold
Close: Push and hold again
NOTE: If battery is disconnected, the power back door needs to be reinitialize\
d.
Refer to the Owner’s Manual for more details.
Open onlyRemote
control
(without
Smartkey)Remote
control
(with
Smartkey)
1. When the liftgate reaches the desired height, push the rear liftgate \
close-button (on the
door jam of the liftgate) once. Press and hold the button until the buz\
zer sounds.
2. To reset the height, with the liftgate open and not moving, press and\
hold the rear liftgate close-button until it buzzes, and continue to hold until it buzzes again\
-then let go. Push
the same button to close the liftgate. When you next open the liftgate i\
t will open to the
maximum height.
3. The height can also be set through the “Setup” screen on the au\
dio display. Setup > Vehicle Customization > Other Vehicle Settings > Power Back Door Opening\
Adjust.
Through this screen, there are 5 height options to choose from.
NOTE: If the liftgate has stopped operating, check inside the glove box,\
on the left side, to ensure the PWR DOOR OFF button has not been pushed.
For detailed instructions, see Owner’s Manual.
PROGRAMMABLE POWER LIFTGATE
TILTING OPERATION
TILTING OPERATION
2017_Highlander_QRG_V1_1.indd 1311/22/16 11:28 PM
Page 20 of 56
18
Up
Down
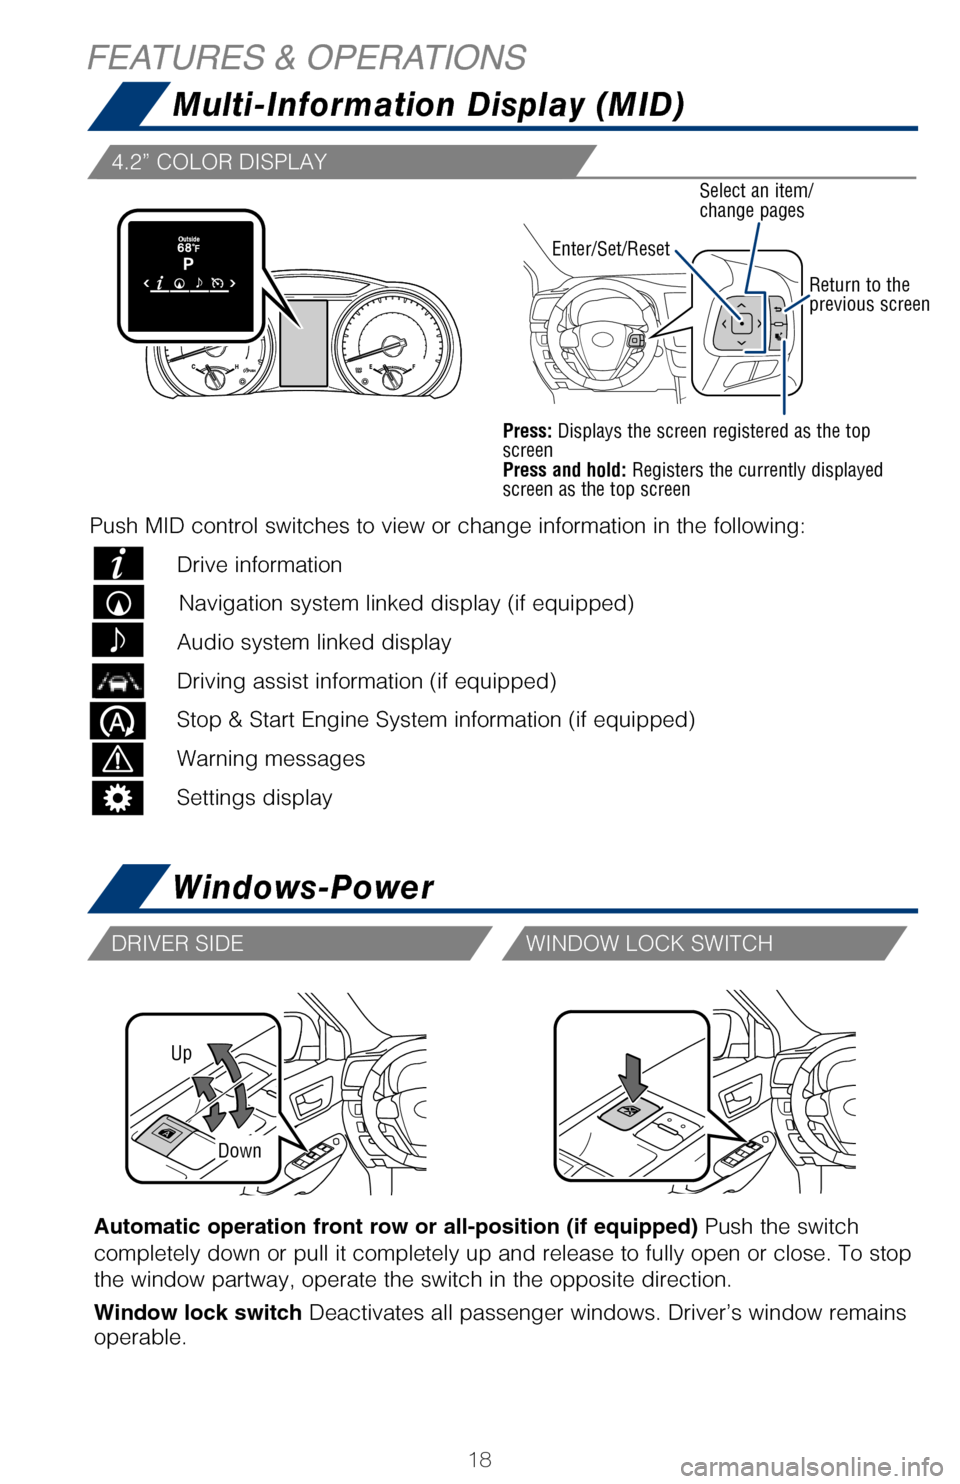
Automatic operation front row or all-position (if equipped) Push the switch
completely down or pull it completely up and release to fully open or cl\
ose. To stop
the window partway, operate the switch in the opposite direction.
Window lock switch Deactivates all passenger windows. Driver’s window remains
operable.
Steering wheel telephone controls
Bluetooth
® technology allows dialing or receipt of calls without taking hands from\
the steering wheel or using a cable to connect the compatible telephone \
and
the system. Refer to “Bluetooth
® Device Pairing Section,” in this guide, for more
information about phone connections and compatibility.
* Position of buttons may vary on some vehicles, for more details please\
refer to the
Owner’s Manual.
The Stop & Start Engine System stops and restarts the engine according
to the brake pedal operation and other operations when the
vehicle is stopped.
Stopping the engine
While driving with the shift lever
in D, depress the brake pedal,
and stop the vehicle.
Disabling the Stop & Start Engine
System
Press the Stop & Start Engine System
cancel switch to disable the system.
DRIVER SIDE WINDOW LOCK SWITCH
If the engine is stopped by the Stop & Start Engine System when the vehi\
cle is
on an incline, brake force is temporarily maintained to prevent rolling
backwards until the engine is restarted and drive force is generated.
When drive force is generated, the maintained brake force is automatical\
ly
canceled.
HILL-START ASSIST CONTROL (HAC)
Volume control
Enter/Set/ResetSelect an item/
change pages
Return to the
previous screen
Press: Displays the screen registered as the top
screen
Press and hold: Registers the currently displayed
screen as the top screen
Multi-Information Display (MID)
Windows-Power
FEATURES & OPERATIONS
4.2” COLOR DISPLAY
Push MID control switches to view or change information in the following\
:
Drive information
Navigation system linked display (if equipped)
Audio system linked display
Driving assist information (if equipped)
Stop & Start Engine System information (if equipped)
Warning messages
Settings display
2017_Highlander_QRG_V1_1.indd 1811/22/16 11:29 PM
Page 32 of 56
30
(1) Press “ ” switches and select from the Multi-Information Display (MID).
(2) Press “ ” switches and select the
setting function and then press “”.
(3) Press “
” each time to change the setting.
(4) Press “
” to go back to the menu.
Note: Operation of the LDA system and setting adjustments continues in t\
he
same condition regardless of Ignition cycle until changed by the driver \
or the
system is reset.
LDA FUNCTIONS
ADJUSTING LDA ALERT SENSITIVITY
TOYOTA SAFETY SENSE™
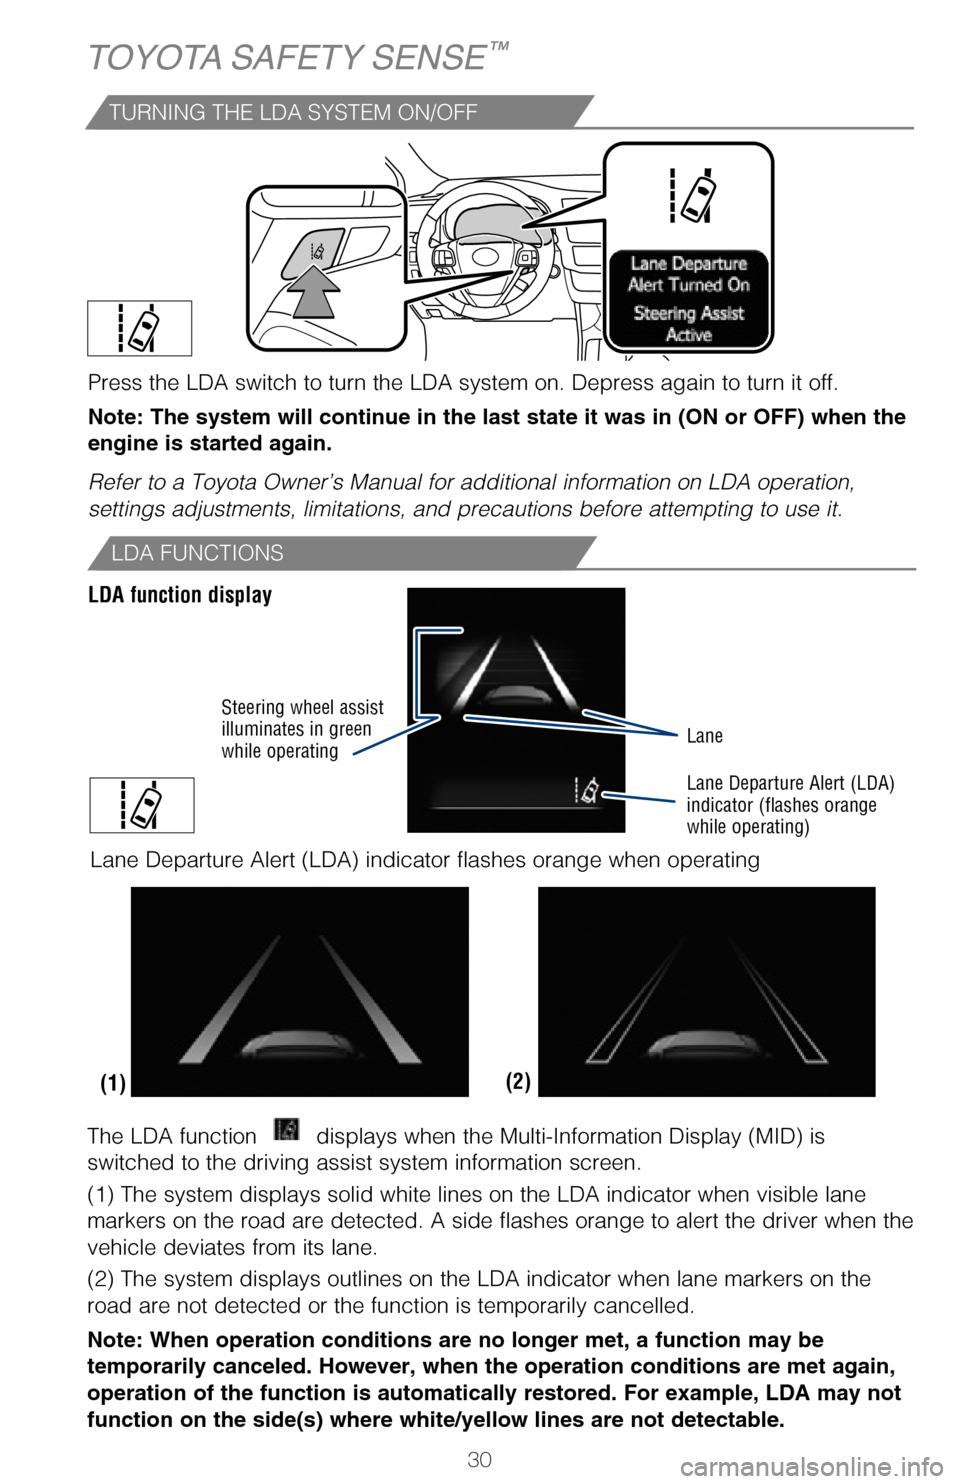
LDA function display
Lane
Lane Departure Alert (LDA)
indicator (flashes orange
while operating)
Steering wheel assist
illuminates in green
while operating
(2)
(1)
Lane Departure Alert (LDA) indicator flashes orange when operating
THE SWAY WARNING SYSTEM (SWS) FUNCTION
SWS is a function of LDA and is designed to detect swaying based on the \
vehicle
location in the lane and the driver’s steering wheel operation. To he\
lp prevent
swaying, the system alerts the driver using a buzzer sound and a warning\
displays
in the MID.
The LDA function displays when the Multi-Information Display (MID) is
switched to the driving assist system information screen.
(1) The system displays solid white lines on the LDA indicator when vi\
sible lane
markers on the road are detected. A side flashes orange to alert the dri\
ver when the
vehicle deviates from its lane.
(2) The system displays outlines on the LDA indicator when lane marker\
s on the
road are not detected or the function is temporarily cancelled.
Note: When operation conditions are no longer met, a function may be
temporarily canceled. However, when the operation conditions are met aga\
in,
operation of the function is automatically restored. For example, LDA ma\
y not
function on the side(s) where white/yellow lines are not detectable.
TURNING THE LDA SYSTEM ON/OFF
Press the LDA switch to turn the LDA system on. Depress again to turn it\
off.
Note: The system will continue in the last state it was in (ON or OFF)\
when the
engine is started again.
Refer to a Toyota Owner’s Manual for additional information on LDA op\
eration,
settings adjustments, limitations, and precautions before attempting to \
use it.
DISABLING THE STEERING ASSIST FUNCTION
The driver can adjust the sensitivity of the LDA (warning) function fr\
om the
Multi-Information Display (MID) customization screen.
High - Is designed to warn approximately before the front tire crosses the
lane marker.
Normal - (default) Is designed to warn approximately when the front tire
crosses the lane marker.
(1) Press “ ” switches and select
from the Multi-Information Display (MID).
(2) Press “ ” switches and select the
setting function and then press “”.
(3) Press “
” each time to change the setting. Press “” to go back to the menu.
2017_Highlander_QRG_V1_1.indd 3011/22/16 11:29 PM
Page 33 of 56
31
OVERVIEW
FEATURES & OPERATIONS
TOYOTA SAFETY SENSE
SAFETY & EMERGENCY FEATURES(1) Press “” switches and select from the Multi-Information Display (MID).
(2) Press “
” switches and select the setting function and then press “”.
(3) Press “
” each time to change the setting.
(4) Press “
” to go back to the menu.
Note: Operation of the LDA system and setting adjustments continues in t\
he
same condition regardless of Ignition cycle until changed by the driver \
or the
system is reset.
ADJUSTING LDA ALERT SENSITIVITY
Lane Departure Alert (LDA)
indicator (flashes orange
while operating)
Lane Departure Alert (LDA) indicator flashes orange when operatingTHE SWAY WARNING SYSTEM (SWS) FUNCTION
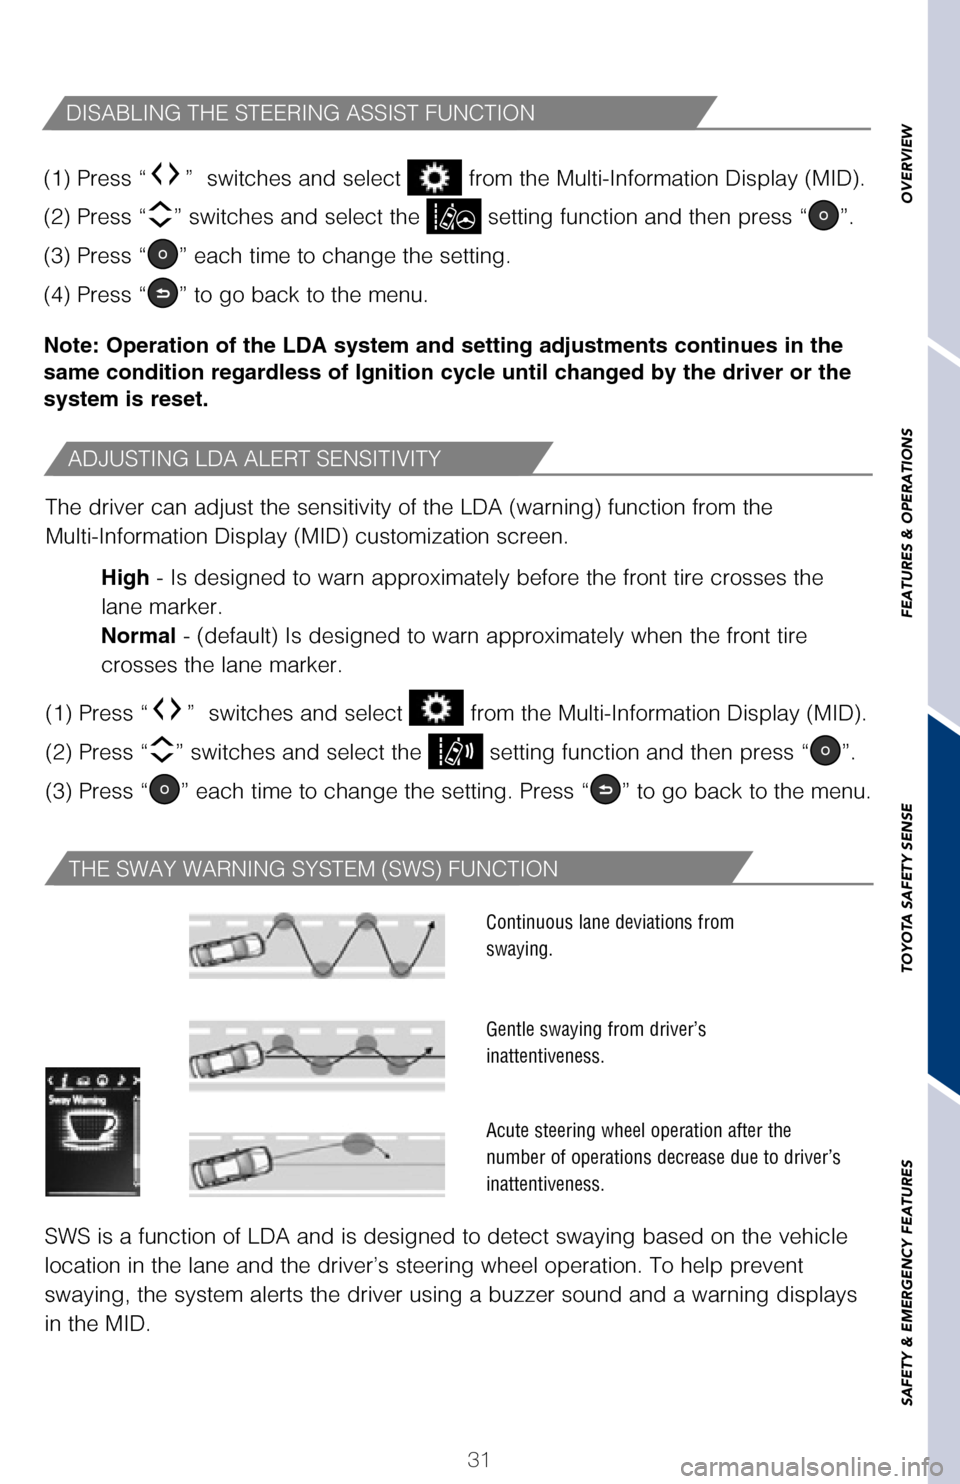
SWS is a function of LDA and is designed to detect swaying based on the \
vehicle
location in the lane and the driver’s steering wheel operation. To he\
lp prevent
swaying, the system alerts the driver using a buzzer sound and a warning\
displays
in the MID.
Continuous lane deviations from
swaying.
Gentle swaying from driver’s
inattentiveness.
Acute steering wheel operation after the
number of operations decrease due to driver’s
inattentiveness.
The LDA function displays when the Multi-Information Display (MID) is
switched to the driving assist system information screen.
(1) The system displays solid white lines on the LDA indicator when vi\
sible lane
markers on the road are detected. A side flashes orange to alert the dri\
ver when the
vehicle deviates from its lane.
(2) The system displays outlines on the LDA indicator when lane marker\
s on the
road are not detected or the function is temporarily cancelled.
Note: When operation conditions are no longer met, a function may be
temporarily canceled. However, when the operation conditions are met aga\
in,
operation of the function is automatically restored. For example, LDA ma\
y not
function on the side(s) where white/yellow lines are not detectable.
Press the LDA switch to turn the LDA system on. Depress again to turn it\
off.
Note: The system will continue in the last state it was in (ON or OFF)\
when the
engine is started again.
Refer to a Toyota Owner’s Manual for additional information on LDA op\
eration,
settings adjustments, limitations, and precautions before attempting to \
use it.
DISABLING THE STEERING ASSIST FUNCTION
The driver can adjust the sensitivity of the LDA (warning) function fr\
om the
Multi-Information Display (MID) customization screen. High - Is designed to warn approximately before the front tire crosses the
lane marker.
Normal - (default) Is designed to warn approximately when the front tire
crosses the lane marker.
(1) Press “
” switches and select from the Multi-Information Display (MID).
(2) Press “
” switches and select the setting function and then press “”.
(3) Press “
” each time to change the setting. Press “” to go back to the menu.
2017_Highlander_QRG_V1_1.indd 3111/22/16 11:29 PM
Page 34 of 56
32
(1) Press “” switches and select from the Multi-Information Display (MID).
(2) Press “
” switches and select the SWS setting function and then press “”.
(3) Press “
” each time to change the setting. Press “” to go back to the menu.
Note: Operation of the LDA system and setting adjustments continues in t\
he
same condition regardless of Ignition cycle until changed by the driver \
or the
system is reset.
Dynamic Radar Cruise Control (DRCC)
TURNING SYSTEM ON/OFF
ADJUSTING DRCC SET SPEED
TOYOTA SAFETY SENSE™
1 The set speed may also be cancelled by depressing the brake pedal.2 The set speed may be resumed once vehicle speed exceeds 25 mph.
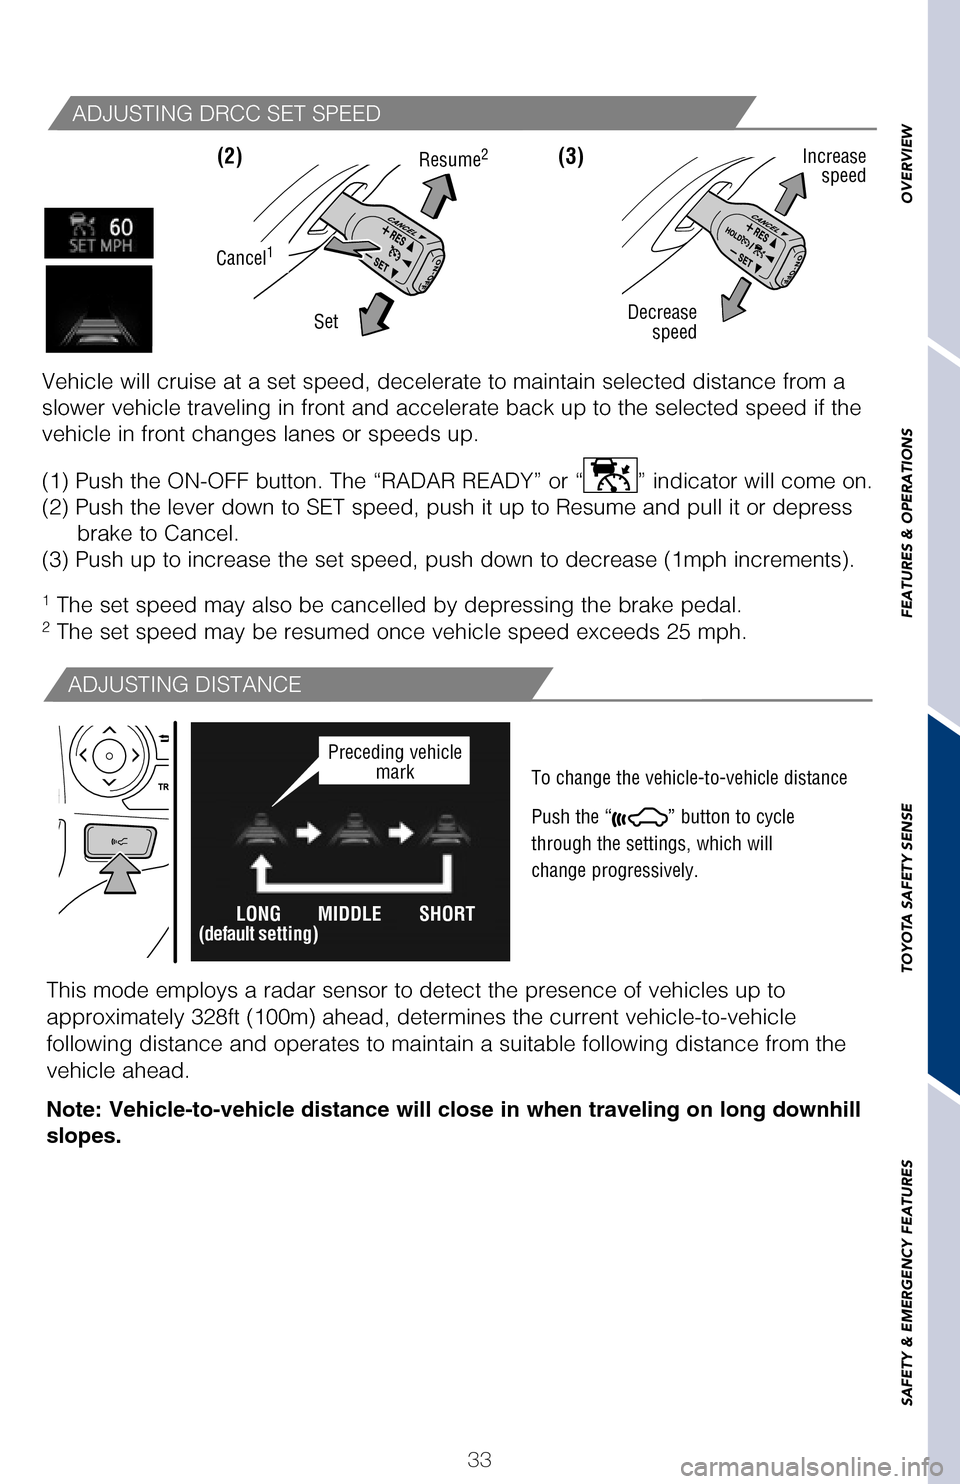
Vehicle will cruise at a set speed, decelerate to maintain selected dist\
ance from a
slower vehicle traveling in front and accelerate back up to the selected\
speed if the
vehicle in front changes lanes or speeds up.
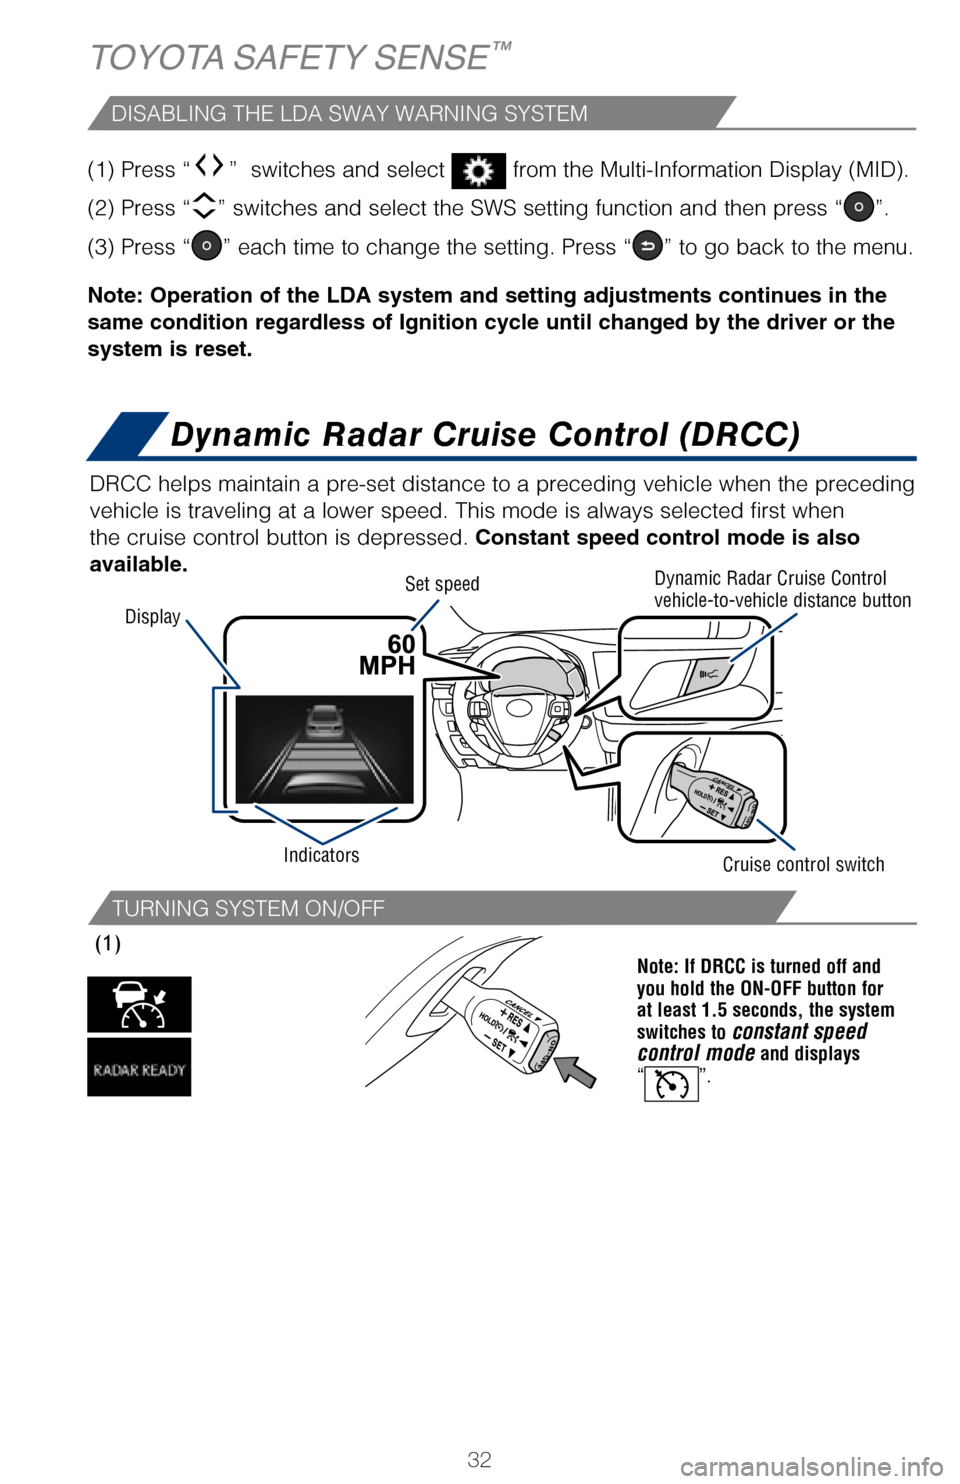
(1) Push the ON-OFF button. The “RADAR READY” or “” indicator will come on.
(2) Push the lever down to SET speed, push it up to Resume and pull it\
or depress brake to Cancel.
(3) Push up to increase the set speed, push down to decrease (1mph in\
crements).
(1) Note: If DRCC is turned off and
you hold the ON-OFF button for
at least 1.5 seconds, the system
switches to
constant speed
control mode and displays
“”.
ADJUSTING DISTANCE
This mode employs a radar sensor to detect the presence of vehicles up t\
o
approximately 328ft (100m) ahead, determines the current vehicle-to-ve\
hicle
following distance and operates to maintain a suitable following distanc\
e from the
vehicle ahead.
Note: Vehicle-to-vehicle distance will close in when traveling on long d\
ownhill
slopes.
DISABLING THE LDA SWAY WARNING SYSTEM
DRCC helps maintain a pre-set distance to a preceding vehicle when the p\
receding
vehicle is traveling at a lower speed. This mode is always selected firs\
t when
the cruise control button is depressed. Constant speed control mode is also
available.
Display Set speed
Indicators Dynamic Radar Cruise Control
vehicle-to-vehicle distance button
Cruise control switch
2017_Highlander_QRG_V1_1.indd 3211/22/16 11:29 PM
Page 35 of 56
33
OVERVIEW
FEATURES & OPERATIONS
TOYOTA SAFETY SENSE
SAFETY & EMERGENCY FEATURES
(1) Press “ ” switches and select from the Multi-Information Display (MID).
(2) Press “ ” switches and select the SWS setting function and then press “
”.
(3) Press “
” each time to change the setting. Press “” to go back to the menu.
Note: Operation of the LDA system and setting adjustments continues in t\
he
same condition regardless of Ignition cycle until changed by the driver \
or the
system is reset.
Dynamic Radar Cruise Control (DRCC)
ADJUSTING DRCC SET SPEED
1 The set speed may also be cancelled by depressing the brake pedal.
2 The set speed may be resumed once vehicle speed exceeds 25 mph.
Vehicle will cruise at a set speed, decelerate to maintain selected dist\
ance from a
slower vehicle traveling in front and accelerate back up to the selected\
speed if the
vehicle in front changes lanes or speeds up.
(1) Push the ON-OFF button. The “RADAR READY” or “
” indicator will come on.
(2) Push the lever down to SET speed, push it up to Resume and pull it\
or depress brake to Cancel.
(3) Push up to increase the set speed, push down to decrease (1mph in\
crements).
(3)
Note: If DRCC is turned off and
you hold the ON-OFF button for
at least 1.5 seconds, the system
switches to
constant speed
control mode and displays
“”.
(2)
ADJUSTING DISTANCE
To change the vehicle-to-vehicle distance
Push the “
” button to cycle
through the settings, which will
change progressively.
Decrease speed Increase
speed
Cancel1
Resume2
Set
This mode employs a radar sensor to detect the presence of vehicles up t\
o
approximately 328ft (100m) ahead, determines the current vehicle-to-ve\
hicle
following distance and operates to maintain a suitable following distanc\
e from the
vehicle ahead.
Note: Vehicle-to-vehicle distance will close in when traveling on long d\
ownhill
slopes.
DRCC helps maintain a pre-set distance to a preceding vehicle when the p\
receding
vehicle is traveling at a lower speed. This mode is always selected firs\
t when
the cruise control button is depressed. Constant speed control mode is also
available.
Dynamic Radar Cruise Control
vehicle-to-vehicle distance button
Cruise control switch
LONG
(default setting)MIDDLE SHORTPreceding vehicle
mark
2017_Highlander_QRG_V1_1.indd 3311/22/16 11:29 PM
Page 39 of 56
37
Unlock
Lock
OVERVIEW
FEATURES & OPERATIONS
TOYOTA SAFETY SENSE
SAFETY & EMERGENCY FEATURES
Seat beltsDoors-Child safety locks
Seat belts-3rd row center
Seat belt reminder indicator
Seat belts-Shoulder belt anchor
Tire Pressure Monitoring (warning) System (TPMS)
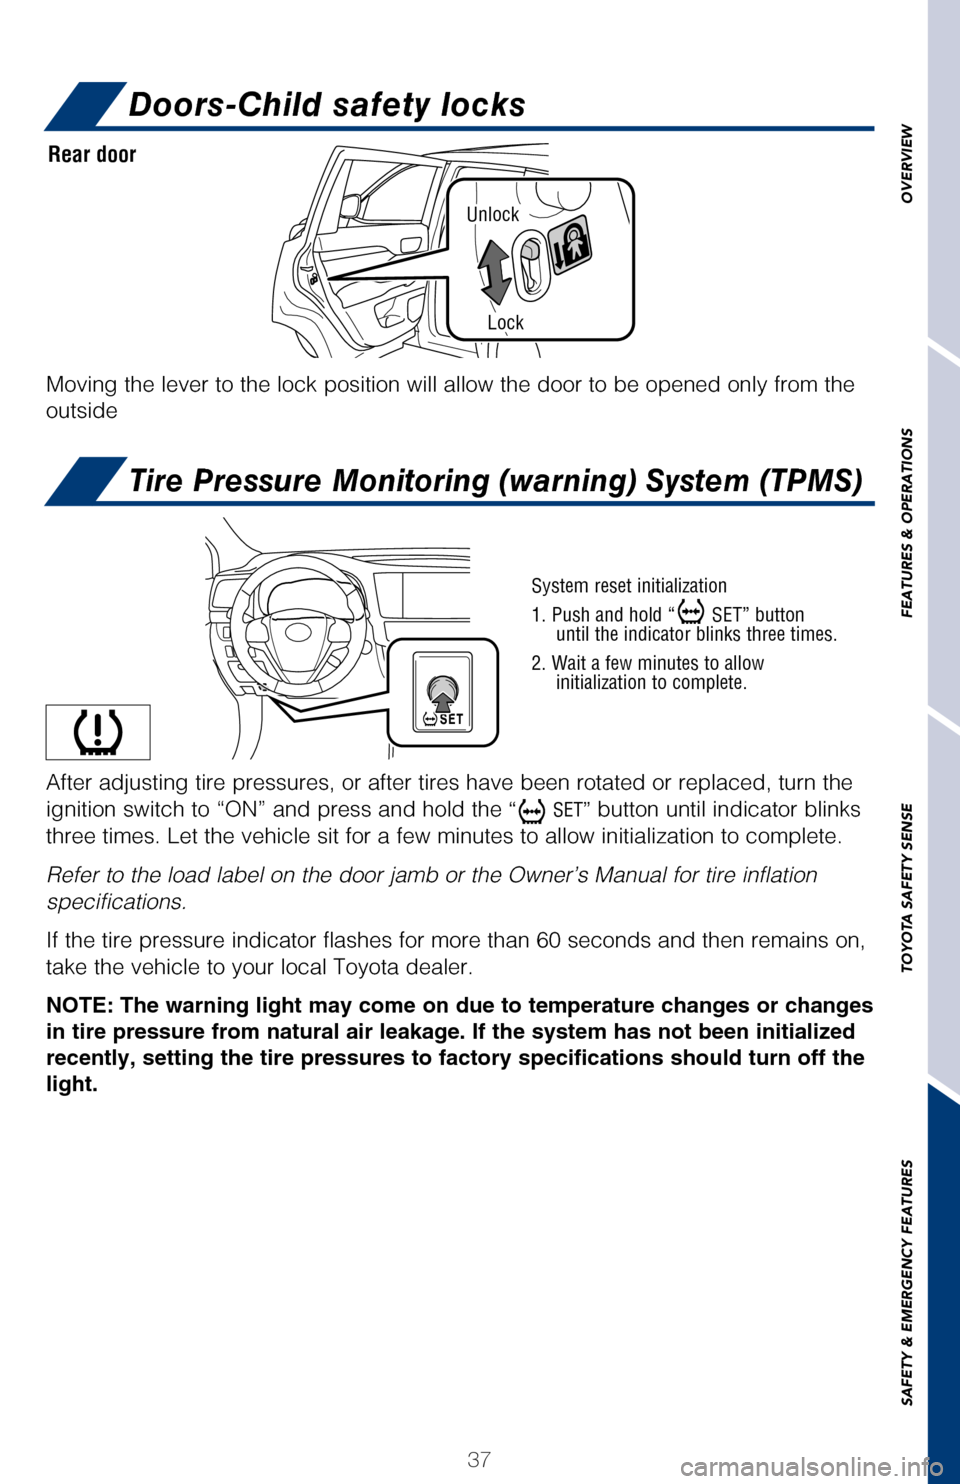
Moving the lever to the lock position will allow the door to be opened o\
nly from the
outside
A buzzer sounds and an indicator will display as a reminder when a
rear second or third row passenger is not wearing a seat belt.
Rear door
System reset initialization
1. Push and hold “
SET” button
until the indicator blinks three times.
2. Wait a few minutes to allow initialization to complete.
After adjusting tire pressures, or after tires have been rotated or repl\
aced, turn the
ignition switch to “ON” and press and hold the
“ SET” button until indicator blinks
three times. Let the vehicle sit for a few minutes to allow initializati\
on to complete.
Refer to the load label on the door jamb or the Owner’s Manual for ti\
re inflation
specifications.
If the tire pressure indicator flashes for more than 60 seconds and then\
remains on,
take the vehicle to your local Toyota dealer.
NOTE: The warning light may come on due to temperature changes or changes
in tire pressure from natural air leakage. If the system has not been in\
itialized
recently, setting the tire pressures to factory specifications should tu\
rn off the
light.
Buckle “B”
Push plate “B” into buckle “B”
until a click sound is heard.
Take up slack
NOTE: If a passenger’s seat belt is fully extended, then retracted ev\
en slightly,
the Automatic locking retractor (ALR) will prevent it from being re-ex\
tended
beyond that point, unless fully retracted again. This feature is used to\
help
hold child restraint systems securely.
To find more information about seat belts, and how to install a child re\
straint system,
refer to the Owner’s Manual.
2017_Highlander_QRG_V1_1.indd 3711/22/16 11:29 PM