TOYOTA HIGHLANDER HYBRID 2016 XU50 / 3.G Owners Manual
HIGHLANDER HYBRID 2016 XU50 / 3.G
TOYOTA
TOYOTA
https://www.carmanualsonline.info/img/14/6458/w960_6458-0.png
TOYOTA HIGHLANDER HYBRID 2016 XU50 / 3.G Owners Manual
Trending: steering wheel adjustment, change key battery, battery capacity, transmission, washer fluid, length, towing
Page 441 of 608
4416-3. Do-it-yourself maintenance
HIGHLANDER_HV_U (OM48F12U)
6
Maintenance and care
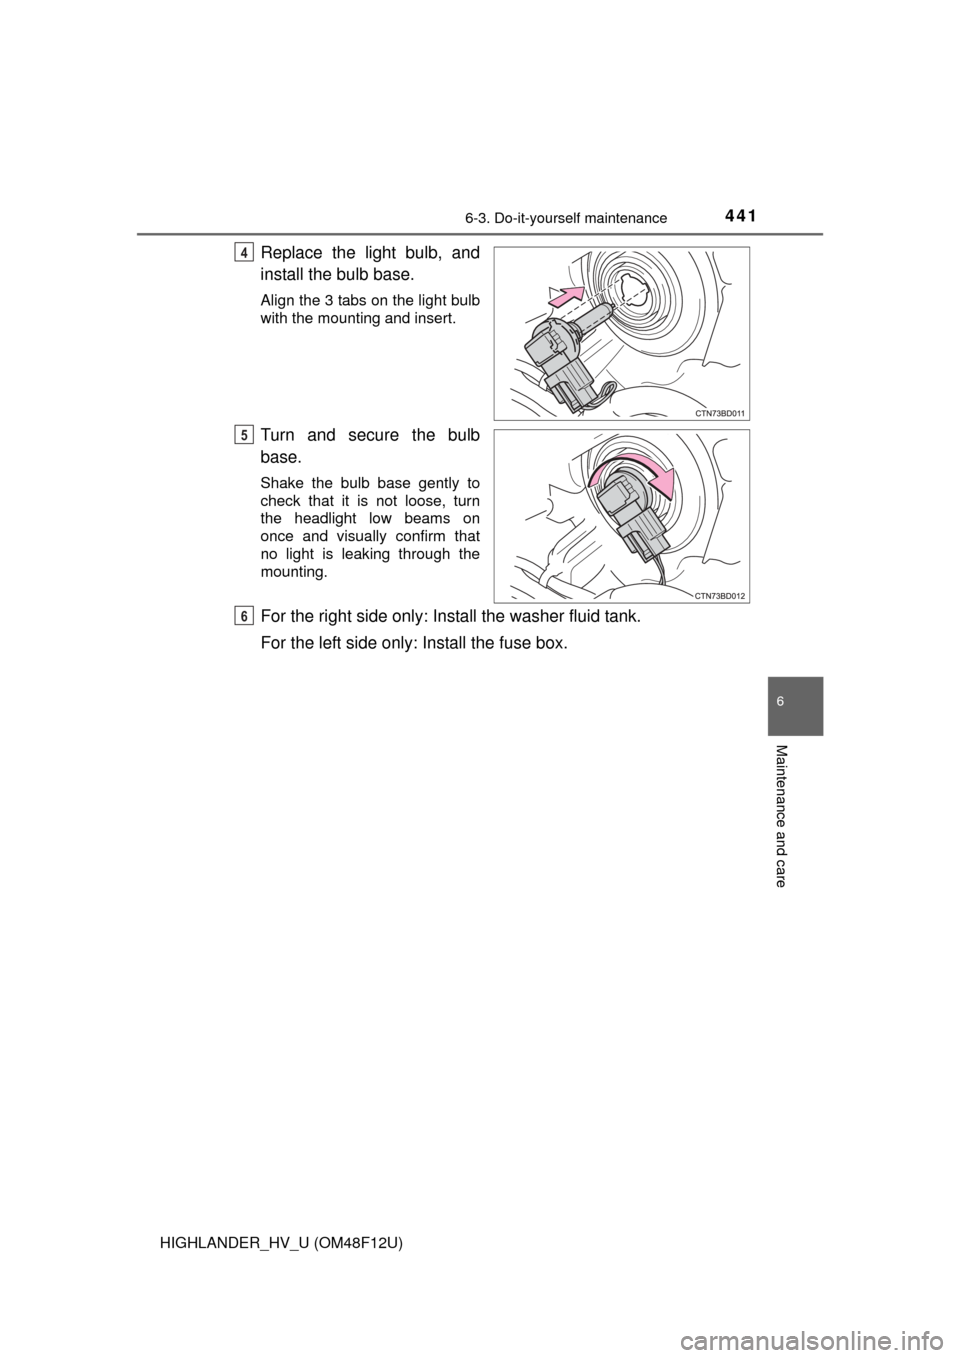
Replace the light bulb, and
install the bulb base.
Align the 3 tabs on the light bulb
with the mounting and insert.
Turn and secure the bulb
base.
Shake the bulb base gently to
check that it is not loose, turn
the headlight low beams on
once and visually confirm that
no light is leaking through the
mounting.
For the right side only: Install the washer fluid tank.
For the left side only: Install the fuse box.
4
5
6
Page 442 of 608
4426-3. Do-it-yourself maintenance
HIGHLANDER_HV_U (OM48F12U)■
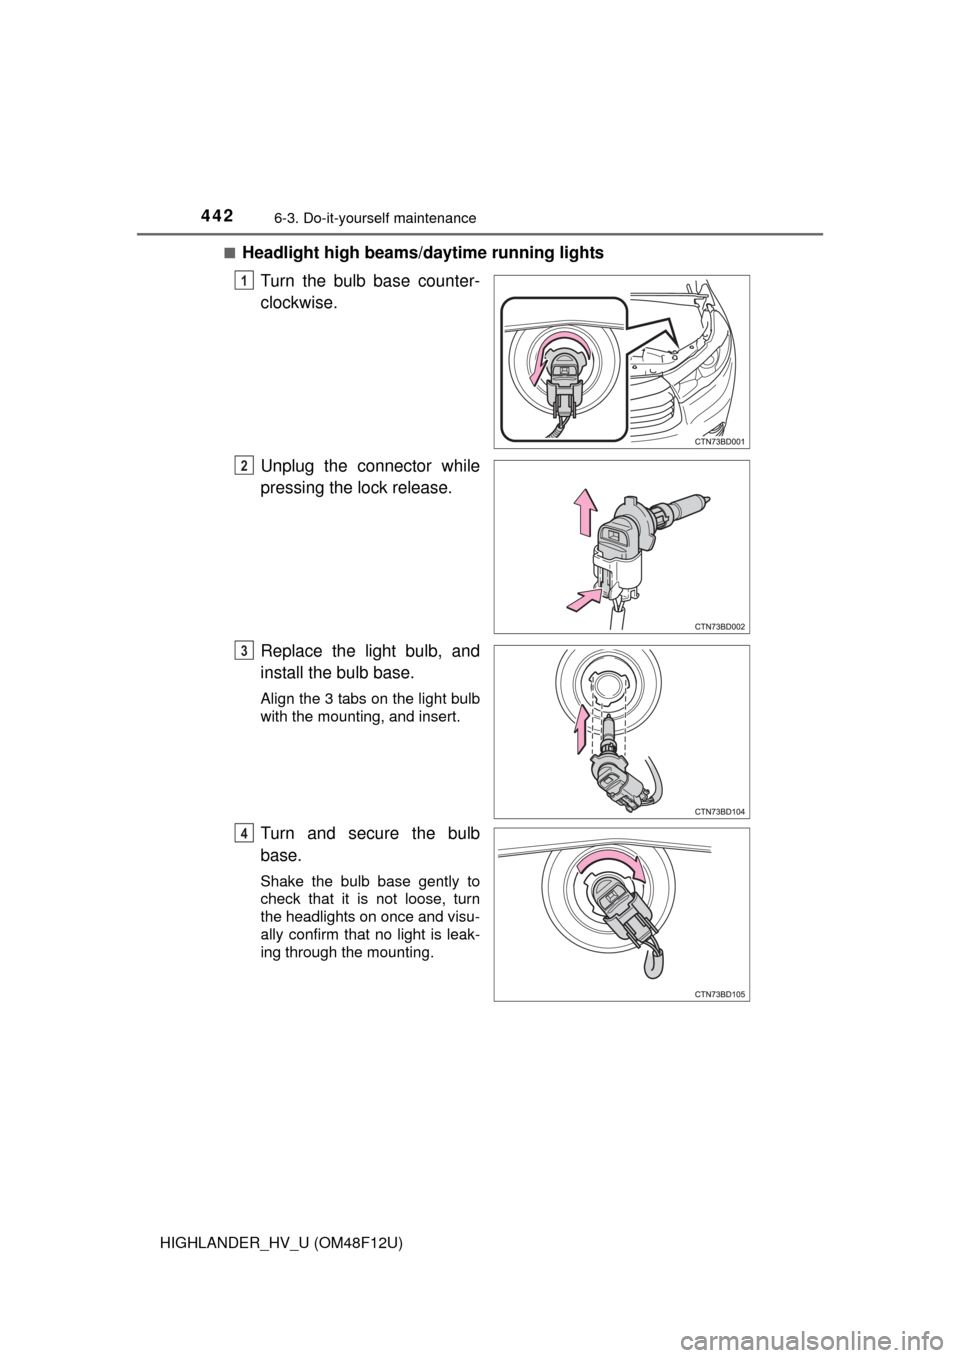
Headlight high beams/
daytime running lights
Turn the bulb base counter-
clockwise.
Unplug the connector while
pressing the lock release.
Replace the light bulb, and
install the bulb base.
Align the 3 tabs on the light bulb
with the mounting, and insert.
Turn and secure the bulb
base.
Shake the bulb base gently to
check that it is not loose, turn
the headlights on once and visu-
ally confirm that no light is leak-
ing through the mounting.
1
2
3
4
Page 443 of 608
4436-3. Do-it-yourself maintenance
HIGHLANDER_HV_U (OM48F12U)
6
Maintenance and care
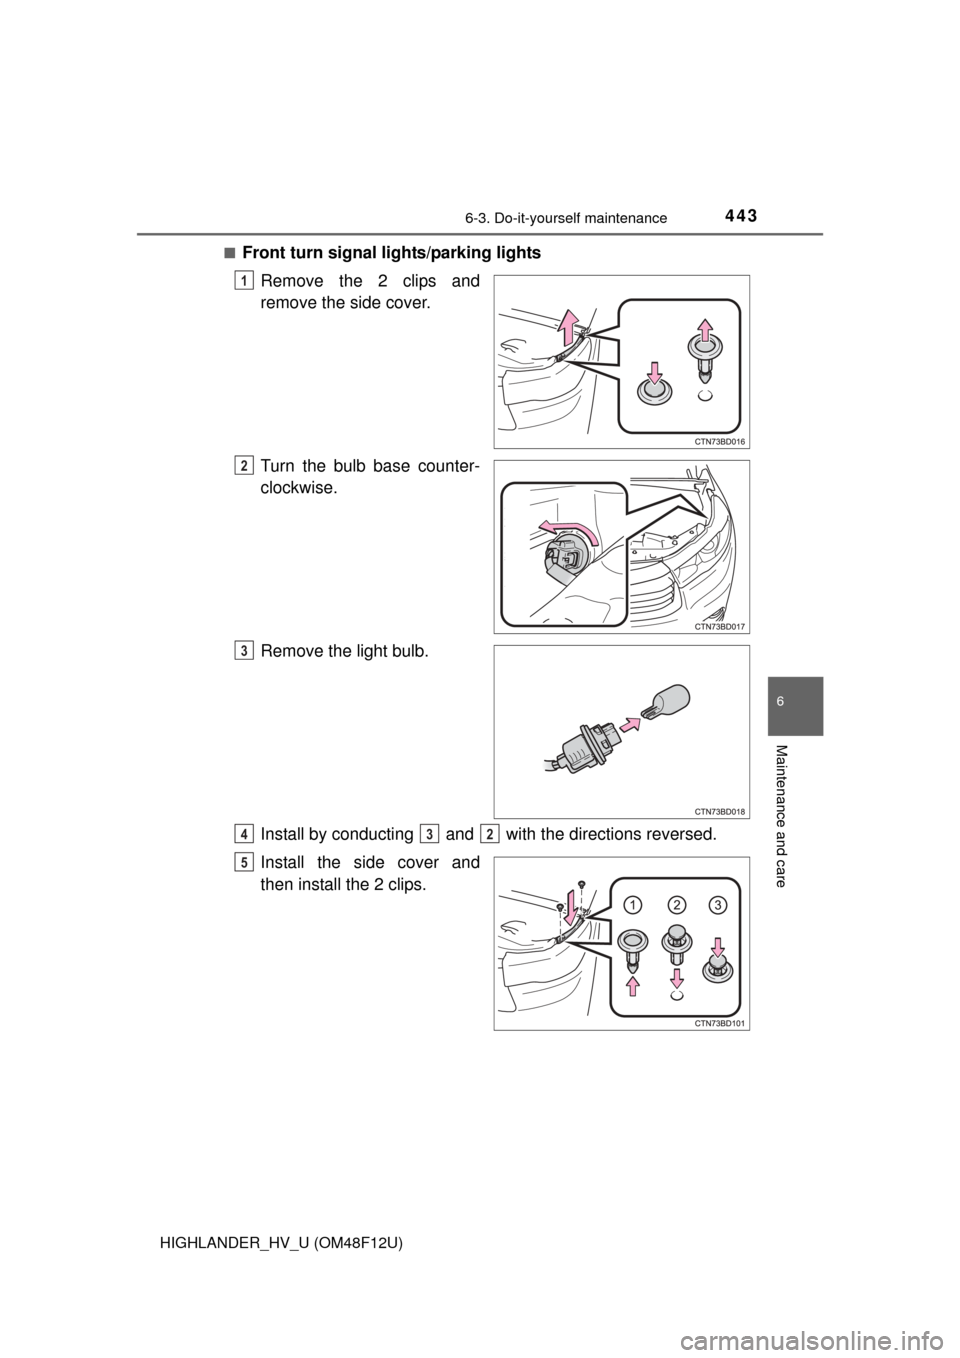
■Front turn signal lights/parking lights
Remove the 2 clips and
remove the side cover.
Turn the bulb base counter-
clockwise.
Remove the light bulb.
Install by conducting and with the directions reversed.
Install the side cover and
then install the 2 clips.
1
2
3
432
5
Page 444 of 608
4446-3. Do-it-yourself maintenance
HIGHLANDER_HV_U (OM48F12U)■
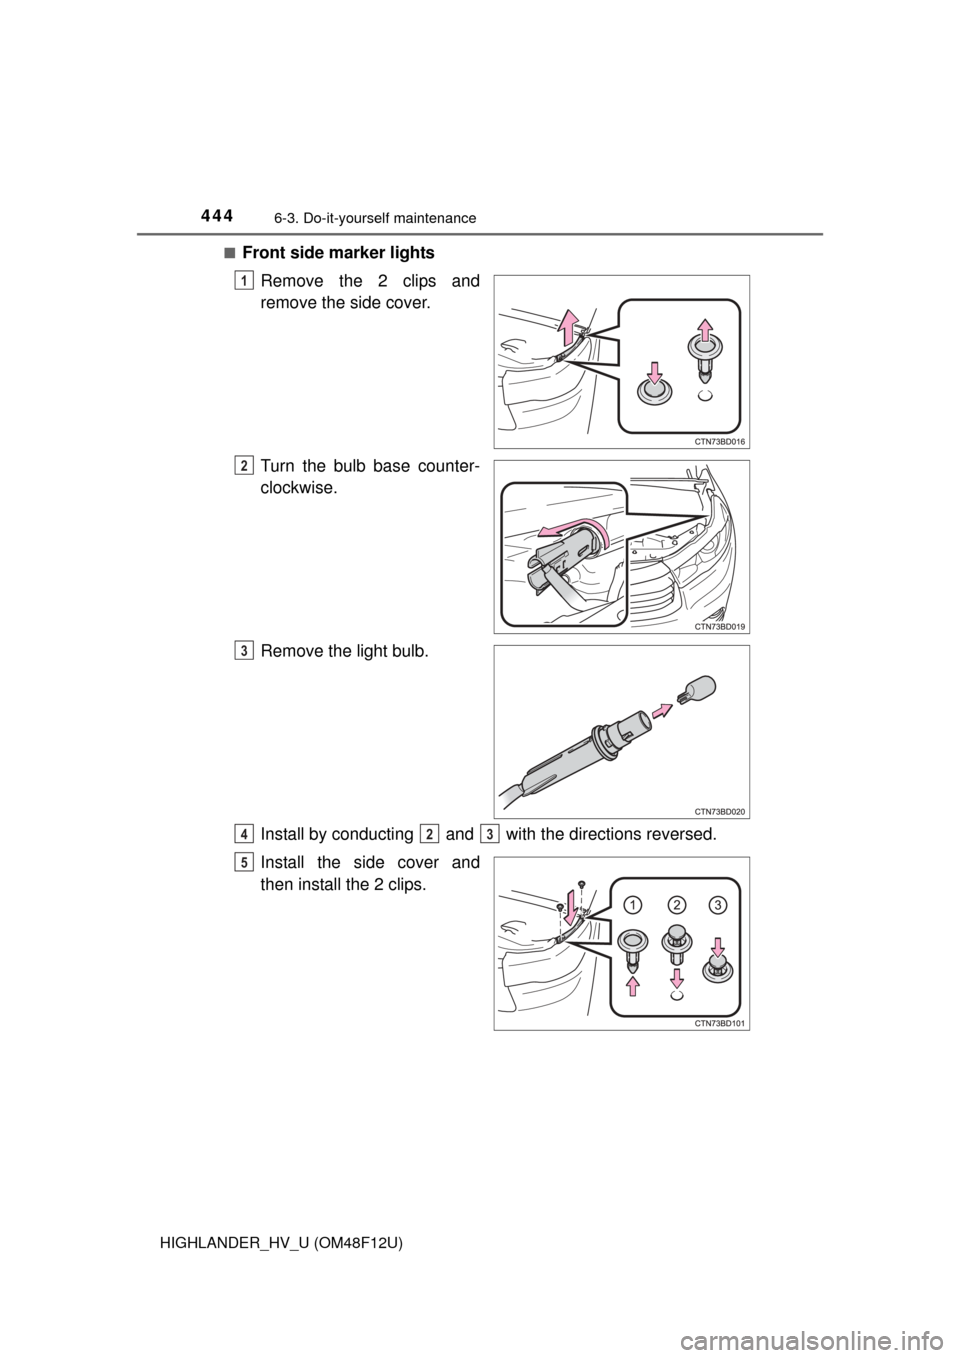
Front side marker lights
Remove the 2 clips and
remove the side cover.
Turn the bulb base counter-
clockwise.
Remove the light bulb.
Install by conducting and with the directions reversed.
Install the side cover and
then install the 2 clips.
1
2
3
423
5
Page 445 of 608
4456-3. Do-it-yourself maintenance
HIGHLANDER_HV_U (OM48F12U)
6
Maintenance and care
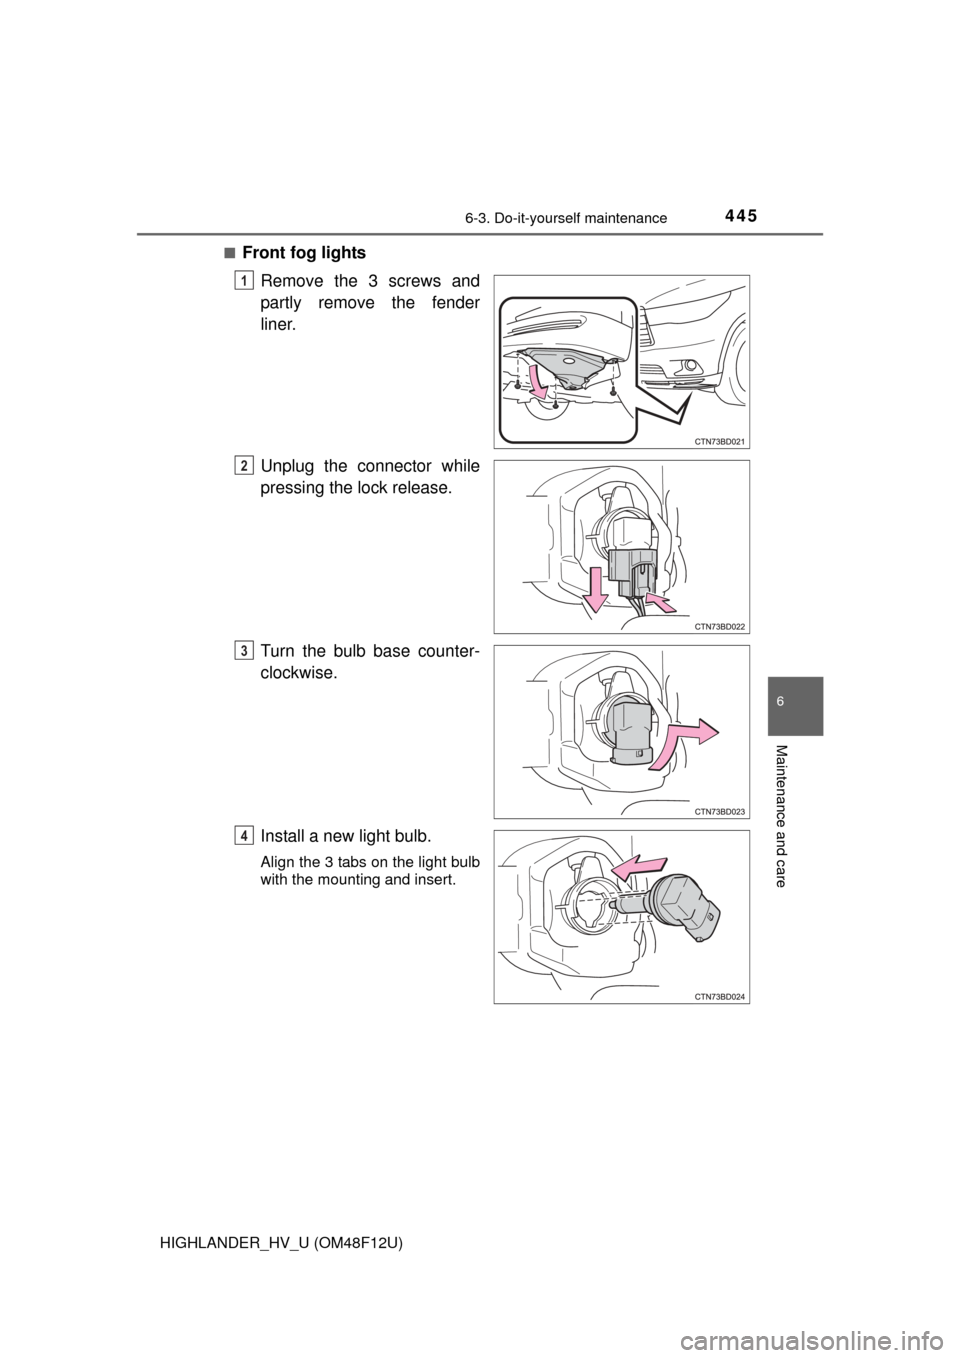
■Front fog lightsRemove the 3 screws and
partly remove the fender
liner.
Unplug the connector while
pressing the lock release.
Turn the bulb base counter-
clockwise.
Install a new light bulb.
Align the 3 tabs on the light bulb
with the mounting and insert.
1
2
3
4
Page 446 of 608
4466-3. Do-it-yourself maintenance
HIGHLANDER_HV_U (OM48F12U)
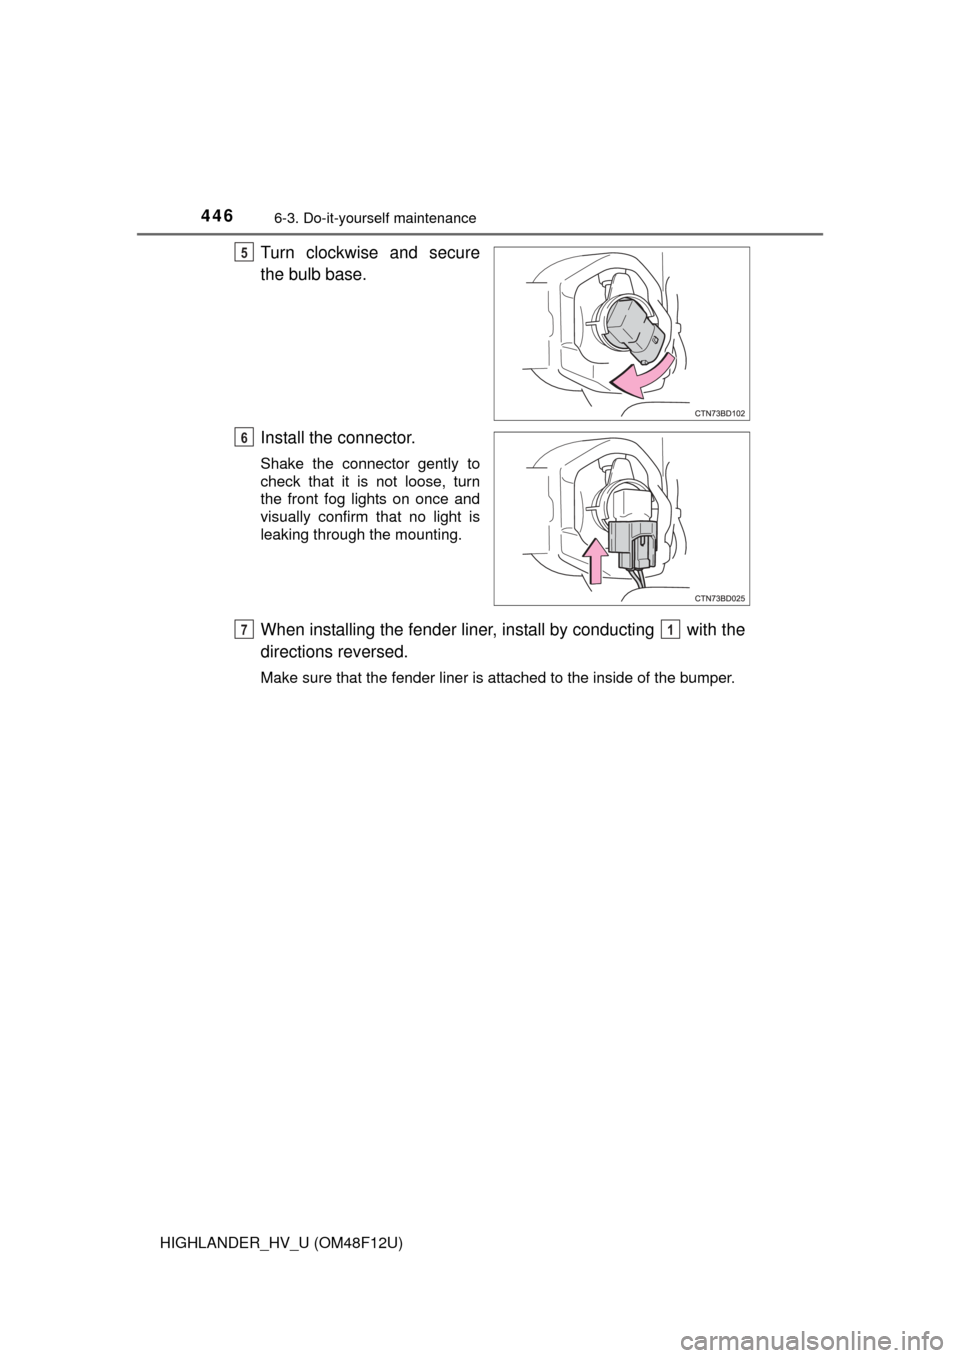
Turn clockwise and secure
the bulb base.
Install the connector.
Shake the connector gently to
check that it is not loose, turn
the front fog lights on once and
visually confirm that no light is
leaking through the mounting.
When installing the fender liner, install by conducting with the
directions reversed.
Make sure that the fender liner is attached to the inside of the bumper.
5
6
71
Page 447 of 608
4476-3. Do-it-yourself maintenance
HIGHLANDER_HV_U (OM48F12U)
6
Maintenance and care
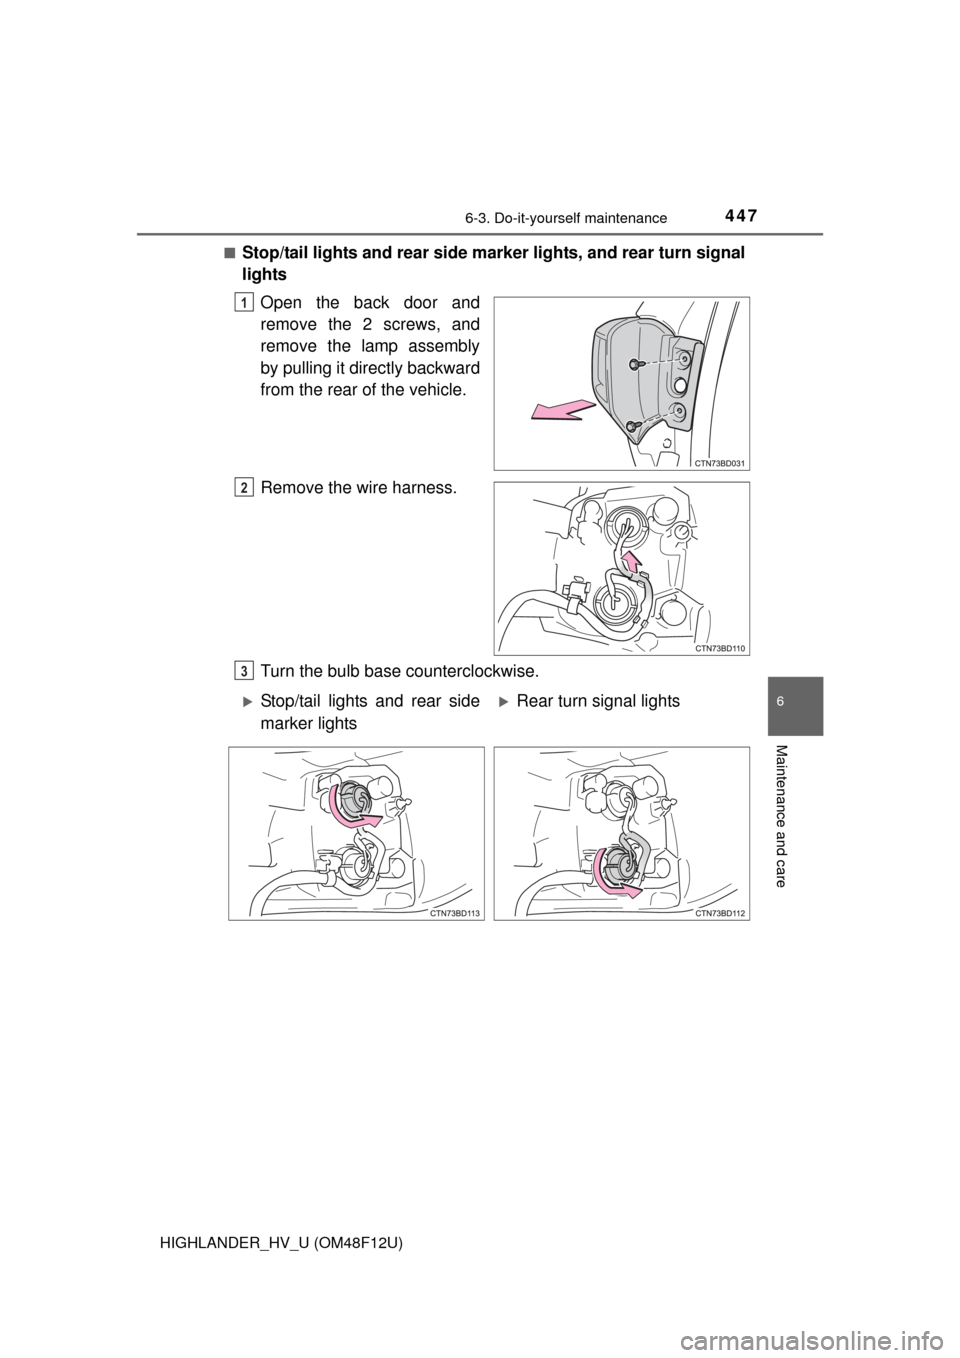
■Stop/tail lights and rear side marker lights, and rear turn signal
lights
Open the back door and
remove the 2 screws, and
remove the lamp assembly
by pulling it directly backward
from the rear of the vehicle.
Remove the wire harness.
Turn the bulb base counterclockwise.
1
2
3
Stop/tail lights and rear side
marker lightsRear turn signal lights
Page 448 of 608
4486-3. Do-it-yourself maintenance
HIGHLANDER_HV_U (OM48F12U)
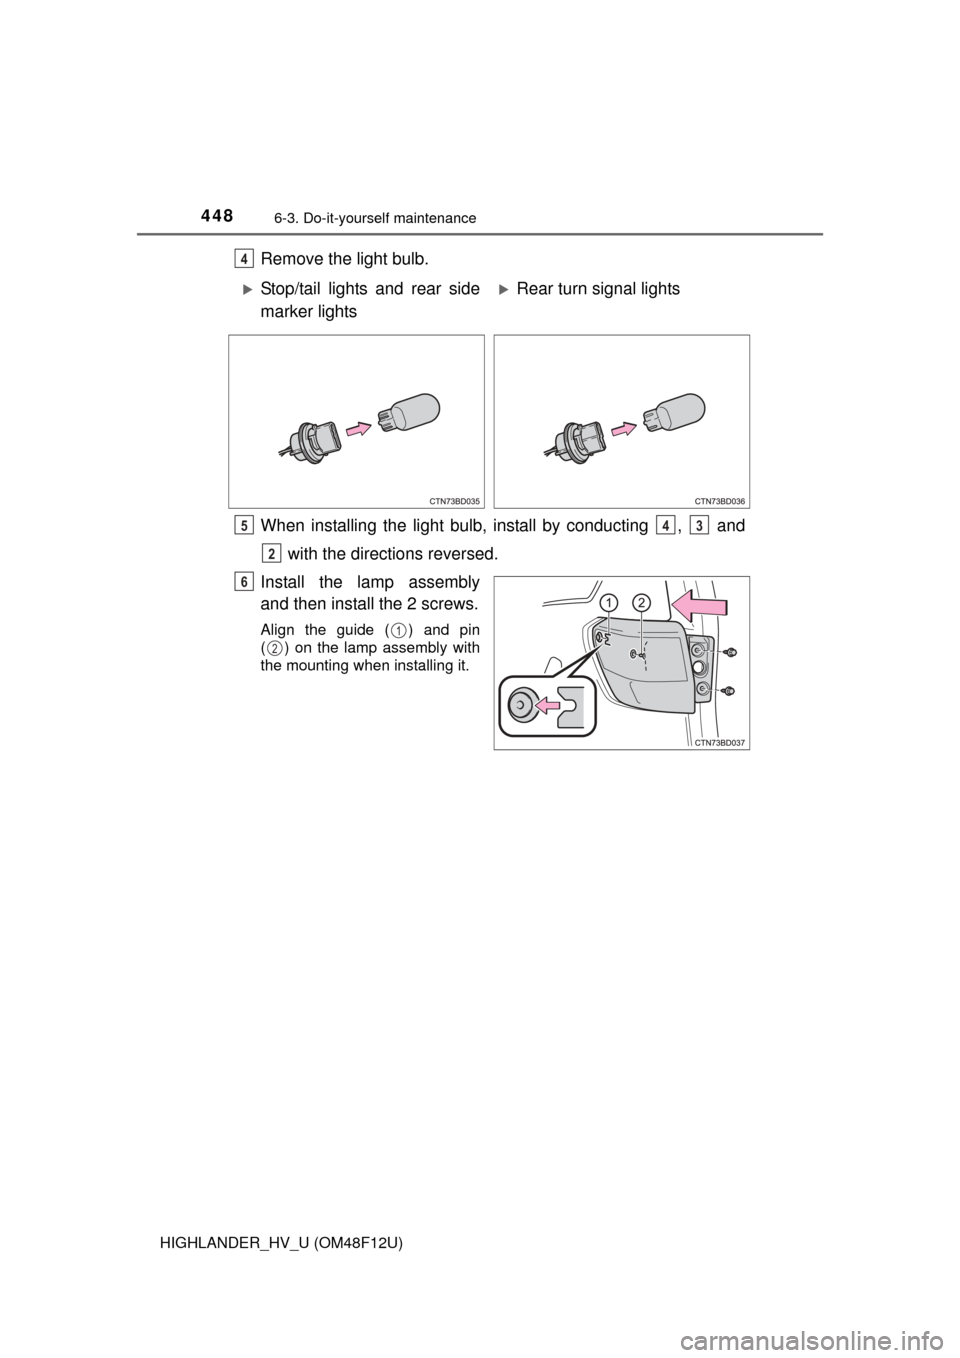
Remove the light bulb.
When installing the light bulb, install by conducting , and with the directions reversed.
Install the lamp assembly
and then install the 2 screws.
Align the guide ( ) and pin
( ) on the lamp assembly with
the mounting when installing it.
4
Stop/tail lights and rear side
marker lightsRear turn signal lights
543
2
6
1
2
Page 449 of 608
4496-3. Do-it-yourself maintenance
HIGHLANDER_HV_U (OM48F12U)
6
Maintenance and care
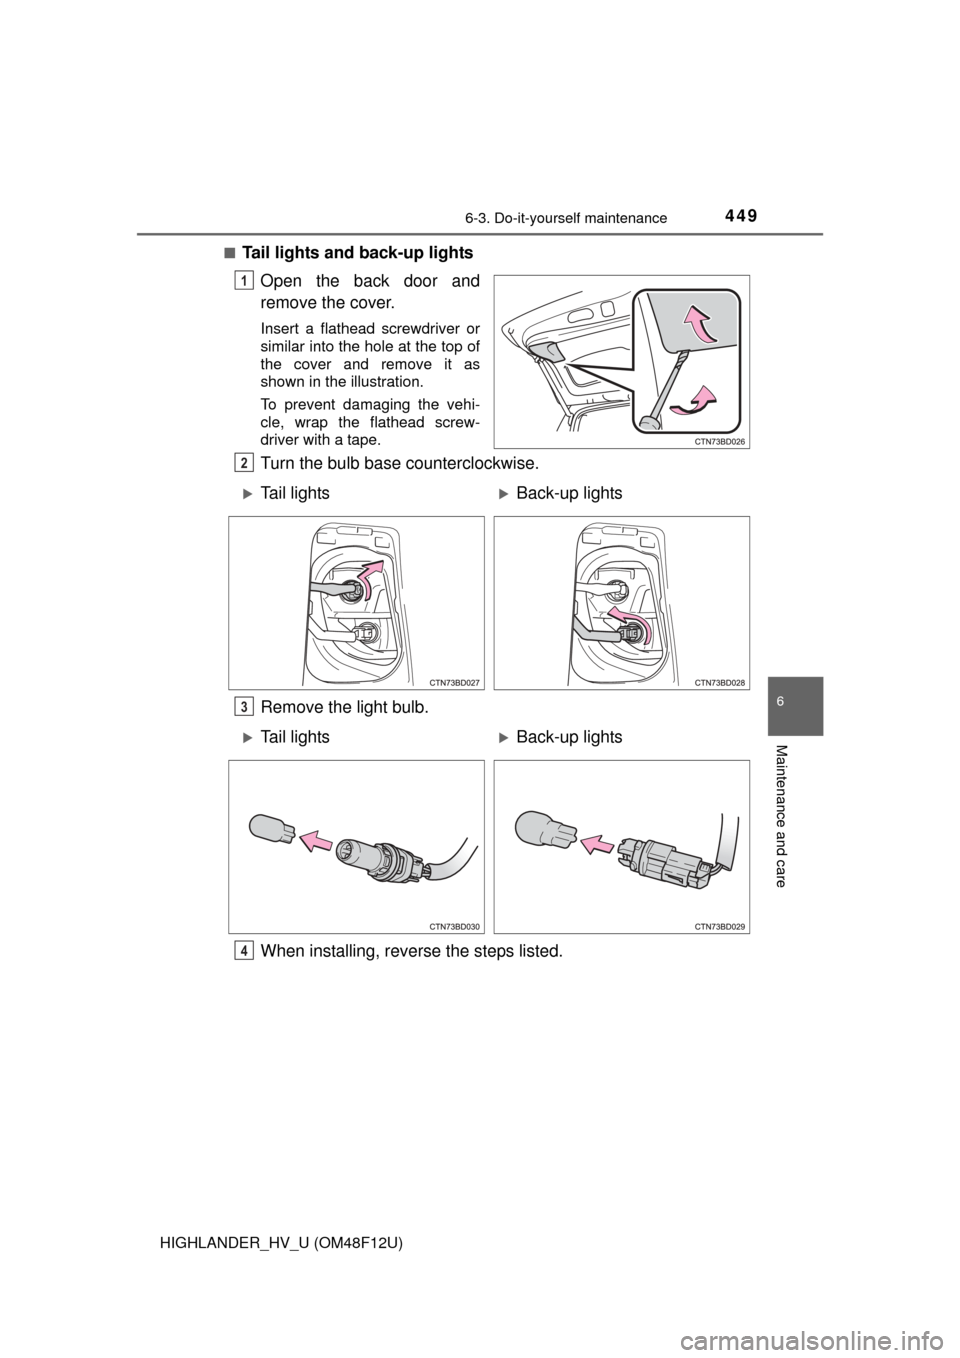
■Tail lights and back-up lightsOpen the back door and
remove the cover.
Insert a flathead screwdriver or
similar into the hole at the top of
the cover and remove it as
shown in the illustration.
To prevent damaging the vehi-
cle, wrap the flathead screw-
driver with a tape.
Turn the bulb base counterclockwise.
Remove the light bulb.
When installing, reverse the steps listed.
1
2
Tail lightsBack-up lights
3
Tail lightsBack-up lights
4
Page 450 of 608
4506-3. Do-it-yourself maintenance
HIGHLANDER_HV_U (OM48F12U)■
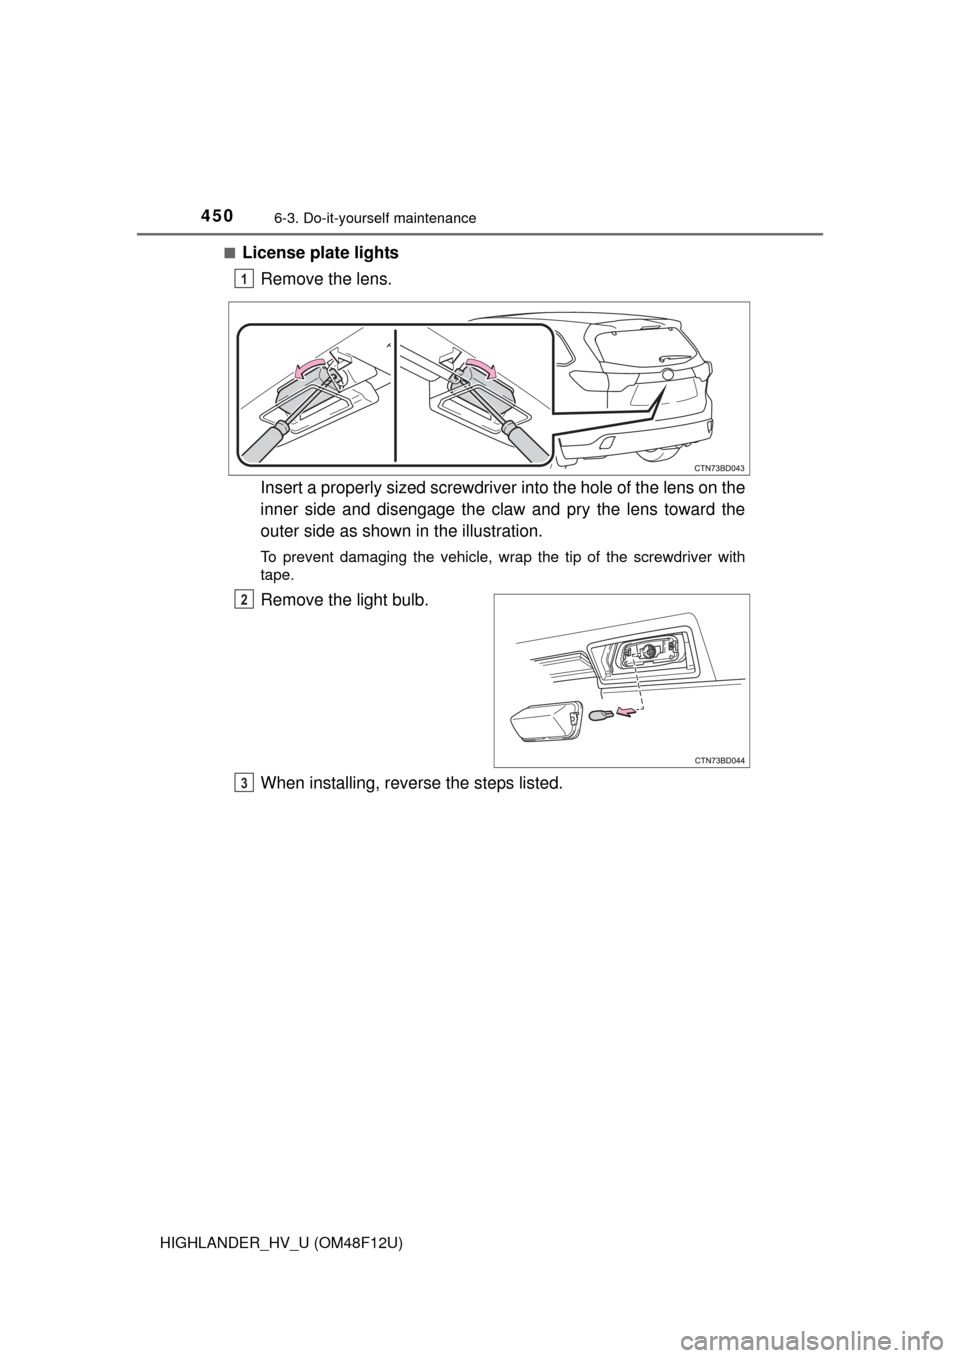
License plate lights
Remove the lens.
Insert a properly sized screwdriver into the hole of the lens on the
inner side and disengage the claw and pry the lens toward the
outer side as shown in the illustration.
To prevent damaging the vehicle, wrap the tip of the screwdriver with
tape.
Remove the light bulb.
When installing, reverse the steps listed.
1
2
3
Trending: windshield wipers, dashboard, coolant, keyless, oil change, homelink, turn signal
