change time TOYOTA HIGHLANDER HYBRID 2021 (in English) Owner's Manual
[x] Cancel search | Manufacturer: TOYOTA, Model Year: 2021, Model line: HIGHLANDER HYBRID, Model: TOYOTA HIGHLANDER HYBRID 2021Pages: 578, PDF Size: 16.92 MB
Page 216 of 578
2164-2. Driving procedures
HIGHLANDER HV_U
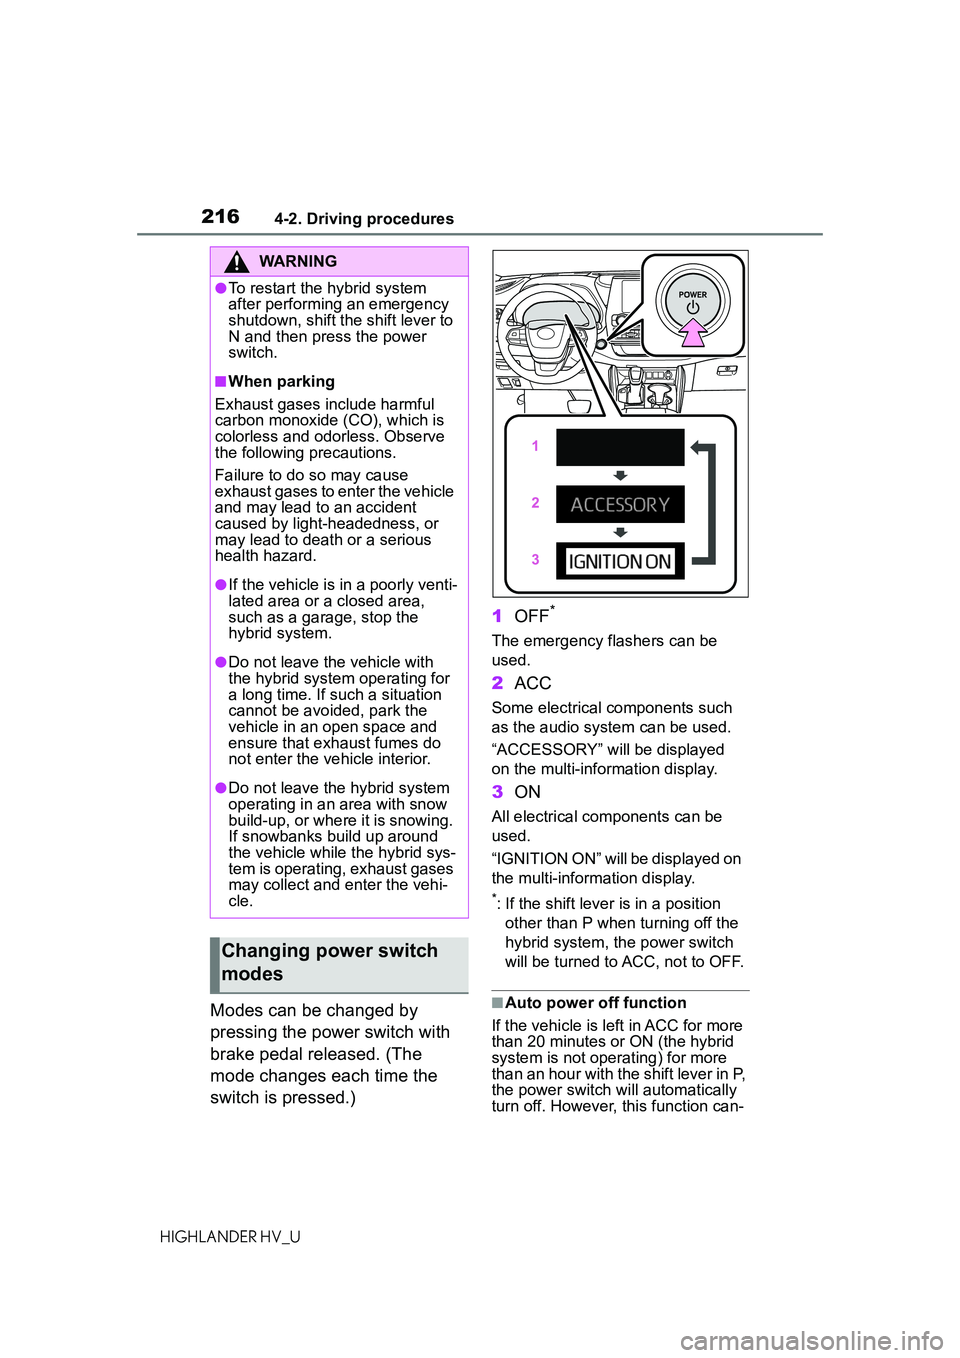
Modes can be changed by
pressing the power switch with
brake pedal released. (The
mode changes each time the
switch is pressed.)1
OFF
*
The emergency flashers can be
used.
2ACC
Some electrical components such
as the audio system can be used.
“ACCESSORY” will be displayed
on the multi-info rmation display.
3ON
All electrical components can be
used.
“IGNITION ON” will be displayed on
the multi-information display.
*: If the shift lever is in a position
other than P when turning off the
hybrid system, the power switch
will be turned to ACC, not to OFF.
■Auto power off function
If the vehicle is left in ACC for more
than 20 minutes or ON (the hybrid
system is not operating) for more
than an hour with the shift lever in P,
the power switch will automatically
turn off. However, this function can-
WARNING
●To restart the hybrid system
after performing an emergency
shutdown, shift the shift lever to
N and then press the power
switch.
■When parking
Exhaust gases include harmful
carbon monoxide (CO), which is
colorless and odorless. Observe
the following precautions.
Failure to do so may cause
exhaust gases to enter the vehicle
and may lead to an accident
caused by light-headedness, or
may lead to death or a serious
health hazard.
●If the vehicle is in a poorly venti-
lated area or a closed area,
such as a garage, stop the
hybrid system.
●Do not leave the vehicle with
the hybrid system operating for
a long time. If such a situation
cannot be avoided, park the
vehicle in an open space and
ensure that exhaust fumes do
not enter the vehicle interior.
●Do not leave the hybrid system
operating in an area with snow
build-up, or where it is snowing.
If snowbanks build up around
the vehicle while the hybrid sys-
tem is operating, exhaust gases
may collect and enter the vehi-
cle.
Changing power switch
modes
Page 223 of 578
2234-2. Driving procedures
4
Driving
HIGHLANDER HV_U
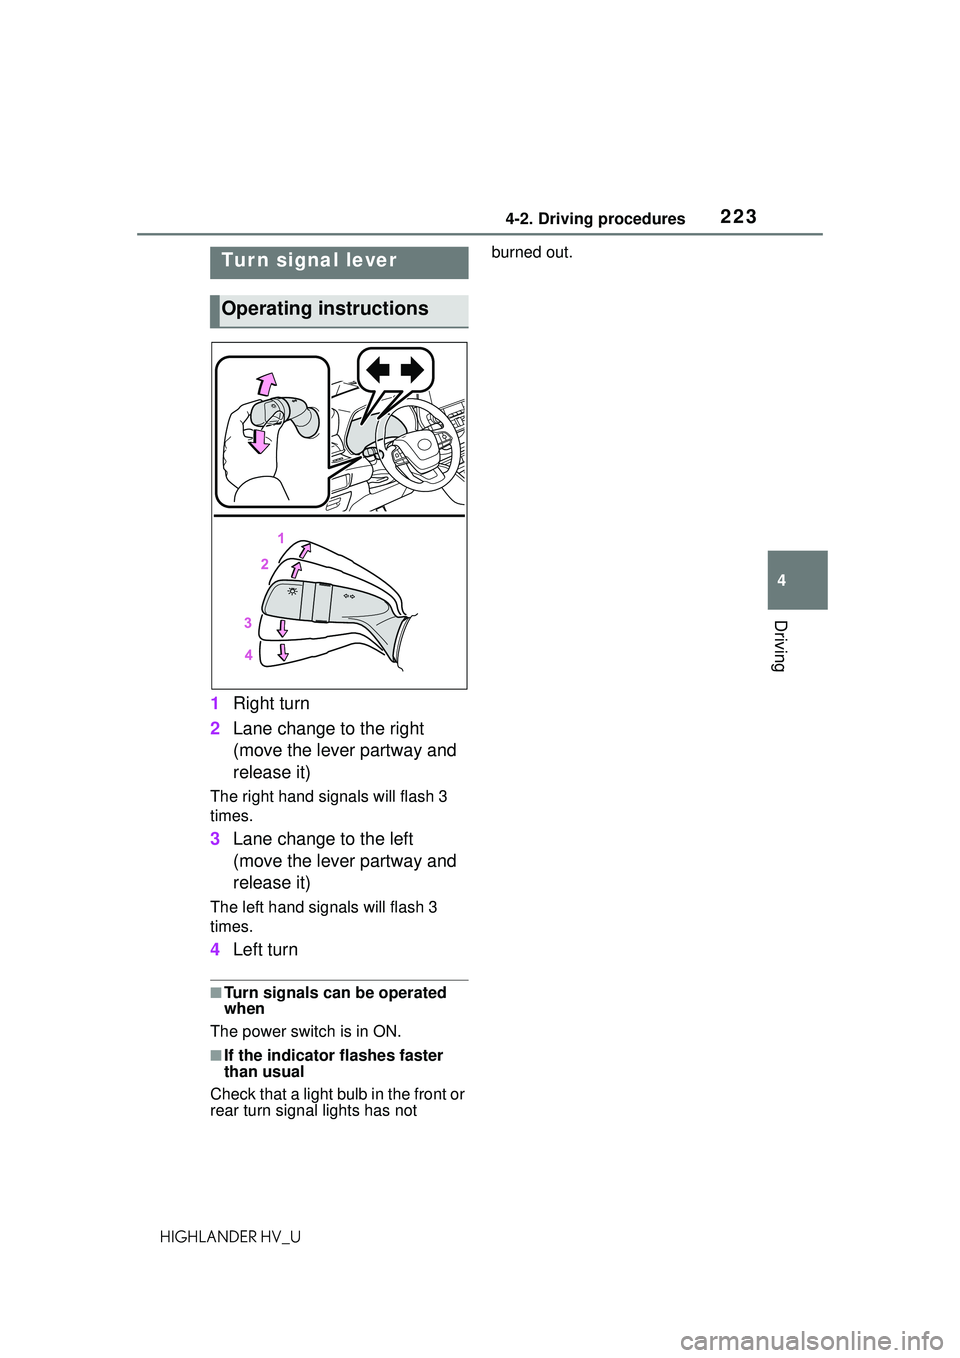
1Right turn
2 Lane change to the right
(move the lever partway and
release it)
The right hand signals will flash 3
times.
3Lane change to the left
(move the lever partway and
release it)
The left hand signals will flash 3
times.
4Left turn
■Turn signals can be operated
when
The power switch is in ON.
■If the indicator flashes faster
than usual
Check that a light bulb in the front or
rear turn signal lights has not burned out.
Tur n signal lever
Operating instructions
Page 233 of 578
2334-3. Operating the lights and wipers
4
Driving
HIGHLANDER HV_Ufrom around a curve
• When the vehicle is cut in front of by another vehicle
• When vehicles ahead cannot be detected due to repeated curves,
road dividers or roadside trees
• When vehicles ahead appear in a faraway lane on a wide road
• When the lights of vehicles ahead
are not on
●The high beams may be turned off
if a vehicle ahead that is using fog
lights without its headlights turned
on is detected.
●House lights, street lights, traffic
signals, and illumi nated billboards
or signs and other reflective
objects may cause the high
beams to change to the low
beams, or the low beams to
remain on.
●The following factors may affect
the amount of time taken for the
high beams to turn on or off:
• The brightness of the headlights, fog lights, and tail lights of vehi-
cles ahead
• The movement and direction of vehicles ahead
• When a vehicle ahead only has
operational lights on one side
• When a vehicle ahead is a two-wheeled vehicle
• The condition of the road (gradi- ent, curve, condition of the road
surface, etc.)
• The number of passengers and amount of luggage in the vehicle
●The high beams may turn on or off
unexpectedly.
●Bicycles or similar vehicles may
not be detected.
●In the following situations the sys-
tem may not be able to correctly
detect the surrounding brightness
level. This may cause the low
beams to remain on or the high
beams to flash or dazzle pedestri-
ans or vehicles ahead. In such a
case, it is necess ary to manually
switch between the high and low
beams. • When driving in inclement weather
(heavy rain, snow, fog, sand-
storms, etc.)
• When the windshield is obscured by fog, mist, ice, dirt, etc.
• When the windshield is cracked or
damaged
• When the camera sensor is deformed or dirty
• When the temperature of the cam- era sensor is extremely high
• When the surrounding brightness
level is equal to that of headlights,
tail lights or fog lights
• When headlights or tail lights of
vehicles ahead are turned off,
dirty, changing color, or not aimed
properly
• When the vehicle is hit by water, snow, dust, etc. from a preceding
vehicle
• When driving through an area of intermittently changing brightness
and darkness
• When frequently and repeatedly driving ascending/descending
roads, or roads with rough, bumpy
or uneven surfaces (such as
stone-paved roads, gravel roads,
etc.)
• When frequently and repeatedly taking curves or driving on a wind-
ing road
• When there is a highly reflective object ahead of the vehicle, such
as a sign or mirror
• When the back of a preceding vehicle is highly reflective, such as
a container on a truck
• When the vehicle’s headlights are damaged or dirty, or are not aimed
properly
• When the vehicle is listing or titling due to a flat tire, a trailer being
towed, etc.
• When the headlights are changed between the high beams and low
beams repeatedly in an abnormal
manner
• When the driver believes that the high beams may be flashing or
dazzling pedestrians or other driv-
ers
Page 234 of 578
2344-3. Operating the lights and wipers
HIGHLANDER HV_U
■Temporarily lowering sensor
sensitivity
The sensitivity of the sensor can be
temporarily lowered.
1 Turn the power switch off while
the following conditions are met.
●The headlight swit ch is in or
.
●The headlight swit ch lever is in
high beam position.
●Automatic High Beam switch is
on.
2 Turn the power switch to ON.
3 Within 60 seconds after step 2,
repeat pulling the headlight
switch lever to the original posi-
tion then pushing it to the high
beam position quickly 10 times,
then leave the lever in high beam
position.
4 If the sensitivity is changed, the
Automatic High Beam indicator
is turn on and off 3 times.
Automatic High Beam (headlights)
may turn on even when the vehicle
is stopped.
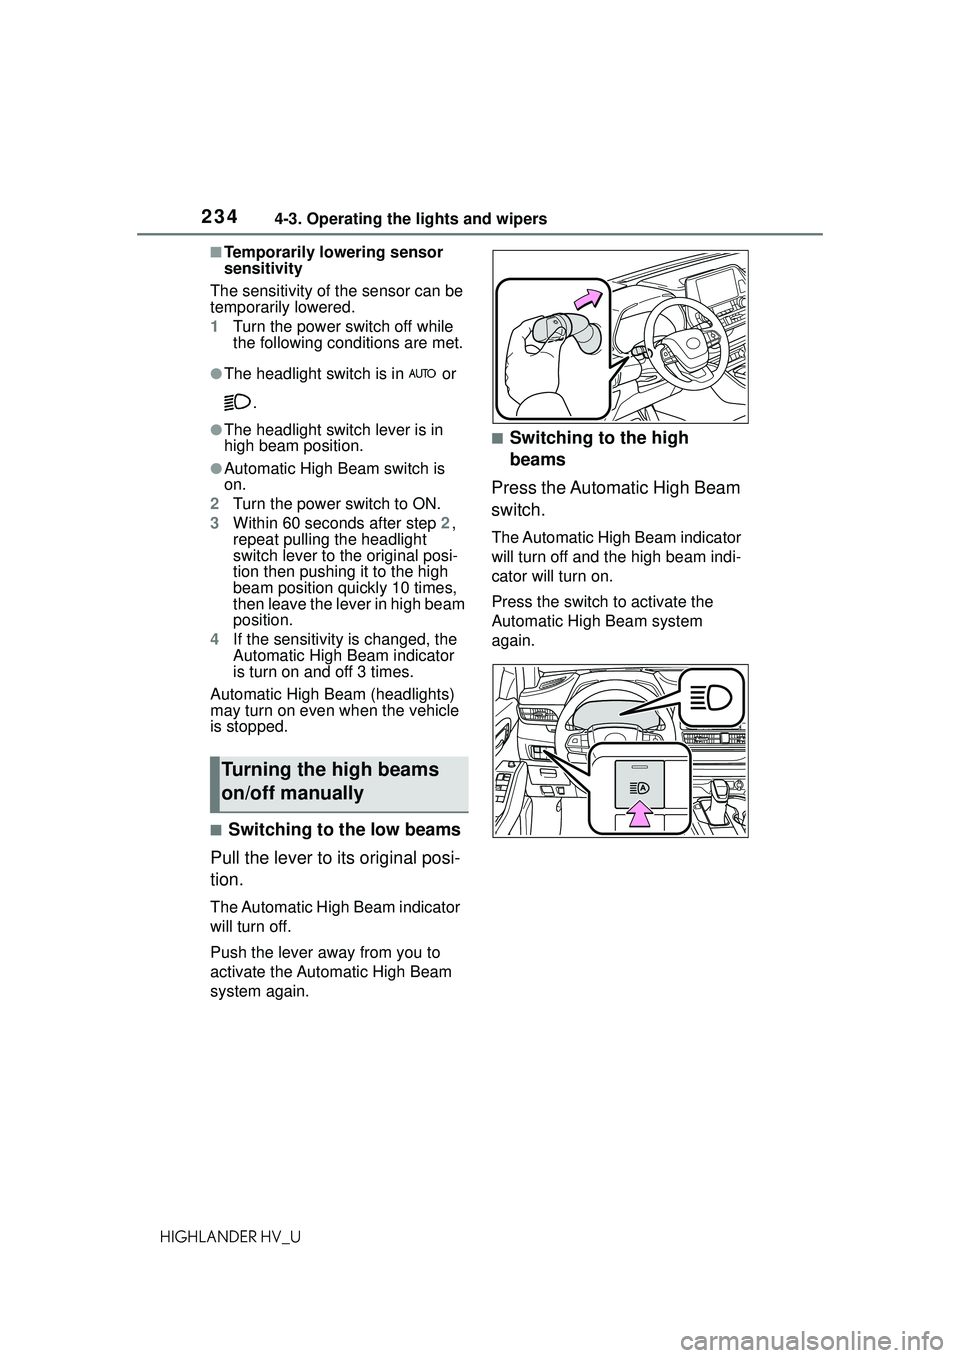
■Switching to the low beams
Pull the lever to its original posi-
tion.
The Automatic High Beam indicator
will turn off.
Push the lever away from you to
activate the Automatic High Beam
system again.
■Switching to the high
beams
Press the Automatic High Beam
switch.
The Automatic High Beam indicator
will turn off and the high beam indi-
cator will turn on.
Press the switch to activate the
Automatic High Beam system
again.
Turning the high beams
on/off manually
Page 239 of 578
2394-3. Operating the lights and wipers
4
Driving
HIGHLANDER HV_U
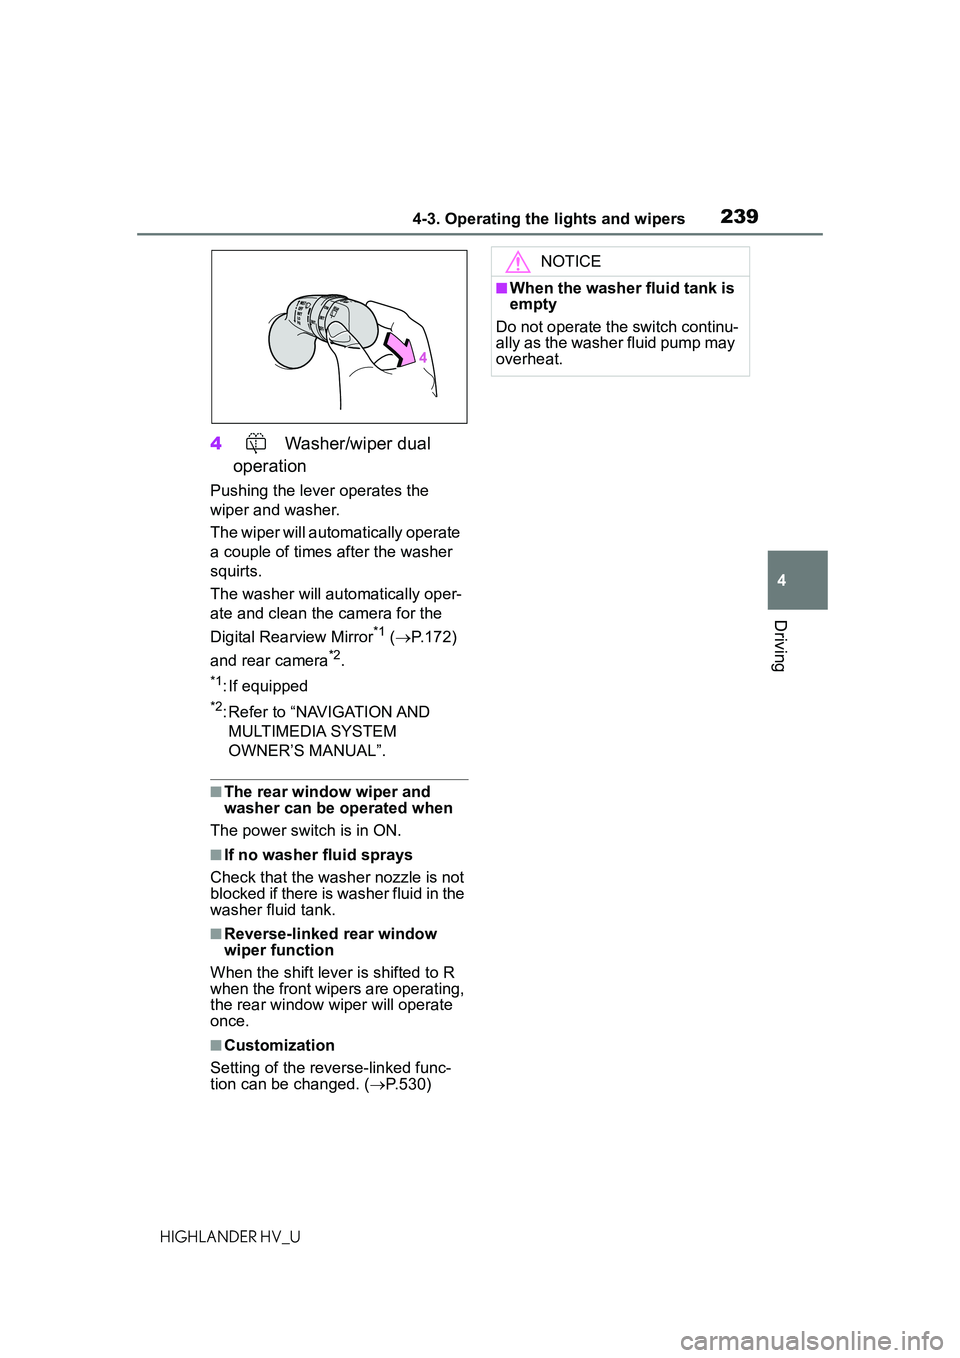
4 Washer/wiper dual
operation
Pushing the lever operates the
wiper and washer.
The wiper will automatically operate
a couple of times after the washer
squirts.
The washer will auto matically oper-
ate and clean the camera for the
Digital Rearview Mirror
*1 ( P.172)
and rear camera
*2.
*1: If equipped
*2: Refer to “NAVIGATION AND MULTIMEDIA SYSTEM
OWNER’S MANUAL”.
■The rear window wiper and
washer can be operated when
The power switch is in ON.
■If no washer fluid sprays
Check that the washer nozzle is not
blocked if there is washer fluid in the
washer fluid tank.
■Reverse-linked rear window
wiper function
When the shift lever is shifted to R
when the front wipers are operating,
the rear window wiper will operate
once.
■Customization
Setting of the reverse-linked func-
tion can be changed. ( P.530)
NOTICE
■When the washer fluid tank is
empty
Do not operate the switch continu-
ally as the washer fluid pump may
overheat.
Page 248 of 578
2484-5. Using the driving support systems
HIGHLANDER HV_U
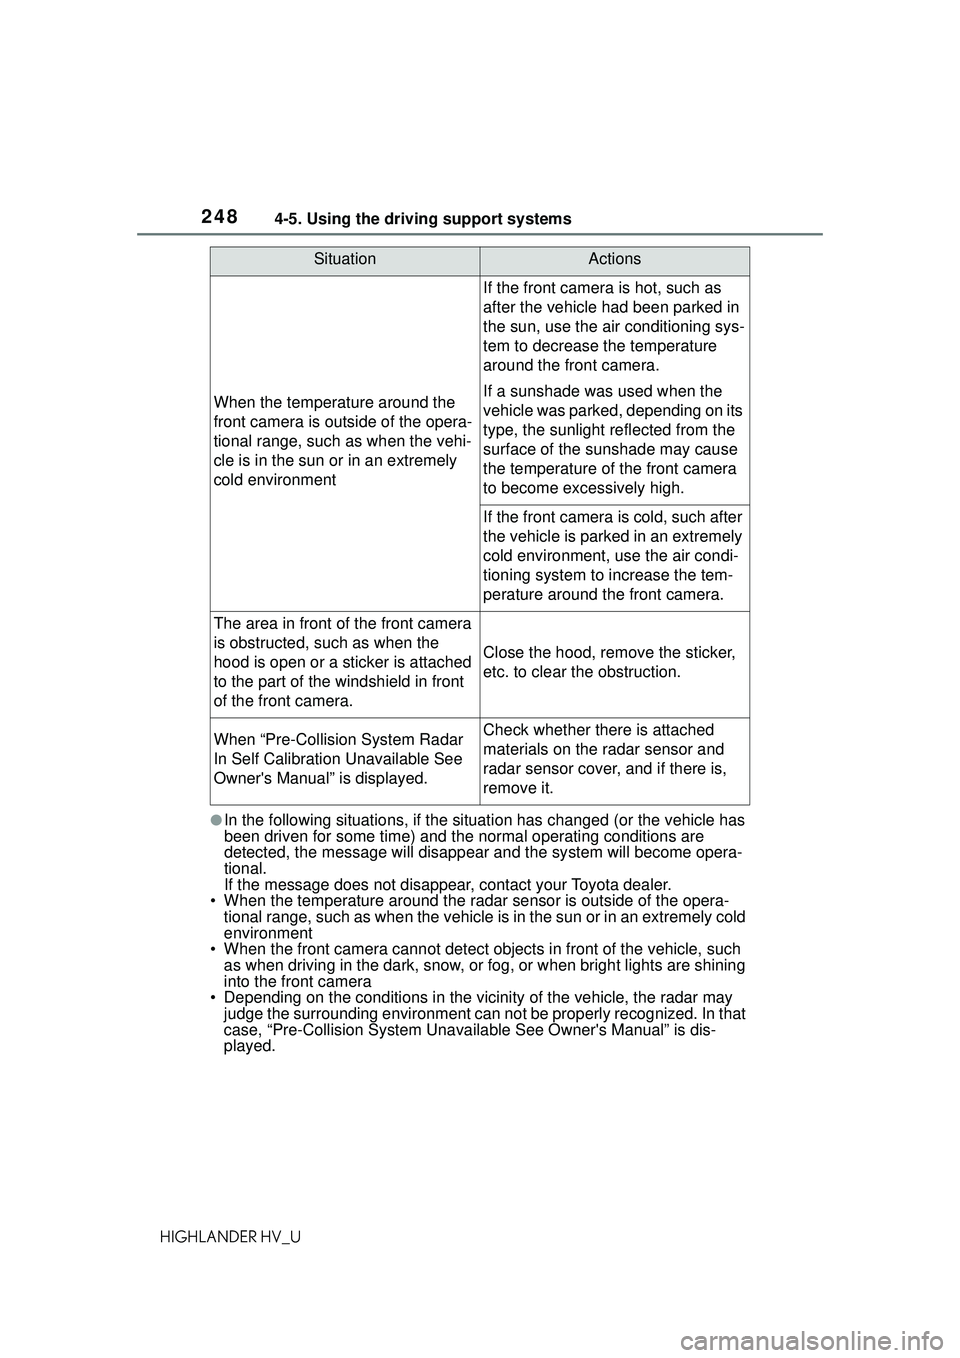
●In the following situations, if the situation has changed (or the vehicle has
been driven for some time) and the normal operating conditions are
detected, the message will disappear and the system will become opera-
tional.
If the message does not disappea r, contact your Toyota dealer.
• When the temperature around the radar sensor is outside of the opera- tional range, such as when the vehicle is in the sun or in an extremely cold
environment
• When the front camera cannot detect objects in front of the vehicle, such as when driving in the dark, snow, or fog, or when bright lights are shining
into the front camera
• Depending on the conditions in the vicinity of the vehicle, the radar may
judge the surrounding environment can not be properly recognized. In that
case, “Pre-Collision System Unava ilable See Owner's Manual” is dis-
played.
When the temperature around the
front camera is outside of the opera-
tional range, such as when the vehi-
cle is in the sun or in an extremely
cold environment
If the front camera is hot, such as
after the vehicle had been parked in
the sun, use the air conditioning sys-
tem to decrease the temperature
around the front camera.
If a sunshade was used when the
vehicle was parked, depending on its
type, the sunlight reflected from the
surface of the sunshade may cause
the temperature of the front camera
to become excessively high.
If the front camera is cold, such after
the vehicle is parked in an extremely
cold environment, use the air condi-
tioning system to increase the tem-
perature around the front camera.
The area in front of the front camera
is obstructed, such as when the
hood is open or a sticker is attached
to the part of the windshield in front
of the front camera.
Close the hood, remove the sticker,
etc. to clear the obstruction.
When “Pre-Collision System Radar
In Self Calibration Unavailable See
Owner's Manual” is displayed.Check whether there is attached
materials on the radar sensor and
radar sensor cover, and if there is,
remove it.
SituationActions
Page 253 of 578
2534-5. Using the driving support systems
4
Driving
HIGHLANDER HV_U
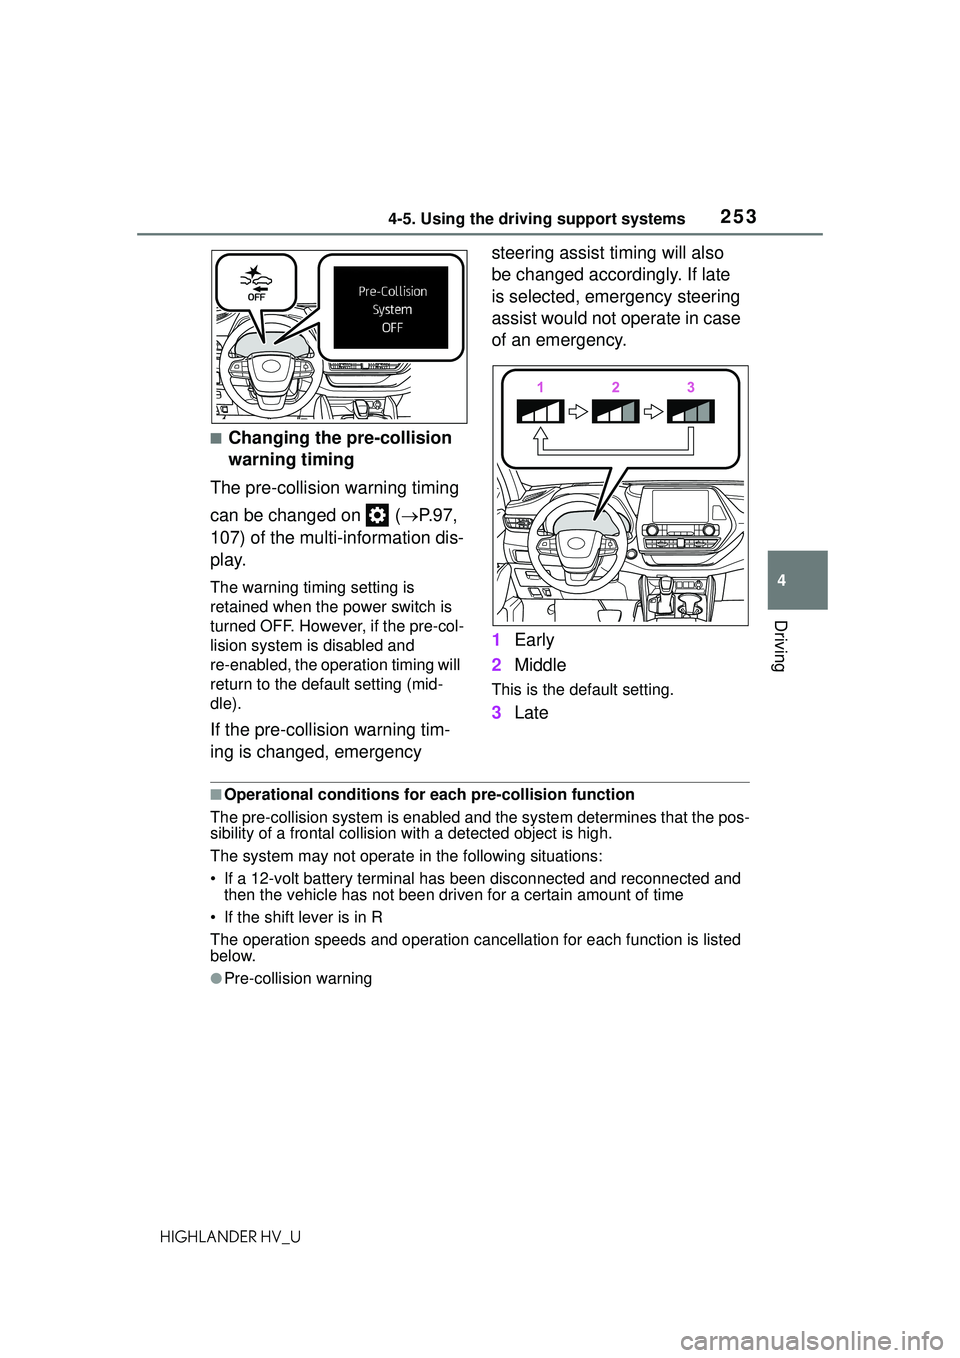
■Changing the pre-collision
warning timing
The pre-collision warning timing
can be changed on ( P.97,
107) of the multi-information dis-
play.
The warning timing setting is
retained when the power switch is
turned OFF. However, if the pre-col-
lision system is disabled and
re-enabled, the operation timing will
return to the default setting (mid-
dle).
If the pre-collision warning tim-
ing is changed, emergency steering assist timing will also
be changed accordingly. If late
is selected, emergency steering
assist would not operate in case
of an emergency.
1
Early
2 Middle
This is the default setting.
3Late
■Operational conditions for each pre-collision function
The pre-collision syst em is enabled and the syste m determines that the pos-
sibility of a frontal collision with a detected object is high.
The system may not operate in the following situations:
• If a 12-volt battery terminal has been disconnected and reconnected and
then the vehicle has not been driv en for a certain amount of time
• If the shift lever is in R
The operation speeds and operation cancellation for each function is listed
below.
●Pre-collision warning
Page 266 of 578
2664-5. Using the driving support systems
HIGHLANDER HV_U
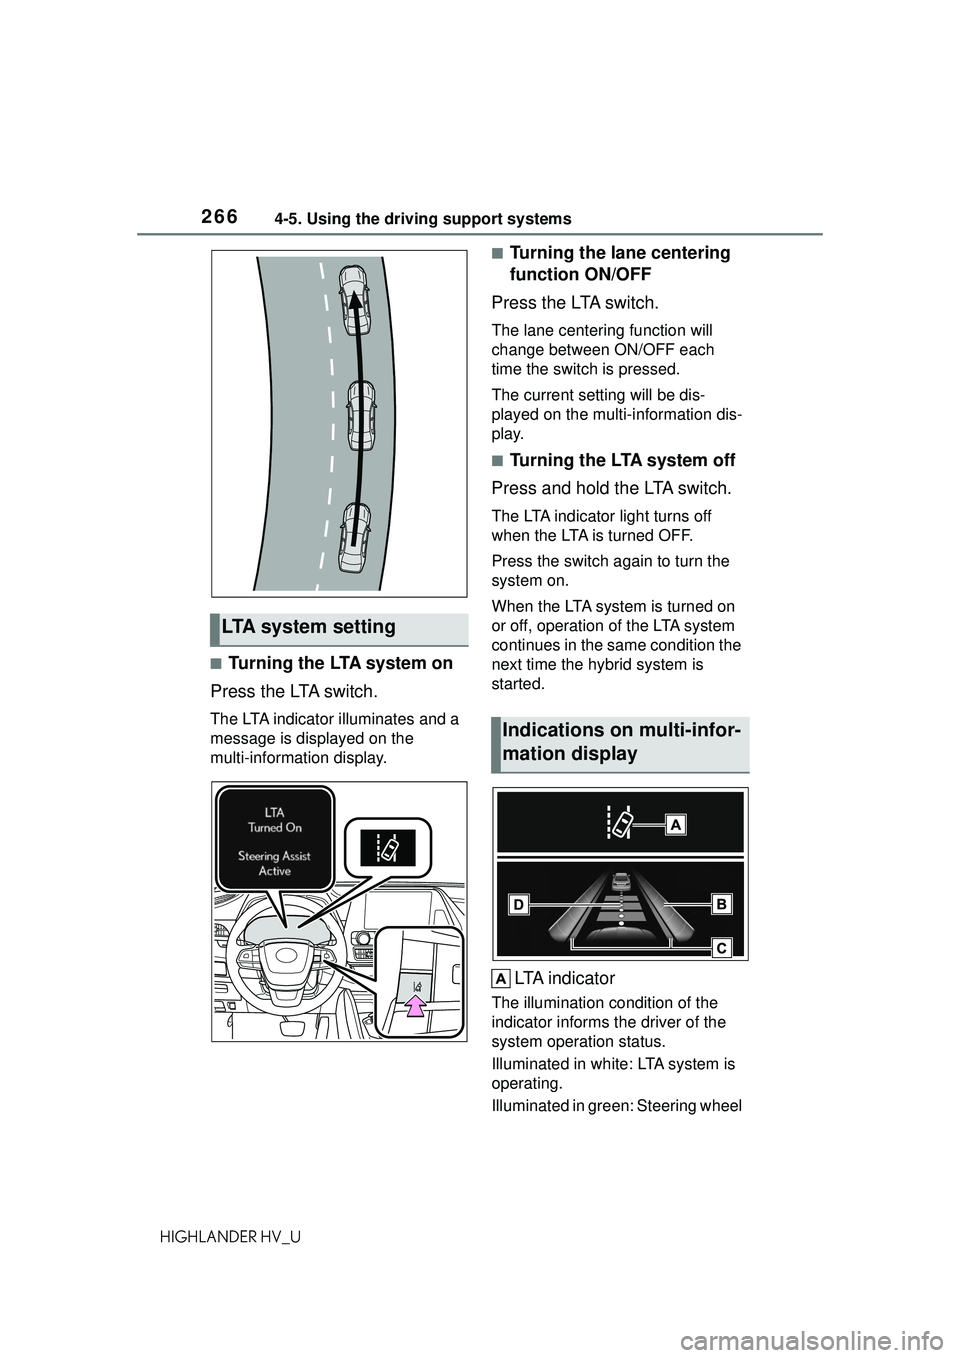
■Turning the LTA system on
Press the LTA switch.
The LTA indicator illuminates and a
message is displayed on the
multi-information display.
■Turning the lane centering
function ON/OFF
Press the LTA switch.
The lane center ing function will
change between ON/OFF each
time the switch is pressed.
The current setting will be dis-
played on the multi-information dis-
play.
■Turning the LTA system off
Press and hold the LTA switch.
The LTA indicator light turns off
when the LTA is turned OFF.
Press the switch again to turn the
system on.
When the LTA system is turned on
or off, operation of the LTA system
continues in the same condition the
next time the hybrid system is
started.
LTA i n d i c a t o r
The illumination condition of the
indicator informs the driver of the
system operation status.
Illuminated in white: LTA system is
operating.
Illuminated in green: Steering wheel
LTA system setting
Indications on multi-infor-
mation display
Page 270 of 578
2704-5. Using the driving support systems
HIGHLANDER HV_U
●When the system determines that
the vehicle may deviate from the
lane while driving around a curve
while the lane centering function is
operating.
Depending on the vehicle condition
and road conditions, the warning
may not operate. Also, if the system
determines that the vehicle is driv-
ing around a curve, warnings will
occur earlier than during
straight-lane driving.
●When the system determines that
the driver is driving without hold-
ing the steering wheel while the
steering wheel assist of the steer-
ing assist function is operating.
If the driver continues to keep their
hands off of the steering wheel and
the steering wheel assist is operat-
ing, the buzzer sounds and the
driver is warned . Each time the
buzzer sounds, the continuing time
of the buzzer becomes longer.
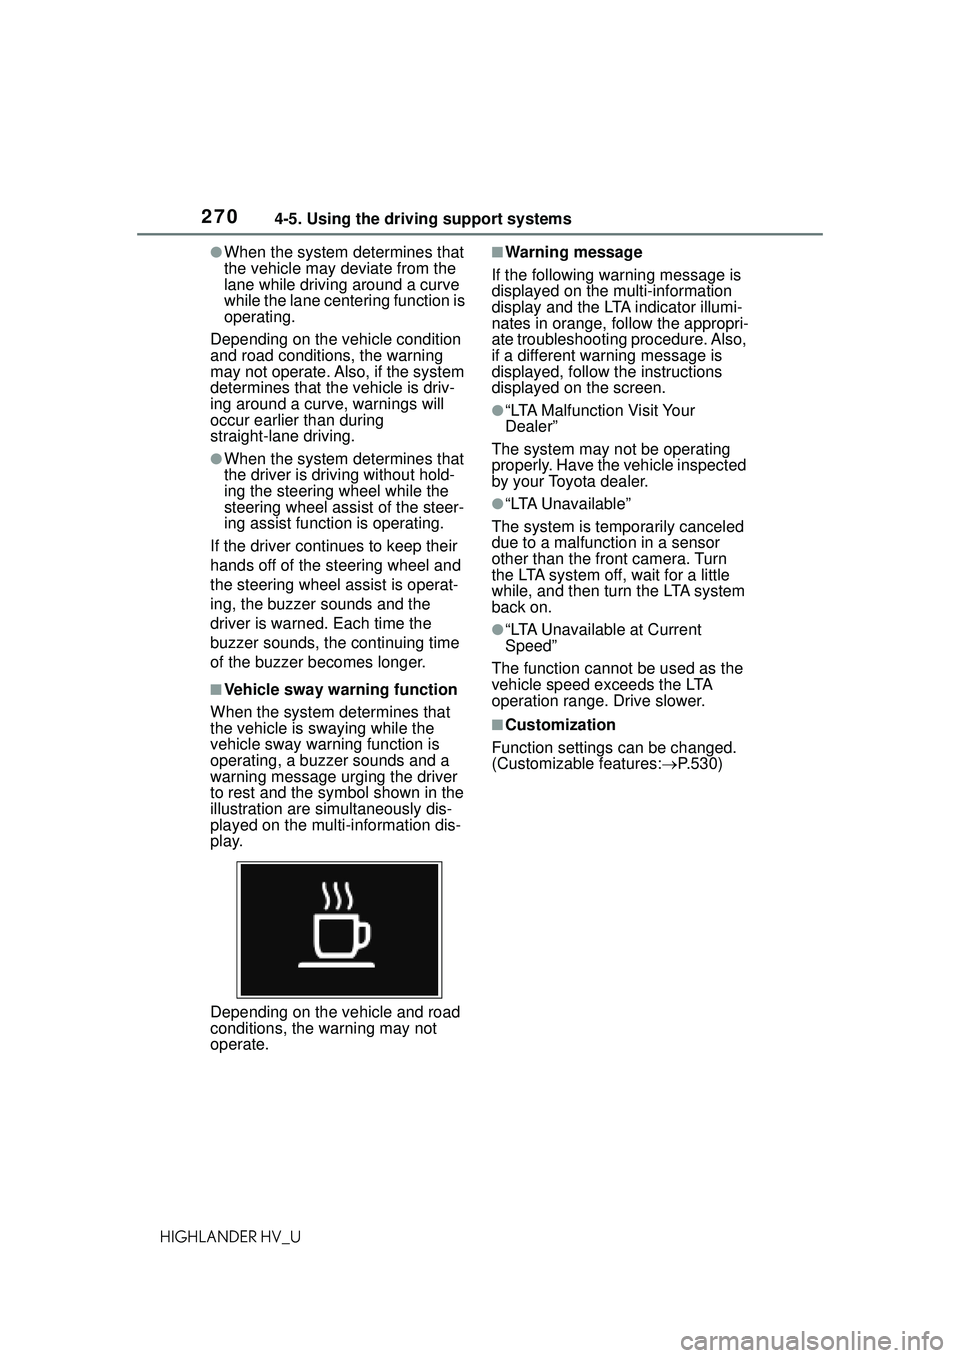
■Vehicle sway warning function
When the system de termines that
the vehicle is swaying while the
vehicle sway warning function is
operating, a buzzer sounds and a
warning message urging the driver
to rest and the symbol shown in the
illustration are simultaneously dis-
played on the multi-information dis-
play.
Depending on the vehicle and road
conditions, the warning may not
operate.
■Warning message
If the following warning message is
displayed on the multi-information
display and the LTA indicator illumi-
nates in orange, follow the appropri-
ate troubleshooting procedure. Also,
if a different warning message is
displayed, follow the instructions
displayed on the screen.
●“LTA Malfunction Visit Your
Dealer”
The system may not be operating
properly. Have the vehicle inspected
by your Toyota dealer.
●“LTA Unavailable”
The system is temporarily canceled
due to a malfunction in a sensor
other than the front camera. Turn
the LTA system off, wait for a little
while, and then turn the LTA system
back on.
●“LTA Unavailable at Current
Speed”
The function cannot be used as the
vehicle speed exceeds the LTA
operation range. Drive slower.
■Customization
Function settings can be changed.
(Customizable features: P.530)
Page 276 of 578
2764-5. Using the driving support systems
HIGHLANDER HV_Uset speed.
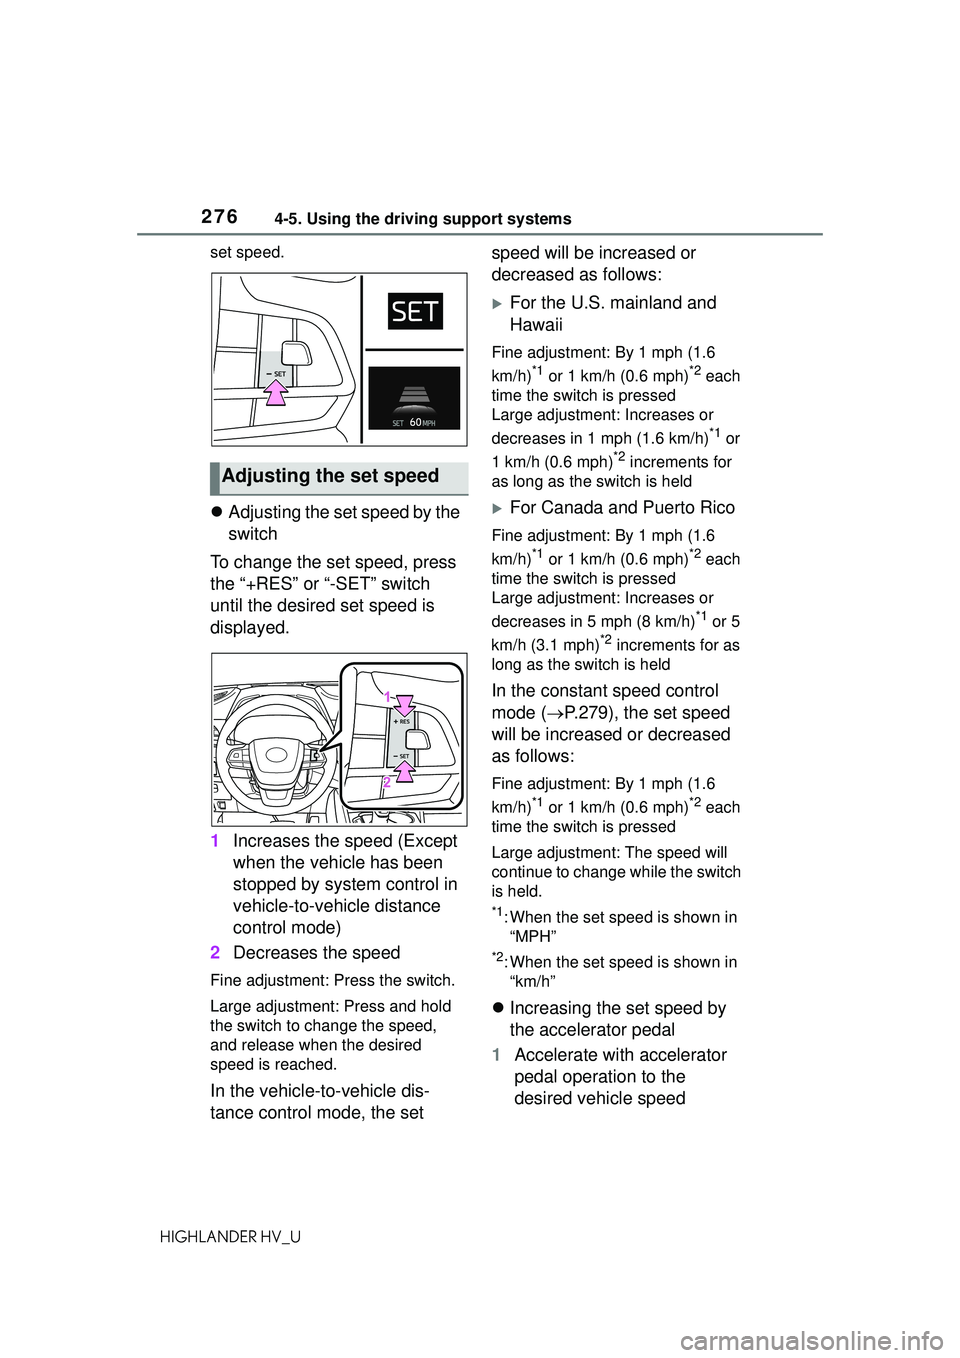
Adjusting the set speed by the
switch
To change the set speed, press
the “+RES” or “-SET” switch
until the desired set speed is
displayed.
1 Increases the speed (Except
when the vehicle has been
stopped by system control in
vehicle-to-vehicle distance
control mode)
2 Decreases the speed
Fine adjustment: Press the switch.
Large adjustment: Press and hold
the switch to change the speed,
and release when the desired
speed is reached.
In the vehicle-to-vehicle dis-
tance control mode, the set speed will be increased or
decreased as follows:
For the U.S. mainland and
Hawaii
Fine adjustment: By 1 mph (1.6
km/h)
*1 or 1 km/h (0.6 mph)*2 each
time the switch is pressed
Large adjustment: Increases or
decreases in 1 mph (1.6 km/h)
*1 or
1 km/h (0.6 mph)
*2 increments for
as long as the switch is held
For Canada and Puerto Rico
Fine adjustment: By 1 mph (1.6
km/h)
*1 or 1 km/h (0.6 mph)*2 each
time the switch is pressed
Large adjustment: Increases or
decreases in 5 mph (8 km/h)
*1 or 5
km/h (3.1 mph)
*2 increments for as
long as the switch is held
In the constant speed control
mode ( P.279), the set speed
will be increased or decreased
as follows:
Fine adjustment: By 1 mph (1.6
km/h)
*1 or 1 km/h (0.6 mph)*2 each
time the switch is pressed
Large adjustment: The speed will
continue to change while the switch
is held.
*1: When the set speed is shown in “MPH”
*2: When the set speed is shown in “km/h”
Increasing the set speed by
the accelerator pedal
1 Accelerate with accelerator
pedal operation to the
desired vehicle speed
Adjusting the set speed