spare tire TOYOTA HILUX 2013 Owners Manual (in English)
[x] Cancel search | Manufacturer: TOYOTA, Model Year: 2013, Model line: HILUX, Model: TOYOTA HILUX 2013Pages: 644, PDF Size: 34.35 MB
Page 503 of 644
503
4-3. Do-it-yourself maintenance
4
Maintenance and care
HILUX_OM_OM0K134E_(EE)
Tires
Replace or rotate tires in accordance with maintenance schedules
and treadwear.
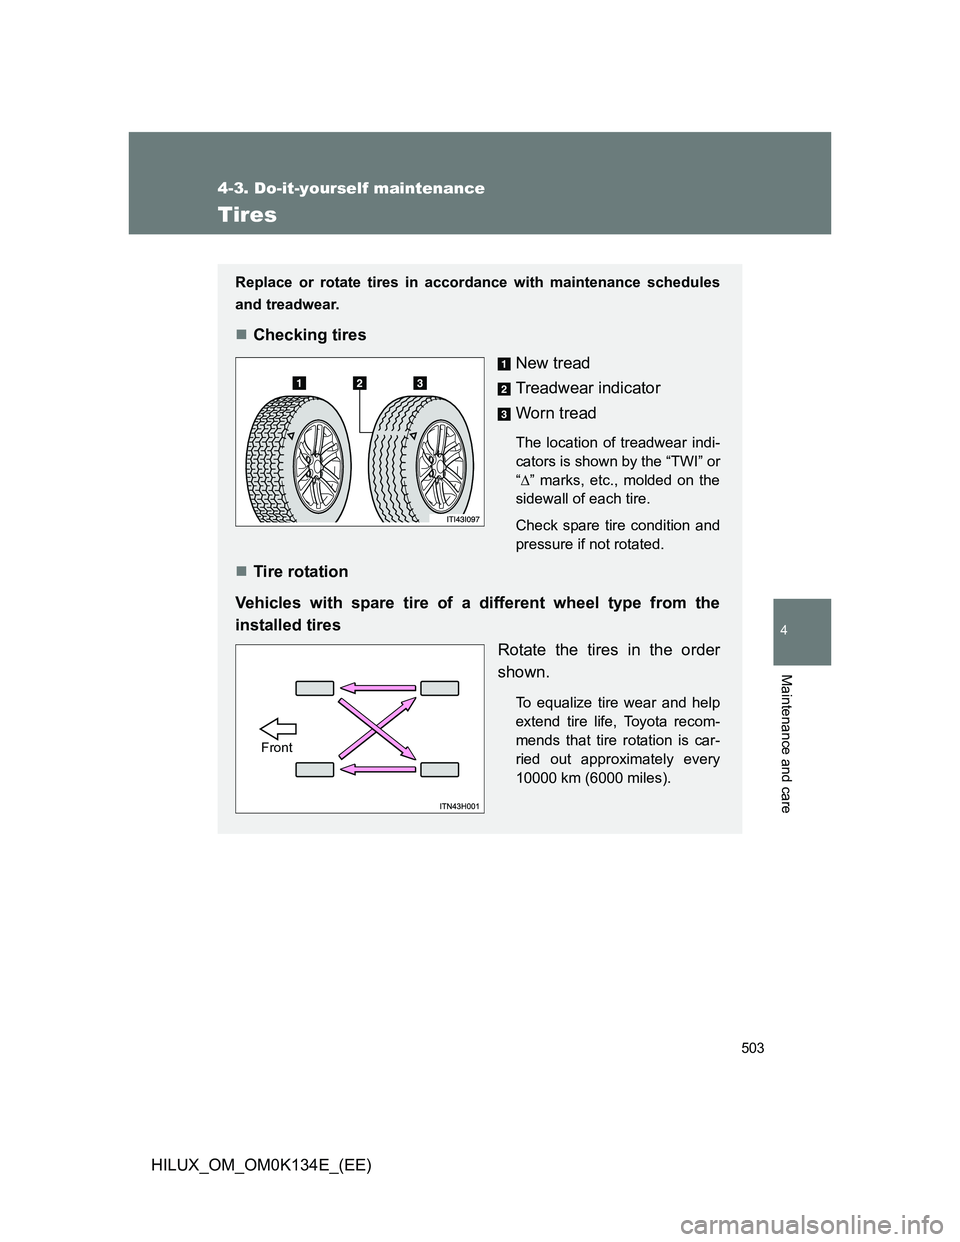
Checking tires
New tread
Treadwear indicator
Worn tread
The location of treadwear indi-
cators is shown by the “TWI” or
“” marks, etc., molded on the
sidewall of each tire.
Check spare tire condition and
pressure if not rotated.
Tire rotation
Vehicles with spare tire of a different wheel type from the
installed tires
Rotate the tires in the order
shown.
To equalize tire wear and help
extend tire life, Toyota recom-
mends that tire rotation is car-
ried out approximately every
10000 km (6000 miles).
Front
Page 504 of 644
504 4-3. Do-it-yourself maintenance
HILUX_OM_OM0K134E_(EE)
When to replace your vehicle’s tires
Tires should be replaced if:
You have tire damage such as cuts, splits, cracks deep enough to
expose the fabric, and bulges indicating internal damage
A tire goes flat repeatedly or cannot be properly repaired due to the size
or location of a cut or other damage
If you are not sure, consult with any authorized Toyota dealer or repairer, or
another duly qualified and equipped professional.
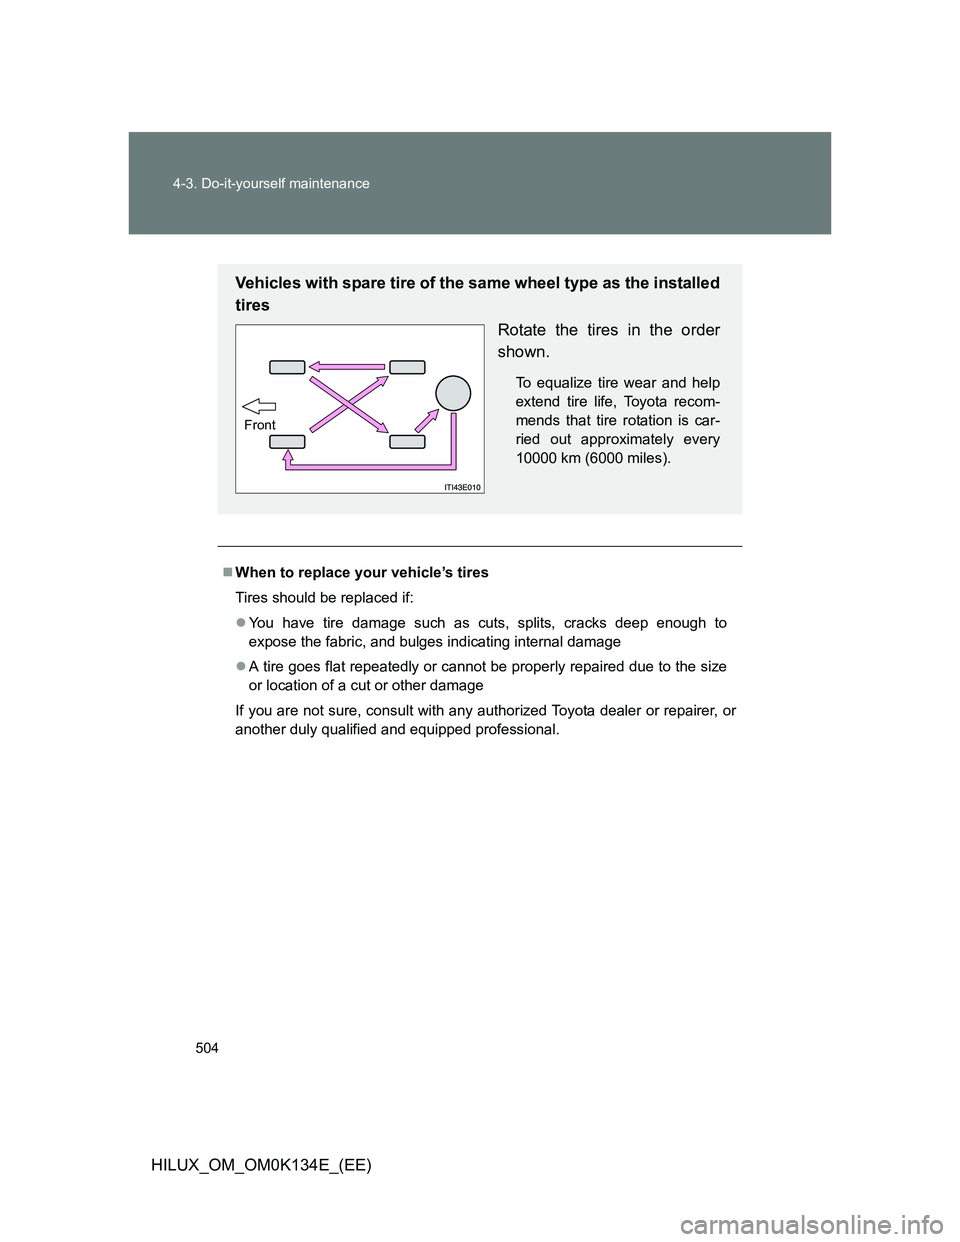
Vehicles with spare tire of the same wheel type as the installed
tires
Rotate the tires in the order
shown.
To equalize tire wear and help
extend tire life, Toyota recom-
mends that tire rotation is car-
ried out approximately every
10000 km (6000 miles).
Front
Page 565 of 644
5
565
5-2. Steps to take in an emergency
When trouble arises
HILUX_OM_OM0K134E_(EE)
If you have a flat tire
Remove the flat tire and replace it with the spare tire provided.
Before jacking up the vehicle
Stop the vehicle on a hard, flat surface.
Set the parking brake.
Shift the shift lever to P (automatic transmission) or R (manual
transmission).
Stop the engine.
Turn on the emergency flashers. (P. 548)
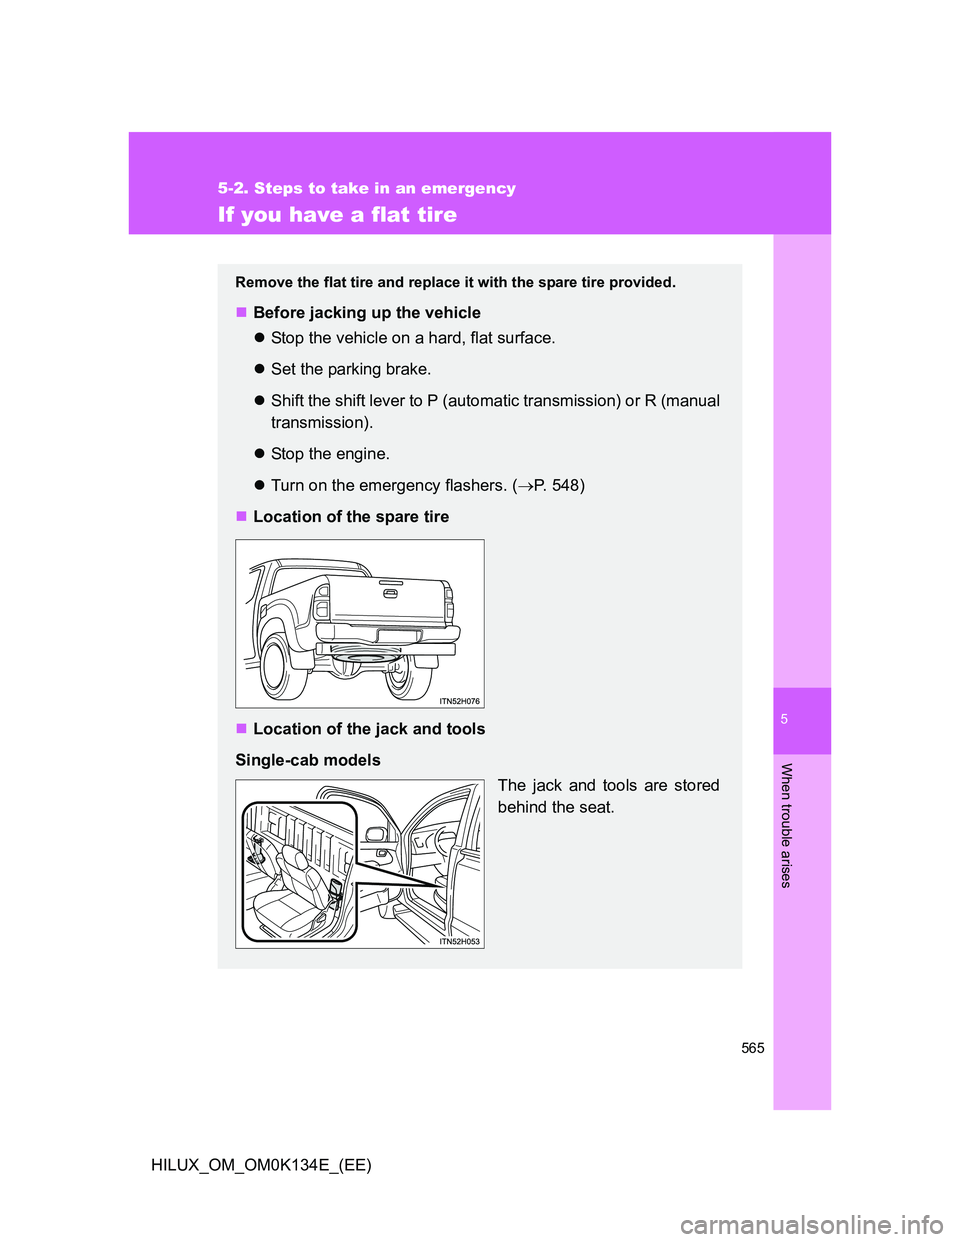
Location of the spare tire
Location of the jack and tools
Single-cab models
The jack and tools are stored
behind the seat.
Page 570 of 644
570 5-2. Steps to take in an emergency
HILUX_OM_OM0K134E_(EE)
Taking out the spare tire
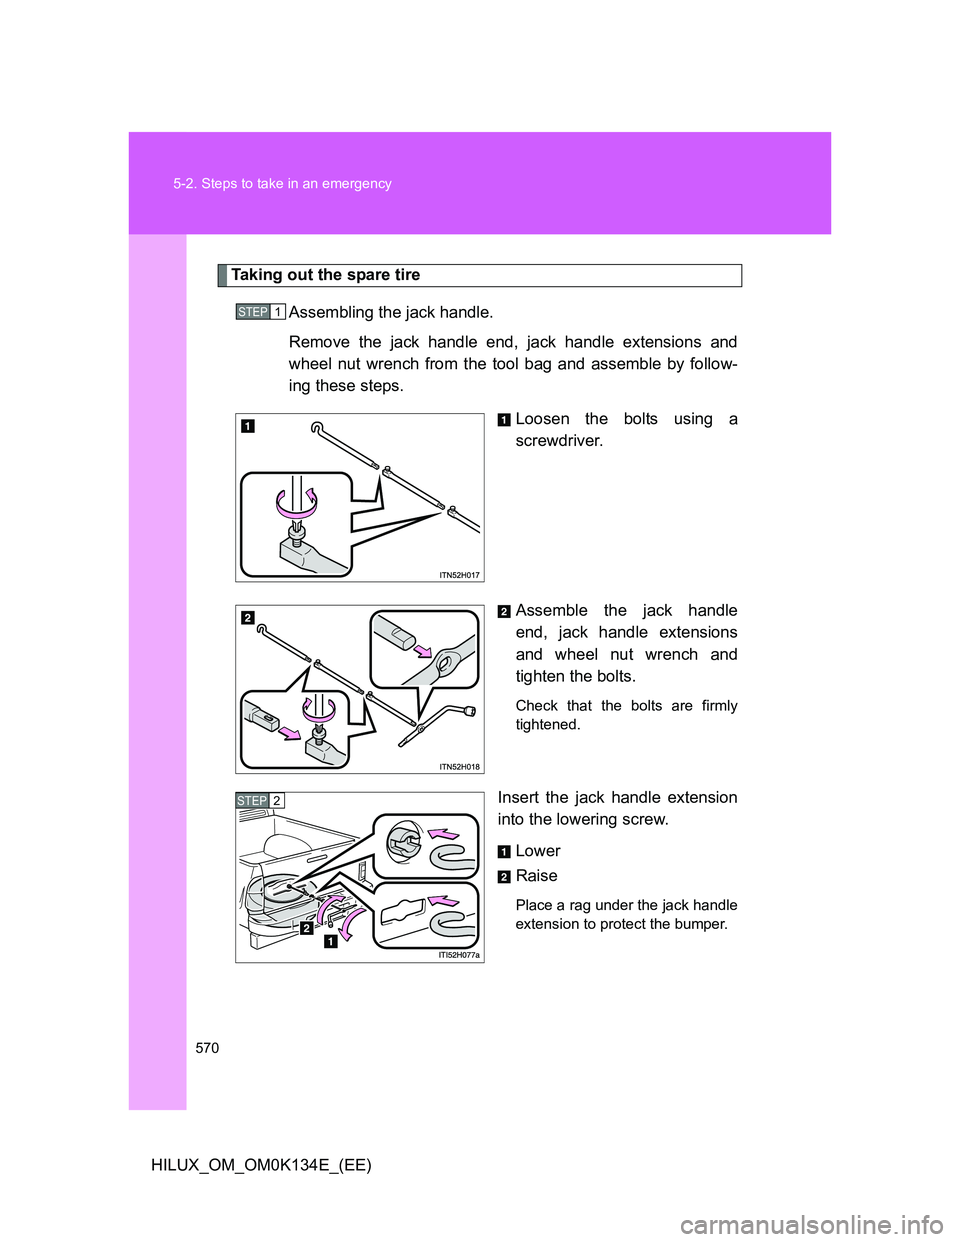
Assembling the jack handle.
Remove the jack handle end, jack handle extensions and
wheel nut wrench from the tool bag and assemble by follow-
ing these steps.
Loosen the bolts using a
screwdriver.
Assemble the jack handle
end, jack handle extensions
and wheel nut wrench and
tighten the bolts.
Check that the bolts are firmly
tightened.
Insert the jack handle extension
into the lowering screw.
Lower
Raise
Place a rag under the jack handle
extension to protect the bumper.
STEP1
STEP2
Page 571 of 644
5
571 5-2. Steps to take in an emergency
When trouble arises
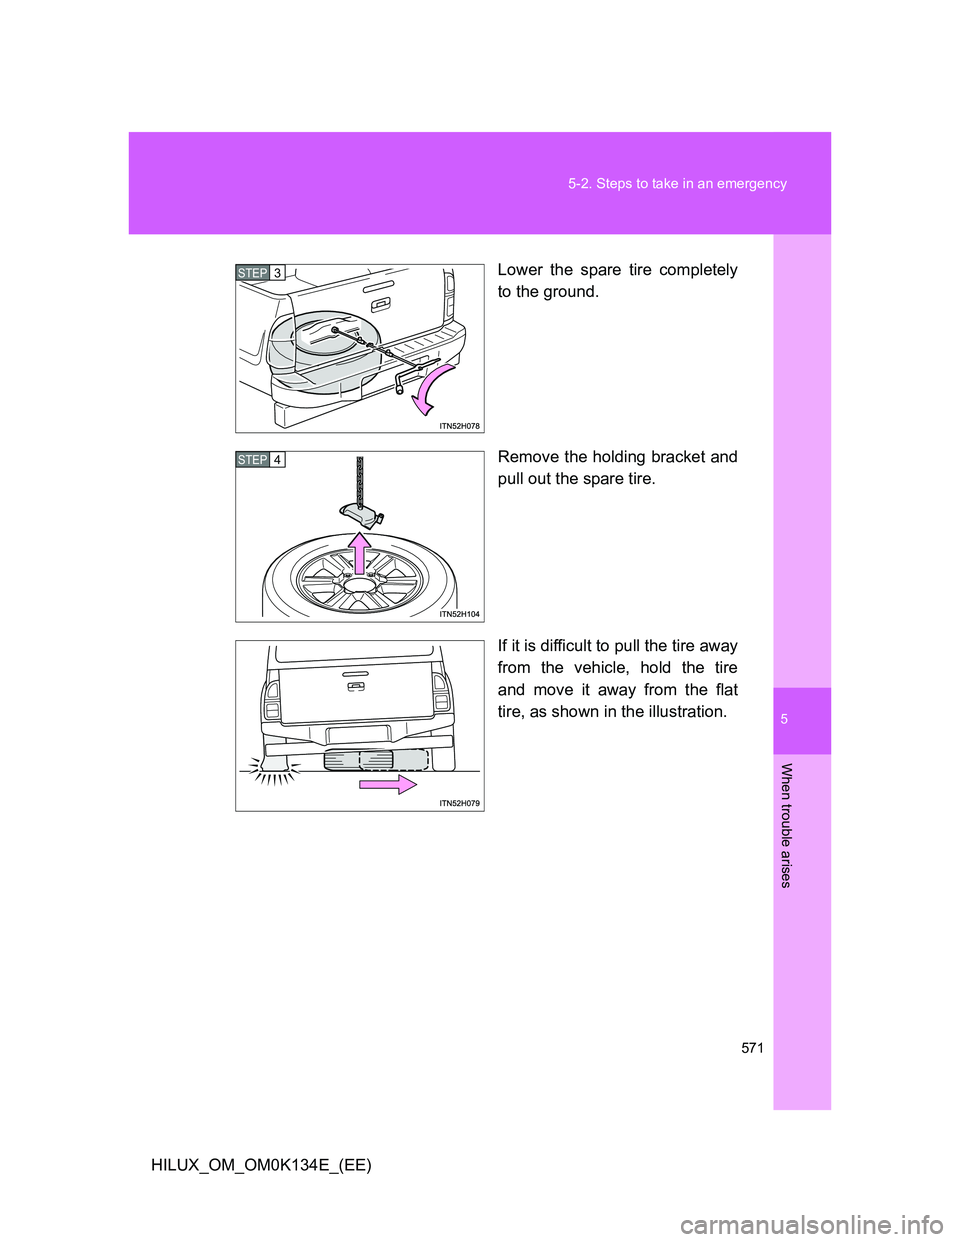
HILUX_OM_OM0K134E_(EE)Lower the spare tire completely
to the ground.
Remove the holding bracket and
pull out the spare tire.
If it is difficult to pull the tire away
from the vehicle, hold the tire
and move it away from the flat
tire, as shown in the illustration.
STEP3
STEP4
Page 575 of 644
5
575 5-2. Steps to take in an emergency
When trouble arises
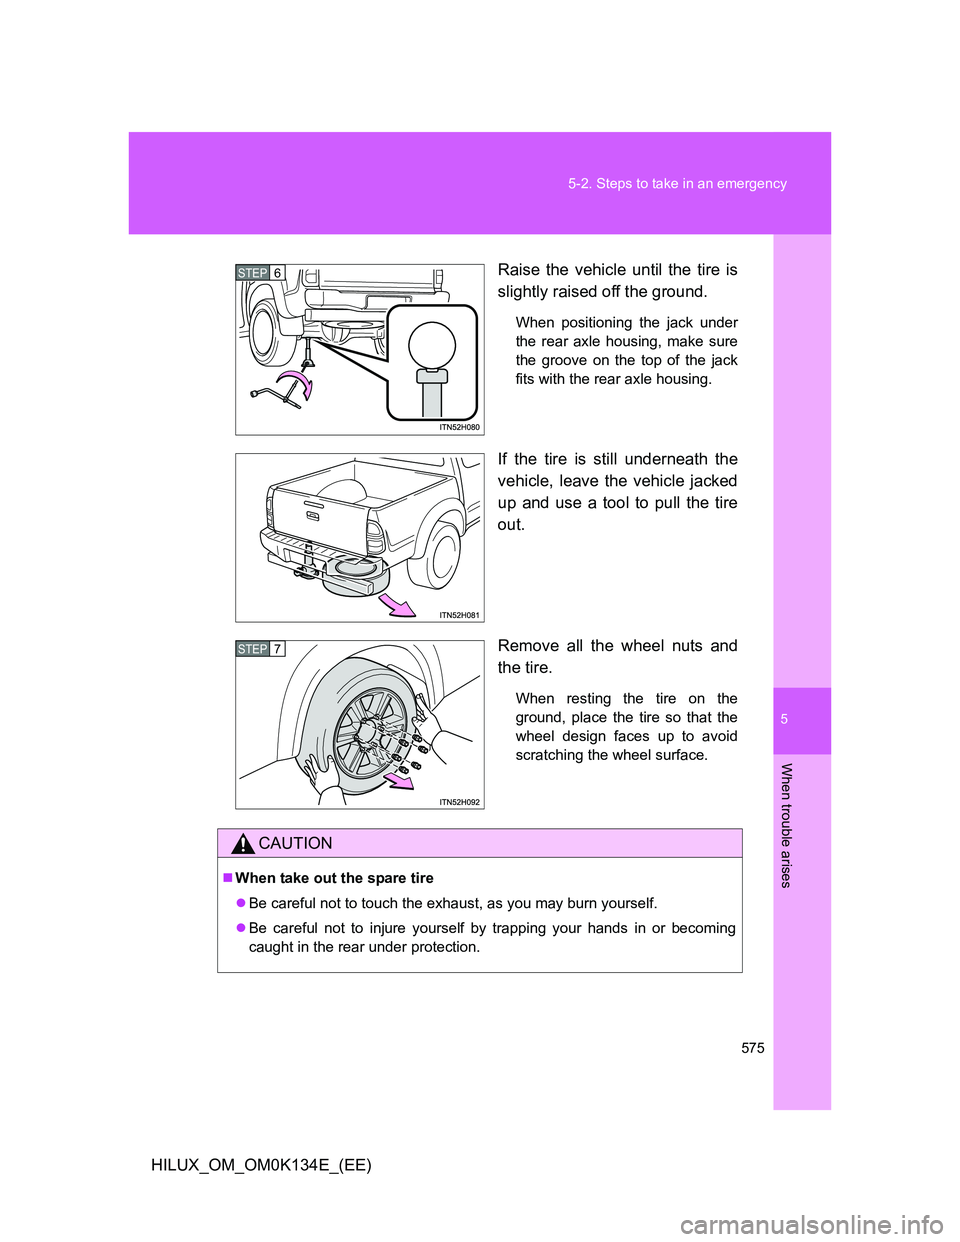
HILUX_OM_OM0K134E_(EE)Raise the vehicle until the tire is
slightly raised off the ground.
When positioning the jack under
the rear axle housing, make sure
the groove on the top of the jack
fits with the rear axle housing.
If the tire is still underneath the
vehicle, leave the vehicle jacked
up and use a tool to pull the tire
out.
Remove all the wheel nuts and
the tire.
When resting the tire on the
ground, place the tire so that the
wheel design faces up to avoid
scratching the wheel surface.
STEP6
STEP7
CAUTION
When take out the spare tire
Be careful not to touch the exhaust, as you may burn yourself.
Be careful not to injure yourself by trapping your hands in or becoming
caught in the rear under protection.
Page 576 of 644
576 5-2. Steps to take in an emergency
HILUX_OM_OM0K134E_(EE)
Installing the spare tire
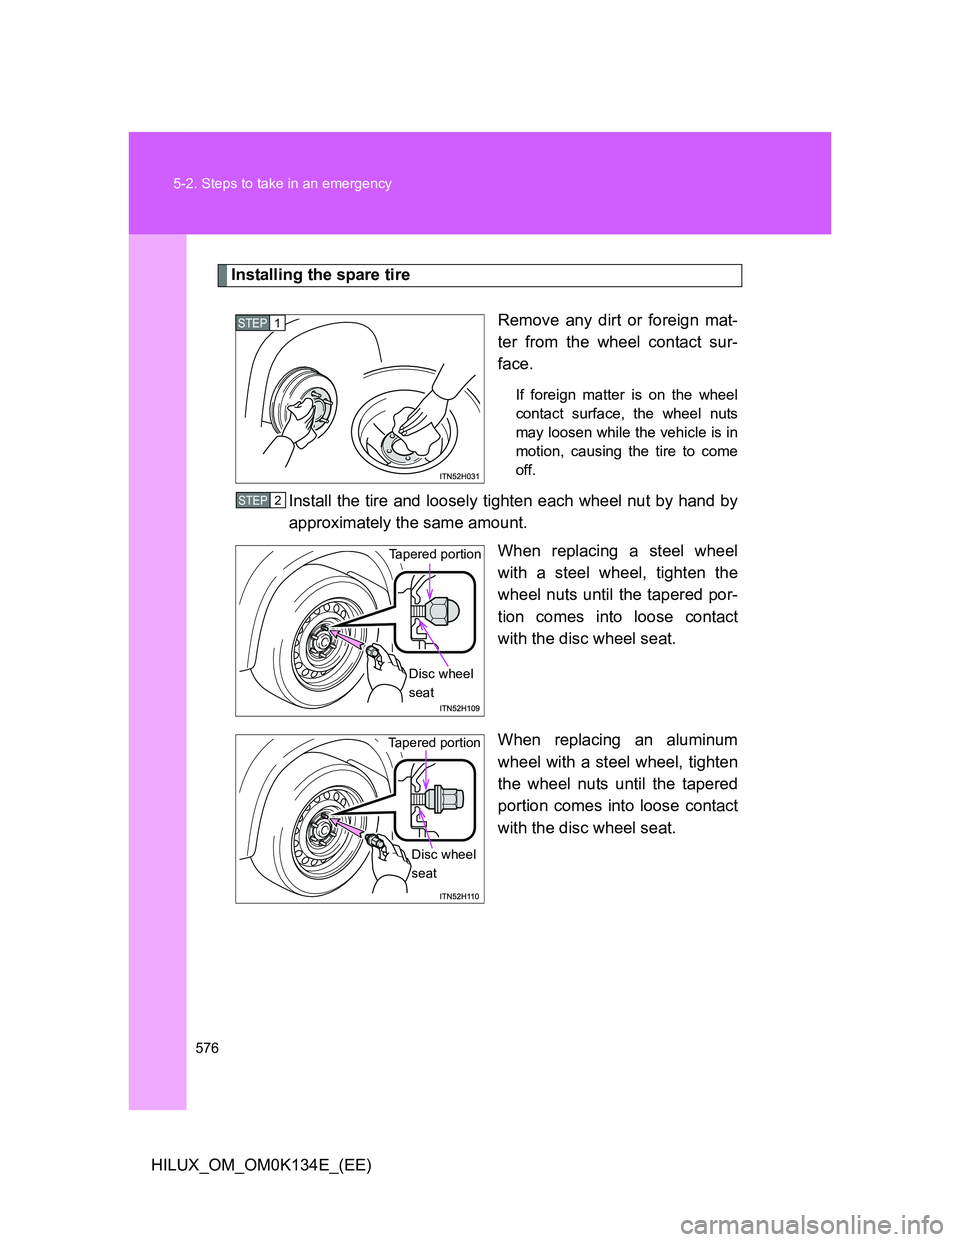
Remove any dirt or foreign mat-
ter from the wheel contact sur-
face.
If foreign matter is on the wheel
contact surface, the wheel nuts
may loosen while the vehicle is in
motion, causing the tire to come
off.
Install the tire and loosely tighten each wheel nut by hand by
approximately the same amount.
When replacing a steel wheel
with a steel wheel, tighten the
wheel nuts until the tapered por-
tion comes into loose contact
with the disc wheel seat.
When replacing an aluminum
wheel with a steel wheel, tighten
the wheel nuts until the tapered
portion comes into loose contact
with the disc wheel seat.
STEP1
STEP2
Tapered portion
Disc wheel
seat
Tapered portion
Disc wheel
seat
Page 578 of 644
578 5-2. Steps to take in an emergency
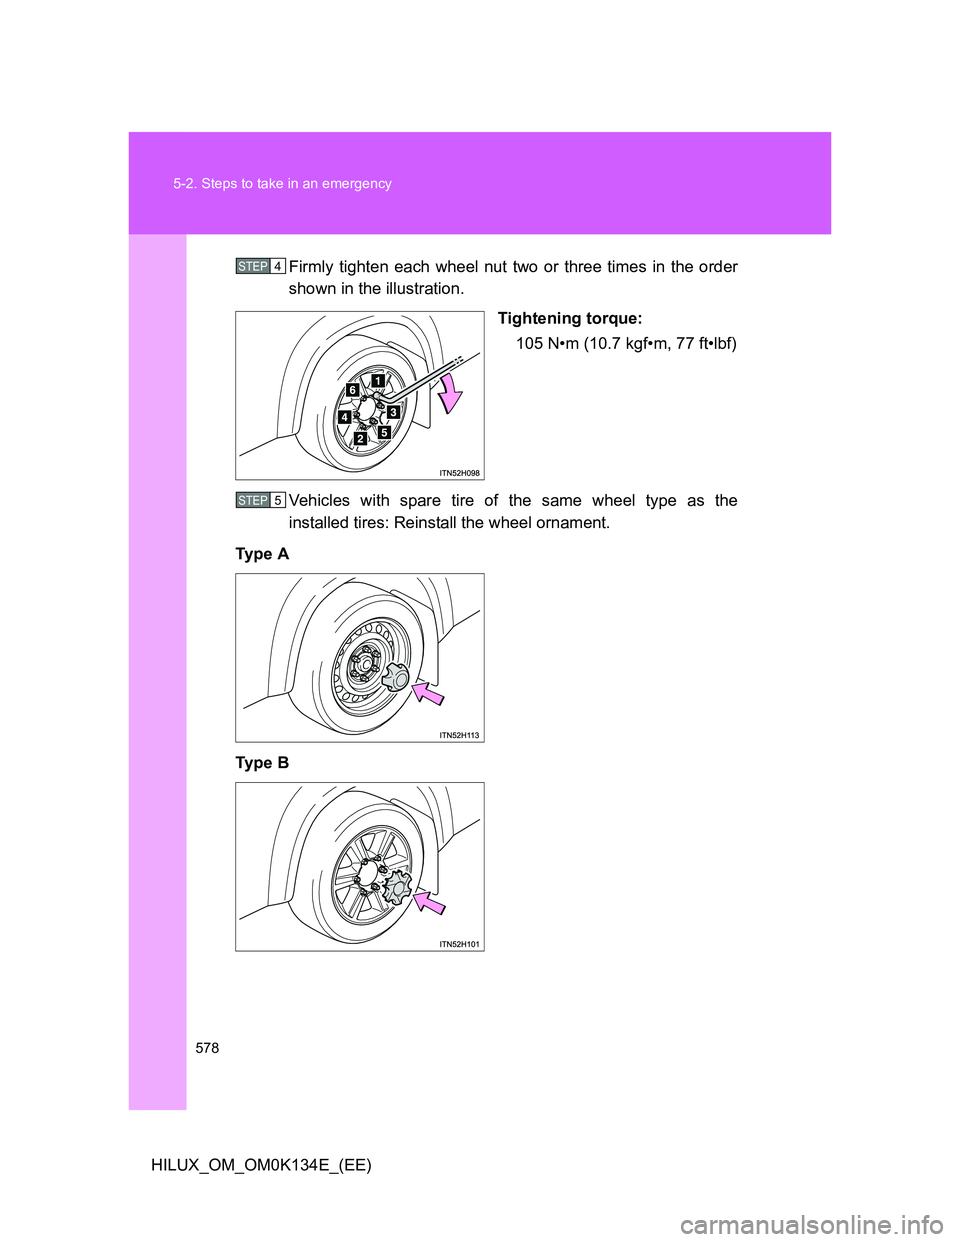
HILUX_OM_OM0K134E_(EE)Firmly tighten each wheel nut two or three times in the order
shown in the illustration.
Tightening torque:
105 N•m (10.7 kgf•m, 77 ft•lbf)
Vehicles with spare tire of the same wheel type as the
installed tires: Reinstall the wheel ornament.
Ty p e A
Ty p e B
STEP4
STEP5
Page 582 of 644
582 5-2. Steps to take in an emergency
HILUX_OM_OM0K134E_(EE)
CAUTION
Using the jack handle
Tighten all the jack handle bolts securely using a Phillips-head screwdriver
or your hand, to prevent the extension parts from coming apart unexpect-
edly.
Replacing a flat tire
Observe the following precautions to reduce the risk of death or serious
injury:
Do not touch the disc wheels or the area around the brakes immediately
after the vehicle has been driven.
After the vehicle has been driven the disc wheels and the area around the
brakes will be extremely hot. Touching these areas with hands, feet or
other body parts while changing a tire, etc. may result in burns.
Lower the spare tire completely to the ground before removing it from
under the vehicle.
Do not try to remove the wheel ornament by hand. Take due care in han-
dling the ornament to avoid unexpected personal injury.
Have the wheel nuts tightened with a torque wrench to 105 N•m
(10.7 kgf•m, 77 ft•lbf) as soon as possible after changing wheels.
Do not attach a heavily damaged wheel ornament, as it may fly off the
wheel while the vehicle is moving.
When installing a tire, only use wheel nuts that have been specifically
designed for that wheel.
If there are any cracks or deformations in the bolt screws, nut threads or
bolt holes of the wheel, have the vehicle inspected by any authorized
Toyota dealer or repairer, or another duly qualified and equipped profes-
sional.
Failure to follow these precautions could cause the wheel nuts to loosen and
the tire to fall off, resulting in death or serious injury.
Page 636 of 644
636 Alphabetical index
HILUX_OM_OM0K134E_(EE)
Seat belts
Adjusting the seat belt............. 80
Child restraint system
installation........................... 134
Cleaning and maintaining
the seat belts ...................... 473
Emergency Locking
Retractor ............................... 81
How to wear your seat belt ..... 78
How your child should wear
the seat belt .......................... 82
Pregnant women, proper seat
belt use ................................. 82
Reminder light ....................... 561
Seat belt pretensioners ........... 81
Seat heaters ............................. 455
Seats
Adjustment .............................. 67
Adjustment
precautions ........................... 71
Child seats/child restraint
system installation .............. 134
Cleaning ................................ 472
Head restraint ......................... 75
Properly sitting in the seat..... 107
Seat heaters.......................... 455
Service reminder
indicators .............................. 180Shift lever
Automatic transmission......... 166
Front drive control lever ........ 212
If the shift lever cannot
be shifted from P ................ 585
Manual transmission ............. 170
Shift lock system ..................... 585
Side airbags ............................. 109
Side doors .................................. 59
Side mirror
Adjusting and folding .............. 88
Side turn signal lights
Replacing light bulbs............. 541
Wattage ................................ 622
Spare tire
Inflation pressure .................. 507
Storage location .................... 565
Specifications .......................... 602
Speedometer ............................ 176
Steering
Column lock release ............. 164
Fluid ...................................... 619
Steering wheel
Adjustment .............................. 85
Audio switches .............. 314, 384
Stop lights
Replacing light bulbs............. 542
Wattage ................................ 622
Storage feature ........................ 440
Storage precautions ................ 233S