spare tire TOYOTA LAND CRUISER 2009 J200 Owners Manual
[x] Cancel search | Manufacturer: TOYOTA, Model Year: 2009, Model line: LAND CRUISER, Model: TOYOTA LAND CRUISER 2009 J200Pages: 556, PDF Size: 10.21 MB
Page 405 of 556
405
4-3. Do-it-yourself maintenance
4
Maintenance and care
L/C200_U (OM60D97U)
Tires
Replace or rotate tires in accordance with maintenance sched-
ules and treadwear.
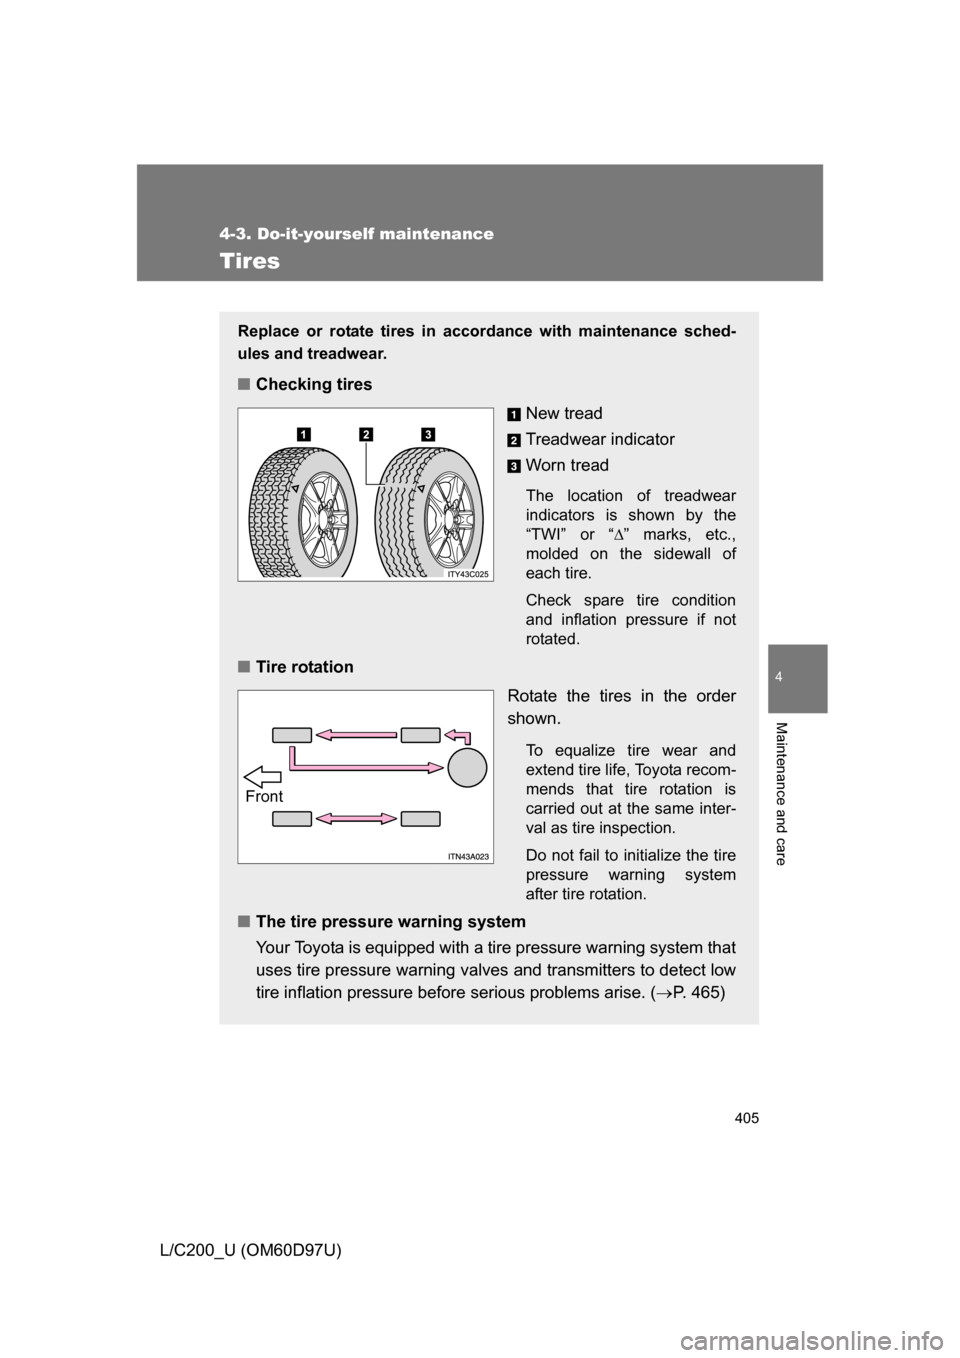
■Checking tires
New tread
Treadwear indicator
Worn tread
The location of treadwear
indicators is shown by the
“TWI” or “” marks, etc.,
molded on the sidewall of
each tire.
Check spare tire condition
and inflation pressure if not
rotated.
■ Tire rotation
Rotate the tires in the order
shown.
To equalize tire wear and
extend tire life, Toyota recom-
mends that tire rotation is
carried out at the same inter-
val as tire inspection.
Do not fail to initialize the tire
pressure warning system
after tire rotation.
■The tire pressure warning system
Your Toyota is equipped with a tire pressure warning system that
uses tire pressure warning valves and transmitters to detect low
tire inflation pressure before serious problems arise. (P. 465)
Front
Page 415 of 556
415
4-3. Do-it-yourself maintenance
4
Maintenance and care
L/C200_U (OM60D97U)
.
■Tire inflation pressure check interval
You should check tire inflation pressu
re every 2 weeks, or at least once a
month.
Do not forget to check the spare.
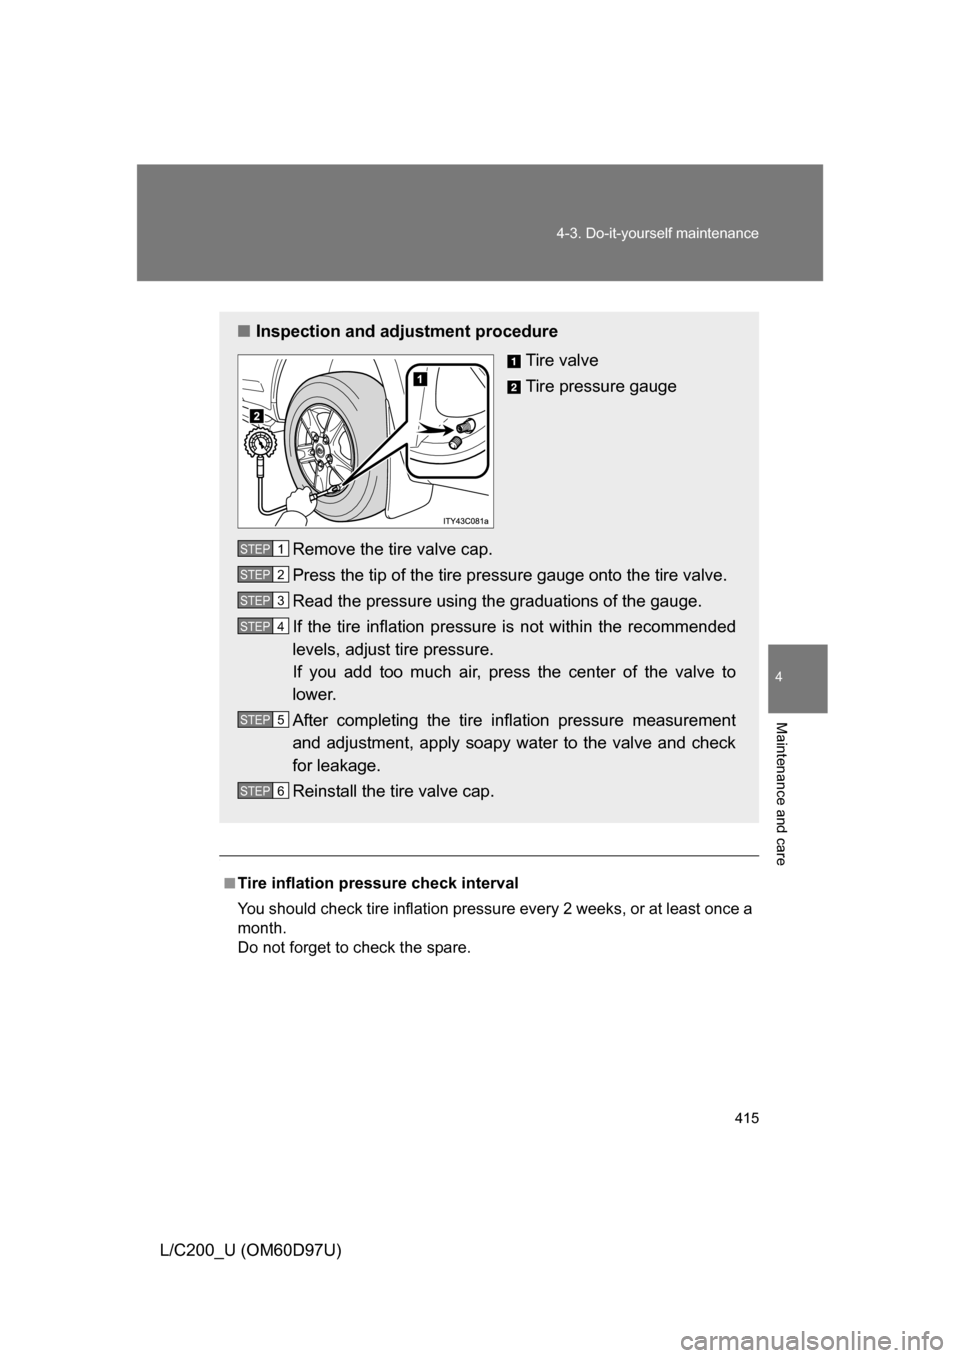
■ Inspection and adjustment procedure
Tire valve
Tire pressure gauge
Remove the tire valve cap.
Press the tip of the tire pressure gauge onto the tire valve.
Read the pressure using the graduations of the gauge.
If the tire inflation pressure is not within the recommended
levels, adjust tire pressure.
If you add too much air, pres s the center of the valve to
lower.
After completing the tire inflation pressure measurement
and adjustment, apply soapy water to the valve and check
for leakage.
Reinstall the tire valve cap.
STEP1
STEP2
STEP3
STEP4
STEP5
STEP6
Page 469 of 556
5
When trouble arises
469
5-2. Steps to take in an emergency
L/C200_U (OM60D97U)
■When a tire is replaced with a spare tire
The spare tire is also equipped with the tire pressure warning valve and
transmitter. The tire pressure warning li
ght will turn on if the tire inflation
pressure of the spare tire is low. If a tire goes flat, even though the flat
tire is replaced with the spare tire, the tire pressure warning light does
not turn off. Replace the spare tire with the repaired tire and adjust the
proper tire inflation pressure. The ti re pressure warning light will turn off
after a few minutes.
■If the tire pressure warning system is inoperative
The tire pressure warning system will become inoperative in the follow-
ing conditions:
(When the condition be comes normal, the system will work properly.)
●If tires not equipped with tire pressure warning valves and transmit-
ters are used.
●If the ID code on the tire pressure warning valves and transmitters is
not registered in the tire pressure warning computer.
●If the tire inflation pressure is more than 73 psi (500 kPa, 5.1 kgf/cm2
or bar).
The tire pressure warning system may become inoperative in the follow-
ing conditions:
(When the condition be comes normal, the system will work properly.)
●If electronic devices or facilities using similar radio wave frequencies
are nearby.
●If a radio set at similar frequencies is in use in the vehicle.
●If a window tint that affects the radio wave signals is installed.
●If there is a lot of snow or ice on the vehicle, in particular around the
wheels or wheel housings.
●If non-genuine Toyota wheels are used. (Even if you use Toyota
wheels, the tire pressu re warning system may not work properly with
some types of tires.)
●If tire chains are used.
●If the spare tire is in a location subject to poor radio wave signal
reception.
●If a large metallic object which can interfere with signal reception is
put in the luggage compartment.
Page 470 of 556
470 5-2. Steps to take in an emergency
L/C200_U (OM60D97U)
■If the tire pressure warning light comes on after blinking for 1
minute frequently
If the tire pressure warning light comes on after blinking 1 minute fre-
quently when the “ENGINE START STOP” switch is turned to IGNITION
ON mode, have it checked by Toyota dealer.
CAUTION
■If the tire pressure warning light comes on
Be sure to observe the following precautions. Failure to do so could
cause loss of vehicle control and re sult in death or serious injury.
●Stop your vehicle in a safe place as soon as possible. Adjust the tire
inflation pressure immediately.
●If the tire pressure warning light comes on even after tire inflation pres-
sure adjustment, it is pr obable that you have a flat tire. Check the tires.
If the tire is flat, change to the spare tire and have the flat tire repaired
by the nearest Toyota dealer.
●Avoid abrupt maneuvering and braking. If the vehicle tires deteriorate,
you could lose control of the steering wheel or the brakes.
■If a blowout or sudden air loss should occur
The tire pressure warning syste m may not activate immediately.
Page 471 of 556
5
When trouble arises
471
5-2. Steps to take in an emergency
L/C200_U (OM60D97U)
CAUTION
■Maintenance of the tires
Each tire, including the spare (if provided), should be checked monthly
when cold and inflated to the inflation pressure recommended by the
vehicle manufacturer on the vehicle
placard or tire inflation pressure
label (tire and load information label). (If your vehicle has tires of a differ-
ent size than the size indicated on the vehicle placard or tire inflation
pressure label [tire and load information label], you should determine the
proper tire inflation pr essure for those tires.)
As an added safety feature, your vehicle has been equipped with a tire
pressure monitoring system (TPMS-ti re pressure warning system) that
illuminates a low tire pressure telltal e (tire pressure warning light) when
one or more of your tires is significantly under-inflated. Accordingly,
when the low tire pressure telltale (tire pre ssure warning light) illumi-
nates, you should stop and check your tires as soon as possible, and
inflate them to the proper pressure. Driving on a significantly under-
inflated tire causes the tire to overheat and can lead to tire failure.
Under-inflation also reduces fuel effi ciency and tire tread life, and may
affect the vehicle’s handling and stopping ability.
Please note that the TPMS (tire pressure warning system) is not a sub-
stitute for proper tire ma intenance, and it is the driver’s responsibility to
maintain correct tire pressure, even if under-inflation has not reached the
level to trigger illu mination of the TPMS low ti re pressure telltale (tire
pressure warning light).
Page 476 of 556
476
5-2. Steps to take in an emergency
L/C200_U (OM60D97U)
If you have a flat tire
Remove the flat tire and replace it with the spare provided.
■Before jacking up the vehicle
●Stop the vehicle on a hard, flat surface.
● Set the parking brake.
● Shift the shift lever to “P”.
● Stop the engine.
● Turn on the emergency flashers.
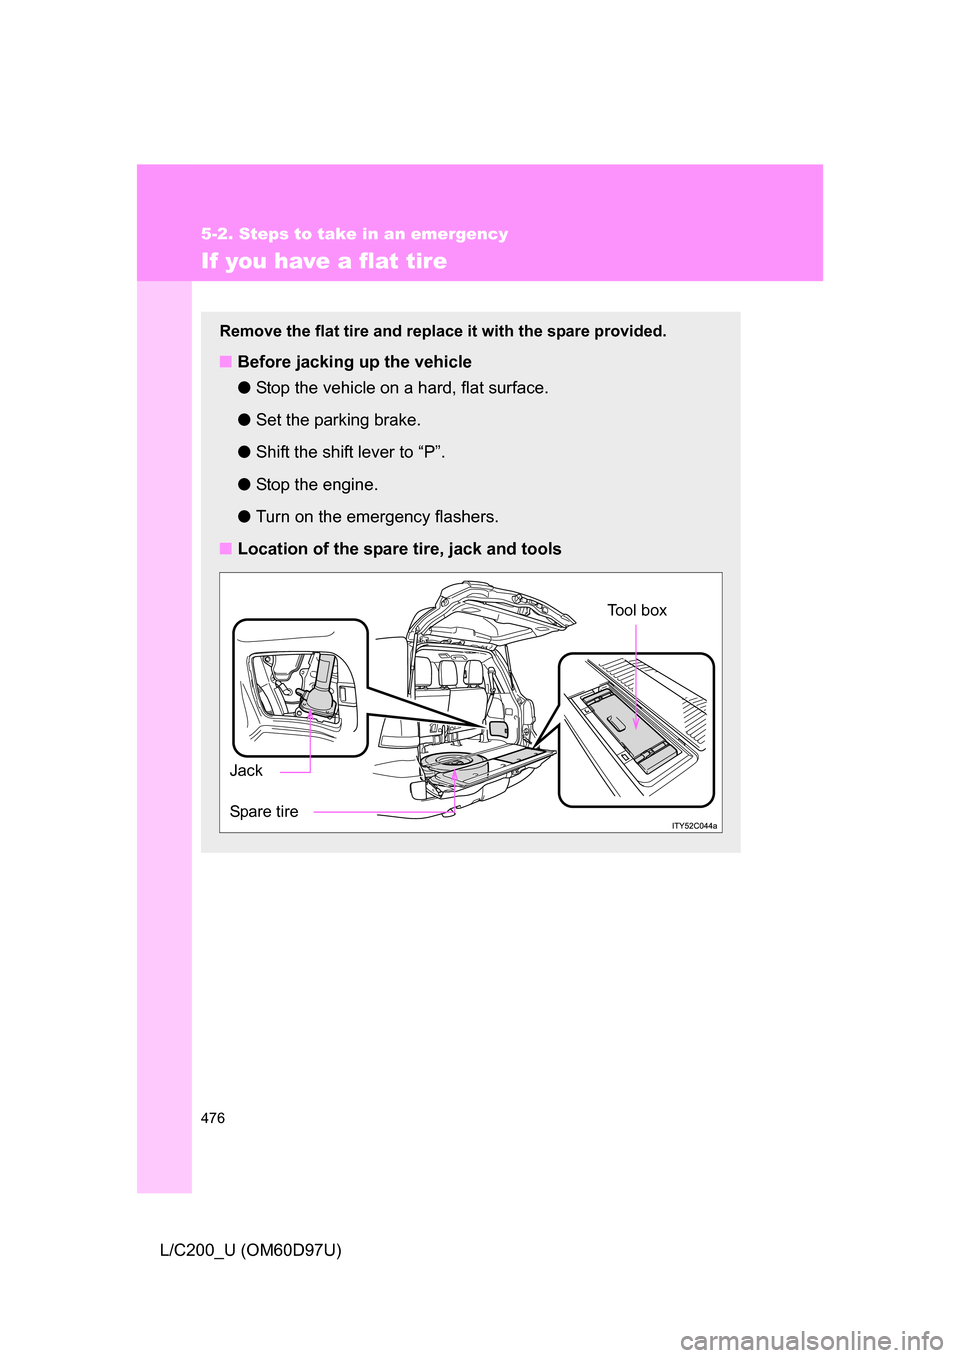
■ Location of the spare tire, jack and tools
Tool box
Spare tire Jack
Page 479 of 556
5
When trouble arises
479
5-2. Steps to take in an emergency
L/C200_U (OM60D97U)
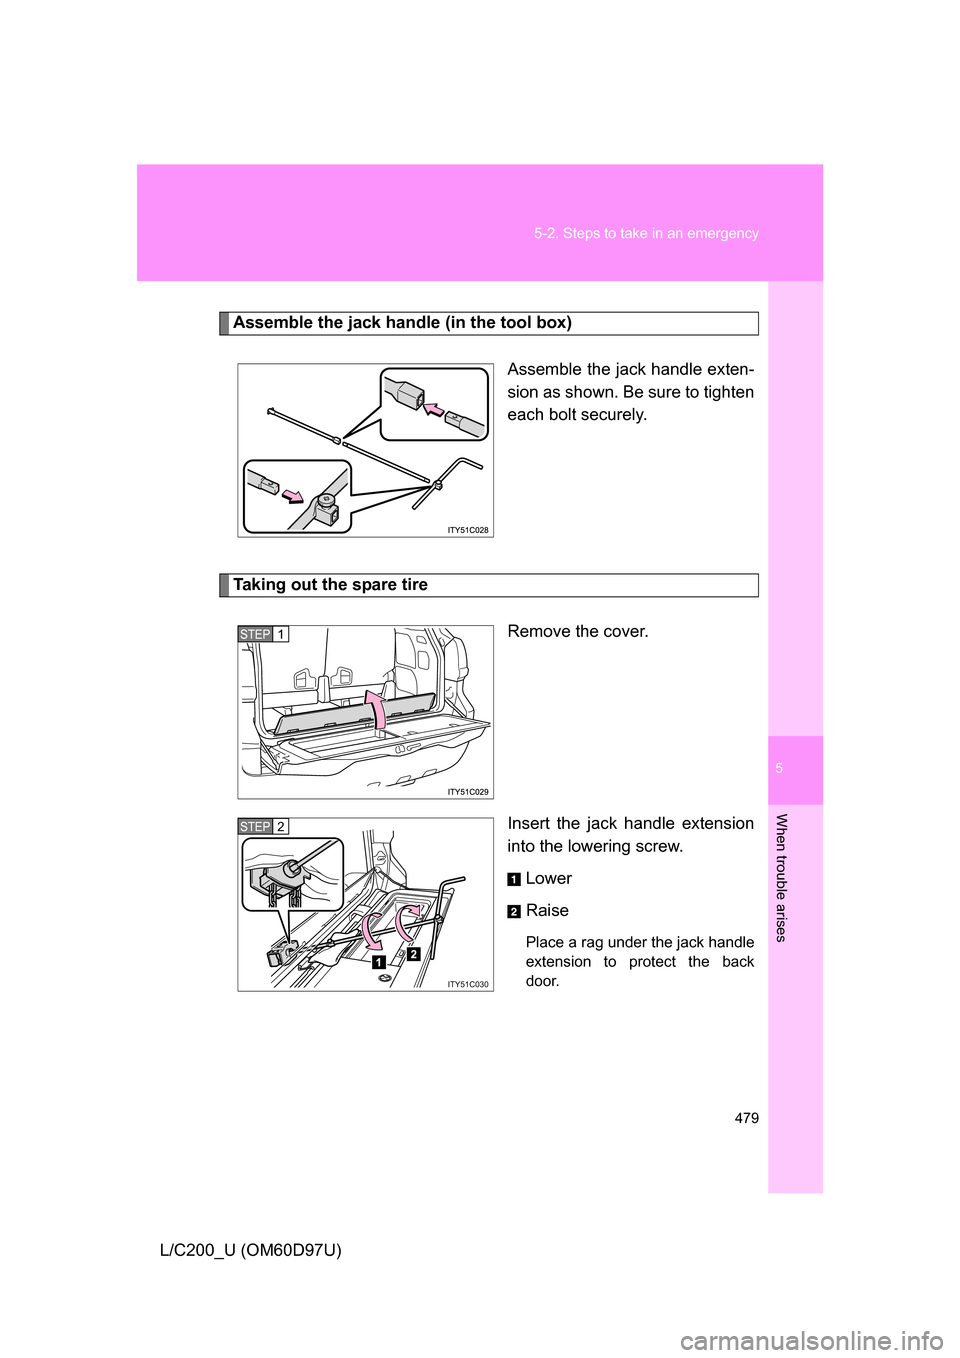
Assemble the jack handle (in the tool box)
Assemble the jack handle exten-
sion as shown. Be sure to tighten
each bolt securely.
Taking out the spare tire
Remove the cover.
Insert the jack handle extension
into the lowering screw.Lower
Raise
Place a rag under the jack handle
extension to protect the back
door.
STEP1
ITY51C030
STEP2
Page 480 of 556
480 5-2. Steps to take in an emergency
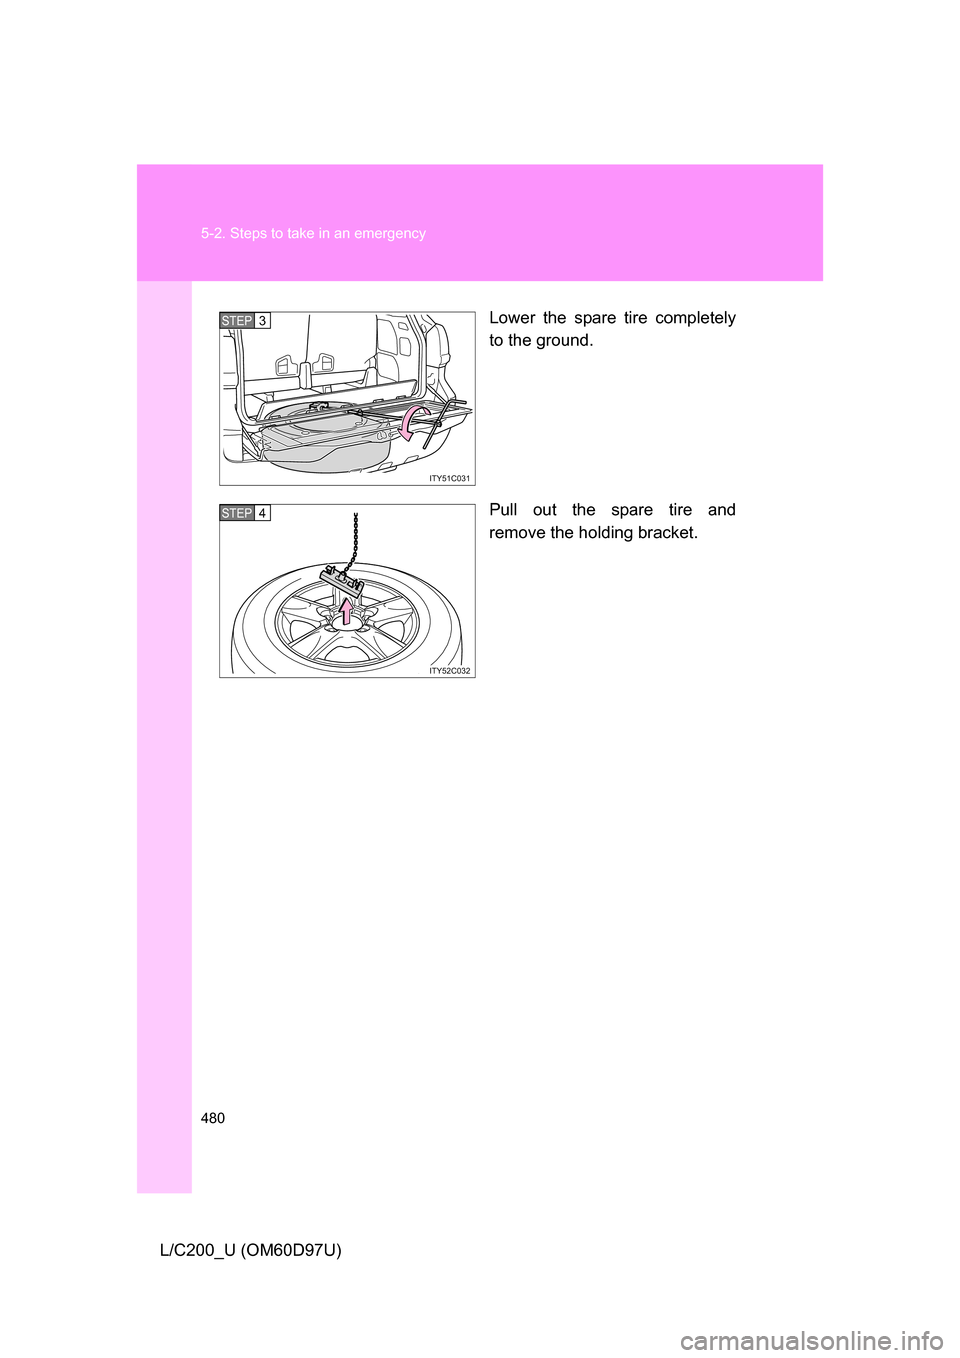
L/C200_U (OM60D97U)Lower the spare tire completely
to the ground.
Pull out the spare tire and
remove the holding bracket.
ITY51C031
STEP3
ITY52C032
STEP4
Page 484 of 556
484 5-2. Steps to take in an emergency
L/C200_U (OM60D97U)
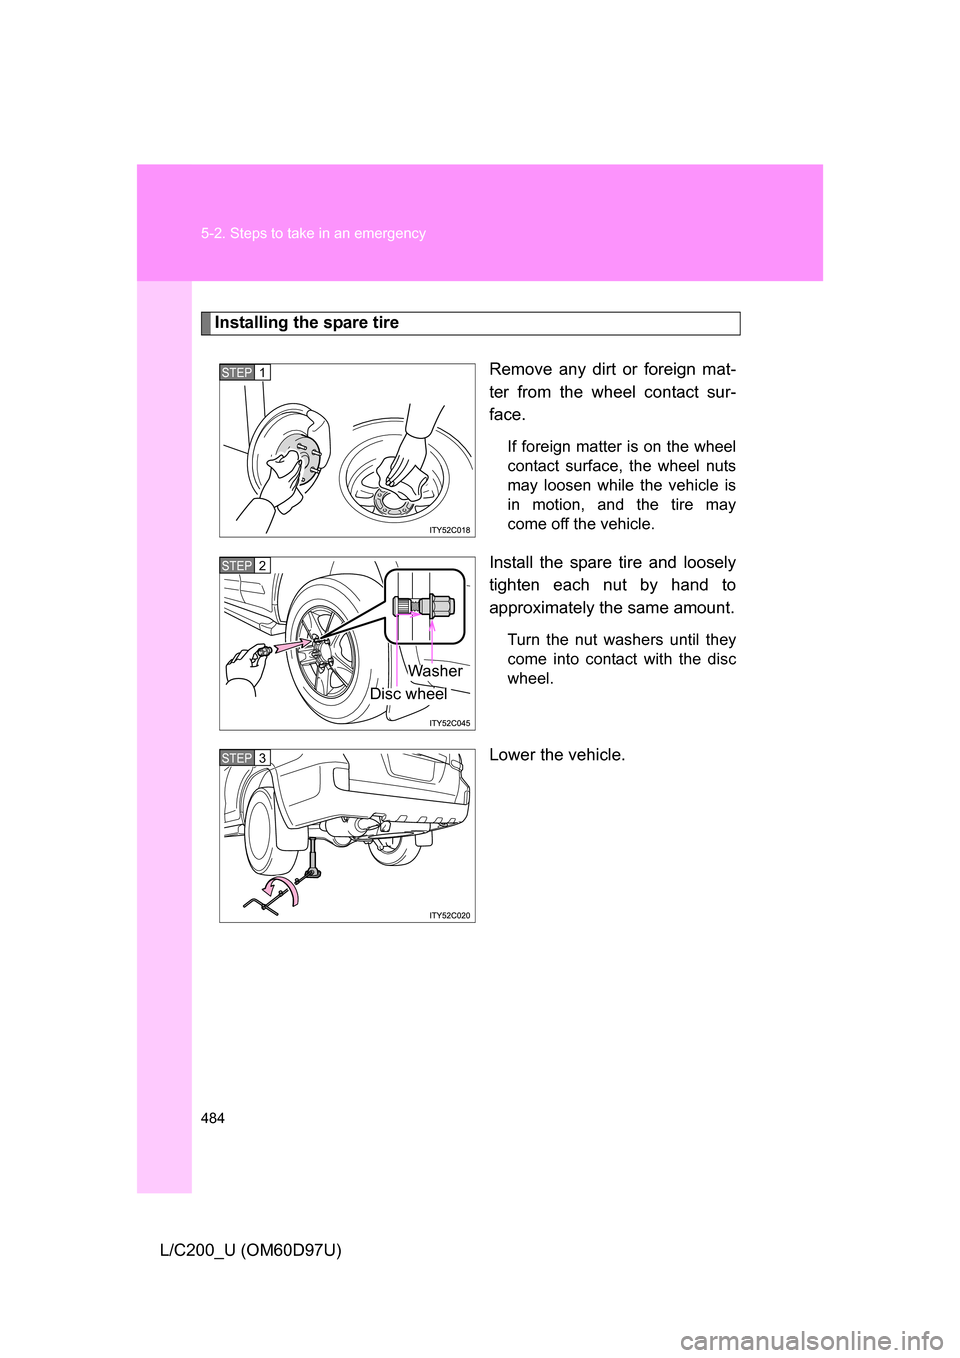
Installing the spare tireRemove any dirt or foreign mat-
ter from the wheel contact sur-
face.
If foreign matter is on the wheel
contact surface, the wheel nuts
may loosen while the vehicle is
in motion, and the tire may
come off the vehicle.
Install the spare tire and loosely
tighten each nut by hand to
approximately the same amount.
Turn the nut washers until they
come into contact with the disc
wheel.
Lower the vehicle.
STEP1
STEP2
Washer
Disc wheel
STEP3
Page 485 of 556
5
When trouble arises
485
5-2. Steps to take in an emergency
L/C200_U (OM60D97U)
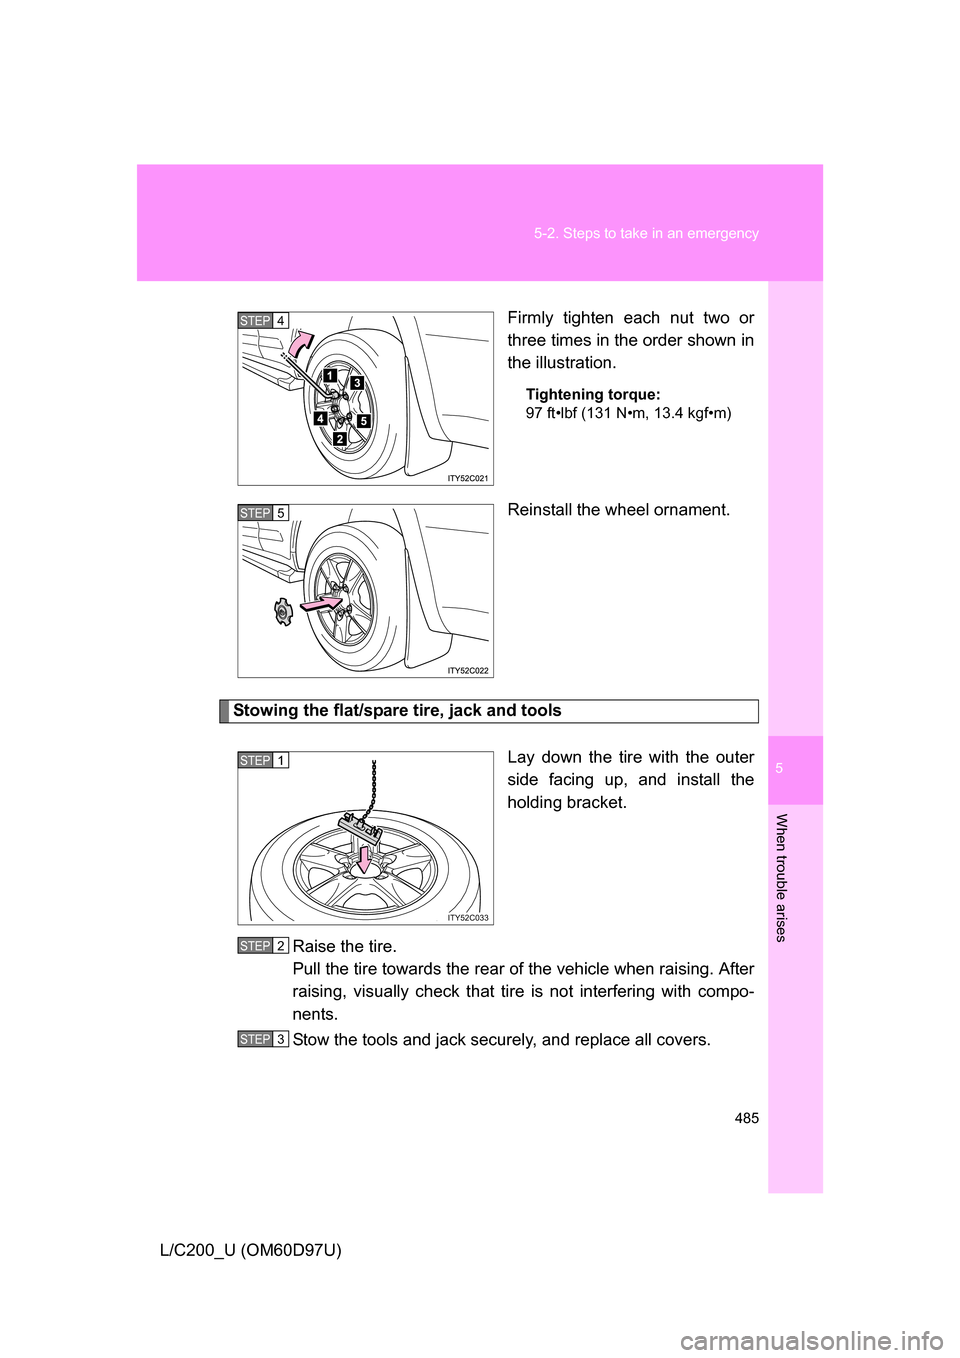
Firmly tighten each nut two or
three times in the order shown in
the illustration.
Tightening torque:
97 ft•lbf (131 N•m, 13.4 kgf•m)
Reinstall the wheel ornament.
Stowing the flat/spare tire, jack and tools
Lay down the tire with the outer
side facing up, and install the
holding bracket.
Raise the tire.
Pull the tire towards the rear of the vehicle when raising. After
raising, visually check that tire is not interfering with compo-
nents.
Stow the tools and jack securely, and replace all covers.
STEP4
STEP5
ITY52C033
STEP1
STEP2
STEP3