stop start TOYOTA LAND CRUISER 2010 J200 Quick Reference Guide
[x] Cancel search | Manufacturer: TOYOTA, Model Year: 2010, Model line: LAND CRUISER, Model: TOYOTA LAND CRUISER 2010 J200Pages: 30, PDF Size: 1.49 MB
Page 4 of 30
2
OVERVIEW
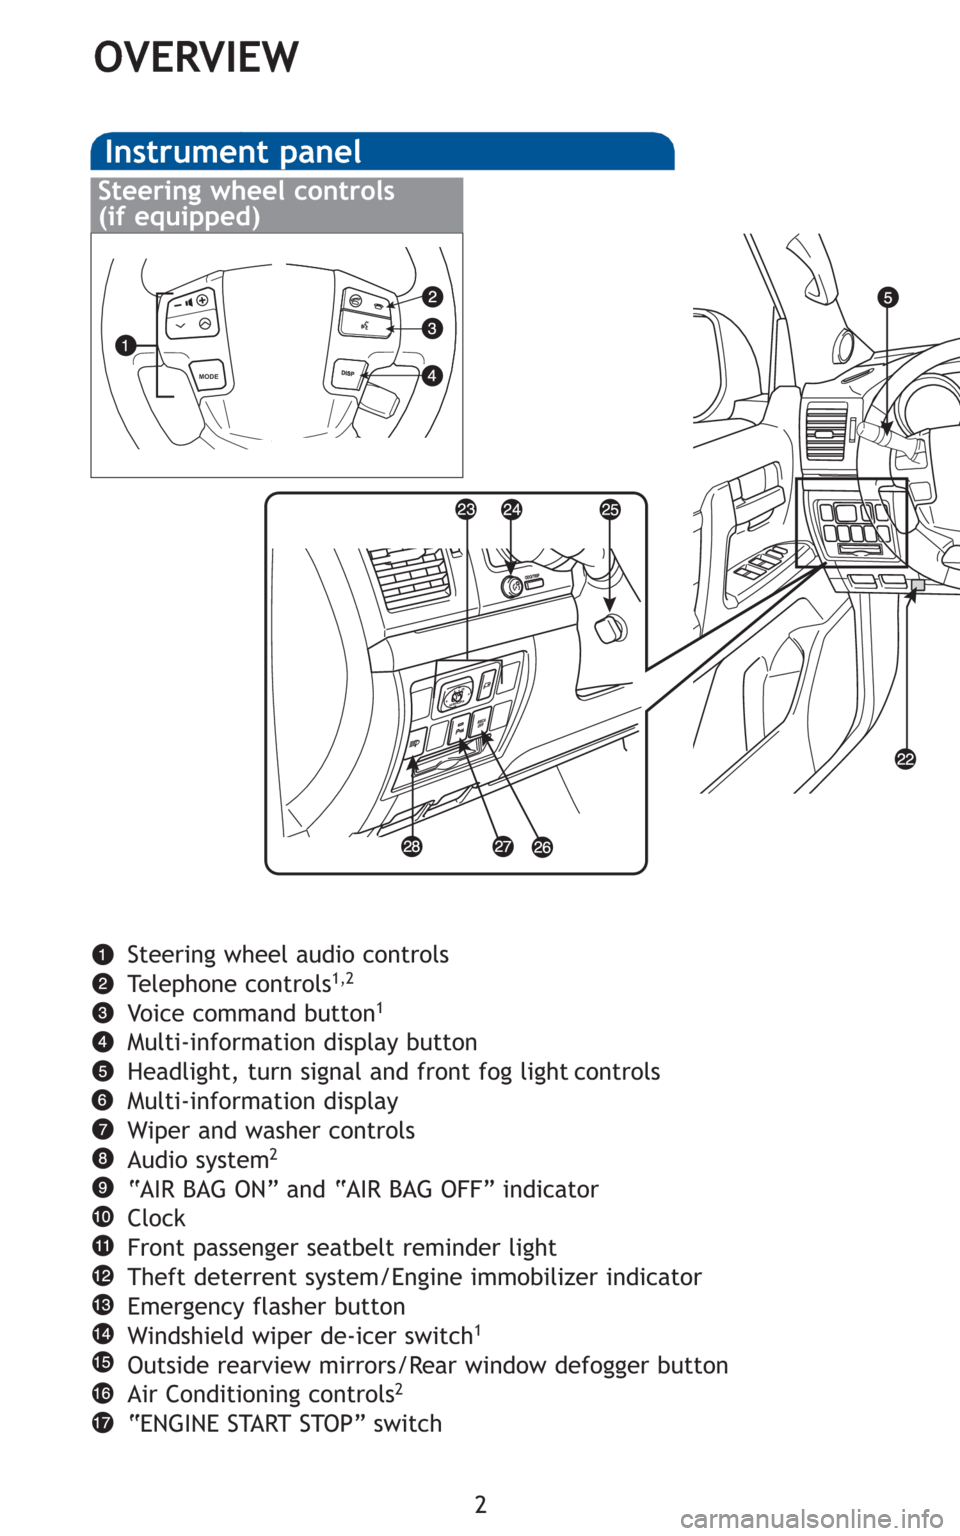
Instrument panel
Steering wheel audio controls
Telephone controls1,2
Voice command button1
Multi-information display button
Headlight, turn signal and front fog light controls
Multi-information display
Wiper and washer controls
Audio system
2
“AIR BAG ON” and “AIR BAG OFF” indicator
Clock
Front passenger seatbelt reminder light
Theft deterrent system/Engine immobilizer indicator
Emergency flasher button
Windshield wiper de-icer switch
1
Outside rearview mirrors/Rear window defogger button
Air Conditioning controls2
“ENGINE START STOP” switch
Steering wheel controls
(if equipped)
MODE
Page 9 of 30
7
OVERVIEW
FEATURES/OPERATIONS
SAFETY AND EMERGENCY FEATURES
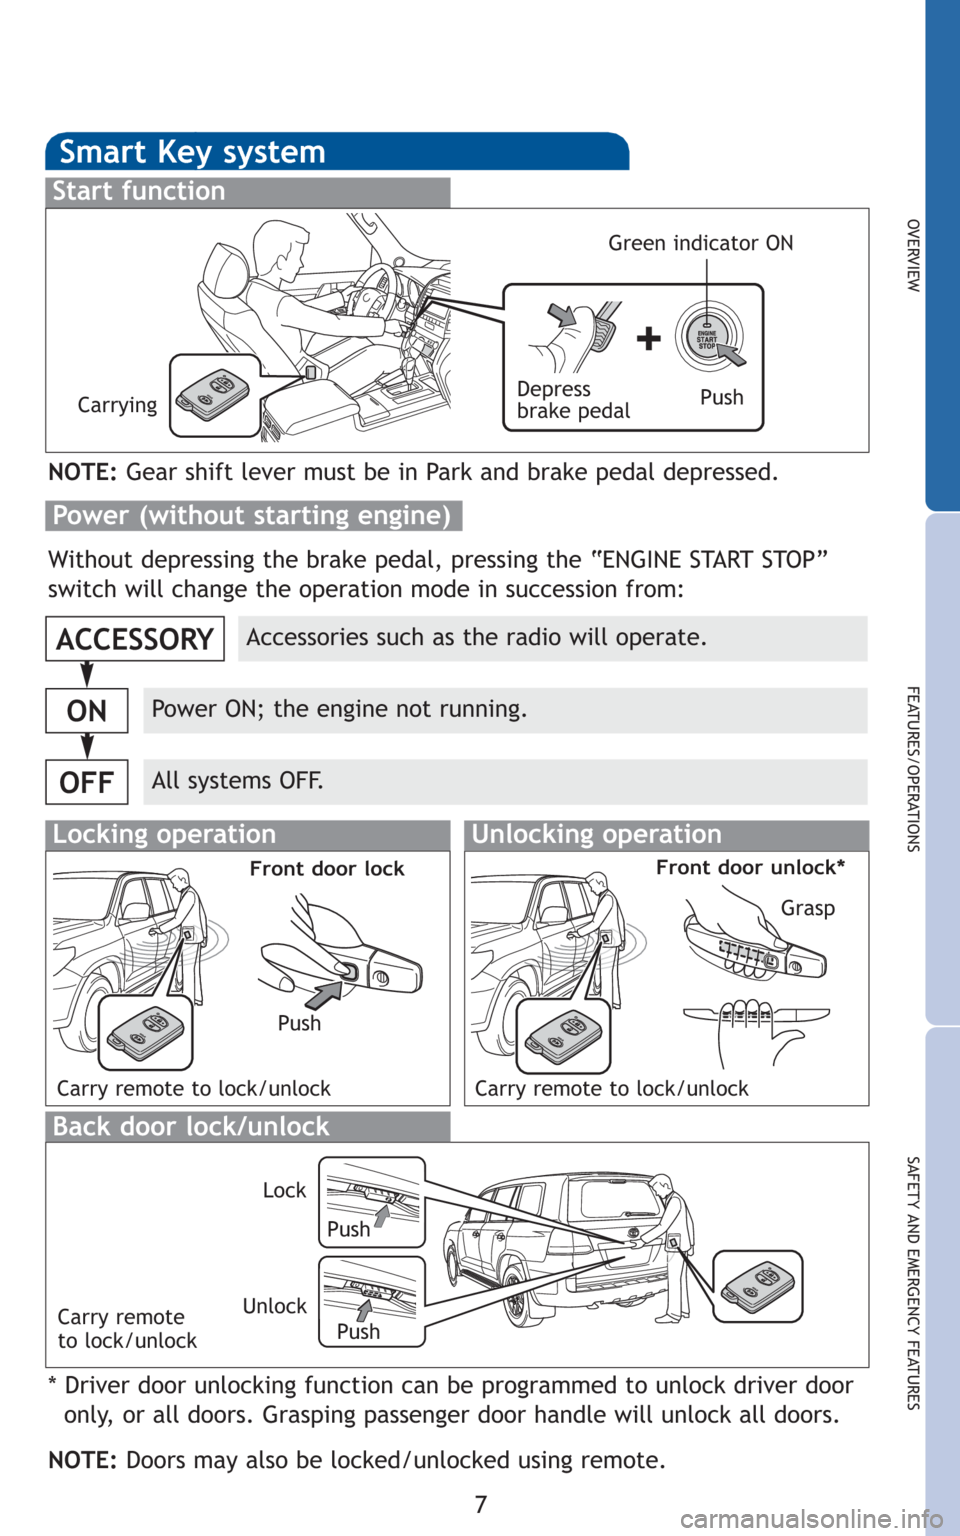
Smart Key system
Start function
Accessories such as the radio will operate.
Power ON; the engine not running.
All systems OFF.
ACCESSORY
ON
OFF
NOTE:Gear shift lever must be in Park and brake pedal depressed.
Push Depress
brake pedalCarrying
Green indicator ON
Without depressing the brake pedal, pressing the “ENGINE START STOP”
switch will change the operation mode in succession from:
Back door lock/unlock
* Driver door unlocking function can be programmed to unlock driver door
only, or all doors. Grasping passenger door handle will unlock all doors.
NOTE:Doors may also be locked/unlocked using remote.
Power (without starting engine)
Push Lock
Push Unlock
Locking operationUnlocking operation
Carry remote to lock/unlockCarry remote to lock/unlock
Push
Front door lockFront door unlock*
Grasp
Carry remote
to lock/unlock
Page 12 of 30
10
FEATURES/OPERATIONS
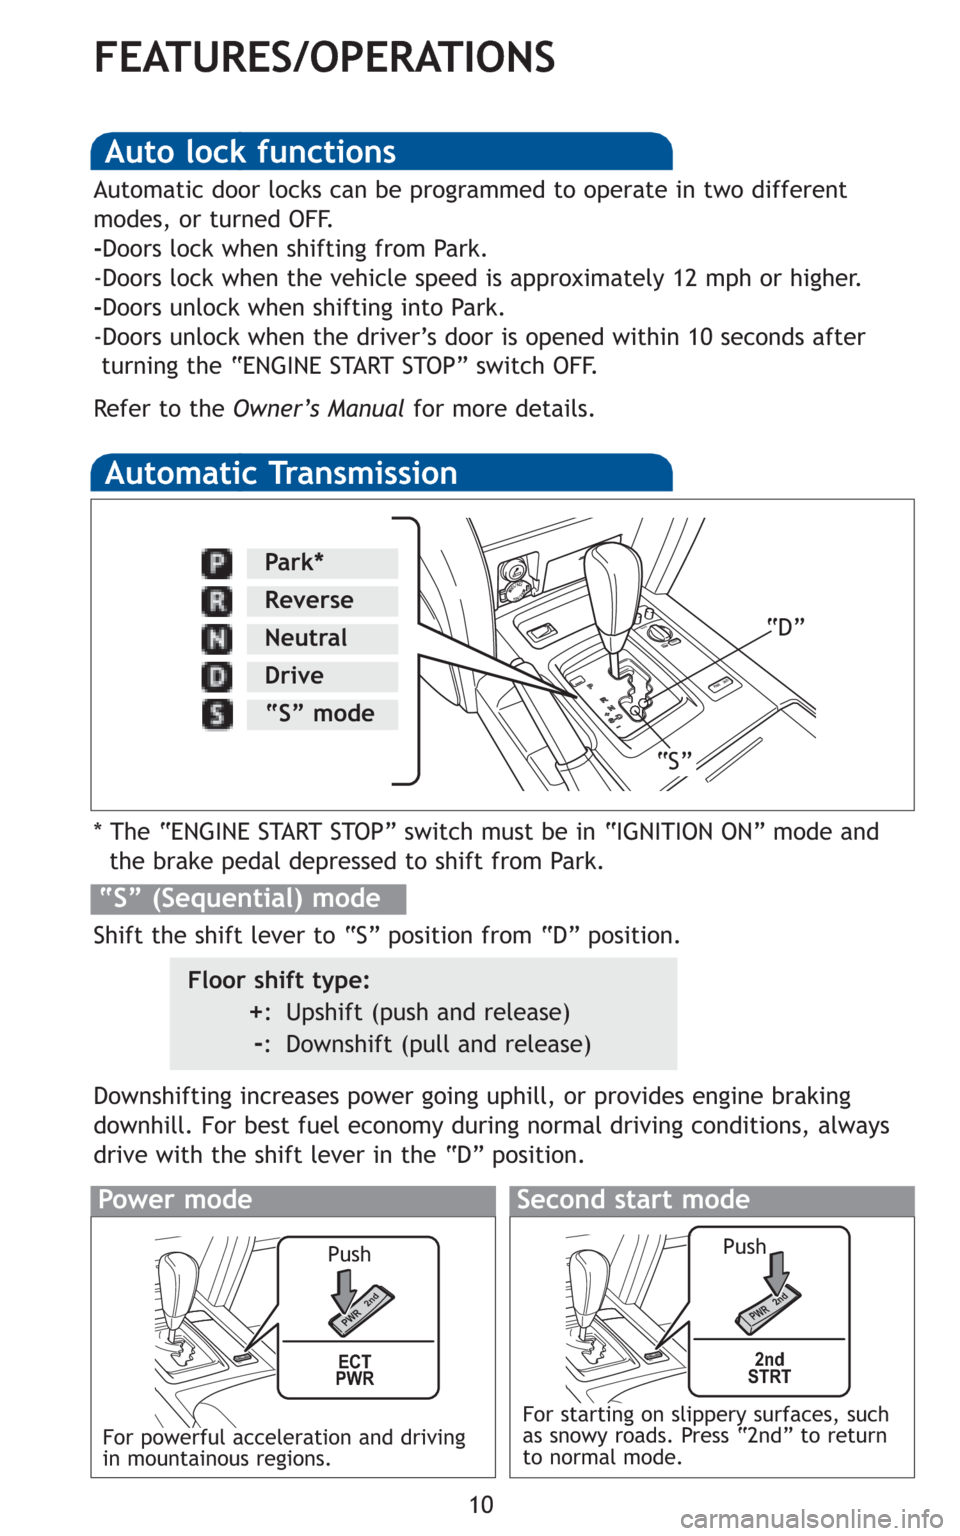
Automatic Transmission
* The “ENGINE START STOP” switch must be in “IGNITION ON” mode and
the brake pedal depressed to shift from Park.
Downshifting increases power going uphill, or provides engine braking
downhill. For best fuel economy during normal driving conditions, always
drive with the shift lever in the “D” position.
Floor shift type:
+: Upshift (push and release)
-: Downshift (pull and release)
“S” (Sequential) mode
Shift the shift lever to “S” position from “D” position.
PRRNN
+-S-D
W P
RD N
2
ON
/
OF
F S
P
EED
Park*
Reverse
Neutral
Drive
“S” mode
“S”“D”
Auto lock functions
Automatic door locks can be programmed to operate in two different
modes, or turned OFF.
-Doors lock when shifting from Park.
-Doors lock when the vehicle speed is approximately 12 mph or higher.
-Doors unlock when shifting into Park.
-Doors unlock when the driver’s door is opened within 10 seconds after
turning the “ENGINE START STOP” switch OFF.
Refer to the Owner’s Manualfor more details.
E
T
C P
W R d
n
2
R
W P d
n
2
ECT
PWR
R
W Pd
n 2
E
T
C
P W
R d
n
2 2nd
STRT
R
W
P d
n
2 R W
Pd n
2
Power modeSecond start mode
For powerful acceleration and driving
in mountainous regions.For starting on slippery surfaces, such
as snowy roads. Press “2nd” to return
to normal mode. PushPush
Page 25 of 30
23
OVERVIEW
FEATURES/OPERATIONS
SAFETY AND EMERGENCY FEATURES
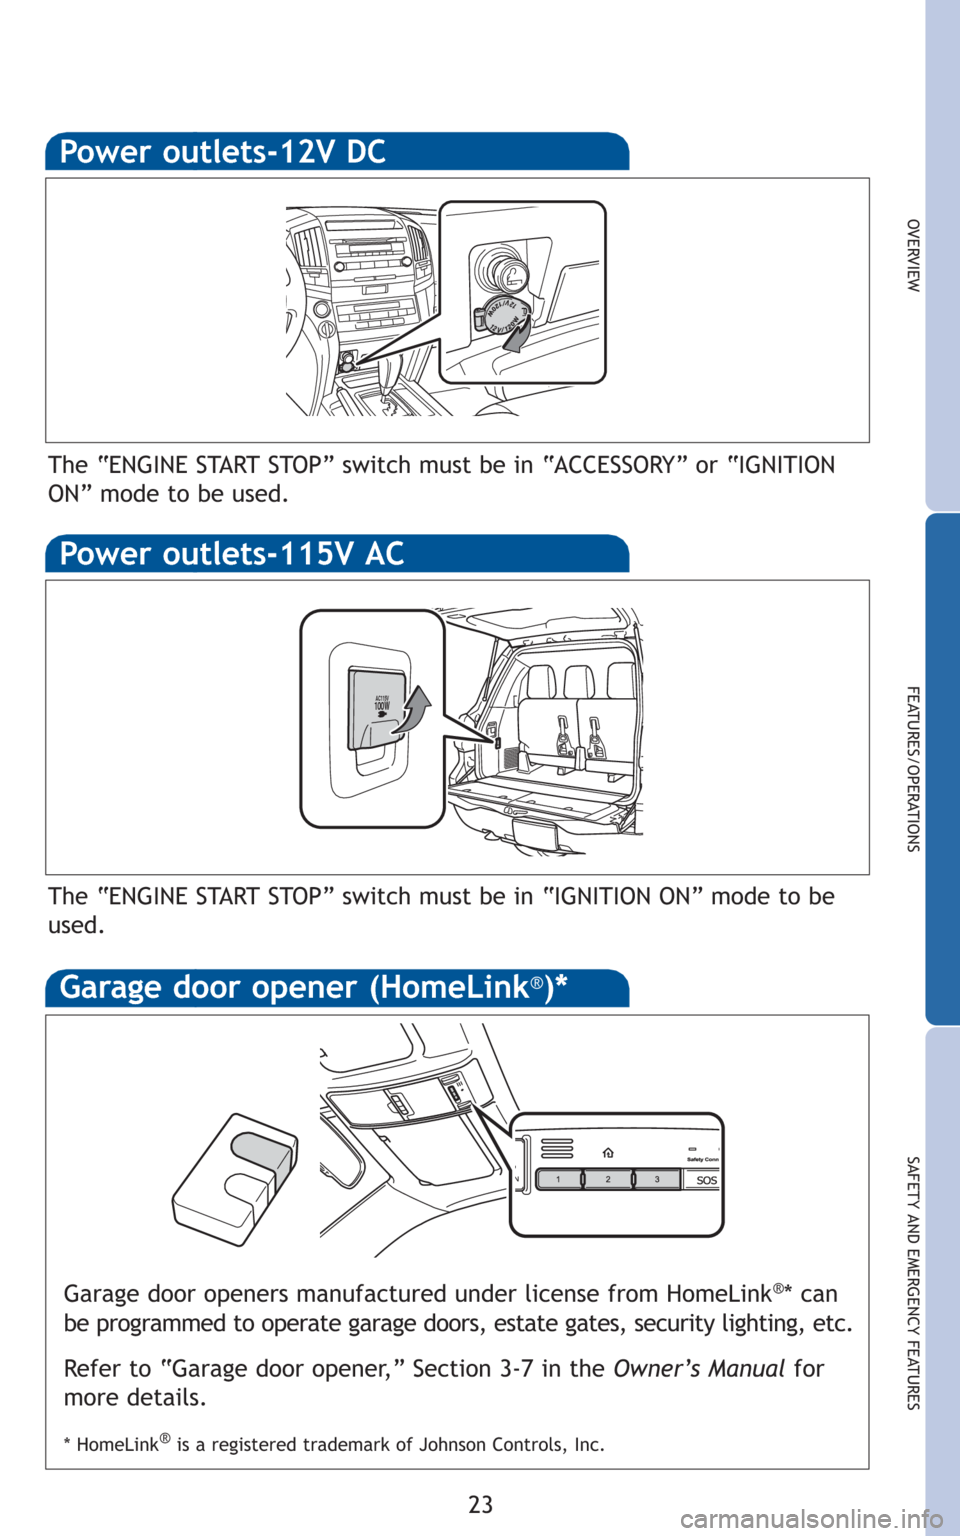
Power outlets-12V DC
The “ENGINE START STOP” switch must be in “ACCESSORY” or “IGNITION
ON” mode to be used.
Power outlets-115V AC
AC115V100W
The “ENGINE START STOP” switch must be in “IGNITION ON” mode to be
used.
Garage door openers manufactured under license from HomeLink®* can
be programmed to operate garage doors, estate gates, security lighting, etc.
Refer to “Garage door opener,” Section 3-7 in the Owner’s Manualfor
more details.
* HomeLink®is a registered trademark of Johnson Controls, Inc.
Garage door opener (HomeLink®)*
Page 30 of 30
28
SAFETY AND EMERGENCY FEATURES
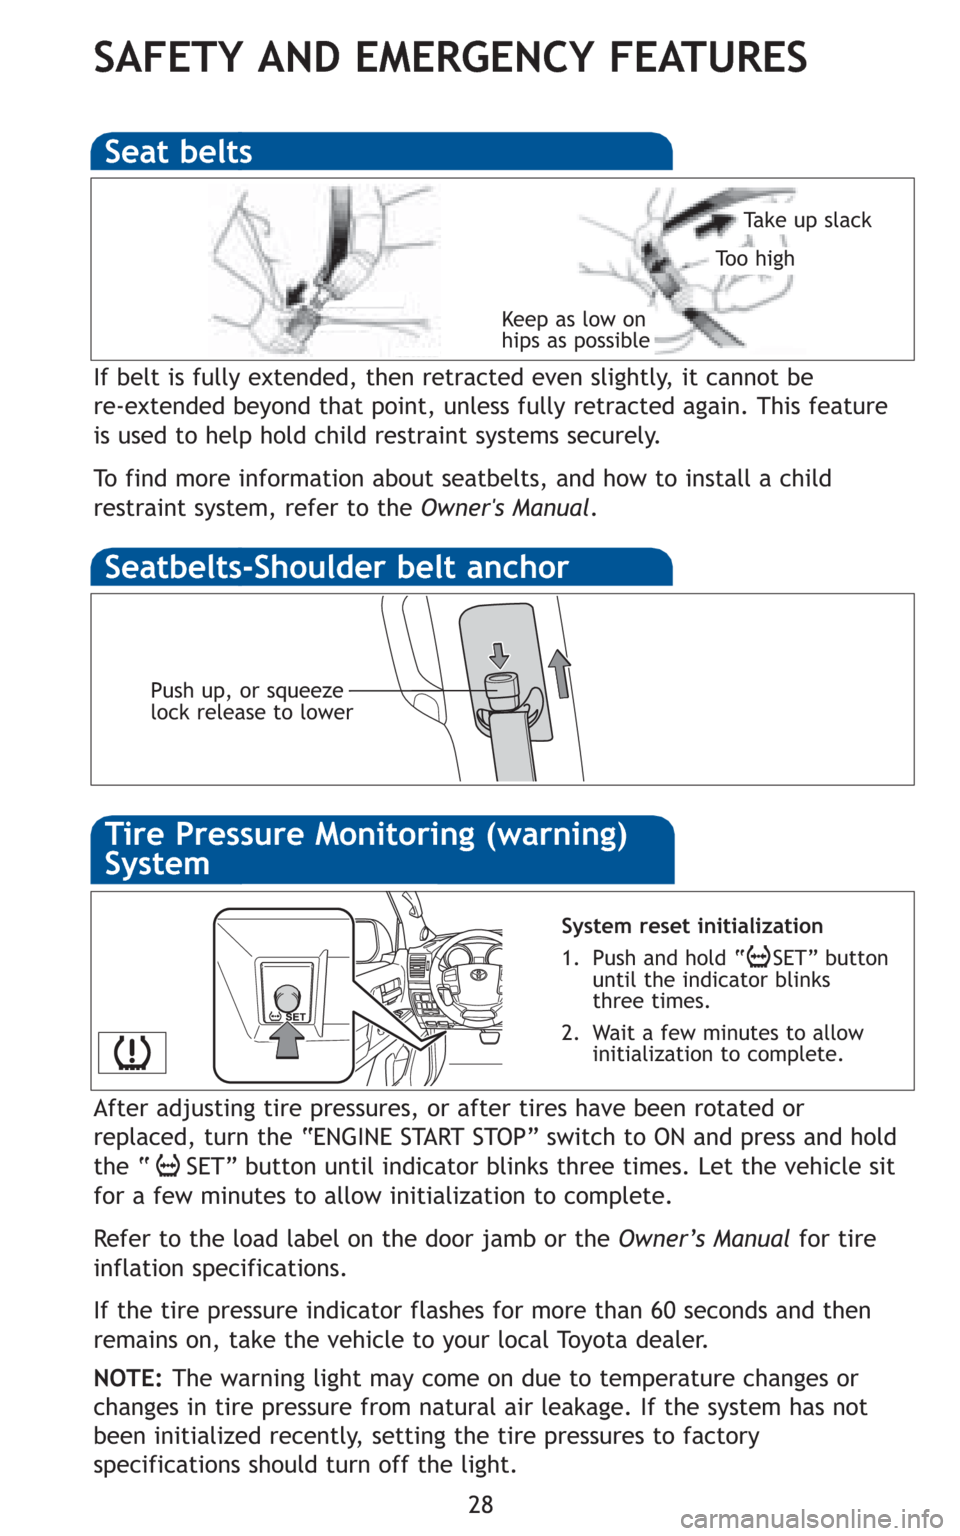
If belt is fully extended, then retracted even slightly, it cannot be
re-extended beyond that point, unless fully retracted again. This feature
is used to help hold child restraint systems securely.
To find more information about seatbelts, and how to install a child
restraint system, refer to the Owner's Manual.
Keep as low on
hips as possible
Take up slack
Too high
Seat belts
Push up, or squeeze
lock release to lower
System reset initialization
1. Push and hold “ SET” button
until the indicator blinks
three times.
2. Wait a few minutes to allow
initialization to complete.
Seatbelts-Shoulder belt anchor
After adjusting tire pressures, or after tires have been rotated or
replaced, turn the “ENGINE START STOP” switch to ON and press and hold
the “ SET” button until indicator blinks three times. Let the vehicle sit
for a few minutes to allow initialization to complete.
Refer to the load label on the door jamb or the Owner’s Manualfor tire
inflation specifications.
If the tire pressure indicator flashes for more than 60 seconds and then
remains on, take the vehicle to your local Toyota dealer.
NOTE:The warning light may come on due to temperature changes or
changes in tire pressure from natural air leakage. If the system has not
been initialized recently, setting the tire pressures to factory
specifications should turn off the light.
Tire Pressure Monitoring (warning)
System