USB TOYOTA LAND CRUISER 2015 J200 Navigation Manual
[x] Cancel search | Manufacturer: TOYOTA, Model Year: 2015, Model line: LAND CRUISER, Model: TOYOTA LAND CRUISER 2015 J200Pages: 427, PDF Size: 7.69 MB
Page 238 of 427
238
1. AUDIO/VIDEO SYSTEM OPERATION
L/C200_Navi_OM60M04U_(U)
14.05.28 15:38
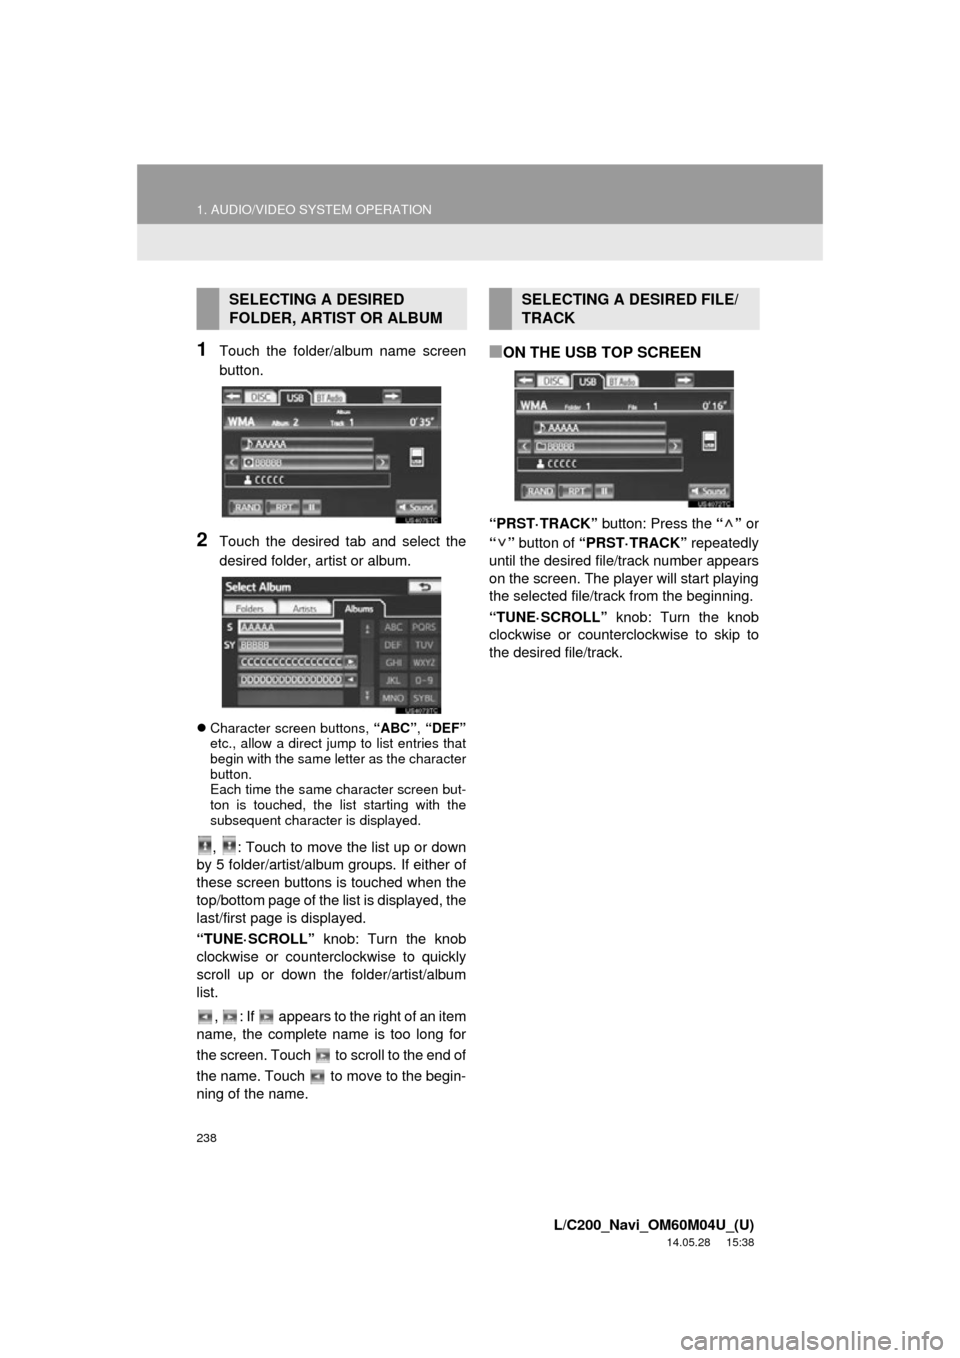
1Touch the folder/album name screen
button.
2Touch the desired tab and select the
desired folder, artist or album.
Character screen buttons, “ABC”, “DEF”
etc., allow a direct jump to list entries that
begin with the same letter as the character
button.
Each time the same character screen but-
ton is touched, the list starting with the
subsequent character is displayed.
, : Touch to move the list up or down
by 5 folder/artist/album groups. If either of
these screen buttons is touched when the
top/bottom page of the lis t is displayed, the
last/first page is displayed.
“TUNE·SCROLL” knob: Turn the knob
clockwise or counterclockwise to quickly
scroll up or down the folder/artist/album
list.
, : If appears to the right of an item
name, the complete name is too long for
the screen. Touch to scroll to the end of
the name. Touch to move to the begin-
ning of the name.
■ON THE USB TOP SCREEN
“PRST·TRACK” button: Press the “” or
“” button of “PRST·TRACK” repeatedly
until the desired file/track number appears
on the screen. The player will start playing
the selected file/track from the beginning.
“TUNE·SCROLL” knob: Turn the knob
clockwise or counterclockwise to skip to
the desired file/track.
SELECTING A DESIRED
FOLDER, ARTIST OR ALBUMSELECTING A DESIRED FILE/
TRACK
Page 269 of 427
269
1. AUDIO/VIDEO SYSTEM OPERATION
5
AUDIO/VIDEO SYSTEM
L/C200_Navi_OM60M04U_(U)
14.05.28 15:38
1Connect a USB memory. (See “CON-
NECTING A USB MEMORY” on page
236.)
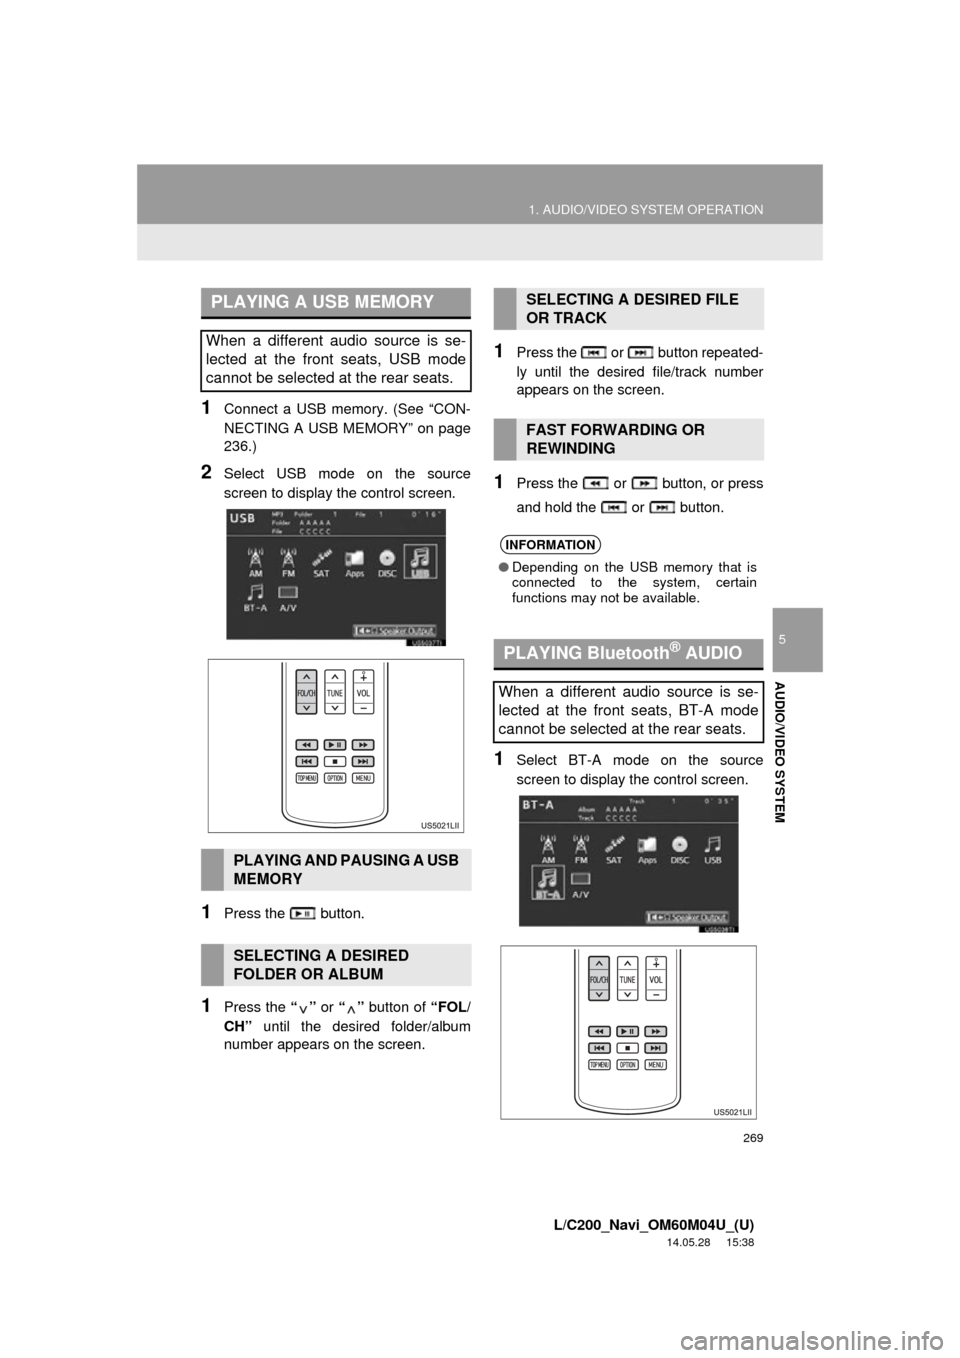
2Select USB mode on the source
screen to display the control screen.
1Press the button.
1Press the “” or “” button of “FOL/
CH” until the desired folder/album
number appears on the screen.
1Press the or button repeated-
ly until the desired file/track number
appears on the screen.
1Press the or button, or press
and hold the or button.
1Select BT-A mode on the source
screen to display the control screen.
PLAYING A USB MEMORY
When a different audio source is se-
lected at the front seats, USB mode
cannot be selected at the rear seats.
PLAYING AND PAUSING A USB
MEMORY
SELECTING A DESIRED
FOLDER OR ALBUM
SELECTING A DESIRED FILE
OR TRACK
FAST FORWARDING OR
REWINDING
INFORMATION
● Depending on the USB memory that is
connected to the system, certain
functions may not be available.
PLAYING Bluetooth® AUDIO
When a different audio source is se-
lected at the front seats, BT-A mode
cannot be selected at the rear seats.
Page 277 of 427
277
1. AUDIO/VIDEO SYSTEM OPERATION
5
AUDIO/VIDEO SYSTEM
L/C200_Navi_OM60M04U_(U)
14.05.28 15:38
If “Check DISC” appears on the display:
It indicates that the disc is dirty, damaged,
or it was inserted upside down. Clean the
disc or insert it correctly. If a disc which is
not playable is inserted, “Check DISC” will
also appear on the screen. For appropriate
discs for the player, see “AUDIO/VIDEO
SYSTEM OPERATING HINTS” on page
283.
If “Region code error” appears on the
display: It indicates that the DVD region
code is not set properly. Insert a disc with
a region code of “ALL” or “1”.
If “DISC error” appears on the display :
The following causes are possible.
• There is a problem inside the system. Eject the disc.
• The inside of the player unit may be too hot due to a very high ambient tempera-
ture. Eject the disc and allow the player
to cool down.
If “No music files found.” appears on
the display : It indicates that the iPod or
USB has no playable data.
If the malfunction is not rectified : Take
your vehicle to your Toyota dealer.
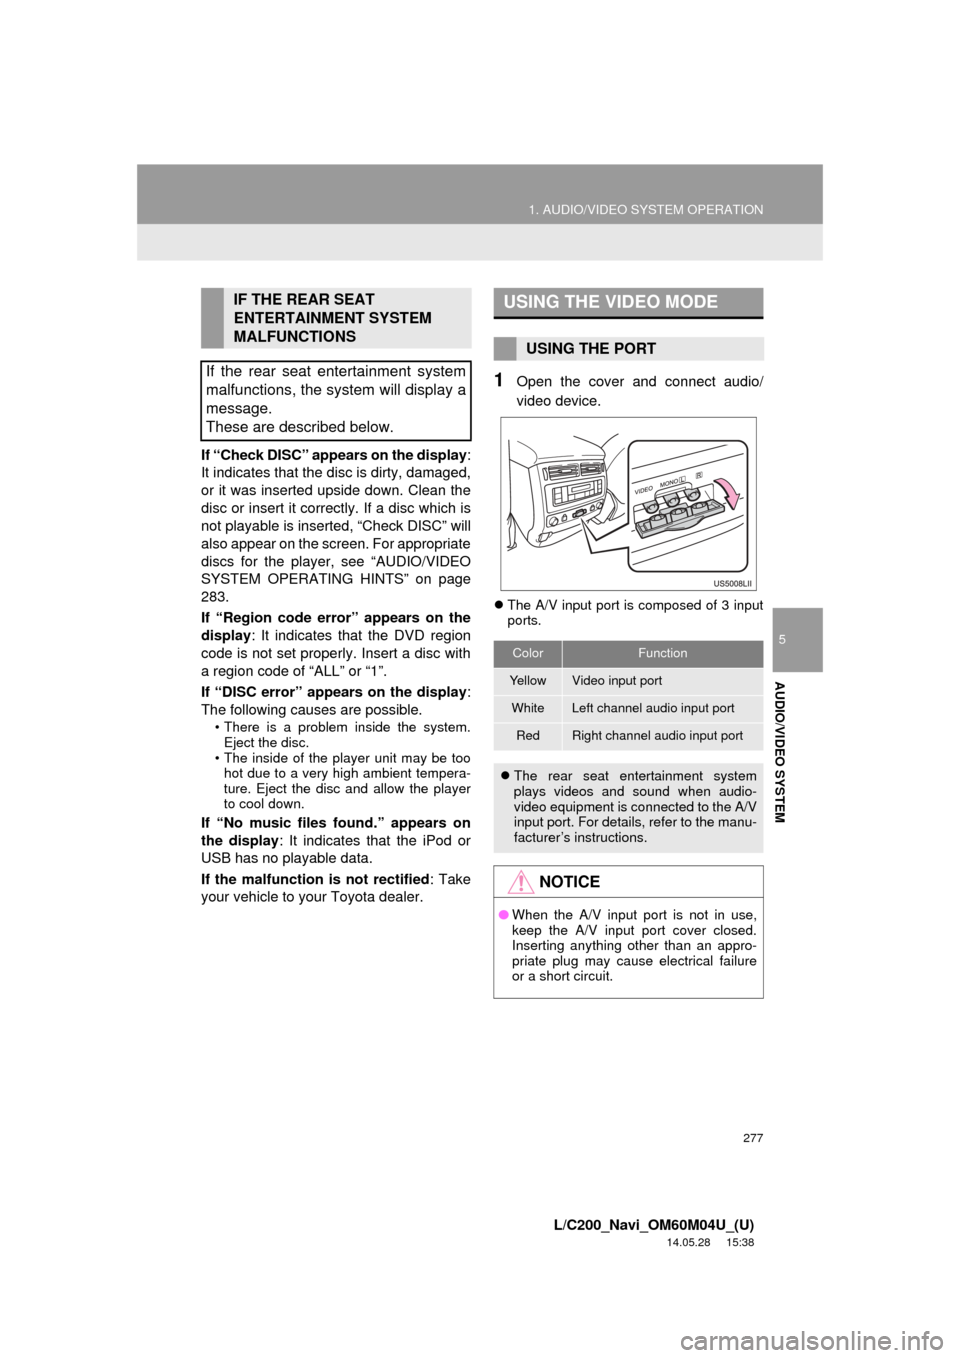
1Open the cover and connect audio/
video device.
The A/V input port is composed of 3 input
ports.
IF THE REAR SEAT
ENTERTAINMENT SYSTEM
MALFUNCTIONS
If the rear seat entertainment system
malfunctions, the system will display a
message.
These are described below.USING THE VIDEO MODE
USING THE PORT
ColorFunction
Ye l l o wVideo input port
WhiteLeft channel audio input port
RedRight channel audio input port
The rear seat entertainment system
plays videos and sound when audio-
video equipment is connected to the A/V
input port. For details, refer to the manu-
facturer’s instructions.
NOTICE
●When the A/V input port is not in use,
keep the A/V input port cover closed.
Inserting anything other than an appro-
priate plug may cause electrical failure
or a short circuit.
Page 282 of 427
282
1. AUDIO/VIDEO SYSTEM OPERATION
L/C200_Navi_OM60M04U_(U)
14.05.28 15:38
Bluetooth® audio player
Use the “” or “” switch to skip up or
down to a different track or album in either
direction.
To select a desired track : Quickly press
and release the “” or “” switch until the
desired track is selected. To return to the
beginning of the current track, press the
“” switch once quickly.
To select a desired album : Press and
hold the “” or “” switch until a beep is
heard to change to the next or the previous
album. Repeat it until the desired album is
selected.
USB memory/iPod
Use the “” or “” switch to skip up or
down to a different file or track in either
direction.
To select a desired file or track : Press
the “” or “” switch until the desired file
or track is selected. To return to the begin-
ning of the current file or track, press the
“” switch once quickly.
To select a desired folder or album
(USB memory only): Press and hold the
“” or “” switch until a beep is heard to
change to the next or the previous folder or
album. Repeat it until the desired folder or
album is selected.
“MODE” switch
Press the “MODE” switch to select an
audio mode. Each press changes the
mode sequentially if the desired mode is
ready to use.
To turn the audio/video system on, press
the “MODE” switch.
Press and hold the “MODE” switch to
mute/unmute or pause/resume the current
operation.
Page 285 of 427
285
1. AUDIO/VIDEO SYSTEM OPERATION
5
AUDIO/VIDEO SYSTEM
L/C200_Navi_OM60M04U_(U)
14.05.28 15:38
The following iPod, iPod nano, iPod
classic, iPod touch and iPhone devic-
es can be used with this system.
Made for
• iPod touch (4th generation)
• iPod touch (3rd generation)
• iPod touch (2nd generation)
• iPod touch (1st generation)
• iPod classic
• iPod with video
• iPod nano (6th generation)
• iPod nano (5th generation)
• iPod nano (4th generation)
• iPod nano (3rd generation)
• iPod nano (2nd generation)
• iPod nano (1st generation)
• iPhone 4
• iPhone 3GS
• iPhone 3G
• iPhone
Depending on differences between mod-
els or software versions etc., some models
might be incompatible with this system.
USB memory that can be used for MP3
and WMA playback:
• USB communication formats: USB 2.0
HS (480 Mbps) and FS (12 Mbps)
• File formats: FAT 16/32
• Correspondence class: Mass storage class
This DVD player is intended for use with
4.7 in. (12 cm) discs only.
Extremely high temperatures can keep the
DVD player from working. On hot days,
use the air conditioning system to cool the
inside of the vehicle before using the
player.
Bumpy roads or other vibrations may
make the DVD player skip.
If moisture gets into the DVD player, the
discs may not be able to be played.
Remove the discs from the player and
wait until it dries.
COMPATIBLE MODELS
USB MEMORY
CARING FOR YOUR DVD
PLAYER AND DISC
CAUTION
● DVD players use an invisible laser beam
which could cause hazardous radiation
exposure if directed outside the unit. Be
sure to operate the player correctly.
Page 288 of 427
288
1. AUDIO/VIDEO SYSTEM OPERATION
L/C200_Navi_OM60M04U_(U)
14.05.28 15:38
MP3 player: MP3 files are compatible with
the ID3 Tag Ver. 1.0, Ver. 1.1, Ver. 2.2 and
Ver. 2.3 formats. The unit cannot display
disc title, track title and artist name in
other formats.
USB memory: MP3 files are compatible
with the ID3 Tag Ver. 1.0, Ver. 1.1, Ver.
2.2, Ver. 2.3 and Ver. 2.4 formats. The unit
cannot display track title and artist name
in other formats.
WMA files can contain a WMA tag that is
used in the same way as an ID3 tag. WMA
tags carry information such as track title
and artist name.
The emphasis function is available only
when playing MP3/WMA files recorded at
32, 44.1 and 48 kHz.
MP3 files for MP3 player:
MPEG 1 LAYER 3 — 32, 44.1, 48 kHz
MPEG 2 LSF LAYER 3 — 16, 22.05, 24
kHz
MP3 files for USB memory:
MPEG 1 AUDIO LAYER 2, 3 — 32, 44.1,
48 kHz
MPEG 2 AUDIO LAYER 2, 3 — 16, 22.05,
24 kHz
WMA files for WMA player:
Ver. 7, 8, 9 (9.1/9.2) CBR — 32, 44.1, 48
kHz
WMA files for USB memory:
Ver. 7, 8, 9 (9.1/9.2) CBR — 32, 44.1, 48
kHz
The sound quality of MP3/WMA files gen-
erally improves with higher bit rates. In
order to achieve a reasonable level of
sound quality, discs recorded with a bit
rate of at least 128 kbps are recom-
mended.
MP3 files for MP3 player:
MPEG1 LAYER3 — 32 to 320 kbps
MPEG2 LSF LAYER3 — 8 to 160 kbps
MP3 files for USB memory:
MPEG 1 AUDIO LAYER 3 — 32 to 320
kbps
MPEG 2 AUDIO LAYER 3 — 8 to 160
kbps
WMA files for WMA player:
Ver. 7, 8 CBR — 48 to 192 kbps
Ver. 9 (9.1/9.2) CBR — 48 to 320 kbps
(VBR*)
WMA files for USB memory:
Ver. 9 (9.1/9.2) CBR — 48 to 320 kbps
(VBR*)
*: Variable Bit Rate
The MP3/WMA player does not play back
MP3/WMA files from discs recorded using
packet write data transfer (UDF format).
Discs should be record ed using “pre-mas-
tering” software rather than packet-write
software.
M3u playlists are not compatible with the
audio player.
MP3i (MP3 interactive) and MP3PRO for-
mats are not compatible with the audio
player.
The player is compatible with VBR (Vari-
able Bit Rate).
When playing back files recorded as VBR
(Variable Bit Rate) files, the play time will
not be correctly displayed if the fast for-
ward or reverse operations are used.
It is not possible to check folders that do
not include MP3/WMA files.
MP3/WMA files in folders up to 8 levels
deep can be played. However, the start of
playback may be delayed when using
discs containing numerous levels of fold-
ers. For this reason, we recommend creat-
ing discs with no more than 2 levels of
folders.
SAMPLING FREQUENCY
PLAYABLE BIT RATES
Page 289 of 427
289
1. AUDIO/VIDEO SYSTEM OPERATION
5
AUDIO/VIDEO SYSTEM
L/C200_Navi_OM60M04U_(U)
14.05.28 15:38
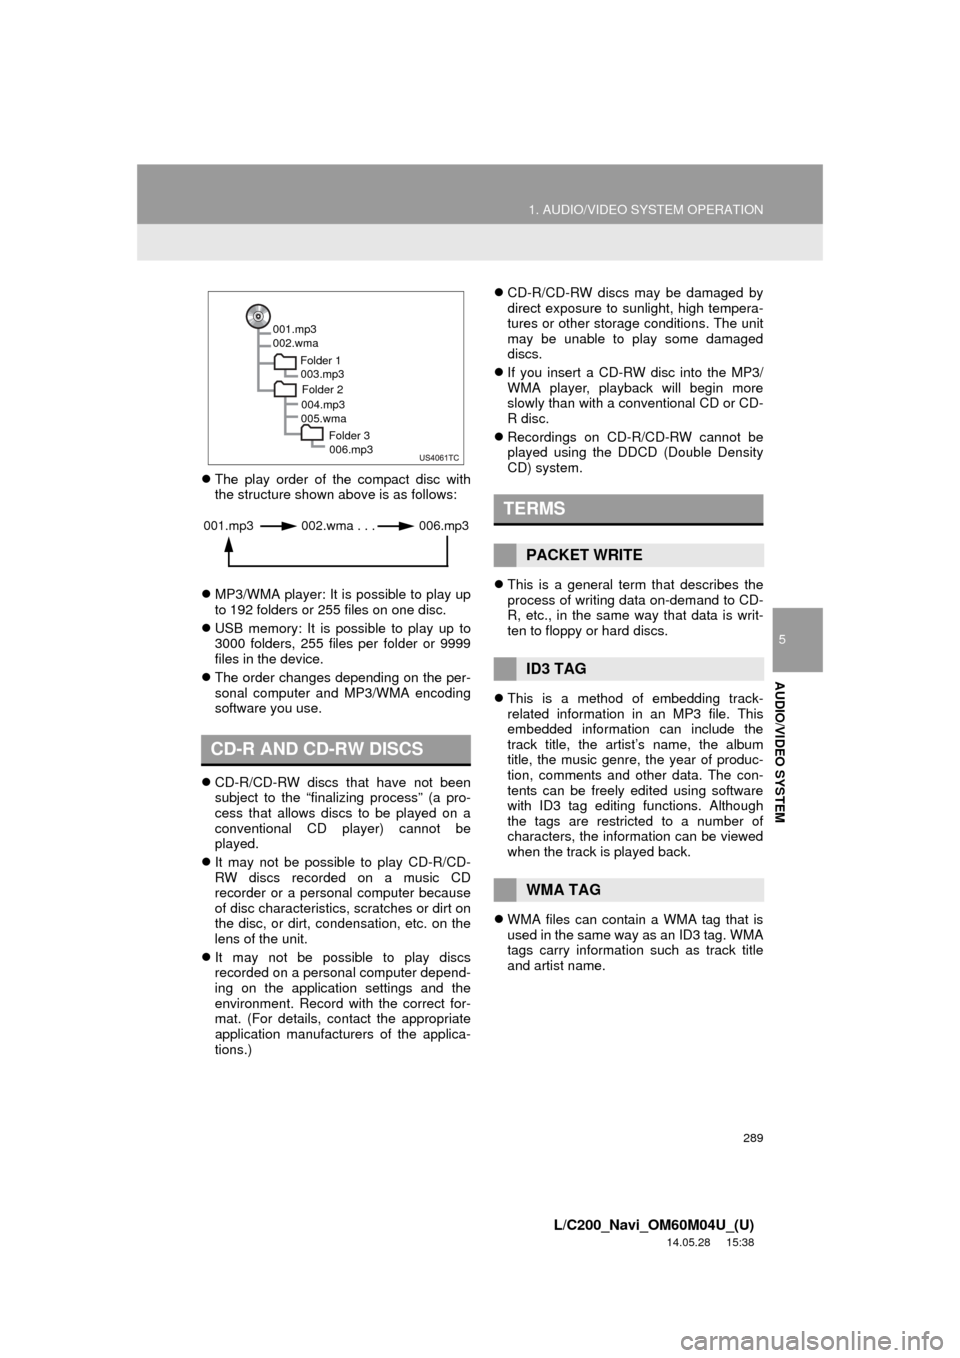
The play order of the compact disc with
the structure shown above is as follows:
MP3/WMA player: It is possible to play up
to 192 folders or 255 files on one disc.
USB memory: It is possible to play up to
3000 folders, 255 files per folder or 9999
files in the device.
The order changes depending on the per-
sonal computer and MP3/WMA encoding
software you use.
CD-R/CD-RW discs that have not been
subject to the “finalizing process” (a pro-
cess that allows discs to be played on a
conventional CD player) cannot be
played.
It may not be possible to play CD-R/CD-
RW discs recorded on a music CD
recorder or a personal computer because
of disc characteristics, scratches or dirt on
the disc, or dirt, condensation, etc. on the
lens of the unit.
It may not be possible to play discs
recorded on a personal computer depend-
ing on the application settings and the
environment. Record with the correct for-
mat. (For details, contact the appropriate
application manufacturers of the applica-
tions.)
CD-R/CD-RW discs may be damaged by
direct exposure to sunlight, high tempera-
tures or other storage conditions. The unit
may be unable to play some damaged
discs.
If you insert a CD-RW disc into the MP3/
WMA player, playback will begin more
slowly than with a conventional CD or CD-
R disc.
Recordings on CD-R/CD-RW cannot be
played using the DDCD (Double Density
CD) system.
This is a general term that describes the
process of writing data on-demand to CD-
R, etc., in the same way that data is writ-
ten to floppy or hard discs.
This is a method of embedding track-
related information in an MP3 file. This
embedded information can include the
track title, the artist’s name, the album
title, the music genre, the year of produc-
tion, comments and other data. The con-
tents can be freely edited using software
with ID3 tag editing functions. Although
the tags are restricted to a number of
characters, the information can be viewed
when the track is played back.
WMA files can contain a WMA tag that is
used in the same way as an ID3 tag. WMA
tags carry information such as track title
and artist name.
CD-R AND CD-RW DISCS
001.mp3
002.wma
Folder 1003.mp3
Folder 2
004.mp3
005.wma
Folder 3006.mp3
001.mp3 002.wma . . . 006.mp3TERMS
PACKET WRITE
ID3 TAG
WMA TAG
Page 295 of 427
295
2. SETUP
5
AUDIO/VIDEO SYSTEM
L/C200_Navi_OM60M04U_(U)
14.05.01 20:55
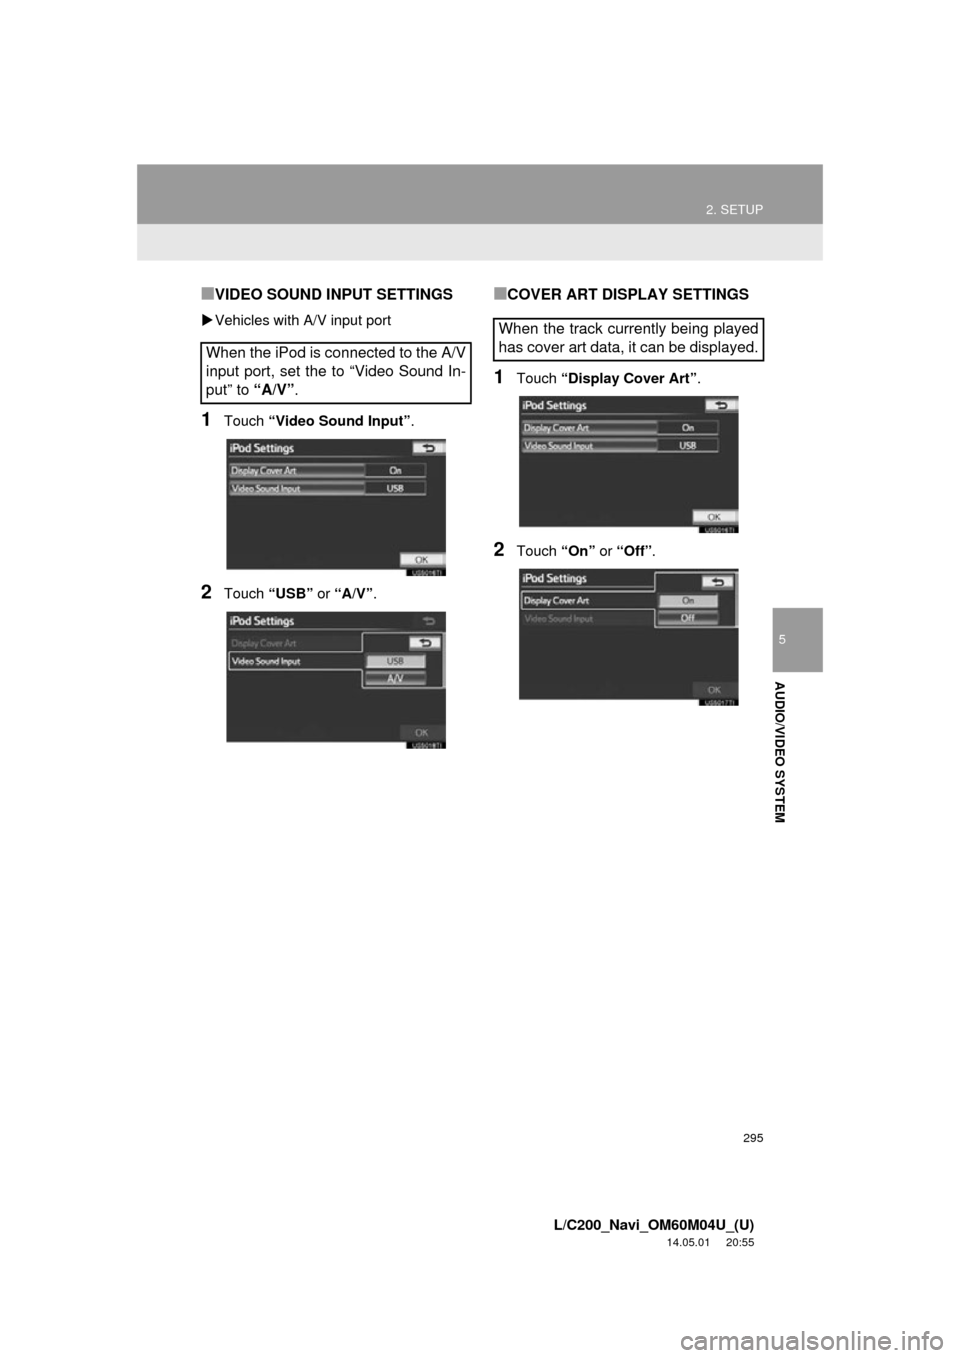
■VIDEO SOUND INPUT SETTINGS
Vehicles with A/V input port
1Touch “Video Sound Input” .
2Touch “USB” or “A/V” .
■COVER ART DISPLAY SETTINGS
1Touch “Display Cover Art” .
2Touch “On” or “Off” .
When the iPod is connected to the A/V
input port, set the to “Video Sound In-
put” to “A/V”.
When the track currently being played
has cover art data, it can be displayed.
Page 315 of 427
315
1. VOICE COMMAND SYSTEM OPERATION
7
VOICE COMMAND SYSTEM
L/C200_Navi_OM60M04U_(U)
14.05.28 15:38
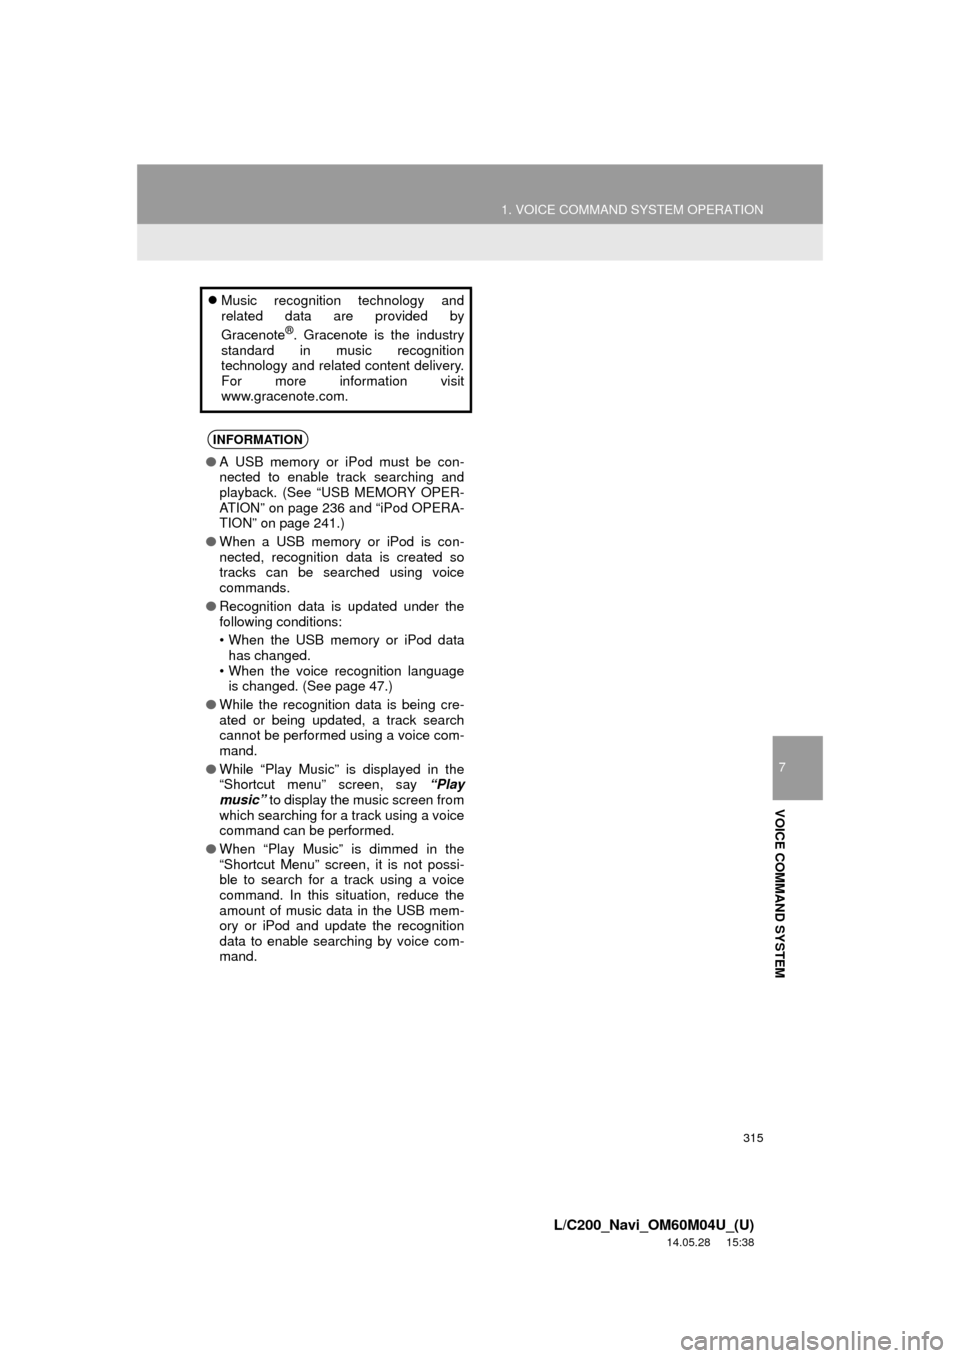
Music recognition technology and
related data are provided by
Gracenote
®. Gracenote is the industry
standard in music recognition
technology and related content delivery.
For more information visit
www.gracenote.com.
INFORMATION
● A USB memory or iPod must be con-
nected to enable track searching and
playback. (See “USB MEMORY OPER-
ATION” on page 236 and “iPod OPERA-
TION” on page 241.)
● When a USB memory or iPod is con-
nected, recognition data is created so
tracks can be searched using voice
commands.
● Recognition data is updated under the
following conditions:
• When the USB memory or iPod data
has changed.
• When the voice recognition language is changed. (See page 47.)
● While the recognition data is being cre-
ated or being updated, a track search
cannot be performed using a voice com-
mand.
● While “Play Music” is displayed in the
“Shortcut menu” screen, say “Play
music” to display the music screen from
which searching for a track using a voice
command can be performed.
● When “Play Music” is dimmed in the
“Shortcut Menu” screen, it is not possi-
ble to search for a track using a voice
command. In this situation, reduce the
amount of music data in the USB mem-
ory or iPod and update the recognition
data to enable searching by voice com-
mand.
Page 321 of 427
321
1. VOICE COMMAND SYSTEM OPERATION
7
VOICE COMMAND SYSTEM
L/C200_Navi_OM60M04U_(U)
14.05.28 15:38
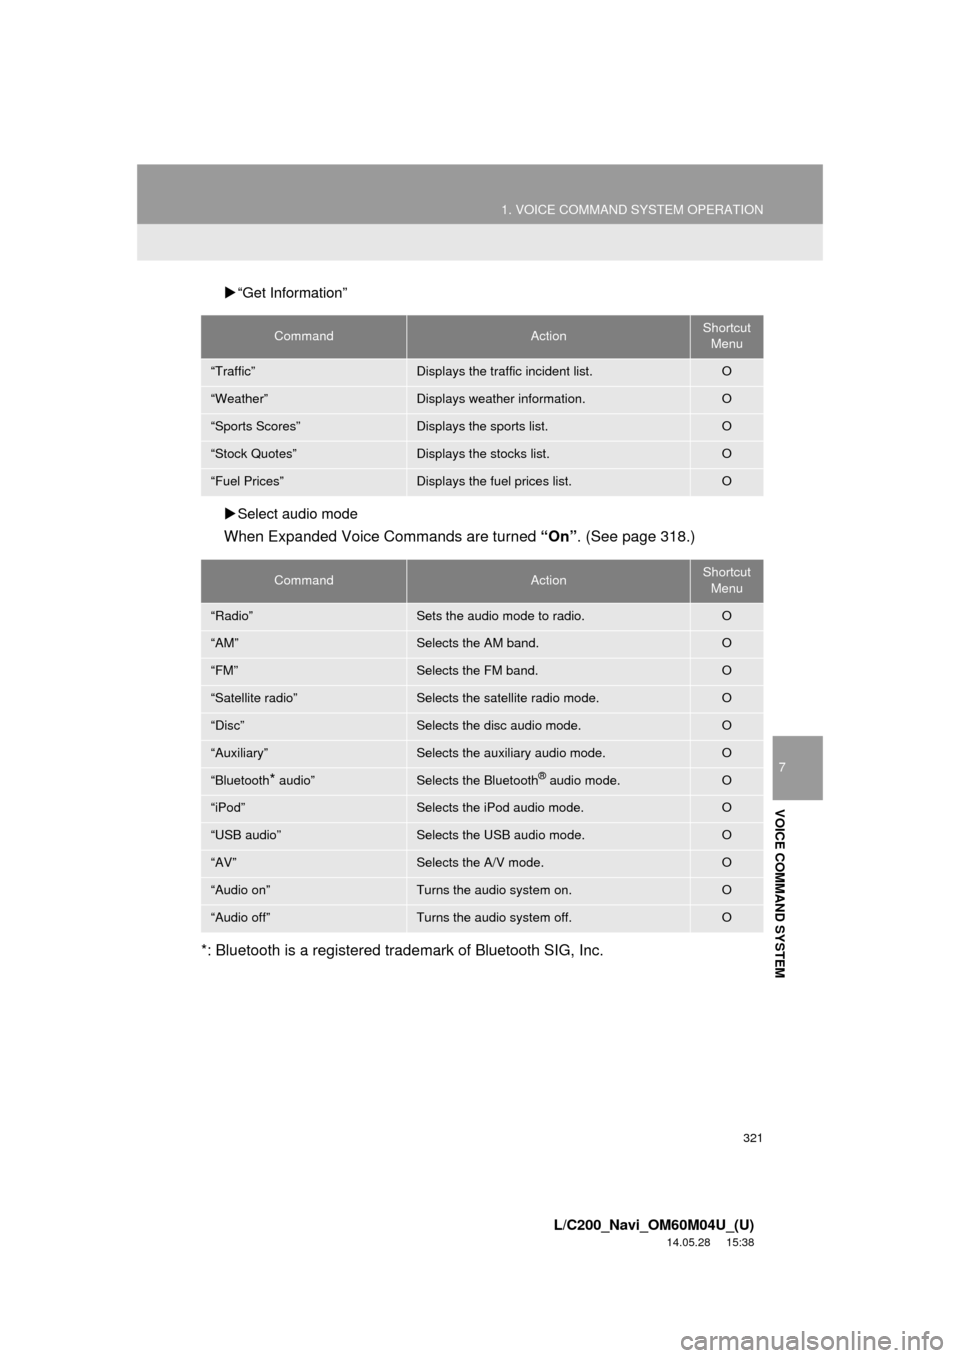
“Get Information”
Select audio mode
When Expanded Voice Commands are turned “On”. (See page 318.)
*: Bluetooth is a registered trademark of Bluetooth SIG, Inc.
CommandActionShortcut Menu
“Traffic”Displays the traffic incident list.O
“Weather”Displays weather information.O
“Sports Scores”Displays the sports list.O
“Stock Quotes”Displays the stocks list.O
“Fuel Prices”Displays the fuel prices list.O
CommandActionShortcut Menu
“Radio”Sets the audio mode to radio.O
“AM”Selects the AM band.O
“FM”Selects the FM band.O
“Satellite radio”Selects the satellite radio mode.O
“Disc”Selects the disc audio mode.O
“Auxiliary”Selects the auxiliary audio mode.O
“Bluetooth* audio”Selects the Bluetooth® audio mode.O
“iPod”Selects the iPod audio mode.O
“USB audio”Selects the USB audio mode.O
“AV”Selects the A/V mode. O
“Audio on”Turns the audio system on.O
“Audio off”Turns the audio system off.O