buttons TOYOTA LAND CRUISER 2016 J200 Navigation Manual
[x] Cancel search | Manufacturer: TOYOTA, Model Year: 2016, Model line: LAND CRUISER, Model: TOYOTA LAND CRUISER 2016 J200Pages: 275, PDF Size: 28.47 MB
Page 111 of 275
LC200_Navi_OM60N15U_(U)
15.07.08 16:49
Audio/visual system
4
1111. Basic operation
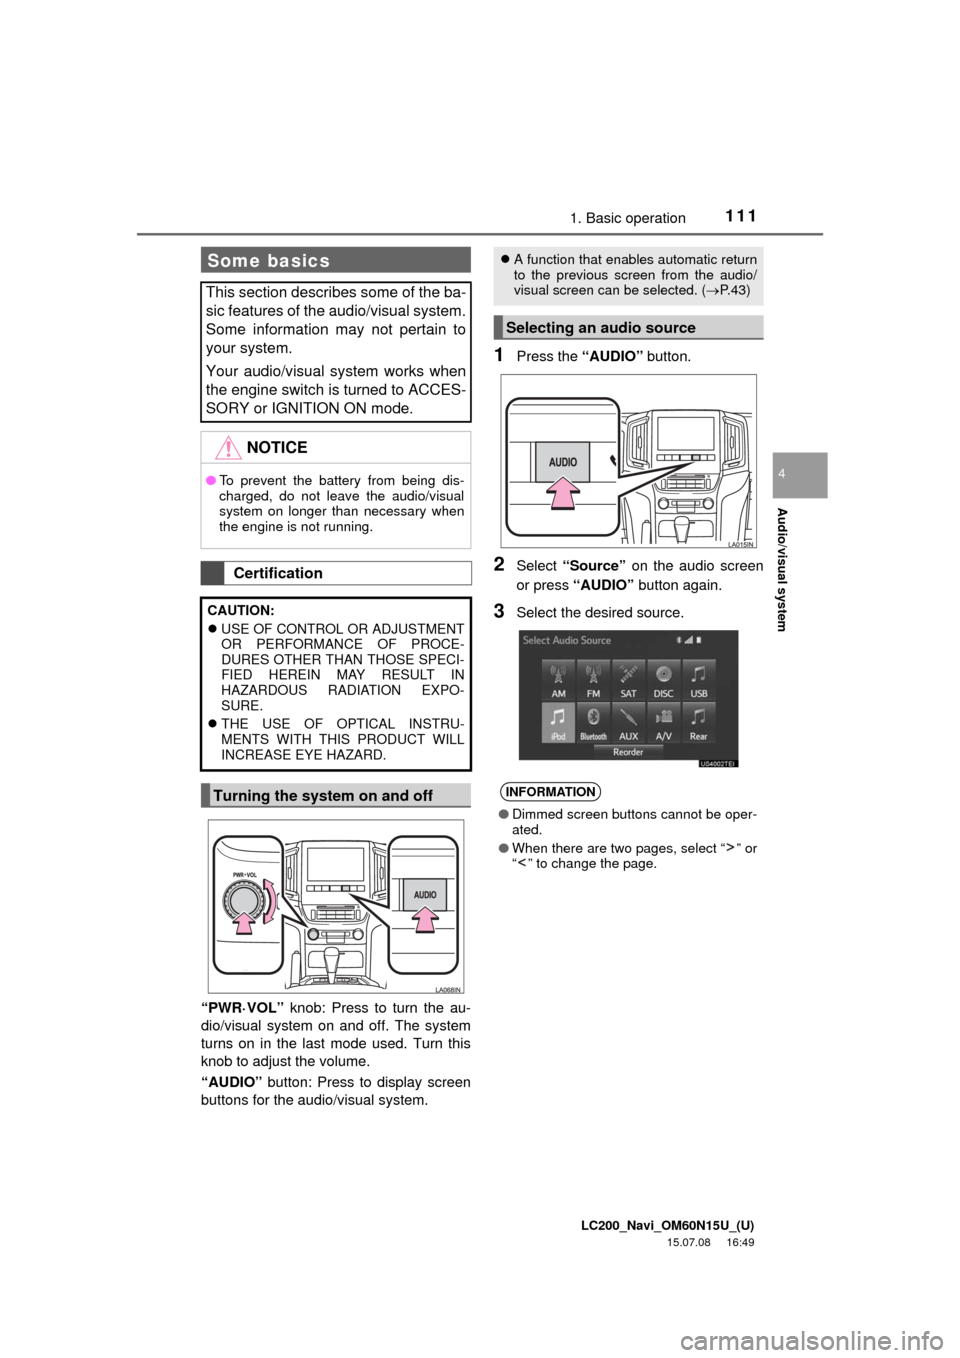
“PWR·VOL” knob: Press to turn the au-
dio/visual system on and off. The system
turns on in the last mode used. Turn this
knob to adjust the volume.
“AUDIO” button: Press to display screen
buttons for the audio/visual system.
1Press the “AUDIO” button.
2Select “Source” on the audio screen
or press “AUDIO” button again.
3Select the desired source.
Some basics
This section describes some of the ba-
sic features of the audio/visual system.
Some information may not pertain to
your system.
Your audio/visual system works when
the engine switch is turned to ACCES-
SORY or IGNITION ON mode.
NOTICE
●To prevent the battery from being dis-
charged, do not leave the audio/visual
system on longer than necessary when
the engine is not running.
Certification
CAUTION:
USE OF CONTROL OR ADJUSTMENT
OR PERFORMANCE OF PROCE-
DURES OTHER THAN THOSE SPECI-
FIED HEREIN MAY RESULT IN
HAZARDOUS RADIATION EXPO-
SURE.
THE USE OF OPTICAL INSTRU-
MENTS WITH THIS PRODUCT WILL
INCREASE EYE HAZARD.
Turning the system on and off
A function that enables automatic return
to the previous screen from the audio/
visual screen can be selected. (P. 4 3 )
Selecting an audio source
INFORMATION
●Dimmed screen buttons cannot be oper-
ated.
●When there are two pages, select “ ” or
“ ” to change the page.
Page 117 of 275
LC200_Navi_OM60N15U_(U)
15.07.15 16:32
Audio/visual system
4
1172. Radio operation
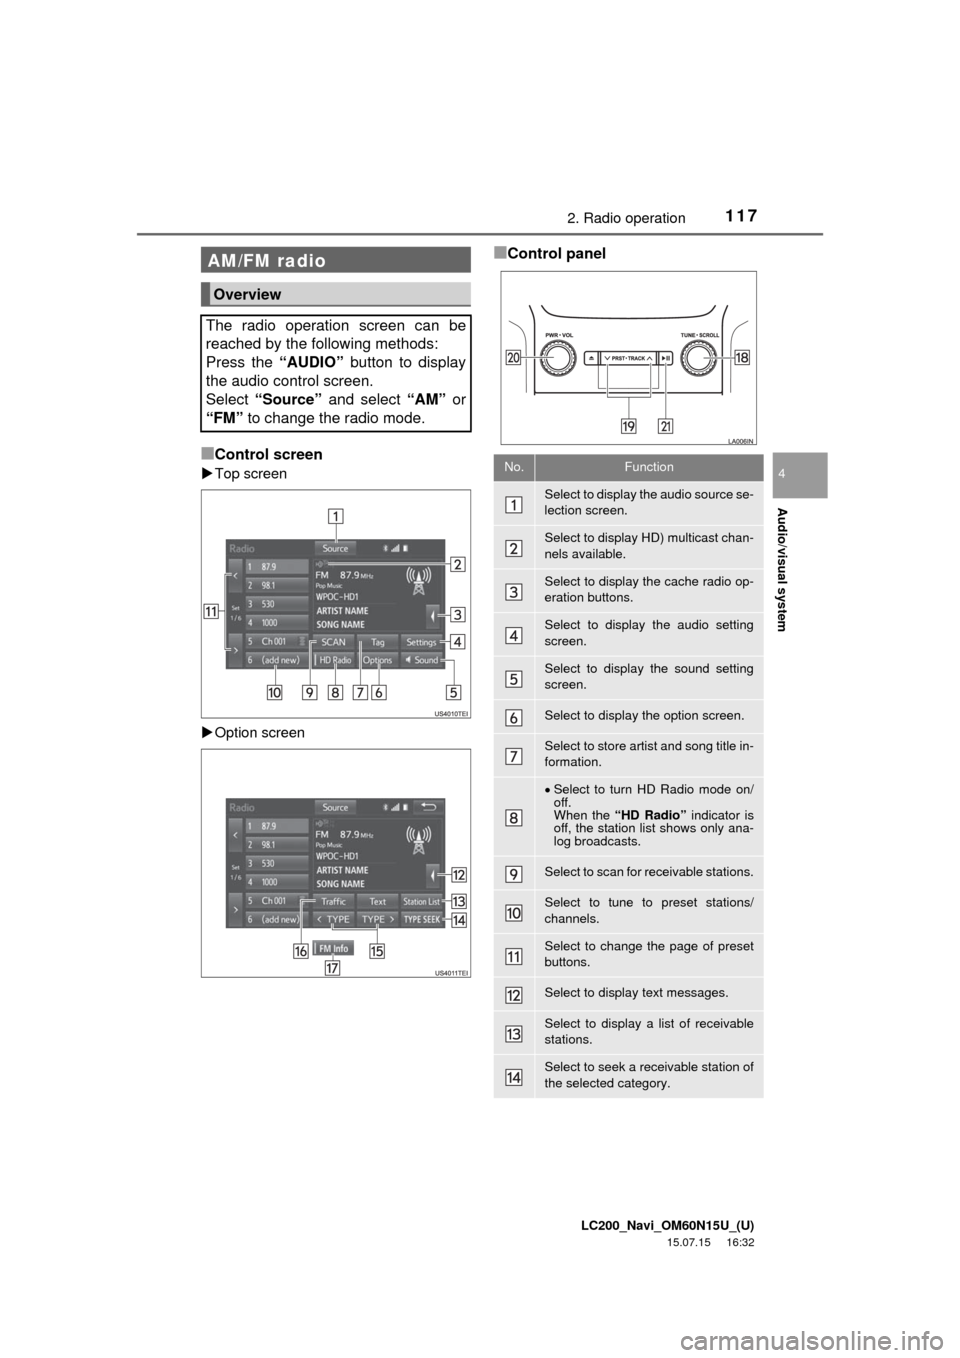
■Control screen
Top screen
Option screen
■Control panelAM/FM radio
Overview
The radio operation screen can be
reached by the following methods:
Press the “AUDIO” button to display
the audio control screen.
Select “Source” and select “AM” or
“FM” to change the radio mode.
No.Function
Select to display the audio source se-
lection screen.
Select to display HD) multicast chan-
nels available.
Select to display the cache radio op-
eration buttons.
Select to display the audio setting
screen.
Select to display the sound setting
screen.
Select to display the option screen.
Select to store artist and song title in-
formation.
Select to turn HD Radio mode on/
off.
When the “HD Radio” indicator is
off, the station list shows only ana-
log broadcasts.
Select to scan for receivable stations.
Select to tune to preset stations/
channels.
Select to change the page of preset
buttons.
Select to display text messages.
Select to display a list of receivable
stations.
Select to seek a receivable station of
the selected category.
Page 120 of 275
LC200_Navi_OM60N15U_(U)
15.07.15 16:32
1202. Radio operation
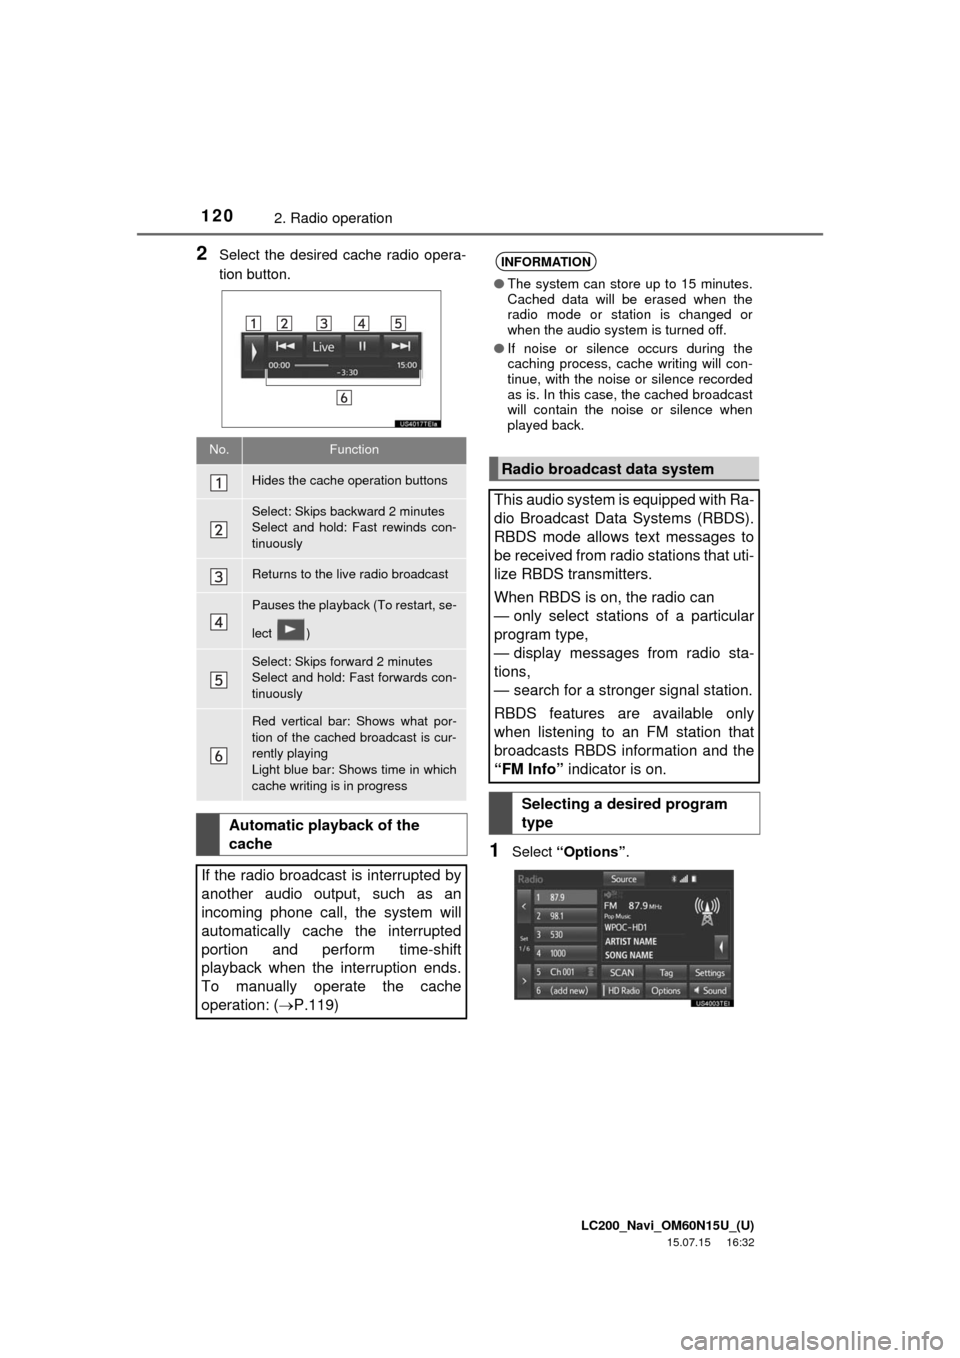
2Select the desired cache radio opera-
tion button.
1Select “Options”.
No.Function
Hides the cache operation buttons
Select: Skips backward 2 minutes
Select and hold: Fast rewinds con-
tinuously
Returns to the live radio broadcast
Pauses the playback (To restart, se-
lect )
Select: Skips forward 2 minutes
Select and hold: Fast forwards con-
tinuously
Red vertical bar: Shows what por-
tion of the cached broadcast is cur-
rently playing
Light blue bar: Shows time in which
cache writing is in progress
Automatic playback of the
cache
If the radio broadcast is interrupted by
another audio output, such as an
incoming phone call, the system will
automatically cache the interrupted
portion and perform time-shift
playback when the interruption ends.
To manually operate the cache
operation: (P.119)
INFORMATION
●The system can store up to 15 minutes.
Cached data will be erased when the
radio mode or station is changed or
when the audio system is turned off.
●If noise or silence occurs during the
caching process, cache writing will con-
tinue, with the noise or silence recorded
as is. In this case, the cached broadcast
will contain the noise or silence when
played back.
Radio broadcast data system
This audio system is equipped with Ra-
dio Broadcast Data Systems (RBDS).
RBDS mode allows text messages to
be received from radio stations that uti-
lize RBDS transmitters.
When RBDS is on, the radio can
— only select stations of a particular
program type,
— display messages from radio sta-
tions,
— search for a stronger signal station.
RBDS features are available only
when listening to an FM station that
broadcasts RBDS information and the
“FM Info” indicator is on.
Selecting a desired program
type
Page 125 of 275
LC200_Navi_OM60N15U_(U)
15.07.15 16:32
Audio/visual system
4
1252. Radio operation
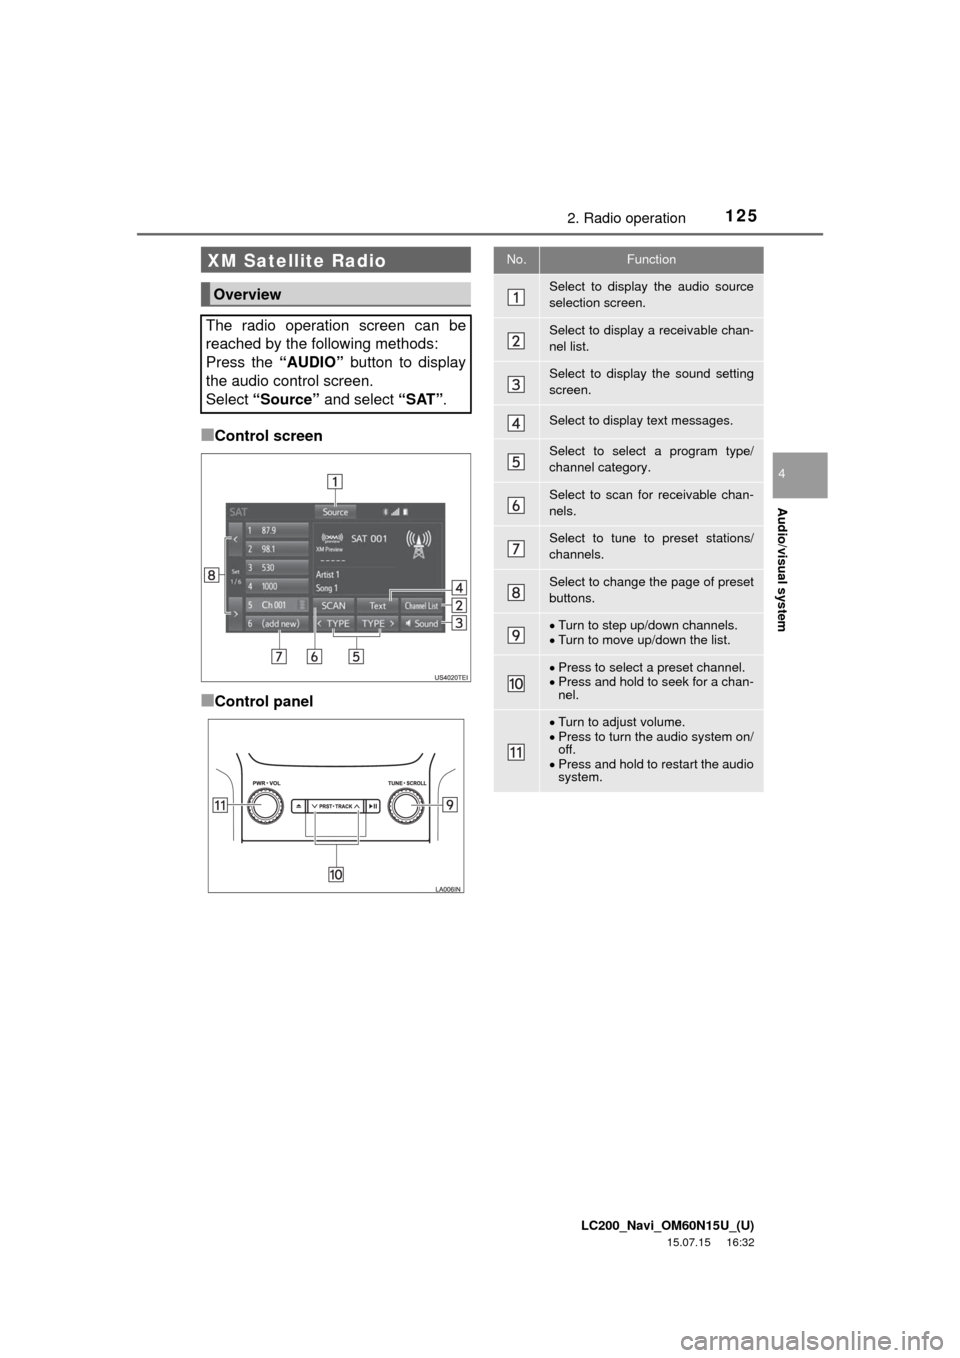
■Control screen
■Control panel
XM Satellite Radio
Overview
The radio operation screen can be
reached by the following methods:
Press the “AUDIO” button to display
the audio control screen.
Select “Source” and select “SAT”.
No.Function
Select to display the audio source
selection screen.
Select to display a receivable chan-
nel list.
Select to display the sound setting
screen.
Select to display text messages.
Select to select a program type/
channel category.
Select to scan for receivable chan-
nels.
Select to tune to preset stations/
channels.
Select to change the page of preset
buttons.
Turn to step up/down channels.
Turn to move up/down the list.
Press to select a preset channel.
Press and hold to seek for a chan-
nel.
Turn to adjust volume.
Press to turn the audio system on/
off.
Press and hold to restart the audio
system.
Page 154 of 275
LC200_Navi_OM60N15U_(U)
15.07.08 16:49
1544. Rear seat entertainment system operation
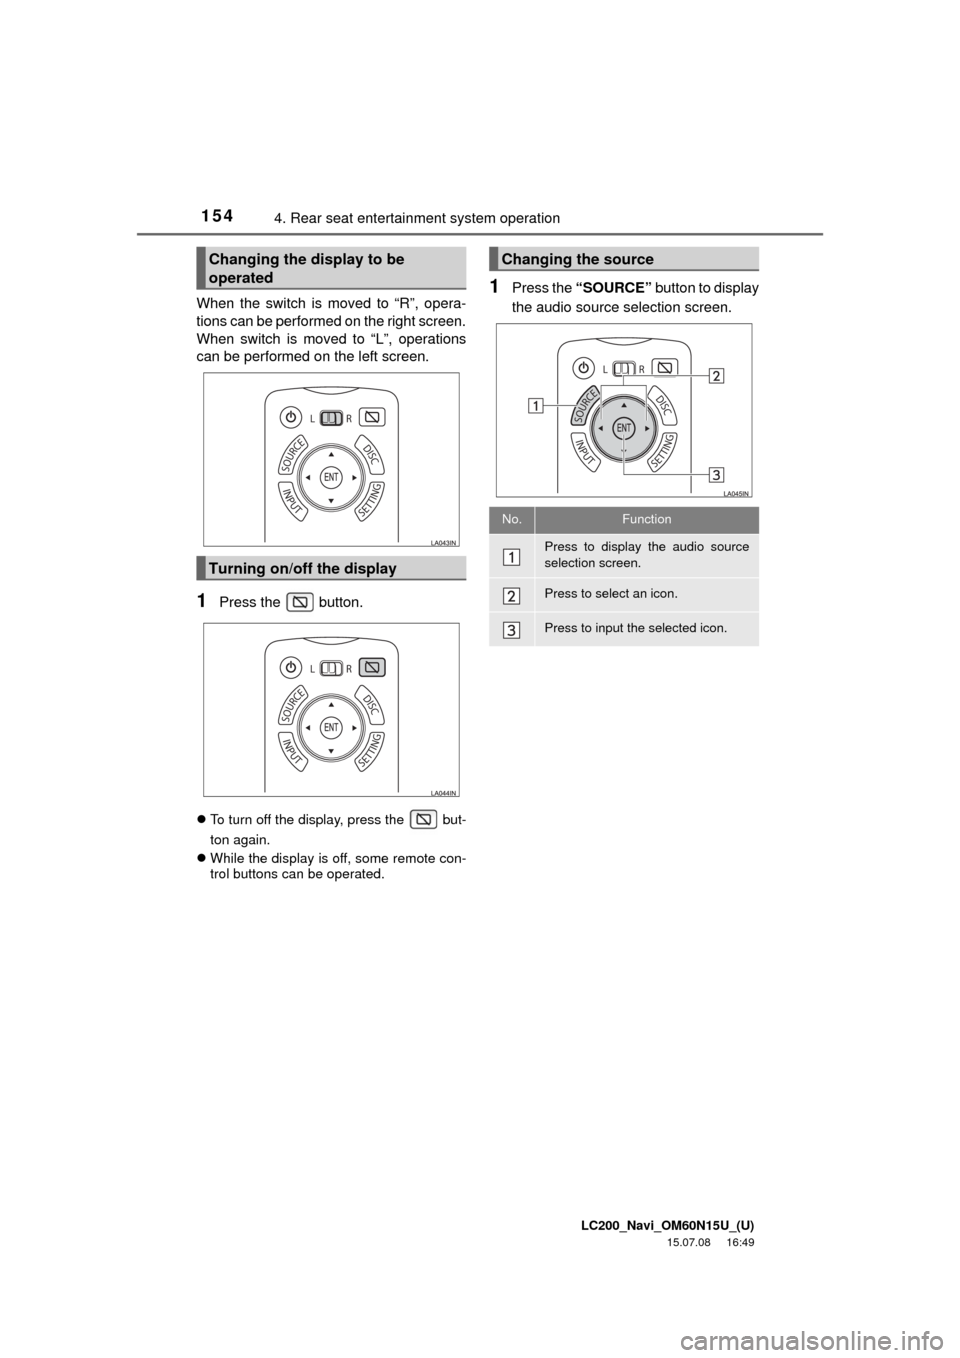
When the switch is moved to “R”, opera-
tions can be performed on the right screen.
When switch is moved to “L”, operations
can be performed on the left screen.
1Press the button.
To turn off the display, press the but-
ton again.
While the display is off, some remote con-
trol buttons can be operated.
1Press the “SOURCE” button to display
the audio source selection screen.
Changing the display to be
operated
Turning on/off the display
Changing the source
No.Function
Press to display the audio source
selection screen.
Press to select an icon.
Press to input the selected icon.
Page 158 of 275
LC200_Navi_OM60N15U_(U)
15.07.08 16:49
1584. Rear seat entertainment system operation
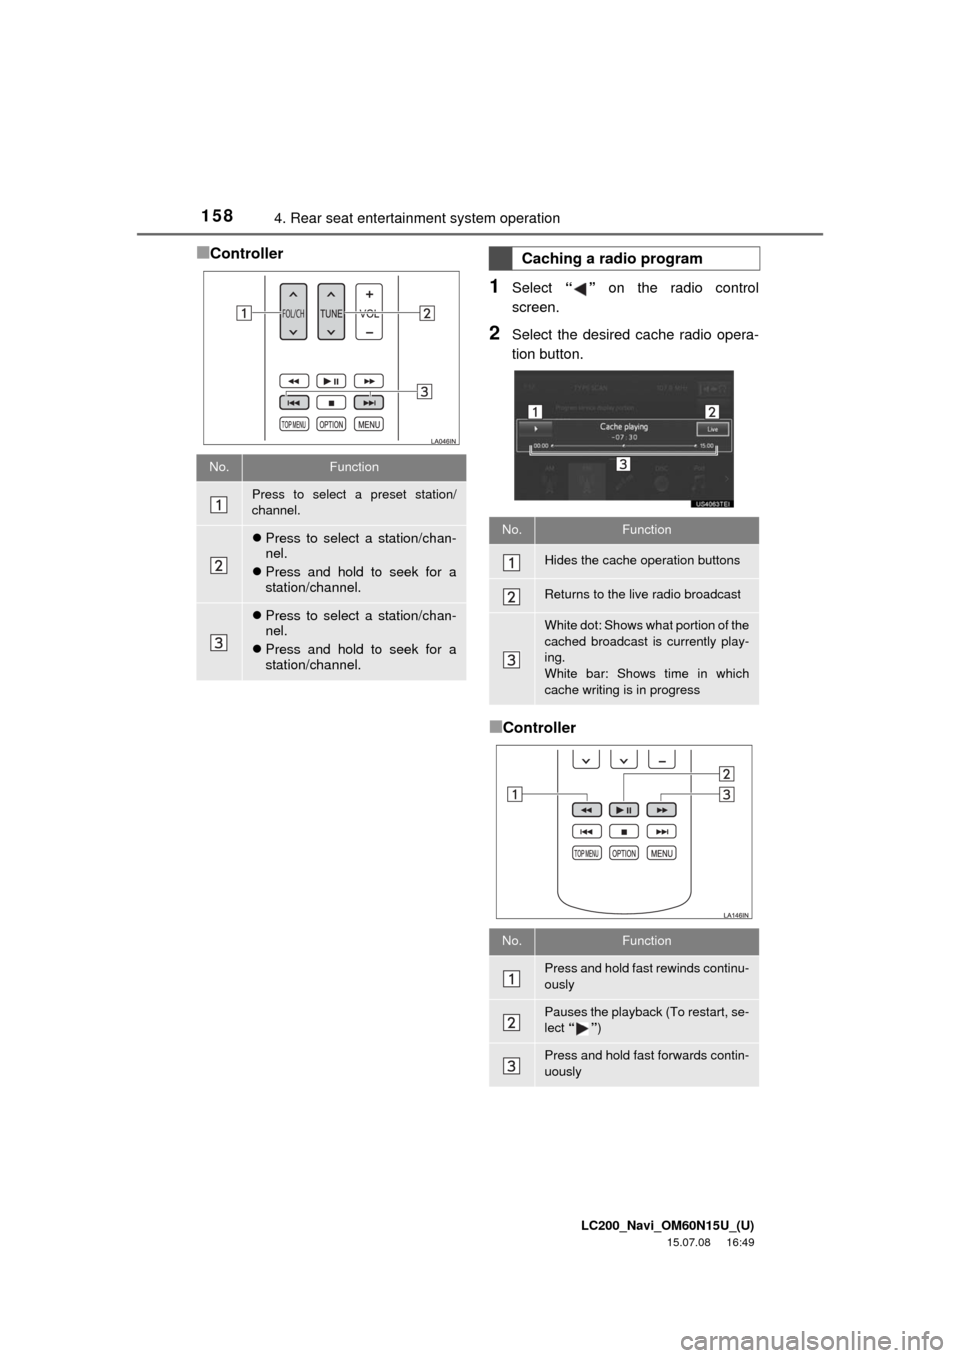
■Controller
1Select “” on the radio control
screen.
2Select the desired cache radio opera-
tion button.
■Controller
No.Function
Press to select a preset station/
channel.
Press to select a station/chan-
nel.
Press and hold to seek for a
station/channel.
Press to select a station/chan-
nel.
Press and hold to seek for a
station/channel.
Caching a radio program
No.Function
Hides the cache operation buttons
Returns to the live radio broadcast
White dot: Shows what portion of the
cached broadcast is currently play-
ing.
White bar: Shows time in which
cache writing is in progress
No.Function
Press and hold fast rewinds continu-
ously
Pauses the playback (To restart, se-
lect “”)
Press and hold fast forwards contin-
uously
Page 162 of 275
LC200_Navi_OM60N15U_(U)
15.07.08 16:49
1624. Rear seat entertainment system operation
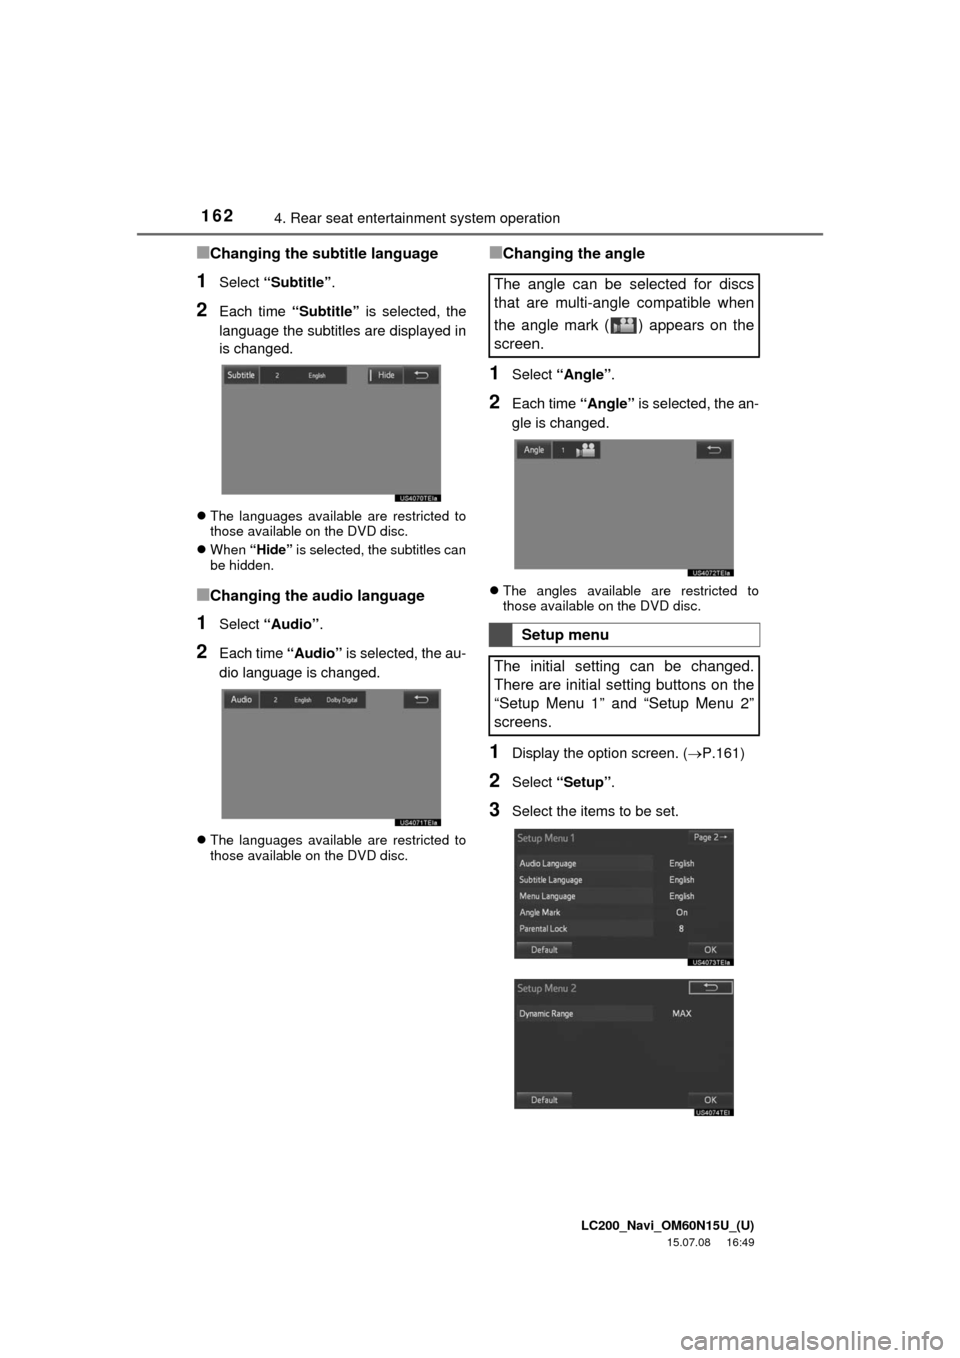
■Changing the subtitle language
1Select “Subtitle”.
2Each time “Subtitle” is selected, the
language the subtitles are displayed in
is changed.
The languages available are restricted to
those available on the DVD disc.
When “Hide” is selected, the subtitles can
be hidden.
■Changing the audio language
1Select “Audio”.
2Each time “Audio” is selected, the au-
dio language is changed.
The languages available are restricted to
those available on the DVD disc.
■Changing the angle
1Select “Angle”.
2Each time “Angle” is selected, the an-
gle is changed.
The angles available are restricted to
those available on the DVD disc.
1Display the option screen. (P.161)
2Select “Setup”.
3Select the items to be set.
The angle can be selected for discs
that are multi-angle compatible when
the angle mark ( ) appears on the
screen.
Setup menu
The initial setting can be changed.
There are initial setting buttons on the
“Setup Menu 1” and “Setup Menu 2”
screens.
Page 258 of 275
LC200_Navi_OM60N15U_(U)
15.07.08 16:45
258Alphabetical index
Alphabetical index
A
AM/FM radio................................. 117
Available HD Radio™
technology............................. 122
Caching a radio program ......... 119
Overview ................................. 117
Presetting a station.................. 118
Radio broadcast data
system................................... 120
Selecting a station from the
list.......................................... 119
Traffic announcement
(FM radio) ............................. 121
Troubleshooting guide ............. 124
Using HD Radio™
technology............................. 122
Audio settings............................... 173
Audio settings screen .............. 173
Audio/visual remote controls ........ 171
Audio/visual system ..................... 109
AUX .............................................. 147
Overview ................................. 147
B
Basic function............................10, 21
Basic information before
operation.......................................22
Basic operation .......................54, 110
Bluetooth
® audio ...........................144
Connecting a Bluetooth®
device ....................................146
Listening to Bluetooth
®
audio ......................................146
Overview ..................................144
Bluetooth
® phone message
function .......................................222
Calling the message sender.....225
Checking messages .................223
Receiving a message ...............222
Replying to a message
(Quick reply) ..........................224
Bluetooth
® settings .........................32
Buttons overview.............................10
C
Calling on the Bluetooth®
phone..........................................215
By call history ...........................216
By contacts list .........................217
By dial pad ...............................218
By favorites list .........................216
By off hook switch ....................219
Casual speech recognization ........199
CD .................................................131
Overview ..................................131
Playing an audio CD ................132
Playing an MP3/WMA/
AAC disc ................................133
Command list ................................201