change language TOYOTA LAND CRUISER 2016 J200 Navigation Manual
[x] Cancel search | Manufacturer: TOYOTA, Model Year: 2016, Model line: LAND CRUISER, Model: TOYOTA LAND CRUISER 2016 J200Pages: 275, PDF Size: 28.47 MB
Page 13 of 275
LC200_Navi_OM60N15U_(U)
15.07.08 16:49
13
Quick guide
1
2. Quick reference
“Setup” screen
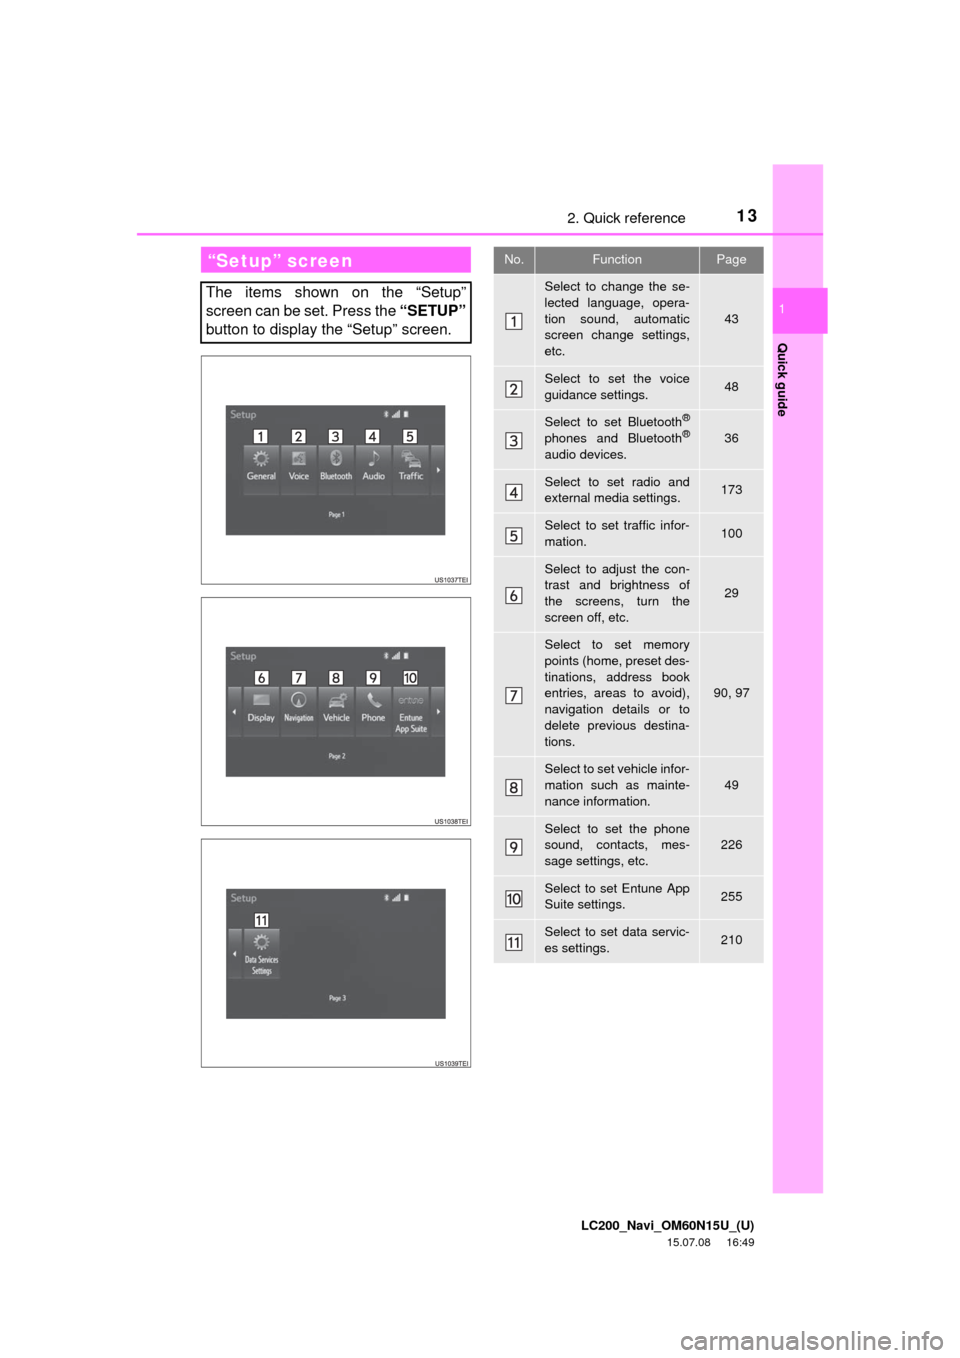
The items shown on the “Setup”
screen can be set. Press the “SETUP”
button to display the “Setup” screen.
No.FunctionPage
Select to change the se-
lected language, opera-
tion sound, automatic
screen change settings,
etc.
43
Select to set the voice
guidance settings.48
Select to set Bluetooth®
phones and Bluetooth®
audio devices.
36
Select to set radio and
external media settings.173
Select to set traffic infor-
mation.100
Select to adjust the con-
trast and brightness of
the screens, turn the
screen off, etc.
29
Select to set memory
points (home, preset des-
tinations, address book
entries, areas to avoid),
navigation details or to
delete previous destina-
tions.
90, 97
Select to set vehicle infor-
mation such as mainte-
nance information.
49
Select to set the phone
sound, contacts, mes-
sage settings, etc.226
Select to set Entune App
Suite settings.255
Select to set data servic-
es settings.210
Page 44 of 275
LC200_Navi_OM60N15U_(U)
15.07.15 16:26
443. Other settings
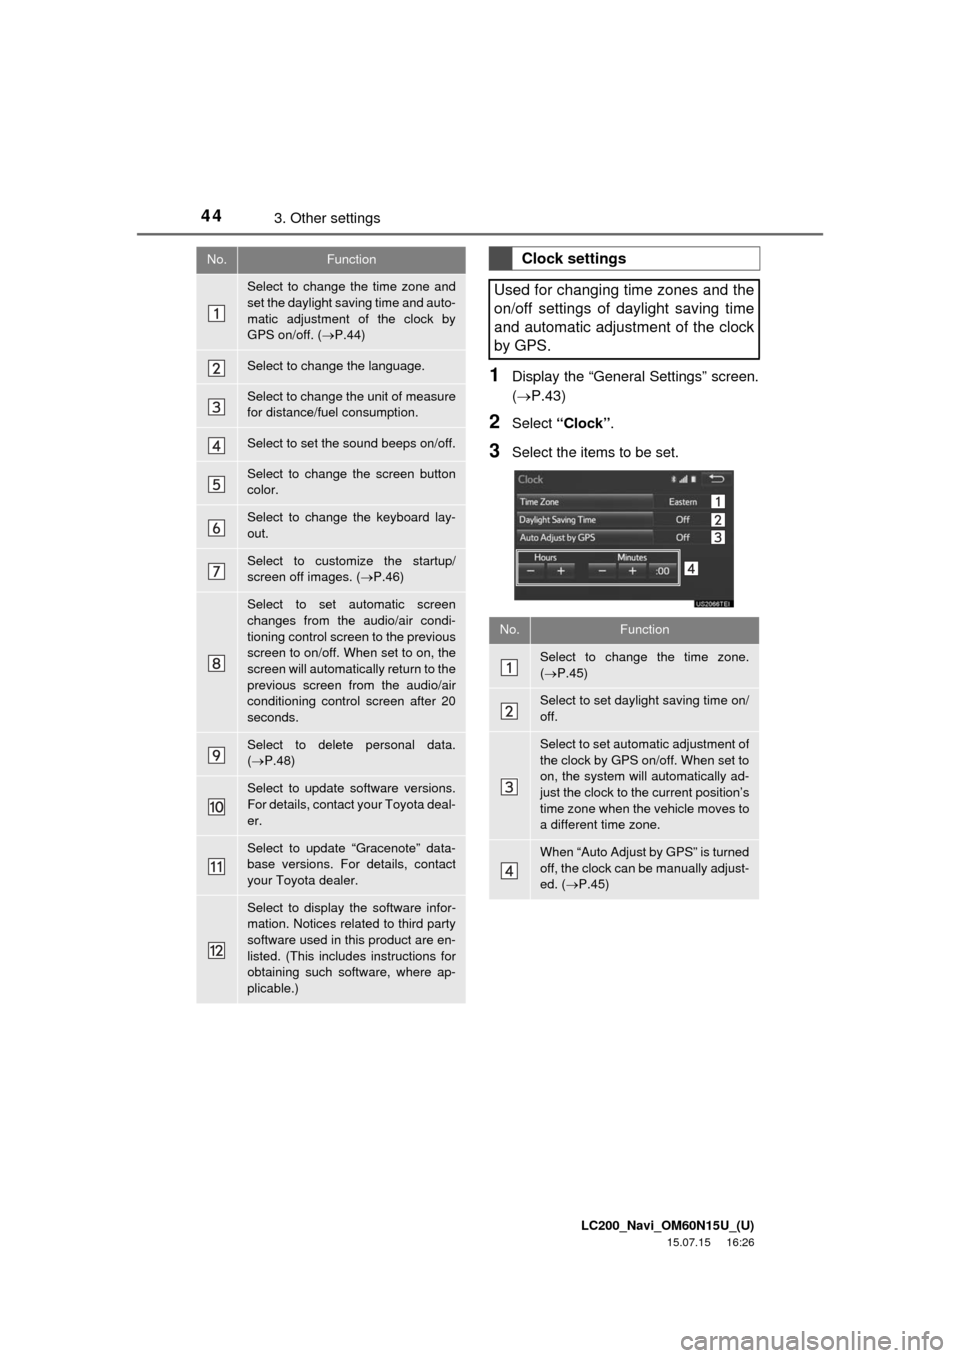
1Display the “General Settings” screen.
(P.43)
2Select “Clock”.
3Select the items to be set.
No.Function
Select to change the time zone and
set the daylight saving time and auto-
matic adjustment of the clock by
GPS on/off. (P.44)
Select to change the language.
Select to change the unit of measure
for distance/fuel consumption.
Select to set the sound beeps on/off.
Select to change the screen button
color.
Select to change the keyboard lay-
out.
Select to customize the startup/
screen off images. (P.46)
Select to set automatic screen
changes from the audio/air condi-
tioning control screen to the previous
screen to on/off. When set to on, the
screen will automatically return to the
previous screen from the audio/air
conditioning control screen after 20
seconds.
Select to delete personal data.
(P.48)
Select to update software versions.
For details, contact your Toyota deal-
er.
Select to update “Gracenote” data-
base versions. For details, contact
your Toyota dealer.
Select to display the software infor-
mation. Notices related to third party
software used in this product are en-
listed. (This includes instructions for
obtaining such software, where ap-
plicable.)
Clock settings
Used for changing time zones and the
on/off settings of daylight saving time
and automatic adjustment of the clock
by GPS.
No.Function
Select to change the time zone.
(P.45)
Select to set daylight saving time on/
off.
Select to set automatic adjustment of
the clock by GPS on/off. When set to
on, the system will automatically ad-
just the clock to the current position’s
time zone when the vehicle moves to
a different time zone.
When “Auto Adjust by GPS” is turned
off, the clock can be manually adjust-
ed. (P.45)
Page 126 of 275
LC200_Navi_OM60N15U_(U)
15.07.15 16:32
1262. Radio operation
How to subscribe to an XM Satellite
Radio
To listen to a satellite radio broadcast
in the vehicle, a subscription to the XM
Satellite Radio service is necessary.
An XM Satellite Radio is a tuner de-
signed exclusively to receive broad-
casts provided under a separate
subscription. Availability is limited to
the 48 contiguous U.S. states and
some Canadian provinces.
How to subscribe
It is necessary to enter into a separate
service agreement with XM Satellite
Radio in order to receive satellite
broadcast programming in the vehicle.
Additional activation and service sub-
scription fees apply that are not includ-
ed in the purchase price of the vehicle
and digital satellite tuner.
For complete information on subscrip-
tion rates and terms, or to subscribe to
XM Satellite Radio:
U.S.A.
Refer to www.siriusxm.com
or call
1-877-447-0011.
NOTICE
●XM Radio ServicesLegal Disclaimers
and Warnings
• Fees and TaxesSubscription fee,
taxes, one time activation fee, and
other fees may apply. Subscription fee
is consumer only. All fees and
programming subject to change.
Subscriptions subject to Customer
Agreement available at
www.siriusxm.com. XM service only
available in the 48 contiguous United
States and Canada.
Explicit Language NoticeChannels
with frequent explicit language are
indicated with an “XL” preceding the
channel name. Channel blocking is
available for XM Satellite Radio
receivers by notifying XM at;
U.S.A. Customers:
Visit www.siriusxm.com or calling
1-877-447-0011
●It is prohibited to copy, decompile,
disassemble, reverse engineer, hack,
manipulate, or otherwise make available
any technology or software incorporated
in receivers compatible with the XM
Satellite Radio System or that support
the XM website, the Online Service or
any of its content. Furthermore, the
AMBE
® voice compression software
included in this product is protected by
intellectual property rights including
patent rights, copyrights, and trade
secrets of Digital Voice Systems, Inc.
●Note: this applies to XM receivers only
and not XM Ready devices.
Page 137 of 275

LC200_Navi_OM60N15U_(U)
15.07.08 16:49
Audio/visual system
4
1373. Media operation
1Select “Audio”.
2Each time “Change” is selected, the
audio language is changed.
The languages available are restricted to
those available on the DVD disc.
1Select “Subtitle”.
2Each time “Change” is selected, the
language the subtitles are displayed in
is changed.
The languages available are restricted to
those available on the DVD disc.
When “Hide” is selected, the subtitles can
be hidden.
1Select “Angle”.
2Each time “Change” is selected, the
angle is changed.
The angles available are restricted to
those available on the DVD disc.
Vehicles with rear seat entertainment
system
Front passengers can cancel this setup
operation by touching “Play”. The player
will resume normal play.
Likewise, a rear passenger can cancel a
front passenger’s selection of the setup
menu.
To lock the rear seat entertainment sys-
tem, see “Operation from the front seats”
on page 157.
Changing the audio language
Changing the subtitle language
Changing the angle
The angle can be selected for discs
that are multi-angle compatible when
the angle mark appears on the screen.
Setup operation from the rear
seat
This screen appears when a rear pas-
senger selects the setup menu.
Page 162 of 275
LC200_Navi_OM60N15U_(U)
15.07.08 16:49
1624. Rear seat entertainment system operation
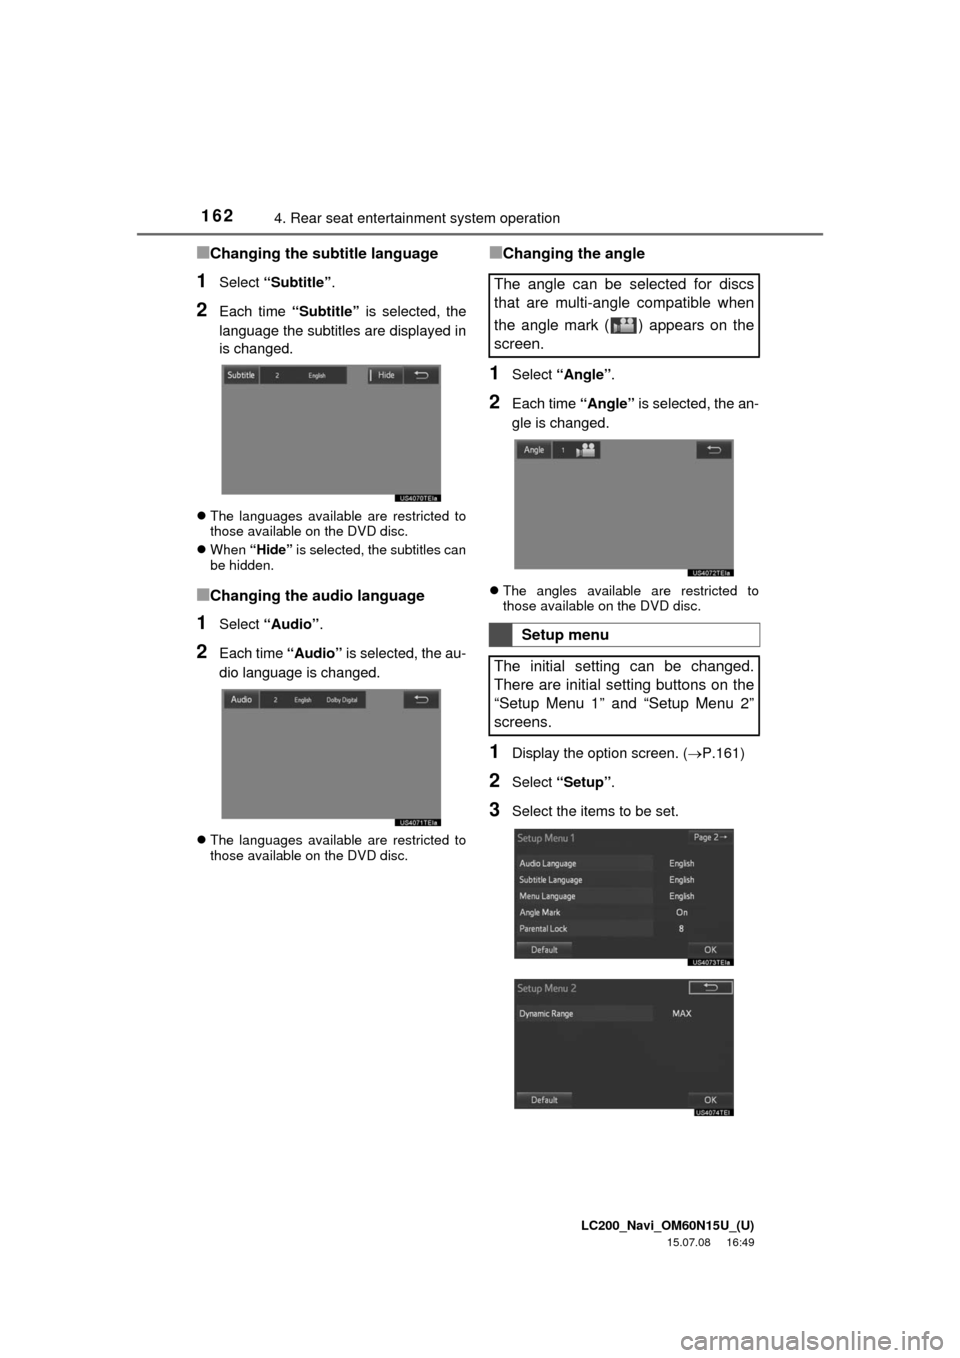
■Changing the subtitle language
1Select “Subtitle”.
2Each time “Subtitle” is selected, the
language the subtitles are displayed in
is changed.
The languages available are restricted to
those available on the DVD disc.
When “Hide” is selected, the subtitles can
be hidden.
■Changing the audio language
1Select “Audio”.
2Each time “Audio” is selected, the au-
dio language is changed.
The languages available are restricted to
those available on the DVD disc.
■Changing the angle
1Select “Angle”.
2Each time “Angle” is selected, the an-
gle is changed.
The angles available are restricted to
those available on the DVD disc.
1Display the option screen. (P.161)
2Select “Setup”.
3Select the items to be set.
The angle can be selected for discs
that are multi-angle compatible when
the angle mark ( ) appears on the
screen.
Setup menu
The initial setting can be changed.
There are initial setting buttons on the
“Setup Menu 1” and “Setup Menu 2”
screens.
Page 163 of 275
LC200_Navi_OM60N15U_(U)
15.07.08 16:49
Audio/visual system
4
1634. Rear seat entertainment system operation
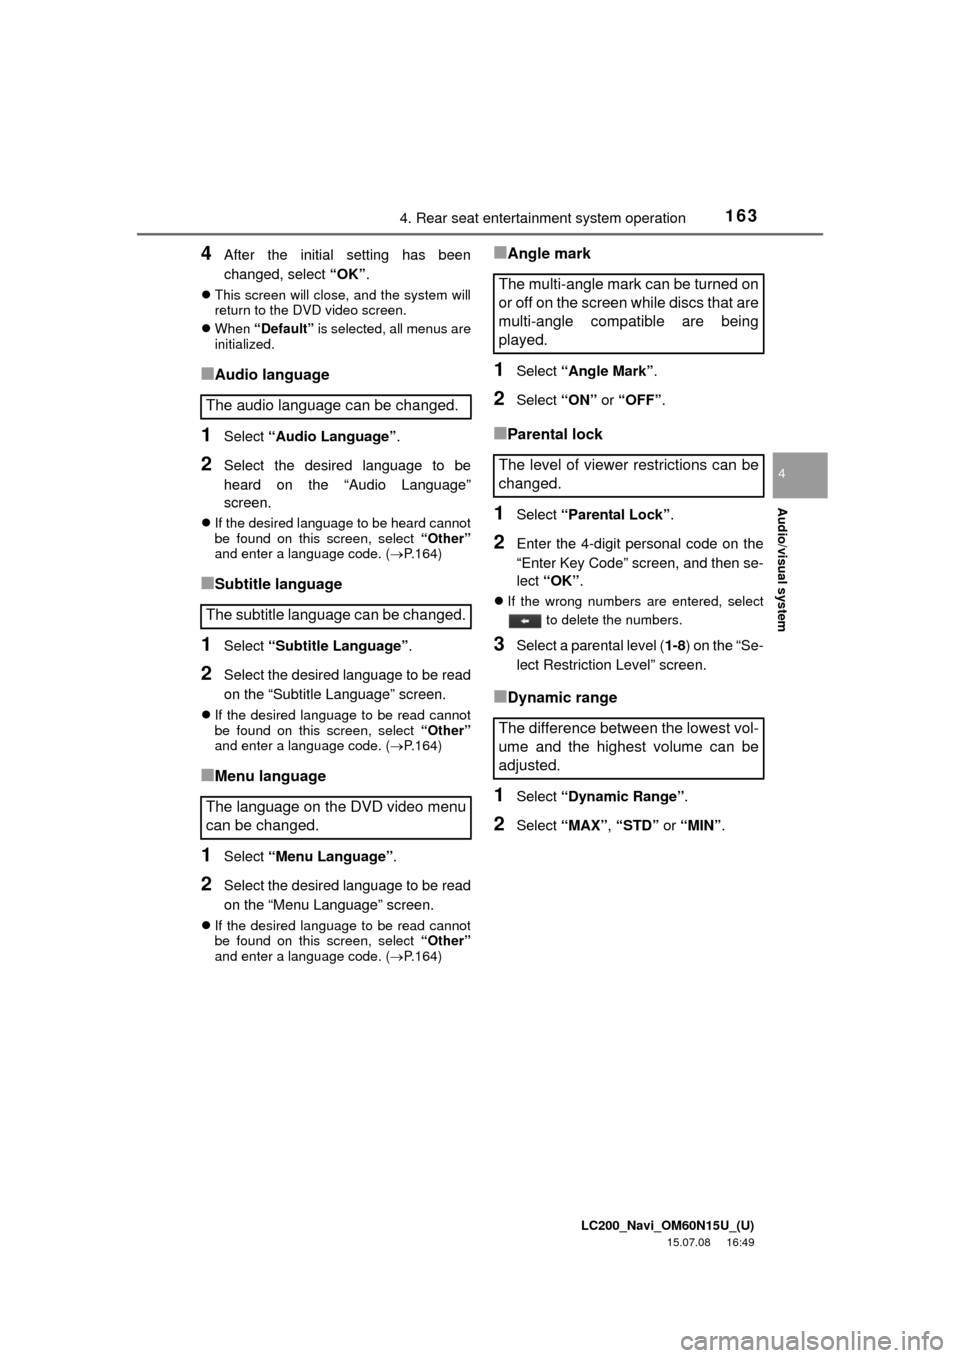
4After the initial setting has been
changed, select “OK”.
This screen will close, and the system will
return to the DVD video screen.
When “Default” is selected, all menus are
initialized.
■Audio language
1Select “Audio Language”.
2Select the desired language to be
heard on the “Audio Language”
screen.
If the desired language to be heard cannot
be found on this screen, select “Other”
and enter a language code. (P.164)
■Subtitle language
1Select “Subtitle Language”.
2Select the desired language to be read
on the “Subtitle Language” screen.
If the desired language to be read cannot
be found on this screen, select “Other”
and enter a language code. (P.164)
■Menu language
1Select “Menu Language”.
2Select the desired language to be read
on the “Menu Language” screen.
If the desired language to be read cannot
be found on this screen, select “Other”
and enter a language code. (P.164)
■Angle mark
1Select “Angle Mark”.
2Select “ON” or “OFF”.
■Parental lock
1Select “Parental Lock”.
2Enter the 4-digit personal code on the
“Enter Key Code” screen, and then se-
lect “OK”.
If the wrong numbers are entered, select
to delete the numbers.
3Select a parental level (1-8) on the “Se-
lect Restriction Level” screen.
■Dynamic range
1Select “Dynamic Range”.
2Select “MAX”, “STD” or “MIN”.
The audio language can be changed.
The subtitle language can be changed.
The language on the DVD video menu
can be changed.
The multi-angle mark can be turned on
or off on the screen while discs that are
multi-angle compatible are being
played.
The level of viewer restrictions can be
changed.
The difference between the lowest vol-
ume and the highest volume can be
adjusted.
Page 175 of 275
LC200_Navi_OM60N15U_(U)
15.07.08 16:49
Audio/visual system
4
1756. Setup
1Display the audio setting screen.
(P.173)
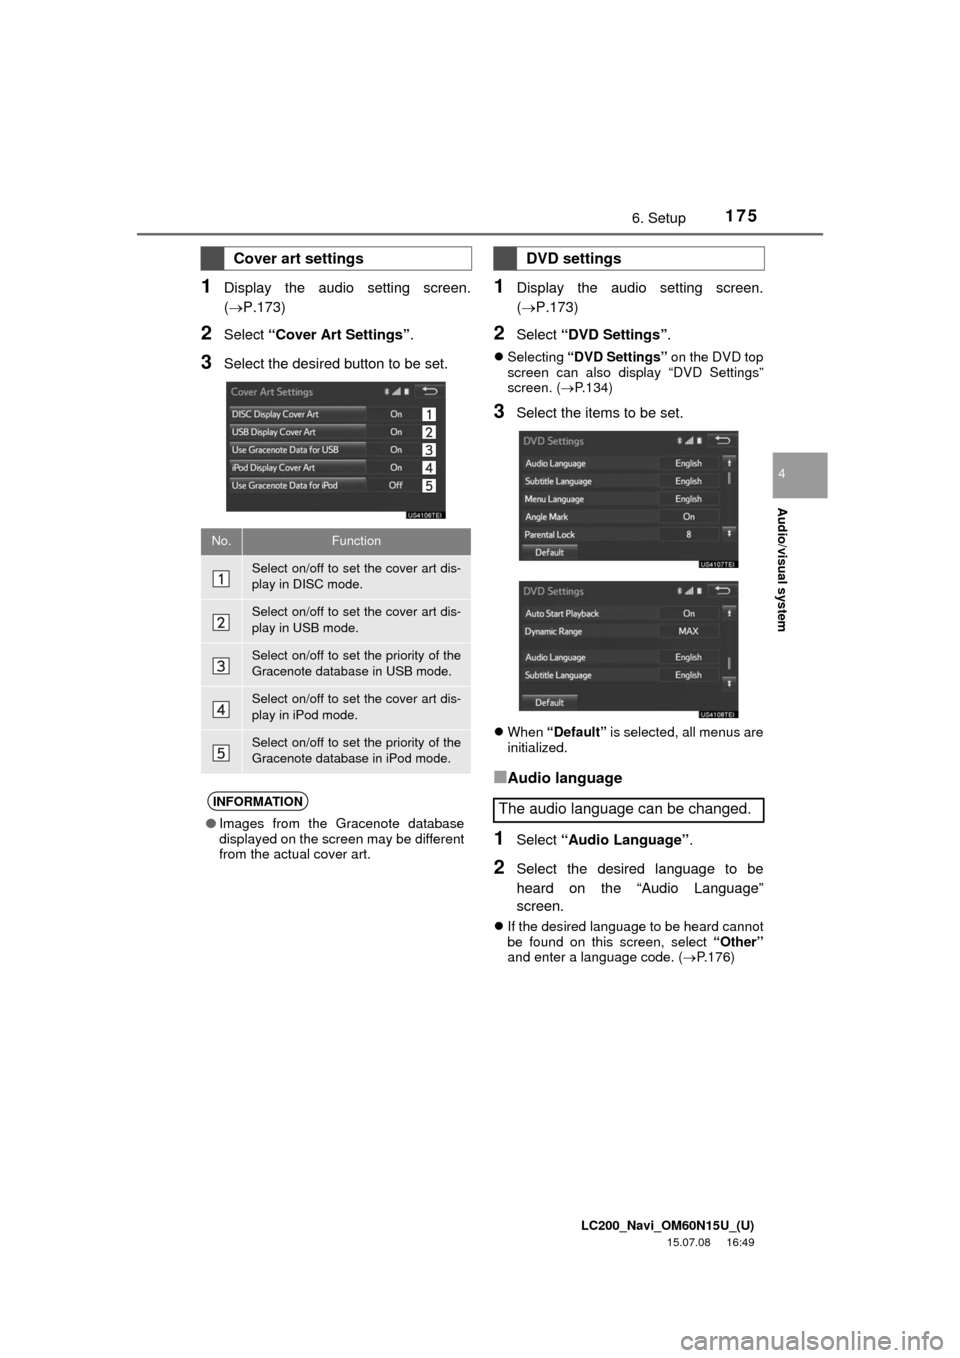
2Select “Cover Art Settings”.
3Select the desired button to be set.
1Display the audio setting screen.
(P.173)
2Select “DVD Settings”.
Selecting “DVD Settings” on the DVD top
screen can also display “DVD Settings”
screen. (P.134)
3Select the items to be set.
When “Default” is selected, all menus are
initialized.
■Audio language
1Select “Audio Language”.
2Select the desired language to be
heard on the “Audio Language”
screen.
If the desired language to be heard cannot
be found on this screen, select “Other”
and enter a language code. (P.176)
Cover art settings
No.Function
Select on/off to set the cover art dis-
play in DISC mode.
Select on/off to set the cover art dis-
play in USB mode.
Select on/off to set the priority of the
Gracenote database in USB mode.
Select on/off to set the cover art dis-
play in iPod mode.
Select on/off to set the priority of the
Gracenote database in iPod mode.
INFORMATION
●Images from the Gracenote database
displayed on the screen may be different
from the actual cover art.
DVD settings
The audio language can be changed.
Page 176 of 275
LC200_Navi_OM60N15U_(U)
15.07.08 16:49
1766. Setup
■Subtitle language
1Select “Subtitle Language”.
2Select the desired language to be read
on the “Subtitle Language” screen.
If the desired language to be read cannot
be found on this screen, select “Other”
and enter a language code. (P.176)
■Menu language
1Select “Menu Language”.
2Select the desired language to be read
on the “Menu Language” screen.
If the desired language to be read cannot
be found on this screen, select “Other”
and enter a language code. (P.176)
■Angle mark
1Select “Angle Mark”.
2Select “On” or “Off”.
■Parental lock
1Select “Parental Lock”.
2Enter the 4-digit personal code on the
“Key Code” screen.
3Select a parental level (1-8) on the
“Select Restriction Level” screen.
■Auto start
1Select “Auto Start Playback”.
2Select “On” or “Off”.
■Sound dynamic range
1Select “Dynamic Range”.
2Select “MAX”, “STD” or “MIN”.
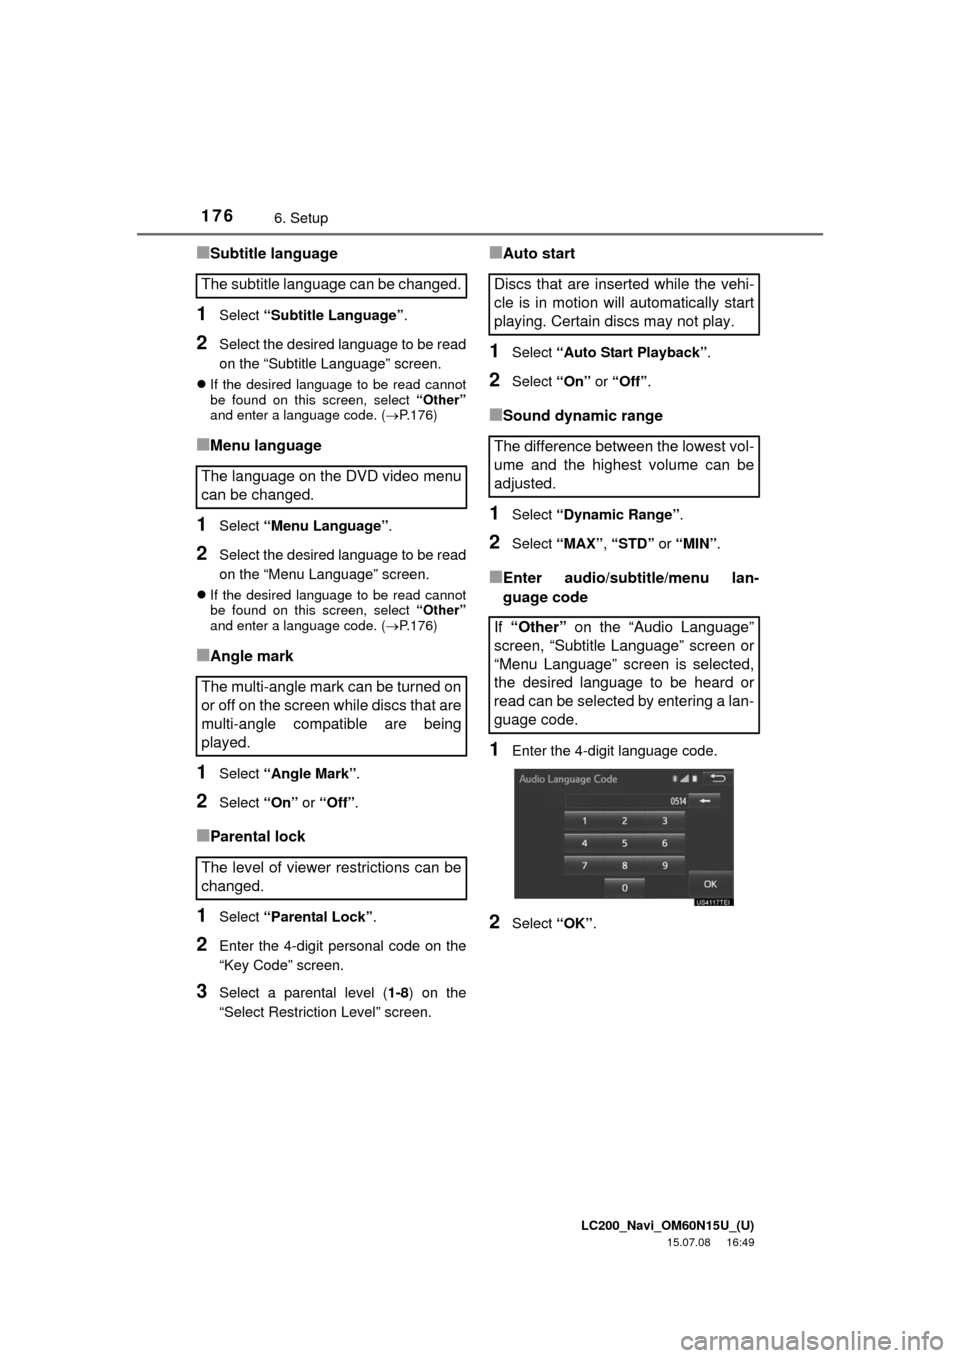
■Enter audio/subtitle/menu lan-
guage code
1Enter the 4-digit language code.
2Select “OK”.
The subtitle language can be changed.
The language on the DVD video menu
can be changed.
The multi-angle mark can be turned on
or off on the screen while discs that are
multi-angle compatible are being
played.
The level of viewer restrictions can be
changed.Discs that are inserted while the vehi-
cle is in motion will automatically start
playing. Certain discs may not play.
The difference between the lowest vol-
ume and the highest volume can be
adjusted.
If “Other” on the “Audio Language”
screen, “Subtitle Language” screen or
“Menu Language” screen is selected,
the desired language to be heard or
read can be selected by entering a lan-
guage code.
Page 183 of 275
LC200_Navi_OM60N15U_(U)
15.07.08 16:49
Audio/visual system
4
1837. Tips for operating the audio/visual system
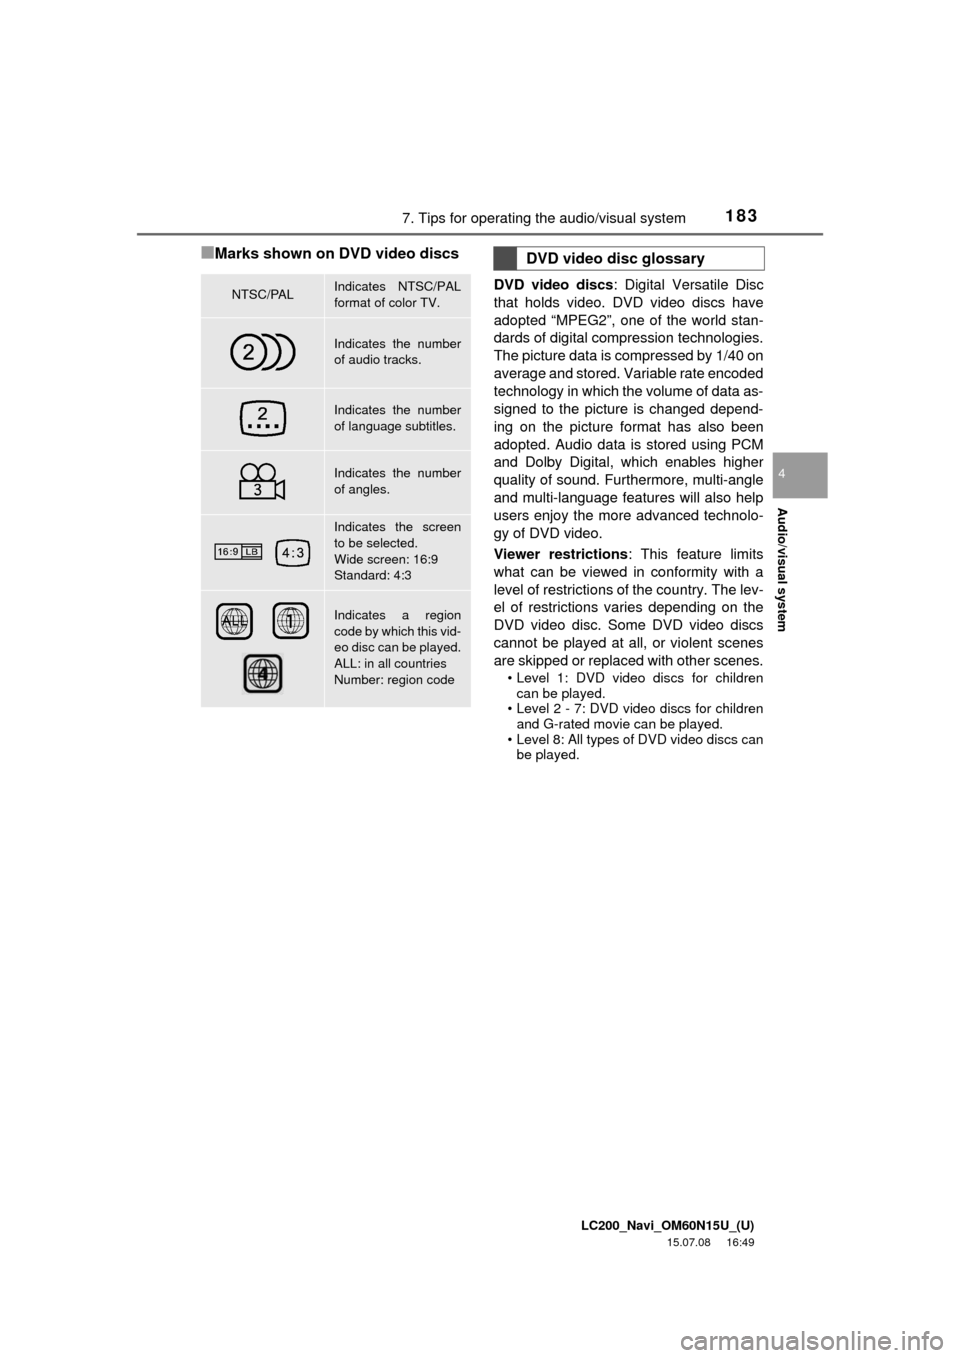
■Marks shown on DVD video discs
DVD video discs: Digital Versatile Disc
that holds video. DVD video discs have
adopted “MPEG2”, one of the world stan-
dards of digital compression technologies.
The picture data is compressed by 1/40 on
average and stored. Variable rate encoded
technology in which the volume of data as-
signed to the picture is changed depend-
ing on the picture format has also been
adopted. Audio data is stored using PCM
and Dolby Digital, which enables higher
quality of sound. Furthermore, multi-angle
and multi-language features will also help
users enjoy the more advanced technolo-
gy of DVD video.
Viewer restrictions: This feature limits
what can be viewed in conformity with a
level of restrictions of the country. The lev-
el of restrictions varies depending on the
DVD video disc. Some DVD video discs
cannot be played at all, or violent scenes
are skipped or replaced with other scenes.
• Level 1: DVD video discs for children
can be played.
• Level 2 - 7: DVD video discs for children
and G-rated movie can be played.
• Level 8: All types of DVD video discs can
be played.
NTSC/PALIndicates NTSC/PAL
format of color TV.
Indicates the number
of audio tracks.
Indicates the number
of language subtitles.
Indicates the number
of angles.
Indicates the screen
to be selected.
Wide screen: 16:9
Standard: 4:3
Indicates a region
code by which this vid-
eo disc can be played.
ALL: in all countries
Number: region code
DVD video disc glossary
Page 197 of 275

LC200_Navi_OM60N15U_(U)
15.07.08 16:49
Voice command system
5
1971. Voice command system operation
1Press the talk switch.
2Say “Call
A confirmation screen will be displayed
showing the recognition results. If multiple
matching items are found, a selection
screen will be displayed. Say “
INFORMATION
●The Gracenote database is only com-
patible with the USB or iPod mode.
●The list screens can be operated by
selecting a screen button as well as by
recognizing the voice commands.
●A USB memory or iPod must be con-
nected to enable track searching and
playback. (P.138, 140)
●When a USB memory or iPod is con-
nected, recognition data is created so
tracks can be searched using voice
commands.
●Recognition data is updated under the
following conditions:
• When the USB memory or iPod data
has changed.
• When the voice recognition language
is changed. (P. 4 3 )
●While the recognition data is being cre-
ated or being updated, a track search
cannot be performed using a voice com-
mand.
●When the “Music” tab is disappeared on
the shortcut menu screen, it is not possi-
ble to search for a track using a voice
command.
Voice command example: Call
name