lights TOYOTA LAND CRUISER 2021 (in English) User Guide
[x] Cancel search | Manufacturer: TOYOTA, Model Year: 2021, Model line: LAND CRUISER, Model: TOYOTA LAND CRUISER 2021Pages: 632, PDF Size: 13.87 MB
Page 53 of 632

531-1. For safe use
LC200_OM_OM60T03U_(U)
1
For safety and security
■Adult*1
■Child*4 or child restraint system with infant*5
Condition and operation in the front passenger occupant classi-
fication system
Indicator/
warning light
“AIR BAG ON” and “AIR BAG OFF” indicator lights“AIR BAG ON”
SRS warning lightOff
Front passenger’s seat belt reminder lightOff*2 or
flashing
*3
Devices
Front passenger airbag
Activated
Side airbag
on the front passenger seat
Curtain shield airbag
in the front passenger side
Front passenger knee airbag
Front passenger’s seat belt pretensioner
Indicator/
warning light
“AIR BAG ON” and “AIR BAG OFF” indicator lights“AIR BAG OFF”
*6
SRS warning lightOff
Front passenger’s seat belt reminder lightOff*2 or
flashing
*3
Devices
Front passenger airbagDeactivated
Side airbag
on the front passenger seat
ActivatedCurtain shield airbag
in the front passenger side
Front passenger knee airbagDeactivated
Front passenger’s seat belt pretensionerActivated
Page 54 of 632
541-1. For safe use
LC200_OM_OM60T03U_(U)■
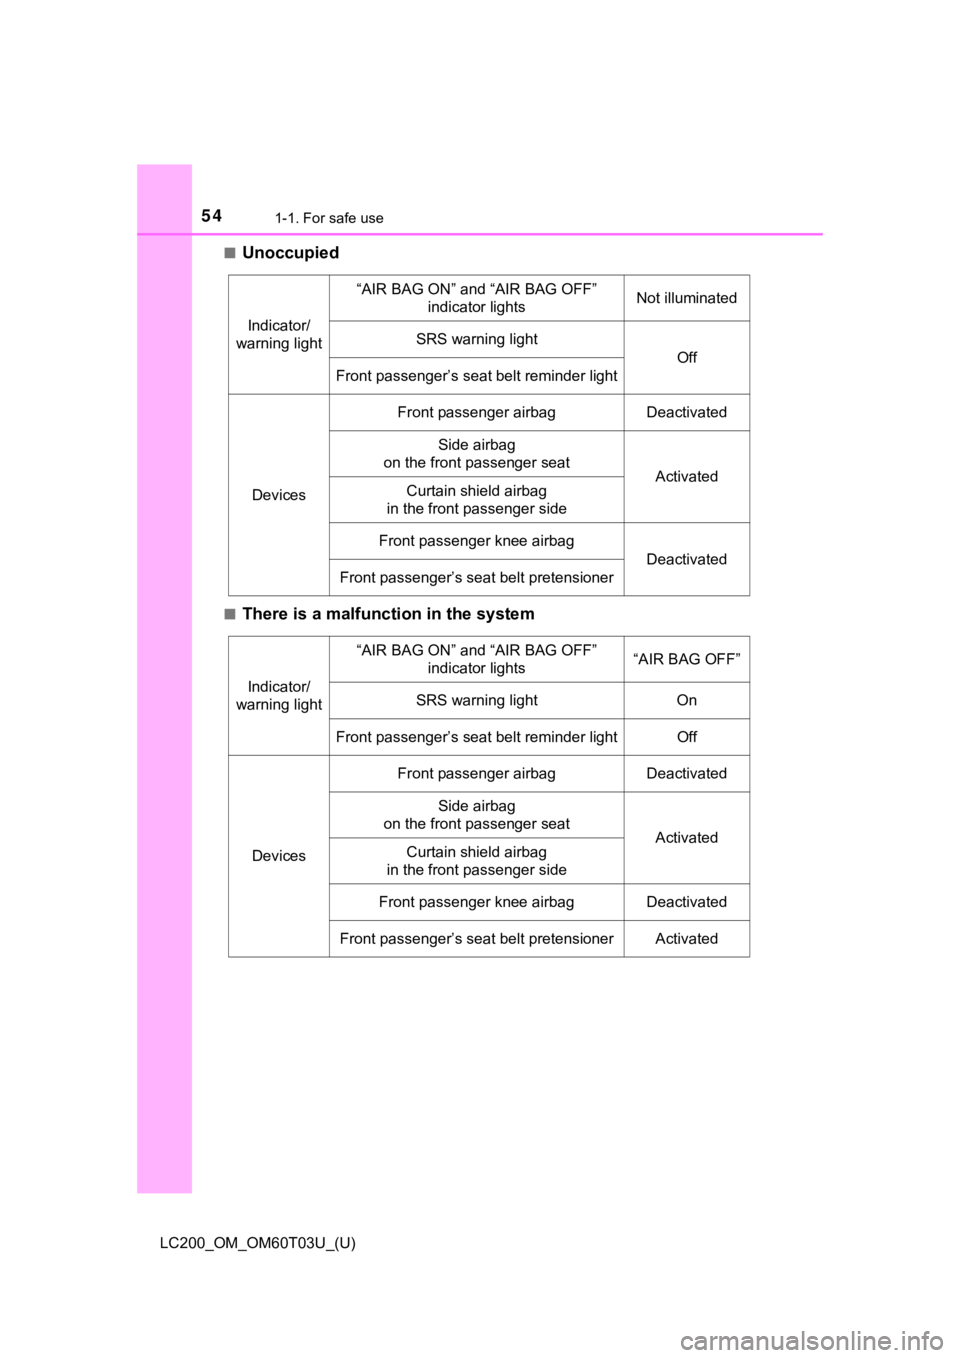
Unoccupied
■There is a malfunction in the system
Indicator/
warning light
“AIR BAG ON” and “AIR BAG OFF” indicator lightsNot illuminated
SRS warning light
Off
Front passenger’s seat belt reminder light
Devices
Front passenger airbagDeactivated
Side airbag
on the front passenger seat
ActivatedCurtain shield airbag
in the front passenger side
Front passenger knee airbag
Deactivated
Front passenger’s seat belt pretensioner
Indicator/
warning light
“AIR BAG ON” and “AIR BAG OFF” indicator lights“AIR BAG OFF”
SRS warning lightOn
Front passenger’s seat belt reminder lightOff
Devices
Front passenger airbagDeactivated
Side airbag
on the front passenger seat
ActivatedCurtain shield airbag
in the front passenger side
Front passenger knee airbagDeactivated
Front passenger’s seat belt pretensionerActivated
Page 91 of 632

91
LC200_OM_OM60T03U_(U)
Instrument cluster2
2. Instrument clusterWarning lights and indicators .......................... 92
Gauges and meters ............ 97
Multi-information display ... 101
Fuel consumption information ...................... 110
Page 92 of 632
92
LC200_OM_OM60T03U_(U)
2. Instrument cluster
Warning lights and indicators
The units used on the speedometer may differ depending on the tar-
get region.
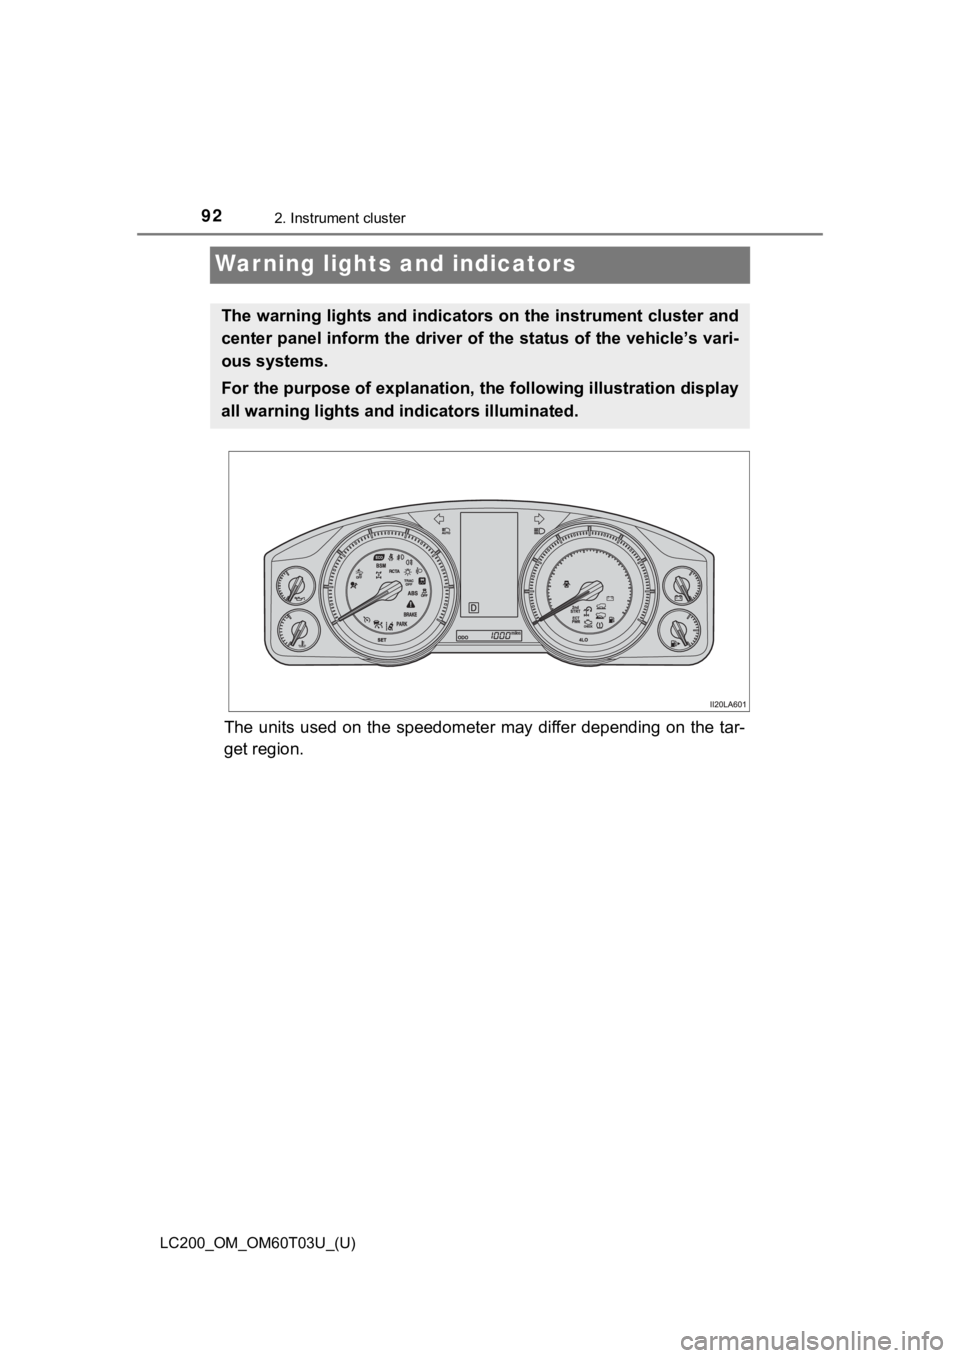
The warning lights and indicators on the instrument cluster and
center panel inform the driver of the status of the vehicle’s vari-
ous systems.
For the purpose of explanation, t he following illustration display
all warning lights and i ndicators illuminated.
Page 93 of 632
LC200_OM_OM60T03U_(U)
932. Instrument cluster
2
Instrument cluster
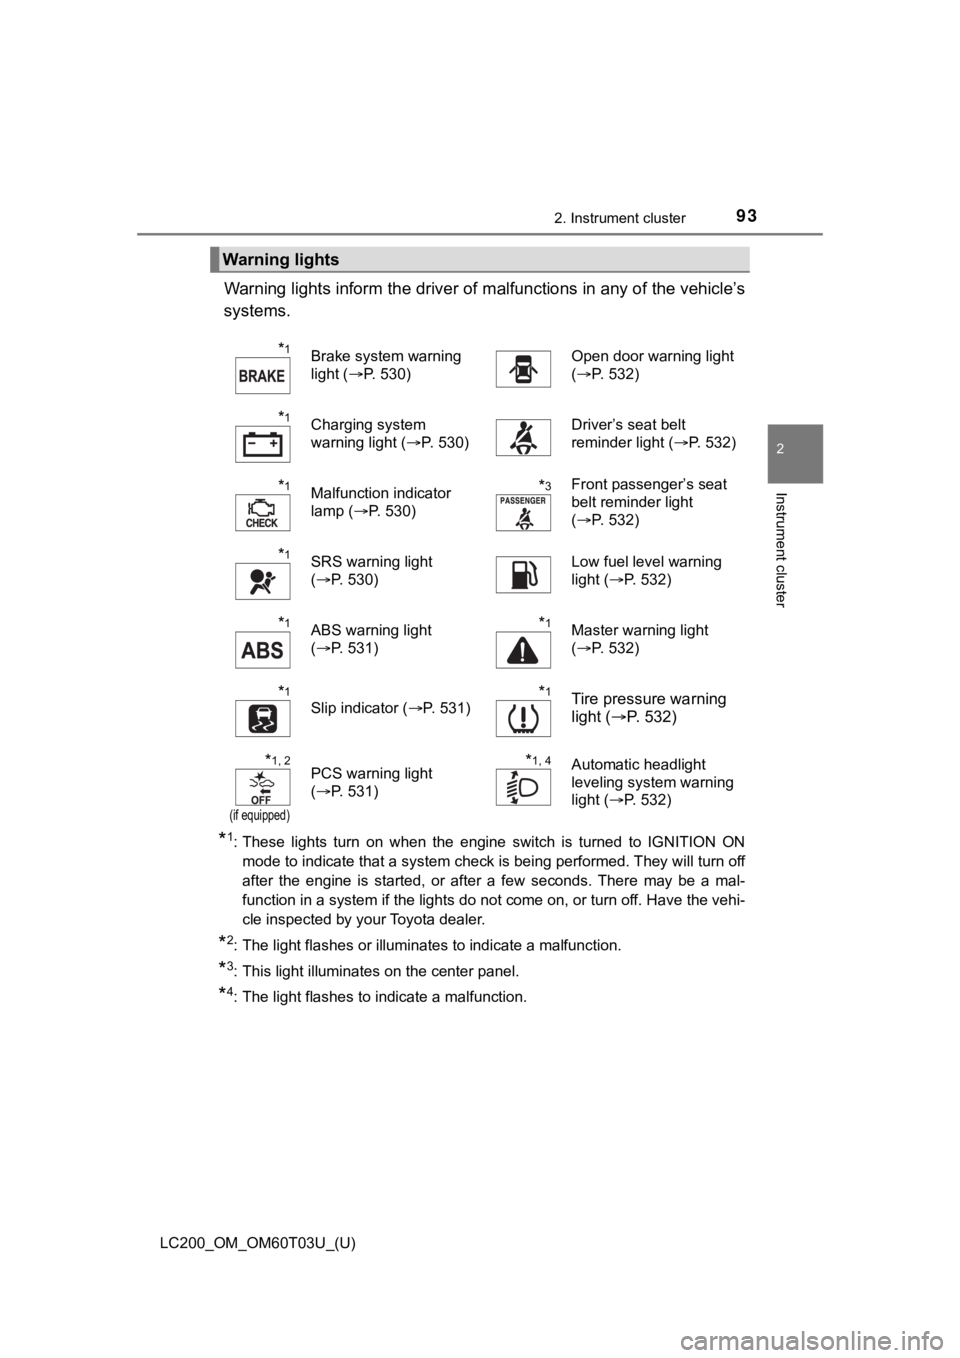
Warning lights inform the driver of malfunctions in any of the vehicle’s
systems.
*1: These lights turn on when the engine switch is turned to IGNIT ION ON
mode to indicate that a system check is being performed. They w ill turn off
after the engine is started, or after a few seconds. There may be a mal-
function in a system if the lights do not come on, or turn off. Have the vehi-
cle inspected by your Toyota dealer.
*2: The light flashes or illuminates to indicate a malfunction.
*3: This light illuminates on the center panel.
*4: The light flashes to indicate a malfunction.
Warning lights
*1Brake system warning
light ( P. 530)Open door warning light
(P. 532)
*1Charging system
warning light ( P. 530)Driver’s seat belt
reminder light ( P. 532)
*1Malfunction indicator
lamp (P. 530)*3Front passenger’s seat
belt reminder light
(P. 532)
*1SRS warning light
(P. 530)Low fuel level warning
light ( P. 532)
*1ABS warning light
(P. 531)*1Master warning light
(P. 532)
*1
Slip indicator ( P. 531)*1Tire pressure warning
light (P. 532)
*1, 2
(if equipped)
PCS warning light
(P. 531)*1, 4Automatic headlight
leveling system warning
light ( P. 532)
Page 95 of 632
LC200_OM_OM60T03U_(U)
952. Instrument cluster
2
Instrument cluster
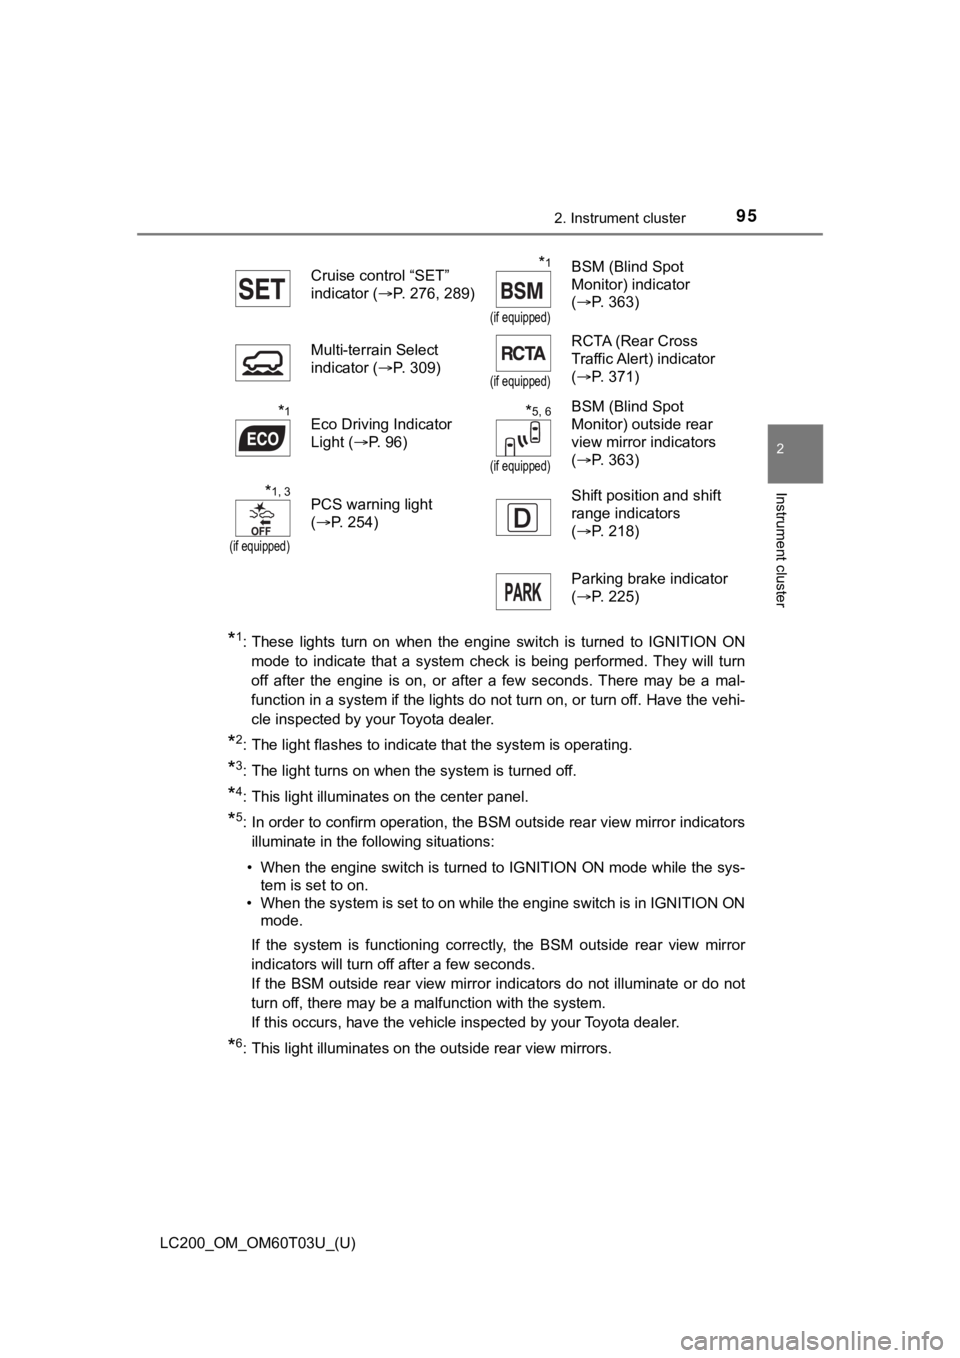
*1: These lights turn on when the engine switch is turned to IGNITION ON
mode to indicate that a system check is being performed. They w ill turn
off after the engine is on, or after a few seconds. There may b e a mal-
function in a system if the lights do not turn on, or turn off. Have the vehi-
cle inspected by your Toyota dealer.
*2: The light flashes to indicate that the system is operating.
*3: The light turns on when the system is turned off.
*4: This light illuminates on the center panel.
*5: In order to confirm operation, the BSM outside rear view mirro r indicators
illuminate in the following situations:
• When the engine switch is turned to IGNITION ON mode while the sys-
tem is set to on.
• When the system is set to on while the engine switch is in IGN ITION ON
mode.
If the system is functioning correctly, the BSM outside rear vi ew mirror
indicators will turn off after a few seconds.
If the BSM outside rear view mirror indicators do not illuminat e or do not
turn off, there may be a malfunction with the system.
If this occurs, have the vehicle inspected by your Toyota deale r.
*6: This light illuminates on the outside rear view mirrors.Cruise control “SET”
indicator (
P. 276, 289)
*1
(if equipped)
BSM (Blind Spot
Monitor) indicator
(P. 363)
Multi-terrain Select
indicator ( P. 309)
(if equipped)
RCTA (Rear Cross
Traffic Alert) indicator
(P. 371)
*1Eco Driving Indicator
Light ( P. 96)*5, 6
(if equipped)
BSM (Blind Spot
Monitor) outside rear
view mirror indicators
(P. 363)
*1, 3
(if equipped)
PCS warning light
(P. 254) Shift position and shift
range indicators
(
P. 218)
Parking brake indicator
( P. 225)
Page 98 of 632
98
LC200_OM_OM60T03U_(U)
2. Instrument cluster
Shift position and shift range display
Displays the selected shift position or selected shift range ( P. 218)
Odometer/trip meter display change button
Switches between odometer and trip meter displays
Instrument panel light control dial
The brightness of the instrument panel light can be adjusted
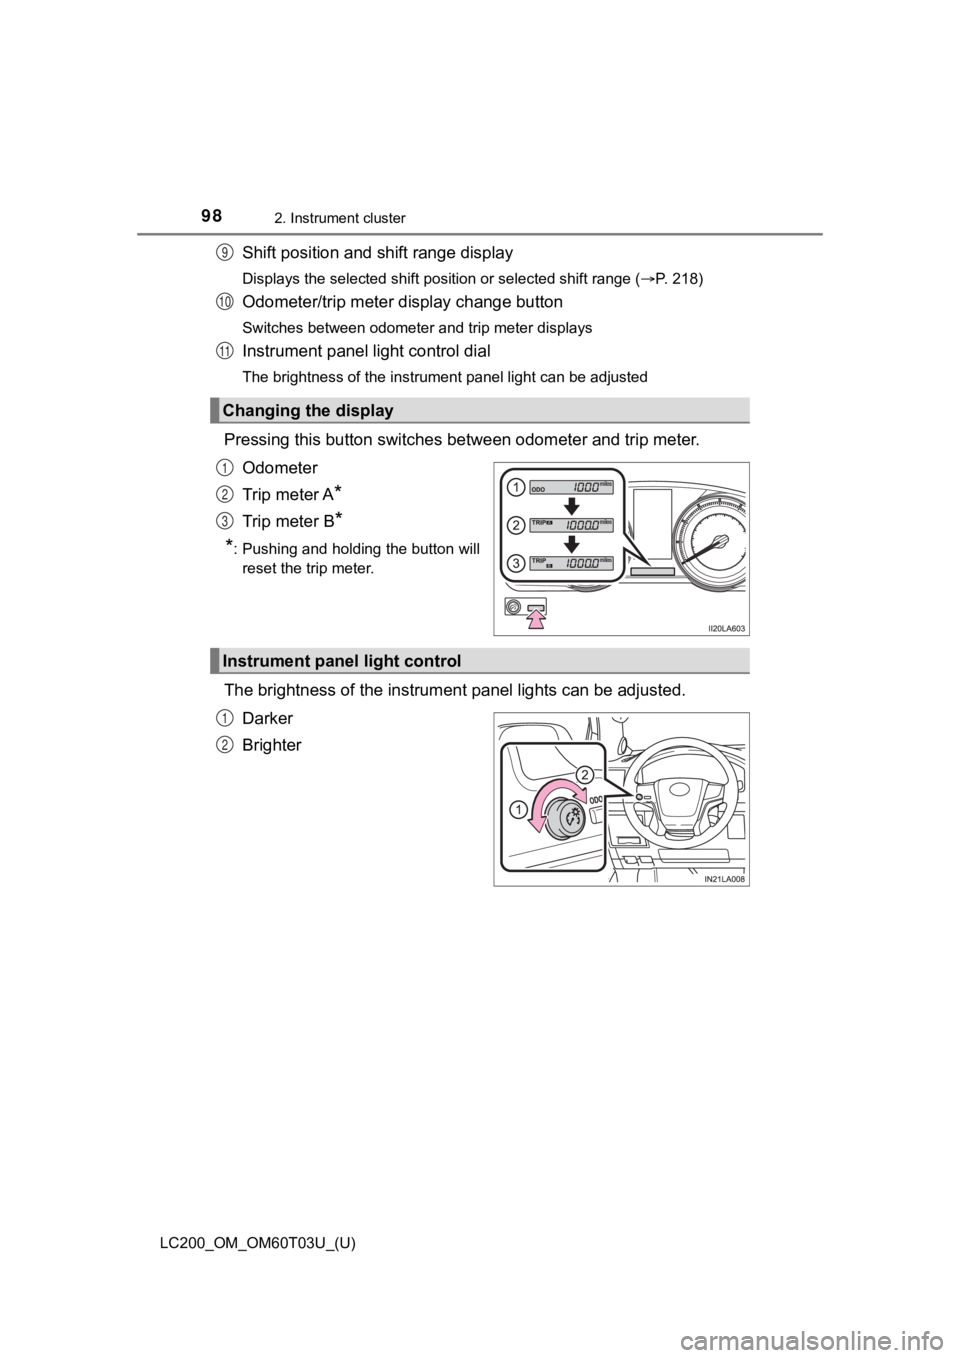
Pressing this button switches between odometer and trip meter.
Odometer
Trip meter A
*
Trip meter B*
*
: Pushing and holding the button will reset the trip meter.
The brightness of the instrumen t panel lights can be adjusted.
Darker
Brighter
Changing the display
9
10
11
1
2
3
Instrument panel light control
1
2
Page 99 of 632

LC200_OM_OM60T03U_(U)
992. Instrument cluster
2
Instrument cluster
■The meters and display illuminate when
The engine switch is in IGNITION ON mode.
■ The brightness of the instrument panel lights
When the tail lights are turned on, the meter’s brightness will be reduced
slightly unless the meter brightness level adjustment is set to the brightest
setting.
If the tail lights are turned on when the surroundings are dark , the meter’s
brightness will reduce slightly. However, when the surroundings are bright,
such as during the daytime, the meter’s brightness will not be reduced even if
the tail lights are turned on.
■ Customization
The meter display can be customized on the multi-information di splay.
(Customizable features: P. 594)
WARNING
■The information display at low temperatures
Allow the interior of the vehicle to warm up before using the liquid crystal
information display. At extremely low temperatures, the information display
monitor may respond slowly, and display changes may be delayed.
For example, there is a lag between the driver’s shifting and t he new gear
number appearing on the display. This lag could cause the drive r to down-
shift again, causing rapid and excessive engine braking and pos sibly an
accident resulting in death or injury.
Page 115 of 632
LC200_OM_OM60T03U_(U)
1153-1. Key information
3
Operation of each component
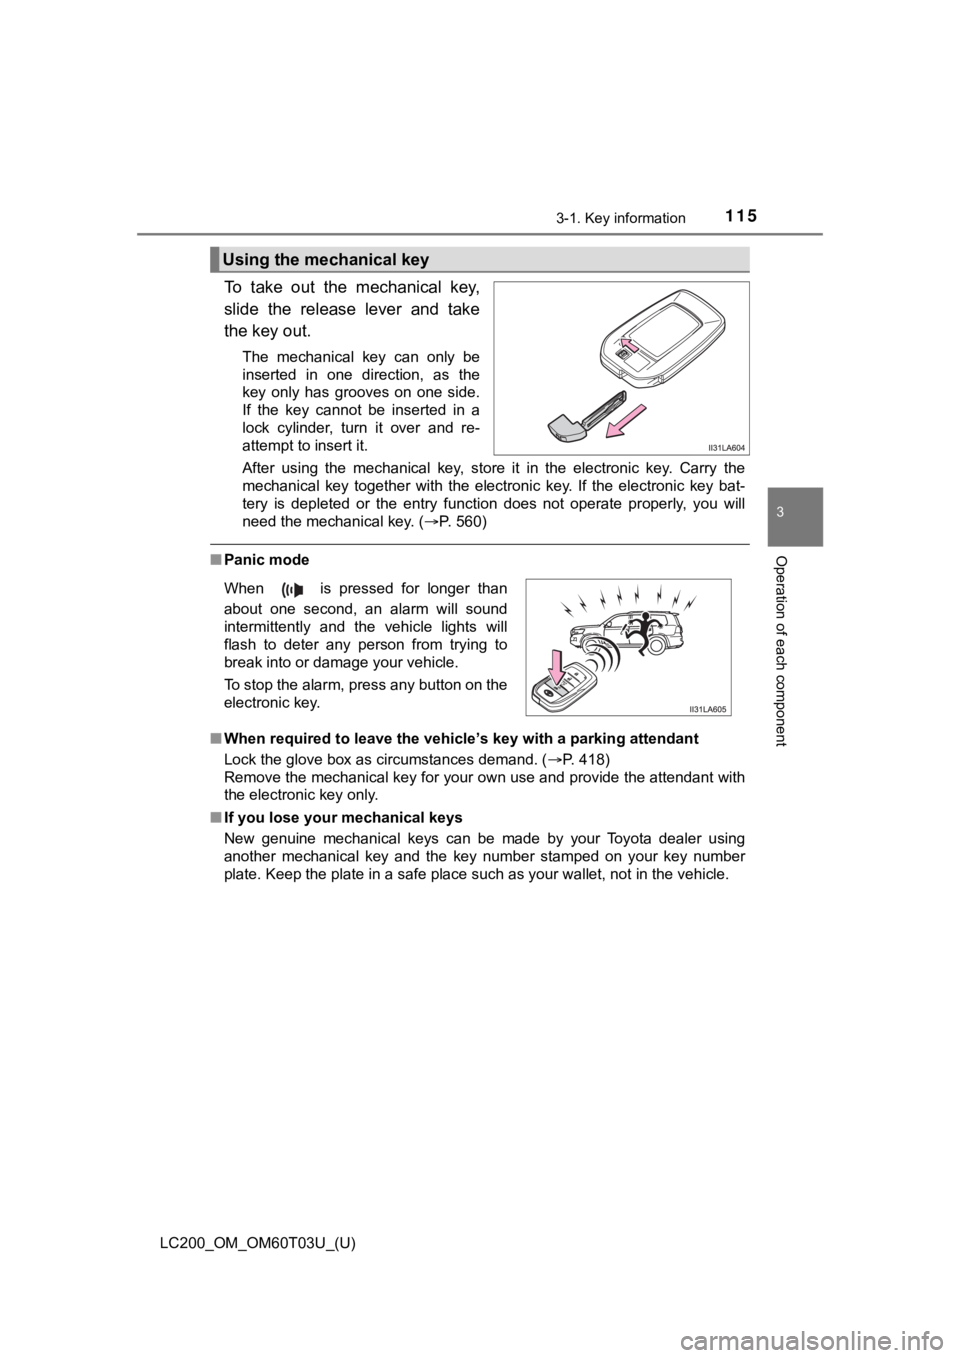
To take out the mechanical key,
slide the release lever and take
the key out.
The mechanical key can only be
inserted in one direction, as the
key only has grooves on one side.
If the key cannot be inserted in a
lock cylinder, turn it over and re-
attempt to insert it.
After using the mechanical key, store it in the electronic key. Carry the
mechanical key together with the electronic key. If the electro nic key bat-
tery is depleted or the entry function does not operate properl y, you will
need the mechanical key. ( P. 560)
■Panic mode
■ When required to leave the vehicle’s key with a parking attendant
Lock the glove box as circumstances demand. ( P. 418)
Remove the mechanical key for your own use and provide the attendant with
the electronic key only.
■ If you lose your mechanical keys
New genuine mechanical keys can be made by your Toyota dealer u sing
another mechanical key and the key number stamped on your key n umber
plate. Keep the plate in a safe place such as your wallet, not in the vehicle.
Using the mechanical key
When is pressed for longer than
about one second, an alarm will sound
intermittently and the vehicle lights will
flash to deter any person from trying to
break into or damage your vehicle.
To stop the alarm, press any button on the
electronic key.
Page 163 of 632
1633-4. Adjusting the steering wheel and mirrors
3
Operation of each component
LC200_OM_OM60T03U_(U)
Inside rear view mirror
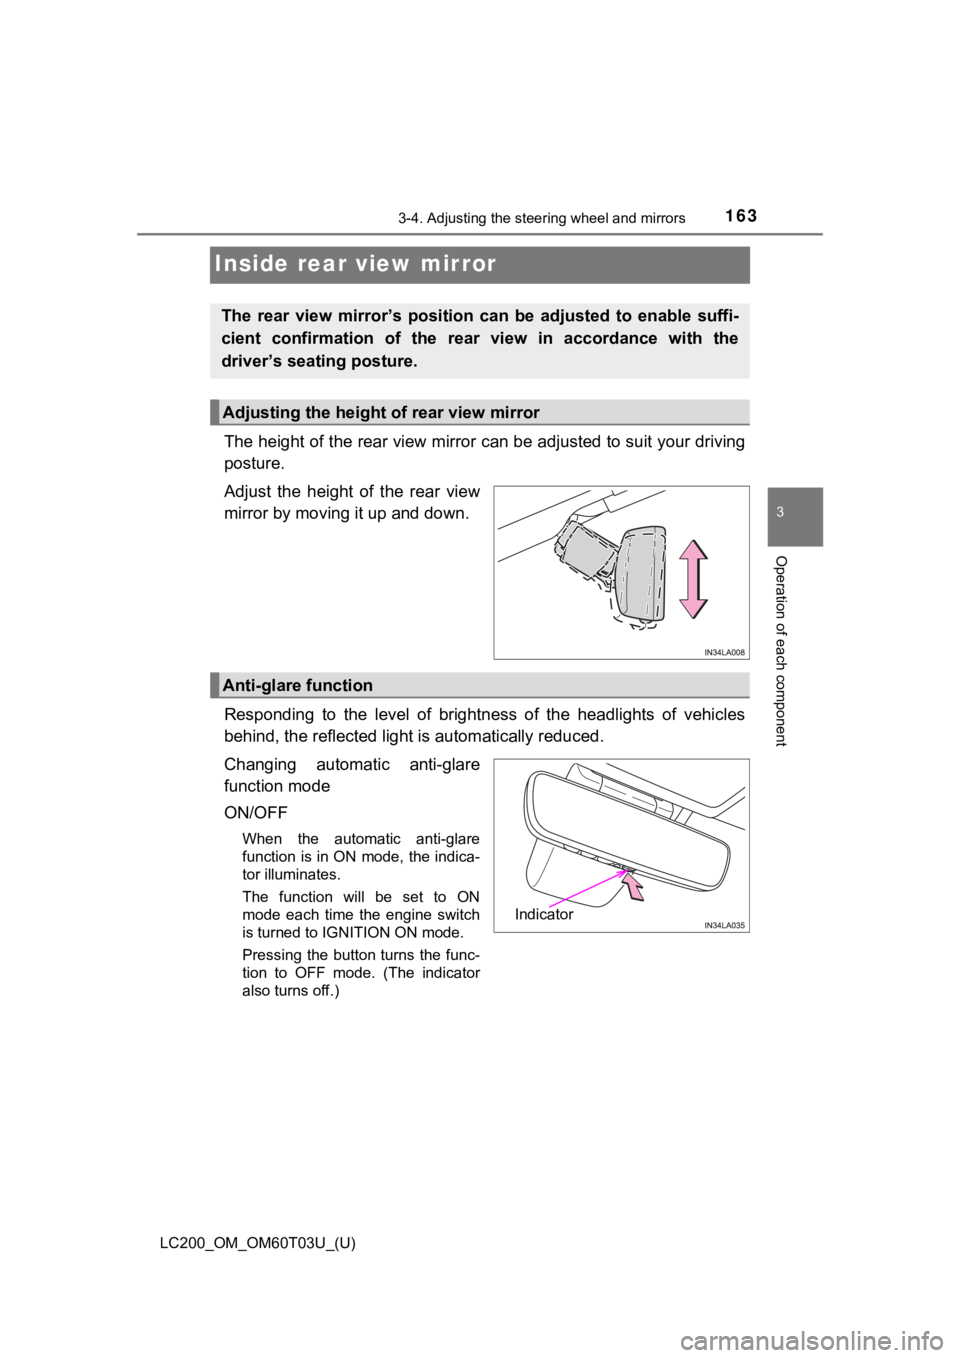
The height of the rear view mirror can be adjusted to suit your driving
posture.
Adjust the height of the rear view
mirror by moving it up and down.
Responding to the level of brightness of the headlights of vehi cles
behind, the reflected light is automatically reduced.
Changing automatic anti-glare
function mode
ON/OFF
When the automatic anti-glare
function is in ON mode, the indica-
tor illuminates.
The function will be set to ON
mode each time the engine switch
is turned to IGNITION ON mode.
Pressing the button turns the func-
tion to OFF mode. (The indicator
also turns off.)
The rear view mirror’s position ca n be adjusted to enable suffi-
cient confirmation of the rear view in accordance with the
driver’s seating posture.
Adjusting the height of rear view mirror
Anti-glare function
Indicator